The Notes app, a clone of the one on the iPhone/iPad, lets you jot down lists, recipes, driving directions, and brainstorms—and they all sync effortlessly among your Apple phones, tablets, and other computers. It’s lost its yellow-lined-paper look but, at heart, it’s the same old Notes.
To create a new page of notes, choose File→New Note (⌘-N), or click the  button at top left. Once the new page appears, type away (Figure 11-21).
Tip
Notes works with Handoff (Handoff). So if you’re editing a note on your Mac, iPhone, or iPad, you’ll be offered the chance to jump to the same note on any other Mac, iPhone, or iPad you own (if it’s on the same WiFi network).
You can dress up your Mac’s Notes pages far more elaborately than you can on the iPhone. For example:
You have control over fonts, type sizes, colors, paragraph alignment, and indentation, using the commands in the Format menu. Notes can even create automatic bulleted, dashed, or numbered lists; check out the Format→Lists submenus.
You can paste or drag photos and other graphics into your notes, too—or even documents, like PDF files, Word documents, or Excel spreadsheets. Drag such a document into a note from the desktop; there it becomes an icon that you can double-click to open later.
You can drag or paste a link into a note. Later, when you click it, it opens into the corresponding Web site.
Note
Not all interior decoration gets synced to your phone or tablet. Pictures, for example, don’t survive the transition, and not all of your Mac fonts are available on your phone. But for the first time, Notes’ typographical skills extend beyond Marker Felt and Helvetica.
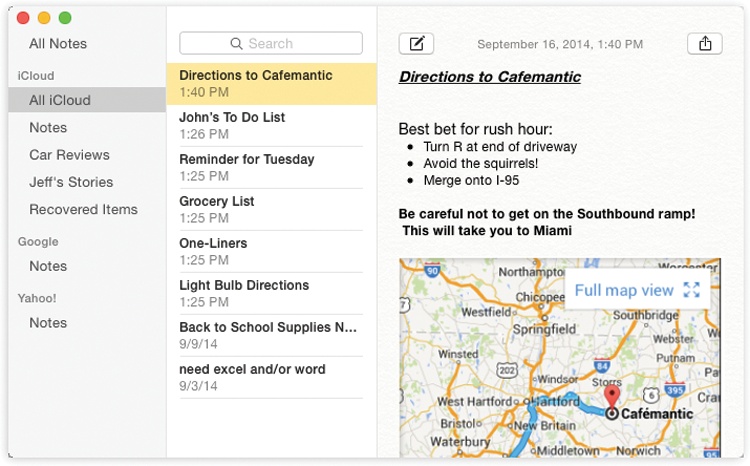
Figure 11-21. The first line of each page becomes the name of that note, as represented in the searchable list of notes (center column). In this illustration, somebody has also opened up the Folders list, the skinny column at far left. Here you can choose which account’s notes you want to see: your iCloud notes, Gmail, Exchange, or what have you.
A handy icon appears at the top right of each Notes page: You can click  to send the note to someone, either by email or in Messages (Chapter 20).
As you create more pages, the Notes list (the center column in Figure 11-21) becomes more useful. It’s your table of contents for the Notes pad. It displays the first lines of your notes (most recent at the top), along with the time or date you last edited them. To open a note, click its name.
There’s a search box here, too. You can search all your notes instantly.
Here’s an undocumented special: If you double-click a note’s name, it opens into a new window, floating on your screen. You can open multiple notes this way, drag them around the screen, and leave them floating there permanently, as though held by magnets on the great refrigerator door of life. In fact, if you choose Window→Float On Top, the note remains in front of all other windows. (You can drag it around using the title as a handle.)
Tip
Notes is a card-carrying full-screen app, as described on Full Screen Mode.
Chances are fairly good that your Mac’s screen is bigger than your phone’s. So Apple gave the Mac version of Notes a few features that require some extra space—and one of them is the side panel of Notes folders. That is, you can organize your notes into various categories, for ease of wading through them. (Any folders you create on the Mac also show up on your iPhone/iPad.)
The key to understanding this feature is the slide-out Folders list, which you can see in Figure 11-21. You can make it appear by choosing View→Show Folders List. Then you can adjust the Folder list’s width by dragging the vertical line at its right edge.
To make a new folder, choose File→New Folder; name the folder and then press Return. You can then drag existing notes into its name in the Folders list. (The usual rules apply: You can select a swath of notes in a list by clicking the first and then Shift-clicking the last. Or you can click individual, nonconsecutive notes by clicking with the ⌘ key pressed.)
Tip
If you press Option as you drag a note, you make a copy of it in the new folder instead of moving the original.
Click a folder’s name to see the notes inside it. (Click “All [account name]” to see all the notes in that account.)
To create a new note within a folder, click the folder’s name first. If you don’t click any folder’s name before you create the note, it goes into the general Notes category.
You can also rename a folder (right-click or two-finger click its name; choose Rename Folder), delete one (right-click or two-finger click its name; choose Delete Folder), put one inside another (drag its name), and move a folder to a different account—for example, from your iCloud account to your Google one—by dragging it.
The real beauty of this app is that it can synchronize your collection of Notes with all kinds of other Apple gear—iPhones, iPads, and other Macs (Mountain Lion or later)—so the same notes are waiting for you everywhere you look.
Just make sure Notes is turned on in System Preferences→iCloud (on your Mac), and in Settings→Mail, Contacts, Calendars→iCloud (on your phone or tablet). The rest is automatic.
Notes can also show you the contents of the Notes modules on Google, Yahoo, AOL, or another IMAP email account. You’ll see each account’s worth of notes in the Folder list, as you can see in Figure 11-21—and from there, you can drag notes hither and yon, among accounts, with abandon.
To set this up, open System Preferences→Internet Accounts. Click the account you want (Exchange, Gmail, Yahoo, AOL, or whatever); finally, turn the Notes switch On.
That should do it. Now each account’s notes appear under its own heading in the Folders list. And your notes are synced, both ways.
All of this makes life a little more complex, of course. For example, when you create a note, you have to worry about which account it’s about to go into. To do that, be sure to specify an account name (and a folder within it, if necessary) before you create the new note.