Chapter 2
Using Advanced C++ Features
IN THIS CHAPTER
 Using comments
Working with conversions, consoles, and preprocessor directives
Manipulating constants, enums, and random numbers
Structuring code and data with switches and arrays
This chapter will amaze you because C++ has amazing advanced features. It begins by helping you understand how to leave notes for yourself so that you don’t embarrass yourself in front of your boss when you forget how your code works. Comments can do a lot more, but for the most part, they’re there to help you remember.
The next sections are all about helping your code jump through new hoops. You discover that you can turn an int into a string, connect with the user at the command line, and tell the compiler to do something new with your code as part of a preprocessor directive. In case that isn’t enough, you also find out new ways to create variables using constants, enums, and random numbers.
The final sections are about working with code using switches so that you don’t have to keep creating huge if…else if statement chains. You also gain knowledge of the humble array, which will make your life considerably easier in so many ways that space doesn’t allow total disclosure. Suffice it to say that storing lists of data elements in a convenient form is just the start.
Filling Your Code with Comments
Your boss is irritable because that rush job you did was a little too rushed and now the application keeps crashing. So, you have your boss standing there, right behind you, wanting you to explain your code, except that you can’t. Your nervousness makes all the code look like a jumble of alien words that you swear you didn’t write, even though you know you did. Why can’t you remember? At this point, you’d just love to go somewhere and hide for a while, but the boss is smoking mad and you’ll never make your escape. You can avoid this situation and many others in which your memory about your code is apt to fail. To remember what your code does, you put comments into it. A comment is simply some words in the code that the compiler ignores and include for the benefit of the humans reading the code. Comments are also quite useful for colleagues who come by to help you out of jams, or to allow someone to fix your code over the weekend when you’d much rather spend time at the beach. Comments are essential to good coding. For example, you may have some code like this:
total = 10;
for (i = 0; i < 10; i++)
{
    total = (total + i) * 3;
}
But this code may not be clear to you if you put it away for six months and come back later to look at it. So instead, you can add some comments. You denote a comment in C++ by starting a line with two slashes, like this:
// Initialize total to the number
// of items involved.
total = 10;

// Calculate total for the
// first ten sets.
for (i = 0; i < 10; i++)
{
    total = (total + i) * 3;
}
Now anyone working on the project can understand what the code does. Note the white space between the groups of code. Using white space helps someone looking at the code see where one thought ends and another begins. You should always include white space in your code so that everyone can read the code more easily. Of course, you could put in comments like this:
// My salary is too low
// I want a raise
total = 10;

// Someday they'll recognize
// my superior talents!
for (i = 0; i < 10; i++)
{
    total = (total + i) * 3;
}
However, comments like this don’t have much use in the code; besides, they may have the reverse effect from the one you’re hoping for! The compiler ignores comments; they’re meant for other humans. You can write whatever you want as comments, and the compiler pretends that it’s not even there.
 A comment begins with
 //, and it can begin anywhere on the line. In fact, contrary to what you might think, you can even put comments at the end of a line containing C++ code, instead of on a separate line. Using comments on a code line lets you focus a comment on just that line, as follows:
int subtotal = 10; // Initialize subtotal to 10.
This comment gives a little more explanation of what the line does. You usually use line comments like this when you want to tell others what kind of information a variable holds or explain a complex task. Normally, you explain blocks of code as shown earlier in this section.
You can use two kinds of comments in C++. One is the double slash (as already described). The other kind of comment begins with a slash-asterisk, /*, and ends with an asterisk-slash, */. The comments go between these delimiters (special character sequences) and can span several lines, as in the following example:
/* This application separates the parts of the
   sandwich into its separate parts. This
   process is often called "separation of
   parts".
   (c) 2020 Sandwich Parts Separators, Inc.
*/
This is all one comment, and it spans multiple lines. You normally use this kind of comment to provide an overview of a task or describe the purpose of a function. This kind of comment also works well for the informational headings that some large company applications require. As with other comments, you can put these anywhere in your code, as long as you don’t break a string or word in two by putting a comment in the middle. Much of the code in the remainder of this chapter has comments in it so that you can see how to use comments and so that you can get a few more ideas about how the code works.
 Some beginning programmers get the mistaken idea that comments appear in the application window when the application runs. That is not the case. A comment does not write anything to the console. To write things to the console, use
 cout.
Converting Types
Sometimes, you just don’t have the type of things you want. You might want to trade in your 2014 Ford Taurus for that brand-new Porsche. But, needless to say, unless you have plenty of money, that might be difficult.
But converting between different types in C++ — now, that’s a lot easier. For example, you may have a string variable called digits, and it holds the string "123". Further, you want to somehow get the numbers inside that string into an integer variable called amount. Thus, you want amount to hold the value 123; that is, you want to convert the string to a number.
Understanding how int and string conversions work
In Listing 2-1, later in this chapter, you see how you can convert between numbers and strings. Book 1, Chapter 8 shows some sample code for converting a number to a string. This example employs that same technique along with a similar technique for converting a string back to a number.
Converting strings is an interesting concept in C++ because an outstanding feature lets you write to and read from a string just as you would to and from a console. For example, although you can write a number 12 out to a console by using code like this:
cout << 12;
you can actually do the same thing with strings: You can write a number 12 to a string, as in
mystring << 12;
After this line runs, mystring contains the value "12". However, to do this, you need to use a special form of string called a stringstream. In the never-ending world of computer terminology, a stream is something that you can write to and read from in a flowing fashion (think about bits flowing through a wire — much as a stream flows along a waterbed). For example, you might write the word "hello" to a stringstream, and then the number 87, and then the word "goodbye". After those three operations, the string contains the value "hello87goodbye".
Similarly, you can read from a stream. In the section “Reading from the Console,” later in this chapter, you discover how you can read from a console by using the > notation. When you read from the console, although your application stops and waits for the user to enter something, the real stream technology takes place after the user types something and presses Enter: After the console has a series of characters, your application reads in the characters as a stream, one character after another. You can read a string, and then a series of numbers, and another string, and so on.
With stringstream, you can do something similar. You would fill the string with something rather than have the user fill it, as in the case of a console. From there, you can begin to read from the string, placing the values into variables of different types. One of these types is int. But because the stringstream is, at heart, just a string, that’s how you convert a string of digits to an integer: You put the digit characters in the string and read the string as a stream into your integer.
The only catch to using these techniques is that you need to know in advance which kind of streaming you want to do. If you want to write to the stringstream, you create an instance of a class called ostringstream. (The o is for output.) If you want to read from a stringstream, you create an instance of a class called istringstream. (The i is for input.)
Seeing int and string conversions in action
The TypeConvert example, shown in Listing 2-1, demonstrates several kinds of int and string conversions that include truncating (lopping the decimal portion off) and rounding (bringing the number value up or down to the nearest whole number). The listing also includes two handy functions that you may want to save for your own programming experience later. One is called StringToNumber() (converts a string to a number) and the other is called NumberToString() (converts a number to a string). This example includes plenty of comments as well as demonstrates some extremely simple onscreen formatting using the tab (\t) escape character (see the “Tabbing your output” section of Book 1, Chapter 3 for details).
LISTING 2-1: Converting Between Types Is Easy
#include <iostream>
#include <sstream>   // for istringstream, ostringstream

using namespace std;

int StringToNumber(string MyString) {
  // Converts from string to number.
  istringstream converter(MyString);
  // Contains the operation results.
  int result;

  // Perform the conversion and return the results.
  converter >> result;
  return result;
}

string NumberToString(int Number) {
   // Converts from number to string.
  ostringstream converter;

  // Perform the conversion and return the results.
  converter << Number;
  return converter.str();
}

int main() {
  // Contains the theoretical number of kids.
  float NumberOfKids;
  // Contains an actual number of kids.
  int ActualKids;

  /* You can theoretically have 2.5 kids, but in the
     real world, you can't. Convert the theoretical number
     of kids to a real number by truncating NumberOfKids
     and display the results. */
  NumberOfKids = 2.5;
  ActualKids = (int)NumberOfKids;
  cout << "Float to Integer" << "\tTruncated" << endl;
  cout << NumberOfKids << "\t\t\t" << ActualKids << endl;

  // Perform the same task as before, but use a
  // theoretical 2.1 kids this time.
  NumberOfKids = 2.1;
  ActualKids = (int)NumberOfKids;
  cout << NumberOfKids << "\t\t\t" << ActualKids << endl;

  // This time we'll use 2.9 kids.
  NumberOfKids = 2.9;
  ActualKids = (int)NumberOfKids;
  cout<<NumberOfKids<<"\t\t\t"<<ActualKids<<endl<<endl;

  // This process rounds the number, instead of
  // truncating it. We do it using the same three
  // numbers as before.
  NumberOfKids = 2.5;
  ActualKids = (int)(NumberOfKids + .5);
  cout << "Float to Integer" << "\tRounded" << endl;
  cout << NumberOfKids << "\t\t\t" << ActualKids << endl;

  // Do it again using 2.1 kids.
  NumberOfKids = 2.1;
  ActualKids = (int)(NumberOfKids + .5);
  cout << NumberOfKids << "\t\t\t" << ActualKids << endl;

  // Do it yet again using 2.9 kids.
  NumberOfKids = 2.9;
  ActualKids = (int)(NumberOfKids + .5);
  cout<<NumberOfKids<<"\t\t\t"<<ActualKids<<endl<<endl;

  // In this case, use the StringToNumber() function to
  // perform the conversion.
  cout << "String to number" << endl;
  int x = StringToNumber("12345") * 50;
  cout << x << endl << endl;

  // In this case, use the NumberToString() function to
  // perform the conversion.
  cout << "Number to string" << endl;
  string mystring = NumberToString(80525323);
  cout << mystring << endl;
  return 0;
}
 The comments in Listing 2-1 give you a complete dialogue of how the code works, so no discussion of it here is needed. Of course, you do want to see the output, which appears in Figure 2-1. The important thing to remember is that rounding is different from truncating in the results that it produces, and each method is appropriate at specific times depending on the rules you want to use. For example, when calculating, in whole dollars, how much someone owes you, you don’t want to rely on truncating or you’ll end up with less money.
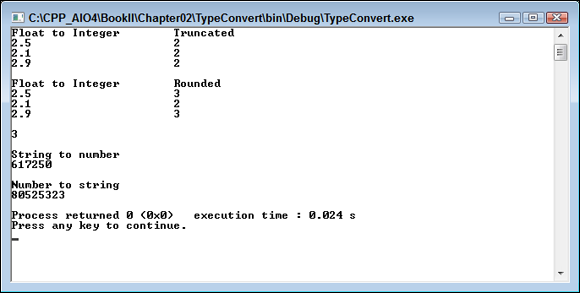
FIGURE 2-1: The formatted output shows the difference between truncating and rounding.
Considering other conversion issues
Another kind of conversion that’s useful is converting floating-point numbers (that is, numbers with a decimal point) and integers and vice versa. In C++, this conversion is easy: You just copy one to the other, and C++ takes care of the rest.
The only catch is that when C++ converts from a float to an integer, it always truncates. That is, it doesn’t round up: When it converts 5.99 to an integer, it doesn’t go up to 6; it goes down to 5. But there’s an easy trick around that: Add 0.5 to the number before you convert it. If the number is in the upper half (that is, from 0.5 to 0.9999 and so on), then adding 0.5 first takes the number above or equal to the upper whole number. Then, when the function rounds the number, the number rounds down to the upper whole number. For example, if you start with 4.6, just converting it outputs 4. But if you add 0.5, the 4.6 becomes 5.1, and then when you convert that, you get 5. It works!
Going in the other direction is even easier: To convert an integer to a float, you just copy it. If i is an integer and f is a float, you just set it as follows to convert it:
f = i;
Whenever you convert from a float to an int or from an int to float, you must tell the compiler that you know what you’re doing by adding (int) or (float) in front of the variable. Adding these keywords is called coercion or type conversion. The act of coercing one type to another is called casting. For example, the following line tells the compiler that you know you’re converting from a float to an int:
ActualKids = (int)NumberOfKids;
If you leave out the (int) part, the compiler normally displays a warning like this one:
warning: converting to 'int' from 'float'
Using the proper coercion code is important because it also tells other developers that you really do intend to perform the type conversion. Otherwise, other developers will point to that area of your code and deem it the source of an error, when it might not be the true source. Using proper coding techniques saves everyone time.
Reading from the Console
Throughout this book, you have used the console to see example output. You can also use the console to get information from the user — a topic briefly mentioned in the “Reading from the Console” section of Book 1, Chapter 4. To use the console to get information from the user, instead of using the usual << with cout to write to the console, you use the >> operator along with cin (pronounced “see-in”).
In the old days of the C programming language, reading data from the console and placing it in variables was somewhat nightmarish because it required you to use pointers. In C++, that’s no longer the case. If you want to read a set of characters into a string called MyName, you just type
cin >> MyName;
That’s it! The application pauses, and the user can type something at the console. When the user presses Enter, the string the user typed goes into the MyName string.
Reading from the console has some catches. First, the console uses spaces as delimiters. That means that if you put spaces in what you type, only the letters up to the space are put into the string. Anything after the space, the console saves for the next time your application calls cin. That situation can be confusing. Second, if you want to read into a number, the user can type any characters, not just numbers. The computer then goes through a bizarre process that converts any letters into a meaningless number. Not good.
The ReadConsoleData example, shown in Listing 2-2, shows you how to read a string and then a number from the console. Next, it shows you how you can force the user to type only numbers. And finally, it shows how you can ask for a password with only asterisks appearing when the user types.
To make these last two tasks work correctly you use the conio library. This library gives you better access to the console, bypassing cin. This example also uses the StringToNumber() function, described in the “Seeing int and string conversions in action” section, earlier in this chapter.
LISTING 2-2: Having the User Type Something
#include <iostream>
#include <sstream>
#include <conio.h>

using namespace std;

int StringToNumber(string MyString) {
  // Holds the string.
  istringstream converter(MyString);
  // Holds the integer result.
  int result;

  // Perform the conversion.
  converter >> result;
  return result;
}

string EnterOnlyNumbers() {
  string numAsString = ""; // Holds the numeric string.
  char ch = getch();       // Obtains a single character.

  // Keep requesting characters until the user presses
  // Enter.
  while (ch != '\r') {  // \r is the enter key
    // Add characters only if they are numbers.
    if (ch >= '0' && ch <= '9') {
      cout << ch;
      numAsString += ch;
    }

    // Get the next character from the user.
    ch = getch();
  }

  return numAsString;
}

string EnterPassword() {
  // Holds the password string.
  string numAsString = "";
  // Obtains a single character from the user.
  char ch = getch();

  // Keep requesting characters until the user presses
  // Enter.
  while (ch != '\r') { // \r is the enter key
    // Display an asterisk instead of the input character.
    cout << '*';
    // Add the character to the password string.
    numAsString += ch;
    // Get the next character from the user.
    ch = getch();
  }

  return numAsString;
}

int main() {
  // Just a basic name-entering
  string name;
  cout << "What is your name? ";
  cin >> name;
  cout << "Hello " << name << endl;

  // Now you are asked to enter a number,
  // but the computer allows you to enter anything!
  int x;
  cout << endl;
  cout << "Enter a number, any number! ";
  cin >> x;
  cout << "You chose " << x << endl;

  // This time you can only enter a number.
  cout << endl;
  cout << "This time enter a number!" << endl;
  cout << "Enter a number, any number! ";
  string entered = EnterOnlyNumbers();
  int num = StringToNumber(entered);
  cout << endl << "You entered " << num << endl;

  // Now enter a password!
  cout << endl;
  cout << "Enter your password! ";
  string password = EnterPassword();
  cout << endl << "Shhhh, it's " << password << endl;
  return 0;
}
The first parts of main() are straightforward. It calls cin >> name; to read a string, name, from the console; then main() prints Hello plus name to the console. Next, main() calls cin >> x; to read and print an integer from the console.
Calling EnterOnlyNumbers() ensures that the user can enter only digits. The first thing EnterOnlyNumbers() does is declare a string called numAsString. When the user types a letter or number, it comes in as a character, so the code saves them one by one in a string variable (because a string is really a character string). To find out what the user types, EnterOnlyNumbers() calls getch(), which returns a single character. (For example, if the user presses Shift+A to produce a capital A, getch() returns the character A.)
After retrieving a single character, EnterOnlyNumbers() starts a loop, watching for the ’\r’ character, which represents a carriage return. The loop continues processing characters until the user presses the Enter key. At that point, the character received by getch() is ’\r’, so the loop exits and returns the number as a string.
Inside the loop, EnterOnlyNumbers() tests the value of the character, seeing whether it’s in the range ’0’ through ’9’. Yes, characters are associated with a sequence, and fortunately, the digits are all grouped together. So it’s possible to determine whether the character is a digit character by checking to see whether it’s in the range ’0’ through ’9’:
if (ch >= '0' && ch <= '9')
If the user presses a number key, the code enters the if statement. Because the user pressed a number key, the code writes the value to the console and adds the digit character to the end of the string. The code has to write it to the console because, when it calls getch(), the computer doesn’t automatically print anything. But that’s a good thing here, because after leaving the if statement, the code calls getch() again for another round. Thus, if the user pressed something other than the Enter key or a number, the character the user pressed doesn’t even appear on the console, and it doesn’t get added to the string, either.
The EnterPassword() routine is similar to the EnterOnlyNumbers() routine, except that it allows the user to enter any character (including spaces). So no if statement is filtering out certain letters. And further, instead of printing only the character that the user types, it prints an asterisk: *. That gives the feeling of a password entry, which is a good feeling.
When you run this application, you get output similar to the following:
What is your name? Hank
Hello Hank

Enter a number, any number! abc123
You chose 0

This time you'll only be able to enter a number!
Enter a number, any number! 5001
You entered 5001

Enter your password! *****
Shhhh, it's hello
The first line went well; there aren’t any spaces so the name Hank made it into the output. But then when asked to enter a number, the user types abc123. The output of 0 indicates that cin can’t convert the input to an int. If you type 123abc instead, you see 123 as the output. The next section doesn’t allow the user to type anything but numbers because it calls EnterOnlyNumbers(). In the final two lines, the user enters a password, and you can see that the computer displays asterisks after each key press. This is because EnterPassword() contains the line cout << ’*’;. You see the actual password output as the last on the screen.
Understanding Preprocessor Directives
When you compile an application, the first thing the compiler does is run your code through something called a preprocessor. The preprocessor simply looks for certain statements in your code that start with the # symbol. You have already seen one such statement in every one of your applications: #include. These preprocessor statements are known as directives because they tell the preprocessor to do something; they direct it. The following sections tell you more about the preprocessor and describe how it works.
Understanding the basics of preprocessing
Think of the preprocessor as just a machine that transforms your code into a temporary, fixed-up version that’s all ready to be compiled. For example, look at this preprocessor directive:
#include <iostream>
If the preprocessor sees this line, it inserts the entire text from the file called iostream (yes, that’s a filename; it has no extension) into the fixed-up version of the source code. Suppose that the iostream file looks like this:
int hello = 10;
int goodbye = 20;
Just two lines are all that’s in it. (Of course, the real iostream file is much more sophisticated.) And suppose that your own source file, MyProgram.cpp, has this in it (as found in the Preprocessor example):
#include <iostream>

int main()
{
  std::cout << "Hello world!" << std::endl;
  return 0;
}
Then, after the preprocessor finishes its preprocessing, it creates a temporary fixed-up file (which has the lines from the iostream file inserted into the MyProgram.cpp file where the #include line had been) to look like this:
int hello = 10;
int goodbye = 20;

int main()
{
  std::cout << "Hello world!" << std::endl;
  return 0;
}
In other words, the preprocessor replaced the #include line with the contents of that file. Now, the iostream file could have #include lines, and those lines would be replaced by the contents of the files they refer to. As you may imagine, what started out as a simple application with just a few lines could actually have hundreds of lines after the preprocessor gets through with it.
Creating constants and macros with #define
The preprocessor also provides you with a lot of other directives besides #include. One of the more useful ones is the #define directive. Here’s a sample #define line:
#define MYSPECIALNUMBER 42
After the preprocessor sees this line, every time it encounters the word MYSPECIALNUMBER, it replaces it with the word 42 (that is, whatever sequence of letters, numbers, and other characters follow the definition). In this case, #define creates a kind of constant where the word is easier to understand than the value associated with it. But #define also lets you create what are called macros, which are a sort of script. This line defines the oldmax() macro:
#define oldmax(x, y) ((x)>(y)?(x):(y))
After the preprocessor sees this line, it replaces every occurrence of oldmax() followed by two arguments with ((x)>(y)?(x):(y)), using the appropriate substitutes for x and y. For example, if you then have this line
q = oldmax(abc, 123);
the preprocessor replaces the line with
q = ((abc)>(123)?(abc):(123));
and does nothing more with the line. Book 1, Chapter 4, refers to the output code as a conditional operator. The variable q is set to the value in abc if the abc value is greater than 123; otherwise, the q gets set to 123.
However, the preprocessor doesn’t have an understanding of the conditional operator, and q doesn’t get set to anything during preprocessing. All the preprocessor knows is how to replace text in your source code file. The preprocessor replaced the earlier line of code that contained oldmax() with the next line containing the conditional operator. That’s it. The preprocessor doesn’t run any code, it doesn’t make the comparison, and it doesn’t put anything in q. The preprocessor just changes the code.
Notice that #define oldmax(x, y) places x and y in parentheses. This is because oldmax() takes two arguments, x and y, and the parentheses serve to tell the compiler that they are arguments. Consequently, q = oldmax(abc, 123); is oldmax() with the required arguments, abc and 123.
Although you can still use #define statements in C++, in general you should simply create a function instead of a macro or use a constant instead of a symbol. Symbols and macros are used in older and outdated styles of programming. However, you still see them used for some purposes, such as conditional compilation, which appears in the next section of the chapter.
Performing conditional compilation
At times, you may want to compile one version of your application for one situation and compile another for a different situation. For example, you may want to have a debug version of your application that has in it some extra goodies that spit out special information for you that you can use during the development of your application. Then, after your application is ready to ship to the masses so that millions of people can use it, you no longer want that extra debug information. To accomplish this transition between debug and production versions, you can use a conditional compilation like this:
#ifdef DEBUG
    cout << "The value of j is " << j << endl;
#else
    cout << j << endl;
#endif
The lines that begin with # are preprocessor directives. The preprocessor has its own version of if statements. In your code, you can have a line like the following, with nothing after it:
#define DEBUG
This line defines a symbol (rather than a constant with a value). It works just like the symbols described earlier, except that it’s not set to be replaced by anything. You can also define such symbols in the command-line options to GCC or whichever compiler you use.
In Code::Blocks, you choose Project ⇒ Build Options. In the Project Build Options dialog box that opens, click the Compiler Settings tab, followed by the #defines subtab, as shown in Figure 2-2. You type your define symbols as shown in the figure. Be sure to place each symbol on a separate line.
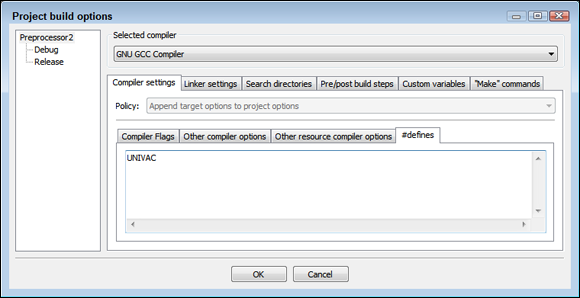
FIGURE 2-2: Provide the compiler options you want to use to change the application output.
Code::Blocks provides a special method for setting Debug or Release builds. You choose Build ⇒ Select Target and then choose the build you want from the menu. Notice that there are three entries in the left pane of Figure 2-2. Selecting Preprocessor2 lets you add defines, such as HAL2000, that affect both Debug and Release builds. Selecting Debug lets you add defines that affect only the Debug build, such as DEBUG. Note that selecting a particular build target doesn’t automatically create a symbol, such as DEBUG, for you.
Now, when the preprocessor starts going through your application and gets to the #ifdef DEBUG line, it checks to see whether the DEBUG symbol is defined. If the symbol is defined, it spits out to its fixed-up file the lines that follow, up until the #else line. Then it skips any lines that follow that, up until the #endif line. For the earlier example in this section, if DEBUG is defined, the block of code starting with #ifdef DEBUG through the line #endif is replaced by the code in the first half of the block:
cout << "The value of j is " << j << endl;
But if the DEBUG symbol is not defined, the preprocessor skips over the lines up until the #else, and spits out the lines that follow, up until the #endif. In this case, it’s replaced by the code following the #else line:
cout << j << endl;
When the preprocessor goes through your file, it’s only creating a new source code file the compiler uses to create an executable. That means that these #ifdef lines affect your application only when the compiler runs the preprocessor. When you compile the application and run it, these #ifdef lines are gone. So remember that #ifdef lines don’t affect how your application runs — only how it compiles.
Exercising the basic preprocessor directives
It’s time to see the various preprocessor directives in action. The Preprocessor2 example, shown in Listing 2-3, demonstrates all the preprocessor directives discussed in this chapter so far. In addition, you see predefined macros demonstrated, such as __FILE__. The C++ standard and your compiler provide predefined macros to allow you to output information such as the current filename without having to develop these macros yourself. You can see a list of predefined macros at https://riptutorial.com/cplusplus/example/4867/predefined-macros.
LISTING 2-3: Using Many Different Preprocessor Directives
#include <iostream>

using namespace std;

#ifdef UNIVAC
const int total = 200;
const string compname = "UNIVAC";
#elif defined(HAL2000)
const int total = 300;
const string compname = "HAL2000";
#else
const int total = 400;
const string compname = "My Computer";
#endif

// This is outdated, but you might see it on
// occasion. Don't write code that does this!
#define oldmax(x, y) ((x)>(y)?(x):(y))
#define MYSPECIALNUMBER 42

int main() {
  cout << "Welcome to " << compname << endl;
  cout << "Total is:" << endl;
  cout << total << endl << endl;

  // Try out the outdated things.
  cout << "*** max ***" << endl;
  cout << oldmax(5,10) << endl;
  cout << oldmax(20,15) << endl;
  cout << MYSPECIALNUMBER << endl << endl;

  // Here are some standard redefined macros.
  cout << "*** Predefined Macros ***" << endl;
  cout << "This is file " << __FILE__ << endl;
  cout << "This is line " << __LINE__ << endl;
  cout << "Compiled on " << __DATE__ << endl;
  cout << "Compiled at " << __TIME__ << endl << endl;

  // Here's how some people use #define, to
  // specify a "debug" version or "release" version.
  cout << "*** total ***" << endl;
  int i;
  int j = 0;
  for (i = 0; i<total; i++)
  {
      j = j + i;
  }

#ifdef DEBUG
  cout << "The value of j is " << j << endl;
#else
  cout << j << endl;
#endif

  return 0;
}
When you run Listing 2-3 without any symbols using the Release target (choose Build ⇒ Select Target ⇒ Release), you see this output:
Welcome to My Computer
Total is:
400

*** max ***
10
20
42

*** Predefined Macros ***
This is file C:\CPP_AIO\BookI\Chapter09
   \Preprocessor2\main.cpp
This is line 35
Compiled on Apr 23 2020
Compiled at 15:19:38

*** total ***
79800
Note, at the beginning, that the code tests for the symbol UNIVAC. But that if block is a bit more complex because it also has an #elif (else if) construct. The language of the preprocessor has no elseifdef or anything like it. Instead, you have to write it like so:
#elif defined(HAL2000)
With this block, the preprocessor checks for the symbol UNIVAC; if the preprocessor finds UNIVAC, it spits out these lines:
const int total = 200;
const string compname = "UNIVAC";
Otherwise, the preprocessor looks for HAL2000; if the preprocessor finds it, it adds these lines to the fixed-up code:
const int total = 300;
const string compname = "HAL2000";
And finally, if neither UNIVAC nor HAL2000 is set, the preprocessor adds these lines:
const int total = 400;
const string compname = "My Computer";
Remember that in each case, these two lines are sent out to the fixed-up version in place of the entire block starting with #ifdef UNIVAC and ending with #endif. If you add UNIVAC to the #defines tab of the Project Build Options dialog box shown previously in Figure 2-2, you change how the preprocessor configures its output. To see the following output, you must choose Build ⇒ Rebuild, and then Build ⇒ Run, rather than use the Build ⇒ Build and Run command as normal.
Welcome to UNIVAC
Total is:
200

*** max ***
10
20
42

*** Predefined Macros ***
This is file C:\CPP_AIO\BookI\Chapter09
   \Preprocessor2\main.cpp
This is line 35
Compiled on Apr 23 2020
Compiled at 15:26:56

*** total ***
19900
To see a different output version, replace UNIVAC with HAL2000 in the #defines tab of the Project Build Options dialog box shown previously in Figure 2-2. Choose Build ⇒ Select Target ⇒ Debug to change the executable type. Finally, rebuild your application by choosing Build ⇒ Rebuild. Here is what you see when you choose Build ⇒ Run.
Welcome to HAL2000
Total is:
300

*** max ***
10
20
42

*** Predefined Macros ***
This is file C:\CPP_AIO\BookI\Chapter09\
  Preprocessor2\main.cpp
This is line 37
Compiled on Dec 18 2013
Compiled at 10:30:23

*** total ***
The value of j is 44850
The downloadable source includes a project file that has all the required defines included with it. If you type this source yourself, you must create the appropriate defines as well or the output won’t match what you see in the book. Simply selecting a debug build, for example, won’t provide the DEBUG define for you.
Using Constants
When you’re programming, you may sometimes want a certain fixed value that you plan to use throughout the application. For example, you might want a string containing the name of your company, such as "Bob’s Fixit Anywhere Anyhoo". And you don’t want someone else working on your application to pass this string into a function as a reference and modify it by mistake, turning it into the name of your global competitor, "Jims Fixum Anyhoo Anytime". That could be bad. Or, if you’re writing a scientific application, you might want a fixed number, such as pi = 3.1415926 or root2 = 1.4142135.
You can create such constants in C++ by using the const keyword. When you create a constant, it works just like a variable, except that you can’t change it later in the application. For example, to declare your company name, you might use
const string CompanyName = "Bobs Fixit Anywhere Anyhoo";
Of course, you can always modify this particular string in your code, but later in your code, you can’t do something like this:
CompanyName = CompanyName + ", Inc.";
The compiler issues an error for that line, complaining that it’s a constant and you can’t change it.
After you declare the CompanyName constant, you can use it to refer to your company throughout your code. The Constants example in Listing 2-4 shows you how to do this. Note the three constants toward the top called ParkingSpaces, StoreName, and pi. In the rest of the application, you use these just like any other variables — except that you don’t try to change them.
LISTING 2-4: Using Constants for Permanent Values That Do Not Change
#include <iostream>

using namespace std;

const int ParkingSpaces = 80;
const string StoreName = "Joe's Food Haven";
const float pi = 3.1415926;

int main() {
  cout << "Important Message" << endl;
  cout << "Here at " << StoreName << endl;
  cout << "we believe you should know" << endl;
  cout << "that we have " << ParkingSpaces;
  cout << " full-sized" << endl;
  cout << "parking spaces for your parking" << endl;
  cout << "pleasure." << endl;
  cout << endl;
  cout << "We do realize that parking" << endl;
  cout << "is tight at " << StoreName << endl;
  cout << "and so we are going to double our" << endl;
  cout << "spaces from " << ParkingSpaces << " to ";
  cout << ParkingSpaces * 2;
  cout << ". Thank you again!" << endl << endl;
  float radius = 5;
  float area = radius * radius * pi;
  cout << "And remember, we sell " << radius;
  cout << " inch radius apple pies" << endl;
  cout << "for a full " << area << " square" << endl;
  cout << "inches of eating pleasure!" << endl;
  return 0;
}
When you run this application, you see the following:
Important Message
Here at Joe's Food Haven
we believe you should know
that we have 80 full-sized
parking spaces for your parking
pleasure.

We do realize that parking
is tight at Joe's Food Haven
and so we are going to double our
spaces from 80 to 160. Thank you again!

And remember, we sell 5 radius inch apple pies
for a full 78.5398 square
inches of eating pleasure!
The biggest advantage to using constants is this: If you need to make a change to a string or number throughout your application, you make the change only once. For example, if you have the string "Bob’s Fixit Anywhere Anyhoo" pasted a gazillion times throughout your application, and suddenly you incorporate and need to change your application so that the string says "Bob’s Fixit Anywhere Anyhoo, LLC", you would need to do some serious search-and-replace work. But if you have a single constant in the header file for use by all your source code files, you need to change it only once. You modify the header file with the new constant definition and recompile your application, and you’re ready to go.
There’s a common saying in the programming world: “Don’t use any magic numbers.” The idea is that if, somewhere in your code, you need to calculate the number of cows that have crossed over the bridge to see whether the bridge will hold up and you know that the average weight of a cow is 632 pounds, don’t just put the number 632 in your code. Somebody else reading it may wonder where that number came from. Instead, make an AverageCowWeight constant and set it equal to 632. Then use AverageCowWeight anytime you need that number. Plus, if cows evolve into a more advanced species and their weight changes, all you need to do is make one change in your code — you change the header file containing the const declaration. Here’s a sample line that declares AverageCowWeight:
const int AverageCowWeight = 632;
You don’t have to create most common mathematical constants in your code. Instead, you add #include <math.h> to the top of your code and then use the constants as defined at @@@https://www.gnu.org/software/libc/manual/html_node/Mathematical-Constants.html. For example, if you want to use the value of pi in your code, you use the M_PI constant.
Unfortunately, the math header isn’t part of the ANSI standard, so sometimes you have to jump through hoops to use it. Older compilers may require that you add #define _USE_MATH_DEFINES at the top of the source code file before any #include statements.
If you have the Code::Blocks compiler set to use the C++ 11 or above standard, the __STRICT_ANSI__ define (added by default) will keep you from using a constant, such as M_PI, in your code. To overcome this issue, add the line #undef __STRICT_ANSI__ to the beginning of your code. Here is a short example of what you need to do:
#undef __STRICT_ANSI__

#include <iostream>
#include <math.h>

using namespace std;

int main()
{
    cout << M_PI << endl;
    return 0;
}
C++ 20 and above developers have some relief from this problem in the form of std::numbers::pi that you access with #include <numbers> (see https://en.cppreference.com/w/cpp/numeric).
Using Switch Statements
Many times in programming, you may want to compare a variable to one thing, and if it doesn’t match, compare it to another and another and another. To do this with an if statement, you need to use a whole bunch of else if lines. Using if statements works out pretty well, but you can do it in another way: Use the switch statement.
The approach shown in this section doesn’t work for all types of variables. In fact, it works with only the various types of integers and characters. It won’t even work with character strings. However, when you need to make multiple comparisons for integers and characters, using this approach is quite useful.
Here’s a complete switch statement that you can refer to as you read about the individual parts in the paragraphs that follow. This switch compares x to 1, and then 2, and, finally, includes a catchall section called default if x is neither 1 nor 2:
int x;
cin >> x;
switch (x)
{
    case 1:
        cout << "It's 1!" << endl;
        break;
    case 2:
        cout << "It's 2!" << endl;
        break;
    default:
        cout << "It's something else!" << endl;
        break;
}
To use the switch statement, you type the word switch and then the variable or expression that you want to test in parentheses. Suppose that x is type int and you want to compare it to several different values. You would first type
switch (x) {
The preceding item in parentheses isn’t a comparison; it’s a variable. You can also put complex expressions inside the parentheses, but they must evaluate to either an integer or a character. For example, if x is an integer, you can test
switch (x + 5) {
because x + 5 is still an integer. A switch statement compares only a single variable or expression against several different items. If you have complex comparisons, you instead use a compound if statement.
After the header line for the switch statement, you list the values you want to compare the expression to. Each entry starts with the word case followed by the value to compare the expression against, and then a colon, as in
case 1:
Next is the code to run in the event that the expression matches this case (here, 1).
cout << "It's 1" << endl;
To complete a specific case, you add the word break. Every case in the switch statement usually has a break line, which ends the case. If you leave out the break statement (either purposely or accidentally), when the computer runs this case, execution continues with the next case statement code.
Note the end of the example switch block has a final default case. It applies to the situation when none of the preceding cases applies. The default case isn’t required; you can leave it off if you don’t need it. However, if you do include it, you put it at the end of the switch block because it’s the catchall case.
The SwitchStatement example in Listing 2-5 is a complete application that demonstrates a switch statement. It also shows you how you can make a simple, antiquated-looking menu application on the console. You don’t need to press Enter after you choose the menu item; you just press the key for your menu selection. That’s thanks to the use of getch() rather than cin.
LISTING 2-5: Making Multiple Comparisons in One Big Block
#include <iostream>
#include <conio.h>

using namespace std;

int main() {
  // Display a list of options.
  cout << "Choose your favorite:" << endl;
  cout << "1. Apples " << endl;
  cout << "2. Bananas " << endl;
  cout << "3. Lobster " << endl;

  // Obtain the user's selection.
  char ch = getch();

  // Continue getting user selections until the user
  // enters a valid number.
  while (ch < '1' || ch > '3')  {
    ch = getch();
  }

  // Use a switch to display the user's selection.
  cout << "You chose " << ch << endl;
  switch (ch) {
  case '1':
    cout << "Apples are good for you!" << endl;
    break;
  case '2':
    cout << "Bananas have plenty of potassium!" << endl;
    break;
  case '3':
    cout << "Expensive, but you have good taste!" << endl;
    break;
  }

  return 0;
}
Supercharging enums with Classes
When you work with classes, you can use a technique called wrapping, which helps you manage a resource. Book 2, Chapter 1 discusses the enum keyword and shows how you can use it to create your own types. However, when you print the enumeration, you don’t see the word, such as red or blue; you see a number. The DisplayEnum example, shown in Listing 2-6, is a simple class that wraps an enum type by converting the number into a human readable form, which is a kind of resource management. You can use this class with enum ColorEnum, as main() demonstrates. When you run this application, you see the single word red in the console.
LISTING 2-6: Creating a Class for enums
#include <iostream>

using namespace std;

class Colors {
public:
  enum ColorEnum {blue, red, green};
  Colors(Colors::ColorEnum value);
  string AsString();
protected:
 ColorEnum value;
};

Colors::Colors(Colors::ColorEnum init) {
  value = init;
}

string Colors::AsString() {
  switch (value) {
    case blue:
      return "blue";
    case red:
      return "red";
    case green:
      return "green";
    default:
      return "Not Found";
  }
}

int main() {
  Colors InkColor = Colors::red;
  cout << InkColor.AsString() << endl;
  return 0;
}
In this example, the switch statement doesn’t include any break statements. Instead, it uses return statements. The return causes the computer to exit the function entirely, so you have no reason to worry about getting out of the switch statement. You may wonder why the switch statement includes a default clause. After all, it will never get called. In this case, if you don’t supply a default clause, the compiler displays the following message:
warning: control reaches end of non-void function
Whenever possible, add the code required for your application to compile without warnings. Adding the default clause simply ensures that the AsString() function always returns a value, no matter what happens. In addition, having the default clause will make it apparent that a color has been added to the enum, but isn’t handled by the switch statement.
The expression Colors::red may be unfamiliar to you. That means you’re using the red value of the ColorEnum type. However, because ColorEnum is declared inside the class Color, you can’t just say red. You have to first say the class name, and then two colons, and then the value. Thus, you type Colors::red.
The code in main() creates the InkColor instance and sets it not to a Color object but to an enum. This works because C++ has a neat little trick: You can create a constructor that takes a certain type. In this case, Color has a constructor that takes a ColorEnum. Then when you create a stack variable (not a pointer), you can just set it equal to a value of that type. The computer will implicitly call the constructor, passing it that value.
Working with Random Numbers
Sometimes, you need the computer to generate random numbers for you. But computers aren’t good at doing tasks at random. Humans can toss dice or flip a coin, but the computer must do things in a predetermined fashion. The computer geniuses of the past century have come up with algorithms that generate pseudorandom numbers. These numbers are almost random or seemingly random. They’re sufficiently random for many purposes.
The only catch with these random-number generators is that you need to seed them, that is, provide them with an input value as a starting point for the calculation. If you provide the same seed each time, the starting output number is the same, as is the sequence of additional output numbers. Consequently, pseudorandom-number generators need some sort of seed that changes in an apparently random fashion. Fortunately, the seconds component of the current time is a changeable input that appears random when used correctly. When you run an application, most likely you won’t start running it at precisely the same second in time. The RandomNumber example shown in Listing 2-7 shows how to generate a random number.
LISTING 2-7: Seeding the Random-Number Generator
#include <iostream>
#include <time.h>
#include <stdlib.h>

using namespace std;

int main()
{
  // Seed the random-number generator
  time_t now;
  time(&now);
  srand(now);

  // Print out a list of random numbers
  for (int i=0; i<5; i++)
  {
      cout << rand() % 100 << endl;
  }

  return 0;
}
The example follows a process that you often see when working with random numbers. To obtain the time, you must include time.h. Initializing and using the random-number generator requires that you include stdlib.h.
- Obtain the current time to start the random-number generator by creating a variable called
nowof a special type calledtime_t(which is just a number). - Call the
time()function, passing the address ofnow, which obtains the number of seconds since January 1, 1970. - Initialize the random number using the time seed by calling
srand(). - Create a random number based on the seed by calling
rand().
Each time you call rand(), you receive a new random int. However, the number may not be in the range you want. To limit the numbers in the range from 0 through 99, the code uses the modulus 100 of the number. (That’s the remainder when you divide the number by 100.) The first time you run Listing 2-7, you may see the following output:
19
69
85
83
47
The second time, you may see this output. It’s different than before:
79
67
38
72
73
Storing Data in Arrays
Most programming languages support a data structure called an array. An array is a list of variables, all stored side by side in a row. You access them through a single name. Each variable in the array must be of the same type. This section tells you how to work with arrays for data storage purposes in a simple manner. A more detailed discussion of creating and using arrays in an advanced way appears in the “Building Up Arrays” section of Book 5, Chapter 1.
When you create an array, you specify how many items the array holds. For example, you can have an array of 100 integers. Or you can have an array of 35 strings or an array of 10 pointers to the class BrokenBottle. If the code you’re working with represents a type, you can create an array out of it.
When you create an array, you give it a name. You can access the array’s elements (items) by using that name followed by an index number in brackets. The first element is always 0. Thus, if you have an array of five integers called AppendixAttacks, the first element is AppendixAttacks[0]. The second is AppendixAttacks[1], and then AppendixAttacks[2], AppendixAttacks[3], and finally AppendixAttacks[4].
Because an array starts with element number 0, the final element in the array has an index that is 1 less than the size of the array. Thus, an array of 89 elements has indexes ranging from 0 to 88.
Declaring and accessing an array
Here’s how you declare an array:
int GrilledShrimp[10];
This line declares an array of 10 integers called GrilledShrimp. You first put the type (which is really the type of each element in the array), and then the name for the array, and then the number of elements in brackets. And because this declares 10 integers, their indexes range from 0 to 9.
To access the first element of the array, you put the number 0 in brackets after the type name, as in
GrilledShrimp[0] = 10;
Often, people use a loop to fill in an array or access each member. People usually call this looping through the array. The ArrayLoop example, in Listing 2-8, shows how to create and use a basic array.
LISTING 2-8: Using a Loop to Loop Through the Array
#include <iostream>

using namespace std;

int main() {
    int Values[5];
    int VSize = sizeof(Values)/sizeof(*Values);
    cout << "Array count: " << VSize << endl;

    for (int i=0; i < VSize; i++) {
        Values[i] = i * 2;
        cout << Values[i] << endl;
    }

    return 0;
}
It’s never a good idea to hard-code the length of your array anywhere in your code because the array length could change. Rather, calculate the size of the array using the sizeof() function. The example shows you how to perform this task by obtaining the actual length of Values in bytes and dividing it by the size of the individual array elements, which requires *Values. The result, VSize, is the number of array elements. When you use a for loop to loop through the array, you set the counter variable, i, to end the loop when it equals or exceeds the value of VSize.
When you use arrays, don’t go beyond the array bounds. Due to some old rules of the early C language, the compiler doesn’t warn you if you write a loop that goes beyond the upper boundary of an array. You may not get an error when you run your application, either.
Arrays of pointers
Arrays are particularly useful for storing pointers — a variable that contains the address of an item in memory — to objects. If you have lots of objects of the same type, you can store them in an array.
Although you can store the actual objects in the array, most people don’t because they take up too much space. Most people fill the array with pointers to the objects. To declare an array of pointers to objects, remember the asterisk in the type declaration, like this:
CrackedMusicCD *missing[10];
The ArrayPointer example, shown in Listing 2-9, declares an array of pointers. In this example, after declaring the array, you fill the elements of the array with zeroes. Remember that each element is a pointer; that way, you can immediately know whether the element points to something by just comparing it to 0. If it’s 0, it’s not being used. If it has something other than 0, it has a pointer in it.
LISTING 2-9: Using an Array to Store a List of Pointers to Your Objects
#include <iostream>

using namespace std;

class CrackedMusicCD {
public:
  string FormerName;
  int FormerLength;
  int FormerProductionYear;
};

int main() {
  CrackedMusicCD *Missing[10];
  int SMissing = sizeof(Missing)/sizeof(*Missing);

  for (int i=0; i < SMissing; i++) {
    Missing[i] = 0;
  }
  return 0;
}
If you want to create a whole group of objects and fill the array with pointers to these objects, you can do this kind of thing:
for (int i=0; i < SMissing; i++) {
    Missing[i] = new CrackedMusicCD;
}
Because each element in the array is a pointer, if you want to access the properties or methods of one of the objects pointed to by the array, you need to dereference the pointer — obtain the value pointed to by the pointer — by using the shortcut -> notation:
Missing[0]->FormerName = "Shadow Dancing by Andy Gibb";
This sample line accesses the FormerName property of the object whose address is in the first position of the array. When you’re finished with the object pointers in the array, you can delete the objects by calling delete for each member of the array, as in this example:
for (int i=0; i < SMissing; i++) {
    delete Missing[i];
    Missing[i] = 0;
}
The preceding code, clears each array element to 0. That way, the pointer is reset to 0 and no longer points to anything after its object is gone.
Passing arrays to functions
Sometimes you need to pass an entire array to a function. Though passing entire objects to arrays can be unwieldy, passing an entire array can be dangerous. Arrays can be enormous, with thousands of elements. If each element is a pointer, each element could contain several bytes, which works with smaller arrays, but could cause problems with arrays containing thousands of elements. When you pass a huge array on the stack, you may overflow the application’s stack — meaning the application crashes. Fortunately, the compiler automatically treats arrays as pointers for you, but you still need to understand what is happening underneath the cover.
As with passing objects, your best bet is to pass an array’s address. You pass the function a pointer to the array. But passing an array’s address to a function is confusing to code. The ArrayPassing example, shown in Listing 2-10, is a sample that passes an array, without directly coding any pointers and addresses.
LISTING 2-10: Passing an Array to a Function by Declaring the Array in the Function Header
#include <iostream>

using namespace std;

const int MyArraySize = 10;

void Crunch(int myarray[], int size) {
  for (int i=0; i<size; i++) {
    cout << myarray[i] << endl;
  }
}

int main() {
  int BigArray[MyArraySize];

  for (int i=0; i<MyArraySize; i++)
  {
    BigArray[i] = i * 2;
  }

  Crunch(BigArray, MyArraySize);
  return 0;
}
When you run this application, it prints the nine members of the array. The array appears in the function header without specifying a size. This means that you can pass an array of any size to the function. The size parameter defines the array size for the function. This example uses a constant rather than calculating the array size; then if you decide later to modify the application by changing the size of the array, you need to change only the one constant at the top of the application. Otherwise, you risk missing one of the 10s.
The example doesn’t actually pass BigArray to Crunch. Instead, it passes the array’s address. When you pass an array this way, the compiler writes code to pass a pointer to the array. You don’t worry about it. The name of an array is actually a pointer to the first element in the array.
@@@Thus, BigArray (as an argument) is the same as &(BigArray[0]). (You put parentheses around the BigArray[0] part so that the computer knows that the & refers to the combination of BigArray[0], not just BigArray.) So you could have used this in the call:
Crunch(&(BigArray[0]), MyArraySize);
Adding and subtracting pointers
You can do interesting things when you add numbers to and subtract numbers from a pointer to an array element that is stored in a pointer variable as an address. If you take the address of an element in an array and store it in a variable, such as one called cur (for current), as in
cur = &(Numbers[5]);
where Numbers is an array of integers, you can access the element at Numbers[5] by dereferencing the pointer, as in
cout << *cur << endl;
Then you can add and subtract numbers from the pointer, like these lines:
cur++;
cout << *cur << endl;
The compiler knows how much memory space each array element takes. When you add 1 to cur, it advances to the next element in the array. And so the cout that follows prints the next element — in this case, Numbers[6].
The PointerArithmetic example, shown in Listing 2-11, shows how to move about an array. The code declares a variable called cur, which is a pointer to an integer. The array holds integers, so this pointer can point to elements in the array.
LISTING 2-11: Moving by Using Pointer Arithmetic
#include <iostream>

using namespace std;

int main() {
  int Numbers[10];
  int SNumbers = sizeof(Numbers) / sizeof(*Numbers);

  for (int i=0; i<SNumbers; i++)
  {
      Numbers[i] = i * 10;
  }

  int *cur = Numbers;
  cout << *cur << endl;
  cur++;
  cout << *cur << endl;
  cur += 3;
  cout << *cur << endl;
  cur--;
  cout << *cur << endl;
  return 0;
}
The code begins with cur pointing to the first element. The array name is the address of the first element. The code then adds and subtracts from the value of cur to point to other array elements. When you run the application, here is the output you see:
0
10
40
30
You can’t do multiplication and division with pointers.