This chapter focuses on modern grains that you may be more familiar with, such as rice and corn. But just because they are ubiquitous does not mean that they are boring! Grains are excellent pantry staples: They have long shelf lives and are durable, economical, versatile and so delicious. In fact, we keep so many grains in our (modestly sized) New York City apartment kitchen that my husband often remarks that we could open a market.
With so many ways to use these grains, the possibilities are endless. I especially love elevating standard grains with big bursts of flavor, as in my Creamy Polenta with Smoked Gouda and Red Wine–Braised Mushrooms. I made this dish one evening for my aunt who was visiting from out of town and she loved it. I knew it had to be featured in this book. I hope you love it as much as we do!

If you’ve ever ordered zucchini fries from your local pizza place, you know how delicious they are. But because they are often fried, they can be heavy and oily. My version, coated with garlicky cornmeal and Parmesan cheese, is lighter, baked in the oven and just as tasty! Also, instead of pairing them with a rich marinara sauce that covers up the zucchini, I serve them with a refreshing lemon yogurt sauce.
SERVES 4
FRIES
½ cup (120 ml) whole milk
2 eggs
1 cup (122 g) medium-grain cornmeal
1 cup (100 g) Parmesan cheese
1 tsp salt
1 tsp garlic powder
½ tsp smoked paprika, plus more for garnish
4 medium zucchini, sliced in half and then quartered lengthwise
LEMON YOGURT
1 cup (240 g) low-fat Greek yogurt
¼ cup (60 ml) lemon juice
2 tbsp (30 ml) olive oil
Salt to taste
Preheat the oven to 375°F (190°C). Line a baking dish with aluminum foil and set aside.
To make the fries: In a bowl, whisk together the milk and eggs until combined.
In another bowl, combine the cornmeal, Parmesan cheese, salt, garlic powder and paprika.
With one hand reserved for wet and one hand reserved for dry, dredge each zucchini fry in egg, then coat in the seasoned cornmeal-Parmesan mixture. Place the zucchini fries on the aluminum foil, then sprinkle with paprika for extra color and flavor.
Bake the zucchini fries for 15 to 20 minutes, or until the coating is crisp and the insides of the vegetable are soft but not falling apart.
To make the lemon yogurt: Mix all the ingredients together, season to taste with salt and place in a small bowl or ramekin. Serve immediately with the fries.
These arancini bites are a play on traditional Italian deep-fried rice balls. They are packed with cheesy rice and studded with delicious peas, and are meat free! Making your own tomato sauce is so simple, and really adds to the flavor of this dish. I like serving these as mini rice balls for appetizers, though you could easily make larger versions. I hope you aren’t intimidated by the numerous steps in this recipe—I promise nothing is too complicated!
SERVES 4 TO 6
TOMATO SAUCE
1 tbsp (15 ml) olive oil
2 pints (600 g) cherry tomatoes, halved
¼ cup (60 ml) red wine
¼ cup (60 ml) water
½ tsp sugar
Salt to taste
ARANCINI
3 tbsp (45 ml) olive oil
1 onion, diced
4 cloves garlic, minced
1 cup (200 g) white rice
2 cups (480 ml) water, or more as needed
1 cup (134 g) peas
2½ cups (250 g) grated Parmesan cheese, divided
1 cup (113 g) shredded mozzarella cheese
1 tsp salt
3 eggs, divided
1 cup (122 g) coarse cornmeal
½ cup (60 g) fine cornmeal
2 tbsp (19 g) garlic powder
To make the tomato sauce: Heat the olive oil in a sauté pan over medium-high heat. Once the oil is hot, add the halved tomatoes and cook for 3 minutes. Add the red wine and water, bring to a boil, cover and cook for 6 minutes. Reduce the heat to medium-low, keep the tomatoes covered, and cook for 25 to 30 minutes. When the sauce is finished cooking, add the sugar and season to taste with salt. Place in a blender or food processor and pulse until the sauce is thinner in consistency but still chunky.
To make the arancini: In a large pot, heat the olive oil over medium heat. Add the onion and cook until translucent, about 5 minutes. Add the garlic and rice, then stir to coat the rice with the oil and onions.
Add the water, 1 cup (240 ml) at a time, stirring well after each addition. Don’t add the next cup until most of the previous liquid has been absorbed. After all 2 cups (480 ml) of water have been absorbed, check the rice for doneness. If the rice needs more cooking time, add more water. Once the rice is finished, add the peas, 2¼ cups (225 g) of the Parmesan, the mozzarella and the salt and stir well to combine. Remove from the heat to slightly cool.
Preheat the oven to 375°F (190°C). In a large bowl, beat 1 of the eggs and stir into the rice mixture. While the rice continues to cool, assemble the two dredging stations by whisking the remaining 2 eggs in one bowl and combining both cornmeals, the garlic powder and the remaining ¼ cup (25 g) Parmesan cheese in another.
With an ice cream scoop, two spoons or your hands, form the rice into balls. Roll the arancini in the egg, then in the seasoned cornmeal and place on a parchment or silicone mat–lined baking sheet. Bake for 30 minutes, or until the cornmeal crust has hardened. Serve warm with the chunky tomato sauce.
I love grain-based salads, and rice works perfectly to balance the many textures in this dish. It can be served warm or cold, depending on how quickly after you toss the rice with the other ingredients. If you serve it warm, the rice begins to just wilt the kale, but when served cold it’s crispy and refreshing. While this recipe is vegan, the savory, Asian-inspired flavors would be great paired with a protein such as chicken, salmon, tofu or my favorite–seared tuna.
SERVES 4
DRESSING
¼ cup (60 ml) toasted sesame oil
2 tbsp (30 ml) soy sauce
1 tbsp (15 ml) ponzu
1 tbsp (15 ml) seasoned rice vinegar
2 cloves garlic, chopped
1 tsp minced ginger
SALAD
2 cups (480 ml) water
½ cup (93 g) white rice
½ cup (83 g) corn kernels
¼ cup (26 g) shelled peanuts
1 bunch kale, thick center ribs discarded
2 tbsp (16 g) black sesame seeds, divided
¼ cup (25 g) sliced scallion, divided
To make the dressing: In a blender or food processor, combine all the dressing ingredients, pulse to combine and set aside.
To make the salad: In a large pot, bring the water to a boil, add the rice and cook for 15 minutes. Turn off the heat, add the corn to the rice, place a lid on the pot and let the rice and corn steam for at least 5 minutes. Fluff with a fork and set aside.
While the rice is cooking, toast the peanuts in a dry skillet over medium-low heat until warm, golden brown and fragrant, about 3 minutes.
In a large bowl, toss the kale with the sesame dressing. With very clean hands, rub the kale and dressing together until well combined and the kale glistens with an even coating of dressing.
Toss the kale with the rice and corn mixture, and half each of the sesame seeds, scallions and peanuts.
Serve family style or in individual bowls topped with the remaining sesame seeds, scallions and peanuts.
We’re big sweet potato fans in my family. They’re packed with nutrition, so delicious and gorgeously hued. Luckily, in this soup, sweet potatoes and Greek yogurt offer the creaminess and thickness of heavy cream without the calories and fat. Adding a chipotle pepper imparts a slight bite but a strong smoky flavor that pairs so nicely with the cool sweet potatoes and the creamy Greek yogurt. I love the versatility of this soup—make it your own by adding your favorite toppings.
SERVES 4
1 large sweet potato, peeled and chopped
¼ cup (60 ml) olive oil, divided
1 medium red onion, chopped
2 cloves garlic, chopped
3 cups (495 g) corn kernels, divided
2 cups (480 ml) low-sodium vegetable stock, or more as needed, divided
1 chipotle pepper in adobo sauce
1 tsp paprika
½ cup (120 g) low-fat plain Greek yogurt
2 tsp (10 ml) lime juice
Salt to taste
¼ cup (12 g) chopped chives
Red pepper flakes (optional)
Preheat the oven to 400°F (200°C).
Coat the sweet potatoes with 2 tablespoons (30 ml) of the olive oil, spread on a baking sheet and roast for 25 minutes, or until they are fork tender.
While the potatoes cook, heat the remaining 2 tablespoons (30 ml) olive oil in a large stockpot. Add the onion and cook, covered, until translucent and tender, about 10 minutes. Then add the garlic and cook for another 2 minutes.
Add 2 cups (330 g) of corn, 1 cup (240 ml) of vegetable stock and the chipotle in adobo sauce to a food processor or blender and combine until very smooth and creamy.
Once the onions and garlic are cooked, add the remaining 1 cup (240 ml) vegetable stock and deglaze the pan by cooking for another 2 minutes. Be sure to scrape the goodness off the bottom with a wooden spoon. Add the cooked onions, garlic and sweet potatoes to the corn purée and blend until smooth.
Place half of the puréed soup into the same stockpot you used for the onions and garlic, add the remaining 1 cup (165 g) of corn and the paprika, and cook over low heat until the corn is cooked through, about 10 minutes.
Add the Greek yogurt and lime juice to the soup in the blender and combine until smooth, then add this mixture to the soup on the stove. Turn off the heat and stir to combine the two batches.
If the soup is too thick for your taste, add another 1 cup (240 ml) of vegetable stock, stir and let cool to room temperature before refrigerating. Season to taste with salt.
Serve the soup chilled, topped with the chopped chives and red pepper flakes, if desired.
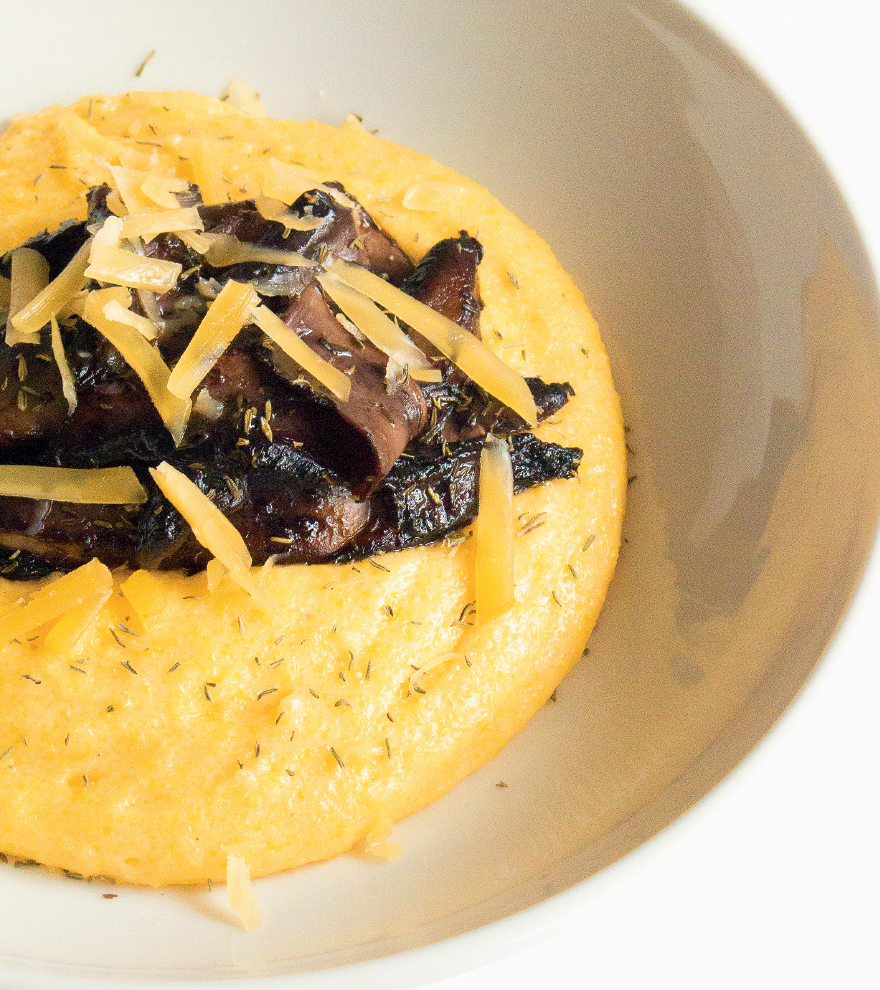
I first made this recipe on an unseasonably cold spring evening. My husband and I were looking for something warm and cozy, and this recipe popped into my head. I’ve cooked it many times over and we’ve been enjoying it ever since—primarily in the winter, when we are especially chilly and looking for a quick weeknight meal. It uses the richness of smoked Gouda to add that distinctive luxuriousness to the polenta. If you haven’t had smoked Gouda, please put the book down and run (do not walk) to your grocery store. You can thank me later.
SERVES 4
POLENTA
4 cups (960 ml) whole milk
1 cup (240 ml) water
2 cups (244 g) medium-grain, quick-cooking polenta
2 cups (200 g) grated smoked Gouda cheese
2 tbsp (28 g) butter
Salt to taste
MUSHROOMS
4 tbsp (56 g) butter
2 tbsp (30 ml) olive oil
4 portobello mushrooms, wiped clean, stems discarded and tops thinly sliced
1 tsp dried thyme, plus more for garnish
1 tsp all-purpose flour
¾ cup (180 ml) full-bodied red wine such as Cabernet Sauvignon
To make the polenta: Combine the milk, water and polenta in a medium-size pot and bring to a boil. Be sure to stir well so there are no clumps. Cook for about 10 minutes, or until the liquid is absorbed and the polenta is soft and creamy. Add the Gouda cheese and stir to combine. Add the butter and stir to combine. Season to taste with salt.
To make the mushrooms: Melt the butter and olive oil in a large skillet over medium heat. Add the mushrooms, then cover and let cook for about 3 minutes. Add the thyme, flour and red wine and stir well to incorporate the flour. Re-cover and cook for 6 minutes, then turn the heat down as low as possible and keep warm until the polenta is finished.
Plate by spooning the polenta into a bowl and topping with the braised mushrooms and a sprinkling of additional thyme. Serve immediately.
*See photo here.
TIPS: Any mushroom will work in this recipe, so use whatever you have. I happen to like the shape of sliced portobellos, but that’s just personal preference.
This recipe is best enjoyed right after cooking. But, if you need to make it ahead of time, keep the polenta and mushrooms separate. When it’s time to serve, reheat the polenta with additional milk to thin out the texture and make it creamy again. It might not ever come back to its original form, but it will be better than anything reheated in the microwave.
My husband and I are Brussels sprouts lovers. We almost always order them at restaurants and I make them frequently at home. I’m a firm believer that anything in the cabbage family should not be served boiled or steamed—these cruciferous vegetables really need some extra cooking time to caramelize and enhance their flavors. The Brussels sprouts are crunchy and deliciously roasted and balance the creaminess of the risotto. This dish is gorgeous to look at, with the green Brussels sprouts, yellow lemon zest and pink-flecked white rice. I love the slight pink hue the red onions give off as they cook, but if you prefer a whiter rice, swap the red onion for any white onion and dig in.
SERVES 4
RISOTTO
4 cups (940 ml) low-sodium vegetable stock
3 tbsp (42 g) butter
1 medium red onion, chopped
2 cloves garlic, chopped
2 tbsp (30 ml) olive oil
1 cup (240 ml) white wine
1¼ cups (250 g) Arborio rice
1 cup (100 g) shredded Parmesan cheese
Zest and juice of 1 lemon
Salt to taste
BRUSSELS SPROUTS
2 tbsp (28 g) butter
2 tbsp (30 ml) olive oil
9 oz (250 g) Brussels sprouts, stems removed and halved
To make the risotto: In a small saucepan, heat the vegetable stock over low heat to warm through.
Preheat the oven to 400°F (200°C).
In a large saucepan, melt the butter over medium heat, then add the chopped onion and cook until translucent, about 4 minutes. Add the garlic and cook for 2 minutes longer.
Add the olive oil, white wine and rice and stir to coat. Cook for 4 to 5 minutes, or until the rice has absorbed all of the wine.
Meanwhile, make the Brussels sprouts: Once the oven comes to temperature, add the butter and olive oil to a cast-iron or oven-safe skillet to melt. Add the Brussels sprouts, cut-side down, and roast until golden brown, 25 to 30 minutes.
Start adding the warmed stock, 1 cup (240 ml) at a time, to the rice, stirring constantly. Once each cup of stock has been absorbed, add another until the risotto is cooked and creamy, 30 to 35 minutes.
Add the Parmesan cheese and lemon juice, stirring well to combine. Season to taste with salt.
Plate the risotto and top with the roasted Brussels sprouts, then sprinkle with the lemon zest and a little more salt. Serve immediately.
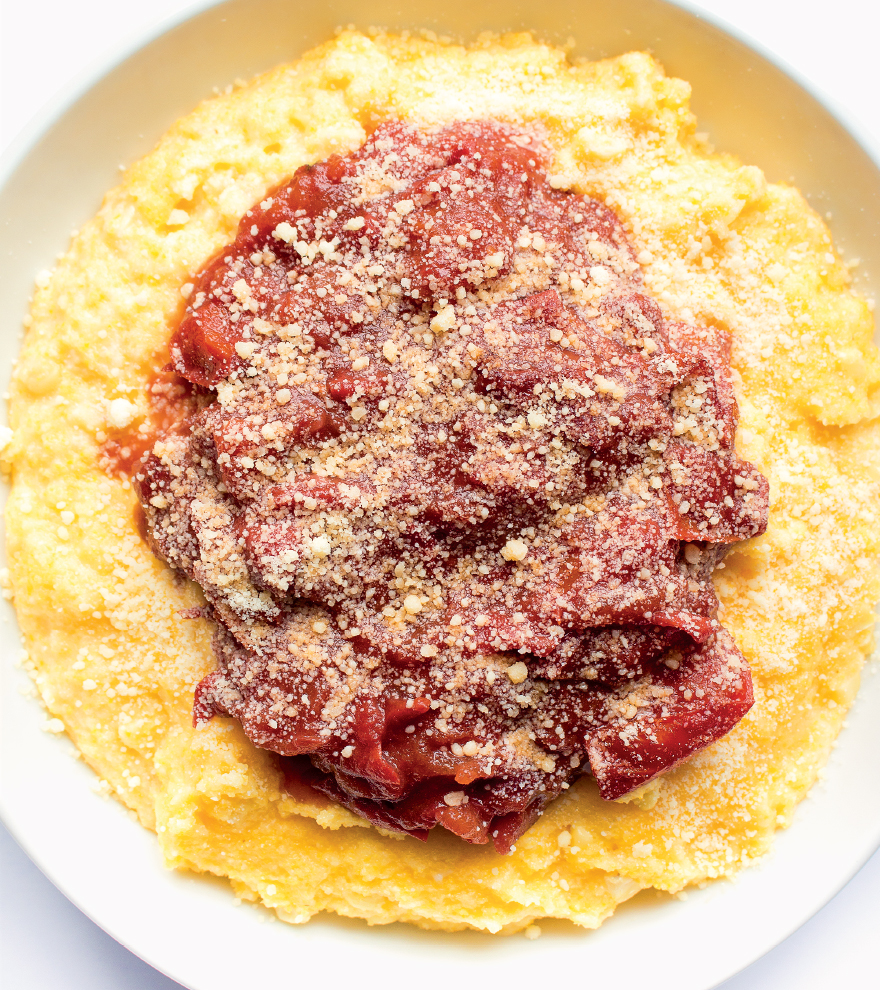
This recipe is especially great in the summer, when corn and tomatoes are at their peak, but it’s easy enough to find these tasty ingredients year-round as well. I love the unexpected crunch of corn in the otherwise super creamy polenta, and the rustic appeal of the homemade chunky tomato ragù. Isn’t there something so satisfying about a homemade sauce? If you’re a meat eater, adding browned ground beef to the sauce would likely be delicious.
SERVES 4
POLENTA
4 cups (960 ml) whole milk
1 cup (240 ml) water
2 cups (244 g) medium-grain, quick-cooking polenta
1¾ cups (175 g) grated Parmesan cheese, plus more for garnish
3 tbsp (42 g) butter
1 cup (165 g) corn kernels
Salt to taste
TOMATO RAGÙ
4 tbsp (56 g) butter
2 tbsp (30 ml) olive oil
2 lbs (910 g) tomatoes on the vine, seeded and roughly diced
2 tsp (5 g) all-purpose flour
¾ cup (180 ml) full-bodied red wine such as Cabernet Sauvignon
To make the polenta: Combine the milk, water and polenta in a medium-size pot and bring to a boil. Be sure to stir well so there are no lumps. Cook for about 10 minutes, or until the liquid is absorbed and the polenta is soft and creamy. Add the Parmesan cheese, butter and corn, then stir to combine. Season to taste with salt.
While the polenta is cooking, make the ragù: Melt the butter and olive oil in a large skillet over medium heat. Add the tomatoes, then cover and let cook for about 2 minutes. Add the flour and red wine and then stir well to incorporate the flour. Re-cover and cook for 10 minutes, then turn the heat down as low as possible and keep warm until the polenta is finished.
Scoop the polenta into a bowl and top with the tomato ragù and additional Parmesan cheese, then serve immediately.
TIP: Polenta is best served very soft and creamy. The longer it sits, the more it will harden. I suggest making and then quickly serving this dish.
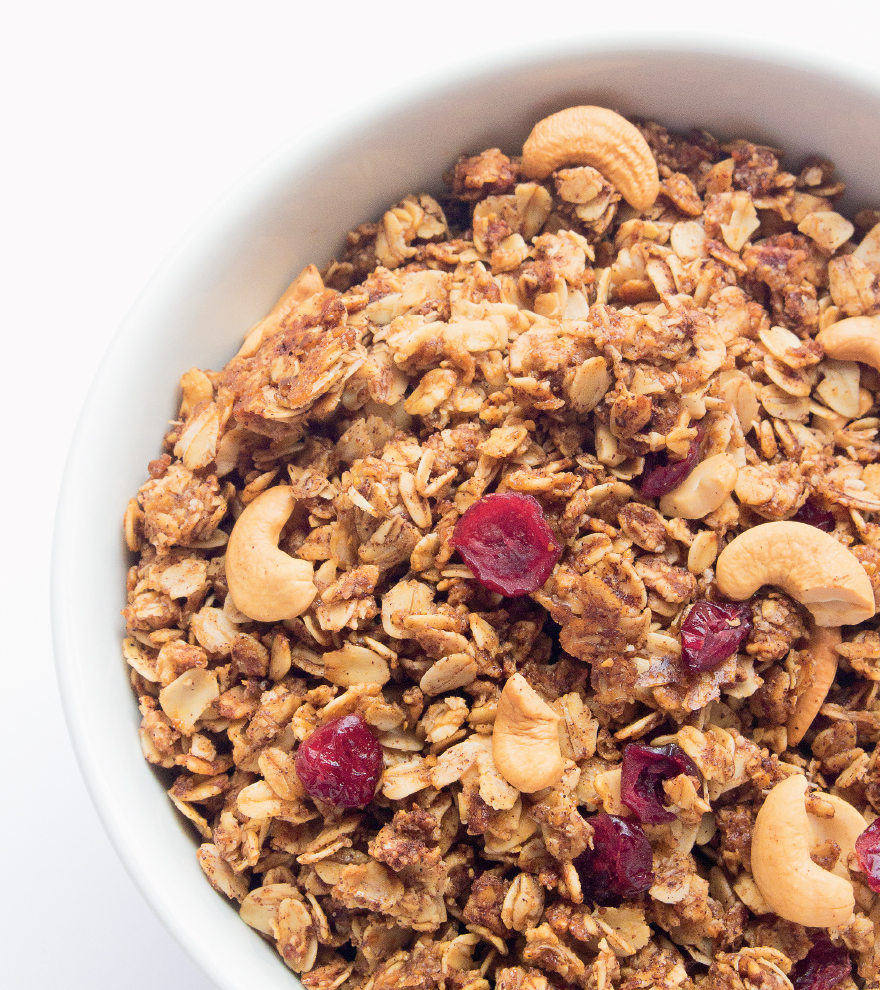
I’ve been making granola at home for years—it’s a great item to serve to brunch guests, and to have around the house for a quick meal or snack. It’s also a great giftable item, one that I often give to hostesses and new moms. Traditionally, granola is soaked in sugar and oil, but my version is a bit lighter and truly delicious. The brown sugar, cinnamon and salt make for an especially well-balanced and tasty bite. If you aren’t a cranberry or cashew fan, swap in your favorite dried fruit and nuts. This recipe lends itself very well to modification, so use what you have on hand and enjoy!
SERVES 8
1 egg white, beaten
2 tbsp (30 ml) water
3 cups (240 g) old-fashioned rolled oats
½ cup (95 g) packed brown sugar
½ cup (120 ml) melted coconut oil
2 tsp (10 ml) vanilla extract
1 tbsp (8 g) ground cinnamon
1 tsp salt
¼ cup (40 g) very roughly chopped cashews
⅓ cup (50 g) dried cranberries
Preheat the oven to 300°F (149°C).
In a large bowl, whisk together the egg white and water until foamy, then add the oats and toss to coat.
In a small bowl, whisk together the brown sugar, coconut oil, vanilla, cinnamon and salt, then pour into the oat mixture and toss well to combine.
Cover a rimmed baking sheet with a nonstick baking mat or parchment paper and spread the oat mixture in one even layer. This granola bakes best on metal trays—glass baking dishes do not work as well.
Bake for 20 minutes, then add the cashews and bake for 20 minutes longer, stirring occasionally.
After 40 minutes, turn the oven off and let the granola sit in the oven for an additional 10 minutes. Remove the granola from the oven, add the cranberries, toss to combine and allow to cool. Granola crisps up as it cools, so do not worry if yours doesn’t seem hard enough fresh out of the oven.
Enjoy over yogurt, with milk or on its own.
TIP: Store granola unrefrigerated in a covered container for up to 1 week.
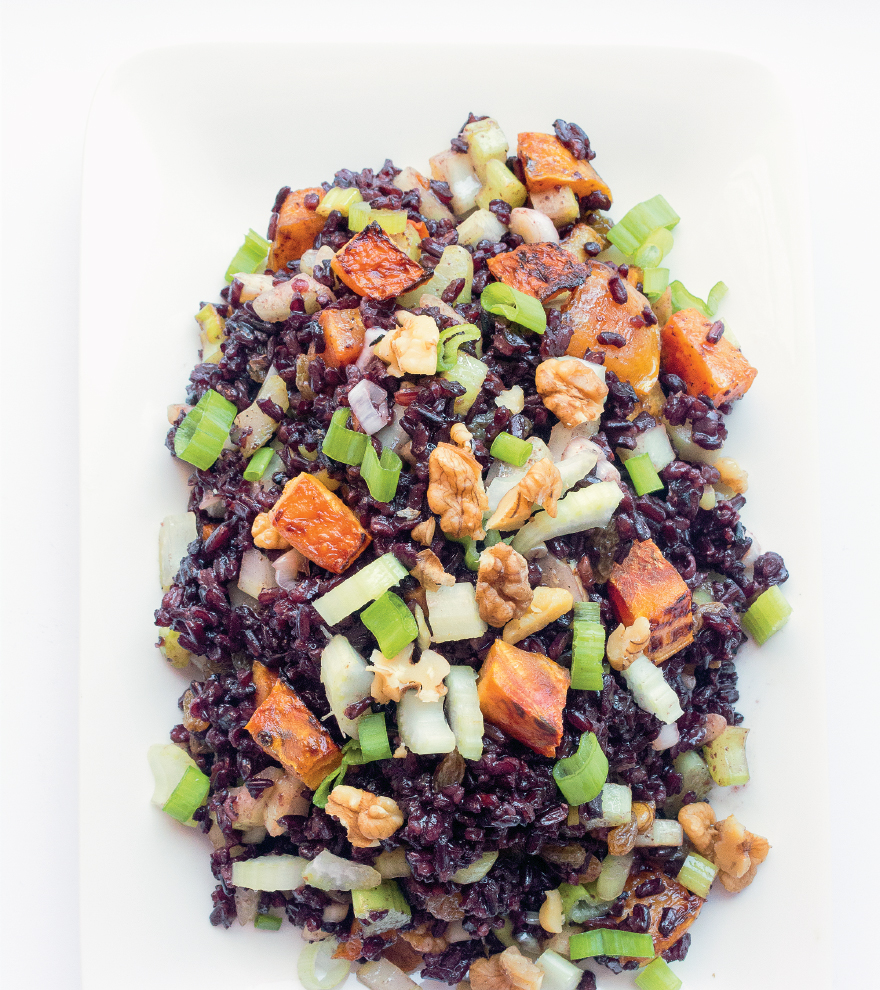
This salad is bursting with textures and flavors! I love the chewiness of the raisins paired with the crunchiness of the walnuts and the al dente bite of the beets. Golden raisins and golden beets work particularly well in this recipe because their vibrant color is a stunning contrast to the rice’s dark hue, while their natural sweetness complement and balance the tangy dressing. Dark raisins and beets, while still tasty, create a monochromatic dish. This salad gets better with time. Make a big batch and enjoy it over and over—warm or cold. And really, who doesn’t like leftovers?
SERVES 4
DRESSING
2 tbsp (30 ml) olive oil
2 tbsp (30 ml) seasoned rice vinegar
2 tbsp (30 ml) lemon juice
½ tsp salt
RICE
1 cup (160 g) black or wild rice, rinsed
2¼ cups (530 ml) water
1 large golden beet, peeled and diced into bite-size pieces
2 tsp (10 ml) olive oil
¼ cup (30 g) walnuts
¼ cup (40 g) golden raisins
2 celery stalks, diced
2 scallions, thinly sliced
Preheat the oven to 375°F (190°C).
To make the dressing: In a bowl, whisk together the dressing ingredients and set aside.
To make the rice: In a heavy-bottomed pan, bring the rice and water to a boil, cover and reduce the heat to very low. Cook until the rice is soft but not overdone and the liquid is absorbed, about 35 minutes.
While the rice is cooking, toss the beets with the olive oil, spread on a baking sheet and roast until golden brown and soft, about 25 minutes.
In a pan over low heat, toast the walnuts for 3 to 5 minutes, or until golden and fragrant, let cool slightly and roughly chop.
Once the rice is cooked, immediately combine the raisins and warm rice in a large bowl, then add the walnuts, celery, scallions, beets and dressing. Stir to combine.
Serve warm or refrigerate for later use.
TIPS: Be mindful of black rice: It might stain a light-colored ceramic pot. You may have some success mitigating this by rinsing the rice beforehand.
Seasoned rice vinegar is sweeter than unseasoned rice vinegar—if you think you might prefer a more savory side dish, opt for the unseasoned variety.
While couscous is a fine semolina grain, Israeli couscous (also called pearl couscous) is much larger—about the size of peppercorns. Toasted couscous is kind of like the love child of brown rice and orzo. We eat with our eyes before our mouths, and this colorful dish will not disappoint. The neutral couscous allows the colorful fruits and vegetables to pop, in terms of both color and flavor. This dish is delicious—sweet and salty combinations are so satisfying!
SERVES 4
2 tbsp (30 ml) olive oil, divided
2 cups (300 g) Israeli couscous
2½ cups (600 ml) water
½ cup (61 g) dried cranberries
2 tbsp (17 g) capers, or more to taste
¼ cup (25 g) sliced scallion, divided
Salt to taste
In a large saucepan, heat 1 tablespoon (15 ml) of the olive oil over medium heat, add the couscous and stir to coat with the oil. Toast for about 2 minutes, until golden brown.
Add the water, cover and bring to a boil. Cook for about 6 minutes, or until the water has evaporated and the couscous is cooked through.
While the couscous is cooking, combine cranberries, capers and half of the scallions with the remaining 1 tablespoon (15 ml) olive oil and set aside. Once the couscous is cooked, turn off the heat, add the cranberry mixture and steam for about 2 minutes using the residual heat.
Season to taste with salt, add more capers if you desire and serve immediately, topped with the remaining scallions.
TIPS: Swapping raisins for the cranberries would also be delicious.
This recipe is also tasty chilled—just make ahead and refrigerate, then toss with extra olive oil right before serving. Once refrigerated, the couscous can stick together.
Making cornbread from scratch is almost as easy as opening the boxed variety and doctoring it. If you are unsure about your baking skills, give this recipe a try—it really is that simple! This cornbread is sweet and delicious. It would be great served with my BBQ tofu grain bowl (here). I love mine warm, fresh out of the oven, with extra butter or honey (and I doubt anyone would make too much of a fuss if you mixed some honey into softened butter to make your own honey butter).
SERVES 8 TO 12
1 cup (157 g) finely ground cornmeal
1 cup (125 g) all-purpose flour
2 tsp (9 g) baking powder
½ tsp salt
1 tsp ground cinnamon
¾ cup (151 g) granulated sugar
⅓ cup (80 ml) melted butter
1 cup (245 g) pure pumpkin
¼ cup (60 ml) maple syrup
½ cup (120 ml) whole milk
2 large eggs
2 tbsp (15 g) coarse cornmeal
Preheat the oven to 375°F (190°C). Grease an 8 × 8-inch (20 × 20-cm) nonstick baking pan.
In a medium-size mixing bowl, combine the finely ground cornmeal, flour, baking powder, salt, cinnamon and sugar.
In a large mixing bowl, whisk together the butter, pumpkin, maple syrup, milk and eggs until well incorporated. Gradually add the dry ingredients, and whisk to combine.
Pour the batter into the baking pan and sprinkle the top with the coarse cornmeal.
Bake for 30 minutes, or until golden brown and a paring knife inserted into the center comes out clean.
TIP: Save yourself time by using 100% canned pure pumpkin. Pure pumpkin is unsweetened and contains only pumpkin, while pumpkin purée is sweetened and spiced.
Traditional oatmeal cookies are loaded with plump raisins. But my version is packed with peanuts and chocolate chips—as if that could be bad, right? This recipe uses whole-wheat flour for a bit of a healthier base to make up for some of the less-than healthy mix-ins. These cookies came to be when I wasn’t in the mood for a traditional oatmeal raisin cookie and wanted to make something sweet for my sister (who loves roasted peanuts)—she loved them, and I’ve kept making them ever since!
MAKES 12 COOKIES
1 ¾ cups (142 g) old-fashioned rolled oats
¾ cup (94 g) whole-wheat flour
2 tsp (2 g) ground cinnamon
½ tsp baking soda
¼ tsp salt
½ cup (112 g) salted butter, at room temperature
1 cup (230 g) packed brown sugar
1 tbsp (15 ml) vanilla extract
1 egg
½ cup (84 g) chocolate chips
½ cup (73 g) salted and roasted or honey-roasted peanuts
Preheat the oven to 350°F (180°C). Grease 2 parchment paper or aluminum foil-lined baking sheets.
In a medium-size bowl, combine the oats, flour, cinnamon, baking soda and salt.
In a stand mixer, blend the butter, brown sugar, vanilla and egg until well combined and light in color, about 5 minutes.
Add the dry mixture to the wet in 3 batches and turn the mixer on low to combine.
Once all of the dry ingredients are incorporated, add the chocolate chips and peanuts and stir by hand. Cover the dough and refrigerate for at least 30 minutes.
Using an ice cream scoop, form dough balls and place 6 on each baking sheet. Bake for 13 to 15 minutes, then let cool and serve. The cookies will harden as they cool.
TIP: If you are short on time, place the dough in the freezer to cool for about 15 minutes.
Because of its size, flavor and texture, Israeli couscous is an interesting substitute for other grains such as rice, farro or barley. I especially like toasting it to get as much flavor as possible out of this round grain. Olives impart such a deliciously salty, briny, umami flavor to grain salads and many other dishes. I love the combination of olives, hazelnuts and lemon juice paired with the silky toasted Israeli couscous.
SERVES 4
2 tbsp (30 ml) olive oil, divided
2 cups (300 g) Israeli couscous
2½ cups (600 ml) water
½ cup (67 g) chopped mixed pitted olives
½ cup (56 g) hazelnuts
Juice of 1 lemon
Salt to taste
In a large saucepan, heat 1 tablespoon (15 ml) of the olive oil over medium heat, add the couscous and stir to coat with the oil. Toast for about 2 minutes, until golden brown.
Add the water, cover and bring to a boil. Let it cook for about 6 minutes, or until the water has evaporated and the couscous is cooked through. Turn off the heat, add the chopped olives and steam for about 2 minutes with the residual heat.
Meanwhile, toast the hazelnuts in a separate pan over medium-low heat until toasted and fragrant, about 2 minutes.
Add half of the hazelnuts to the couscous mixture and toss with the remaining 1 tablespoon (15 ml) olive oil and the lemon juice.
Season to taste with salt, then serve warm with the remaining hazelnuts sprinkled on top.
TIPS: I like using green and black olives for more color and variety, but use whatever you prefer.
Olives are salty, so be sure to taste the dish before you salt it—you can always add more salt if you need it.
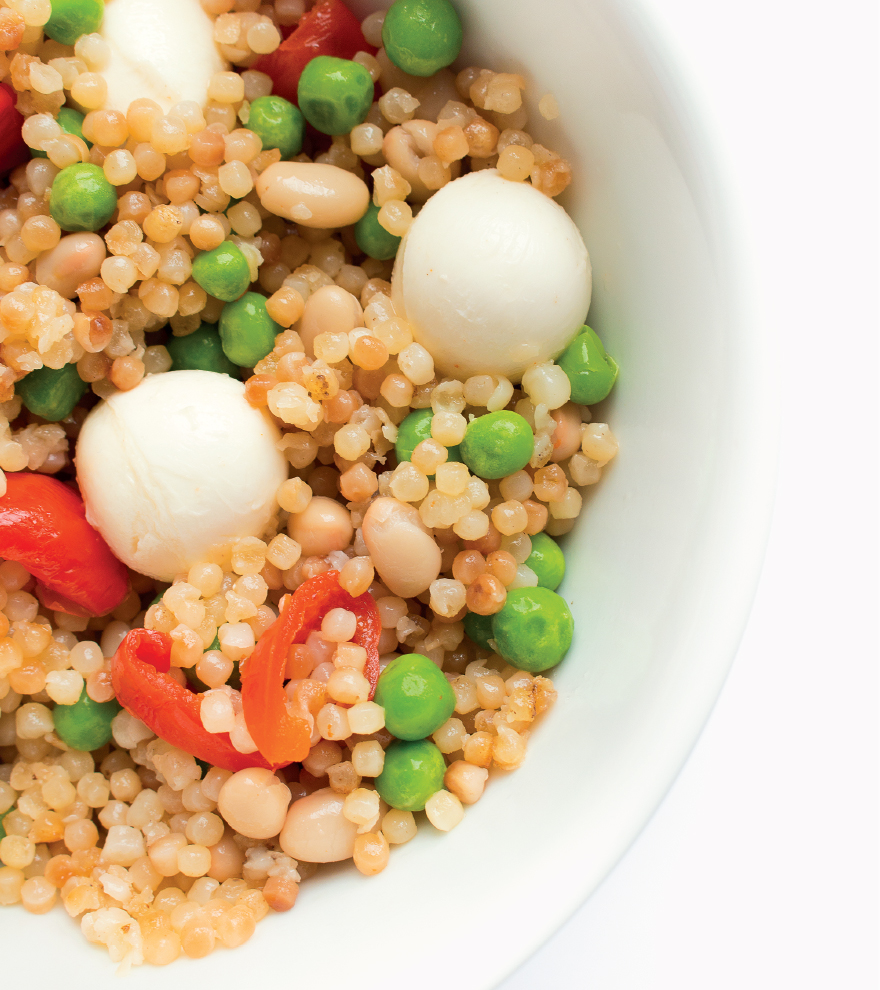
As I’ve mentioned, sweet and salty combinations are some of my favorites, and the pickled punch of the ever-so-slightly spicy peppadew peppers really intensifies the flavors of this dish. Ciliegine mozzarella are grape-size, fresh mozzarella balls, but any bite-size cheese will do. You could also dice a larger block of cheese if you can’t find bite-size options. If you’re feeling ultra ambitious, stuffing the peppadew peppers with the Ciliegine mozzarella would give this dish a totally different look.
SERVES 4
2 tbsp (30 ml) olive oil, divided
2 cups (300 g) Israeli couscous
2½ cups (600 ml) water
½ cup (72 g) peas
½ cup (90 g) white navy beans
½ cup (92 g) drained and quartered pickled mild peppadew peppers
½ cup (66 g) Ciliegine mozzarella
Salt to taste
In a large saucepan, heat 1 tablespoon (15 ml) of the olive oil over medium heat, add the couscous and stir to coat with the oil. Toast for about 2 minutes, until golden brown.
Add the water, cover and bring to a boil. Let cook for about 6 minutes, or until the water has evaporated and the couscous is cooked through. Turn off the heat, add the peas and steam for about 2 minutes with the residual heat, then set aside to cool.
In a large bowl, combine the white beans, peppadews and mozzarella cheese. Add the cooled couscous mixture and the remaining 1 tablespoon (15 ml) olive oil, then toss to combine. Season to taste with salt and serve.
TIP: The seeds of the peppers are the hottest part, so if you are especially sensitive to spice, remove the seeds before tossing the peppers with the couscous.
Rice doesn’t always have to be savory—it works nicely when sweet, too. I’ve always loved rice pudding, but growing up, it was never something that made it onto the menu. But now that I plan our menus, it’s a special treat, though it’s so easy to make that it really could be served all the time. Pumpkin adds a nice earthy and subtly sweet taste to so many dishes, and rice pudding is no exception!
SERVES 4
1¼ cups (300 ml) whole milk
¾ cup (180 ml) water
½ cup (93 g) medium-grain rice
1 tsp ground cinnamon, plus more for garnish
½ tsp ground nutmeg
⅓ cup (70 g) sugar
½ cup (120 g) pure pumpkin
1 large egg
2 tsp (10 ml) vanilla extract
⅛ tsp salt
Dried fruit (optional)
Chopped nuts (optional)
Chocolate chips (optional)
Combine the milk, water, rice, cinnamon and nutmeg in a pot and bring to a boil, stirring the mixture often. Reduce the heat to the lowest setting, cover and cook until the rice is soft and most of the liquid has evaporated, 20 to 25 minutes.
In a bowl, whisk together the sugar, pumpkin, egg, vanilla and salt until well combined. After 20 minutes of cooking the rice, remove it from the heat, add the sugar mixture and stir well to combine. Return to the heat and cook for 10 to 15 minutes longer. The longer you cook the rice, the thicker it will become.
Serve warm topped with extra cinnamon and anything you like: dried fruit, chopped nuts or chocolate chips.