Dulce de Leche Lava Cakes with Whipped Cream and Cocoa
![]() MASTERCHEF LESSON: Homemade Dulce de Leche
MASTERCHEF LESSON: Homemade Dulce de Leche
Flourless Chocolate Cake with White Chocolate Drizzle and Almond Brittle
Pineapple-Lychee Upside-Down Cake
Mexican Hot Chocolate Tres Leches Cake with Caramel and Kettle Corn
![]() MASTERCHEF LESSON: Building a Better Layer Cake
MASTERCHEF LESSON: Building a Better Layer Cake
Apple Butter Bundt Cake with Cinnamon-Sugar
Chocolate-Citrus Olive Oil Cake with Orange Glaze and Whipped Ricotta
![]() MASTER THIS: The Easiest Chocolate Cake
MASTER THIS: The Easiest Chocolate Cake
Chocolate Layer Cake with Spiced Ganache and Raspberry-Chocolate Drizzle
DULCE DE LECHE

WITH WHIPPED CREAM AND COCOA


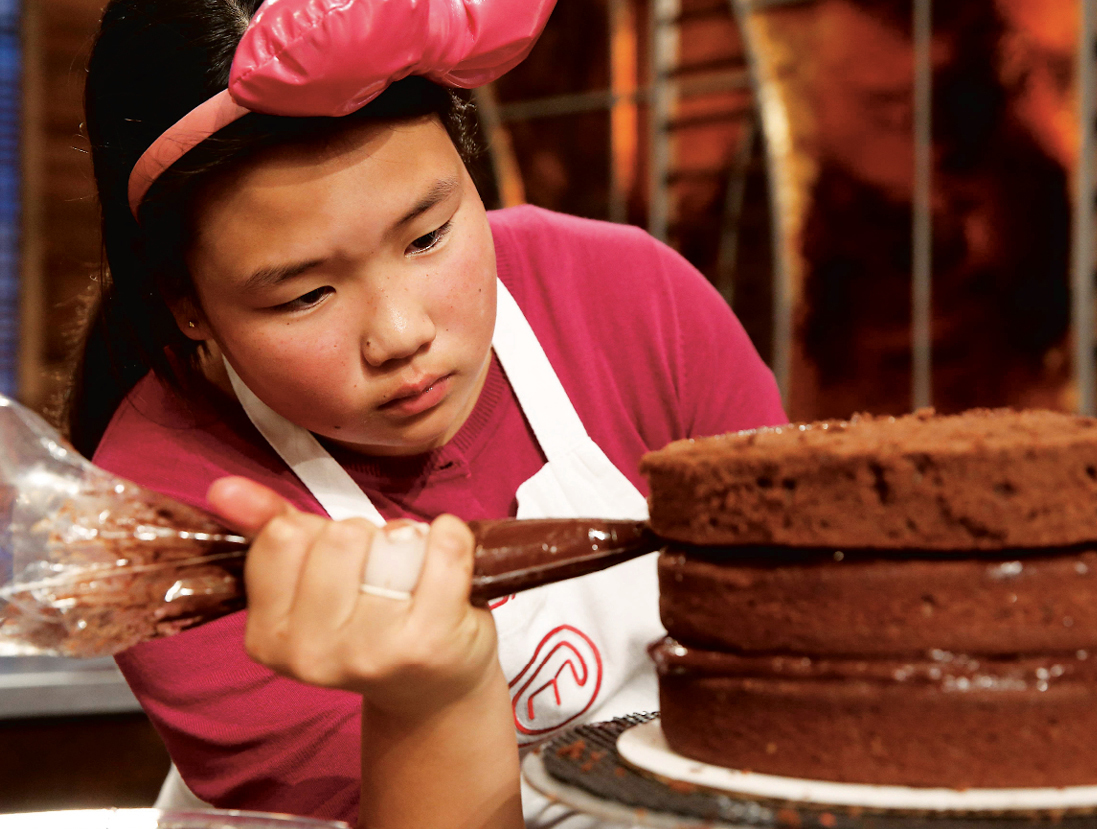
These decadent personal-size cakes filled with dulce de leche (see this page) are Evan’s fun twist on traditional chocolate lava cakes and a creative way to work the butterscotch-flavored spread into a classic dessert. Just remember to keep an eye on the clock—as judge Christina Tosi advised in Season 6, overbaking the cakes by even a minute can make them lose their signature gooeyness. This is one recipe where strategy and timing are key. Because these petite cakes are quite sweet, topping them with barely sweetened whipped cream provides a nice contrast. A final flurry of cocoa powder on top finishes the whole thing off.
MAKES 4 INDIVIDUAL CAKES

LAVA CAKES
2 tablespoons unsalted butter, plus more at room temperature for the ramekins
1 cup dulce de leche (see MasterChef Lesson, this page)
¼ cup all-purpose flour
¼ teaspoon ground cinnamon
¼ teaspoon kosher salt
1 large egg
2 large egg yolks
2 tablespoons light brown sugar
1 teaspoon pure vanilla extract
WHIPPED CREAM
⅓ cup heavy cream
½ teaspoon confectioners’ sugar
Sweetened cocoa powder, for garnish
-
Make the lava cakes: Preheat the oven to 425°F. Lightly butter four 6-ounce ramekins.
-
In a small saucepan, melt 2 tablespoons butter over low heat. Add the dulce de leche and stir until smooth. Remove from the heat.
-
In a small bowl, whisk together the flour, cinnamon, and salt.
-
In a large bowl, using an electric mixer fitted with the whisk attachment, whip the whole egg, egg yolks, brown sugar, and vanilla until the mixture is pale and thick and has doubled in volume, about 3 minutes. Spoon in the dulce de leche mixture and continue whipping until combined, about 1 minute. Use a rubber spatula to gently fold in the flour mixture until just combined and no streaks of flour are visible. Divide the batter evenly among the prepared ramekins. Place the ramekins on a baking sheet and bake until the cakes are golden brown but still wobbly in the center, about 12 minutes. Let the cakes rest for 1 minute before serving.
-
While the cakes are in the oven, make the whipped cream: In a bowl, using an electric mixer fitted with the whisk attachment, beat the cream and confectioners’ sugar on medium-high speed until the cream forms soft peaks, 2 to 3 minutes. Set aside.
-
To serve, run a knife around the edge of each ramekin to loosen the cakes. Invert each ramekin onto a dessert plate. Spoon the whipped cream on each cake, dust with a pinch of cocoa powder, and serve immediately.
— MASTERCHEF LESSON —

Dulce de leche is crazy delicious not only in cute little cakes but also swirled into brownies, as the filling for sandwich cookies, or even as a dip for apple slices.
Cans of this creamy caramel spread can be found in many grocery stores, usually in the baking aisle. But it’s also super easy to DIY! Here’s how:
Peel the label from a can of sweetened condensed milk and place the can (completely sealed/unopened) in a deep saucepan or pot of water, making sure that the can is covered by at least 2 inches of water. Bring the water to a boil over medium heat, then reduce the heat to low and simmer for about 3 hours, adding more water as needed as the water evaporates. (For safety reasons, you always want to make sure there is at least 1 inch of water covering the can.) After 3 hours, carefully remove the can from the water (it will be hot!) and let it cool completely, about 1 hour, before opening. You can also use an electric pressure cooker (like an Instant Pot) to make an even speedier version: Just place an unopened, label-free can of sweetened condensed milk on top of the rack insert, fill the cooker with enough water to cover the can by 1 inch, seal the lid, and cook on high pressure for 40 minutes. Do a quick pressure release, then let the can cool completely before opening.
Either way, the result is a batch of ooey-gooey, amazing dulce de leche. It’s like magic! Once the dulce de leche is made, you can transfer it to a mason jar and keep it in the refrigerator for up to 1 month—though it’s unlikely it will last that long before getting gobbled up!
APRICOT-ALMOND


With a gentle almond flavor and a touch of cardamom spice, this simple, homey cake is super adaptable and just the sort of recipe every young chef should have in that back pocket whenever a sweet craving strikes or a flat of summer berries or stone fruit calls to you at the farmers’ market. Because it is so forgiving, as long as you stick to the recipe’s basic formula, you can easily swap out the apricots for other fruits such as sliced pears, plums, or even a generous scoopful of blueberries. Just don’t skip the final sprinkling of coarse cardamom sugar—it creates a thin, caramelized crust on top that is guaranteed to have you reaching for another slice.
SERVES 8

Nonstick pan spray
1¼ cups all-purpose flour
1 teaspoon baking powder
¾ teaspoon ground cardamom
½ teaspoon kosher salt
1 stick (4 ounces) unsalted butter, at room temperature
¾ cup granulated sugar
2 large eggs
2 teaspoons pure almond extract
1½ pounds apricots (8 to 10), halved and pitted
1 tablespoon turbinado sugar (such as Sugar In the Raw)
-
Preheat the oven to 350°F. Coat a 10-inch cast-iron skillet with pan spray.
-
In a medium bowl, whisk together the flour, baking powder, ½ teaspoon of the cardamom, and the salt.
-
In a large bowl, using an electric mixer with the paddle attachment, beat the butter and granulated sugar on medium-high speed until light and fluffy, about 5 minutes. Reduce the speed to medium-low and add the eggs one at a time, beating well after each addition and scraping down the sides and bottom of the bowl as needed. Add the almond extract and beat briefly. Reduce the mixer speed to low and add the flour mixture, beating until just combined.
-
Spoon the batter into the prepared skillet and smooth out the top. Arrange the halved apricots on top, skin-side up—they should nearly fill the surface. In a small bowl, stir together the remaining ¼ teaspoon cardamom and the turbinado sugar and sprinkle the mixture over the top of the cake.
-
Bake until the cake is golden, the apricots are soft, and a toothpick inserted into the center of the cake comes out clean, about 45 minutes. Transfer the skillet to a wire rack to cool. Slice the cake into wedges and serve slightly warm or at room temperature. Store, covered, in the refrigerator for up to 5 days.
TIP If you don’t have a cast-iron skillet, you can use a 9-inch round cake pan or springform pan.
FLOURLESS

WITH WHITE CHOCOLATE DRIZZLE AND ALMOND BRITTLE

Judge Gordon Ramsay called this fudgy flourless cake “perfection on a plate” when Quani presented it during the Season 6 chocolate challenge. Whipping whole eggs into the batter, rather than separating them, makes the cake intensely rich, smooth, and dense in the most delicious way. A drizzle of white chocolate over the top provides a nice contrast to the dark chocolate and gives the whole thing a fun “drip cake” look. While you could certainly leave the almond brittle garnish off, it’s a cinch to make and so tasty. In fact, you might want to double the batch so you have extra to snack on!
MAKES ONE 8-INCH CAKE

FLOURLESS CHOCOLATE CAKE
Nonstick pan spray or butter
1½ cups chopped bittersweet chocolate (about 9 ounces)
1 stick (4 ounces) unsalted butter, cubed
4 large eggs
½ cup sugar
1 teaspoon pure vanilla extract
¼ teaspoon kosher salt
WHITE CHOCOLATE DRIZZLE
½ cup white candy melts
½ cup white chocolate chips
½ cup heavy cream
ALMOND BRITTLE
Nonstick pan spray
1 cup sliced almonds
¾ cup sugar
⅛ teaspoon cream of tartar
¼ teaspoon kosher salt
-
Preheat the oven to 325°F. Lightly grease an 8-inch round cake pan with pan spray. Line the bottom of the pan with a round of parchment paper (see Tip, this page) and grease the parchment as well.
-
Make the flourless chocolate cake: In a heatproof medium bowl set over a pan of simmering water (make sure the bottom of the bowl does not touch the water), combine the chocolate and butter and heat, stirring often, until melted and completely smooth, about 4 minutes. Use oven mitts to remove the bowl from the pan and set aside.
-
In a large bowl, using an electric mixer fitted with the whisk attachment, beat the eggs, sugar, vanilla, and salt on medium-high until the mixture is very pale and frothy and has doubled in volume, about 5 minutes. Gradually spoon the melted chocolate mixture into the egg mixture and use a rubber spatula to fold them together until just combined, taking care to deflate the batter as little as possible.
-
Pour the batter into the prepared pan. Bake until the surface of the cake has formed a thin crust and the edges look dry, 30 to 35 minutes. Let the cake rest in the pan for 5 minutes, then run a butter knife around the edges of the pan to loosen the cake. Using oven mitts, invert the cake onto a plate or serving platter. Transfer the cake to the refrigerator to cool completely.
-
Make the white chocolate drizzle: Place the candy melts and white chocolate chips in a heatproof medium bowl. In a small saucepan, bring the cream to a simmer over medium heat. Pour the hot cream over the candy melts and chocolate and set aside for 1 minute, then stir until smooth.
-
Starting at the center, slowly spoon the white chocolate drizzle over the cooled cake, letting some drip over the sides. Return the cake to the refrigerator to chill until set, about 30 minutes or up to overnight.
-
Meanwhile, make the almond brittle: Line a baking sheet with parchment paper and coat the parchment with pan spray.
-
In a medium skillet, toast the almonds over medium-high heat, stirring often, until golden and fragrant, 3 to 5 minutes. Turn off the heat, remove the almonds from the pan, and set aside.
-
In a medium saucepan, whisk together the sugar, cream of tartar, and ¼ cup water. Bring to a simmer over medium heat, stirring, just until the sugar dissolves, then cook, without stirring, until the mixture turns a deep amber and a thermometer inserted into the caramel reads around 310°F, about 10 minutes. Remove the pan from the heat and stir in the toasted almonds and the salt. Working quickly and carefully, pour the caramel mixture onto the prepared baking sheet and use a silicone spatula to spread it into a thin layer. (The caramel will be very hot; be very careful not to touch it or splatter it—you might want to ask an adult for help.) Set the baking sheet aside until the caramel hardens, about 30 minutes. Break the brittle into small shards. Arrange the almond brittle on top of the chilled cake and serve.
TIP To get perfect slices when serving the cake, dip a long serrated knife (like a bread knife) into warm water, wipe it clean, then slice. Repeat the dip-and-wipe before every slice.
CHOCOLATE-HAZELNUT

Judge Christina Tosi called Mikey’s cheesecake “just divine” and said it was easily one of the best desserts she’d tasted on the show, ever! Crunchy, creamy, fudgy, and amped up with a generous helping of rich hazelnut spread, this decadent take on chocolate cheesecake won him the coveted golden apron and secured his place in the Season 6 semifinals. Adding ground hazelnut flour to the cookie crust adds another layer of flavor and ties together with the hazelnut elements in the filling and the toasted hazelnuts on top. Just remember: Because cheesecakes need hours to chill before serving, you’ll need to plan accordingly.
SERVES 10 TO 12
CHOCOLATE-HAZELNUT CRUST
Nonstick pan spray or butter
28 chocolate sandwich cookies (such as Oreos), crushed
1 cup hazelnut flour, store-bought or homemade (see Tip)
½ teaspoon kosher salt
6 tablespoons (¾ stick) unsalted butter, melted
CHOCOLATE-HAZELNUT CHEESECAKE FILLING
8 ounces bittersweet chocolate, finely chopped
½ cup hazelnut spread (such as Nutella), at room temperature
3 (8-ounce) bricks cream cheese, at room temperature
1 cup sour cream
1 cup sugar
⅓ cup unsweetened Dutch-process cocoa powder
½ teaspoon kosher salt
1 tablespoon pure vanilla extract
4 large eggs
HAZELNUT GANACHE
½ cup bittersweet chocolate chips
¼ cup heavy cream
1 tablespoon chocolate-hazelnut spread
¼ teaspoon kosher salt
½ cup chopped hazelnuts, for garnish
-
Make the chocolate-hazelnut crust: Preheat the oven to 325°F. Grease a 9-inch springform pan with pan spray and wrap the bottom tightly with two layers of foil.
-
In a food processor, pulse the cookies until finely ground. Add the hazelnut flour, salt, and melted butter and pulse until it is evenly combined and has the texture of damp sand, about three 5-second pulses. Pour the crumb mixture into the prepared pan and use the bottom of a spoon or measuring cup to press it evenly over the bottom and about ½ inch up the sides of the pan. Bake until firm, about 12 minutes, then transfer to a wire rack to cool. Keep the oven at 325°F.
-
Make the chocolate-hazelnut cheesecake filling: In a heatproof medium bowl set over a pan of simmering water (make sure the bottom of the bowl doesn’t touch the water), melt the chocolate, stirring until completely smooth. Add the hazelnut spread and stir until smooth. Using oven mitts, remove the bowl from the pan and set aside to cool to room temperature.
-
In a large bowl, using an electric mixer with the whisk attachment, beat the cream cheese and sour cream on medium-low speed until smooth, about 2 minutes. Beat in the sugar, cocoa powder, salt, and vanilla. Add the eggs one at a time, beating well after each addition and scraping down the sides and bottom of the bowl as needed. Beat in the melted chocolate mixture.
-
Bring a teakettle of water almost to a boil. Pour the batter into the prepared pan and tap gently against the counter to release any air bubbles. Place the pan inside a 9 × 13-inch baking dish. Open the oven and, wearing oven mitts, pull the center rack so it extends out of the oven. Set the baking dish on the oven rack. Pour enough hot water from the teakettle into the baking dish to come halfway up the sides of the springform pan. Bake until the center of the cheesecake is set and the top is no longer shiny, about 1 hour 15 minutes. Turn off the oven and let the cake rest inside for 30 minutes more.
-
Ask an adult to help you remove the baking dish from the oven. Carefully transfer the springform pan to a flat surface and discard the foil. Run a butter knife around the inside of the pan to loosen the edges of the cheesecake. Transfer the pan to a wire rack to cool for 30 minutes, then cover and refrigerate for at least 5 hours or up to 3 days.
-
At least 1 hour before serving, make the hazelnut ganache: Place the chocolate in a heatproof medium bowl. In a small saucepan, bring the cream to a simmer over medium heat. Pour the hot cream over the chocolate and let stand for 1 minute, then stir until smooth. Whisk in the chocolate-hazelnut spread and salt. Set aside to cool for 15 minutes.
-
Release the chilled cheesecake from the springform pan and, with the cake still resting on the metal base, transfer it to a serving dish. Spread the hazelnut ganache over the cake, pushing it to the edges and letting some drizzle down the sides. Return the plated cake to the refrigerator to chill until the ganache has set, 20 to 30 minutes.
-
Meanwhile, in a medium skillet, toast the chopped hazelnuts over medium-high heat, stirring often, until golden and fragrant, about 5 minutes. Turn off the heat and transfer the hazelnuts to a plate to cool.
-
Scatter the toasted hazelnuts over the top of the cake and serve.
TIP This recipe uses hazelnut flour, which is made by grinding whole hazelnuts until they are fine and powdery. Many grocery stores carry hazelnut flour in the alternative flour section of the baking aisle—but if you have a high-powered blender, you can also make your own!
DOUBLE-VANILLA


Moist, tender pound cake is one of the first treats many MasterChef Junior contestants learn to bake. This classic version includes a splash of buttermilk and a double dose of vanilla for big flavor. Serve it thickly sliced and pair it with whipped cream and fresh fruit—or take a page out of Cydney’s playbook and make it the centerpiece of a fondue dessert buffet.
MAKES ONE 8½ × 4½-INCH LOAF
1½ sticks (6 ounces) unsalted butter at cool room temperature (see MasterChef Lesson, this page), plus 1 tablespoon softened butter for the pan
2 cups all-purpose flour
1½ teaspoons baking powder
½ teaspoon kosher salt
1 cup sugar
2 teaspoons pure vanilla extract
1 vanilla bean, split lengthwise
3 large eggs, at room temperature
¾ cup buttermilk
-
Preheat the oven to 325°F. Grease an 8½ × 4½-inch loaf pan with the softened butter and line it with parchment paper, leaving a few inches of overhang on both of the long sides. (This will help you lift the loaf out of the pan after baking.)
-
In a medium bowl, whisk together the flour, baking powder, and salt.
-
In a large bowl, using an electric mixer with the paddle attachment, beat 1½ sticks of the cold butter and the sugar on medium-high speed until light and fluffy, about 5 minutes. Add the vanilla extract and use the tip of a paring knife to scrape the vanilla seeds out of the vanilla pod into the bowl. Beat on medium-low speed to combine. Add the eggs one at a time, beating well after each addition and scraping down the sides and bottom of the bowl as needed. Remove the bowl from the mixer and use a rubber spatula to add the flour mixture in three additions, alternating with the buttermilk, beginning and ending with the flour. Scrape down the sides of the bowl and stir until just combined; do not overmix. (It is okay if the batter still looks lumpy.)
-
Scrape the batter into the prepared pan. Bake until the cake is tall, domed, and golden and a toothpick inserted into the tallest part of the cake comes out clean, about 1 hour 15 minutes. Let the cake rest in the pan for 20 minutes, then use the parchment to lift it out onto a wire rack to cool completely. Store at room temperature, tightly wrapped in plastic wrap, for up to 1 week.
PINEAPPLE-LYCHEE


An exotic twist on traditional pineapple upside-down cake, this recipe inspired lots of applause in the Season 6 canned food challenge, especially from judge Christina Tosi, who called the coconut milk sponge cake “to die for!” Avery’s choice to add chopped lychees to the batter helps make the dish extra moist and sweet, but if you have trouble tracking down a can, you can substitute an equal amount of crushed pineapple (about ½ cup) and leave them off the top.
SERVES 8
Nonstick pan spray
1⅓ cups all-purpose flour
2 teaspoons baking powder
½ teaspoon kosher salt
½ cup full-fat canned coconut milk
2 teaspoons pure vanilla extract
1 (20-ounce) can juice-packed pineapple rings, drained, ¼ cup juice reserved
1 (20-ounce) can pitted lychees, drained
1½ cups granulated sugar
½ cup vegetable oil
1 large egg
4 tablespoons (½ stick) unsalted butter
⅓ cup packed light brown sugar
½ teaspoon ground ginger
⅛ teaspoon ground allspice
-
Preheat the oven to 375°F. Lightly grease a 9-inch round cake pan with pan spray.
-
In a small bowl, whisk together the flour, baking powder, and salt. In another small bowl, combine the coconut milk, vanilla, and reserved pineapple juice. Set aside 8 whole lychees, then coarsely chop the remainder and transfer to a small bowl.
-
In a large bowl, using an electric mixer fitted with the whisk attachment, beat ½ cup of the granulated sugar and the oil on medium-high speed until smooth and slightly thickened, about 2 minutes. Beat in the egg and the coconut milk mixture. Reduce the mixer speed to low and gradually add the flour mixture, until just combined. Fold in the lychees and set aside.
-
In a small skillet, melt the butter over medium heat. Stir in the brown sugar, ginger, and allspice until incorporated. Transfer the mixture to the prepared cake pan (don’t worry if the mixture clumps or separates—it will loosen during baking). Place one pineapple ring in the center of the pan, then add the others in a circle around it. Place a whole lychee in the center of each ring.
-
Spread the batter over the fruit to the edges of the pan. Bake until the cake is set and a toothpick inserted into the center comes out clean, 30 to 35 minutes. Let the cake rest in the pan for 3 minutes, then carefully invert it onto a serving plate. Wait 1 minute, then lift the pan away, taking care to avoid any steam that escapes. Serve warm or at room temperature. Refrigerate leftovers for up to 3 days.
QUADRUPLE-GINGER

This dark, sticky cake, inspired by cupcakes that Samuel made in Season 2, may look unassuming, but thanks to a four-part dose of ginger—in the form of ground ginger, fresh ginger, candied ginger, and even ginger beer—it’s absolutely bursting with complex, spicy flavor. A final flurry of confectioners’ sugar sprinkled on before serving makes the cake look like something right out of a winter wonderland!
SERVES 8
Nonstick pan spray
1½ cups all-purpose flour
½ teaspoon baking powder
2 tablespoons ground ginger
½ teaspoon freshly ground black pepper
¼ teaspoon kosher salt
¾ cup spicy ginger beer
½ teaspoon baking soda
⅔ cup packed light brown sugar
½ cup plus 1 tablespoon robust molasses
¼ cup granulated sugar
2 large eggs
⅓ cup vegetable oil
1 tablespoon plus 1 teaspoon grated fresh ginger
¼ cup chopped candied ginger
Confectioners’ sugar, for dusting
-
Preheat the oven to 350°F. Coat a 9-inch round baking pan with pan spray and line it with a round of parchment paper (see Tip, this page).
-
In a large bowl, whisk together the flour, baking powder, ground ginger, pepper, and salt.
-
In a medium saucepan, bring the ginger beer to a low simmer over medium heat. Remove from the heat and stir in the baking soda, stirring constantly as it foams. Add the brown sugar, molasses, and granulated sugar and stir until well combined. Whisk in the eggs, oil, and fresh ginger.
-
Using a rubber spatula, scrape half the ginger beer mixture into the flour mixture and stir until mostly combined. Add the remaining ginger beer mixture and stir until just smooth. Transfer the batter to the prepared pan and smooth out the top.
-
Bake for 10 minutes, then quickly remove the pan from the oven and sprinkle the surface with the candied ginger. Return the pan to the oven and bake until the cake is set, springy to the touch, and golden on top, 20 to 25 minutes more. Let the cake rest in the pan for 5 minutes, then invert it onto a wire rack to cool completely.
-
To serve, dust the cake with confectioners’ sugar and slice it into wedges. The cake will keep, covered, at room temperature for up to 5 days.
TIPS Allowing the cake to bake a bit before sprinkling the candied ginger on top helps prevent the pieces from settling to the bottom of the pan.
Remember to pop a knob of ginger in the freezer for an hour before grating it to make the process a whole lot easier.
MEXICAN HOT CHOCOLATE

WITH CARAMEL AND KETTLE CORN
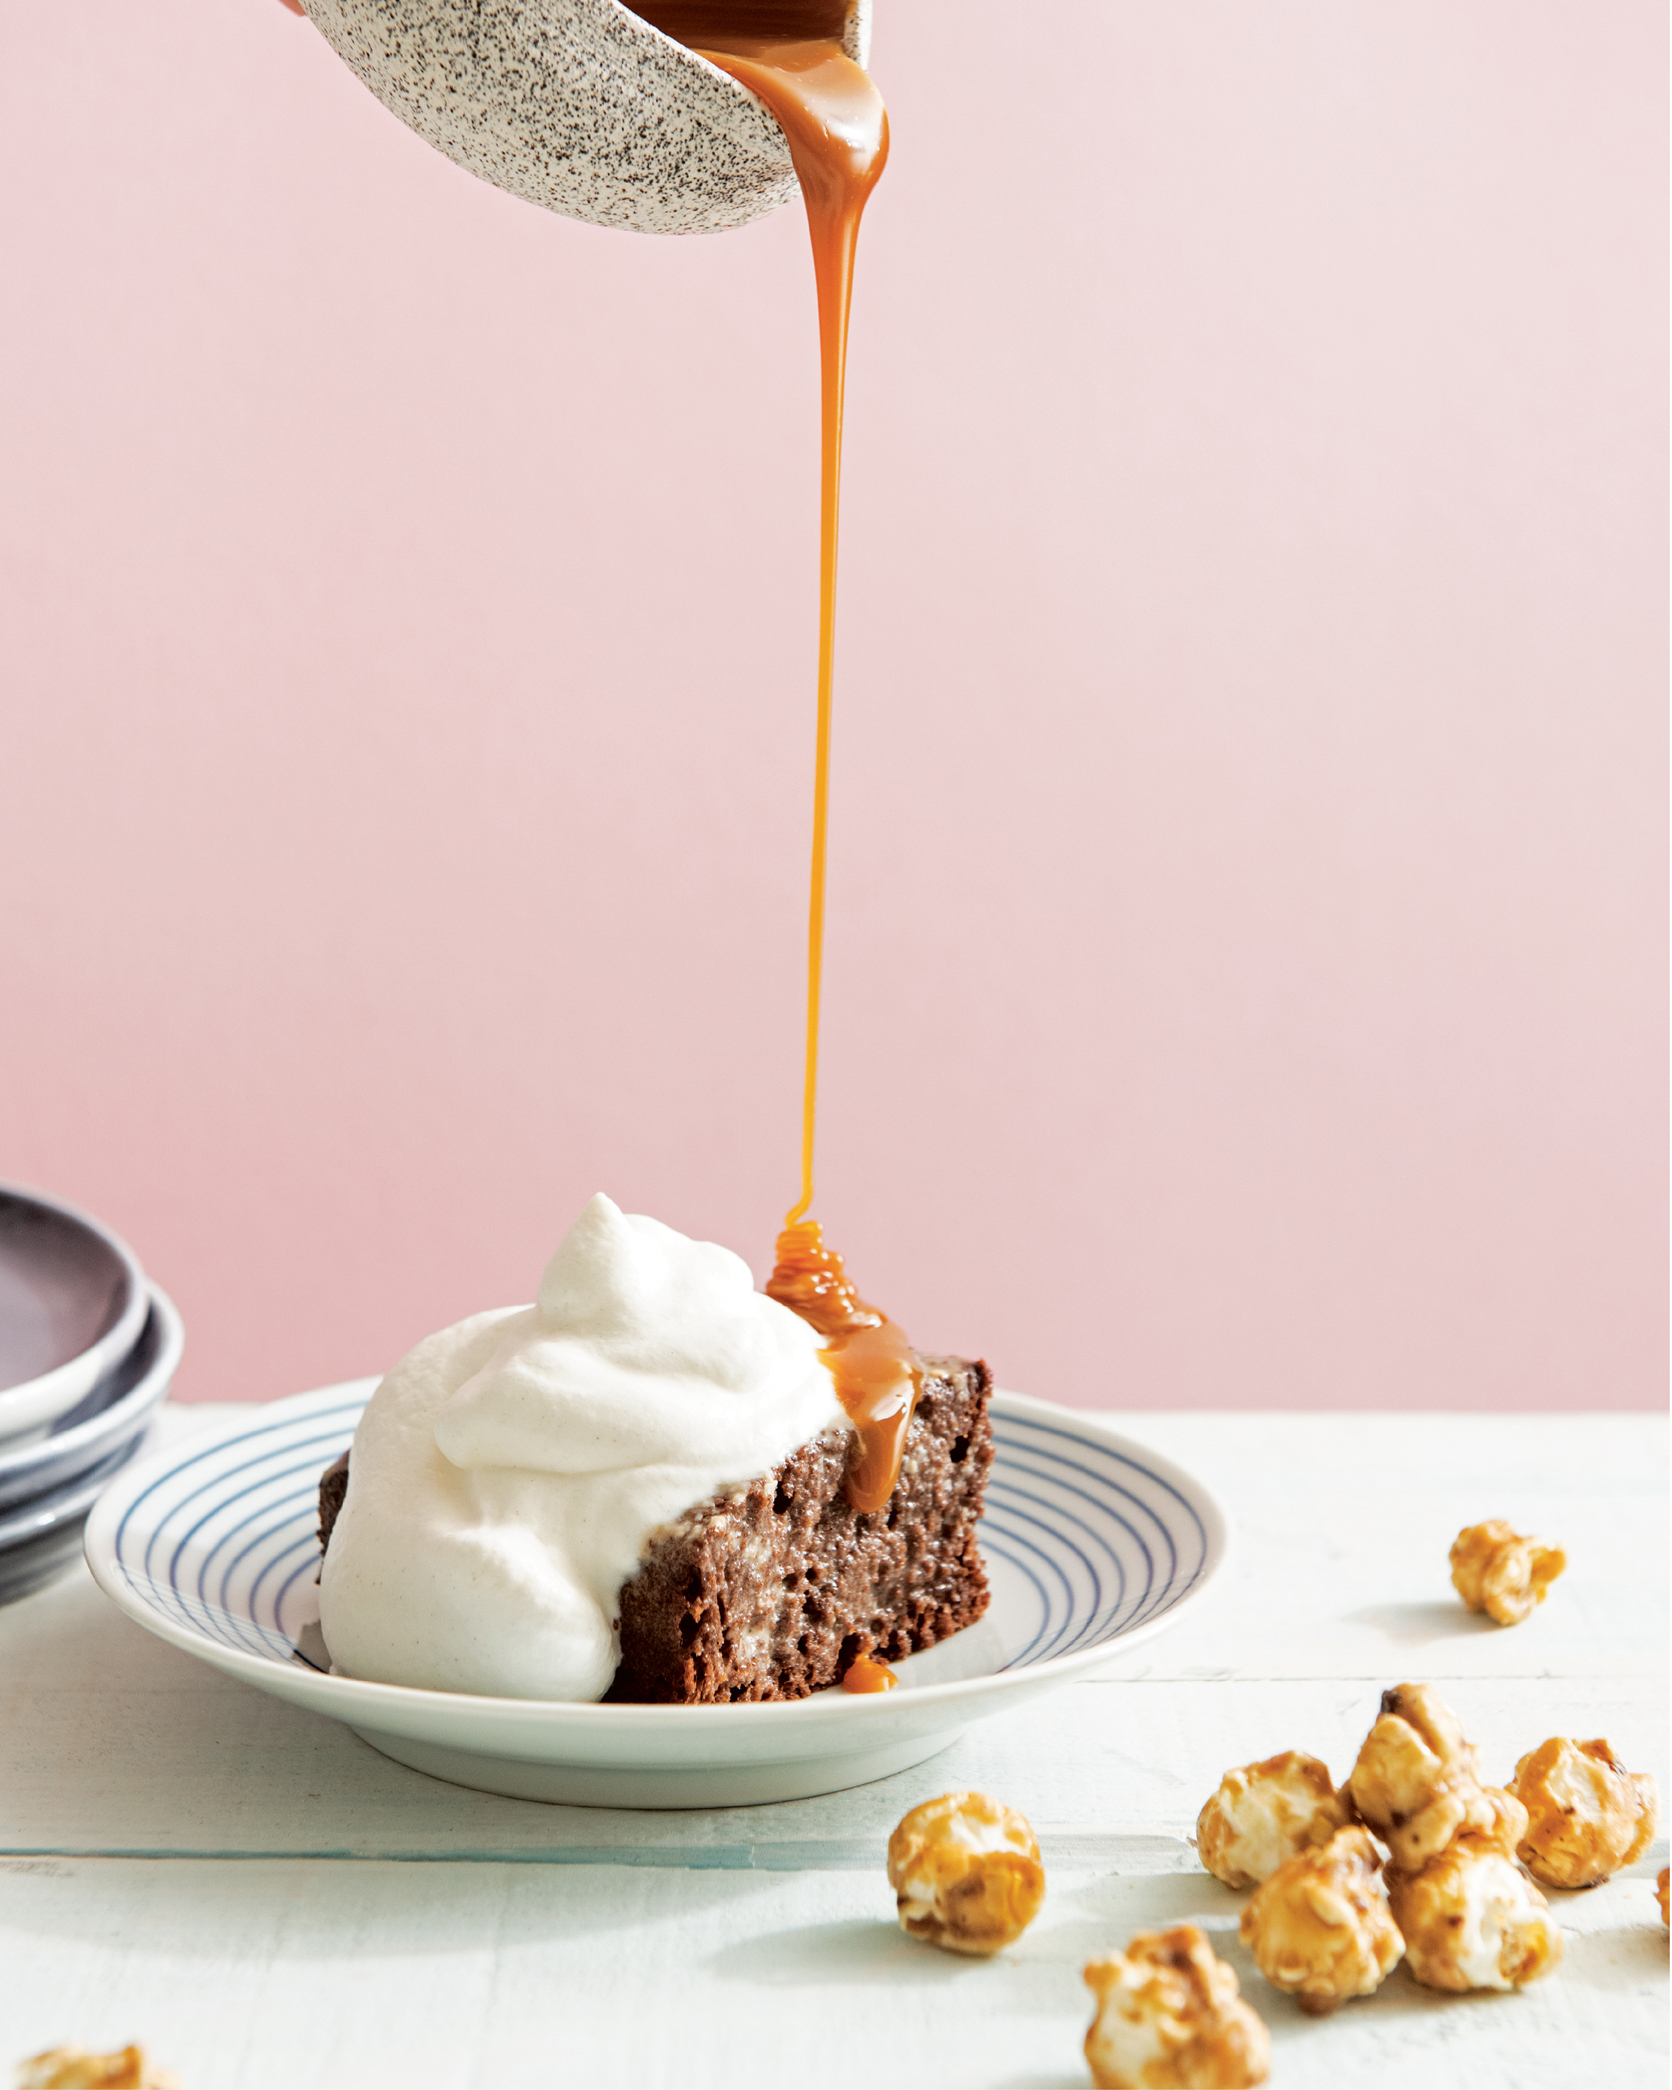

Tres leches cake is a classic Latin American dessert made by soaking sponge cake with three kinds of milk—condensed, evaporated, and cream—until it is sweet and tender! When Avery brought her imaginative twist on tres leches cake to the judges’ table during the Season 6 finale, judge Christina Tosi congratulated her on its perfectly rich, luscious texture. This version gets a kick from cayenne pepper, which is nice with the cocoa, but you can omit it if you prefer.
SERVES 12
HOT CHOCOLATE TRES LECHES CAKE
Nonstick pan spray
1¼ cups all-purpose flour
½ cup plus 2 tablespoons unsweetened Dutch-process cocoa powder
1 tablespoon espresso powder
1½ teaspoons ground cinnamon
½ to ¾ teaspoon cayenne pepper, to taste
1½ teaspoons baking powder
¼ teaspoon kosher salt
6 large eggs, at room temperature
1¼ cups granulated sugar
⅓ cup whole milk
1 teaspoon pure vanilla extract
TRES LECHES CREAM
1 (14-ounce) can sweetened condensed milk
1 (12-ounce) can evaporated milk
½ cup heavy cream
2 tablespoons chocolate syrup
½ teaspoon kosher salt
CINNAMON WHIPPED CREAM
2½ cups heavy cream
2 tablespoons confectioners’ sugar
1 teaspoon pure vanilla extract
½ teaspoon ground cinnamon
OPTIONAL GARNISHES
Store-bought caramel sauce, warmed
Store-bought kettle corn
-
Make the hot chocolate tres leches cake: Preheat the oven to 350°F. Generously grease a 9 × 13-inch baking dish with pan spray.
-
In a medium bowl, whisk together the flour, cocoa powder, espresso powder, cinnamon, cayenne, baking powder, and salt. Set aside.
-
Separate the eggs, placing the whites in one large bowl and the yolks in another large bowl. To the eggs yolks, add 1 cup of the granulated sugar and use an electric mixer fitted with the whisk attachment to beat the mixture until creamy and thick, about 3 minutes. With the mixer running, drizzle in the milk and vanilla and beat until combined, about 30 seconds. Set the bowl aside and carefully wash and dry the whisk attachment.
-
Using the mixer fitted with the clean, dry whisk attachment, beat the egg whites on high speed until light and frothy, 2 to 3 minutes. Add the remaining ¼ cup granulated sugar and beat until the mixture forms stiff, glossy peaks, about 2 minutes more.
-
Lightly whisk half the flour mixture into the egg yolk mixture, then gently fold in half the egg whites. Repeat with the remaining flour and egg whites, using a gentle touch, until everything is combined.
-
Scrape the batter into the prepared baking dish and smooth the surface. Bake until a toothpick inserted into the center of the cake comes out clean, about 22 minutes. Transfer the baking dish to a wire rack and let cool completely.
-
Make the tres leches cream: In a large saucepan, whisk together the condensed milk, evaporated milk, heavy cream, chocolate syrup, and salt until smooth. Cook over medium heat, stirring often, until the mixture is bubbling at the edges and just shy of a boil, about 5 minutes (don’t walk away—cream has a tendency to boil over if not watched!). Remove from the heat.
-
Pierce the cooled cake all over with a very thin, sharp knife or a skewer, spacing the holes 1 inch apart and making sure they pierce to the bottom of the pan. Starting at the edges of the cake and circling your way toward the center, pour the warm tres leches cream over the cake, pausing to allow any cream that pools up to be absorbed. Continue until you have used all the cream and the cake is fully and evenly saturated. Cover the baking dish with plastic wrap and refrigerate until thoroughly chilled, at least 4 hours or up to 24 hours.
-
Before serving, make the cinnamon whipped cream: In a large bowl, using an electric mixer fitted with the whisk attachment, beat the heavy cream on high speed until it begins to thicken, about 1 minute. Slowly sprinkle in the confectioners’ sugar, vanilla, and cinnamon and beat until the cream thickens and holds peaks, 1 to 2 minutes more.
-
To serve, cut the cake into 12 squares. Top each square with a generous dollop of whipped cream. If desired, drizzle the plate with caramel sauce and garnish with kettle corn.

If there’s one thing the MasterChef Junior kids agree on, it’s that nothing screams “Happy Birthday!” like a colorful confetti cake. And when the homemade version is this fun and simple to make, you’ll definitely want to ditch the boxed mix! A double dose of sprinkles—stirred into the fluffy yellow batter and strewn all over the vanilla buttercream frosting—are the secret to giving the cake its party-perfect look. Rainbow sprinkles are traditional, but if you’d like your cake to be even more personalized, try making your own sprinkle blend!
SERVES 12
CONFETTI CAKE
Nonstick pan spray
3 cups cake flour
2½ teaspoons baking powder
¾ teaspoon kosher salt
2 sticks (8 ounces) unsalted butter, at room temperature
1½ cups granulated sugar
4 large eggs, at room temperature
1 cup whole milk
1 tablespoon pure vanilla extract
1 cup multicolored sprinkles
VANILLA BUTTERCREAM
2 sticks (8 ounces) unsalted butter, at room temperature
5 cups confectioners’ sugar
2 teaspoons pure vanilla extract
¼ cup heavy cream
¼ teaspoon kosher salt
2 cups multicolored sprinkles, for garnish
-
Make the confetti cake: Preheat the oven to 350°F. Grease three 8-inch round cake pans with pan spray and line the bottoms with rounds of parchment paper (see Tip, this page).
-
In a medium bowl, whisk together the cake flour, baking powder, and salt.
-
In a large bowl, using an electric mixer with the paddle attachment, beat the butter and granulated sugar on medium-high speed until light and fluffy, about 5 minutes. Add the eggs one at a time, beating well after each addition and scraping the bowl as needed. Reduce the mixer speed to low and add the flour mixture in two additions, alternating with the milk. Add the vanilla and beat until just combined. Fold in the sprinkles. Divide the batter evenly among the prepared pans.
-
Bake until the cakes are golden, the center resists light pressure, and a toothpick inserted into the center comes out clean, 25 to 30 minutes. Let the cakes rest in the pans for 10 minutes, then unmold the cakes onto wire racks to cool completely.
-
Make the vanilla buttercream: Use an electric mixer with the paddle attachment. Beat the butter on medium-high speed until light and fluffy, about 2 minutes. Reduce the speed to medium-low and add the confectioners’ sugar, about ½ cup at a time, beating well after each addition and scraping the bowl as needed. Add the vanilla, cream, and salt and beat on high speed until the frosting is light and fluffy, about 3 minutes. Cover and refrigerate the frosting until ready to use. (The buttercream will stiffen as it chills; to get it back to spreading consistency, let it sit at room temperature before whisking.)
-
To assemble the cake, place one layer, flat-side up, on a platter or cake stand. Using an offset spatula, spoon about ¾ cup of the buttercream onto the cake and spread it into an even layer. Top with a second layer of cake, flat-side up, and another ½ to ¾ cup of buttercream. Top with the third cake layer, flat-side up, and use the remaining buttercream to frost the top and sides. Decorate with sprinkles, moving around the cake until the surface is evenly covered. Refrigerate until ready to serve or for up to 24 hours. Let the cake come to room temperature before serving. Leftovers can be stored, covered, in the refrigerator for up to 5 days.
TIP For more on assembling and frosting layer cakes, see the MasterChef Lesson on this page.
— MASTERCHEF LESSON —
BUILDING A

Do you dream of baking tall, graceful cakes dressed up with buttercream and perfect frosting rosettes and swirls—but always seem to wind up with something that looks more like the leaning tower of Pisa?
Learning how to assemble and decorate layer cakes like a pro takes patience. But knowing a few simple tricks can make the process a whole lot less painful.
USE THE RIGHT TOOLS
First, start with a long, serrated knife to trim uneven tops and slice layers horizontally into two or three thinner ones (this is also known as “torting”). A cake stand is great, too, not only for showing off your cake but also for supporting the layers and making it easier to get up close to the bottom and sides while you’re frosting. If you don’t have a cake stand, you can improvise one by setting a plate on a stack of books or an overturned bowl. Place strips of parchment paper on the cake stand before setting the cake layer on top to protect the stand from drips and spills (and the strips are easy to remove and toss away before serving). A small offset spatula helps you frost even the littlest crevices cleanly and smoothly. Finally, make sure to plan ahead and clear some space in your refrigerator: You’re going to want plenty of room to let the cake chill without fear of it being smushed by a teetering ketchup bottle!
COOL CAKES COMPLETELY
Because cakes are fragile when they’re warm, always let them cool in the pans on a wire rack for 10 to 15 minutes before trying to unmold them. After the layers are out of the pans, let them cool to room temperature, then wrap them tightly in plastic wrap and chill them in the refrigerator for at least 1 hour before continuing. Pro tip: Chilled cake layers are much easier to cut and trim.
TRIM THE LAYERS
When you’re ready to begin assembly, clear your work area and make sure your frosting and utensils are nearby. Inspect the chilled layers for any cracks or other issues. If the layers have little domes on top, use your serrated knife to even them off (and, of course, help yourself to the scraps!). For safety’s sake, when trimming the layers horizontally, always steady the cake by placing your hand on top of it, not on the side. This will spare your fingers in case the knife slips. To slice the layers horizontally into two thinner layers, hold a ruler perpendicular to the cake and measure upward from the bottom. Use four toothpicks to mark the midpoint, inserting one pick each at the twelve o’clock, three o’clock, six o’clock, and nine o’clock positions. Using the toothpicks as a guide, use a long serrated knife to gently slice the cake into two even sections.
BUILD FROM THE BOTTOM UP!
Invert the first layer of cake onto the stand so that the flat bottom faces up and the trimmed side faces down—this gives you a perfectly flat surface to frost. Use an offset spatula to put a large dollop of frosting (about ¾ cup) on the center of the layer, then work it around until it is smooth and covers all the way to the edges. Place the next layer on top of the frosting, flat-side up, and repeat. Inspect your architecture: Is the frosting between layers even? Does the cake seem to be leaning? Get in there and make any adjustments before proceeding. Sometimes cakes start leaning when the frosting gets too soft, allowing the structure to shift. If you notice that happening, pause and chill the cake for a few minutes to allow the frosting to firm up again, and ease it into proper position before placing the last layer of cake on top with its flat side facing up.
FROST LIKE A PRO
Now it’s time to tackle the rest of the frosting. Use an offset spatula to smooth a thin layer of icing all over the cake, starting with the top, and then frosting the sides. Don’t worry about looks yet: This is just the “crumb coat”—the underlayer that helps seal in the crumbs and keeps them from marking the finished cake. (Cakes that have been crumb-coated always look 100 percent neater than ones that haven’t—so trust us, you don’t want to skip this step!) Place the cake in the refrigerator for about 15 minutes to let the crumb coat harden, then finish it with a final layer of frosting. Start by dolloping a large scoop of frosting on the top of the cake and rotate the cake stand as you work the spatula over the top, smoothing the surface in a large, even swirl. Dab a scoop of frosting onto the side of the cake and, holding an offset spatula (or butter knife) perpendicular to the stand, work it into a smooth layer. Add frosting and repeat until the sides are completely covered. Give the top one more look and make any touch-ups. Add any last-minute garnishes or sprinkles—and then stand back and admire your handiwork!

Step 1: When slicing or trimming layers, steady the cake by placing your hand on top of it, not on the side.

Step 2: Use an offset spatula to smooth a thin layer of icing all over the cake. This is called the crumb coat.
Step 3: To smooth the surface, rotate the plate or cake stand as you work your spatula over the top of the cake in a large, even swirl.
APPLE BUTTER

WITH CINNAMON-SUGAR

Beautiful domed Bundt cakes are a classic homestyle American dessert and one of Shayne’s favorite baking projects. A generous helping of apple butter in the batter and a sparkling coating of cinnamon-sugar makes this version taste just like a giant apple cider doughnut!
SERVES 10 TO 12
Nonstick pan spray
2½ cups all-purpose flour
2 teaspoons baking powder
½ teaspoon baking soda
1 tablespoon plus 2 teaspoons ground cinnamon
1½ teaspoons nutmeg, preferably freshly grated
½ teaspoon kosher salt
1¼ cups apple butter
1 tablespoon pure vanilla extract
1 stick (4 ounces) unsalted butter, at room temperature
1 cup sour cream
¼ cup packed light brown sugar
1 cup plus 3 tablespoons granulated sugar
4 large eggs
⅔ cup confectioners’ sugar
-
Preheat the oven to 350°F. Generously coat a 12-cup Bundt pan with pan spray.
-
In a medium bowl, whisk together the flour, baking powder, baking soda, 1 tablespoon of the cinnamon, the nutmeg, and the salt. In a small bowl, stir together the apple butter and the vanilla. Set both aside.
-
In a large bowl, using an electric mixer with the paddle attachment, beat the butter, sour cream, brown sugar, and 1 cup of the granulated sugar on medium-high speed until very light and smooth, about 6 minutes. Reduce the mixer speed to medium-low and add the eggs one at a time, scraping down the sides and bottom of the bowl as needed, about 2 minutes.
-
Reduce the mixer speed to low and add the flour in two additions, alternating with the apple butter mixture. Beat just until combined. Scrape the batter into the prepared pan and smooth the surface with a rubber spatula.
-
Bake until a toothpick inserted into the center of the cake comes out clean, about 55 minutes. Let the cake rest in the pan for 10 minutes, then turn it out onto a wire rack to cool completely.
-
In a small bowl, combine the remaining granulated sugar and cinnamon. In another small bowl, combine the confectioners’ sugar and 2 tablespoons water and stir until smooth. Brush the cake with the confectioners’ sugar mixture, then immediately sprinkle the cinnamon-sugar over the cake, turning it so that all sides get coated. Serve warm or at room temperature.
CHOCOLATE-CITRUS

WITH ORANGE GLAZE AND WHIPPED RICOTTA

This heady, citrus-scented cake—inspired by the one Che made for the big Season 7 finale—looks and tastes so sophisticated, it’s hard to believe it requires just two bowls and can be mixed by hand in a matter of minutes. A touch of almond flour in the batter lends it a subtle crumbly texture and a faint nuttiness that pairs beautifully with the bitter chocolate, fruity olive oil, and rich ricotta cream.
SERVES 10
CHOCOLATE-CITRUS OLIVE OIL CAKE
Butter or nonstick pan spray
1½ cups all-purpose flour
½ cup almond flour
¼ cup unsweetened Dutch-process cocoa powder
1¾ cups granulated sugar
¾ teaspoon kosher salt
1 teaspoon baking powder
½ teaspoon baking soda
1⅓ cups extra-virgin olive oil
3 large eggs
1¼ cups whole milk
2 tablespoons grated orange zest
½ cup fresh orange juice
2 teaspoons orange extract
ORANGE GLAZE
1½ cups confectioners’ sugar
1 tablespoon grated orange zest
2 tablespoons fresh orange juice
WHIPPED RICOTTA
1 cup whole-milk ricotta cheese
1 teaspoon extra-virgin olive oil
1 teaspoon grated orange zest
1 teaspoon fresh orange juice
½ cup confectioners’ sugar
Chopped candied orange peel, for garnish (optional)
-
Make the chocolate-citrus olive oil cake: Preheat the oven to 350°F. Grease the bottom and sides of a 9-inch springform pan with butter or pan spray and line the bottom with a round of parchment paper (see Tip).
-
In a medium bowl, whisk together the all-purpose flour, almond flour, cocoa powder, granulated sugar, salt, baking powder, and baking soda. In a large bowl, whisk together the olive oil, eggs, milk, orange zest, orange juice, and orange extract until smooth and glossy. Gently stir the flour mixture into the oil mixture until just combined.
-
Pour the batter into the prepared pan and bake until the cake is domed and springy and a toothpick inserted into the center comes out clean, about 1 hour 10 minutes. Let the cake rest in the pan for 10 minutes, then run a butter knife around the edges, release the springform ring, and transfer the cake (still on the metal base) to a wire rack to cool completely, about 1 hour.
-
Make the orange glaze: In a medium bowl, whisk together the confectioners’ sugar, orange zest, and orange juice until smooth and opaque.
-
Transfer the cooled cake to a serving platter or cake stand. Spoon the glaze over the top of the cake and let it drip over the sides. Let rest until the glaze has set, about 20 minutes. (If your kitchen is especially warm or humid, transfer the cake to the refrigerator to allow the glaze to firm up.)
-
Make the whipped ricotta: In a food processor, combine the ricotta, olive oil, orange zest, orange juice, and confectioners’ sugar. Process until smooth, about 1 minute.
-
Spoon the whipped ricotta onto the center of the cake. Garnish with candied orange peel (if using, or the candied dried orange slices from the Orange Blossom Cupcakes on this page) and serve immediately.
TIP It’s easy to make a perfectly round parchment liner to fit your pan. Here’s how: Tear off a piece of parchment that is slightly larger than your pan. Fold it in half from top to bottom, then in half again from left to right. You will have a squat rectangle. Fold one side of the rectangle over, corner to corner, to form a triangle (sort of like if you were making a paper airplane). Fold the triangle over again, corner to corner, so you have what looks like a long, skinny funnel with a pointed tip. Place the parchment against the bottom of the pan with the pointed tip touching the center. Mark the parchment where it meets the edge of the pan, then cut the parchment just inside that line. Unfold and voilà: a perfect round!
— MASTER THIS —
THE EASIEST

This ridiculously easy, seriously sinful chocolate cake should come with a warning—because once you realize how dangerously simple it is to make, you may find yourself inventing a new cake-worthy occasion every day. (Callbacks for the school play? Deserves a slice! Made the semifinals in soccer? Cupcake time!) Unsweetened Dutch-process cocoa gives the batter a deep dark bite that’s balanced by the caramel sweetness of brown sugar. Adding a spoonful of espresso powder boosts the chocolate flavor without overpowering it—but if you’d rather leave it out, it’s not essential. All in all, the process may take a minute more work than a store-bought mix—but the results are more than worth it! This cake can also be used to make the Chocolate Layer Cake with Spiced Ganache and Raspberry-Chocolate Drizzle (this page).
MAKES ONE 9 × 13-INCH SHEET CAKE, TWO 9-INCH ROUND CAKE LAYERS, OR 24 CUPCAKES
Butter or nonstick pan spray
2 cups all-purpose flour
1 cup unsweetened Dutch-process cocoa powder
1⅓ cups granulated sugar
⅔ cup packed light brown sugar
1 tablespoon espresso powder (optional)
1½ teaspoons baking powder
1½ teaspoons baking soda
1 teaspoon kosher salt
2 large eggs
1 cup buttermilk
½ cup vegetable oil
2 teaspoons pure vanilla extract
1 cup boiling water
-
Preheat the oven to 350°F. Use butter or pan spray to grease one 9 × 13-inch baking pan, two 9-inch round cake pans, or two 12-cup muffin tins.
-
In a large bowl, whisk together the flour, cocoa powder, granulated sugar, brown sugar, espresso powder (if using), baking powder, baking soda, and salt. In a 4-cup measuring cup, whisk together the eggs, buttermilk, oil, and vanilla. Pour the egg mixture into the flour mixture and use an electric mixer fitted with the whisk attachment, to beat on medium-high speed until well combined, about 1 minute. Add the boiling water and beat briefly on medium-low speed to combine. (Don’t be concerned if the batter seems very loose; that’s the way it is supposed to be.)
-
Pour the batter into the prepared pan(s). Bake until set and springy and a toothpick inserted into the center comes out clean: about 35 minutes for sheet cakes or layer cakes or 25 minutes for cupcakes. Let the cakes rest in the pan(s) for 10 minutes, then remove from the pan (if making layers or cupcakes) and transfer to a wire rack to cool completely.
-
Top with the frosting of your choice. Maybe marshmallow buttercream (this page) or salted caramel frosting (this page)? Decorate as desired.


WITH SPICED GANACHE AND RASPBERRY-CHOCOLATE DRIZZLE

This towering chocolate cake, inspired by the one Dara presented to the judges in Season 1, is made up of three complementary parts: moist, tender chocolate cake layers; a light yet rich whipped chocolate ganache infused with a kick of cinnamon and cayenne; and a tangy raspberry ganache drizzle. Judge Graham Elliot told Dara she “really hit it out of the park” and complimented her balanced use of spices and how the raspberry brings out the floral, fruity flavors in the chocolate. To get a tall, four-layer look that’s packed with fudgy frosting, we baked two cake rounds and split each one in half horizontally—but if you’d like to leave them whole for a two-layer cake, it will still be an impressive sight!
SERVES 12
The Easiest Chocolate Cake (this page), baked as two 9-inch layers and cooled
SPICED GANACHE
4 cups bittersweet chocolate chips
2½ cups heavy cream
1 teaspoon ground cinnamon
½ teaspoon cayenne pepper
1 teaspoon kosher salt
RASPBERRY-CHOCOLATE DRIZZLE
½ cup bittersweet chocolate chips
2 tablespoons seedless raspberry jam
¼ cup heavy cream
1 cup fresh raspberries, for garnish
-
Bake and cool the cake layers as directed on this page.
-
Make the spiced ganache: Place the chocolate chips in a heatproof medium bowl. In a small saucepan, bring the cream to a simmer over medium heat. Pour the hot cream over the chocolate chips and let stand for 1 minute, then sprinkle in the cinnamon, cayenne, and salt and stir until smooth. Set the ganache aside until cool (the consistency should be similar to toothpaste), about 1½ hours. Once cooled, beat the ganache with an electric mixer fitted with the whisk attachment until light, fluffy, and nearly doubled in volume, about 4 to 6 minutes.
-
To assemble the cake, use a long serrated knife to slice each layer in half horizontally so that you are left with 4 thinner layers (see this page for more on this technique; you can also leave the layers whole for a two-layer cake). Place one layer on a serving platter or cake stand, flat-side up. Using an offset spatula, spoon about ¾ cup of the ganache onto the center of the cake and spread it into an even layer. Top with a second layer of cake, flat-side up, and another ½ to ¾ cup of the ganache. Repeat with a third layer of cake and another ½ to ¾ cup of the ganache, then top with the final cake layer, flat-side up. If desired, make a “crumb coat” (see this page) by smoothing a thin layer of the ganache all over the cake, starting with the top, and then chill the cake until firm. After the crumb coat has firmed up, frost the top and sides of the cake. (If not making a crumb coat, simply use the remaining ganache to frost the top and sides of the cake.) Transfer the cake to the refrigerator to allow the ganache to set.
-
Meanwhile, make the raspberry-chocolate drizzle: Place the chocolate chips in a heatproof medium bowl. In a small saucepan, bring the raspberry jam and cream to a simmer over medium heat, whisking until the jam is melted and smooth. While still hot, pour the cream mixture over the chocolate chips. Let stand for 1 minute, then stir until smooth. Set aside for 20 minutes to cool.
-
Remove the frosted cake from the refrigerator. Slowly spoon the raspberry-chocolate drizzle around the top edge of the cake, letting it drip down over the sides. Garnish the top of the cake with the fresh raspberries. Store leftovers in the refrigerator, loosely wrapped in plastic wrap, for up to 5 days.
TIP For more advice on assembling and frosting layer cakes see the MasterChef Lesson on this page.