
![]() MASTERCHEF LESSON: How to Cream Butter
MASTERCHEF LESSON: How to Cream Butter
Gluten-Free Peanut Butter Cookies
Chocolate-Covered Oatmeal Raisin Cookies with White Chocolate Drizzle
Spicy Gingerbread Folks with Royal Icing
Earl Grey Madeleines with Grapefruit Glaze
![]() HOME CHALLENGE: Green Tea Macarons with Strawberry Coulis
HOME CHALLENGE: Green Tea Macarons with Strawberry Coulis
VANILLA


Don’t be fooled: These simple sugar cookies pack some big, buttery vanilla flavor. Easy to put together with mostly pantry ingredients, they’re a great family project—just ask Mikey from Season 6, who has been making cut-out cookies like these with his grandmother since he was two years old. The best part: Every time she comes to visit, she brings a surprise new cookie cutter. (What a fun way to start a new collection!) Sturdy and sweet, these cookies are a perfect blank canvas for decorating (bring on the icing) or all on their own, with a mug of cocoa.
MAKES ABOUT 36 (3- TO 4-INCH) COOKIES

2½ cups all-purpose flour, plus more for rolling
¼ teaspoon kosher salt
2 sticks (8 ounces) unsalted butter, at cool room temperature
1 cup granulated sugar
2 large egg yolks
1 tablespoon pure vanilla extract
Sanding sugar, sprinkles, or icing (see Royal Icing, this page) to decorate (optional)
-
In a large bowl, whisk together the flour and salt.
-
In another large bowl and using an electric mixer with the paddle attachment, beat the butter and granulated sugar on medium-high speed until light and fluffy, about 5 minutes. Add the egg yolks and vanilla and beat to combine, about 1 minute more. Reduce the mixer speed to low, scrape down the sides of the bowl, and gradually add the flour, mixing until just combined.
-
Divide the dough into 2 equal portions and press each into a 1-inch-thick disc. Wrap the discs tightly in plastic wrap and refrigerate until firm, about 30 minutes.
-
Position the racks in the upper and lower thirds of the oven and preheat the oven to 375°F. Line two baking sheets with parchment paper.
-
On a lightly floured work surface, roll out one disc of dough into an even ⅛-inch-thick sheet. Cut the dough into shapes using the cookie cutter of your choice. Gather any scraps, press them into a ball, re-roll, and continue cutting out more shapes. (If at any point the dough gets warm or feels limp and sticky, pop it into the refrigerator to chill for a few minutes before continuing.) After re-rolling once, discard the remaining scraps.
-
Arrange the cookies on the prepared baking sheets, leaving at least 1 inch between them. (If you are decorating with sanding sugar, sprinkle it onto the cookies now, before baking, and press it gently to adhere.) Transfer the baking sheets to the refrigerator and chill until the cookies are firm, about 20 minutes.
-
Bake the cookies, switching the pans from top to bottom rack and rotating the pans front to back once halfway through, until there is just a hint of golden color at the edges, about 10 minutes. Let the cookies rest on the baking sheets for 5 minutes, then transfer them to a wire rack to cool completely. Repeat the process with the remaining disc of dough. Cool the cookies completely before decorating with icing and sprinkles. Store the cookies in an airtight container for up to 1 week.

— MASTERCHEF LESSON —

Butter is one of baking’s most elemental ingredients—and how it is used in a recipe is one of the factors that has the biggest effect on how a cookie, cake, or pie turns out. Earlier we saw how the process of “cutting in” cold butter to flour produces light, flaky biscuits, scones, and pastry crusts (see MasterChef Lesson, this page). Here we’re going to look how “creaming” softened butter and sugar results in light, airy cakes and tender cookies.
In a nutshell, “creaming” butter and sugar just means beating room-temperature butter and sugar until the sugar granules get evenly suspended throughout the mixture. The movement of the sugar forces air into the butter, lightening it in color. This helps baked goods rise and gives them a fine, fluffy texture.
When creaming, many recipes call for “room-temperature” butter—but what does that really mean? Ideally, it should be soft but not greasy. If you press firmly on the butter with a fingertip, it should leave an impression, like pressing your finger into very soft clay—it should not squish right into it. (If you wind up with a cake that is too dense and squat, overly warm butter may be the culprit!) If you want to be super-accurate, you can check the temperature of the butter with an instant-read thermometer: Between 64° and 68°F is the sweet spot. The easiest way to get that is to take the butter out of the refrigerator about 30 minutes before you plan to use it.
Though it’s certainly possible to cream butter and sugar by hand, the most effective (and arm-friendly!) way to do it is to use an electric hand mixer or stand mixer with the paddle attachment. Begin by putting the butter in the bowl and beating it on low speed until smooth, about 30 seconds to 1 minute. Then increase the speed to medium-high and slowly add the sugar. Continue beating, pausing to scrape down the sides and bottom of the bowl occasionally, until the butter-sugar mixture has lightened considerably and is smooth and fluffy. This usually takes about 5 minutes—or longer, if you’re doing it by hand!

GLUTEN-FREE


Bursting with peanut butter goodness, these classic cookies have such big old-fashioned flavor that you’d never guess they’re gluten-free! Even better: The recipe is so simple you can do it all in one bowl. Any store-bought creamy peanut butter without a layer of oil on top (in other words, not “natural”) works as a base—or, if you’re feeling creative, you can try swapping in chunky peanut butter for a bit of crunch or almond or cashew butter for a different take. Chilling the dough well before baking makes it easier to handle and helps the cookies hold their shape. And don’t skip making the classic fork-press crisscross design on top before baking—Cydney from Season 5 says you can’t have real peanut butter cookies without it!
MAKES ABOUT 18 (3-INCH) COOKIES
2 cups creamy peanut butter (not “natural,” which has oil on top)
1½ cups packed light brown sugar
½ teaspoon baking soda
½ teaspoon kosher salt
2 large eggs
2 teaspoons pure vanilla extract
-
In a bowl, using an electric mixer with the paddle attachment, beat the peanut butter, brown sugar, baking soda, and salt on medium speed until smooth and well combined, about 3 minutes. Add the eggs, one at a time, beating between additions to incorporate, followed by the vanilla. Beat briefly until just combined. Transfer the bowl to the refrigerator and chill the dough for 30 minutes.
-
Position the racks in the upper and lower thirds of the oven and preheat the oven to 350°F. Line two baking sheets with parchment paper.
-
Shape the dough into balls (about 1½ tablespoons each) and divide them among the prepared baking sheets, leaving about 2 inches between them. Gently press down on the center of each ball with the tines of a fork, creating a crisscross pattern.
-
Bake the cookies, switching the pans from top to bottom rack once halfway through, until they are just golden and slightly crinkled on top, about 15 minutes. Let the cookies cool on the baking sheets for 10 minutes, then transfer them to a wire rack to cool completely. Store the cookies in an airtight container for up to 5 days.
JAMMY


Many of the MasterChef Junior children say they made their first foray into baking while helping their families make holiday cookies—and no festive cookie tray would be complete without a few classic jam-filled thumbprints. Buttery and crumbly, with a lovely warm, nutty flavor from the toasted almond flour, these are seriously hard to resist. Bright-red raspberry and golden apricot jams make lovely fillings, but feel free to swap in any other flavor preserves if you prefer. Just don’t skip rolling the rounds in coarse sugar before baking—it gives the cookies a lovely sparkle and crunch.
MAKES ABOUT 36 COOKIES
1½ cups almond flour
2 sticks (8 ounces) unsalted butter, at cool room temperature
½ cup granulated sugar
1 large egg
1 teaspoon pure vanilla extract
1 teaspoon pure almond extract
1½ cups all-purpose flour
1½ teaspoons baking powder
½ teaspoon kosher salt
½ cup turbinado sugar (such as Sugar In the Raw)
1 cup fruit preserves, such as raspberry jam, apricot jam, or orange marmalade
-
Preheat the oven to 350°F.
-
Line a baking sheet with parchment paper and spread the almond flour on it in an even layer. Toast, stirring often, until the flour is lightly golden and fragrant, about 8 minutes. Remove the pan from the oven and set the almond flour aside to cool. Increase the oven temperature to 375°F and position the racks in the upper and lower thirds of the oven.
-
In a large bowl, using an electric mixer with the paddle attachment, beat the butter and granulated sugar on medium-high speed until light and fluffy, about 5 minutes. Reduce the speed to low, then add the egg, vanilla, and almond extract and beat until combined, scraping down the bowl as needed, about 1 minute. In a large bowl, whisk together the cooled almond flour, all-purpose flour, baking powder, and salt. Gradually add the flour mixture to the butter mixture and stir with a rubber spatula until just combined. Cover the bowl with plastic wrap and refrigerate for 30 minutes.
-
Line two baking sheets with parchment paper. Spread turbinado sugar on a plate or in a bowl. Use a tablespoon to scoop the dough and roll it into 1-inch balls. Roll the balls in the turbinado sugar (you may need to press slightly to get the sugar to adhere) and transfer them to the prepared baking sheets, leaving 2 inches between them.
-
Gently press an indentation into the top of each ball with your finger. (Try to make the indentation deeper than it is wide, as the opening will expand during baking—you may want to use your pinky finger!) Fill each indentation with a small spoonful of preserves.
-
Bake the cookies, switching the pans from top to bottom rack once halfway through, until the cookies are golden around the edges, 15 to 17 minutes. Let the cookies rest on the baking sheets for 5 minutes, then transfer to a wire rack to cool completely. Store in an airtight container for up to 5 days.
CHOCOLATE-COVERED

WITH WHITE CHOCOLATE DRIZZLE

Raisins and chocolate are both awesome additions to old-fashioned oatmeal cookies, and the best part of this moist, chewy version—inspired by one of Ben’s favorite cookie combinations—is that you don’t have to choose just one. Using melted butter and oil, rather than creaming butter and sugar together, means that the batter can be assembled quickly and easily with just two bowls—and makes these cookies perfect for when you need a quick pick-me-up.
MAKES ABOUT 22 COOKIES
2 cups rolled oats
1 cup all-purpose flour
½ teaspoon kosher salt
¼ teaspoon baking soda
½ cup sugar
1½ teaspoons ground cinnamon
4 tablespoons (½ stick) unsalted butter, melted
⅓ cup maple syrup
¼ cup canola oil
1 teaspoon pure vanilla extract
1 large egg
1 cup chocolate-covered raisins
1 cup white chocolate chips
-
Position racks in the upper and lower thirds of the oven and preheat the oven to 375°F. Line two baking sheets with parchment paper.
-
In a large bowl, whisk together the oats, flour, sugar, cinnamon, salt, and baking soda. In a small bowl, whisk together the melted butter, maple syrup, oil, vanilla, and egg. Pour the butter mixture into the flour mixture and stir with a rubber spatula until it forms a sticky dough. Cover the bowl with plastic wrap and refrigerate for 30 minutes.
-
Use a tablespoon to scoop the dough onto the prepared baking sheets, leaving at least 1½ inches between them.
-
Bake the cookies, switching from top to bottom rack once halfway through, until they have spread and are golden and crisp around the edges, about 15 minutes. Let the cookies rest on the baking sheets for 5 minutes, then transfer them to a wire rack to cool completely.
-
Place the white chocolate chips in a microwave-safe bowl and microwave on medium for 40 seconds. Stir, then microwave until completely smooth, 15 to 20 seconds longer.
-
Use a spoon to drizzle melted white chocolate over each cookie. Return the cookies to the rack to cool until the white chocolate is set, about 20 minutes. Store in an airtight container for up to 5 days.
SNICKERDOODLE


Instead of buying store-bought presents for the holidays, every year Quani from Season 6 makes big batches of homemade cookies to share. Talk about sweet! His snowball cookies and snickerdoodles are always everyone’s favorites—so here they’re combined in one buttery, crumbly, spicy treat. Think of it as the best of both worlds!
MAKES ABOUT 36 COOKIES
1½ cups all-purpose flour
1 teaspoon cream of tartar
½ teaspoon baking soda
¼ teaspoon kosher salt
½ teaspoon nutmeg, preferably freshly grated (see Tip)
2 teaspoons ground cinnamon
1 stick (4 ounces) unsalted butter, at cool room temperature
¾ cup granulated sugar
1 large egg
1 teaspoon pure vanilla extract
1 cup confectioners’ sugar
-
In a medium bowl, whisk together the flour, cream of tartar, baking soda, salt, nutmeg, and 1 teaspoon of the cinnamon.
-
In a bowl, using an electric mixer with the paddle attachment, beat the butter and granulated sugar on medium-high speed until light and fluffy, about 5 minutes. Add the egg and vanilla and beat until combined, about 30 seconds, using a rubber spatula to scrape down the sides and the bottom of the bowl as needed. Reduce the mixer speed to low and add the flour mixture, mixing until just combined. Cover the bowl with plastic wrap and refrigerate for 30 minutes.
-
Preheat the oven to 350°F. Line two baking sheets with parchment paper.
-
In a wide, shallow bowl, whisk together the confectioners’ sugar and remaining 1 teaspoon cinnamon. Set aside.
-
Roll the dough into 1-inch balls and arrange them on one of the baking sheets, leaving about 2 inches between them. (Return any remaining dough to the refrigerator to chill until ready to shape the next batch.) Bake, switching the pans from top to bottom rack once halfway through, until the cookies are puffed and lightly golden around the edges, about 15 minutes. Let the cookies rest on the baking sheet until just cool enough to handle.
-
While the cookies are still warm, toss each one in the cinnamon–confectioners’ sugar mixture until well coated on all sides. Transfer the coated cookies to a wire rack to cool completely.
-
Meanwhile, repeat the process with any remaining dough. Store the cookies in an airtight container for up to 2 weeks.
TIP If a recipe calls for nutmeg, buy the nutmeg whole and grate the amount you need yourself using a Microplane zester/grater (this page) for the purest, brightest flavor. Just remember to remove the outer shell first.
CHOCOLATE


For Cory, chocolate chip cookies are not only an all-American classic—they’re big business! Before he impressed the judges with his skills on Season 3 of MasterChef Junior, the enterprising young baker started his own company. While his original recipe is a secret, his cookies, like these, are known for being packed with bittersweet chocolate. We adore the crispy texture of this take on the classic, and think the sprinkle of salt on top gives them a sophisticated edge.
MAKES ABOUT 20 COOKIES
2 cups all-purpose flour
1 teaspoon baking soda
½ teaspoon kosher salt
2 sticks (8 ounces) unsalted butter, at cool room temperature
1½ cups packed dark brown sugar
½ cup granulated sugar
2 teaspoons pure vanilla extract
2 large eggs
2 (4-ounce) bittersweet chocolate bars, coarsely chopped, or about 1½ cups bittersweet chocolate chunks
Flaky sea salt (such as Maldon), for finishing (optional)
-
Position racks in the upper and lower thirds of the oven and preheat the oven to 350°F. Line two baking sheets with parchment paper.
-
In a medium bowl, whisk together the flour, baking soda, and kosher salt.
-
In a bowl, using an electric mixer with the paddle attachment, beat the butter, brown sugar, and granulated sugar on medium-high speed until fluffy and pale, about 5 minutes. Reduce the mixer speed to medium-low and add the vanilla and eggs, one at a time, beating well after each addition and scraping down the sides of the bowl as needed. Add half the flour mixture and use a rubber spatula to stir until just a few dry streaks remain. Add the remaining flour and stir until just combined. Stir in the chocolate chunks.
-
Drop large spoonfuls of dough (about the size of a walnut) onto the prepared baking sheets, leaving at least 2½ inches between them. Sprinkle each mound with a small pinch of flaky sea salt, if desired. (Place any remaining dough in the refrigerator to chill until ready to shape.)
-
Bake the cookies, switching the pans from top to bottom rack once halfway through, until the cookies are golden brown, nearly flat, and crispy at the edges, 12 to 15 minutes. Let rest on the baking sheet for 5 minutes, then transfer to a wire rack to cool completely. Repeat with the remaining dough. Store the cookies in an airtight container for up to 5 days.
SPICY

WITH ROYAL ICING


When Cydney and Peyton won the team gingerbread-house-decorating challenge in Season 5, judges Gordon Ramsay and Christina Tosi praised their precise, steady work with the icing and their attention to detail. Bring the same skills to these deliciously dark gingerbread cookies and you’ll have little edible works of art! Gingerbread men are traditional, of course, but this adaptable dough can be rolled and cut into whatever shape you like. And the icing is super versatile, too; try using it to decorate Vanilla Cut-Out Cookies (this page). Avani from Season 5 even likes to make little holes in her gingerbread cookies and hang them as ornaments on her family’s Christmas tree! Black pepper might seem like an odd addition, but the heat from the pepper gives the cookies a wonderfully warm bite. Note that the dough needs to chill for at least 2 hours before you roll, cut, and bake the cookies, so plan accordingly!
MAKES 24 TO 36 (3- TO 4-INCH) GINGERBREAD PEOPLE

GINGERBREAD
4½ cups all-purpose flour, plus more for rolling
1½ teaspoons baking soda
1 tablespoon ground cinnamon
1 tablespoon ground ginger
1 teaspoon ground cloves
1 teaspoon nutmeg, preferably freshly grated
1 teaspoon freshly ground black pepper
¼ teaspoon kosher salt
2 sticks (8 ounces) unsalted butter, at cool room temperature
1 cup granulated sugar
1 large egg
¾ cup robust molasses (see Tip, this page)
ROYAL ICING
2 cups confectioners’ sugar, plus more if needed
2 tablespoons meringue powder (see Tip)
1 teaspoon light corn syrup
½ teaspoon pure vanilla extract
Sprinkles, sanding sugar, dragées, or gel colors (optional)
-
Make the gingerbread: In a large bowl, whisk together the flour, baking soda, cinnamon, ginger, cloves, nutmeg, pepper, and salt until combined.
-
In a bowl, using an electric mixer with the paddle attachment, beat the butter and granulated sugar on medium-high speed until light and fluffy, about 5 minutes. Reduce the mixer speed to medium-low and beat in the egg and molasses until just combined, using a rubber spatula to scrape down the sides and bottom of the bowl as needed. Reduce the mixer speed to low and add the flour mixture 1 cup at a time, mixing until the dough is just combined, about 45 seconds. Divide the dough into even thirds, then press each piece into a 1-inch-thick disc and wrap tightly in plastic wrap. Refrigerate for at least 2 hours or up to 2 days.
-
Position racks in the upper and lower thirds of the oven and preheat the oven to 375°F. Line two baking sheets with parchment paper.
-
On a lightly floured work surface, roll one disc of dough to a ⅛-inch thickness, reflouring as needed to keep the dough from sticking. Cut the dough into shapes using the cookie cutters of your choice. Slide a metal spatula under the cutouts and transfer them to the prepared baking sheets, leaving 1½ inches between them. Gather any scraps, press them into a ball, re-roll, and continue cutting out more shapes. (If at any point the dough gets warm or feels limp and sticky, pop it into the refrigerator to chill for a few minutes before continuing.) After re-rolling once, discard the remaining scraps. (Keep the other discs of dough in the refrigerator until ready to roll and cut.) Transfer the cookies to the freezer and chill for 10 minutes.
-
Bake the cookies, switching the pans from top to bottom rack once halfway through, until firm but not dark, about 14 minutes. Let the cookies rest on the baking sheets for 5 minutes, then transfer them to a wire rack to cool completely before icing. Repeat with the remaining dough.
-
Make the royal icing: In a medium bowl, whisk together the confectioners’ sugar, meringue powder, corn syrup, vanilla, and ¼ cup water until smooth, about 3 minutes. (The consistency of the icing should be like thick honey. If it’s runny, beat in a bit more confectioners’ sugar; if it’s thin, add more water, 1 tablespoon at a time.) Use a rubber spatula to transfer the icing to a squeeze bottle or a pastry bag fitted with a very small plain tip.
-
Ice the cookies and decorate them with sprinkles, sanding sugar, dragées, or gel colors as desired. After decorating, let the cookies set completely, about 2 hours, before serving. Store the cookies in an airtight container for up to 1 week.
TIP Meringue powder is an egg white substitute that’s often used in icing to provide stability and is a great alternative for anyone who is worried about eating raw eggs.

HONEY-LAVENDER


Avani from Season 5 says that one of the best lessons she learned from Chef Ramsay is that it’s important to push outside your comfort zone, and this shortbread is a perfect example of the delicious things that can happen when you do. Dried lavender can be tricky to bake with—but when balanced with salty butter and honey, it adds up to sophisticated cookie perfection.
MAKES 8 PIECES
2 sticks (8 ounces) plus 1 tablespoon salted butter (preferably European, like Kerrygold or Lurpak; see Tip, this page), at cool room temperature
¾ cup confectioners’ sugar
1 tablespoon finely grated lemon zest (from 1 lemon)
3 teaspoons crushed culinary lavender
2 cups all-purpose flour
1½ tablespoons honey
2 teaspoons turbinado sugar (such as Sugar In the Raw)
-
Use 1 tablespoon of the butter to grease the bottom and sides of a 10-inch fluted tart pan or springform cake pan.
-
In a bowl, using an electric mixer with the paddle attachment, beat the remaining 2 sticks butter on medium-low speed until smooth, about 2 minutes. In a small bowl, whisk together the confectioners’ sugar, lemon zest, and 2 teaspoons of the lavender. Add the sugar mixture to the butter and increase the speed to medium-high. Beat until very pale and fluffy, about 3 minutes more, scraping bowl as needed. Reduce the mixer speed to low and slowly sprinkle in the flour, mixing until just combined.
-
Transfer the dough into the prepared pan and press it into an even layer, using the back of a spoon to smooth the surface. Place the pan in the refrigerator and chill the dough until firm, at least 30 minutes.
-
Meanwhile, preheat the oven to 300°F.
-
In a small saucepan, warm the honey over low heat until runny. In a small bowl, combine the remaining 1 teaspoon lavender and turbinado sugar. Brush the surface of the chilled dough with the honey and sprinkle it with the lavender-sugar mixture. Score the dough into 8 wedges and prick the surface all over with the tines of a fork.
-
Bake the shortbread until it is pale golden and firm in the center, about 1 hour. Recut the wedges, then transfer the pan to a wire rack to cool completely. Store the cookies in an airtight container for up to 1 week.

WITH GRAPEFRUIT GLAZE

Just as a batch of perfectly baked citrus-scented madeleines helped Logan clinch the win during the finale of Season 2, these buttery little two-bite French cakelets are guaranteed to delight anyone who is lucky enough to have a taste. Though madeleines have a reputation for being tricky, the recipe is quite forgiving since it involves no creaming of butter or complicated techniques. Stirring a few tablespoons of finely ground citrusy Earl Grey tea into the batter adds a lovely floral fragrance that perfectly complements the bright, tangy grapefruit glaze. The signature scallop-shaped pans are the only special equipment it requires.
MAKES ABOUT 18 MADELEINES
MADELEINES
1 tablespoon Earl Grey tea (from about 3 teabags)
⅔ cup all-purpose flour
1 teaspoon baking powder
⅛ teaspoon kosher salt
⅓ cup granulated sugar
1 tablespoon finely grated grapefruit zest
2 large eggs
1½ teaspoons pure vanilla extract
6 tablespoons (¾ stick) unsalted butter, melted and cooled to room temperature
3 tablespoons whole milk
Nonstick pan spray
GLAZE
1¼ cups confectioners’ sugar
2 to 3 tablespoons fresh grapefruit juice
-
Make the madeleines: Pulse the tea in a spice grinder until finely ground. (If you do not have a spice grinder, you can use a coffee grinder, a small food processor, or a mortar and pestle; the aim is just to break down the tea so that it is not in large pieces.) In a medium bowl, whisk together the ground tea, flour, baking powder, and salt.
-
In a large bowl, using an electric mixer fitted with the whisk attachment, beat the granulated sugar and grapefruit zest on low speed until the mixture is fragrant and sandy looking, about 30 seconds. Add the eggs and beat on medium-high until the mixture is light and has begun to thicken, 3 to 4 minutes. With the mixer running, beat in the vanilla. Using a rubber spatula, gently fold in the flour mixture by hand until just combined. Stir in the melted butter and the milk. Cover the bowl with plastic wrap and refrigerate for at least 1 hour or up to overnight.
-
Thirty minutes before you plan to bake the madeleines, place a 12-cavity madeleine pan into the freezer to chill (if you have 2 madeleine pans, chill them both) and preheat the oven to 400°F (if using two madeleine pans, adjust the oven racks to the upper and lower thirds of the oven).
-
Remove the madeleine pan(s) from the freezer and evenly coat them with pan spray. Spoon the batter evenly into the molds, filling each cavity three-quarters full. Tap the pan gently on the counter once or twice to release any air bubbles. Bake until the cookies are golden around the edges, about 15 minutes. Let the madeleines rest in the pan for 2 minutes, then gently nudge them out of the pan with your fingers or the rounded end of a spoon and transfer them to a wire rack to cool until just cool to the touch.
-
Immediately make the glaze: In a small bowl, whisk together the confectioners’ sugar and grapefruit juice until smooth. (Start with 2 tablespoons of grapefruit juice; if the glaze seems a little stiff, add a bit more juice.)
-
When the madeleines are just cool to the touch, dip each one lightly into glaze, ridged-side down. Let any excess glaze run off the madeleine and back into the bowl. Return the glazed madeleines to the rack, glazed-side up, and set aside until the cookies have cooled completely and the glaze is set, about 15 minutes. Though they will keep in an airtight container for up to 3 days, madeleines are best the day they are made—and are preferably eaten while still a little warm!
TIP Not all butters are created equal, so when you’re in the dairy aisle, look closely at the labels. American-style butters (like Land O’Lakes) are required to have at least 80% butterfat and tend to have a balanced, neutral flavor. “European”-style butters (like Kerrygold and Lurpak) are made with “cultured” cream that has been lightly fermented with live cultures and churned longer than American butters, which gives them a higher butterfat content (upward of 82%), a deeper, yellowy hue, and an intense “buttery” taste. How do bakers know which type to use and when? Because of their gentle flavor, American-style butters work well in recipes like brownies and cupcakes, where butter plays a part but isn’t the star. European-style butters, on the other hand, are ideal for recipes like the sugar cookies (this page) or shortbread (this page), where you want the bold, rich butter flavor to shine through.

MINI


It’s no surprise that the combo of sweet, nutty graham crackers, melty chocolate, and gooey marshmallow is a favorite inside the MasterChef Junior kitchen. After all, what kid doesn’t love s’mores? In Season 5, Jasmine decided to go with s’mores cupcakes with seven-minute frosting as her entry in the blowtorch challenge. This take on the campfire classic shows off the flavors in mini whoopie pie form, with tender brown sugar and cinnamon-scented graham cracker–inspired cakelets sandwiched with a rich chocolate ganache and fluffy marshmallow crème—no blow torch needed!
MAKES 16 TO 18 SMALL WHOOPIE PIES
GRAHAM CAKES
1½ cups all-purpose flour
1 cup whole wheat flour
1 cup packed dark brown sugar
1 teaspoon baking soda
½ teaspoon ground cinnamon
¼ teaspoon kosher salt
½ cup plain whole-milk yogurt
⅓ cup canola oil
2 teaspoons pure vanilla extract
3 large eggs
GANACHE
¾ cup milk chocolate chips
¼ cup heavy cream
MARSHMALLOW FILLING
1 stick (4 ounces) unsalted butter, at room temperature
1 cup confectioners’ sugar
1½ cups marshmallow crème (such as Fluff)
1 teaspoon pure vanilla extract
-
Make the graham cakes: In a medium bowl, whisk together the all-purpose flour, whole wheat flour, brown sugar, baking soda, cinnamon, and salt.
-
In a bowl, using an electric mixer with the paddle attachment, beat the yogurt, oil, vanilla, and eggs on medium-high speed until smooth and slightly thickened, about 3 minutes. Use a rubber spatula to mix the flour mixture into the egg mixture in two parts, stirring just to combine after each addition. Cover the bowl with plastic wrap and transfer it to the refrigerator to chill for 30 minutes.
-
Preheat the oven to 350°F. Line two baking sheets with parchment paper.
-
Spoon the chilled dough onto the prepared baking sheets in rounded tablespoons, leaving 1½ inches between them (you will have about 36 rounds total.) Bake until golden and springy, about 10 minutes. Let the graham cakes rest on the baking sheets for 2 minutes, then transfer them to a wire rack to cool completely.
-
Make the ganache: Place the chocolate chips in a heatproof medium bowl. In a small saucepan, bring the cream to a simmer over medium heat (watch it closely—cream likes to come to a boil really fast and then bubble over the rim of the saucepan!). Pour the hot cream over the chocolate chips and set aside for 1 minute, then whisk until smooth. Cool until spreadable, about 1 hour.
-
Make the marshmallow filling: In a large bowl, with an electric mixer, beat the butter, confectioners’ sugar, marshmallow crème, and vanilla on medium speed until fluffy, smooth, and spreadable, about 4 minutes.
-
To assemble the whoopie pies, spread a layer of ganache on the flat side of half the graham cakes. Spread a thick layer of marshmallow filling onto the flat side of each of the remaining cookies. Sandwich the two sides together. Serve the whoopie pies immediately, or store in an airtight container in the refrigerator for up to 24 hours. Let the whoopie pies come to room temperature before serving.


Cydney from Season 5 loves to explore new baking recipes, especially pâtisserie classics, and lately, she says, her obsession has been cannelés—small French pastries with custardy vanilla-flavored centers and dark, chewy, caramelized sugar shells. Heads up—the cannelé batter is best after a day of resting in the fridge (this allows the flour to completely absorb the liquid)—so be prepared to make the batter the day before you plan to bake. But once you’ve got that ready, the rest of the process is a snap.
MAKES 16 CANNELÉS
2 cups whole milk
⅓ cup heavy cream
1 vanilla bean, split lengthwise (see this page)
1 cup sugar
1 cup all-purpose flour
2 large eggs
2 large egg yolks
2 tablespoons unsalted butter, melted
1½ teaspoons rum extract
Nonstick pan spray
-
In a small saucepan, bring the milk and cream to a simmer over low heat, then remove from the heat. With the tip of a paring knife, scrape the vanilla seeds out of the vanilla bean and add to the milk mixture. Let cool for 10 minutes.
-
In a large bowl, gently whisk together the sugar, flour, whole eggs, and egg yolks until the mixture is smooth but pasty. Slowly drizzle in the warm milk mixture and the melted butter and whisk until it comes together. Stir in the rum extract to combine. (The consistency should now be similar to a loose pancake batter.) Transfer the batter to a 4-cup measuring cup, cover with plastic wrap, and refrigerate for at least 12 hours or up to (and preferably) 24 hours.
-
Remove the chilled batter from the refrigerator an hour before you plan to bake the cannelés and let it come to room temperature. (If the batter has separated, lightly whisk it until smooth and tap the measuring cup against the counter once or twice to release any air bubbles.)
-
Preheat the oven to 450°F. Lightly coat the inside of two 8-cavity silicone cannelé molds with pan spray and place each one on a baking sheet (if you only have one mold, then bake half the batter at a time).
-
Pour the batter into the molds, filling each cavity three-quarters full. Bake for 10 minutes, then reduce the oven temperature to 400°F and bake until the cannelés are a deep mahogany brown, 50 to 60 minutes more. (Don’t panic if they seem burned: That is actually how they are supposed to look!) Let the cannelés cool inside the molds for 10 minutes, then carefully unmold them using the rounded back of a spoon to push them up and out of the silicone molds (they stay hot!) and place them, domed-side up, on a wire rack to cool completely. The cannelés will keep in an airtight container for up to 3 days.
— MASTERCHEF LESSON —

It’s the mile-high cloud-like topping on a lemon meringue pie, it’s the fluffy base that you fold into mousses and soufflé batters to make them airy and light—it’s meringue! As delicate as snowflakes, meringue feels a little bit like magic every time you make it, with the most amazing thing about it, being how simple it is to prepare!
Changing the way you combine the sugar and eggs produces different styles of meringue: There is French meringue, Italian meringue, and Swiss meringue. French meringue is the most straightforward style—and the one that appears most often on MasterChef Junior in delicate macarons and on top of tall, white-peaked pies. To make French meringue, you simply beat egg whites vigorously with sugar and, usually, a pinch of cream of tartar (which is an acid that stabilizes the meringue) until the mixture becomes thick, frothy, and full of air bubbles. From there you can spoon or pipe the meringue into shapes or dollop it onto a pie. While this meringue is the easiest kind to make, it’s also the most delicate and prone to deflating—so it needs to be baked right away. After baking, French meringues are pale and crisp on the outside and light and airy inside.
For Italian meringue, sugar is melted on the stovetop in a saucepan until it becomes a syrup, which is then slowly drizzled into egg whites while they are being beaten into glossy peaks. Italian meringue is the most stable but also the toughest kind to make!
Swiss meringue is a nice compromise between the two. Like Italian meringue, it uses cooked sugar—but instead of combining it with water to make a syrup, the sugar is added directly to the egg whites and the two are cooked together in a bain-marie (a bowl set over a saucepan of simmering water) until it reaches 140°F and then transferred to a mixer and whipped to stiff peaks. After whipping, both Italian and Swiss meringues have a shiny, soft, fluffy, marshmallow-like consistency.
MAKING FRENCH MERINGUE
Since French meringue is the simplest style for beginners to master and is the most popular method used by the young bakers on MasterChef Junior, it’s worth diving into a little more detail on how to get it just right. Before the lemon meringue pie challenge in Season 3, judges Graham Elliot and Gordon Ramsay gave the contestants a few rules to remember when making French meringues.
-
Make sure your bowl and whisk (or mixer attachment) are completely clean and dry. Fat is the enemy of meringue—and even a dribble of water or a smudge of butter can contaminate the egg whites and make them much harder to whip (some bakers even whip vinegar around the inside of their bowl and their whisk to make sure there is no fat remaining before whipping egg whites). It’s also the reason you should be really careful when separating the egg whites from the egg yolks. Egg yolks have fat, and even a drop will prevent your whites from whipping to peaks. Another tip: Use a glass or metal bowl, because plastic is more porous and more likely to trap residue that could get in the way of firm and glossy peaks.
-
Let the egg whites come to room temperature before you begin, because warmer eggs whip faster than cold ones.
-
Start whisking on a low speed, then increase the speed gradually, so you don’t have to worry about overbeating (yes, egg whites can be overwhipped—when they are, they go from smooth and glossy to bumpy and broken looking).
-
Add the sugar gradually as you’re beating the whites so it has time to dissolve during whipping—or else the result will be a gritty meringue. Nobody wants that!
-
Finally, bake the meringues low and slow in a cool oven so that they stay pale and light without a hint of sogginess. This is critical if you are baking Meringue “Ghosts” (this page), or baking the meringues in larger discs to make a Pavlova (like the one on this page).

Soft peaks: The meringue has begun to firm up but is still soft and falls quickly.
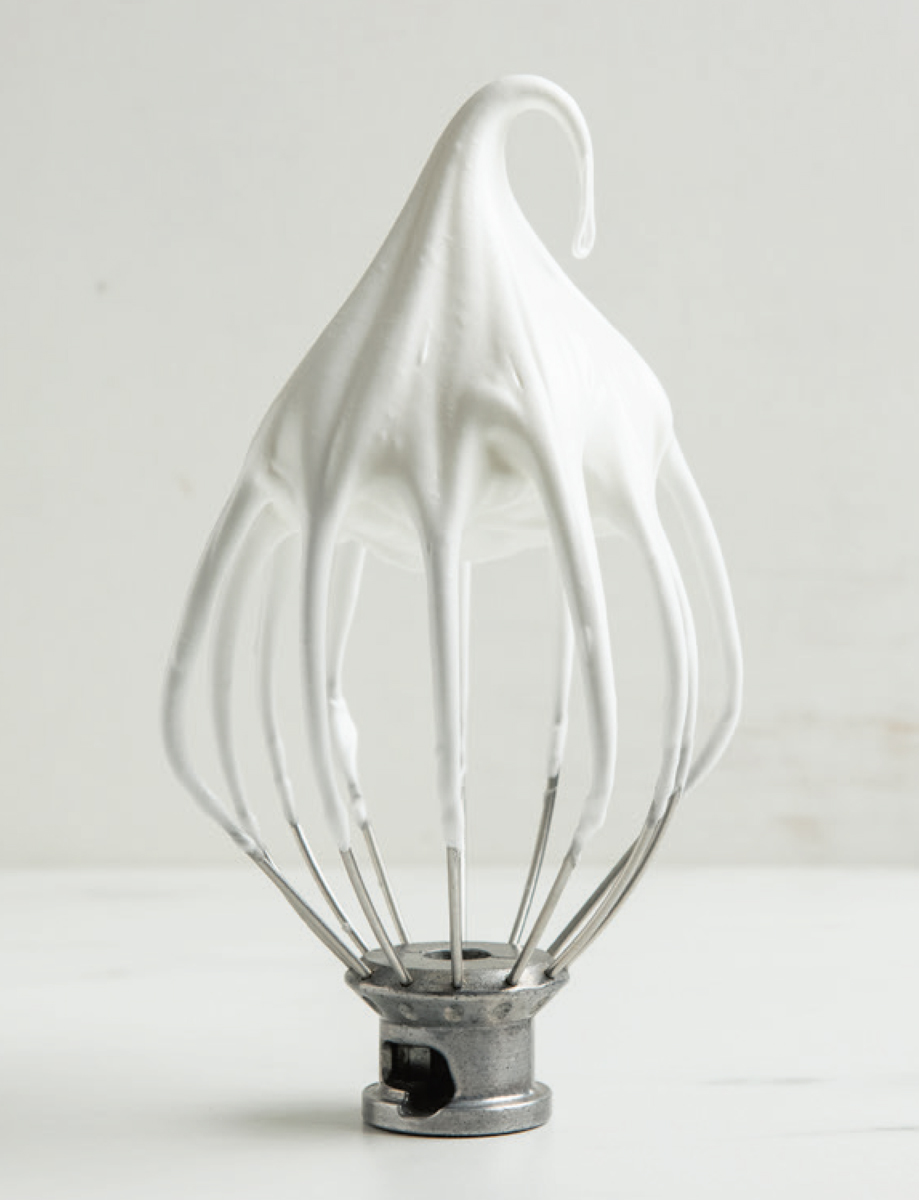
Medium peaks: The meringue is stiff. When you invert your whisk, the meringue holds a peak but the tip curls over.
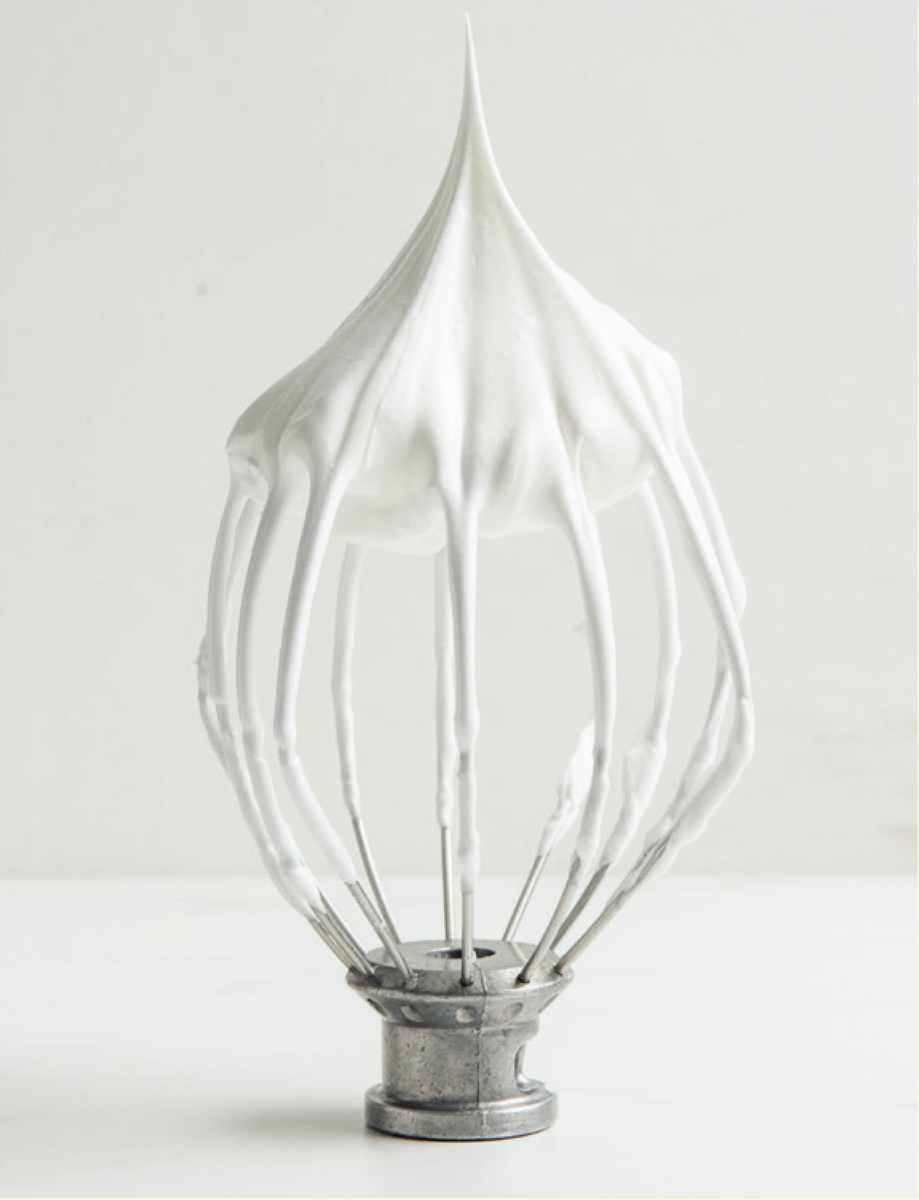
Stiff peaks: The meringue is very thick. When you invert your whisk, the peak holds its shape without collapsing.
CUSTOMIZE YOUR MERINGUE
You can use any kind of sugar when making a French meringue. Granulated sugar is standard, but confectioners’ sugar is a bit easier to dissolve (and has cornstarch in it so that it doesn’t form clumps). Brown sugar produces meringues that are a pale tan color instead of pure white—it also gives the meringue a gentle caramel flavor. You can also try dressing up meringue by flavoring it with a splash of extract (vanilla, peppermint, almond, and lemon are all nice) or tint it with a drop or two of food coloring to make pink, lavender, blue, or really any shade you can think of. To make pretty meringue bites, use a pastry bag fitted with a decorative tip to pipe the meringue onto baking sheets in decorative swirls before baking. The little crisp treats are easy, elegant, and cute as can be—not to mention naturally gluten-free.


These ghoulishly cute treats are one of Cydney’s (from Season 5) most beloved Halloween traditions. “My mom started baking these for our family when I was a little kid,” she says. “And now we love to make them together!” Because the process is as simple as making a basic meringue (see MasterChef Lesson, this page), it’s a great way for young bakers to practice their whipping and piping skills.
MAKES ABOUT 24 GHOSTS
6 large egg whites, at room temperature
½ teaspoon cream of tartar
½ teaspoon pure almond extract (optional)
¼ teaspoon kosher salt
1½ cups confectioners’ sugar, sifted
48 mini chocolate chips
-
Preheat the oven to 200°F. Line two baking sheets with parchment paper.
-
In a large, clean, dry bowl, combine the egg whites, cream of tartar, and almond extract (if using). Beat, using an electric mixer with the paddle attachment, on medium speed until soft peaks form, about 2½ minutes. With the mixer running, add the salt and then the sugar, 2 tablespoons at a time, and beat until the meringue forms stiff, glossy peaks, about 3 minutes more.
-
Spoon the meringue into a pastry bag fitted with a ½-inch plain tip (see this page). Pipe the meringue onto the baking sheets in tall conical swirls, 2 inches in diameter at the base and 3 inches tall, that taper as they come to a point at the top, spacing them 1 inch apart. Once they are all piped, place two mini chocolate chips onto each swirl to create eyes.
-
Carefully place the pan in the oven and bake until the meringues are pale, dry, and crisp to the touch, about 1½ hours. Turn off the oven and let the meringues rest in the oven until completely dry and cool to the touch, about 2 hours. Store the meringues in an airtight container at room temperature for up to 1 week.
TIP You will have yolks left over after you separate the eggs; for ways to use them up, try Key Lime Pie Bars (this page) or Malted Milk Crème Brûlée (this page).
— MASTER THIS —


These delicate French meringue cookies are a perennial favorite on MasterChef Junior and were the focus of exciting competitions in Seasons 5 and 6. When introducing the young bakers to the challenges, judge Christina Tosi explained that macarons require a tremendous amount of technical skill to get just right. What makes a perfect one? Look for a smooth, hollow shell with a ruffled edge (sometimes called a “foot”) and a rich, thin filling of jam, buttercream, or ganache. This recipe is a starting place—use it to play with all sorts of flavors and fillings (see the variations, this page).
MAKES ABOUT 36 MACARONS

1 cup almond flour
2 cups confectioners’ sugar
4 large egg whites
⅛ teaspoon kosher salt
⅛ teaspoon cream of tartar
¼ cup superfine sugar (see Tip)
¾ cup jam or ganache (this page), for filling
-
In a large bowl, whisk together the almond flour and 1 cup of the confectioners’ sugar until combined. Set aside.
-
Put the eggs whites in a large bowl. Sprinkle in the salt and cream of tartar and, using an electric mixer fitted with the whisk attachment, beat on medium-high speed until light and foamy, 1 to 1½ minutes. Reduce the speed to medium-low and slowly sprinkle in the remaining 1 cup confectioners’ sugar and the superfine sugar. Beat until the meringue forms glossy peaks, about 4 minutes more. (If adding food coloring or flavoring, stir it in now; see the variations this page.)
-
Using a clean rubber spatula, gently fold the almond flour mixture into the meringue until there are no streaks visible.
-
Line two baking sheets with parchment paper. Working in two batches, transfer the batter to a pastry bag fitted with a ¼-inch plain tip. Hold the tip perpendicular to the parchment so that it is nearly touching and gently squeeze the batter onto the parchment in 1½-inch rounds, leaving at least 1 inch of space between them. (Tip: For even mounds, before piping, use a pencil to lightly trace circles onto the parchment as a template, then flip the parchment so the marks face the baking sheet.) Tap the baking sheets firmly against the counter to release any air bubbles.
-
Transfer the baking sheets to a cool, dry place. Let the macarons rest until the tops dry out a bit and form a delicate skin, about 1½ hours.
-
Position a rack in the center of the oven and preheat the oven to 325°F. When ready to bake, reduce the oven temperature to 300°F.
-
Bake the macarons, one sheet at a time, until the tops are firm and smooth and set, about 12 minutes. Remove the macarons from the oven and set aside to cool on the baking sheet for 15 minutes, then transfer them to a wire rack to cool completely.
-
Before serving, spread the flat side of half of the macarons with jam, ganache, or the filling of your choice and top with the remaining rounds, domed-side up.
TIP Superfine sugar is a type of granulated sugar that has been ground into very fine crystals so that it dissolves quickly. You can find superfine sugar in the baking aisle of most grocery stores, but it’s also simple to make your own in a pinch: Just put granulated sugar in a food processor or blender (it’s best to use a little bit more than the amount of superfine sugar you need so you can measure it out), then process on high speed for about 1½ minutes, until the sugar is finely ground.
VARIATIONS
Chocolate-Hazelnut Macarons: Add 1 tablespoon unsweetened cocoa powder and 4 or 5 drops brown gel food coloring to the batter along with the confectioners’ sugar. To assemble the cookies, spread half the rounds with chocolate-hazelnut spread and top with the remaining halves.
Peanut Butter and Jelly Macarons: Stir 1 tablespoon finely ground freeze-dried raspberries and 4 or 5 drops purple gel food coloring into the batter once the meringue has formed stiff, glossy peaks. Make peanut butter buttercream by blending 1 cup creamy peanut butter, 4 tablespoons (½ stick) softened unsalted butter, and 1¼ cups confectioners’ sugar until smooth. To assemble the cookies, spread half the rounds with the peanut butter buttercream. Dot a small spoonful of raspberry jelly in the center of the buttercream and top with the remaining halves.

— HOME CHALLENGE —

WITH STRAWBERRY COULIS


When Remy presented these sophisticated little cookies during the Season 6 macaron challenge, judge Christina Tosi called them “incredibly delicious and unique” and praised Remy for her careful technique. Matcha, which is a powder made from finely ground green tea leaves, gives the shells and the buttercream filling a delicate, earthy flavor that’s a perfect complement to the bright sweetness of the strawberry coulis—and the pale-green-and-pink color combination couldn’t be any prettier.
MAKES ABOUT 36 MACARONS
MACARONS
Macaron batter (this page) made through step 2
4 or 5 drops green gel food coloring
2 tablespoons finely ground freeze-dried strawberries
STRAWBERRY COULIS
1 cup sliced strawberries
1 tablespoon fresh lemon juice
¼ cup granulated sugar
1 tablespoon cornstarch
GREEN TEA BUTTERCREAM
10 tablespoons unsalted butter, at room temperature
2 cups confectioners’ sugar
1 tablespoon pure vanilla extract
1 tablespoon matcha powder (green tea powder)
-
Make the macarons: Make the macaron batter as directed on this page. Once the meringue forms shiny, glossy peaks in step 2, add the green food coloring and beat on high for 30 seconds to combine. Using a clean rubber spatula, gently fold the almond flour mixture into the meringue until the batter is streak-free.
-
Pipe the macaron batter onto lined baking sheets as described. Using a fine sieve, sprinkle each round with a fine dusting of the ground freeze-dried strawberries. Transfer the baking sheets to a cool, dry place. Let the macarons rest until the tops dry slightly and form a delicate skin, about 1½ hours.
-
Meanwhile, make the strawberry coulis: In a small saucepan, combine the strawberries, lemon juice, sugar, and 2 tablespoons water. Bring to a simmer over medium heat and cook, stirring frequently, until the strawberries begin to break down, 10 to 12 minutes. Whisk in the cornstarch and return to a simmer until thickened, 2 to 3 minutes, using a wooden spoon to break up any large pieces of strawberry that remain. Remove from the heat and scrape the mixture into a small bowl. (You should have about ½ cup.) Set aside to cool completely.
-
Make the green tea buttercream: In a bowl, using an electric mixer with the paddle attachment, beat the butter on high speed until light and creamy, about 2 minutes. Reduce the speed to medium and add the confectioners’ sugar ½ cup at a time, beating well after each addition. Add the vanilla and matcha powder and beat on high until the buttercream is smooth, 20 to 30 seconds. Spoon the buttercream into a pastry bag fitted with a ¼-inch plain tip and refrigerate until ready to use.
-
Bake and cool the macarons as directed in the recipe.
-
When ready to assemble, remove the buttercream from the refrigerator and let it come to cool room temperature (this could take up to 30 minutes depending on how firm the buttercream is when you remove it from the fridge). Spread a scant ½ teaspoon of the coulis over the flat side of half the macarons. Pipe the buttercream onto the flat sides of the remaining macarons. Sandwich the two sides together and arrange the macarons on a baking sheet. Lightly cover the sheet with plastic wrap and refrigerate for 30 minutes or until ready to serve. Let the macarons come to room temperature for 15 minutes before serving. Store the macarons in an airtight container in the refrigerator for up to 3 days or in the freezer for up to 3 months.