
Caramelized Banana Cannoli with Ricotta and Dark Chocolate
Churros with Mango-Chile Sauce
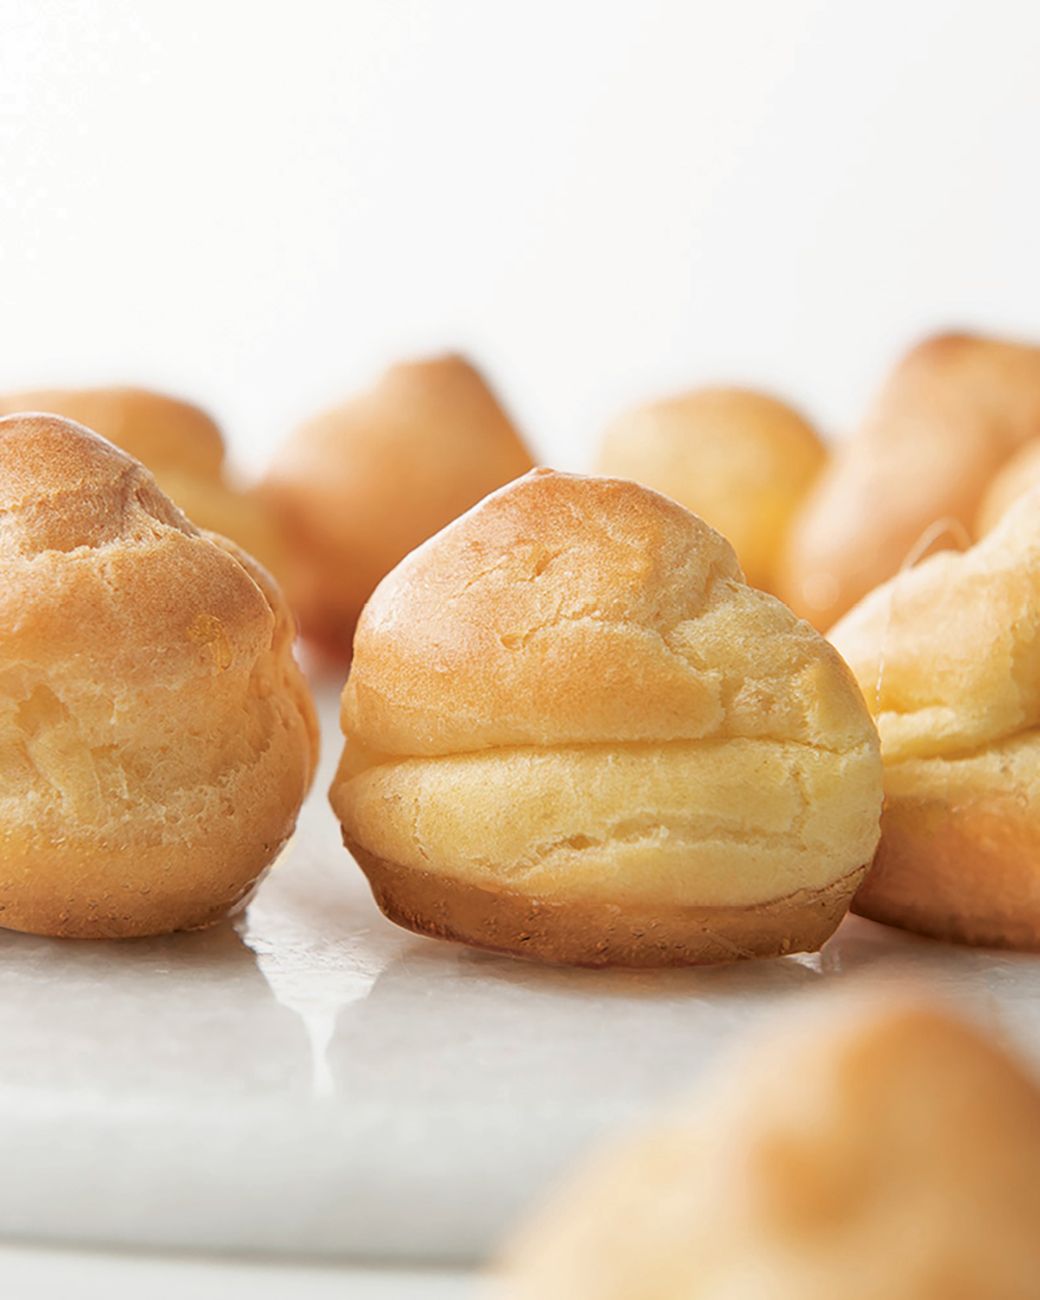
![]() MASTER THIS: Sweet or Savory Pâte à Choux
MASTER THIS: Sweet or Savory Pâte à Choux
Chocolate Cream Puffs with Dark Chocolate Glaze
Peach Melba Pavlova with Yogurt Whipped Cream
![]() HOME CHALLENGE: Chocolate Soufflé
HOME CHALLENGE: Chocolate Soufflé
CARAMELIZED

WITH RICOTTA AND DARK CHOCOLATE
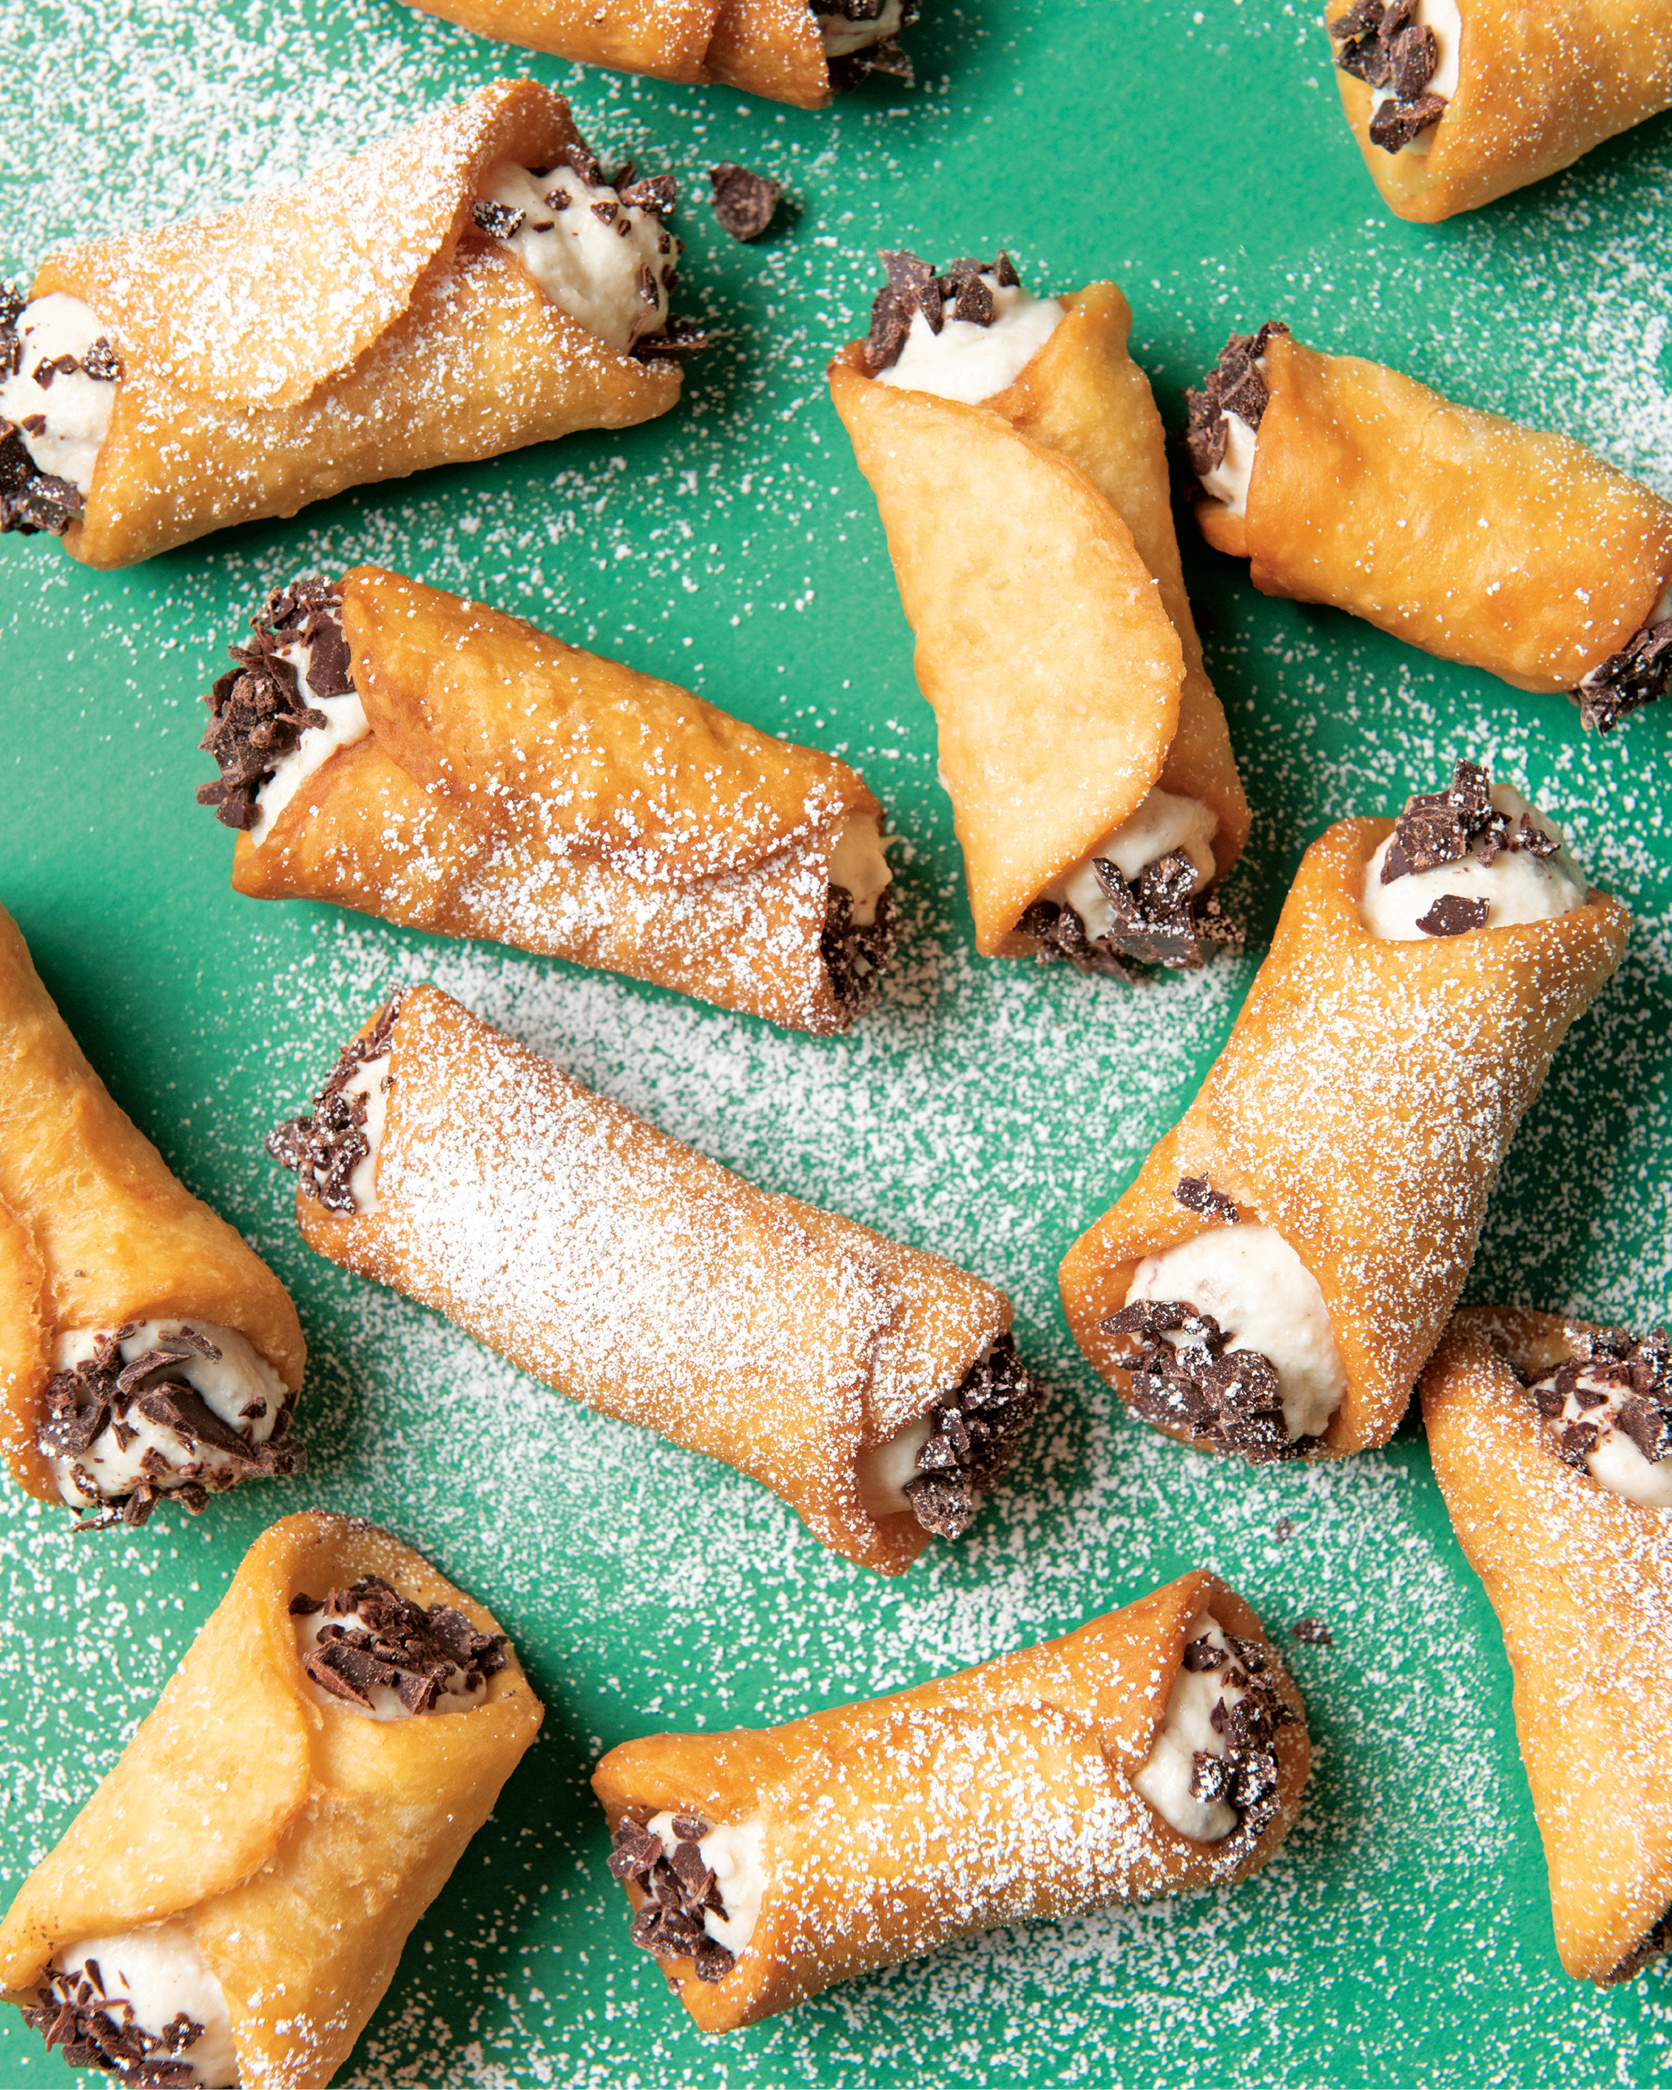

This is a very involved recipe, but i f you’re looking for an impressive special-occasion dessert, these little cannoli won’t disappoint. Mikey was inspired by his Italian heritage when he made crunchy banana cream–filled pastries like these in Season 6—and the results were so amazing they even wowed self-described cannoli expert Joe Bastianich! Caramelizing the sliced bananas in a hot pan before incorporating them into the rich ricotta and cream cheese filling really brings out their butterscotch-y natural sweetness.
MAKES 16 TO 18 CANNOLI

CANNOLI SHELLS
2 cups all-purpose flour
2 tablespoons granulated sugar
¼ teaspoon kosher salt
4 tablespoons (½ stick) cold unsalted butter, finely cubed
2 large eggs, beaten
2 tablespoons white wine vinegar
CARAMELIZED BANANA FILLING
8 ounces whole-milk ricotta cheese
1 tablespoon unsalted butter
2 tablespoons dark brown sugar
2 large ripe bananas, peeled and sliced into ¾-inch rounds.
8 ounces cream cheese, at room temperature
¼ cup whole milk
¼ cup honey
¼ teaspoon ground cinnamon
¼ teaspoon kosher salt
All-purpose flour, for rolling
Vegetable oil, for deep-frying
3 ounces bittersweet chocolate, very finely chopped, for garnish
¼ cup confectioners’ sugar, for dusting (optional)
-
Make the cannoli shells: In a medium bowl, whisk together the flour, granulated sugar, and salt. Add the butter and, using your fingertips, cut it into the flour until the mixture is sandy, with some pea-size pieces of butter still visible. Using a fork, stir in the eggs and vinegar and mix until the dough just comes together. Turn the dough onto the counter and knead it three or four times until smooth. Press it into a large disc about 1 inch thick and wrap in plastic wrap. Transfer the disc to the refrigerator to rest for at least 20 minutes.
-
Meanwhile, make the caramelized banana filling: Scoop the ricotta into a fine-mesh sieve set over a medium bowl and set aside to drain for 30 minutes.
-
Meanwhile, in a large skillet, melt the butter over medium heat. Add the brown sugar and cook, stirring often, until the mixture is golden and thick, about 2 minutes. Arrange the banana slices cut-side down in the pan on top of the sugar mixture. Cook, undisturbed, until the banana slices are golden brown and caramelized on one side, about 3 minutes, then flip and repeat on the second side, about 3 minutes. Transfer the bananas to a large bowl and let cool to room temperature, about 15 minutes.
-
When the bananas have cooled, roughly mash them with a fork. Add the drained ricotta, cream cheese, milk, honey, cinnamon, and salt and beat, using an electric mixer with the whisk attachment on medium speed, until thick and well combined, about 1 minute. (Don’t worry if there are still a few chunks of banana visible; a little bit of texture is good.) Cover and refrigerate the filling for at least 1 hour, while you fry the cannoli shells.
-
Remove the chilled cannoli dough from the refrigerator. Lightly dust a work surface with flour. Using a rolling pin, roll the dough as thin as possible, but no thicker than ⅛ inch. Using a 4-inch round cookie cutter or a similar-size glass, cut the dough into rounds, collecting the scraps and re-rolling them once. Wrap a round of dough around a cannoli mold, pulling one edge over the other so it overlaps, moisten the underside with a drop of water, and press firmly to seal. Repeat with 5 more pieces of dough and cannoli molds. (You will need 6 cannoli molds to fry them in batches.) Transfer the unshaped rounds to a parchment-lined baking sheet and keep them cool in the refrigerator until ready to use.
-
To fry the shells, pour at least 2 inches vegetable oil into a large, deep, heavy-bottomed pot and heat the oil over medium-high heat until a pinch of flour sizzles when you drop it into the oil or a candy thermometer reads about 360°F. Line a wire rack with paper towels and have it nearby. Using tongs, carefully lower 3 cannoli molds into the oil. Fry, turning the shells slowly in the oil, until they are golden and crisp on all sides, 2 to 3 minutes. Use a frying spider to carefully remove the molds from the oil and transfer them to the paper towel–lined rack. Using an oven mitt to carefully hold the mold, grasp each cannoli shell lightly with a clean kitchen towel and very gently slide it off the mold. Let the cannoli mold rest until cool to the touch. Check that the oil temperature remains at 360°F or adjust the heat accordingly before frying the remaining dough. Let the shells cool to room temperature before filling.
-
To fill the shells, spoon the caramelized banana filling into a pastry bag fitted with a large plain tip. (If you don’t have a pastry bag, you can improvise one by snipping off a small corner of a large zip-top storage bag.) Insert the tip of the bag into each shell and squeeze until filled. Dip both ends of the cannoli into the chopped chocolate so the chocolate sticks to the banana filling. If desired, dust the cannoli shells with the confectioners’ sugar before serving.
TIP To make DIY cannoli molds, fold a 12-inch square of foil in half and wrap it three times around a broom handle or 1-inch wooden dowel. Slide it off, set aside, and repeat until you’ve made 18 molds.

WITH MANGO-CHILE SAUCE


There’s nothing more delicious than a piping-hot churro dusted with cinnamon-sugar…except maybe one that’s paired with a tangy mango sauce! Churros are usually served with thick, molten chocolate, but in Season 6, Zia had the brilliant idea to give the dish this fresh, tropical update. A pinch of chile powder and a squeeze of lime juice help give the sauce a little extra zip without making it too spicy.
SERVES 12

MANGO-CHILE SAUCE
3 large mangoes, pitted, peeled, chopped, and pureed (about 3 cups)
2 tablespoons sugar
1 teaspoon finely grated lime zest
2 tablespoons fresh lime juice
¼ teaspoon red chile powder (such as ancho)
CHURROS
1¼ cups sugar
3 tablespoons unsalted butter
1 teaspoon pure vanilla extract
½ teaspoon kosher salt
2 cups all-purpose flour
2 large eggs
1 tablespoon ground cinnamon
Vegetable oil, for deep-frying
-
Make the mango-chile sauce: In a medium saucepan, stir together the mango puree, sugar, lime zest, and lime juice. Bring to a simmer over medium heat, then partially cover and cook, stirring occasionally, until reduced to about 1 cup, about 30 minutes. Stir in the chile powder. Transfer the sauce to a bowl and let cool to room temperature. Cover with plastic wrap and refrigerate until chilled, at least 1 hour or for up to 3 days.
-
Make the churros: In a medium saucepan, combine ¼ cup of the sugar, the butter, vanilla, salt, and 2 cups water and bring to a simmer over medium heat, stirring until the butter melts. Add the flour and stir vigorously with a wooden spoon. Cook the mixture, stirring constantly, until the dough forms into a sticky ball and pulls away from the sides of the pan, 30 seconds to 1 minute. Remove the pan from the heat and transfer the dough to a large bowl. Let cool for 5 minutes. Using an electric mixer, add the eggs one at a time and beat on medium speed until the dough is smooth after each addition. Spoon the dough into a pastry bag fitted with a large star tip.
-
Preheat the oven to 200°F.
-
In a large bowl, whisk together the remaining 1 cup sugar and the cinnamon and set aside. Line a wire rack with paper towels and have it nearby.
-
Pour at least 2 inches of vegetable oil into a large, deep, heavy-bottomed pot and heat the oil over medium-high heat until a pinch of flour sizzles when you drop it into the oil or a candy thermometer reads around 360°F. Holding the pastry bag over the hot oil, squeeze about 3 inches of dough from the pastry bag, slicing it off at the tip end with a paring knife, and carefully let the dough fall into the hot oil. Repeat to make 5 churros. Fry the churros, using a fork or frying spider to turn them often, until they are evenly golden brown and cooked through, about 5 minutes. Using a fork or a frying spider, transfer the churros to the paper towels to drain, then transfer them to a baking sheet and place in the oven to keep warm while you fry the remaining dough.
-
While the churros are still warm, toss them in the cinnamon-sugar mixture until well coated, shaking off any excess. Stir the chilled mango sauce to loosen. Serve the churros immediately, with the mango-chile sauce alongside for dipping.
— MASTER THIS —
SWEET OR SAVORY

Remember in Season 4 when the junior chefs were challenged to build a towering Croquembouche (this page)—a stunning pyramid of cream puffs bound together with caramel and decorated with spun sugar—completely from scratch? Success or failure all came down to nailing their pâte à choux—and now you can master this pastry classic, too. This surprisingly simple, eggy dough is one of the most important recipes for pastry chefs to know and is the basis of all sorts of impressive treats. The sweet version is perfect for profiteroles, éclairs (this page), and cream puffs (this page). Or you can make the dough without sugar and bake small puffs to be filled with chicken salad, spinach artichoke dip, or any of your other favorite cheese spreads for an elegant party snack.
MAKES ENOUGH DOUGH FOR ABOUT 12 ÉCLAIRS, 24 LARGE CREAM PUFFS, OR 50 MINI PUFFS

1 stick (4 ounces) unsalted butter, cubed
2 tablespoons granulated sugar (optional, for the sweet version)
½ to 1 teaspoon kosher salt (½ teaspoon for sweet version; 1 teaspoon for savory version)
1¼ cups all-purpose flour
4 large eggs
-
In a medium saucepan, combine the butter, sugar (if using), salt, and 1 cup water. Bring to a simmer over medium heat, stirring until the butter melts. Add the flour all at once and stir vigorously with a wooden spoon. Cook, stirring constantly, until there is a thin film of dough on the bottom of the pan and the dough forms a sticky ball and pulls away from the sides of the pan, 30 seconds to 1 minute. Remove the pan from the heat and let the dough cool for 5 minutes.
-
Transfer the dough to a large bowl. Add the eggs one at a time and beat using an electric mixer with the whisk attachment on medium speed after each addition until the dough is smooth. Immediately transfer the dough to a pastry bag fitted with a large plain tip, or cover with plastic wrap and refrigerate for up to 2 days.
-
Preheat the oven to 425°F. Line two baking sheets with parchment paper.
-
Pipe the dough onto the parchment in the shape of your choice, leaving 1½ inches between them. Bake for 15 minutes, then reduce the oven temperature to 375°F and bake until the pastries are golden and puffed and sound hollow when you tap on them, about 25 minutes more. Immediately pierce the shells with a small, sharp knife to release steam (this helps them stay crispy) and transfer them to a wire rack to cool. Fill as directed or store unfilled shells in an airtight container for up to 2 days. Before serving, stuff with the filling of your choice.
— HOME CHALLENGE —


Sam did so well on the croquembouche challenge in Season 4 that judge Christina Tosi offered him a job at her bakery on the spot! She was especially impressed by how neatly his puffs were filled and how the crispy shells made a nice hollow sound when she tapped on them. Why? Remember: It’s important to use all of your senses when baking, and that sound—which indicated that the shells are crisp on the outside and airy inside—is one of the best ways to tell if the pâte à choux has been cooked correctly. A simple dusting of confectioners’ sugar on top will make the croquembouche look extra impressive—but if you really want to pull out all the stops, ask a grown-up to help you warm any remaining caramel in the pan just until it is loose enough to drizzle. Then very carefully (remember, hot caramel is dangerous stuff!) dip a fork into the caramel and swirl it around the tower to make a web of spun sugar all around!
SERVES 12 OR MORE

Sweet Pâte à Choux (this page)
Pastry Cream (this page)
1½ cups granulated sugar
½ cup light corn syrup
½ cup confectioners’ sugar
-
Preheat the oven to 425°F. Line two baking sheets with parchment paper.
-
Prepare the sweet pâte à choux as directed through step 3. Pipe the batter onto the baking sheets into 1-inch rounds and bake for 15 minutes, then reduce the oven temperature to 375°F. Bake until the pastries are golden and puffed and sound hollow when you tap on them, about 25 minutes more. Pierce one side of each puff with a small, sharp knife to release steam (this helps the cream puffs stay crispy) and transfer to a wire rack to cool. (After they have cooled, the puffs can be stored in an airtight container for up to 2 days.)
-
Prepare and chill the pastry cream as directed on this page.
-
Just before you’re ready to assemble the croquembouche, spoon the chilled pastry cream into a pastry bag fitted with a small plain tip. Holding a cream puff in your palm, poke the tip of the pastry bag into the side where you made the steam vent and squeeze until filled. Repeat with the remaining cream puffs. (Refrigerate filled cream puffs until you begin assembly.)
-
In a medium saucepan, whisk together the sugar, corn syrup, and ½ cup water, stirring until the sugar has dissolved. Bring the mixture to a boil over medium heat and cook, without stirring, until the syrup turns a deep golden amber color and a candy thermometer inserted into the mixture reads 340°F, 6 to 8 minutes. Immediately get ready to assemble the croquembouche.
-
Set a cake stand or round serving platter on your work surface. Hold the cream puffs at the rounded tip and very, very carefully dip the flat end of one cream puff into the warm caramel until just lightly coated (the caramel is very hot—take care not to accidently dip your fingertips in the hot caramel—be sure a grown-up is nearby in case you need help). Place the cream puff, caramel-side down, at the edge of the cake stand. Continue dipping and placing cream puffs until you have formed a roughly 8-inch circle of cream puffs around the perimeter of the cake stand. (You’ll need about 12 cream puffs for the first layer.) Next make a smaller layer on top of the first, dipping and placing the cream puffs so that they are staggered with the layer below. Continue dipping and placing cream puffs, building circles on top of each other, until you have formed a pyramid-shaped tower that narrows at the top. Finish with a single cream puff at the top. Dust with the confectioners’ sugar and serve.
TIP The assembled croquembouche can hold at room temperature for a couple of hours, but because its structure is delicate and it is filled with pastry cream (which needs to be refrigerated), it is best to assemble it as close as possible to serving. If you’d like to break up the work, prepare the cream puffs and the pastry cream filling a day or two ahead. Then, an hour or two before the party, fill the puffs, make the caramel, and assemble the tower.

CHOCOLATE

WITH DARK CHOCOLATE GLAZE
This pâtisserie classic is so much simpler than it seems. In Season 6, Anthony had some issues when his filling got a bit too stiff and heavy, but this one—basically a cocoa-infused whipped cream—is as light and airy as a dream. If you’re feeling ambitious, or want to make the puffs even richer, you could fill them with Chocolate Pastry Cream (this page). Adding a spoonful of corn syrup to the ganache glaze helps keep it beautifully shiny.
MAKES ABOUT 24 (3-INCH) CREAM PUFFS
Sweet Pâte à Choux (this page)
COCOA-CREAM FILLING
⅔ cup confectioners’ sugar
⅓ cup unsweetened Dutch-process cocoa powder
2 cups heavy cream
1 tablespoon pure vanilla extract
DARK CHOCOLATE GLAZE
½ cup bittersweet chocolate chips
¼ cup heavy cream
1 tablespoon light corn syrup
⅓ cup confectioners’ sugar, for dusting
-
Preheat the oven to 425°F. Line two baking sheets with parchment paper.
-
Prepare the sweet pâte à choux as directed through step 3. Pipe the batter onto the baking sheets into 2-inch rounds. Bake for 15 minutes, then reduce the oven temperature to 375°F and bake until the pastries are golden and puffed and sound hollow when you tap on them, about 25 minutes more. Pierce one side of each puff with a small, sharp knife to release steam (this helps the cream puffs stay crispy) and transfer them to a wire rack to cool. (After they have cooled, the puffs can be stored in an airtight container for up to 2 days.)
-
Make the cocoa-cream filling: In a small bowl, whisk together the confectioners’ sugar and cocoa powder until combined. In a large bowl, using an electric mixer fitted with the whisk attachment, beat the cream on medium-high speed until frothy, about 1 minute. With the mixer running, reduce the speed to medium-low, slowly sprinkle in the vanilla and the sugar-cocoa mixture, and beat until the cream holds stiff, smooth peaks, 1 to 1½ minutes more.
-
Make the dark chocolate glaze: Place the chocolate chips in a heatproof medium bowl. In a small saucepan, bring the cream and corn syrup to a simmer over medium heat, whisking to combine. Pour the hot cream mixture over the chocolate chips. Let stand for 1 minute, then stir until smooth. Set aside while you assemble the cream puffs.
-
To assemble the puffs, halve the cream puffs horizontally. Using a small spoon, fill the bottom halves with the cocoa-cream, then cover with the tops and drizzle each one with chocolate glaze. Chill until the glaze sets, about 30 minutes. Just before serving, dust the puffs with the confectioners’ sugar.


This sunny, sweet lemon cream is one of Justise’s favorite pastry fillings and is sure to brighten any day. Meyer lemons are a cross between conventional lemons and mandarin oranges and have juice that’s slightly sweeter and deeper in color than that of their ordinary lemon cousins. Look for them in the market from November to February, when they’re in season, but if you have trouble tracking them down, it’s fine to use regular lemons in their place.
SERVES 12
Pastry Cream (this page)
¼ cup Meyer lemon juice (from about 2 Meyer lemons)
Sweet Pâte à Choux (this page)
MEYER LEMON GLAZE
2 cups confectioners’ sugar
1 tablespoon finely grated Meyer lemon zest
2 to 3 tablespoons Meyer lemon juice
1 or 2 drops yellow gel food coloring (optional)
2 teaspoons finely grated Meyer lemon zest, for garnish
-
Prepare and chill the pastry cream as directed on this page, slowly stirring in the Meyer lemon juice with the butter in step 2.
-
Preheat the oven to 425°F. Line two baking sheets with parchment paper.
-
Make the sweet pâte à choux as directed through step 3. Pipe the batter onto the prepared baking sheets in strips that are 5 inches long and 1 inch wide. Run a moistened fingertip along the surface of the strips, smoothing out any peaks or rough edges. Bake for 15 minutes, then reduce the oven temperature to 375°F and bake until the pastries are golden and puffed and sound hollow when you tap on them, about 25 minutes more. Pierce the pastries at one end with a thin, sharp knife to release steam (this helps them stay crispy), and transfer to a wire rack to cool completely. (After they’ve cooled, they can be stored in an airtight container for up to 2 days.)
-
Make the glaze: In a medium bowl, whisk together the confectioners’ sugar, lemon zest, 2 tablespoons of the lemon juice, and the food coloring (if using) until smooth. The glaze should be very shiny, thick, and almost pasty; if needed, add a bit more juice or confectioners’ sugar until it reaches the right consistency.
-
Assemble the éclairs: Split the pastries in half horizontally. Fill the bottom half with chilled pastry cream and replace the top. Carefully spoon the glaze over the tops. Garnish with zest. Chill for 30 minutes to set, then serve.

WITH YOGURT WHIPPED CREAM

This stunning layered dessert of vanilla-scented meringue, sliced peaches, raspberry sauce, and airy whipped cream is like summertime on plate. Though it certainly looks impressive, once you’ve mastered making meringue (see MasterChef Lesson, this page), it actually comes together in a snap. Adding a scoopful of yogurt to the whipped cream lightens it and lends it a subtle tang that’s a perfect complement to the sweetness of the meringue and the fresh fruit. While peaches are lovely in this version, if they’re out of season (or just not what you’re craving), feel free to swap in another stone fruit or a pile of mixed berries in their place.
SERVES 8 TO 10
MERINGUES
6 large egg whites, at room temperature
⅛ teaspoon kosher salt
1 teaspoon cream of tartar
1½ cups superfine sugar
2 tablespoons cornstarch
1 teaspoon pure vanilla extract
RASPBERRY SAUCE
1 cup fresh or frozen raspberries
¼ cup granulated sugar
¾ cup seedless raspberry jam
PEACHES
4 large peaches, pitted and thinly sliced (about 3 cups)
2 tablespoons granulated sugar
½ teaspoon ground ginger
YOGURT WHIPPED CREAM
2 cups heavy cream
1 cup plain whole-milk yogurt
2 teaspoons pure vanilla extract
2 tablespoons confectioners’ sugar
⅛ teaspoon kosher salt
Fresh mint, for garnish
-
Make the meringues: Position racks in the center and lower third of the oven and preheat the oven to 250°F. Line two baking sheets with parchment paper. In the center of each sheet of parchment, use a pencil to draw a 9-inch-diameter circle (the easiest way to do this is to trace a 9-inch cake pan). Flip the parchment pencil-side down.
-
In a large bowl, using an electric mixer fitted with the whisk attachment, beat the egg whites and salt on medium-high speed until foamy, about 1 minute. Add the cream of tartar and beat until soft peaks form, about 2 minutes. In a medium bowl, whisk together the superfine sugar and cornstarch. With the mixer running, slowly sprinkle the sugar mixture into the egg whites and beat until stiff, shiny peaks form, about 3 minutes more. Using a rubber spatula, gently fold in the vanilla.
-
Divide the meringue between the 2 circles on the parchment paper. Use a spoon or an offset spatula to spread the meringue to the edges of the circles and smooth it out. Transfer the pans to the oven and bake for 1 hour, switching the pans from the center to bottom rack once halfway through. Turn off the oven and let the meringues cool and dry completely in the oven until they are no longer tacky to the touch, about 1½ hours. When they are done, they will be stiff and crisp on the outside and tender and chewy inside. (The meringue layers can be prepared up to 3 days ahead and stored lightly wrapped in parchment paper at room temperature until you’re ready to assemble the Pavlova. Do not refrigerate.)
-
Make the raspberry sauce: In a small saucepan, combine the raspberries, granulated sugar, and 2 tablespoons water. Bring to a simmer and cook, stirring occasionally, until soft and jammy, about 5 minutes. Transfer the raspberry mixture to a blender, add the raspberry jam, and puree until mostly smooth but with a few small pieces of raspberry still visible, about 30 seconds. Transfer the sauce to a small measuring cup and refrigerate until cool, about 1 hour. (The sauce can be prepared up to 3 days ahead and stored, covered, in the refrigerator.)
-
Prepare the peaches: In a medium bowl, gently toss together the peaches, granulated sugar, and ginger. Cover and refrigerate until ready to use.
-
Just before assembling, make the yogurt whipped cream: In a large bowl, using an electric mixer fitted with the whisk attachment, beat the cream, yogurt, vanilla, confectioners’ sugar, and salt on medium-high speed until it holds soft peaks, 2 to 3 minutes.
-
Assemble the Pavlova: Place one of the meringue rounds on a large platter. Spoon half the yogurt whipped cream into the center of the round and smooth it slightly with the back of a spoon. Scoop up half the sliced peaches with a slotted spoon and arrange them on top. Drizzle with 2 tablespoons of the raspberry sauce and top with the second meringue round. Spoon the remaining yogurt whipped cream on top and arrange the remaining sliced peaches in the center. Drizzle with 2 more tablespoons of the raspberry sauce and garnish with mint. Pour the remaining raspberry sauce into a small pitcher. Serve the Pavlova immediately, with the extra sauce on the side.
— HOME CHALLENGE —

When judge Christina Tosi introduced the Season 4 semifinalists to the soufflé challenge, she reminded them that soufflés are “one of the hardest desserts to master in the entire world” and that sometimes even professional pastry chefs get nervous about them! Her advice: For light, airy, delicious results every time, it’s incredibly important to concentrate on technique. That means making sure to carefully separate your egg whites and yolks, get your chocolate base thick and smooth, and beat your egg whites until they are shiny and firm but not overwhipped. And once you fill your ramekins and pop them in the oven, resist the urge to take a peek! Opening the oven door makes the temperature inside dip, which can cause the delicate batter to sink and fall. With attention to detail and patience, you and your soufflés will both rise to the challenge!
MAKES 8 INDIVIDUAL SOUFFLÉS
3 tablespoons unsalted butter, at room temperature
¾ cup granulated sugar, divided
4 large egg yolks
1¼ cups whole milk
2 tablespoons cornstarch
1 tablespoon unsweetened Dutch-process cocoa powder
¼ teaspoon kosher salt
4 ounces bittersweet chocolate, finely chopped (about ⅔ cup)
1 teaspoon pure vanilla extract
8 large egg whites, at room temperature
½ teaspoon cream of tartar
¼ cup confectioners’ sugar, plus more for dusting
-
Position a rack in the lower third of the oven and preheat the oven to 375°F. Use 2 tablespoons of the butter to lightly grease eight 6-ounce straight-sided ramekins. Use ¼ cup of the granulated sugar to coat the insides of the ramekins, turning them to coat the sides and bottom evenly, then tap out any excess.
-
Make an ice bath by filling a large bowl with ice cubes and 1 cup water. Set aside. In a medium saucepan, whisk together the egg yolks, milk, remaining ½ cup granulated sugar, the cornstarch, cocoa powder, and salt. Cook over medium heat, whisking often, as the mixture comes to a low simmer and thickens, about 4 minutes (be sure to get the whisk—or a wooden spoon—into the corners of the pan so the mixture doesn’t cook on the bottom!). Cook, whisking, until the mixture is smooth and thick, 1 to 2 minutes more. Remove from the heat and whisk in the chocolate, the remaining 1 tablespoon butter, and the vanilla until the mixture looks smooth and shiny. Scrape the chocolate mixture into a medium bowl. Set the bottom of the bowl in the prepared ice bath, taking care not to let any water spill into the bowl. Let the mixture cool, whisking occasionally, until the chocolate base is smooth and cooled to room temperature, 10 to 12 minutes.
-
In a large, clean, dry bowl, using an electric mixer fitted with the whisk attachment, beat the egg whites and cream of tartar on medium-high speed until they form soft peaks, about 1½ to 2 minutes. Slowly sprinkle in the confectioners’ sugar, a tablespoon or two at a time, and beat until the egg whites are glossy and form stiff peaks, about 1 minute more.
-
Using a rubber spatula, very gently fold half the egg whites into the cooled chocolate base. Repeat with the remaining egg whites, folding just enough to combine.
-
Divide the mixture evenly among the prepared ramekins and very carefully place them on a baking sheet. Lightly set the baking sheet on the oven rack and gently close the oven door. Bake until the soufflés rise and crack on top but are still slightly wobbly in the center, 15 to 20 minutes. Take care not to jump around or open the oven door before the soufflés are ready—any big movements or sudden changes in temperature can make them deflate!
-
Remove the baking sheet from the oven and carefully set it on a heatproof surface. Set each soufflé on a plate and dust the tops with confectioners’ sugar. Serve immediately.

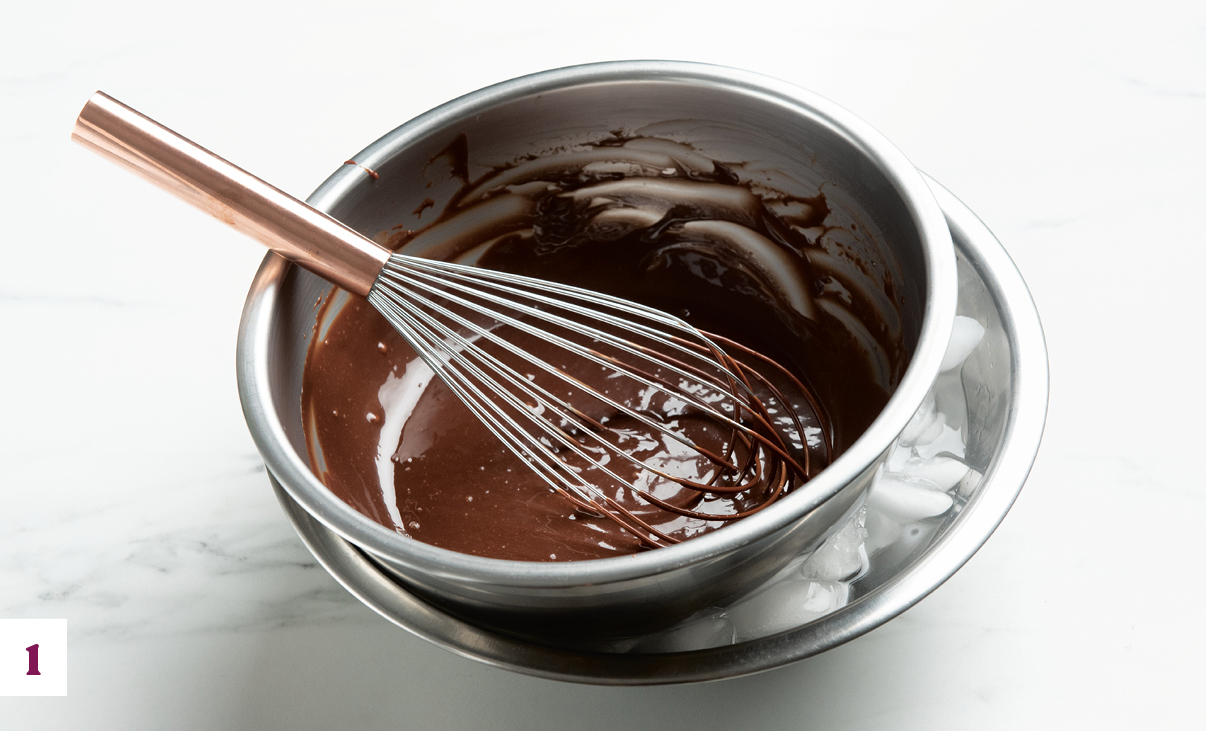
Step 1: Whisk the chocolate base until completely smooth and use an ice bath to chill to room temperature.

Step 2: Gently fold the egg whites into the chocolate base.
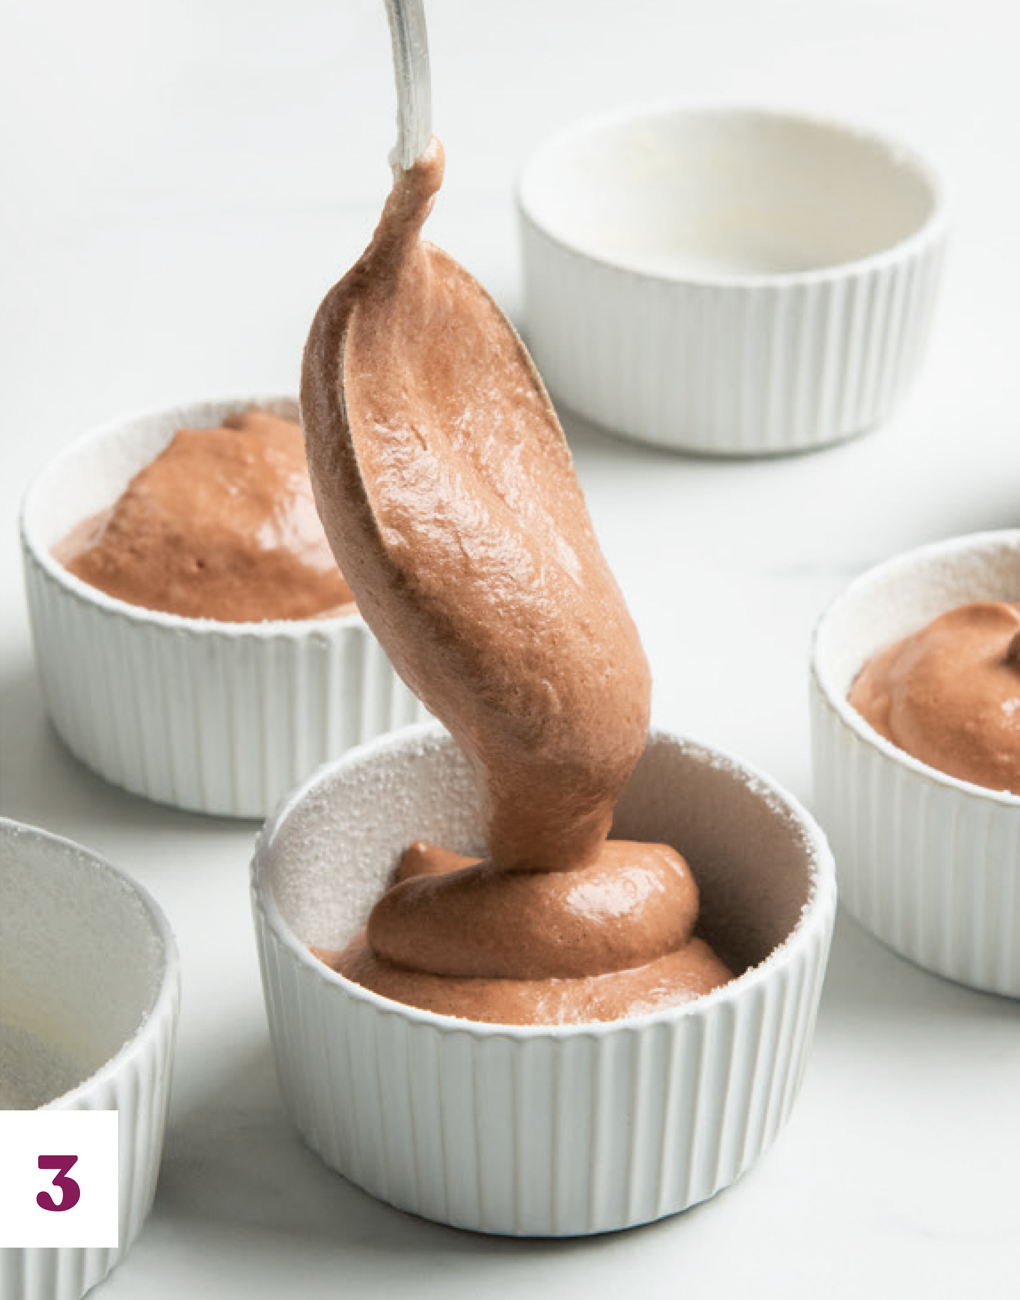
Step 3: Divide the mixture evenly among the prepared ramekins.

Step 4: Bake until the soufflés are tall and beginning to set on top but still wobbly at the center. Dust with confectioners’ sugar and serve immediately.