With all of that in hand, it is now easy to discuss the IplImage data structure. In essence this object is a CvMat but with some extra goodies buried in it to make the matrix interpretable
as an image. This structure was originally defined as part of Intel's Image Processing Library (IPL).[19] The exact definition of the IplImage
structure is shown in Example 3-10.
Example 3-10. IplImage header structure
typedef struct _IplImage {
  int                  nSize;
  int                  ID;
  int                  nChannels;
  int                  alphaChannel;
  int                  depth;
  char                 colorModel[4];
  char                 channelSeq[4];
  int                  dataOrder;
  int                  origin;
  int                  align;
  int                  width;
  int                  height;
  struct _IplROI*      roi;
  struct _IplImage*    maskROI;
  void*                imageId;
  struct _IplTileInfo* tileInfo;
  int                  imageSize;
  char*                imageData;
  int                  widthStep;
  int                  BorderMode[4];
  int                  BorderConst[4];
  char*                imageDataOrigin;
} IplImage;
As crazy as it sounds, we want to discuss the function of several of these variables. Some are trivial, but many are very important to understanding how OpenCV interprets and works with images.
After the ubiquitous width and height, depth and nChannels
are the next most crucial. The depth variable takes one
of a set of values defined in ipl.h, which are
(unfortunately) not exactly the values we encountered when looking at matrices. This is
because for images we tend to deal with the depth and the number of channels separately
(whereas in the matrix routines we tended to refer to them simultaneously). The possible
depths are listed in Table 3-2.
Table 3-2. OpenCV image types
|
Macro | |
|---|---|
|
|
Unsigned 8-bit integer (8u) |
|
|
Signed 8-bit integer (8s) |
|
|
Signed 16-bit integer (16s) |
|
|
Signed 32-bit integer (32s) |
|
|
32-bit floating-point single-precision (32f) |
|
|
64-bit floating-point double-precision (64f) |
The possible values for nChannels are 1, 2, 3, or
4.
The next two important members are origin and
dataOrder. The origin variable can take one of two values: IPL_ORIGIN_TL or IPL_ORIGIN_BL,
corresponding to the origin of coordinates being located in either the upper-left or
lower-left corners of the image, respectively. The lack of a standard origin (upper versus
lower) is an important source of error in computer vision routines. In particular, depending
on where an image came from, the operating system, codec, storage format, and so forth can
all affect the location of the origin of the coordinates of a particular image. For example,
you may think you are sampling pixels from a face in the top quadrant of an image when you
are really sampling from a shirt in the bottom quadrant. It is best to check the system the
first time through by drawing where you think you are operating on an image patch.
The dataOrder may be either IPL_DATA_ORDER_PIXEL or IPL_DATA_ORDER_PLANE.[20] This value indicates whether the data should be packed with multiple channels
one after the other for each pixel (interleaved, the usual case), or
rather all of the channels clustered into image planes with the planes placed one after
another.
The parameter widthStep contains the number of bytes
between points in the same column and successive rows (similar to the "step" parameter of
CvMat discussed earlier). The variable width is not sufficient to calculate the distance because each
row may be aligned with a certain number of bytes to achieve faster processing of the image;
hence there may be some gaps between the end of ith row and the start of
(i + 1) row. The parameter imageData contains a pointer to the first row of image data. If there are
several separate planes in the image (as when dataOrder =
IPL_DATA_ORDER_PLANE) then they are placed consecutively as separate images with
height*nChannels rows in total, but normally they are
interleaved so that the number of rows is equal to height and with each row containing the
interleaved channels in order.
Finally there is the practical and important region of interest
(ROI), which is actually an instance of another IPL/IPP
structure, IplROI. An IplROI contains an xOffset, a yOffset, a height, a width, and a coi, where COI
stands for channel of interest.[21] The idea behind the ROI is that, once it is set, functions that would normally
operate on the entire image will instead act only on the subset of the image indicated by the ROI. All
OpenCV functions will use ROI if set. If the COI is set to a nonzero value then some
operators will act only on the indicated channel.[22] Unfortunately, many OpenCV functions ignore this parameter.
When working with image data we usually need to do so quickly and efficiently. This
suggests that we should not subject ourselves to the overhead of calling accessor
functions like cvSet*D or their equivalent. Indeed, we
would like to access the data inside of the image in the most direct way possible. With
our knowledge of the internals of the IplImage structure, we can now understand how best
to do this.
Even though there are often well-optimized routines in OpenCV that accomplish many of
the tasks we need to perform on images, there will always be tasks for which there is no
prepackaged routine in the library. Consider the case of a three-channel HSV [Smith78]
image[23] in which we want to set the saturation and value to 255 (their maximal values
for an 8-bit image) while leaving the hue unmodified. We can do this best by handling the
pointers into the image ourselves, much as we did with matrices in Example 3-9. However, there are a few minor
differences that stem from the difference between the IplImage and CvMat structures. Example 3-11 shows the fastest way.
We simply compute the pointer ptr directly as the
head of the relevant row y. From there, we de-reference
the saturation and value of the x column. Because this
is a three-channel image, the location of channel c in
column x is 3*x+c.
One important difference between the IplImage case
and the CvMat case is the behavior of imageData, compared to the element data of CvMat. The data element of CvMat is a
union, so you must indicate which pointer type you want to use. The imageData pointer is a byte pointer (uchar*). We already know that the data pointed to is not necessarily of type
uchar, which means that—when doing pointer arithmetic
on images—you can simply add widthStep (also measured
in bytes) without worrying about the actual data type until after the addition, when you
cast the resultant pointer to the data type you need. To recap: when working with
matrices, you must scale down the offset because the data pointer may be of nonbyte type;
when working with images, you can use the offset "as is" because the data pointer is
always of a byte type, so you can just cast the whole thing when you are ready to use
it.
ROI and widthStep have great practical importance,
since in many situations they speed up computer vision operations by allowing the code to
process only a small subregion of the image. Support for ROI and widthStep is universal in OpenCV:[24] every function allows operation to be limited to a subregion. To turn ROI on
or off, use the cvSetImageROI() and cvResetImageROI() functions. Given a rectangular subregion of interest in the form of a CvRect, you may pass an image pointer and the rectangle to cvSetImageROI() to "turn on" ROI; "turn off" ROI by passing
the image pointer to cvResetImageROI().
void cvSetImageROI( IplImage* image, CvRect rect );
void cvResetImageROI( IplImage* image );
To see how ROI is used, let's suppose we want to load an image and modify some region
of that image. The code in Example 3-12
reads an image and then sets the x, y, width, and
height of the intended ROI and finally an integer
value add to increment the ROI region with. The program
then sets the ROI using the convenience of the inline cvRect() constructor. It's important to release the ROI with cvResetImageROI(), for otherwise the display will observe the
ROI and dutifully display only the ROI region.
Example 3-12. Using ImageROI to increment all of the pixels in a region
// roi_add <image> <x> <y> <width> <height> <add>
#include <cv.h>
#include <highgui.h>
int main(int argc, char** argv)
{
IplImage* src;
if( argc == 7 && ((src=cvLoadImage(argv[1],1)) != 0 ))
{
int x = atoi(argv[2]);
int y = atoi(argv[3]);
int width = atoi(argv[4]);
int height = atoi(argv[5]);
int add = atoi(argv[6]);
cvSetImage ROI(src, cvRect(x,y,width,height));
cvAddS(src, cvScalar(add),src);
cvResetImageROI(src);
cvNamedWindow( "Roi_Add", 1 );
cvShowImage( "Roi_Add", src );
cvWaitKey();
}
return 0;
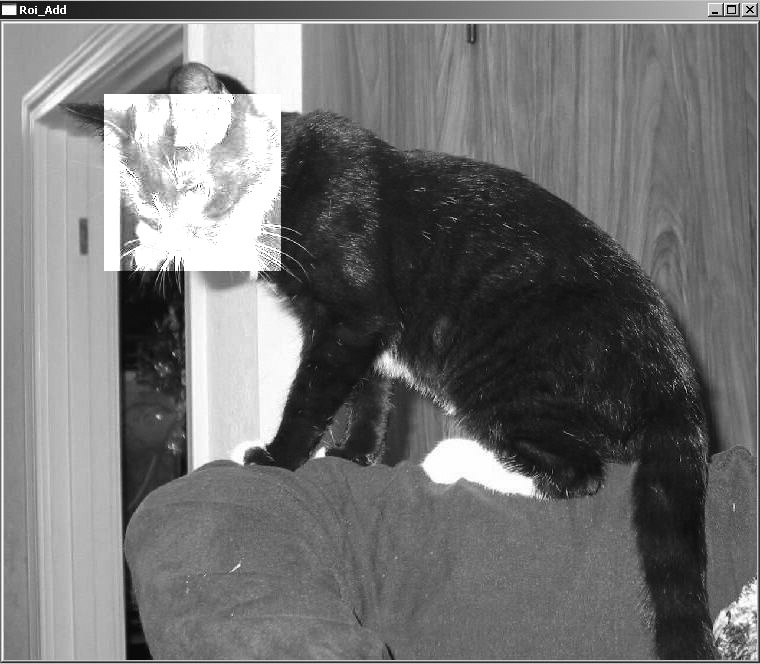
}Figure 3-3 shows the result of adding 150 to the blue channel of the image of a cat with an ROI centered over its face, using the code from Example 3-12.
We can achieve the same effect by clever use of widthStep. To do this, we create another image header and set its width and
height equal to the interest_rect width and height. We
also need to set the image origin (upper left or lower left) to be the same as the
interest_img. Next we set the widthStep of this subimage to be the widthStep of the larger interest_img; this
way, stepping by rows in the subimage steps you to the appropriate place at the start of
the next line of the subregion within the larger image. We finally set the subimage
imageData pointer the start of the interest
subregion, as shown in Example 3-13.
Example 3-13. Using alternate widthStep method to increment all of the pixels of interest_img by 1
// Assuming IplImage *interest_img; and
 //  CvRect interest_rect;
 //  Use widthStep to get a region of interest
 //
 // (Alternate method)
 //
 IplImage *sub_img = cvCreateImageHeader(
   cvSize(
      interest_rect.width,
      interest_rect.height
   ),
   interest_img->depth,
   interest_img->nChannels
 );

 sub_img->origin = interest_img->origin;

 sub_img->widthStep = interest_img->widthStep;

 sub_img->imageData = interest_img->imageData +
   interest_rect.y * interest_img->widthStep   +
   interest_rect.x * interest_img->nChannels;

 cvAddS( sub_img, cvScalar(1), sub_img );

 cvReleaseImageHeader(&sub_img);
So, why would you want to use the widthStep trick
when setting and resetting ROI seem to be more convenient? The reason is that there are
times when you want to set and perhaps keep multiple subregions of an image active during
processing, but ROI can only be done serially and must be set and reset
constantly.
Finally, a word should be said here about masks. The cvAddS() function used in the
code examples allows the use of a fourth argument that defaults to NULL: const CvArr* mask=NULL. This is an 8-bit single-channel array
that allows you to restrict processing to an arbitrarily shaped mask region indicated by
nonzero pixels in the mask. If ROI is set along with a mask, processing will be restricted
to the intersection of the ROI and the mask. Masks can be used only in functions that
specify their use.
[19] IPL was the predecessor to the more modern Intel Performance Primitives (IPP), discussed in Chapter 1. Many of the OpenCV functions are actually relatively thin wrappers around the corresponding IPL or IPP routines. This is why it is so easy for OpenCV to swap in the high-performance IPP library routines when available.
[20] We say that dataOrder may be either IPL_DATA_ORDER_PIXEL or IPL_DATA_ORDER_PLANE, but in fact only IPL_DATA_ORDER_PIXEL is supported by OpenCV. Both values are generally
supported by IPL/IPP, but OpenCV always uses interleaved images.
[21] Unlike other parts of the ROI, the COI is not respected by all OpenCV functions. More on this later, but for now you should keep in mind that COI is not as universally applied as the rest of the ROI.
[22] For the COI, the terminology is to indicate the channel as 1, 2, 3, or 4 and to reserve 0 for deactivating the COI all together (something like a "don't care").
[23] In OpenCV, an HSV image does not differ from an RGB image except in terms of how the channels are interpreted. As a result, constructing an HSV image from an RGB image actually occurs entirely within the "data" area; there is no representation in the header of what meaning is "intended" for the data channels.
[24] Well, in theory at least. Any nonadherence to widthStep or ROI is considered a bug and may be posted as such to
SourceForge, where it will go on a "to fix" list. This is in contrast with color
channel of interest, "COI", which is supported only where explicitly stated.