Heat Loss,
Air Quality,
and Moisture
MOISTURE, AIR QUALITY, AND THERMAL CONTROL are relevant straw bale design issues in all climates, but they are most crucial in cold and/or wet climates. Bales are a good choice for cold-climate walls, because they insulate well. They can only perform to their highest potential, however, when incorporated into an overall strategy for superinsulation. This chapter will define, for owner-builders and others not already familiar with them, the basic concepts and terms relevant to heat loss, air quality, and moisture control—the three technical criteria that form the foundation of cold climate design.1 Don’t be dismayed about encountering this technical discussion before we dive into the practical aspects of building with bales. Dealing effectively with these design challenges is without a doubt the key to building a successful, durable straw bale house.
Heat Loss and Indoor Air Quality
If we look only at conserving heat, the ideal house would have thick, well-insulated walls, floors, and ceilings. Because we want no cold air to enter or warm air to leave, there would be no fans or chimney stacks. Neither would there be any doors or windows, except maybe for some insulating glass on the south side, for solar gain. On the other hand, a house designed only with air quality in mind might hardly be a house at all. A cave (with no campfire allowed) might serve well, or a roof and a couple of flimsy walls, for protection from wind and rain. If it were an actual house, people might not be allowed inside, on account of their CO2 emissions. Clearly, cold-climate design strategies must involve a compromise between heating efficiency and ventilation.
We can see this need for compromise in real houses that people are struggling to live in. Some of the early attempts at airtight, superinsulated construction have poor air quality because they were designed only to conserve heat. On the other hand, many old houses allow an excessive amount of outdoor air to leak in. If you’ve ever lived in one, you know all about closing off rooms, keeping close to the stove to stay warm, and waking up with a sore throat on account of excessively dry indoor air. The key to comfort lies in striking a balance between heat loss and fresh air. To balance them wisely the designer must understand the relationship between them.
A building’s ability to hold heat depends on the quality of its doors and windows, the insulating properties of its shell components, and the rate at which air passes in and out. To some degree it also depends on the mass inside the building, though this has more to do with the quantity of heat energy that can be stored than the rate at which it escapes. (See sidebar, “What Is Rvalue Anyway?”)
Door and window makers publish product guides for designers that provide the insulation and infiltration (air leakage) characteristics of their products. Compare them and buy (or build) the best ones you can afford.
Insulation is largely what this book is about— bales of straw as wall insulation. Bales provide an Rvalue of 1.45 per inch when laid flat (heat flow along the length of the straws, “with the grain”) and somewhere upward of 2.06 per inch on their edge (heat flow perpendicular to the straws, “across the grain”). Regardless of how you use them, bales provide a superinsulated wall to retain heat inside a building.
Infiltration, which is responsible for 28 percent of the heat loss in a typical, new, codebuilt house in the United States, is a more complicated issue. Anyone who has spent a winter in an unplastered straw bale house can tell you that bales alone do not prevent massive quantities of cold air from leaking into a building. They need the inside and outside coats of plaster to provide a cavity of still air. This is true of most insulation materials. Even if insulation materials could block the flow of air, however, they would not stop the majority of infiltration into the typical house. The plaster and drywall planes of walls and ceilings are usually relatively airtight; most leakage occurs at seams between these surfaces, and around windows, doors, lights, electrical outlets, vents, and other openings; at framing intersections; and through holes drilled between conditioned and unconditioned spaces for pipes, wires, and heating ducts. An efficient building shell controls leakage at all of these points.
Many people say that a building needs to “breathe,” so that its occupants might do like-wise. This is obviously the case; the key to balancing heat loss with ventilation is to regulate the breathing. In the same way that a person breathes through a portal known as the mouth, by the action of a pump known as the lungs, and takes in more or less air depending on the body’s need at the moment, an efficiently designed house breathes through windows and fans, and takes in more or less air, according to the activities going on inside. (This “breathing” is not, unfortunately, a very useful term, as it is also some-times meant to indicate a wall’s ability to slowly diffuse water vapor and other gases. Openness to vapor diffusion is a good idea in bale walls, but it has nothing to do with inhaling or exhaling air. This ambiguity has caused endless confusion among bale enthusiasts. If we had our way, we would purge this term from the construction lexicon. See “Vapor Permeability,” and “Paul’s Diatribe against ‘Breathable,’” later in this chapter.)
Often, in mainstream construction, little effort is made to close the many small gaps in a typical building’s shell, the idea being that these will provide fresh air to the occupants. This is only crudely true. The problem with this approach is that the amount of fresh air bears no relationship to the needs of the people inside. It might or might not be distributed where they need it, and its volume is determined by the weather. Thanks to the stack effect and to wind pressure (see sidebar, “The Driving Forces Behind Air Movement”), such a house will exchange more air with the outdoors as the temperature drops (as the difference between indoor and outdoor temperatures increases), or as the wind blows harder. It is highly unlikely that these would consistently be the times when a house requires extra ventilation. This fact does, however, create an extra incentive for owners of old houses to host parties on the coldest nights of the year. You are already paying for a copious supply of fresh air, so why not help your neighbors through the loneliness of winter?
When the temperature difference between indoors and outdoors is not all that great, such as in spring and fall, a house with many small gaps but no real controls may not provide enough ventilation for its occupants. Though it might seem obvious that people would simply open their windows at such times, this does not always happen. In Western societies, most people are now away at work during most days, trying to keep up with their next mortgage payment. In the spring and fall, it is typically only in the middle of the day when temperatures are warm enough to make people want to open a window. By the time they get home, and begin their evening rituals of breathing, cooking, and showering, the temperature will usually have dropped enough that they are less inclined to open the windows. It may not have dropped enough, however, for the stack effect to provide ample fresh air.
Let’s look at a building whose air intake is controlled by the needs of the occupants. To begin with, such a building would be detailed to minimize air leakage. Openings between heated and unheated spaces would be avoided wherever possible, and the unavoidable seams in the building’s framing would be sealed. Wind and weather, therefore, would have a much reduced effect on the environment inside the house. All combustion appliances would be of the “sealed” variety, drawing none of their combustion air from within the building. In these appliances, exhaust and intake are ducted directly to and from the outdoors, and all combustion takes place within a sealed chamber. Equipment of this sort has no effect on airflow patterns, and cannot pollute interior air.
In this building with minimal air leakage, fresh air is provided by quiet, efficient, timer-controlled fans, often the same fans that handle heavy moisture loads from showering and cooking. Two ventilation methods are suitable for cold climates: heat recovery and exhaust only.

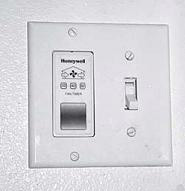
This HRV controller features an electronic button, which kicks on an exhaust fan for a preset period when the bathroom is in use.
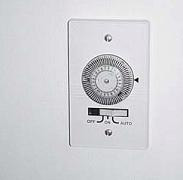
This simple controller runs an exhaust fan for a portion of each hour, converting a bath fan into an exhaust-only ventilation system.
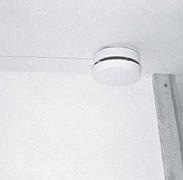
A makeup air vent with a closable lid.
Heat-Recovery Ventilation
Heat-recovery ventilators, more commonly known as HRVs or air-to-air heat exchangers, transfer heat from the warm air leaving a house to the cool air that is entering. They are beautifully simple devices. The two streams of air (which are typically broken into many small streams, to maximize surface area) are separated only by a thin sheet of heat-conducting material. Heat energy moves across this membrane, flowing naturally from the warm air to the cool air. As much as 80 percent of the heat is recovered from the outgoing air.
HRVs can connect directly to the indoors, or they can be incorporated into the supply side of a forced-air heating system. They are typically designed to run continuously at a low level, providing a constant supply of fresh air. Override switches in bathrooms and kitchens allow the occupants to kick the fan to full volume during cooking, showers, or dance parties.
The most obvious strength of an HRV is the heat-recovery feature. You can have your warmth and breathe it too! But their merits don’t end there. Because the in- and out-flows are balanced in an HRV, they have no effect on other air pressures within the building. This is important in very tightly constructed houses where backdrafting duels between various fans and chimneys can be a real problem.
Heat recovery ventilators are only worth installing on buildings that are quite airtight. At $600–$1,100 U.S., these units are not inexpensive. While they can offer good value in an airtight house, in both heat saved and indoor air quality, they will never pay for themselves in a leaky house in which their effects are diluted by lots of uncontrolled air changes.
Exhaust-Only Ventilation
Exhaust-only ventilation means that air is sucked out of the building, usually by fans. Makeup air enters where it can—typically through the multiple seams that remain unsealed in most houses, even in those that we attempt to build airtight. In some cases special makeup air vents with closeable lids are inserted in the walls, as intentional leaks through which air can enter.
Exhaust-only ventilation has the benefit of being substantially less expensive to install than heat-recovery ventilation. In a sophisticated system a basement-mounted fan is hitched to a timer or other controller and ducted to bathrooms and the kitchen (though not to the range hood, as these fans are not intended to handle grease). The timer typically runs the fan for a portion of each hour, or continuously, at low power. An override switch allows the occupants to kick the fan on, at full bore, at times of major moisture production.
A less expensive system converts the bathroom and kitchen fans (which will already be there anyway) into a ventilation system, by rigging them with timers. The trick to keeping such a system in operation over the years is to install high-quality, quiet fans. Manufacturers publish sone (noise) and power consumption ratings for their fans, and these are worth comparing: 1 to 1.5 sones at maximum speed is very quiet. This is no place to cut corners; spend the extra money and buy a good-quality fan. It will last longer and consume less electricity than a cheap one, and you will never be bothered by the sound of its running.
Fan controllers are available in a number of different styles and function combinations. The crucial matter is to install one that allows both consistent and on-demand use. Two units worth mentioning are the Airetrak and Humitrak, produced by Tamarack Technologies in Wareham, Massachusetts. These are available in both AC and DC models. The Airetrak is a nifty little gadget. It runs your fan at intervals that you set, and at a speed that you set. It also includes an override button (the only part of the unit that is visible through the cover plate) that kicks the fan on for twenty minutes at full speed. The Humitrak turns your fan on when the humidity inside the house reaches a set level, anywhere between 10 and 90 percent. Units are available with built-in or remote sensing devices. The Humitrak also includes an override switch, which kicks the fan on for twelve minutes. Each of these units retails for less than a hundred U.S. dollars.
The Driving Forces Behind Air Movement
Air is pretty light stuff, easily pushed around. The three forces that do most of the pushing are the stack effect, wind pressure, and powervented appliances.
THE STACK EFFECT
Warm air rises. This is known as the stack effect because it is the force that makes chimneys (smokestacks) work. Warm air finds the most direct route to the highest point; the role of the chimney is to provide a channel to the sky.
The stack effect isn’t confined to chimneys, however. If you squint your eyes a bit, you can probably imagine your entire house as something of a chimney, built of lots of pieces, with small gaps where these pieces meet, and with an imperfectly fitting lid. Now imagine a heat source— let’s say, for the sake of simplicity, an electric heater—in the center of the first floor of the house.
What happens in this chimneylike house? The air around the heater warms up, and because warm air is less dense, it begins to rise. The warm air fans out as it rises, giving up heat to everything it touches. At first it cools and sinks back down; before long, however, enough warm air has reached into the higher parts of the house that the air there has become warmer than the outside air. It pushes against the roof and upper walls of the house and leaks out through small openings between the building’s parts. Some sneaks out around second-story windows, some through ceiling-mounted light fixtures. Quite a lot finds the attic hatch, and exits around the perimeter of the door. Since nature abhors a vacuum, this escaping air must be replaced by cold air coming in at the lower parts of the house: around windows and electrical outlets, under doors, and from the basement, through small gaps between floorboards.
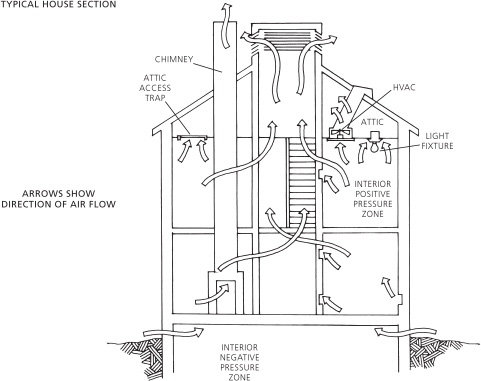
The stack effect: warm air rises to the highest point.
WIND PRESSURE
Wind pressure can be a very powerful force in determining how air moves in and out of buildings. During particularly windy periods it can overwhelm the stack effect. Wind ncreases the air pressure on the windward side of a building and reduces it on the leeward side, so that air leaks in on the wind side and out on the lee. In leaky houses, this can result in very significant energy losses, and unpleasant cold drafts.
POWER-VENTED APPLIANCES
power-vented appliances, typically boilers, furnaces, hot water heaters, dryers, range hoods, and central vacuum cleaners, draw air from inside the building. Occasionally, in a tight building, such an appliance can actually backdraft a conventional chimney, drawing flue gases back down. To avoid this, we recommend sealed combustion equipment, in which combustion air is drawn directly from the outdoors and combustion gases returned there. The burn chamber in such a unit is actually sealed off from the living space; there is no opportunity for waste gases to leak into the house and no chance that the ap-pliance will affect house air pressures.
Envelope Efficiency vs. Thermal Mass
While this chapter is primarily concerned with the design of a building’s envelope—those surfaces that divide the conditioned interior space from the vagaries of the outdoor world—it is worth taking a moment to note the role of thermal mass in the overall equation of building ef-ficiency. The efficiency of the envelope is determined by two factors: the degree of insulation of walls, floors, ceilings, windows, and doors, and the rate of air leakage through these components. A simple way to understand this is to imagine one Btu of heat put into a building. How soon will it be able to get out? The answer depends upon lots of factors, especially the difference in temperature between inside and outside. However, the consistent truth is that the more insulated and airtight the building’s shell is, the longer this Btu will be trapped inside. The quality of the building’s envelope determines the rate at which it will lose heat.
Thermal mass, on the other hand, determines the quantity of heat energy that the building is capable of storing. Let’s oversimplify again by imagining a house from which no heat escapes— the envelope is built infinitely well, so the rate of heat loss is zero. Let’s also imagine, for a moment, that the building has no thermal mass. What happens as we begin to add heat energy, a few Btus at a time? The air inside begins to warm up. Pretty soon it feels like a sauna, and after a while we go outside and jump in a river. With our heads cleared, we begin to reason. We need to do something to store some of this heat; so we turn off the heat source and haul in a few rocks, and as the rocks absorb heat energy out of the air, the indoor temperature begins to drop down to a comfortable level. Because we are living in a simplified example, we also realize that if we keep hauling in rocks, we can keep the heat source cranked up without overheating the air inside the building, because the rocks are absorbing the energy—they’re warming up. We have discovered the function of thermal mass: The quantity of mass in a building determines the quantity of heat that can be stored inside.
The efficiency of the envelope is determined by two factors: the degree of insulation of walls, floors, ceilings, windows, and doors, and the rate of air leakage through these components.
This storage capability is not very important in an example where the envelope is incapable of passing heat, but what about in an actual building? In the real world, some amount of heat would have been escaping all along. The role of the warmed-up rocks, then, would be to provide a reservoir of energy, so that the space would remain comfortable for a while, even if the heat source were turned off. This is the whole point of cold-climate design: to keep interior spaces comfortable while running the furnace or boiler or stove as little as possible.
Thermal mass is especially important in houses where some proportion of the heat is to be provided by the sun. The mass serves two functions here. It absorbs solar radiation during the day, (hopefully) keeping the air in the building from overheating on a sunny afternoon. It then releases the heat at night, thereby reducing the need to burn something in order to keep the place warm. The extent to which the mass can do this job is determined by the amount of insolation (solar input) received during the day, and by—you guessed it!—the quality of the envelope— the rate at which the house is losing heat to the outdoors. Thermal mass is most effective when spread out over a large area, so plastered bale walls are ideal, because they provide relatively thin mass everywhere!
What Is
R-Value,
Anyway?2
R-value is a contrived (derived) number that the insulation industry came up with in the 1950s to sell its product. It is a measure of thermal resistance, and is the inverse of U-value, a measure of thermal conductance (R = 1/U). So, the smaller the U-value, the less heat is conducted and the better the thermal performance of the material. In a land where we tend to think “bigger is better,” it is easy to understand why the insulation industry made up the “R-value.” The larger the Rvalue the better the product is at resisting heat loss in the winter and some types of heat gain in the summer.
Just what is U-value? It’s hard to simplify. U-value is: the number of British Thermal Units of energy (Btu) that will flow through 1 square foot of a material during one hour (at whatever thickness the material is) with a one degree Fahrenheit difference between the air temperatures at the two sides of the material. As a formula, U = Btu/([Temp In–Temp Out] x sq. ft. x hours).
Let’s take an example. Say we have 1 square foot of “pink insula-tion” separating two spaces. The temperature on one side is 70°F, and the temperature on the other side is 0°F. We can find the U-value once we know how much heat energy it takes to keep the warm side at 70 degrees for one hour. Let’s say it took exactly 3.68 Btus to maintain the 70-degree temperature difference: 3.68 Btu/(70 degrees x 1 hour x 1 sq. ft.) = 0.05263. That’s the U-value of that insulation material. To get the Rvalue we divide the U-value into 1. And 1 divided by 0.05263 = 19. Therefore, the material has an Rvalue of 19. This happens to be the standard value for 6-inch-thick fiberglass batts.
A well-built thermal envelope is always a good idea in cold climates. Interior thermal mass is usually a good idea as well, because, regardless of the solar heating component, buildings that coast along at a consistent temperature tend to be more comfortable than those whose temperatures rise and fall noticeably as the heat source kicks on and off. Mass is like momentum for a building: it can keep it cruising along in between inputs of fuel. Mass can be of disservice, however, when a building will be allowed to cool down for long periods between heating. A weekend house in the woods might be a good example. Because it receives no solar input, such a building would spend the whole week losing heat. When the owners arrive on Friday night they fire up the woodstove and furnace, they try to stay away from the cold walls and near the stove, and they spend the entire weekend heating up the mass of the house, just so it can cool down again. The building, in this case, is like a tractortrailer stuck in a row of stoplights; it requires repeated large energy inputs in order to slowly climb up through its gears, only to be stopped before it reaches cruising speed. This is not very efficient.
Moisture
Water is the main enemy of straw. Straw that gets wet and stays wet will surely decompose; kept dry, it seems to last forever. In the straw bale construction world, as well as the wider building world, many people misunderstand how moisture gets into and out of walls, and such misunderstanding can lead to ineffective house design. Water enters straw bale walls from four major sources:
1. From the interior, in the form of condensation from leaking air or diffused vapor.
2. From the ground, in the form of groundwater or condensation, transported primarily by capillary action in the foundations, and also by vapor diffusion.
3. During construction, as liquid water from almost anywhere.
4. From the exterior, as rain or, to some degree, melting snow. This, obviously, is the most dangerous long-term source.
Ventilating
Off-the-Grid
Houses
Stand-alone power systems often run so close to the bone that they cannot afford the small amount of electricity (less than 20 watts for some exhaust-only fans) required to operate a continuous or intermttent ventilation system. Until recently, even night-lights were taboo in many off-grid homes. The owners of such systems are necessarily willing to adjust their electrical usage to the charge of their batteries, and must remember where their furniture is to avoid wandering into it during nocturnal jaunts. It would seem that such independent souls would also be quite capable of moderating the air quality inside their homes by opening windows every day. Unfortunately, this often does not happen; people seem to have a basic aversion to opening a window when it’s 0 degrees outside.
Traditionally, woodstoves have acted as defacto exhaust-only ventilation systems in off-the-grid houses. Older woodstoves draw a lot of air out of the living space and send it up the chimney. Replacement air must come from somewhere, so it comes in through small leaks in the building envelope, as it would in an exhaust-only ventilation system. (The same thing happens with a fireplace, at a volume that is orders of magnitude greater than with a woodstove. Thus the adage about a roaring fire warming the area directly in front of it, while making the rest of the house feel colder; it doesn’t just feel colder by comparison, it actually gets colder, as winter air rushes in to slake the thirsty draft of the chimney.) The problem with this approach is that newer, airtight stoves, designed to waste less heat, also send less air up the chimney. Add in the fact that it is now common practice to duct combustion air directly to the stove, and it becomes entirely unreliable as an exhaust mechanism. (The reason for ducting air to the stove is to avoid the real danger that, if the house truly is built tightly, the chimney might not draw well, especially if other exhaust appliances are running. Then toxic gases and black, smelly smoke will back up into the room.)
Opening the windows for a portion of each day is not the most energy-efficient means of providing a house with ventilation. Neither is it the simplest, since the homeowner must consistently remember to do it. However, where heat energy is more readily available than electrical energy, and where the occupants enjoy attending to the details of operating their home (or enjoy opening windows), such a system can work quite adequately. The key is, before designing a house this way, you need to ask yourself whether you will, in fact, open the windows!
An off-the-grid house should still have ventilation fans to exhaust brief, intense moisture loads and smells from the kitchen and bath. These fans run for such short periods (typically twenty minutes or less) and at low enough wattages that they use a minimal amount of power. Excellent-quality, quiet fans are available in both AC and DC models.
Interior Moisture Sources
We begin with interior sources of moisture, not because they are the most important, but because the definitions of terms that are required here will be useful through the remainder of this chapter.
VAPOR AND RELATIVE HUMIDITY
Most readers of this book have heard about water vapor, that mysterious stuff in the air that, when it gets into the fabric of a building, can cause moisture problems. What is this stuff? Air is a mixture of many gases, including water. In this gaseous state water is known as water vapor. How does it get into the air? Out of doors, it is largely the product of evaporation or tran-spiration—from oceans, lakes, rivers, the ground, and plants. Indoors, it comes from obvious sources such as showers and cooking, and also from less obvious sources, including people breathing, transpiration from house plants, evaporation from washed dishes and clothing, and even from drying firewood. In addition, just like outside, evaporation from the ground into the living space is potentially a huge source. Unvented cooking and heating appliances that burn any fuel also create water vapor as a byproduct of combustion.
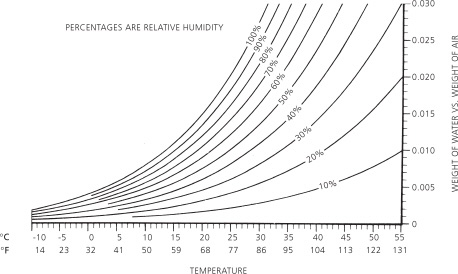
Moisture content of air.
The ability of a given volume of air to hold moisture varies with temperature. The warmer air gets, the more water vapor it can hold; the colder it gets, the less it can hold. This is why outdoor winter air is dry in cold climates—it is simply not capable of holding much moisture. “Relative humidity,” then, is a term for expressing how “full” air is—how the amount of water in the air compares with the maximum amount of water that the air could hold. In more mathematical terms, relative humidity is defined as the percentage of possible water vapor that is present in a given volume of air, at a particular temperature. For the sake of illustration, let’s say that a volume of air is capable of holding 100 molecules of water vapor at 75 degrees. If those 100 molecules are present, the air is said to be at 100 percent relative humidity. The air is saturated; it is holding all the moisture that it possibly can at that temperature. Now let’s remove 50 of those molecules. The air is still at 75 degrees, and can still hold 100 molecules, but now we only have 50 molecules of water vapor left; the air is now at 50 percent relative humidity. If we further reduced the number of vapor molecules to 25, the air would be at 25 percent relative humidity, and so on. So, it is possible to change the relative humidity of air by changing the amount of moisture in it.
It is also possible to change relative humidity by changing the temperature of the air. That same 75-degree air, at 50 percent relative humidity, is holding 50 molecules of water vapor while able to hold 100 molecules. If we cool the air, we reduce its maximum capacity. If we cool it enough that its capacity is dropped to 50 molecules, it will now be at 100 percent relative humidity; the 50 molecules present are 100 percent of the new maximum. Likewise, if we warm the air we decrease the relative humidity because warm air is capable of holding more vapor.
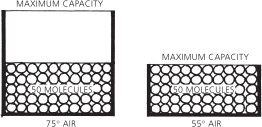
Air temperature vs. holding capacity of moisture.
CONDENSATION AND DEWPOINT
How do vapor and relative humidity relate to what goes on within the fabric of buildings? Warm, relatively moist interior air, traveling outward through holes in a wall in winter, will eventually hit a surface cold enough that the air is chilled below the point of 100 percent relative humidity. This is known as the dewpoint temperature— the temperature at which, for a given starting temperature and relative humidity, the air will come to contain more molecules of water than it is capable of holding. Some of this vapor drops out of the air, and is deposited on a surface, as liquid water. This is called “conden-sation” in a wall; it is “dew” when it happens outdoors, on grass.
The tricky thing about condensation in conventional walls is that, while the dewpoint temperature might be reached at some point between the interior gypsum and the exterior sheathing, condensation will only actually happen on a surface, typically on the inside face of the sheathing. Water does not condense in substantial quantities on the fibers of cellulose or fiberglass insulation, because condensation gives up heat, which raises the temperature of these low-mass materials above the dewpoint. Because straw has much higher mass than these other materials, it would be healthy to assume that vapor can condense into water at whatever depth the dewpoint temperature may be reached, within a straw bale wall.
AIR LEAKAGE AND VAPOR DIFFUSION
Water vapor makes its way into walls from the inside by two mechanisms: air leakage and vapor diffusion. Of the two, air leakage is by far the most significant; it is typically responsible for over 90 percent of the total vapor that gets into walls. (Air leakage also accounts for 25 percent or more of the heat loss in a typical codebuilt home.)
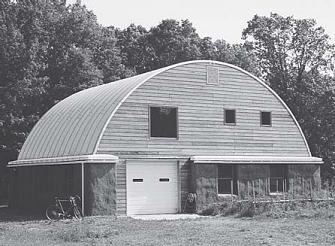
This clever building in Minnesota had one problem: the steel baseplate of the Quonset hut is as wide as the bale wall, upon which it rested directly. Cold steel created a perfect surface for condensation, saturating the top course of bales. The resourceful owners have removed a layer of straw, and isolated the straw from the steel.
A Colloquial
Condensation
Conversation
Two changes in the condition of the air can cause condensation. The first is an increase in the amount of water vapor in the air, the second is a decrease in temperature. You have probably often experienced condensation as a result of adding too much moisture to the air. Let’s say you get up in the morning and head for the shower. You don’t know it, but the relative humidity of the air in your bathroom is hanging around at 30 or 40 or 50 percent. You turn on the shower, and as the water heats up, steam (water vapor) begins to waft into the room. The amount of water vapor in the bathroom air begins to climb; the relative humidity of the bathroom air begins to climb. At some point, the relative humidity of the bathroom air reaches 100 percent. The air is full. In order for the air in the bathroom to continue to receive the water vapor being produced by your shower (which it has no choice but to do) it must relieve itself of some—in the form of condensation on bathroom surfaces. Thus the fogged mirror.
You have probably also experienced condensation caused by lowered temperature, though you may not have recognized it as such. Take a particularly hot and humid day in summer, 90°F (32°C)and 90 percent relative humidity. You’ve been working all day, and decide it’s time for one of those homebrews you’ve got stashed at the back of the fridge. You get out the beer, pop off the cap, and just as you’re about to pour it into a glass, the phone rings. It’s your good friend Art, with whom you have a lively running debate over whether the giant cabbages at Findhorn have to do with the gardeners’ unusual sensitivity to particular earth energies, or whether they are a simple function of growing so far north, in the long light of the Scottish summer. After twenty minutes of international cabbage statistics you return to your beer to find the bottle so wet that the handwriting on the label has begun to run. Why has this happened? As the air moves around your kitchen, some of it passes around the cold bottle of beer on the counter. This air cools, quickly reaching the point of 100 percent relative humidity. As the air continues to cool, it must give up some of its moisture; this is deposited on the bottle. If the bottle were left on the counter long enough that its temperature could equalize with the rest of the room, and if the air were still at 90 percent relative humidity, the air would begin to take that moisture back in. Eventually, and if you don’t mind drinking 90-degree homebrew, you could pour that beer without getting your hands wet. When people talk about condensation happening within a wall, this is the exact process that they are describing.
Ice
Dams
Aside from wasting energy and providing an inconsistent supply of fresh air to a house’s occupants, air leakage is also a major contributor to ice dam problems on roofs. In a typical codebuilt house no attention is paid to maintaining a continuous air barrier between the living space and the attic. The ceiling of each room is an individual unit, separated from others by the top plates of partition walls. As if this partition framing were not leaky enough to begin with, it is then drilled for wire runs and plumbing stacks. The wall surfaces, meanwhile, are punched full of holes for electrical outlets and switches. Interior partition walls thus become chimneys, drawing warm air into the attic. This air rises to the underside of the roof sheathing, where it begins to give off its heat, melting the snow above. The melt runs down the roof surface until it reaches the cold eave; it then refreezes into icicles and a dam, removing gutters and shingles in the process.
The simplest way to avoid this problem is to install a continuous membrane of plaster, drywall, or poly at the upper story ceiling before framing interior partitions, and then to carefully seal any holes drilled for the installation of services.
Air leakage takes two forms, infiltration and exfiltration. Air is said to be infiltrating when (like a spy!) it is making its way from the exterior, through the building enclosure, and into the living space. Exfiltrating air is on exactly the opposite course, passing (like an exile or expatriate) through the fabric of the building on its way from inside to outside. Infiltration and exfiltration are always in balance, which is to say that for each cubic foot of air that leaves a building, a cubic foot comes in.
During the heating season, infiltrating air is usually cold. If it enters by too large a stream we call it a draft, and nobody likes to sit in a draft. Too much infiltration in a specific area can also lower the local surface temperature to the point where condensation occurs and mold begins to grow. Air that is infiltrating in many small streams can cause problems as well; too much infiltration can add up to a house that is difficult to heat. On the plus side, controlled infiltration can serve two very necessary functions. It is the most obvious source of fresh air for the home’s occupants and, as it warms, this relatively dry air can reduce interior humidity levels.
Exfiltrating air is riskier stuff; it is the source of many moisture problems in cold-climate houses. As warm, moist air makes its way out through the fabric of a building it begins to cool. The temperature of this exfiltrating air can eventually drop to the dewpoint level, so that the condensation of water begins. In a conventional house this happens at the inner side of the sheathing; in a bale house we must assume that it can happen at any depth in the wall where the dewpoint is reached.
Some air must leave the building, of course, if fresh air is to make its way in. The secret to avoiding problems is to control the rate and points of departure. Exfiltration that is directed through windows and fans poses no threat to your home, your health, or your heating bill. In fact, we don’t even call it exfiltration. We call it ventilation.
Diffusion through surface materials is another method by which water vapor can enter building assemblies, though this is a much less important factor than air leakage. Diffusion is not governed by air pressure, but by vapor pressure. In a practical sense, vapor pressure can be understood as the tendency of water vapor (any gas, really) to migrate from an area of higher concentration to an area of lower concentration. In the winter, the vapor pressure (concentration of water molecules) inside a cold-climate house is higher than the vapor pressure outside. Water vapor, therefore, will want to move from inside to outside, through your building assembly.
You have two choices about how to deal with this issue. The conventional approach, which came to the fore during the second half of the 20th century, is to stop vapor before it reaches the insulation layer, either by installing a polyethylene vapor barrier behind the sheetrock or by painting the sheetrock (or plaster) surface with a manufactured paint. The logic here is that if vapor is prevented from entering the wall cavity, then it cannot do any damage.
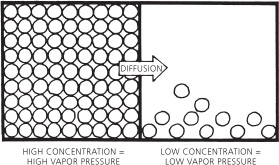
Diffusion is governed by vapor pressure.
The traditional approach, employed for mil-lennia in houses all around the world, is to construct the building envelope in such a way that any vapor that enters will be allowed to keep on moving toward the outside. When people talk about allowing a wall to “breathe,” this is generally what they mean. In cold climates, the trick here is to design the wall so that the exterior is at least as vapor permeable, and ideally more so, than the interior, so that there is no danger of water vapor entering the assembly more quickly than it can escape.
Builders have had success with each of these approaches to bale walls. Typically, the choice of exterior finish determines which design makes the most sense. If the exterior will receive cement stucco, which is the least permeable of plasters, then the interior should probably be coated in a vapor-retardant paint. (This has been a common practice, and seems to have worked well to this point, though no long-term examples exist in cold and wet climates.) The main drawback to such a system is that the drying potential (ability of vapor to make its way out by diffusion) is lower than in almost any other configuration. So, if such a wall takes in an unusual amount of water, say from a poor flashing detail or a crack in the stucco at a particularly exposed location, or from a large quantity of condensation due to air leakage, it will be slower to dry than with just about any other combination of finishes. This disadvantage must be weighed against the structural advantages of cement.
VAPOR DIFFUSION CAPACITY OF CONVENTIONAL BUILDING MATERIALSa

If the exterior of the building will be finished in lime, clay, or wood, on the other hand, the drying potential to the outside will be much greater than in the cement scenario. A vaporpermeable exterior wall also opens up the option of a more vaporpermeable interior wall, one of unpainted lime or clay plaster. Such a system will allow the wall to dry to either side, rather than only to the outside.
It is worth mentioning that this system of relatively permeable interior and exterior walls is particularly well suited to the specific demands of mixed heating and cooling climates. This is the beautiful flexibility of a wall whose two sides are open to the passage of vapor; regardless of where the major moisture source and possible condensation point may lie, the wall should be capable of drying by diffusion. Regardless of climatic region or which of these strategies you choose, it is wise to insert at least a few moisture probes in the walls, as long-term indicators of whether your system is working. (Sensors are discussed in chapter 14, “Moisture Studies and Sensors.”)
Paul’s
Diatribe
Against
“Breathable”
In the language of straw bale construction, no single word has caused greater confusion than “breathable.” It has been impossible to form any sort of consensus on a definition because, though in normal life it clearly has something to do with air, its intended meaning in buildings usually (but not always) has to do with moisture.
I’ve heard this term used several ways. The most common is to indicate a wall that allows a high rate of vapor diffusion, as in, “you want a wall to breathe, so that it will not trap any moisture.” See the ambiguity? Many people take this to mean that air leaking through or into a wall will help to keep it dry. Running with this idea, the ingenious straw bale crowd has concocted any number of “venting systems” for their walls, in an attempt to dry them by “breathing.” One building industry professional even contacted me with the notion of leaving one side of the wall unplastered, so that it might “breathe.” At their best, such schemes degrade the insulative value of the wall, by introducing cold (and windy) exterior air into what should be a still cavity; at their worst, they create the possibility of serious condensation-based moisture problems, by allowing large quantities of moist nterior air to leak into the wall.
Not surprisingly, this notion of “breathing” also leads people to conclude that proper ventilation is not required in a straw bale house, because all of the air required for human respiration will somehow be inhaled through the fabric of the building. This is probably true until the plaster goes on, as bales themselves are hardly airtight. I can assure you that this is not the case in a finished house, however; I’ve been inside lots of straw bale houses, and some of them have terrible air quality. Almost without exception, the owner of such a house, when asked about the ventilation system, has explained that the walls “breathe.” I’d breathe pretty hard too, running for the door.
So, please, when we want to talk about moisture moving through a wall, let’s say “drying potential” or “vapor permeability.” When we mean fresh air, “ventilation” ought to do. A little less throaty than “breathe,” maybe, but at least we might get the right idea across.
Perm
Ratings
When we speak of the permeance of various materials, we are talking about their ability to allow water vapor to pass through them. Perm ratings exist for many common building materials; the higher the number the greater the permeance. Materials with a perm rating below 1 are considered vapor diffusion retarders, the “vapor barriers” of common parlance (see the chart on ). Unfortunately, perm ratings for many of the materials common to straw bale construction (lime plaster, earth plaster) do not exist (Though perm ratings for lime mortars are available; see chapter 11, “Lime Plaster”). To determine which approach makes the most sense in a given situation, we need to proceed, to some degree, based on empirical evidence and common sense.
Ground Sources of Moisture
In conventional construction, the concrete foundation wall is topped with a pressure-treated or otherwise rot-resistant sill plate, above which framing proceeds with normal, biodegradable lumber. The sill plate protects the framing from moisture that might be moving up through the foundation, either by capillary action (“wicking”) or, to a lesser degree, by vapor diffusion.
We know from the previous section that vapor diffusion is a process of individual water molecules moving through a material in the vapor state, from an area of higher concentration to an area of lower concentration. Capillary action is a similar process, but instead of vapor it is actually liquid water that moves through the pores of a material. Capillary action depends on pore size; if the pores in a material are large enough, as in gravel, the water molecules cannot fill and “stick” to the sides of the pores, and capillary action does not take place. Likewise, if the pores are small enough, as in aluminum flashing, water molecules cannot fit through them. The pore size in standard concrete is perfect for capillary action, and thus water moves up from the ground and through the concrete, contacting the underside of the framing, or bales. Presumably, it can keep on rising, right into the straw.
How vapor would migrate up from concrete, into the bales, is a bit less obvious than capillary movement. Sometimes the concrete is warmer than the framing above it. In the cool evening of a warm day, for instance, the massive concrete will cool more slowly than the wooden sill or straw walls of the building. If these are in direct contact with the foundation, vapor can then condense out of the concrete onto the cooler wood or straw. Similarly, it is easy to imagine periods when the concrete is colder than the air surrounding it. This happens frequently in spring, summer, and fall, at times of the day when the concrete wall has yet to be warmed by the sun. At such times vapor in the air can condense on the concrete. It is safe to assume that, under these circumstances, any untreated wood or straw in contact with concrete is susceptible to moisture damage.
For all of the above reasons, designers of bale buildings should follow the lead of conventional construction and isolate any biodegradable wall materials from direct contact with concrete foundations. If the bales are to sit on a framed floor, they are already held away from the concrete; details between foundation and framing should follow conventional construction practices. Where a wall rests on a slab, it is crucial that some separation be created. Rigid foam or Roxul boards isolate biodegradable materials extremely well— they also insulate and elevate, forming the toeup that is so crucial in keeping the bales dry during construction.
Water During the Construction Process
Straw bale builders commonly assume that the top and bottom of a bale wall (including window sills) absolutely must be protected from rainwater during construction. The top is usually protected by a roof or tarps, the bottom by a toeup that raises the bales off of the floor on which water might puddle (see chapter 5, “foundations,” for more details on toe-ups). If a driving rain is expected it is equally important to protect the sides of the walls, because the pressure drop across a windward wall will draw water into the bales. (See “Siding,” in chapter 9 for more on pressure drop.) Also, if a significant amount of water contacts the surface of an unplastered bale wall, it may be drawn toward the center by capillary action, both through the straws themselves and through the gaps between the straws. (Have you ever noticed how little effort it takes to draw water up a drinking straw? They didn’t call them “straws” for nothing! )
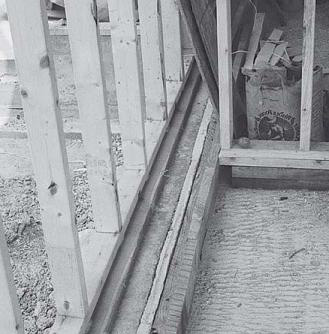
A sill of rot-resistant black locust separates the bottom plate of the stud wall from the foundation.
In most cases, surface wetting of an inch or two into the bale will dry quickly in good weather. A bale that is wet to its core, on the other hand, will take so long to dry out that biodegradation may begin. The wetter and colder the climate, the more this becomes a problem. The difference is between a drying process that is carried out primarily by air and a process that is primarily diffusion. Air passes readily into the first inch or two of an unplastered bale, so it is no surprise that a few days of warm, dry weather can remove water from that area. The core of a bale is a different story. It dries primarily by vapor diffusion through the straw, from the damp center to the dry surfaces, where it is picked up and carried away by dry air. This is a much slower process.
The temperature and relative humidity of the air have fairly obvious effects on these processes. The drier and warmer the air, the more moisture it can hold and carry away from the bale surface. Similarly, the difference in vapor pressure driving diffusion from the core of the bale to outside air is greater when the outside air is dry. Toe-ups, therefore, are doubly crucial. Not only is the un-toed bale more likely to find itself sitting in a puddle, thirstily sucking water by capillary action but the bottom and center of this bale can only dry by vapor diffusion toward the surfaces. Soaking up a puddle takes minutes, while drying a soaked bale takes weeks.
Exterior Moisture Sources
Of all the potential sources of moisture, precipitation poses the greatest threat to cold-climate straw bale houses. The bales, therefore, must be protected from rain, and, to some degree, from melting snow. Additionally, as mentioned above, the choice of exterior finish is limited by the need to be kept at least as vapor permeable as that employed on the interior, so that any vapor that makes its way into the walls from the inside has the opportunity to dry to the outside.
Of all the potential sources of moisture, precipitation poses the greatest threat to cold-climate straw bale houses.
Driving rain and piled snow can cause problems with any building; it follows that current best practices from conventional structures should be applied to bale buildings. It is also becoming increasingly clear that bales, or at least plastered bales, are not appropriate for every site and situation. The careful designer will think obsessively about potential sources of water entry and design details to prevent such entry.
In theory, the matter is simple: First, reduce the amount of rain and snow that strike wall surfaces. Second, employ construction details and strategies that prevent deposited precipitation from wetting the bales. The need to reduce exposure to rain and snow should be obvious, but the basic methods are often ignored. The built-in matters include siting, roof overhangs and gutters, elevation from the ground, and drip-sills and flashing details. Maintenance, however, is at least as important as any of these factors.
MAINTENANCE
One of the unfortunate repercussions of postmodern life is that most people, liberated by machines and telecommunications, are now so busy trying to keep up with their ever increasing re-sponsilities that they have little time for (or interest in) the simple matters of food and shelter that once helped bond their predecessors to the places where they lived. This pattern is noticeable in many facets of our lives—where we get our food, the distances between our work and our homes—but it really comes to bear on straw bale construction in the matter of building main-tenance. Once a source of pride and a sensible part of the annual cycle of life, people now look on maintenance as drudgery—a consumer of valuable time, an obstacle in the way of getting on to more important and profitable activities. Maybe we should apologize for using the word in public; our culture has so little time or respect for maintenance that it has become one of the dirtiest words in the construction lexicon.
This has had serious implications for our choice of building materials, of course. The most obvious example is the spread of PVC (vinyl) siding. This material does one thing superbly well: It sheds weather for years with no need of main-tenance. It’s also cheap, and looks it. It cannot be painted successfully, which means that when bored suburbanites decide to change the color of their house, they have it all torn off and tossed into a dumpster, and a fresh batch applied. This is absurd and wasteful, but only a minor affront compared to the fact that the stuff was ever put on the market in the first place. PVC is stable in solid form, but in gaseous and liquid form it is one of the most toxic materials we produce. It is tremendously dangerous to the factory workers who make it, and to the environment surrounding the factories. It is one of the great banes of fire-fighters. From an ecological perspective, PVC should not even be produced. By the narrow logic of today’s construction industry, however, it is considered (by anyone who can tolerate the fact that it looks like plastic) to be a flawless material. It is applied to thousands of new homes and retrofits every day.
Aperson who is unwilling to accept yearly maintenance as part of the long-term package simply has no business considering a plastered straw bale house.
Now, it is possible to apply PVC siding over a straw bale house. It is possible, in fact, to apply any kind of siding on straw bales, and some kind other than vinyl may be a good idea for wooded or very exposed sites, or for homeowners who really cannot abide the idea of annual maintenance. For the majority whose image of a bale house includes a plaster finish, however, there is simply no way out of a maintenance routine. This is because all plasters crack. Try as we might to build perfectly sound buildings atop perfectly stable substrates, some shifting and settling always goes on during the life of a building. Add to this the abusive actions of wind loads and freeze/thaw cycles, and you come to the inevitable conclusion that no masonry finish can be trusted to remain waterproof forever.
In mainstream stucco construction, where relatively brittle cementitious products are the norm, walls are built with a drainage layer of asphalt felt between stucco and substrate. This tar paper “drainage plane” catches any water that makes its way through the plaster, diverting it down and away from the plywood or OSB (oriented strand board) sheathing. The assumption here is that the stucco will crack; the felt acts as insurance against imperfect materials, poor workmanship, and lack of maintenance.
In bale construction, the situation is very different. Installation of a felt drainage plane is impractical for reasons of both mechanics and moisture. There is, first of all, no civilized way to attach tar paper to a bale wall, and no way to attach the then necessary stucco netting over it, without poking the paper full of holes. The long-term problem with this method, however, is that it radically reduces the drying potential of the wall, by removing the possibility of water passing in the liquid state from the straw to the plaster, and then on to the outside. Because the felt works equally well at stopping water coming from either side, any moisture in the straw must change into the vapor state in order to pass through the tar paper, then to the stucco, then to the outside. (See chapter 10, “Cement Stucco,” for more details.)
Without a drainage plane, the exterior plaster must be counted on to protect the bales beneath from damage. This is the great question for bale construction in wet climates: Is the exterior finish up to this task? Historical evidence from around the world indicates that the answer should be yes— but only if the plaster is maintained to a degree that reflects the weather exposure of a given wall. The maintenance routine varies with site and material choice, but generally involves a day or two each spring, applying limewash or patching cracks. A person who is unwilling to accept yearly maintenance as part of the long-term package simply has no business considering a plastered straw bale house. We will discuss the mainte-nance requirements of each plaster option in much greater detail in chapter 9, “Selecting Finishes.”
SITING
The level of maintenance required depends on the site, and on the degree to which the building is designed in response to the site. This begins with geographic region; drier and warmer climates are obviously easier on buildings, wetter and colder climates more harsh. Local site conditions become quite crucial for plastered bale buildings in areas where precipitation averages above 20 inches per year. On the ideal site, the building will be protected from the predominant weather by some combination of landforms and vegetation. This is not always as easy as it sounds. Where Paul lives, for instance, most of the winter weather comes from the northwest, while spring storms blow up from the south. Some mean winter storms crash in off the Atlantic Ocean, however, and the hilly landscape can play havoc with any of these patterns, to the point where they can never be completely trusted.
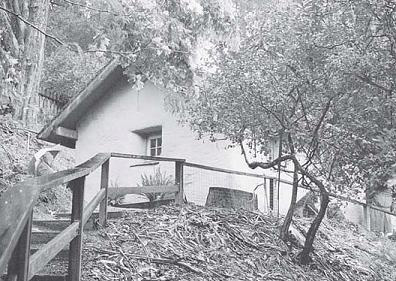
Designed in response to local landforms and vegetation, a building positioned for protection from weather will also look like it belongs on its site. Hermitage at Santa Sabina Monastery, San Rafael, California, and Hesla/Bennett home, Wiscoy Valley, Minnesota.
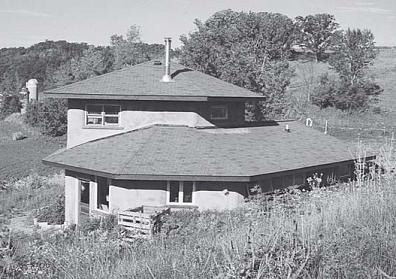
One of the first questions in designing a bale house, then, is about the site. How well do you really know it? Does it conform to regional weather patterns, or does it have a local logic of its own? Can the house be tucked in for shelter among trees and land formations, or must it be exposed to the full force of nature? The answers to these questions will have a profound effect on your choice of exterior finishes, and on the amount of maintenance they will require. They affect what you choose to do to the site, in order to buffer the house, and, in an intelligent design, they affect the placement of overhangs, porches, firewood sheds, and so forth. These issues, in turn, influence your options for interior finishes, and, obviously, how the building will look. If the owner is averse to maintenance, it may even turn out that a plastered bale building is simply not appropriate for a given site. Wood or manufactured siding might be a better choice; or bales might not be appropriate, at all.
ROOF OVERHANGS AND GUTTERS
Roof overhangs on a plastered bale building should be at least two feet wide in wet climates. Three-foot overhangs (or continuous porches) are better yet, especially on a two-story build-ing. Eighteen inches should suffice in dry climates. Ideally, the rainwater should be run into gutters and then away from the foundation, either through a pipe to daylight, or through extended downspouts. Unfortunately, gutters are usually impractical on metal-roofed buildings— sliding snow will often take the gutters along with it. There is no reason not to incorporate them on roofs of all other types, however. In good-quality new construction, the ice dams that are the bane of gutters on older buildings simply should not be a problem (see the “Ice Dams” sidebar earlier in this chapter).

Intersecting roofs can concentrate water onto a bale wall; they should be flashed so as to direct the water away from the wall surface.
In situations where gutters are not appropriate, Michel has had good luck placing a 2-foot-wide band of small, round stones around the perimeter of a house. When rain hits these stones, the jumble of convex curves breaks the droplets into a fine mist, dispersing it such that only a small percentage splashes back onto the wall, and that in a much less concentrated (and therefore less damaging) form than the typical splashback droplets. The stone bed should be tied into the foundation drain system.
Michel has found an even simpler solution to the problem of snow piling up against walls: He has noticed that in most cases, it turns out not to be a problem at all. Snow does accumulate against the wall during the early part of the winter, but because all walls (even those made of bales) allow some heat to pass through, a narrow channel of air soon forms between the snowbank and the wall, clear down to the ground! (Paul was amazed when he began to actually look at these snow piles, and realized that Michel was exactly right.) As the pile of snow grows higher, the air channel grows higher as well, so that, come spring thaw, the meltwater is really not in contact with the wall. Good foundation drains are obviously crucial with this system as well.
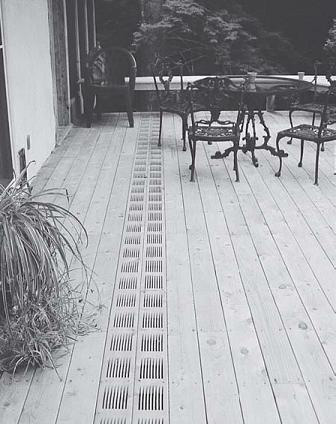
A drainage board at the dripline prevents water from running or splashing back against the wall.Dadell/Espy house, Guilford, Vermont.
ELEVATION FROM THE GROUND
Given a good set of details for dealing with rainwater, the typical code minimum for biodegradable materials—8 inches above finished grade— should be sufficient for a bale wall. If the site is particularly wet, or if rainwater can be expected to splash back against the wall, then an elevation of two feet or more might be appropriate. Whenever the design will allow it, extra distance between the bales and the ground will serve as health insurance for your bale walls.
DRIPSILLS AND FLASHING DETAILS
One of the main ways to keep the weather out of bale houses is to copy how it was done in the old days, before modern sheet, roll, and caulking materials introduced the option of sloppy workmanship. Have you ever seen an old house in a wet climate without protruding sills below the windows? Dripsills carry the water that sheets off the windows out and away from the building, where it belongs. These sills can be made of wood, or stone, or poured concrete. It is also a good idea to push the window right to the outside edge of the wall. An exterior sill of straw and plaster, even if covered by a dripsill, is a vulnerable point; omitting it greatly reduces the likelihood of water working its way in, over time.
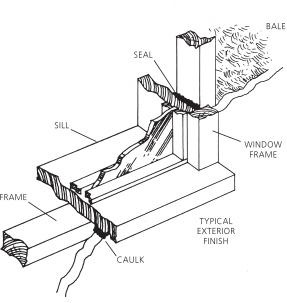
Typical window dripsill.
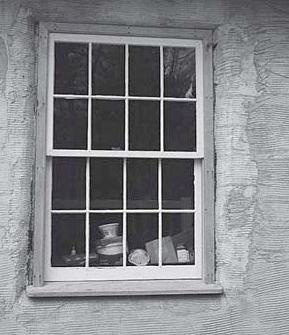
A wooden dripsill carries water out away from the building, where it belongs. Shirley White and Rosie Heidkamp’s studio, Wendell, Massachusetts.
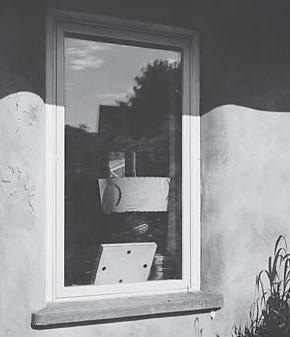
Todd Osman’s poured concrete sill is another handsome and durable option. Hesla/Bennet home, Wiscoy Valley, Minnesota.
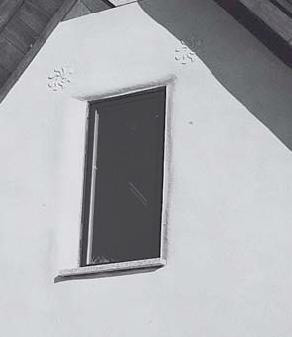
A stone sill can also work well.Shaw home, Charlotte, Vermont.
Flashing, of course, is as crucial in a bale building as in any other building. Unless the window is right up under the eaves, the flashing above it must be detailed very carefully. Plaster (typically reinforced by some sort of lath) should be run down into this flashing, to create a continuous water-shedding layer. To whatever degree it is possible in a system that does not employ a felt drainage plane, typical stucco details should apply.
Though our long-term experience with straw bale walls in cold (and especially cold and wet) climates is quite limited, it seems that by carefully thinking through the issues of heat loss, air quality, and moisture control we should be able to detail our new bale buildings well enough that, in exchange for some loving maintenance, they will repay dividends of comfort to generations of our heirs.
1 . Much of the information in this chapter is derived from The Moisture Control Handbook by Joe Lstiburek and John Carmody, republished several times; most recently by John Wiley & Sons, (1996). The best all-around book on moisture theory, but hard to come by.
2 . This is excerpted from an article by Nehemiah Stone, “Energy and Straw Bale Walls: Basic Heat Transfer,” The Last Straw (winter 1999/2000).