One of the key features of the C++ programming language is that it is object-oriented. Up until now we have largely ignored this feature, making only passing reference to it in earlier chapters. For the remainder of this book, we focus on object-orientation, allowing readers to utilise this feature in their C++ programs.
6.1 The Raison d’Être for Classes
At the end of Chap. 5 we introduced the concept of a module. We explained that modules are useful for code reuse, and therefore allow rapid code development for programs that require the functionality provided by the module, even if the programmer has no understanding of the operations that a module performs. This may be highlighted by using the example of a module for solving linear systems that was introduced in Chap. 5. Three advantages of having this module available are given below.
Linear algebra lies at the heart of numerical analysis, and so numerical analysts use linear solvers in many programs that they write. A module allows them to reuse this code rather than write new functionality for solving linear systems each time they write a new program.
There are many different linear algebra techniques for solving linear systems. It is possible to include many different techniques in a module, and to specify which technique is to be used as part of the interface to the module.
Other scientists with little mathematical expertise may have to write programs which require the solution of a linear system. A module allows them to do so without learning the mathematical techniques that underpin linear algebra algorithms.
Modules are clearly very useful when writing scientific computing programs. But, as we now explain, the use of modules may cause problems.
6.1.1 Problems That May Arise When Using Modules
Suppose that the linear solver that we discussed in the previous section has been written so that the solution of this linear system is calculated using the GMRES algorithm.1 This technique for solving linear systems requires several instances of a calculation of the scalar product between two vectors. Implementation of this technique would, therefore, probably include a function being written to calculate the scalar product of two vectors of a given length. Use of this function would not be restricted to users of the module for solving linear systems: another part of the code may use this function to calculate, for example, the normal derivative of a function of two or more variables. Suppose whoever was using the scalar product function to calculate a normal derivative decided to change the inputs to the scalar product function. This would inadvertently cause the linear solver to stop functioning correctly. The linear solver module could then not be treated as a “black box”.
Another drawback of using standard modules is the way in which data is stored. There is only ever one copy of a particular module and one copy of any data associated with it. If that data is changed for the module to fulfil a particular purpose, then it will be changed for all future uses. Consider a linear solver which has had its functionality extended so that it is able to deal with singular matrices. Such a linear solver will need to have access to the null space (or kernel) of the singular matrix or matrices in question. Suppose we use the extended linear solver to solve a singular linear system. The linear system will then solve the singular system subject to knowing and storing the null space of this system. If we were to subsequently use the module to solve another nonsingular linear system, we would have to remember to specify the null space as being empty or the linear solver would attempt to find the solution of the nonsingular system subject to the previously specified null space.
In the next section, we explain how classes allow us to write code including all the features of modules, but without the drawbacks identified above.
6.1.2 Abstraction, Encapsulation and Modularity Properties of Classes
The shortcomings of modules, described in the previous section using the example of a module for solving a linear system, could be overcome if we could write a “module” that:
1.
contains all the functions needed to solve the system;
2.
does not allow these functions to be accessed by any other part of the program except through the interface;
3.
can not itself access any other part of the program; and
4.
also contains all the data needed to solve the system.
This is possible through the use of classes, and the specifications described above—that is, the compartmentalisation of all of the resources needed—are known as the encapsulation feature of classes. The variables/data and functions associated with a class are known as class members, and the functions more specifically as methods. We are now in a position to describe some of the technical terms from Sect. 1.1.1.
Classes allow modularity, which includes placing similar functionality in a few files. Classes allow us to go further than this: access controls allow us to control which resources are available outside of the class, and which are hidden from users. Hiding parts of the code may—at first sight—seem to have the undesirable effect of preventing a user from accessing the full functionality of the software. As we shall see later in this chapter, this is certainly not the consequence: it actually has the more desirable effect of preventing users from inadvertently corrupting data. Furthermore, combining functionality in this way allows us to associate data with the functionality.
The concept of abstraction is that the particulars of an idea should not be important. Classes allow us to hide the irrelevant details of functionality from users who need not know about them. For example, a reader of this book does not need to know how a compiler translates a C++ code into a machine readable executable file, but only how to instruct the compiler to perform this task. Abstraction allows emphasis to be placed on the qualities or properties that characterise the objects in how they act and the type of information that they carry.
A further property of classes is inheritance which allows easy code reuse, extensibility and polymorphism. Inheritance will be discussed in Chap. 7.
6.2 A First Example Simple Class: A Class of Books
The first simple class that we develop is a class of books.
6.2.1 Basic Features of Classes
Each book has the following attributes:
an author;
a title;
a format;
a price;
a year of publication; and
a publisher.
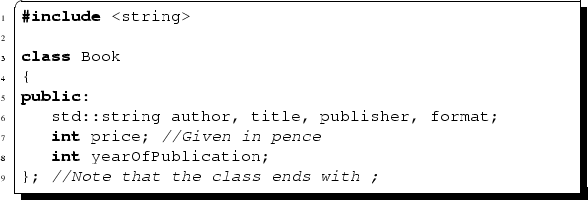
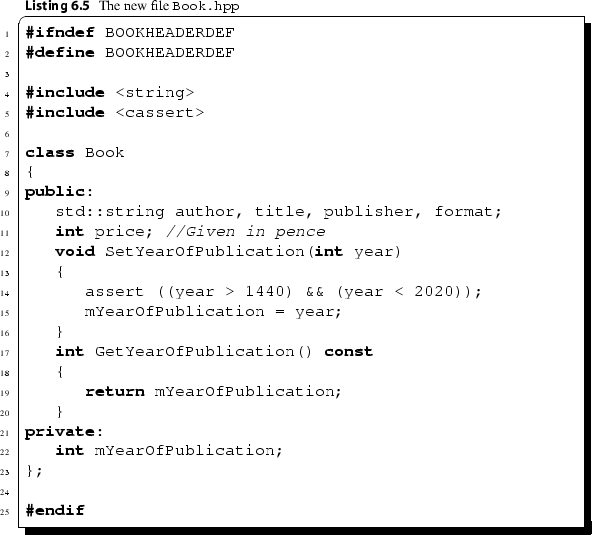
These attributes can be associated with each instance of a book by first saving the file below as Book.hpp. As explained earlier, these attributes are known as class members.
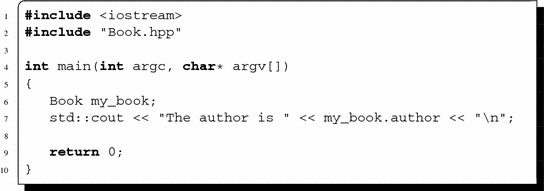
The file above is known as the header file associated with the class: the extension .hpp indicates that this file is a header file associated with a C++ program. At this stage, it is sufficient to know that the word public that is used in line 5 of this file allows us to access all variables associated with the class. We will give more precise details on what are known as access privileges later in this chapter. Note the semi-colon that is required after the closing curly bracket at the end of this file. A common mistake made by novice programmers is to miss this semi-colon at the end of the class definition.
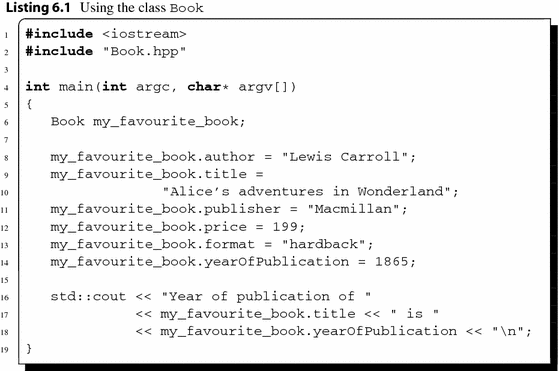
The class of books may then be used as shown in the code below. Note that when header files that we have written are included the names of these files are enclosed within quotation marks, in contrast to the system header files such as iostream, fstream and cmath that we have used earlier. The compiler does not distinguish between included files with quotation marks and those with angle brackets, but a common coding convention encourages programmers to use quotation marks and angle brackets to make the distinction between local include files and those from external libraries, respectively.
The class of books written here allows us to associate data with each instance of the class. As such, we can think of this class as allowing us to define a new data type and line 6 of the code above as declaring an instance of that class, in this case called my_favourite_book. The class members can all be accessed as shown in lines 8–18 of the code above—that is, the string my_favourite_book.author is the class member author associated with the instance of the class called my_favourite_book.
6.2.2 Header Files
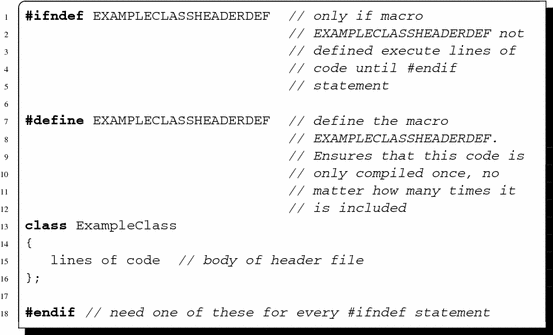
It doesn’t matter if we include header files such as iostream, string, etc. more than once. But we should be very careful not to include files such as Book.hpp in the form that it was written in the previous section more than once, as this can cause problems. We will see later on in this book when we are working with several different classes that it is easy to inadvertently include header files more than once. To avoid this code being included twice, we adapt it so that the header file for a class called ExampleClass is of the form shown below.
InitiallyEXAMPLECLASSHEADERDEF will not be defined. The “ifndef” in line 1 is a contraction of ifnot defined. The first line of code below therefore instructs the computer to include the code between here and the #endif (line 18 of the code) only if the macroEXAMPLECLASSHEADERDEF is not defined. The first time this code is included this macro will not be defined, and so all of the code in the listing below will be read. Note that when this code is included, the first task that is performed is to define the macro EXAMPLECLASSHEADERDEF (line 7 of the code). As EXAMPLECLASSHEADERDEF is now defined, if this code were to be included a second time all code between the #ifndefEXAMPLECLASSHEADERDEF statement (line 1) and #endif (line 18) will now not be included. We therefore see that the #ifndef, #define and #endif statements may be used to ensure that the contents of a header file are not included more than once.
6.2.3 Setting and Accessing Variables
In the class of books we developed in the previous section, all class members were variables, such as strings, double precision floating point numbers, or integers. Classes are, however, much more powerful than this: we will now show how functions may also be defined as class members, known as class methods.
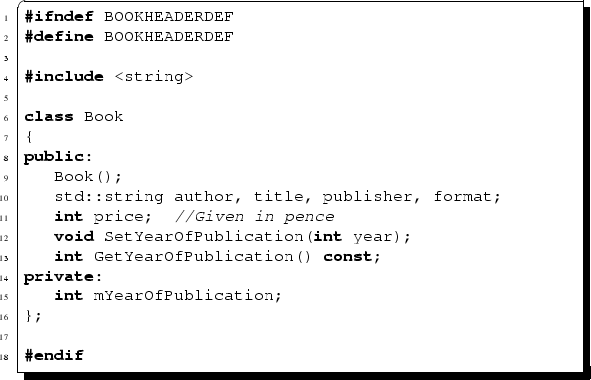
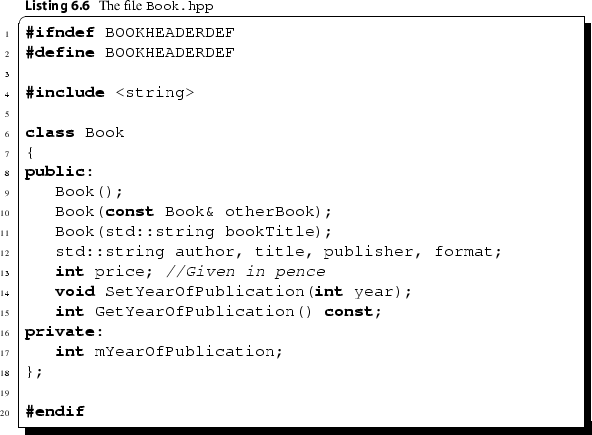
Suppose we want to check that the year of publication of an instance of the class Book always takes a valid year. Assuming that no book in our catalogue was published before the invention of the printing press, and has already been published or will be in the near future, then we may write a function known as a member method, called SetYearOfPublication, that allows us to set this variable and check that the integer value for year of publication falls within a sensible range (after the invention of the printing press and not too far in the future). As we are writing a method that allows us to check that a valid year of publication is assigned, it seems sensible to force the user of the class to use this method to set this variable. This may be implemented by setting the member yearOfPublication to be a private variable. Private variables may only be accessed by other class members: making yearOfPublication a private variable therefore prevents us from accessing this variable through code such as line 14 in Listing 6.1. However, it can be set through the member method SetYearOfPublication, which we will make a public member of this class. Access privileges—that is, the use of public and private members—will be discussed more fully in Sect. 6.2.5.
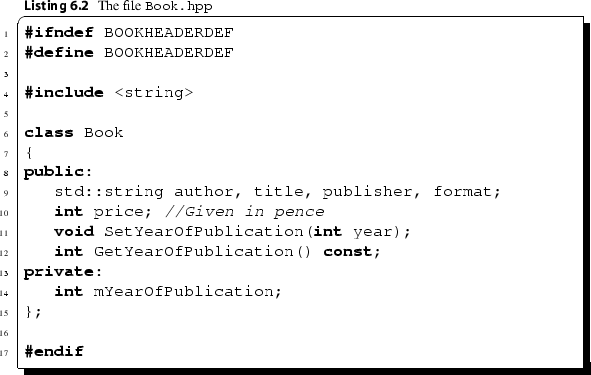
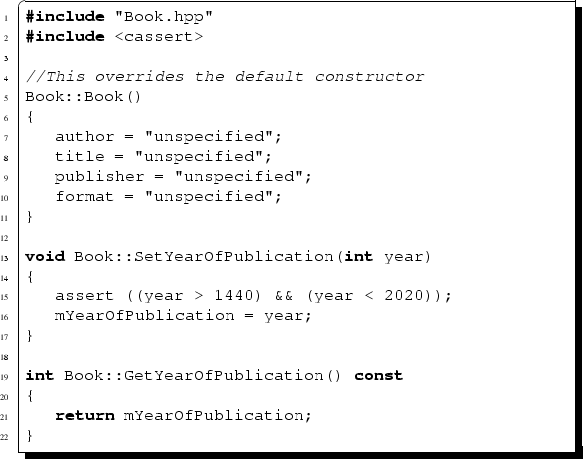
Now that we have made yearOfPublication a private member, we cannot directly access this member from outside the class. We therefore need to write a public method that allows us to access this member—this class member will be called GetYearOfPublication. We are also going to slightly modify the name yearOfPublication to mYearOfPublication, where the prefix “m”—with the “m” pertaining to “my”—reminds us that this variable is private to the class. We now present code that implements this discussion. First we need a new header file Book.hpp, given below.
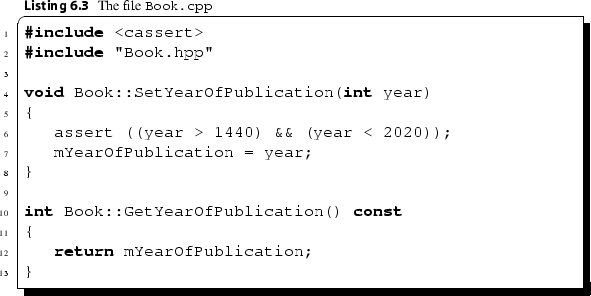
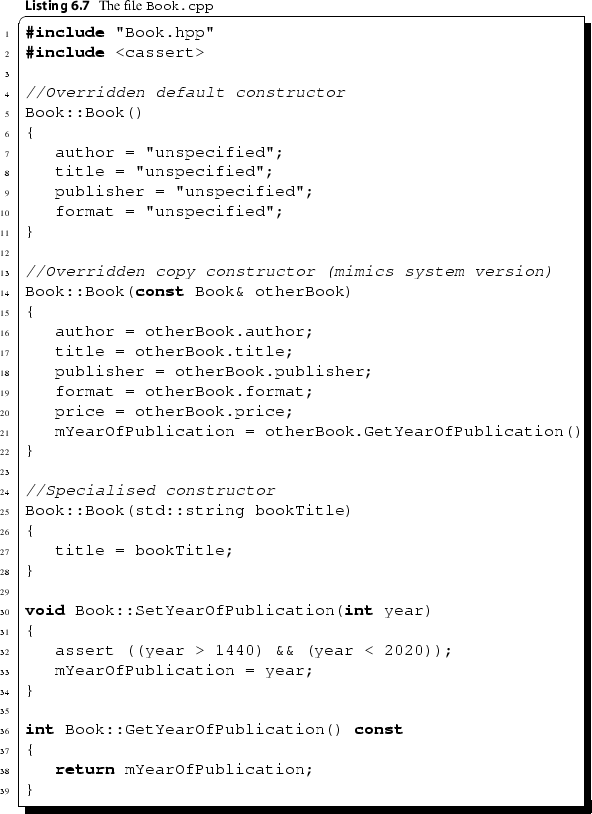
In the code below, all members that follow public and precede private (lines 9–12) may be accessed from outside the class. As mYearOfPublication comes after private it is only accessible to class members. We will discuss access privileges more fully in Sect. 6.2.5. Note the methods declared in lines 11 and 12 of this code. We have specified that the method SetYearOfPublication accepts an integer argument and returns no value, that is, it is a void function. The method GetYearOfPublication returns an integer, but does not require any input arguments as it can access all class members including mYearOfPublication. The keyword const after the declaration of this method is a signal to the compiler that we want to ensure that the instance of the class will remain constant throughout the execution of the method. That is, the method GetYearOfPublication should have changed nothing inside the class. We now need to tell the computer what these methods do. This is given in the code in Listing 6.3, which should be saved as Book.cpp. We have used an assert statement to check that the year of publication does fall within a sensible period when it is set. Note that the header file required for assert statements should be included in this file.
In the code above, line 4 requires more explanation. In common with functions introduced in Chap. 5, the void at the start of this line indicates that this method does not return any variable. The remainder of this line indicates that this method: (i) is associated with a class called Book; (ii) is called SetYearOfPublication; and (iii) requires one integer input argument which will be termed year. Inside this method we first check that the input year is appropriate through an assertion, before allocating it to the mYearOfPublication of a book. The method GetYearOfPublication, which is written in lines 10–13, allows us to access the variable mYearOfPublication from outside the class, without allowing us to change this value to what may be an incorrect value.
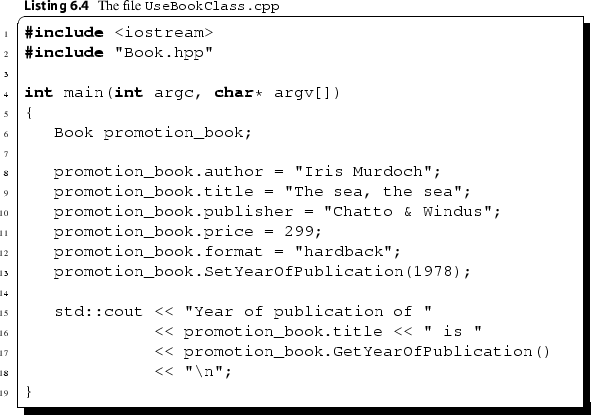
Code that uses this updated class is given below, and should be saved as UseBookClass.cpp. Using access privileges to ensure that variables may only be set through a class member that provides a check on the accuracy of data is very good programming practice, and should be used whenever possible.
Note that in line 17 of the code above we need to acknowledge that the class member GetYearOfPublication is a function or method by including empty brackets after using this class method, even though no input arguments are required.
The files Book.hpp and Book.cpp together form valid C++ code for a class of books. The code in Listing 6.4 above is a valid C++ use of this class. So far in this book we have only needed to compile one file. Now, however, we need to think a bit more about how to compile the multiple files that arise from using classes.
6.2.4 Compiling Multiple Files
In Sect. 1.3.3 we compiled a single C++ file into an executable program using the single compilation step below.
What really happens in this process is that the C++ file is first compiled to another file called HelloWorld.o, and known as an object file, which is a machine-readable file. In a second step, the object file is compiled into the executable file and the intermediate object file is deleted. What we are actually doing when using the compilation command above is to combine the two compilation steps given below.
The first of these commands creates an object file called HelloWorld.o from the C++ file HelloWorld.cpp through the use of the -c compiler flag. The second command creates an executable file HelloWorld from the object file HelloWorld.o. Up until this point, we have used a one line compilation command, allowing us to completely ignore the existence of object files. When compiling multiple files we do, however, need to be aware of the existence of these files.
Before we can compile the file UseBookClass.cpp in Listing 6.4, we first need to compile the Book class to create an object file Book.o associated with this class. This is done, as above, by using the -c option when compiling:
This produces an object file Book.o. We can now compile UseBookClass.cpp into an object file and then link the two object files to make an executable. The two compilation commands are now
As in the above “HelloWorld” example, it is possible to skip one step in the compilation process so that we do not have to explicitly produce the intermediate file UseBookClass.o.
The code may be run as before by typing
at the command line.
6.2.4.1 Using Makefiles to Compile Multiple Files
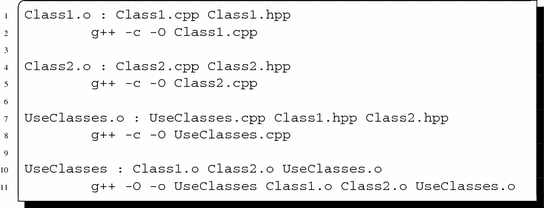
Suppose we have code that uses several classes stored in several files. We would rather not compile all of these classes separately every time one file is modified slightly. This may be avoided by the use of a Makefile—using this approach only the necessary compilation is carried out. The following is a Makefile for code UseClasses.cpp that uses two classes, Class1 and Class2.
If the file above is saved as Makefile, then to generate an up-to-date executable file UseClasses we simply type “make UseClasses” at the command line.
Using this approach only the necessary compilation will be carried out. Line 10 of this Makefile tells the compiler that the executable file UseClasses requires three files: Class1.o, Class2.o and UseClasses.o. Line 11 gives the rule for compiling the executable file from its dependencies. Line 1 tells the compiler that the file Class1.o depends on the two files Class1.cpp and Class1.hpp. Only if one or both of these files have been changed since the last time this class has been compiled will this class be recompiled using the rule given on Line 2. Similar remarks hold for the class Class2. Note that in line 7, the recompilation of UseClasses.o depends not only on the relevant C++ file, but also on the classes’ header files—so that a change in either class interface will result in a recompilation of the file which uses its functionality. Finally, having worked through all the steps described, a new executable UseClasses will be created only if one or more of the files listed on line 10 have changed as a consequence of this compilation process.
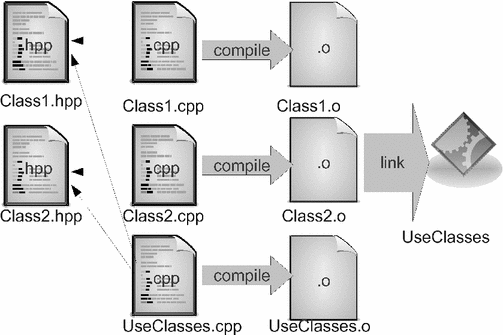
The compilation procedure is illustrated in Fig. 6.1. In this figure, the thin lines with arrows represent some of the code dependencies described above that are encapsulated within the Makefile. Many of the integrated development environments described in Sect. 1.3.1 will automatically generate Makefiles.
6.2.5 Access Privileges
In Sect. 6.2.3, we briefly discussed access to class members. There are three degrees of access to class members:
private—these class members are only accessible to other class members, unless friend (which will be introduced in Sect. 6.3) is used;
public—these class members are accessible to everyone;
protected—these class members are accessible to other class members, to derived classes (which will be introduced in Chap. 7), and to friends.
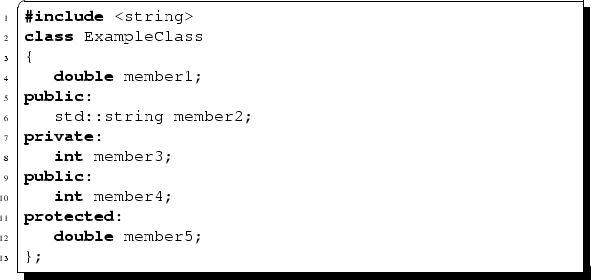
The reserved keywords private, public and protected may be used as often as desired, with the default being private. For example in the class below, member1 and member3 are private members, member2 and member4 are public members, and member5 is a protected member.
Fig. 6.1
The compilation process
6.2.6 Including Function Implementations in Header Files
We saw in Sect. 6.2.4 that it can be inconvenient to have to compile multiple classes. When working on large projects that require the use of multiple classes it can be difficult to keep track of the class members and their access privileges (stored in the header file) and the implementations of the member functions (stored in the .cpp file). If functions associated with a class require only a few lines of code then it may be more convenient to include the implementation of these functions in the header file. This may be done as shown below, where we implement the functions that are members of our class Book in the header file for this class, thus combining the files in Listings 6.2 and 6.3 into a single file Book.hpp.
6.2.7 Constructors and Destructors
Each time an object of the class Book is created the program calls a function that allocates space in memory for all the variables used. This function is called a default constructor and is automatically generated. This default constructor can be overridden if desired—for example we may wish to set all the string variables in our class of books to “unspecified” so that it will be clear when accessing this object that these strings have not yet been properly assigned. An appropriate header file for this class is shown below. Note that when overriding the default constructor this function has the same name as the class, takes no arguments, has no return type and must be a public member of the class.
The methods associated with this class are given in the file below.
The code below demonstrates how to use the overridden default constructor.
The code above will print “The author is unspecified”.
We will see in Chap. 10 that, if any memory management such as allocating memory dynamically is required by a class, then it is essential to change the behaviour of the automatically generated default constructor: if not, the default constructor will not allocate any memory. We can change the behaviour of the automatically generated default constructor either by overriding it with a default constructor of our own (as in the example of Book, above) or by providing some other constructor (which we will discuss shortly). This is because the automatically generated default constructor is only available if no other constructors have been provided by the programmer.
Another constructor that is automatically generated is a copy constructor. This constructor requires as input another instance of the class, and creates a copy of this instance of the class. In common with default constructors, copy constructors may also be overridden. Note that the argument to a copy constructor has to be a reference to another instance of the class, rather than that object itself. This is because, by default, all method arguments are called by copy. Were we to miss the fact that this constructor takes a reference argument, then we would need to use a copy constructor in the call—the very machinery that we are defining here. It is also a good idea to declare the argument to a copy constructor as const which is an instruction to the compiler to ensure that the object argument otherBook to the copy constructor in the code in Listing 6.6 will remain constant during this operation. That is, the constructor will have no hidden side-effects on the instance of the class that it is copying.
Furthermore, in addition to the default and copy constructors, we may write our own customised constructor that takes any inputs that we feel are appropriate, and we may write as many of these constructors as we like. For example, we may want to specify a book’s title when creating an object. We now demonstrate how to write a constructor such as this, and how to override a copy constructor. First, we need an appropriate header file: one is shown in Listing 6.6. Line 10 of this header file declares an overridden copy constructor, and line 11 explains that there will be a constructor that accepts a string as input. As we have provided a constructor ourselves the automatically generated default constructor is not available: we may, however, supply a default constructor ourselves.
The methods associated with this class are given in the file in Listing 6.7. Lines 14–22 are the overridden copy constructor, where all class members are set to be the same as the instance of the class that we wish to copy. Lines 25–28 represent the specialised constructor that sets the title of the book to a specified string.
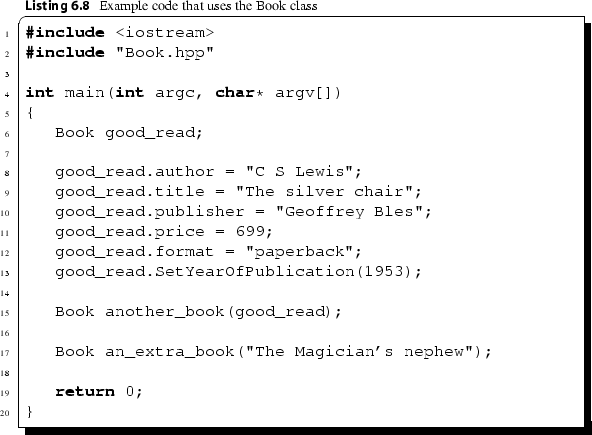
The code in Listing 6.8 first creates an instance of the class Book, called good_read, and sets the class members associated with good_read. Line 15 demonstrates how to use the overridden copy constructor to create another instance of the class Book, called another_book, that is initialised with class members taking identical values to those of good_read. Line 17 uses the constructor that sets the title when the instance of the class is declared: an instance of the class called an_extra_book is declared, with title set to “The Magician’s nephew”.
Destructors are also automatically written, and free memory allocated for an object when it goes out of scope. We will see later when writing classes of vectors and matrices that there are situations—specifically where the constructor has performed dynamic allocation of memory—where the automatically generated destructor should be overridden. This allows us to adhere to the tip introduced in Sect. 4.3.3, which advised programmers to ensure that any line of code where memory is dynamically allocated using new has a corresponding line where the memory is freed up using delete.
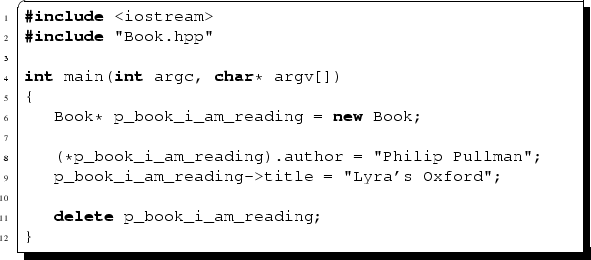
6.2.8 Pointers to Classes
We maydeclare a pointer to an instance of a class as we show in the code below. In line 6 of this code we declare a pointer, p_book_i_am_reading, to an instance of the class Book described earlier in this chapter, and allocate memory for this instance through the use of new. In line 8, we use *p_book_i_am_reading to denote the contents of the memory whose address is stored by the pointer. By placing this in brackets, we may access the class members as shown in earlier sections of this chapter. Line 9 is a more convenient way of accessing a class member associated with a pointer to a class in which the forward arrow, ->, means “de-reference and then access the member”.
In the code above, note that we have followed the advice given in Sect. 4.3.3—which we shall repeat many times in this book—to always write a delete statement to match a new statement.
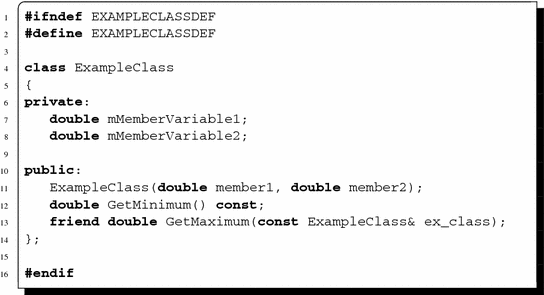
6.3 The friend Keyword
When developing a program, we may wish to access private members of a class from outside the class. One way of doing this is to create a new public method that accesses the private member in the same way as we did in Sect. 6.2.3. Another way is to write a free function that is a friend of the class: such functions may access all members of the class, including private variables. This is demonstrated in the class that we write below. First, we write the header file.
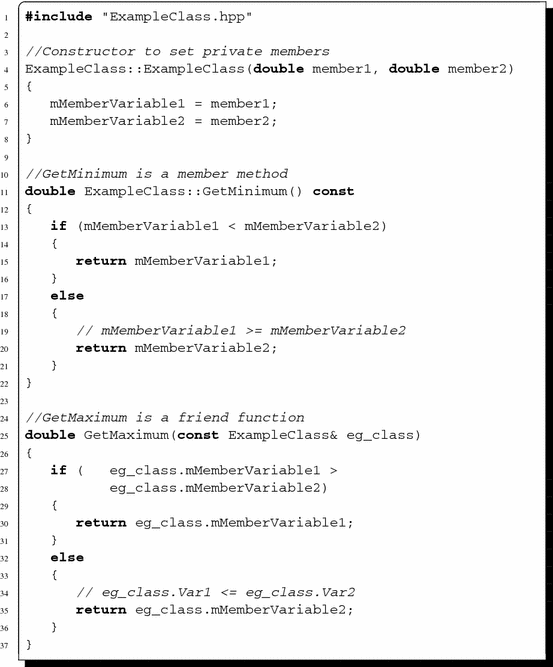
The constructor, member function and friend function are then implemented using the code below. Note that as the friend function GetMaximum is not a member of the class, we do not include ExampleClass:: in line 25 of the code as we would do when writing a method that is a member of the class.
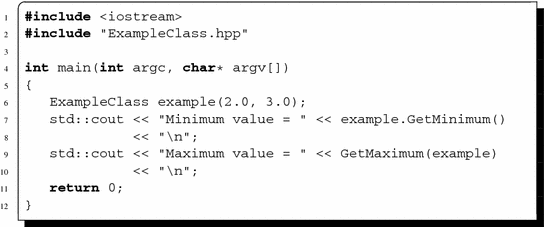
Code that uses the friend function of the class above is shown below.
6.4 A Second Example Class: A Class of Complex Numbers
In the class of books that we have developed, all class members were quite simple, being either variables—such as strings or integers—or straightforward methods. We now develop a class of complex numbers, allowing some more advanced features of classes—such as operator overloading—to be showcased through a scientific computing example. It is worth pointing out, before developing the class, that C++ does already have a complex number type which is based on templates (see Chap. 8). We are developing a complex number class here solely for illustration. If you need to use complex numbers we recommend you use the official C++ class (which we will revisit in Sect. 9.5).
A complex number has a real part and an imaginary part. A class of complex numbers will therefore contain class members that represent both of these quantities. It seems sensible to override the default constructor to set both the real and imaginary part of a complex number to zero in the absence of any specified value. We would also like a constructor to be available that allows us to set the complex number z = x + iy, where x and y are double precision floating point variables, using statements of the form shown below.
In addition, we may also include class members that are methods that calculate both the modulus and the argument of this complex number. A further method that may be of use is raising the complex number to a specified power.
6.4.1 Operator Overloading
If we have declared a, b, c and d to be integer variables then we may easily relate these variables through statements such as those below.
We would also like to write statements such as these if a, b, c and d were complex numbers rather than integers. Before we can do this, we need to define: (i) what the assignment operator (equals) means for complex numbers; (ii) what the unary2 minus operator means—i.e. what is meant by the expression “-a” if a is a complex number; and (iii) what the binary3 addition operator means—that is, what a+b means for complex numbers a and b. Defining these operators for classes is known as operator overloading. We will explain how this is done in C++ below.
6.4.2 The Class of Complex Numbers
In light of the discussion above, we will write a class of complex numbers with the following members.
A double precision floating point variable mRealPart containing the real part of the complex number.
A double precision floating point variable mImaginaryPart containing the imaginary part of the complex number.
An overridden default constructor ComplexNumber() that initialises the real part and the imaginary part to zero.
A constructor ComplexNumber(double x, double y) that initialises the real part to x and the imaginary part to y.
A method CalculateModulus() that returns a double precision floating point variable containing the modulus (or magnitude) of the complex number.
A method CalculateArgument() that returns a double precision floating point variable containing the argument (or phase) of the complex number.
A method CalculatePower(double n) that returns the complex number calculated when raising the original complex number to the power n.
Overloading of the assignment operator.
Overloading of the unary subtraction operator.
Overloading of the binary addition and subtraction operators.
Overloading of the output stream () insertion operator which gives control of the output format for complex numbers.
A suitable header file for this class is shown below. This should be saved as ComplexNumber.hpp. We have made the data associated with each complex number—i.e. the real part and the imaginary part—private members of this class to prevent inadvertent corruption of these members. These members can, of course, be accessed by the methods of the class.
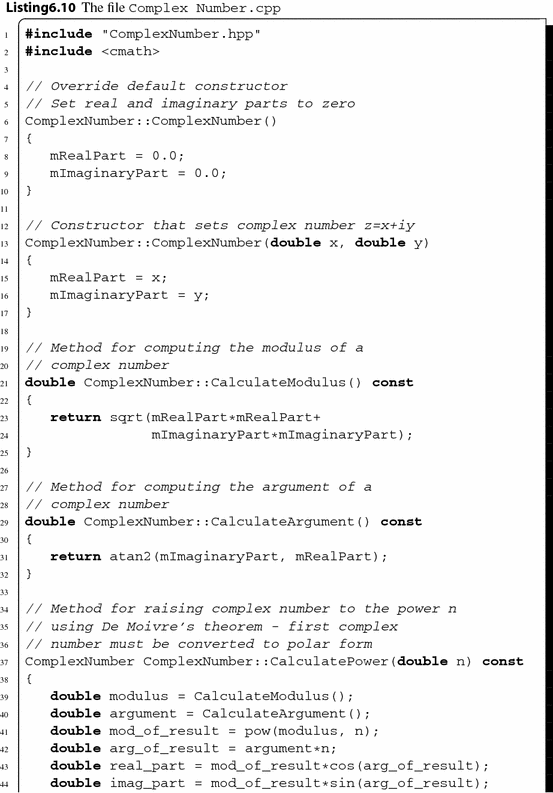
Code for the class members that are methods is shown in Listing 6.10, and should be saved as ComplexNumber.cpp.
In the code in Listing 6.10 we have written two constructors. The first of these (lines 6–10) overrides the automatically generated default constructor, and initialises both the real part and the imaginary part of the complex number to zero if no values are specified. The second constructor (lines 13–17) accepts two double precision floating point variables, sets the real part of the complex number to the first of these, and the imaginary part of the complex number to the second of these. Readers who have followed the discussion of constructors for the class of books will need no more discussion on the implementation of these constructors. We have not defined a new copy constructor because the automatically generated copy constructor behaves correctly.
We now turn our attention to the third method in the code below, the method for calculating the modulus of a complex number in lines 21–25. As this method returns the modulus of the complex number, which is a double precision floating point variable, we begin line 21 with the word double to reflect this. This is then followed by the text ComplexNumber::CalculateModulus() to indicate that: (i) it is a member of the class ComplexNumber; and (ii) the method is called CalculateModulus. The text () indicates that no arguments are required. Recall that member methods can access all class members, and so there is no need to specify either the real part or the imaginary part of the complex number in the list of arguments. Line 21 then concludes with the reserved keyword const to ensure that both the real part and the imaginary part of the complex number whose modulus is being calculated are left unchanged by this method. A simple calculation is then performed to return the modulus of this number. The fourth method in the code above, lines 29–32, uses very similar ideas to calculate the argument of a complex number. Readers should work through this method to ensure that they understand exactly why the function has been written in this way.
Much of the discussion on the methods CalculateModulus and CalculateArgument applies to the fifth method in lines 37–47 of the code, namely the function CalculatePower, which is used to return the nth power of a given complex number. We perform this calculation by first writing the complex number in polar form, that is, z = re. We may then write z = r, which has real part r cos(n), and imaginary part r sin(n). This method requires some different features to the methods of this class already described, which we now explain. In line 37, we specify that the type of variable returned is of type ComplexNumber: that is, methods can be used to return an instance of a class as well as simpler variable types such as double. This method also requires input of the exponent to which we raise the complex number: this is specified by the “double n” in brackets at the end of line 37. Inside the method, the first two lines of code calculate the modulus and argument of the original number using the two class members CalculateModulus and CalculateArgument—this demonstrates how to call these methods from within the class. The next two lines then perform the calculations required on both the modulus and argument of the complex number to raise it to the power of n. Having set both the real part and the imaginary part of the resulting complex number, this complex number is then returned.
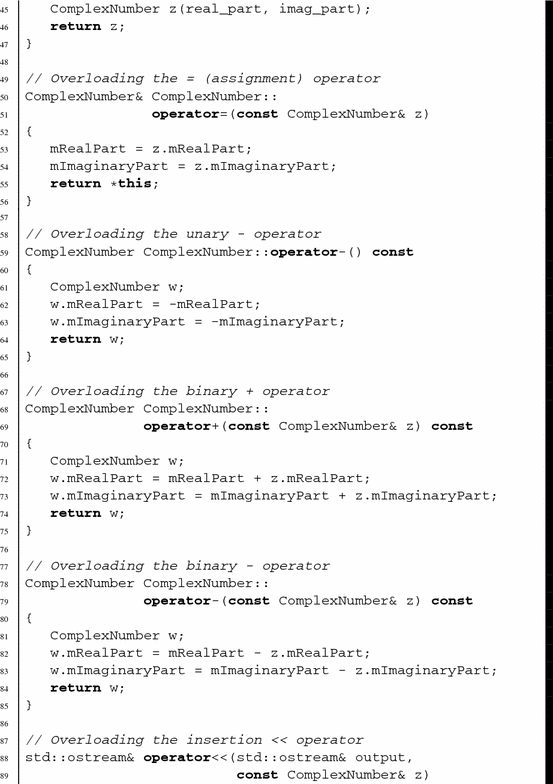
In lines 50–56, we overload the assignment operator. Note that the argument to the assignment operator is a reference to another instance of the class, rather than the object itself. This is because, by default, all method arguments are called by copy, necessitating the overhead of the use of the copy constructor in making the assignment. The use of the const keyword guarantees that the assignment operator will not alter the contents of the object argument z. The remainder of the method for assignment uses an entity called this which does not appear to have been declared. For the purpose of this book, the reader need only know that this is a pointer to the complex number that is returned: it is the contents of this which is returned.
The unary subtraction operator is overloaded in lines 59–65. Line 59 explains that: (i) the return type is a ComplexNumber; (ii) the method is a member of the class ComplexNumber; (iii) defines the operator “”; (iv) the function requires no input arguments (as specified by the empty brackets); and (v) the original complex number is left unchanged (through use of const). An instance of the class ComplexNumber, called w, is then declared in line 61, and the real part and imaginary part of w are set to the negative of those of the original complex number in lines 62 and 63. Finally, the complex number w is returned.
The binary addition operator is defined in lines 68–75. We begin as usual in lines 68–69 by specifying the return type, the class that the function is a member of, the operator and the input argument. There is only one input argument which is that to the right of the + operator—the class itself is the left operand. We declare an instance of a complex number (line 71), perform the required addition (lines 72–73), and then return the result of this addition (line 74). A similar function overloads the binary subtraction operator in lines 78–85.
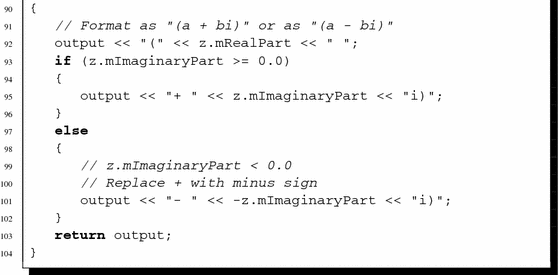
The final operator is defined in lines 88–103. This is the output stream () insertion operator. The syntax here is different: the operator is not a member method of the class, but is an external function. This operator uses the friend keyword introduced in Sect. 6.3. By using the friend keyword for the operator in line 21 of the header file for complex numbers, we are telling the computer that, although this operator is not a class member, this operator may access all class members—including private members. When this operator is defined in lines 88–103 of the listing above, we see that we do not make it a class member through ComplexNumber::. The function defining this operator takes an output stream (such as std::cout or an output stream to a file) and inserts characters into it using the complex number z.
We now demonstrate use of the class of complex numbers in the following code. Recall from earlier that when member methods are called that require no arguments we still need to acknowledge that they are functions by using empty brackets, for example z1.CalculateModulus() in line 9 of the code below. Note that we can declare an array of complex numbers: this is shown in line 25 of the listing below where we create an array of complex numbers with two entries. In lines 26–27, we set the first element of this array to the complex number z1, and the second element of this array to the complex number z2. In lines 28 and 29, we show how to access a friend function of an entry of an array, through printing the complex number that is the second entry of the array of complex numbers to screen.
6.5 Some Additional Remarks on Operator Overloading
In Sect. 6.4.1, we introduced the concept of operator overloading. This concept was demonstrated in Sect. 6.4.2 using the example class of complex numbers. In this example class, we demonstrated how to overload the assignment operator, and both unary and binary addition and subtraction operators. Many more operators may be overloaded, as will be demonstrated in later chapters. In Sect. 8.1, we show how the square bracket operator may be overloaded. In Sect. 8.3.2, we show how the “less than” operator can be overloaded: extending this to the “greater than” operator, the “less than or equals to” operator, the “greater than or equals to” operator, the “not equal to” operator, and the equality operator then follows the same pattern. In Sect. 10.3.4, we demonstrate how to overload the round bracket operator.
6.6 Tips: Coding to a Standard
Many programming organisations and projects use coding standards in an attempt to ensure that the software written is of an appropriate quality. A famous C++ coding style called JSF (Joint Strike Fighter) was drafted for an international aviation project and has now been adopted by many commercial software houses. Some organisations use automatic checks to ensure that their code complies to the standard (to the extent that employees are reprimanded if their work falls short), while other organisations use the standard as a guideline.
Coding standards are basic rules for programming. Some rules dictate how programs should be laid out (in terms of where comments, new lines and spaces should appear). Other rules are about the naming of variables, classes, functions and methods. Still other rules outlaw various programming practises which, although legal in the language, are considered dangerous (such as returning a pointer to locally allocated memory). The reasons for adopting coding standards are various, but it is generally believed that they promote code which is more reliable, portable, maintainable, readable and extensible.
We believe that a few simple coding rules make programs much more readable (and therefore more maintainable). For this reason, we have used a small set of coding standard rules throughout this book. We don’t always follow these rules rigidly, especially when we present small fragments of programs, but once you are familiar with some of the rules we are using then our presentation of code should make more sense.
1.
Code within blocks (such as those introduced in Sect. 5.1, as well as functions, loops, branches of if statements, and other places which may have curly brackets) is indented. The curly brackets ({ and }) are always used, even in single-statement blocks (see Sect. 2.1.1), and they appear on a line of their own.
2.
Lines of code which are too long to fit comfortably within the width of an editor are split across multiple lines with a suitable indentation.
3.
Names for variables and functions are meaningful (e.g., local_index or numberOfNodes) but are not so verbose that they become too long and unwieldy.
4.
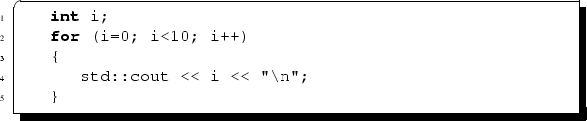
Variables are declared close to where they are used, rather than at the beginning of a function. This is so that the context is clear (see Sect. 5.1). Loop counter variables are declared in the context of the loop, that is, we write
rather than
5.
Locally declared variable names have underscores (e.g., total_sum).
6.
Where types are pointers or references the “*” or “&” character is written adjacent to the native type, with no space between, that is,
rather than
As explained in Sect. 4.1.2, a consequence of this rule is that each pointer variable declaration should appear on its own line.
7.
Pointer names begin with “p” (e.g., p_return_result or pLastResult). One exception to this rule is when the pointer is used for an array of values stored in dynamically allocated memory.
8.
Function names are in camel-case (i.e., where capital letters begin each word) and the first word is a verb, to indicate what it is that they do (e.g. GetSize() or InitialisePreconditioner()). This applies to class methods as well as to regular functions.
9.
Names of arguments to functions (and class methods) are in also camel-case, but they begin in lower-case (e.g., firstDimension). The same format is also applied to member data of classes, but the following rule helps us to distinguish them.
10.
Class data which have access controls are also in camel-case with “m” (for “my”) to denote “private” or “protected” (e.g., mSize or mpQuadraticMesh where the latter is a private pointer). Since it is advisable for member data to be private, this naming convention allows us to distinguish, in the body of a class method, between the method arguments and the class variables.
11.
Class names are also in camel-case (as are function names), but they can be distinguished by the context (e.g., FiniteElementSolver or PopSinger).
12.
There should be lots of descriptive comments as discussed in Sect. 5.10.
6.7 Exercises
In all of the exercises below, test your code using suitably chosen test cases.
Methods called GetRealPart and GetImaginaryPart that allow us to access the corresponding private members. In the class of complex numbers, the members representing the real and imaginary parts of the complex number—called mRealPart and mImaginaryPart—are private members. These members may be set through using a constructor, but there is no way to access them.
2.
Friend functions RealPart and ImaginaryPart so one may either write z.GetImaginaryPart() or ImaginaryPart(z).
3.
An overridden copy constructor.
4.
A constructor that allows us to specify a real number in complex form through a constructor that accepts one double precision floating point variable as input, sets the real part of the complex number to the input variable, and the imaginary part to zero.
5.
A const method CalculateConjugate which returns the complex conjugate x - iy of a complex number x + iy.
6.
A method SetToConjugate which has a void return type and sets the complex number x + iy to its complex conjugate x - iy.
7.
Write code to dynamically allocate memory for a 3 3 matrix of complex numbers. Extend this code to calculate the exponential of the matrix, where the exponential of a matrix A is given by
where, in practice, the infinite sum above is truncated at a suitably large value of n. Having allocated the memory for this array dynamically what should you now do? See Sect. 4.3.3 if you don’t know.
8.
Test the class to ensure that special cases give sensible results. For example (0+0i) should equal zero for most values of n, but any number raised by n = 0 should return 1.
6.2
Develop a class of matrices of double precision floating point variables that has the features listed below.
1.
An overridden default constructor that initialises all entries of the matrix to zero.
2.
An overridden copy constructor.
3.
A constructor that specifies the four entries of the matrix and allocates these entries appropriately.
4.
A method (function) that returns the determinant of the matrix.
5.
A method that returns the inverse of the matrix, if it exists.
6.
Overloading of the assignment operator, allowing us to write code such as A = B; for instances of the class A and B.
7.
Overloading of the unary subtraction operator, allowing us to write code such as A = -B; for instances of the class A and B.
8.
Overloading of the binary addition and subtraction operators, allowing us to write code such as A = B + C; or A = B - C; for instances of the class A, B and C.
9.
A method that multiplies a matrix by a specified double precision floating point variable.


 ) insertion operator which gives control of the output format for complex numbers.
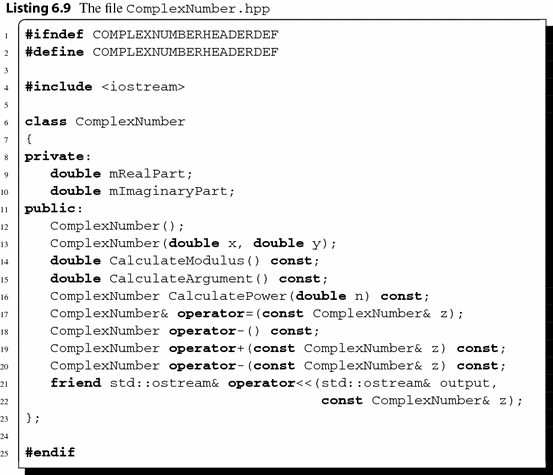
 . We may then write z
 = r
= r , which has real part r
 cos(n
cos(n ), and imaginary part r
 sin(n
sin(n ). This method requires some different features to the methods of this class already described, which we now explain. In line 37, we specify that the type of variable returned is of type ComplexNumber: that is, methods can be used to return an instance of a class as well as simpler variable types such as double. This method also requires input of the exponent to which we raise the complex number: this is specified by the “double n” in brackets at the end of line 37. Inside the method, the first two lines of code calculate the modulus and argument of the original number using the two class members CalculateModulus and CalculateArgument—this demonstrates how to call these methods from within the class. The next two lines then perform the calculations required on both the modulus and argument of the complex number to raise it to the power of n. Having set both the real part and the imaginary part of the resulting complex number, this complex number is then returned.
 ”; (iv) the function requires no input arguments (as specified by the empty brackets); and (v) the original complex number is left unchanged (through use of const). An instance of the class ComplexNumber, called w, is then declared in line 61, and the real part and imaginary part of w are set to the negative of those of the original complex number in lines 62 and 63. Finally, the complex number w is returned.
 ) insertion operator. The syntax here is different: the operator is not a member method of the class, but is an external function. This operator uses the friend keyword introduced in Sect. 6.3. By using the friend keyword for the operator
  in line 21 of the header file for complex numbers, we are telling the computer that, although this operator is not a class member, this operator may access all class members—including private members. When this operator is defined in lines 88–103 of the listing above, we see that we do not make it a class member through ComplexNumber::. The function defining this operator takes an output stream (such as std::cout or an output stream to a file) and inserts characters into it using the complex number z.


 3 matrix of complex numbers. Extend this code to calculate the exponential of the matrix, where the exponential of a matrix A is given by where, in practice, the infinite sum above is truncated at a suitably large value of n. Having allocated the memory for this array dynamically what should you now do? See Sect. 4.3.3 if you don’t know.
 should equal zero for most values of n, but any number raised by n = 0 should return 1.
 matrices of double precision floating point variables that has the features listed below.