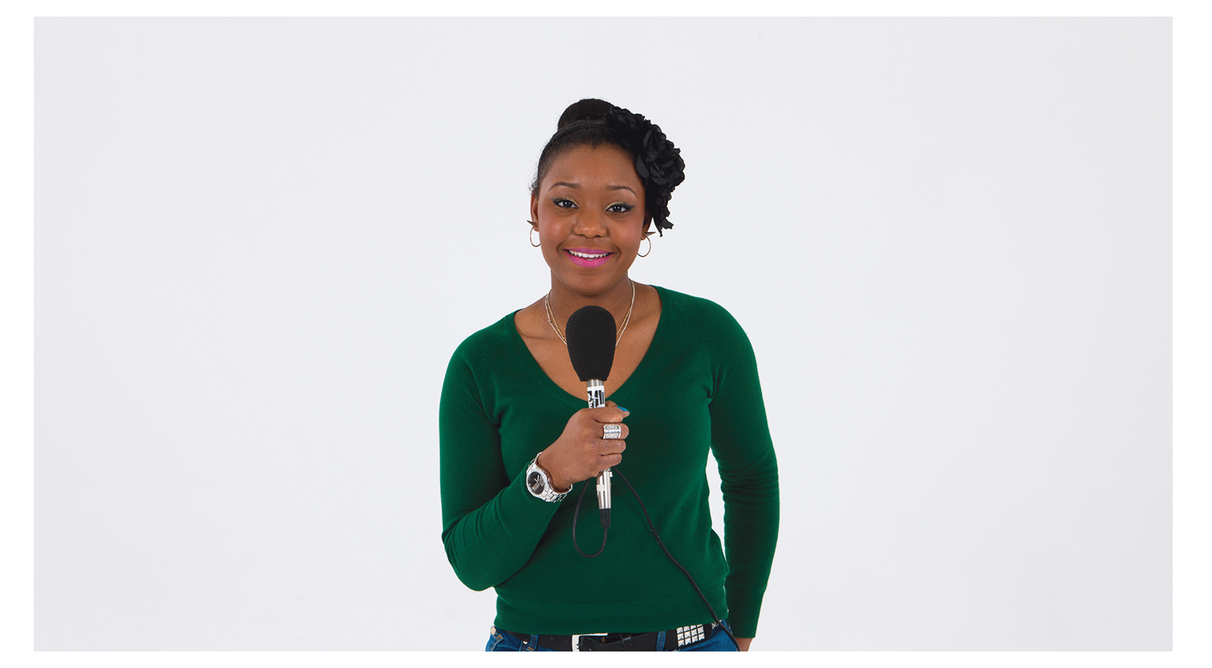
Figure 15.1 An example of a correct eye line shot
Shooting for factual programmes and shooting for drama involve slightly different techniques. There are aspects which overlap but there are also aspects which are completely different. This chapter will talk you through some of the main techniques you’ll need for factual programmes. The first thing is to think through the main tasks in a factual programme and who does what. Any shoot can be a pressurised situation; the more everyone is aware of what they are supposed to be doing the better. The shoot will run more smoothly and you will have more time to think creatively. There are usually far fewer people involved in a factual shoot than a drama and often the same person will do several tasks. How you decide to allocate the tasks is up to you but you just need to make sure that someone is doing it.
Directors and producers are often the same people in factual. As director/producer you will be in charge of the shoot. You are not just creatively in charge but also logistically. You need to keep the whole thing going, keep the show on the road, and make sure everyone knows what they are doing when. This is really hard to do at the same time as being very creative, but that was why you did all those forms and schedules, so that you had that side sorted out.
From the research, planning and recce you should now have a good idea of the kind of shots you want. However, as with all the other plans this can change slightly when you are on the ground. Shots which seemed a very good idea in theory turn out to be not quite so good in practice. This is fine; so long as you know the kinds of shots you will have to do to make the piece work then it’s fine to embellish. Once you are looking through a camera, many more ideas will come to you and you can start to be quite creative. You may see two or three alternatives, and if you’ve got time you can always do it more than one way. However, you should keep referring back to your treatment to make sure that you are not missing anything vital.
One of the most daunting moments of a shoot is when you first start. So what do you do first? What do you do when you arrive on location? Here are a few steps to get you into it.
You may feel a bit stupid saying this to people you’ve been working with and know well, and who have drawn up the shooting script with you, but it will help you to feel in control of the situation. You can then hope that people will start to spring into action, since they all know what they are doing for each section and when they should start doing it. If they are staring at you blankly then remind them what they have to do (e.g. Emma, can you make sure Karen gets some makeup on and help her get ready? Steve, shall we go to the terrace and have a look at some shots?).
Camera and director can sometimes be rolled into one, in which case you will only be discussing things with yourself, but if you have different people doing these jobs you will need to be in constant discussion with them.
Once the camera is in position it’s the job of the director and camera to find the shots. The director should have an idea of what kind of shot they want and the cameraperson will look for it but also offer up suggestions. They are the people looking through the lens and usually they have a lot of experience, so directors would be foolish to ignore their suggestions.
The cameraperson is responsible for thinking about the best framing for the shot, the best angles, depth of field, etc. They can discuss this with the director but they are the people looking down the lens, so they should also be coming up with ideas.
Importantly the cameraperson is responsible for the lighting. Whether or not you have a lighting kit, it’s the cameraperson’s job to think about the best lighting for the shot. If you are outside, they should also be thinking about where the sun is and where it is going to; that way you can help make decisions about the order of shots.
They should also take responsibility for the safekeeping of all the rushes. They should also make sure all the rushes are properly labelled. For some reason people find this quite an irritating job although it’s perfectly simple; however, you will regret it if you don’t, as you will spend hours looking at irrelevant rushes find the shot you want.
You need to start thinking about the sound around you. You will need to start thinking about background noise and how much this is affecting any interviews. Remember: a constant background noise is much less disturbing than an intermittent one, particularly if the viewer already knows the source of the noise. If you are doing an interview, it is the sound person who is responsible for making sure that the levels are correct and you have the right balance between the interviewee or presenter and the ambient sound.
If done by different people, sound, camera and director need to constantly talk to each other. Sound should be advising on what he or she can hear and whether it’s acceptable or likely to be a problem. At the end of a take the sound should let the camera and director know if there were any sound problems on the take; if there were they can take the shot again.
In a factual recording these are likely to be the interviewees, although they may not be part of your group. You should make sure that any contributors are kept informed of what is going on. There is nothing more dispiriting to a contributor than to watch a group of people running around like headless chickens and to have no idea when they are going to be needed, or indeed what they are going to be asked to do. If there are delays then that’s fine, but make sure the contributors know about it and know when they are likely to be needed. When you come to shoot, explain to them what they are going to have to do, and if you are likely to have to ask them to repeat some action then explain this to them in advance. You should also remember to thank them at the end of the contribution. If you need them to do something again, thank them first and then ask if you could repeat the action but be very clear why you want to repeat it; that way they won’t do the same thing again.
These are not often used on factual programmes which tend to have small budgets. However, if you do have one, the role can cover the following:
On a factual programme there are a number of different types of shooting you are going to have to do. It’s worth getting clear in your mind what you have to think about in each case.
A piece to camera is generally done by the presenter of the programme. It differs from an interview in that the person is generally scripted; they have written the piece first. They are also talking directly to the viewer, so they should be looking directly at the camera. If you are planning a piece to camera you need to think about the size of shot you are looking for. You also need to think about the location, particularly if it is a wide shot. The choice of location should help tell the story. You should plan any moves. Is the camera going to tilt or pan? Is the presenter going to walk and talk or just talk? If you are planning moves then there should be a good reason. Is there anything they can refer to, perhaps with a gesture or turn of the head? Are they using any props? What is the feel of the piece? Is it reflective or is it energised? This can depend on what part of the piece you are in; pieces to camera tend to be more energised at the beginning and more reflective at the end. Think about the performance. This will depend to some extent on your target audience and the nature of the piece you are doing. Journalists tend to give a fairly straightforward performance as they want to foreground the story. However, if it’s more of an entertainment piece then obviously the performance of the presenter is very important.
Think about the length of pieces to camera. Long pieces to camera rarely work well; they tend to end up sounding like a lecture and an inexperienced presenter finds it very difficult to hold a performance for very long. Thirty seconds or about 90 words is probably about right and anything longer than a minute (180 words) may start to sound laborious.
A presenter needs to look directly at the camera (Figures 15.1, 15.2 and 15.3, opposite). They also need to stay looking at the camera all the time and not let their eyes wander. The moment they do they will start to look shifty or as if they don’t know what they are doing; it’s not a good look.
You should also think about the angle of your shot. Do you want the presenter at eye level or would you want to look up or down on them? This mostly depends on the style and the subject matter of your piece; just remember: you can vary the angles, but beware of making the piece start to look a bit comical with too many different shots.
Lots of factual programmes include interviews. These can vary in length and type from a quick vox pop to a lengthy interview with an expert. They may also include eyewitnesses or they can be characters in your piece who may not be experts but who have the kind of experience which will illuminate your subject.
When you are shooting an interview there are a number of things you need to consider. Interview technique is very important and is dealt with in a later chapter. For the moment just think about how you might set up an interview.
The first thing to consider is where do you want to do the interview? This will depend a little on who you are interviewing and what they are going to be talking about. However, if possible you will want to put your interviewee in a situation that is interesting to the audience. An office isn’t a particularly interesting location, although for some types of interviews it is appropriate. Ideally, however, you would choose a location which relates to the subject. This is not only more interesting for the viewer but it is likely to stimulate a better answer as he or she is closer to the subject.

Figure 15.1 An example of a correct eye line shot
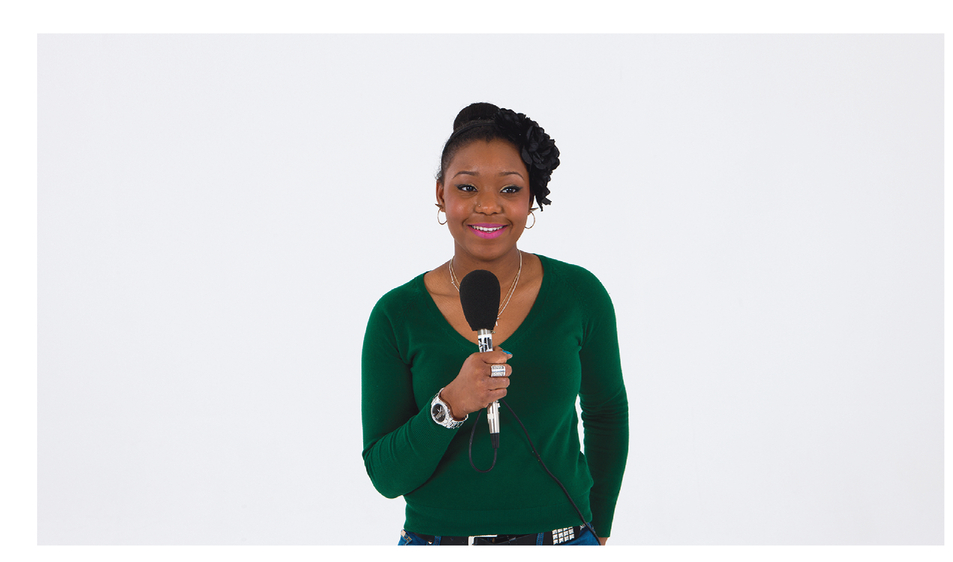
Figure 15.2 Two examples of a poor eye line shot
Typically interviews start with a mid-shot. This helps the viewer understand where the interviewee is, particularly if he is on location somewhere. A head shot doesn’t tell the viewer very much. However, you may want a slightly more intimate shot as well, particularly if the interviewee is recounting something personal. A closer shot tells the viewer a lot more about the emotional content of the answer; it will help the audience connect. A combination of wider shots moving into closer shots tends to work well.
One thing to avoid is moving your shot during the interview. You should avoid zooms and pans. During the edit you will find it difficult to cut on a move and you will be left with a long, rambling answer. If you want to change shot sizes you should do it between answers, not during them.
You should also check your framing on a shot. Remember to think about looking room and head room. Don’t cut off the interviewee’s chin or have their nose tight up against the edge of frame.
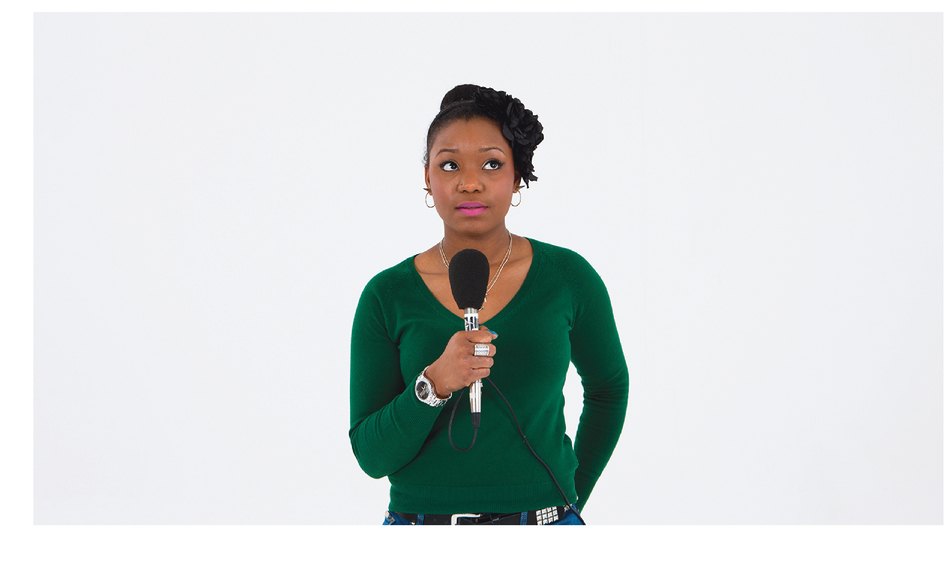
Eye lines are important during an interview. Unless there is a particular reason you want a low or high angle shot, generally you want the interviewee’s eye line to be the same as the interviewer’s. So if the interviewee is sitting, the interviewer should be sitting and if the interviewee is standing so should the interviewer. If there is a discrepancy in height between the two you might need to compensate a little (Figures 15.3, 15.4 and 15.5a, opposite).
The interviewee should never be looking at the camera; this will give the impression that they are the presenter. However, they should not be looking too far either to the left or to the right of camera; you should avoid profile shots, and you should make sure that you can always see the whole face and both eyes. If the interviewer is not in shot then the way to deal with this is to make sure the interviewer sits or stands as close to the camera as possible and asks the interviewee to look at them and not at the camera. That way the eye line will be either just to the left or to the right of the camera which is where it should be. If they are looking too far to the right or left viewers will start to feel disconnected (Figures 15.5b, 15.6 and 15.7, see page 148).
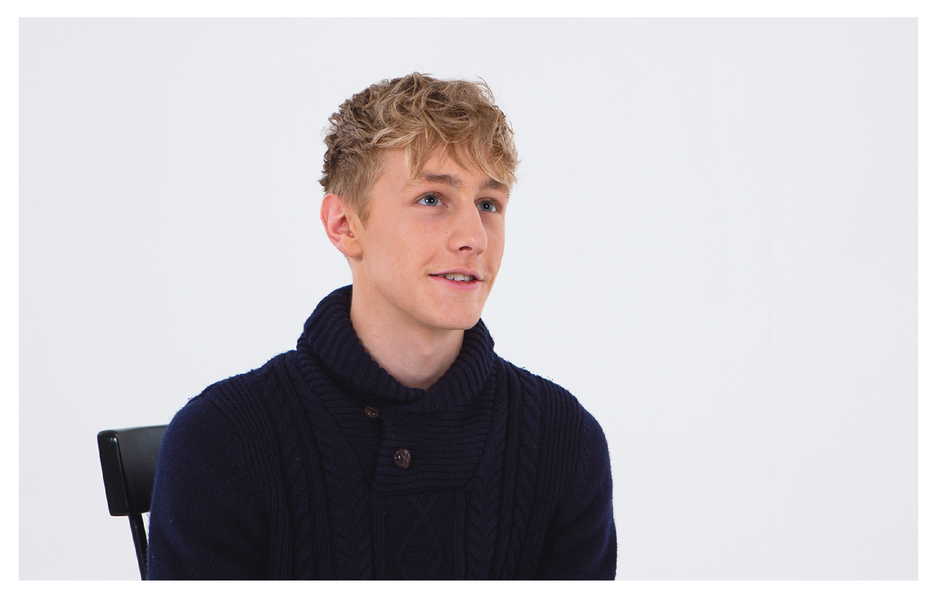
Figure 15.3 Eye line too high
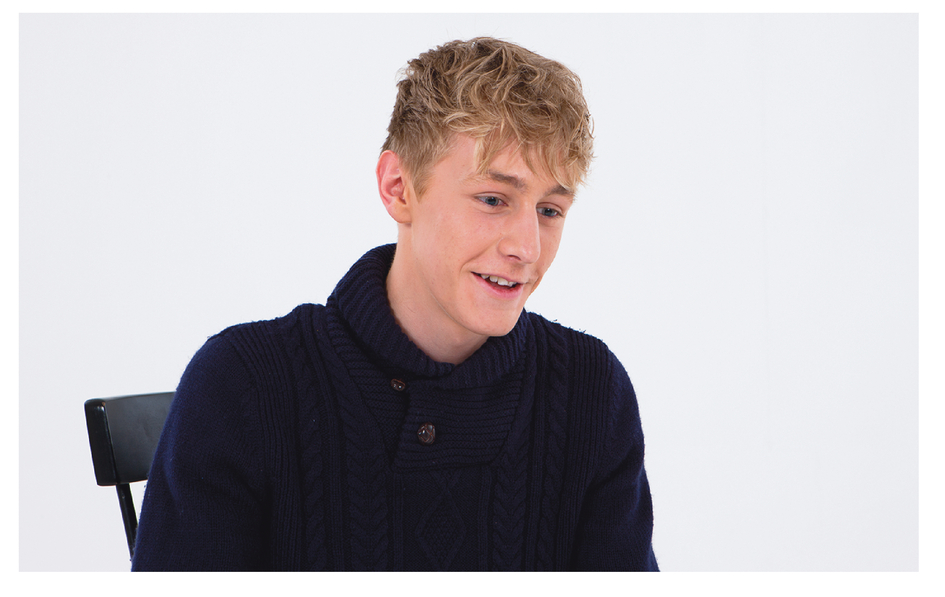
Figure 15.4 Eye line too low
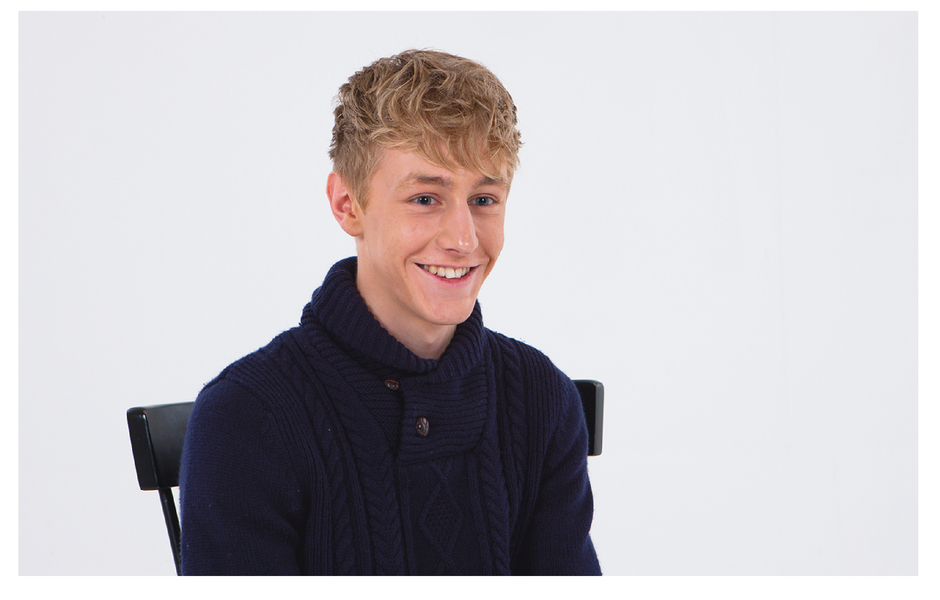
Figure 15.5a An example of a correct eye line shot
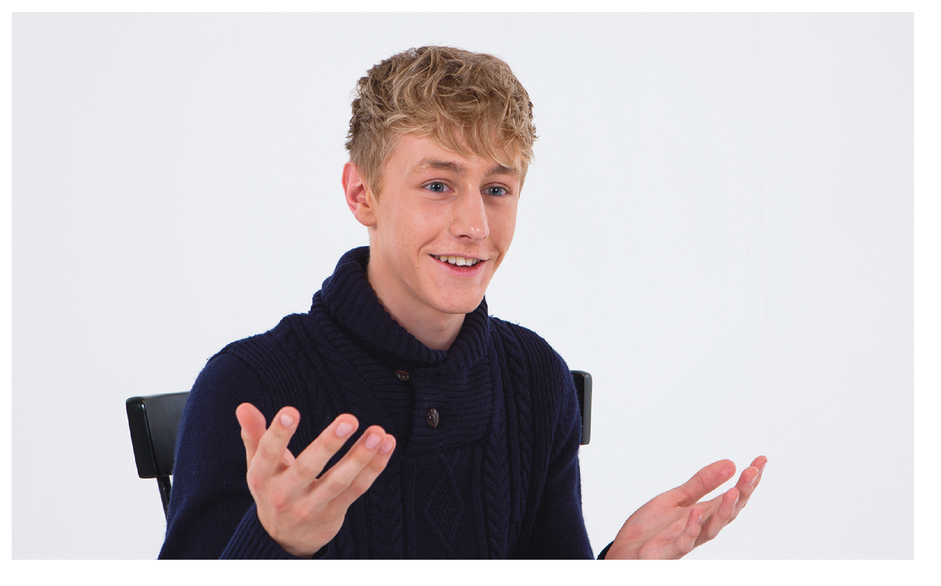
Figure 15.5b An example of a correct eye line shot
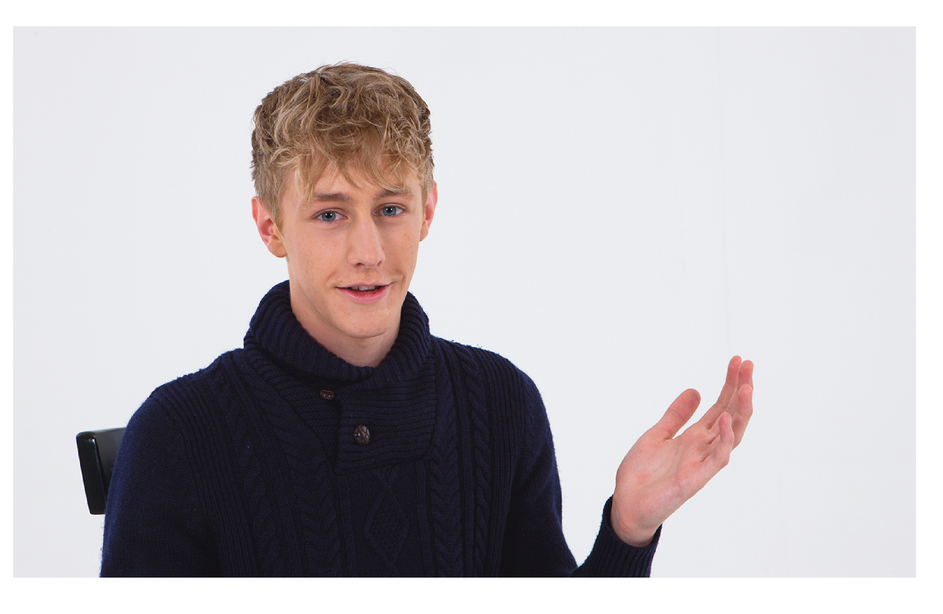
Figure 15.6 Eye line to camera shot
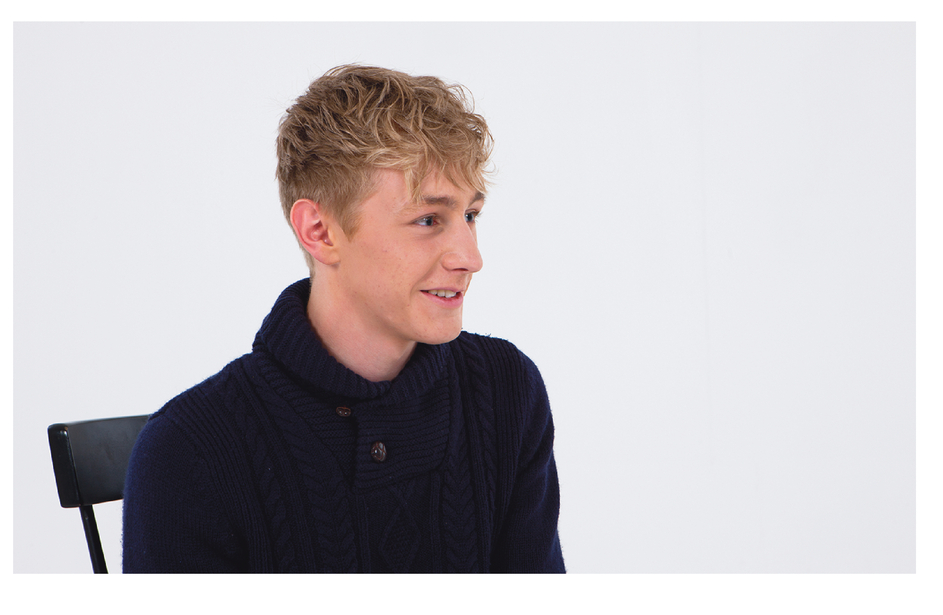
Figure 15.7 Eye line too much in profile
When you are framing a number of interviews for the same piece then it’s a good idea to alternate which side of the camera the interviewer sits or stands between interviews. Thus if you have four interviewees, two of them will be shot with the interviewer standing to the left of the camera and the other two will be shot with them standing to the right of the camera. When you come to the edit, the shots will start to have a more varied feel (Figures 15.8 and 15.9).
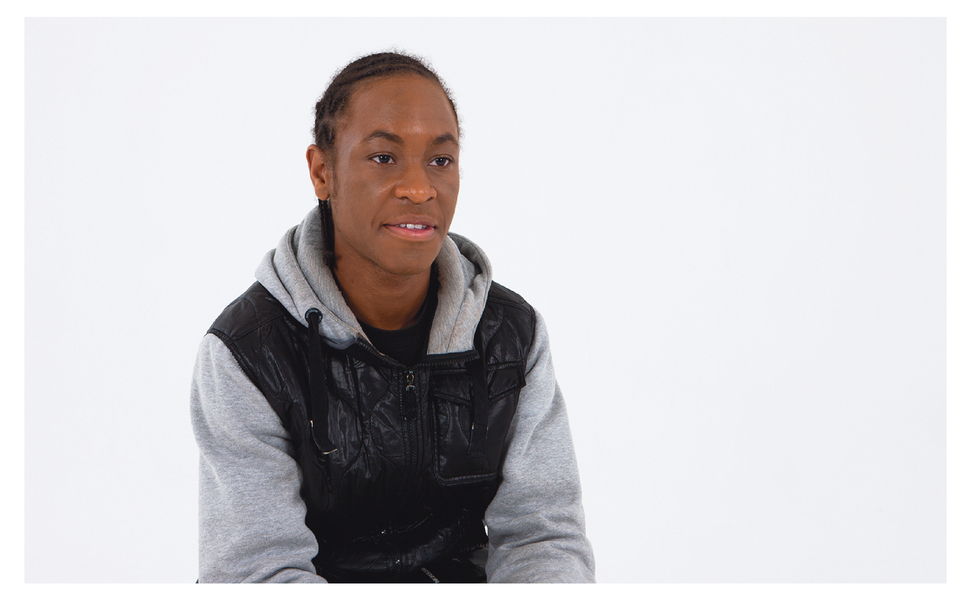
Figure 15.8 Interviewee looks camera right
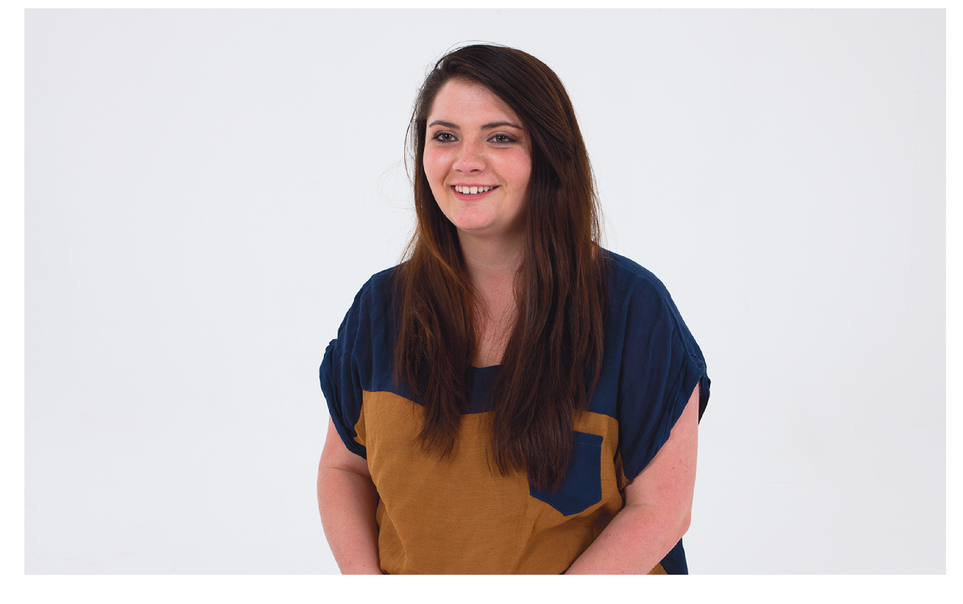
Figure 15.9 Interviewee looks camera left
If you want to have the interviewer in shot there are two options. You can go for an over-the-shoulder shot (Figure 15.10, overleaf). In this type of shot the interviewer should stand immediately in front of the camera and slightly to the left or right. The camera person then widens the angle slightly so that part of the head and one shoulder of the interview is in frame. However, this is not a very comfortable shot and you would not want the whole interview to be conducted in this way. You might just use it to establish the interviewer and then move to a closer shot.
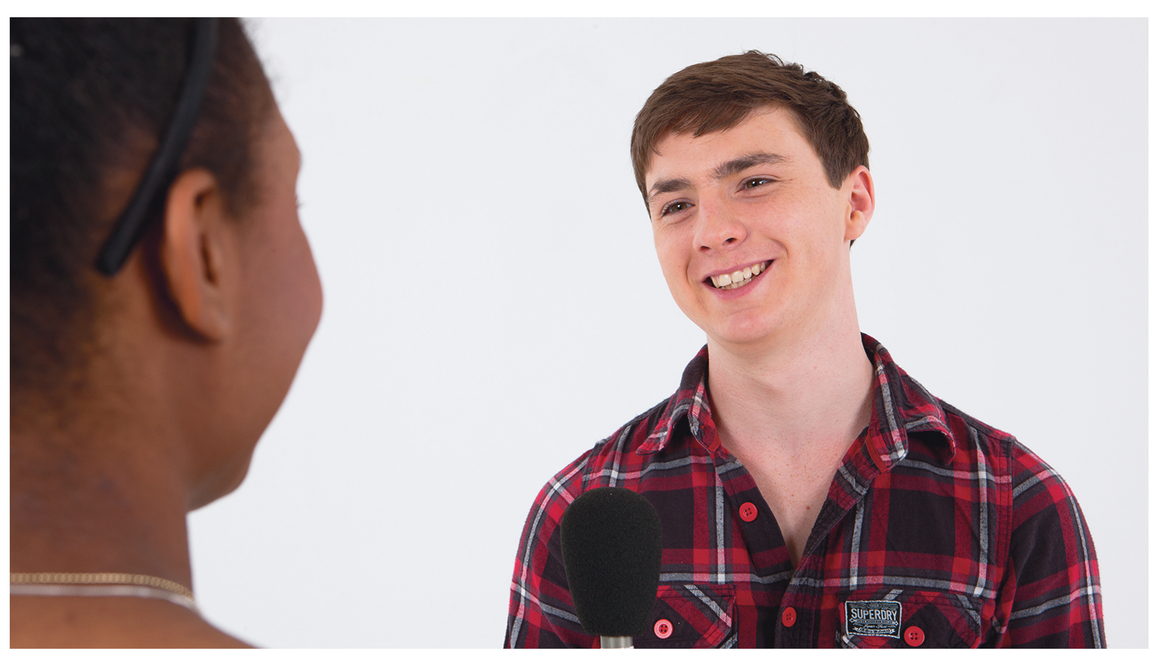
Figure 15.10 Over-the-shoulder shot
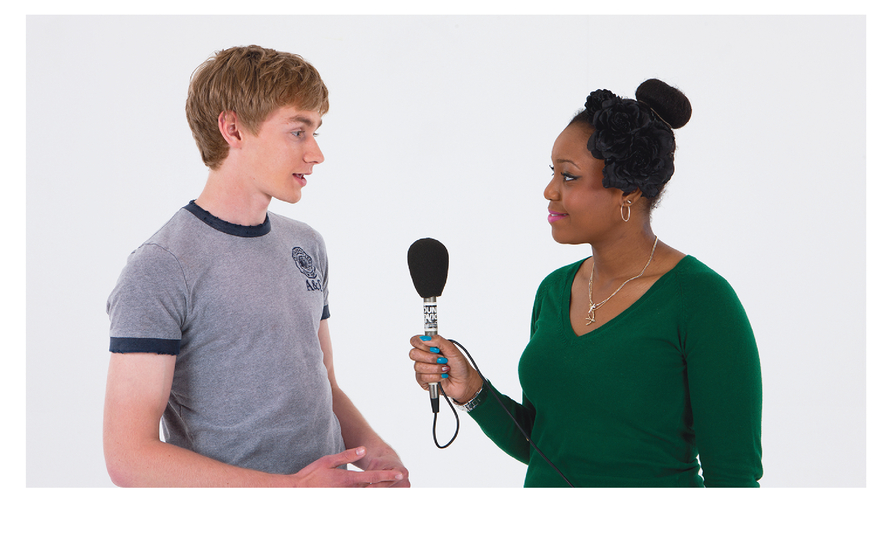
The other option is a two shot where you have both the interviewer and the interviewee in shot (Figure 15.11). This type of shot tends to be used in pieces which have presenters. The presenter is a kind of constant presence and you don’t want to lose them from the interview. In this case you should have the interviewee and interviewer standing next to each other and slightly angled towards one another. Again you should angle them so that you can see as much of the face as possible.
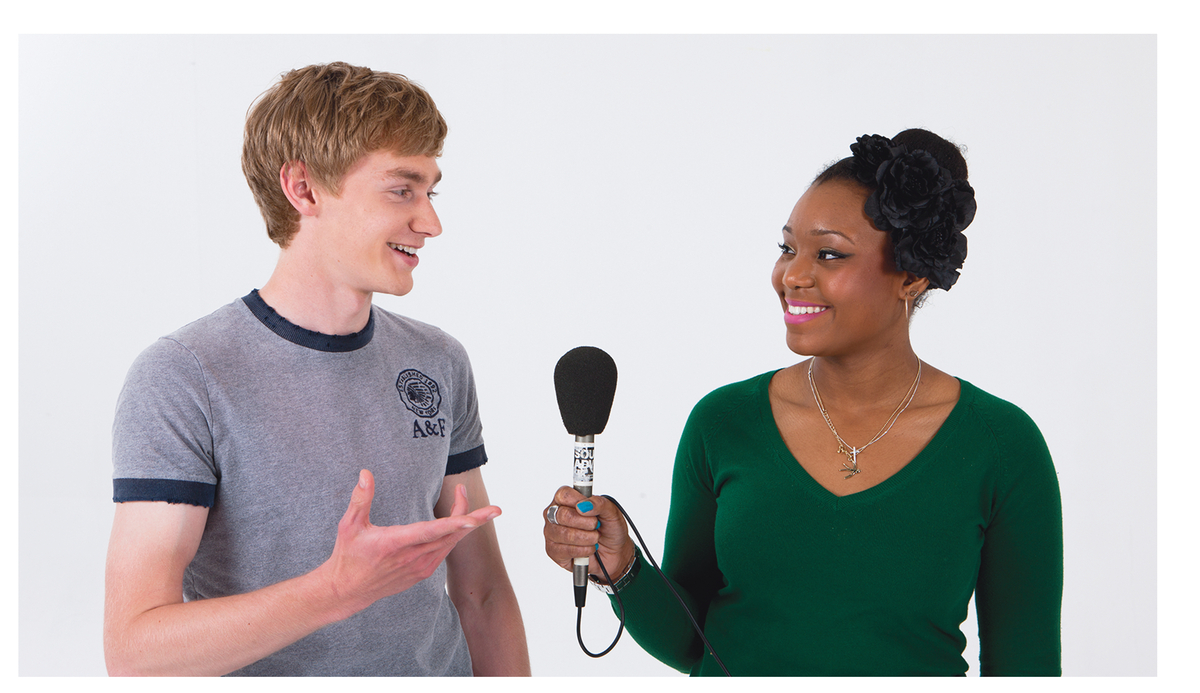
Figure 15.11 Two shot, presenter and interviewee
Again you can change the shot sizes. A wide shot tends to be used to introduce the piece or if there is something in the surroundings that the interviewee is likely to refer to. You might choose to move to closer shots or even single shots for the rest of the interview (Figures 15.12 and 15.13).
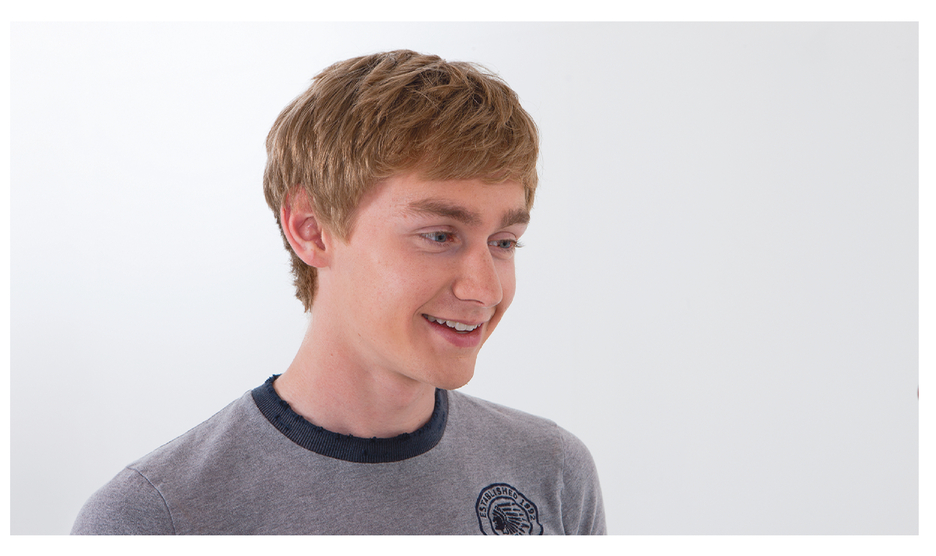
Figure 15.12 Single of interviewee
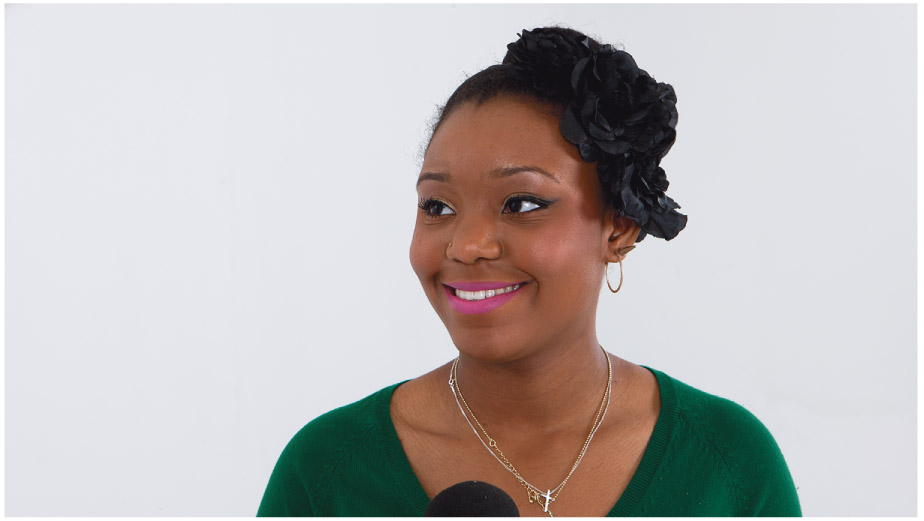
Figure 15.13 Single of presenter
If you are doing a two-shot interview but have chosen to move into closer singles, you may want to have singles on both the interviewee and the interviewer. In this case you should try to match the shot sizes. It will feel very odd if you have an MCU on the interviewer asking the question and then cut to a CU on the interviewee for the answer. You should try to shoot both in the same size shot (Figures 15.14 and 15.15, overleaf).
Just as with a presenter you should avoid moving in and out of shot sizes too much. If you have been using single closer shots then coming back out to a wide shot will signal something to a viewer. It will either signal that you are coming to the end of the interview or that you are going to talk about something which they can see around them.
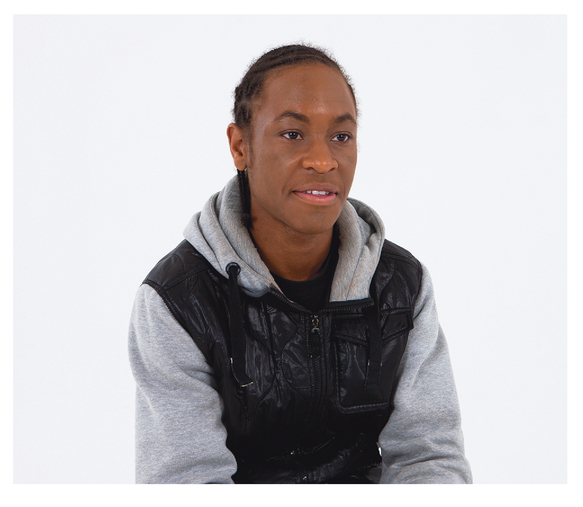
Figure 15.14 Two examples of matching shot sizes
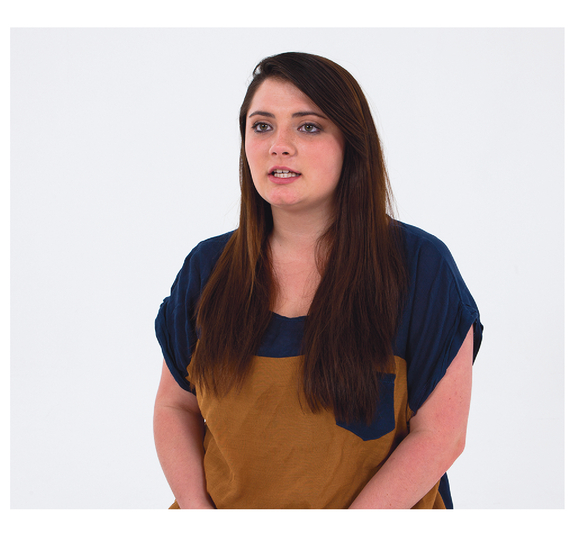
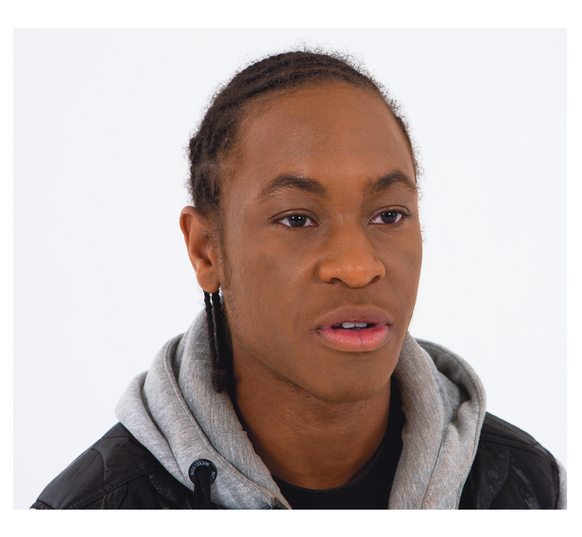
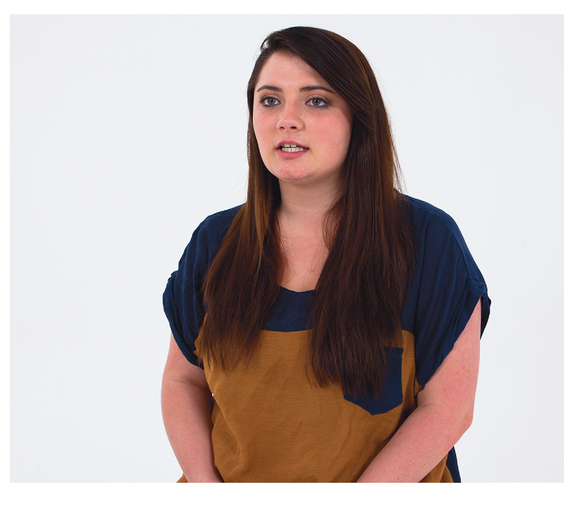
Figure 15.15 Two examples of non-matching shot sizes
Conventionally, if a presenter is in shot then they might end the piece by thanking the interviewee and then perhaps moving on to another piece to camera. When you are thanking the interviewee you can have both people in the shot. You may then choose to come to a closer shot for the piece to camera if you are moving on to a completely different subject.
If you are shooting an interview with more than one interviewee then the same sorts of rules apply. If the interviewer is in shot you should place them in such a way as to have them slightly turned towards the interviewees but not so much that you lose their full face. They can either be in the centre or to one side. You should use a wide shot as your opening shot so that the viewer knows who is there and then perhaps cut to closer shots. However, when the interviewer moves from talking to one interviewee to a different one it’s a good idea to come out to a wide shot so that the viewer gets the geography of who is talking next.
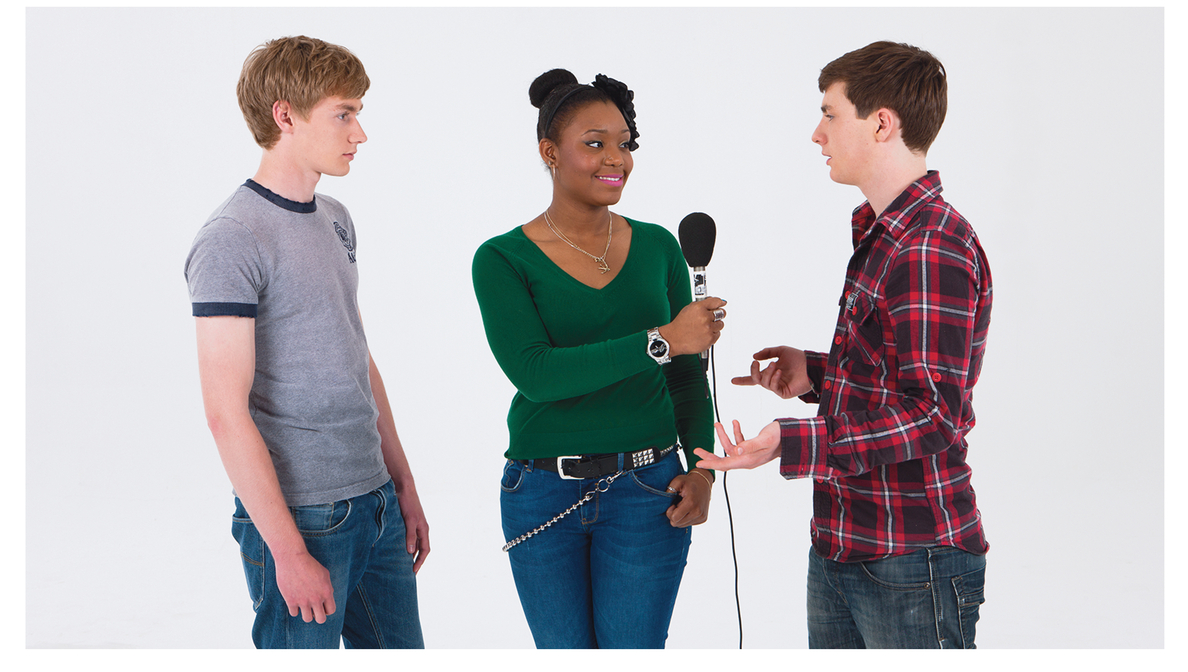
Figure 15.16 Presenter plus two interviewees
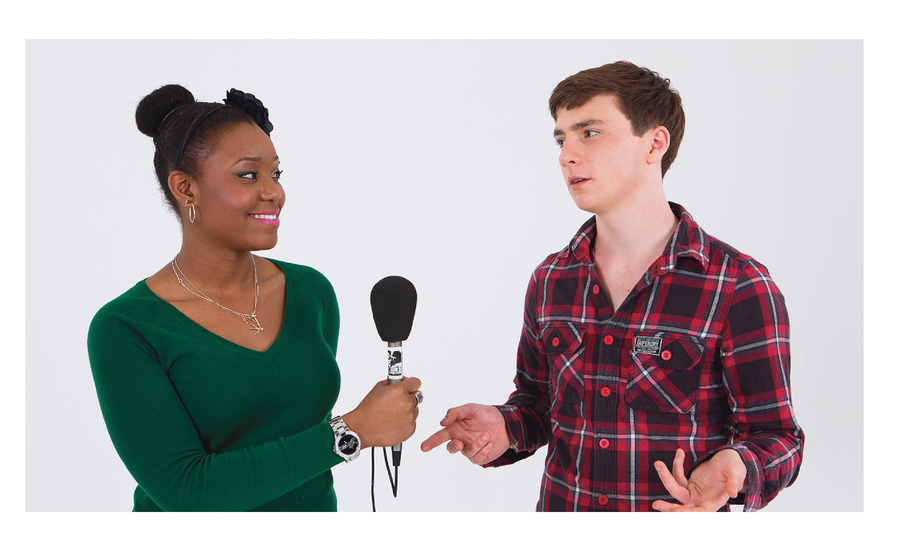
Figure 15.17 Two examples of a two shot
You will also need to decide on the angle of the shot. This is really up to you and how you want the piece to look stylistically. Conventionally, interviews tend to be done with the camera at eye level. If you were interviewing for a news report you would try to keep the camera at eye level.
There are no fixed rules about when to use what shot. Directors will tend to mix them up all the time. It will only really become clear when you start to edit. However, there is a tendency to use a wide shot or establishing shot early on in the scene so that the viewer gets a sense of where they are and the geography is established. This is not a hard-and-fast rule by any means but it’s something to consider. You should avoid moving in and out all the time for no particular reason. When you are shooting a sequence you could start with a WS, move into to MS and then to a CU. However, it will start to look a little odd if you begin with a WS, go straight to a CU and then out to MS, then BCU and then back to a WS. You will discover more about this when you start to edit, but when you are shooting just try to remember to get as many shot sizes and angles as you can to give yourself as much flexibility in the edit as possible.
Shooting action is filming things that are happening, or filming someone doing something. It may be action that is already happening or it may be something you deliberately set up. It might be that you are just trying to give the viewer a sense of where they are. However, when you shoot action you need to start to think in sequences rather than single shots. You should be thinking about shooting a number of shots which can all be edited together to make an interesting sequence. Shots are rarely much good on their own; one shot only of lots of different things will be worse than useless in your edit. There are several types of action sequences you might have to shoot for a factual programme:
This is small-scale action which doesn’t involve people moving around too much or moving in or out of shot a lot. You may need to shoot something that someone is doing. It might be some kind of process.
In order to be able to do this effectively the action will need to be repeated a number of times. As you only have one camera, which can only take one shot at a time, if you want different sizes of shots on the same action you will need to repeat the action.
Typically, a static shot tends to become quite boring after about five seconds; the conventions of film lead us to expect the shot to change. Of course that’s not a rule. Many people use much shorter shots and there will be directors who like to hold shots for much longer. But if you imagine a piece of action which takes one minute, you are likely to change shots about 15 times. This does not mean to say that you have to have 15 different shots; you can come back to the same shot a number of times but you do need enough different shots to give the piece some variety.
Some people talk about a five-shot rule. That is to say you should take at least five shots for any sequence. Here are some of the shots you might think about getting:
The wide shot should if possible show the complete actions. If something is continuous or you can’t do it that many times then this may not be possible. The shot needs to be wide enough to show all the action at the same time. It is sometimes also called a master shot, that’s because when you come to the edit, you can always return to this shot if you don’t have anything else. However, you will need more than just the wide shot, first because just one shot will be very boring, and second, you can’t see anything in detail.
Since this is your master shot then depending on the feel of your piece you may not want to have too many moves on it. Possibly you may want to move onto the action at the beginning
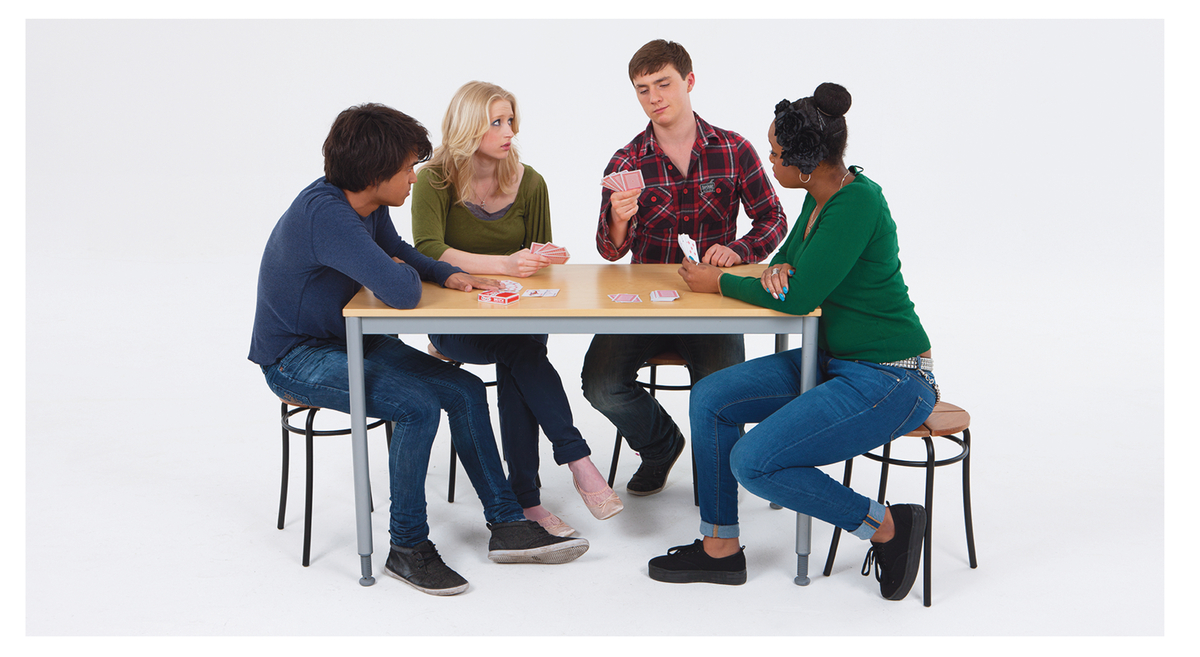
Figure 15.18 Shooting action, wide shot
or off the action at the end but be wary of too many moves in between; you will give yourselves a lot of problems during the edit. However, there are certain styles of programme that use moving shots a lot; they have a high-energy feel to them and the camera is rarely still. They give a sense of urgency and action and of things happening. If this is your style then fine, but you really need to make a decision about that to start with; you can’t really mix and match: you have to commit to it!
This will help you get into the action. Going from a wide shot straight to a close-up can leave the viewer feeling a little disorientated, so you will often need to go to a mid-shot first. You should try to get several mid-shots from different angles and you should definitely get one from a different angle to the wide shot. When you come to edit it will feel awkward to cut from a wide shot to a mid-shot at the same angle. This is called a jump cut and can look quite ugly. Again, some directors like to use this kind of shot as a stylistic device but it’s difficult to use effectively.
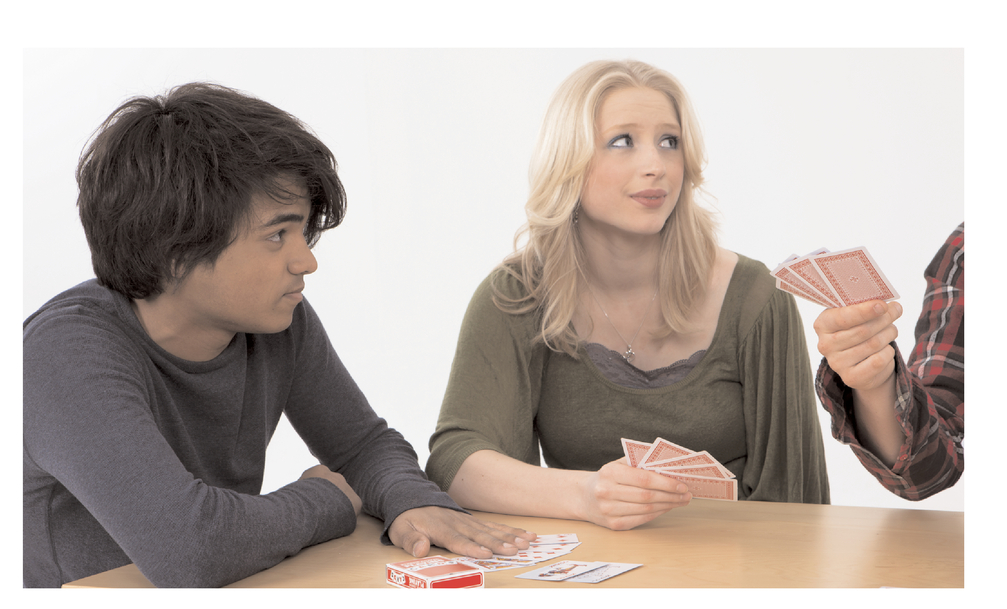
Figure 15.19 Shooting action, mid-shot/ two shot
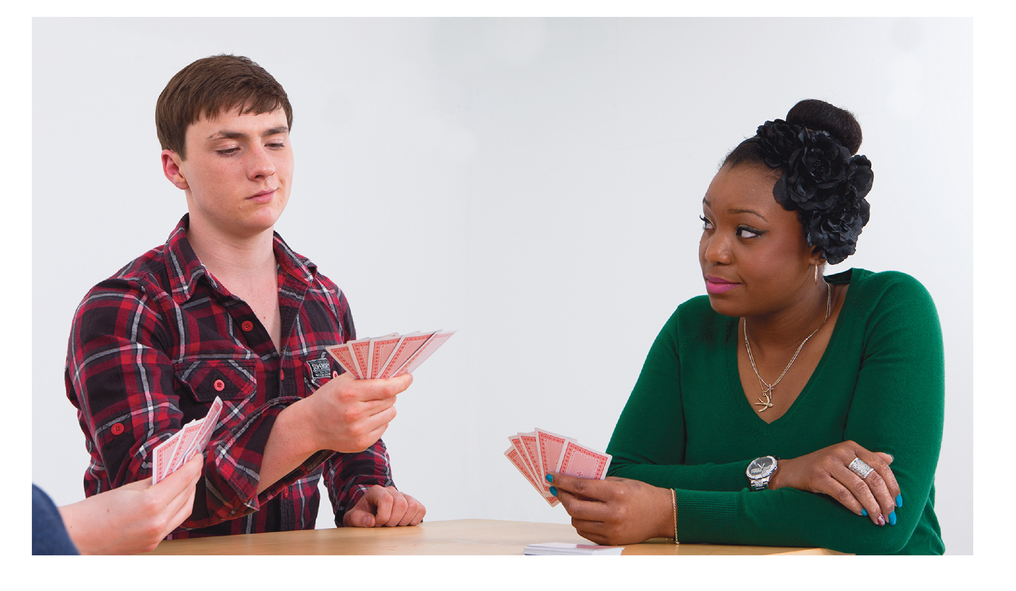
Figure 15.20 Shooting action, mid-shot/ two shot
This gives the viewer the feeling that they are watching what the character is seeing. Obviously this only works if you have a person in the shot. It’s sometimes helpful to be able to see part of the person’s head or shoulder (Figure 15.21).
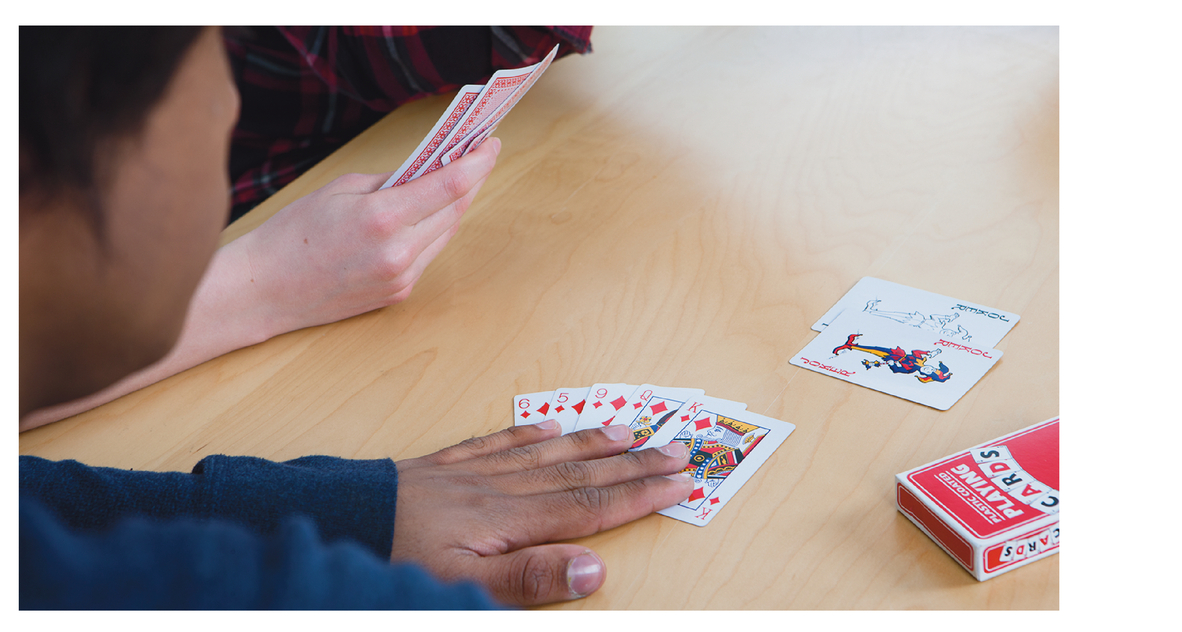
Figure 15.21 Shooting action, over the shoulder
These give a different perspective and will add variety to your finished piece. You can do this dramatically by having a very high or low angle, or something a bit more subtle by changing the height of the tripod or standing on something if you are handholding the camera (Figure 15.22).
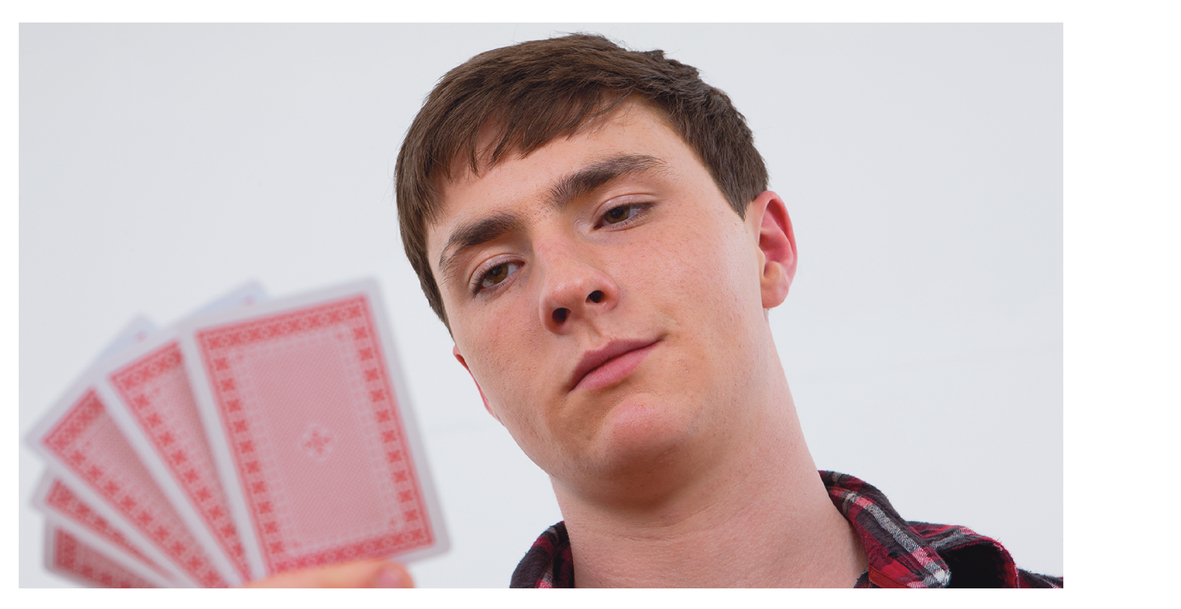
Figure 15.22 Shooting action, low angle
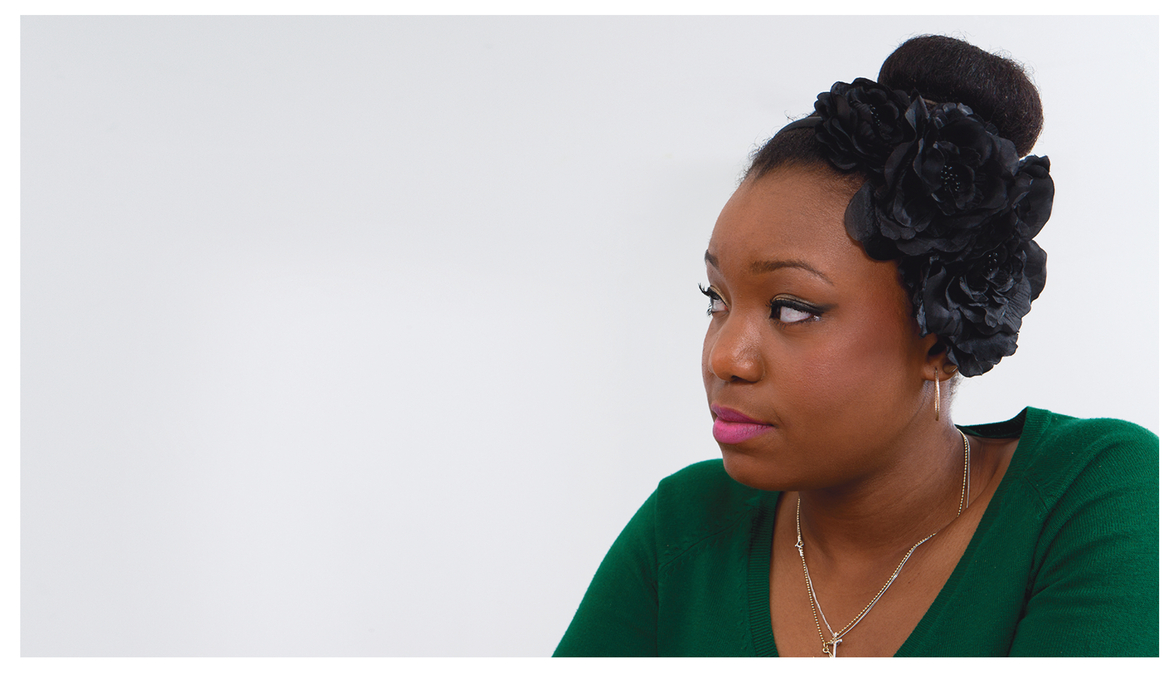
These need to have a purpose. Random cutaways may not be that useful in the end. You may want to show some particular part of the action. There may be some detail that’s important (Figures 15.23 and 15.24). It’s often a good thing to have a close shot of the person’s face; this would be quite a versatile shot when you come to the edit. Again you need to vary the angle from which you take the close-ups; this will give your piece a feeling of movement and be much more interesting (Figure 15.25, opposite).
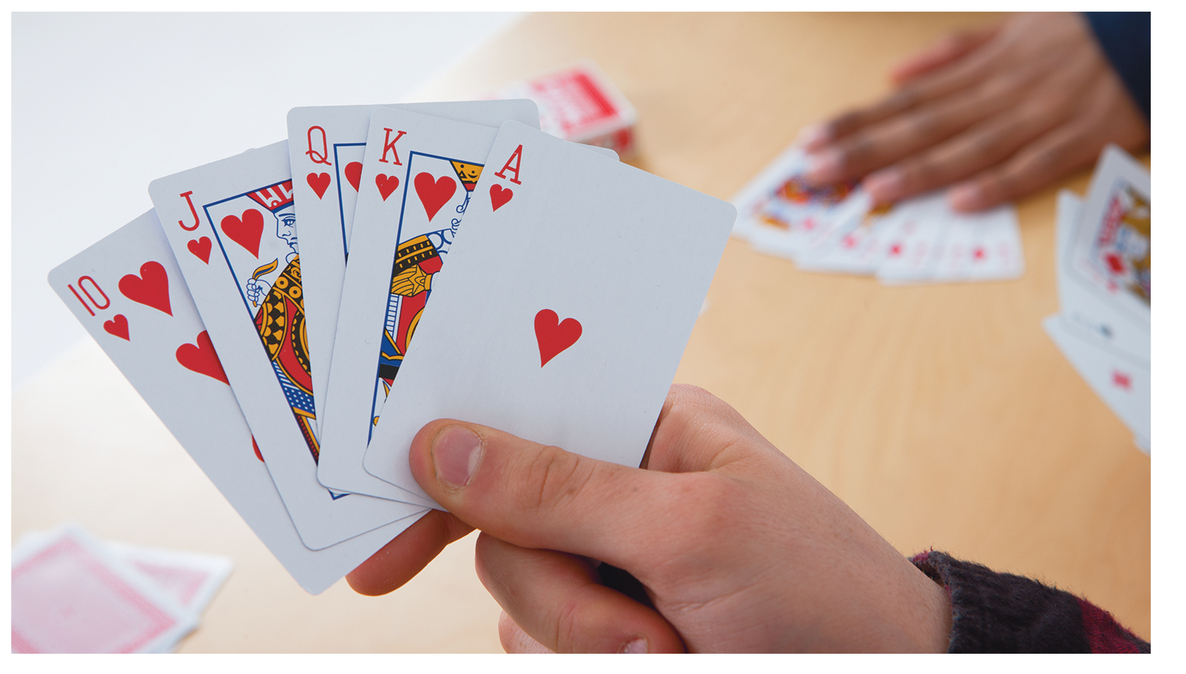
Figure 15.23 Shooting action, close-up
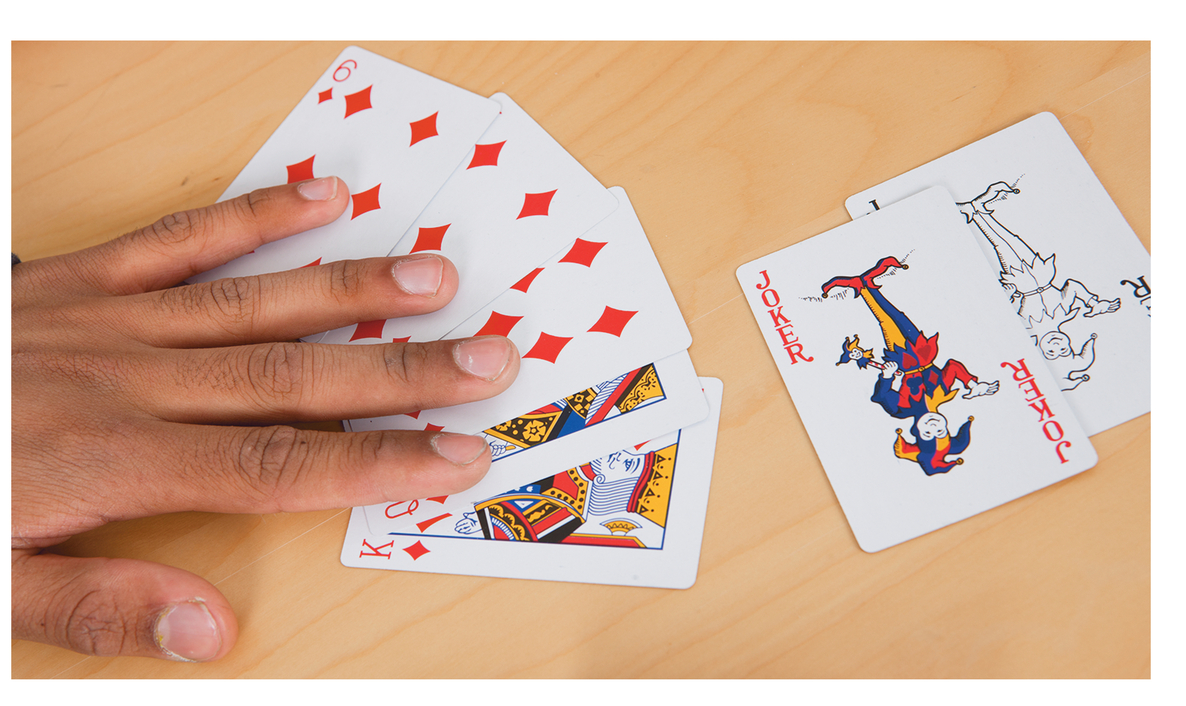
Figure 15.24 Shooting action, close-up
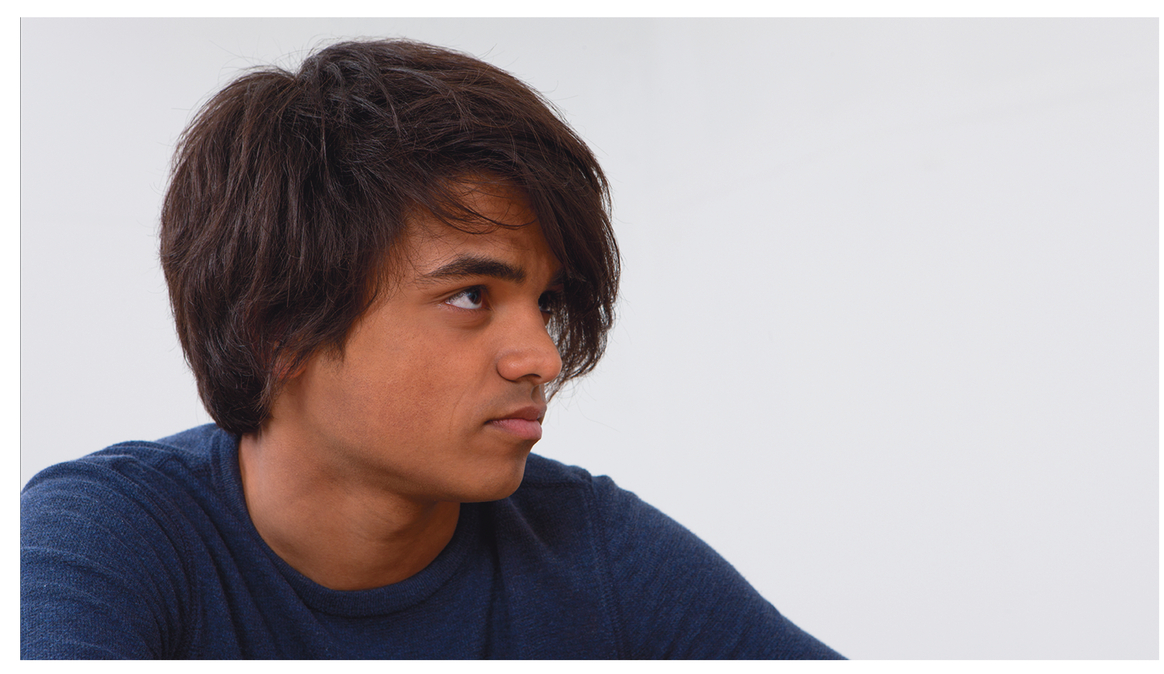
Figure 15.25 Two examples of shooting action single shots
Depending on how long the action is, you may not want to shoot all the action in close-up as well as a wide shot, but you should shoot enough to give you a good variety of shots.
If you are shooting action you need to think about continuity. This means that the action is repeated in the same way each time. When you cut the piece together the viewer is not going to be aware that you have shot this piece of action several times. It needs to feel as if it’s the same piece of action you are watching. You therefore need to make sure that the action is repeated in the same way. For example, if the person has to pick up an object, the object should be in the same place to start with each time and they should use the same hand to pick up the object.
Remember to put handles on the beginnings and ends of all your shots.
Close action is one type of sequence; you may however need to shoot some action which is much bigger. It could be someone entering a shop and buying something. What you shoot will depend on what you are trying to achieve, but the same basic rules apply. Just as with close action you will need to shoot the same action several times.
These need to be big enough to tell the viewer where they are. You may want to take a couple from different angles to give yourself some variety.
Your subject could be in position when you come to the shot or he or she could walk into view. It’s also often a good idea to let the subject walk out of shot as well. This is particularly true if the next time you see them they will be somewhere else. Thus if you are looking at the example of someone walking down the street and going into a shop then you may want to start with the subject walking down the street but finish the shot either with him walking out of the frame or walking into the shop. By the end of the shot you will no longer see the subject.
This means that when you find the subject again the viewer won’t feel confused. They know he has gone somewhere and are perfectly happy to accept that he is now in a shop. However, if you cut from a picture of a person walking down the street while they are still in frame and then the next shot shows the same person in a shop, it tends to confuse the viewer; they wonder how they got from the street into the shop.
If the action is quite long, you may want to spend some time time with the subject walking down the street; in this case you can get some MS and CU as well. Again there should be a purpose to it. If you cut to a close-up the viewer will think you are trying to tell them something. If you aren’t purposeful about these shots you will confuse the viewer; they will wonder why you suddenly cut to a close-up of the buttons on his shirt: what are you trying to tell them? While they are trying to work this out they are not watching the rest of the film. Remember too that if you are taking more than one size shot on the same piece of action you will need to change the angle of the camera between shots.
However many close-ups and mid-shots you do like this, make sure that you have all the action in wide shot, particularly the beginnings and ends of the shot, as these will be important in the edit. As with close action you need to remember:
Sometimes it’s not possible to repeat an action several times. For example, if you were filming a carnival parade you can’t ask the floats to come past three or four times to get your shots. In a big drama this is probably what would happen or they would have lots of cameras, but since this is factual you won’t be able to do this. In this case the type of filming you do is called ‘following action’. Basically this means that the camera has to follow what is happening rather than direct it.
However, even if you are adopting this approach, you should be thinking in sequences and thinking about a variety of shots. It does mean thinking a bit on your feet, so the more you know up front about what you are going to film the better.
With this kind of shooting it’s very much down to the cameraperson. You can’t set up shots in the ways described earlier; no one is going to stop the parade while you get ready and shout ‘Action!’ In order to get the best out of this type of filming you need to be aware of the type of story you are trying to tell. So the cameraperson needs to be briefed on the types of shots they are trying to get. If the story is about the fabulous costumes, they need to be focusing on this. If the piece is about potential trouble, they are more likely to be concentrating on the crowd. If it’s about the economic benefits of a town having a carnival, they will need to be looking for shots of people buying things, and so on.
Invariably you are going to need a wide shot. This will tell the viewer where they are and what they are looking at. If you have done a recce, you will have chosen a spot from which you can do a wide shot. If you haven’t been able to do so, this is probably the first shot you need to find. This will establish the action and from there you can move into closer shots However, if it’s possible it’s a good idea to get a wide shot from different angles; again this will give you flexibility in the edit. It will help establish the geography of the scene in the mind of the viewer.
Lots of moving shots won’t be a good idea here. You should also try to keep the camera still. A lot of action in front of the camera with lots of action from the camera itself can leave the viewer feeling a little seasick. Don’t forget the handles on either end of the shot.
As discussed earlier, the success of this type of shooting depends on the cameraperson knowing the subject of the piece and looking for the right shots. They may not have much time, so they will really need to be clear about what they are looking for. Again a lot of movement in the shots here may end up being confusing and difficult to edit. Movements need to be smooth and purposeful rather than random. For the most part keep the camera still and you can let the action happen in front of you.
You will need to move around quite a lot to get different types of shots, and again you should vary the shot size and angle as much as possible to give as much variety as possible.
Finally, you could help the viewer orient themselves by creating some kind of fixed point in the shot. This very much depends on where you are, but in the carnival, for example, there may be some kind of distinctive building or other fixed object. If this is in the wide shot it could also be included in some of the mid-shots. It needn’t be the focus of the shot; it can just be in the background, and even though it may be quite subtle it will help the viewer feel orientated.
As with the mid-shots you will need to understand what you are trying to say in the story before you can shoot any close-ups successfully. Like the mid-shot, a steady camera will probably be more helpful and easier to edit than one with lots of movement in it. Again, if you do use a move you need to put handles on either end of the shot.
Sometimes this kind of shooting is used to create a feeling of veritas (truthfulness). Some documentary film-makers like to document rather than direct what is happening. These tend to be personal stories rather than science or history programmes. Remember:
The advantage of this type of shooting is that it has quite an energetic feel to it; it’s lively and if done well can make the viewer feel very much part of the action.
GVs are sometimes referred to as wallpaper shots, a slightly disparaging term! The name refers to the types of shots you get on location which show the viewer something about the story. You may, for example, be filming a piece which follows a group of teenagers on their first foreign holiday. The GVs would be the shots of the airport, the resort they were staying at, the local shops, beaches, and anything else that will give the viewer a flavour of the location and add colour and variety to your piece. GVs have a number of purposes.
These can help the viewer understand where they are and give them a flavour of what is going on. GVs give you an opportunity to film what is going on around the story.
For the most part you want to try to get your pictures to tell the story; however, you may sometimes need some commentary. Your GVs will help you when you have a commentary section. However, there will be times when you will need to give a bit of commentary and you will need some pictures.
When you write the commentary you may need to introduce one of your contributors; some GVs of this person going about their business can help with this. You need to be a little careful about doing this; it can easily start to feel extremely clunky. If you introduce contributors in this way make sure they are doing something meaningful; shots of people walking down a street or walking into a building can look very staged and rather dull.
GVs should not simply be a collection of rather random shots. You should still think in terms of sequences, wide shots followed by mid-shots and close-ups on a particular scene. The sequence of shots should be trying to tell the viewer something. Nor are GVs a place to start hose-piping or taking long, meaningless pans. The same kind of thought needs to go into the shots. Use moves sparingly and for a good purpose, and as always make sure that you leave handles on either end of the shot. While you should think carefully about them, you should also get lots of them. They will add an enormous amount to your film.
Filming for documentaries or other factual programmes involves a number of different techniques. You won’t always need all of these techniques; however, it’s worth having them at your disposal so that you can bring them out if necessary. When you are doing your planning it’s worth thinking about which technique you are going to have to use and when.