Use Network-Attached Storage (NAS)
When I asked a technical friend about his opinion on which kind of Network-Attached Storage (NAS) device to buy, his response mirrored my own (and perhaps yours, too): He’d been thinking about getting one, but the sheer number of variables involved kept him away from actually making a purchase.
A NAS itself typically looks like an unassuming largish box, sometimes with just a single drive, but more often with two or more drive bays into which you insert bare hard drives or SSDs (making it possible to upgrade the overall storage over time by using higher-capacity drives). The magic that makes it special is that it’s also a computer in its own right, with a processor, operating system, and RAM to handle all of its tasks.
The NAS connects to the network via Ethernet cable, making it available to everyone else on the same network. And in many cases, the NAS can be accessed when you’re outside the local network. If you arrive somewhere and realize that an important file is stored on a disconnected hard disk (even if you’re on the couch downstairs and the drive is in the home office upstairs), it’s no problem; that file is available just as if its drive was directly connected to the computer.
Several vendors sell NAS units, such as Synology, QNAP, Drobo, and WD. And among those, you’ll find models designed for personal use, for small offices, and for industrial applications. In this section, I cover the thought process of determining whether you might want to get a NAS, look at the important features and components to help you choose one, and walk through the process of incorporating NAS storage into your situation.
Why You Might Consider a NAS
You’ve probably already put some thought toward this topic, or maybe you’re looking at your current storage setup and hoping to streamline it. Let’s walk through some of the reasons you’d consider buying a NAS:
You want more storage, but having a drive physically connected to your computer is limiting. I’ve used laptops as my main Macs for years, precisely because they’re mobile. If I’m working in my living room, I don’t have to trudge to my home office and plug in a drive to access files, because I can easily Mount the NAS Volume in the Finder.
You want that storage to be centrally located. “Out of sight is out of mind,” as the saying goes, so if I have to guess which of the various drives on my shelves (and closet, and drawers) contains the files I need, the data may as well not exist. The simplicity of knowing that everything you need is in a central location means you’re not expending time and brain power searching.
You want data to be available to anyone else on your home or work network. Family members or colleagues can access all the same files, or you can set up access for individuals. A NAS isn’t just a big hard drive—it has an operating system and sophisticated networking features and user permissions.
You want private access to files. In many ways, cloud services such as Dropbox or Google Drive perform the same storage tasks as a NAS. However, everything runs through those companies’ networks, and can be accessed (in various degrees) by their employees. If your small business is working on proprietary information, you can keep it on a NAS on the local network.
You want remote access to material. The flip side of NAS storage is that you won’t always be on the same local network as the NAS, but still need to grab files from it. A photographer I know, Brian Ach, told me a story once about being on an ocean cruise when a client desperately needed photos from his archive. He was able to connect to his office remotely, locate the images, and send them from the NAS without further interrupting his vacation. (See Connect to the NAS Remotely.)
You want something that can adapt to your storage needs over time, rather than simply replacing hard drives (and their enclosures, power supplies, and cables) every few years.
You want to stream media from a local server to any device on your network, such as tablets and connected televisions.
You want a local copy of cloud data. What I see in the Dropbox folder on my MacBook Pro’s SSD doesn’t represent all of my files stored on Dropbox’s servers, thanks to a feature called Selective Sync that lets me choose what is stored locally. This feature is key if your internal storage is limited, and is similar to iCloud’s Optimize Mac Storage feature described in Choose Cloud Storage. My Synology NAS also connects to Dropbox, but without Selective Sync, giving me a local copy of that data in case my Internet access goes down or Dropbox experiences technical trouble.
Features to Look for in a NAS
If you thought looking at hard drive specs was eye-glazing, wait until you wade into the technicalities of NAS devices. Price is always a consideration, and some manufacturers mix and match components to hit price points—a unit might have four drive bays instead of two, for example, but use an older processor and offer less RAM. But that also means you can find something in your budget that does the tasks you expect a NAS to do.
NAS vs. External Drive
Before we step through the features themselves, ask yourself why you might consider a NAS instead of an external hard drive. Some common reasons include:
More storage: A NAS can offer more storage than a single external drive. I put off buying a NAS for a long time because hard drive capacities kept expanding to fit my needs (thanks, manufacturers!). Although I knew a NAS could provide more than what a single disk offered, it was easier to bump up the storage and go with what I was familiar with. That started to get expensive, though. When storage needs outpace individual disk sizes, a NAS with several drive bays becomes more appealing.
Expandable storage: A NAS is designed to grow with your data needs; when an internal hard drive fills up, replace it with a higher-capacity one. I could go through my office and count the current and retired external hard drives, with their enclosures and cables and power supplies, but that would be too depressing.
Protection against drive failure: Related to the above, it’s no fun when hard drives fail—and they do fail. Some NAS devices are built as RAID 1 or RAID 5 arrays (see RAID), or proprietary variations that incorporate the same technology, to mirror data such that if a disk crashes, you don’t lose data. And if that does happen, you can keep using the NAS volume while swapping out the bad drive.
Remote access: If you primarily work on a desktop computer that doesn’t travel, having a high-capacity external hard drive plugged in all the time is no trouble—for that one computer. Connecting to the data on a laptop, or another computer on the same network, is made easier with a NAS. It doesn’t rely on a desktop computer to share its contents, as you can do with a traditional hard drive, because the NAS is the computer. This point is doubly important if you’re nowhere near your local network, such as traveling to another city, and need access to files.
Streaming media: Many NAS devices include software for streaming video and audio stored on the drives. If you’ve built up a home library of movies, whether recorded yourself, ripped from DVDs, or downloaded, a NAS makes it easy to stream them on TVs, tablets, phones, and other devices.
Business services: Although outside the scope of this book, many NAS devices can be set up as web or email servers, cloud servers, and more. Some small businesses or individuals prefer to have full control over these services instead of relying on Dropbox, Gmail, and others.
Network backups: With a lot of storage and a constant presence on the network, a NAS can be a good on-site storage destination for backing up local computers. For example, my wife’s MacBook Pro is usually in our living room, and she doesn’t want a hard drive dangling from it for Time Machine backups. Instead, her data is backed up over the network.
NAS Features
I’ve arranged the following specs roughly based on their importance, although you may have a few different priorities (like hardware transcoding for streaming movies):
Number of drive bays: Packing more drives into a NAS gives you more storage, but there’s more to it than that. A two-bay NAS sounds like a good starter, and it’s certainly affordable. But remember that a typical NAS RAID configuration is set up with one drive for data and one drive for redundancy—RAID 1 in a two-bay model.
If you populate it with two 4 TB drives, for example, you end up with 4 TB of usable storage space and 4 TB of mirrored protection. To increase the capacity, you could buy two 8 TB drives to replace the 4 TB drives, giving you 8 TB of usable storage (and 8 TB of protection).
With a four-bay model, you could instead add two more 4 TB drives (which cost less than 8 TB drives) to fill out the slots and end up with 12 TB of usable storage and 4 TB of protection in a RAID 5 configuration (or similar proprietary setup) for greater data redundancy and failure protection.
Ethernet: The “network” part of Network-Attached Storage comes from connecting via Ethernet. In most models, that refers to 1 gigabit Ethernet (GbE), capable of theoretical transfer speeds of 1,000 Mbps. Some more expensive models include 10 GbE connections, pushing transfer speeds to 1.2 GBps (gigabytes per second). Faster is always better, but consider that the iMac Pro, Mac Pro, and Mac mini are currently the only Macs that support 10 GbE directly; you can buy adapters to use it with Thunderbolt 3-equipped Macs. Also, 10 GbE requires an Ethernet switch that can handle the speed. My 10 GbE recommendation is that if you think you’ll want it in the future, buy a NAS that either has 10 GbE built in or can be added to it; some NAS models include PCIe expansion card slots that accept such upgrades.
Another Ethernet consideration is how many ports are included. NAS models with two or more offer a feature called link aggregation. When connected to an Ethernet switch that supports LACP (Link Aggregation Control Protocol), the NAS can balance the amount of data throughput between the Ethernet ports to avoid a bottleneck. If you have multiple computers on the network accessing the NAS frequently, link aggregation can improve network performance among them. It does not, unfortunately, double the amount of data that gets fed to a single computer, so you won’t see a speed benefit in that case.
CPU: Since a NAS is a full-fledged computer, not just a dumb hard drive, it requires a processor (abbreviated to CPU, or Central Processing Unit, in most specifications) to run the software and manage storage. For most uses, the type and brand of CPU doesn’t matter, as they can all serve files well. CPU becomes important when encrypting data or transcoding video to watch on devices that don’t support that resolution.
Memory: As with any computer, the more memory (RAM) a NAS contains, the more overhead it has to accomplish its tasks. You’re not running Photoshop on it, but more RAM helps when the unit is handling multiple simultaneous connections, encrypting data, and other duties. Look for a model that you can expand with more RAM. Even if you don’t max out the memory when you buy the NAS, you can upgrade it later.
Power consumption: A NAS is designed to run constantly, so check how much energy it requires both under normal operation and when drives are in low power or hibernation mode.
Hardware encryption: If it’s important that your data remains encrypted while stored on the NAS, look for a model that offers hardware encryption. You can still encrypt data without this feature, but that requires more CPU power and is slower than dedicated encryption hardware. Reading and writing encrypted data involves a decrease in performance overall, but some hardware assistance is preferable to none. Also check to see if the NAS you’re considering encrypts data at the volume level or just at the folder level.
Hardware transcoding: If you’re planning to host your audio and video libraries on the NAS and stream the content to computers and devices on the network, hardware transcoding can more quickly convert high-resolution video files to versions that are optimized for the destinations. So, for example, let’s say you capture a 4K movie file using a recent iPhone: when viewed on a 1080p HD television, the NAS streams a transcoded version suitable for that device, discarding the overhead of the 4K resolution data.
RAID/file system support: A NAS that includes more than a single drive uses a RAID scheme to make the disks appear as a single volume. Check to see which RAID levels are supported, in case you want to manually change them. It may also employ its own custom RAID configuration. Synology, for instance, uses Synology Hybrid RAID (SHR), which offers striping and redundancy while maximizing the amount of usable storage. Drobo’s BeyondRAID technology works similarly.
Depending on the model you’re researching, you may run into two file systems: ext4 is a widely deployed system; Btrfs adds support for snapshots and some low-level data integrity checks. Not all models support Btrfs, even among the same manufacturers. I wouldn’t call this a make-or-break feature, but you’re likely to run into it.
Other considerations: There are plenty of other things to note, such as the noise level the NAS makes and the operating temperature if the box’s location is in a warm or cold environment. I’m also tempted to add performance throughput to this list—after all, faster performance is better, right? However, manufacturers don’t provide it for all models, and you have to keep in mind that those numbers come from controlled tests designed to come up with the best results. So, by all means, take performance into account, but with a skeptical eye.
Work with Files on a NAS
A NAS can do a lot, but since our focus is on storage, this section covers how to interact with the NAS and its files.
First, a little background on how the NAS identifies itself on a network. Since networks vary, I’m speaking generally about how this works, but you’ll get the basic idea; consult the instructions for your NAS for details.
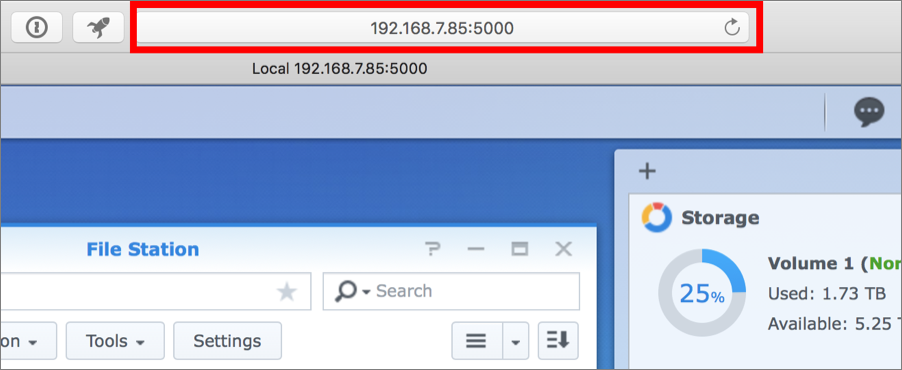
A hardware router—which could be the part of the modem that connects to the internet or a Wi-Fi base station—assigns a unique address to every computer and device connected to the network. In most home networks, the router uses NAT (Network Address Translation) to give each device a number such as 192.168.7.85. That’s an IP (Internet Protocol) address, although the 192.168.x.xx range is used just for private networks; it can’t be reached from outside your network. When you set up the NAS, you likely visited a webpage that reveals the number.
To access the NAS controls in a desktop-like interface (Figure 49), you type that number into a web browser’s address bar and enter the user name and password you set up for the NAS.
Mount the NAS Volume in the Finder
Ultimately, the point behind storing files on a NAS is so you don’t have to think about where the data is physically located. The volume is just available on your Mac, no cables or power cords required, as if it were plugged in directly. Here’s how to connect to it in the Finder:
In the settings on the NAS, make sure AFP (Apple Filing Protocol) or SMB (Server Message Block) is enabled. (This may require a trip to a control panel or consulting the NAS documentation.)
In the Finder on your Mac, choose Go > Connect to Server.
If you know the IP address, enter it preceded by
afp://, such asafp://192.168.7.85(Figure 50), or preceded bysmb://if you selected only SMB in step 1. Click the Favorite button to add it to the Favorite Servers list for future connections.
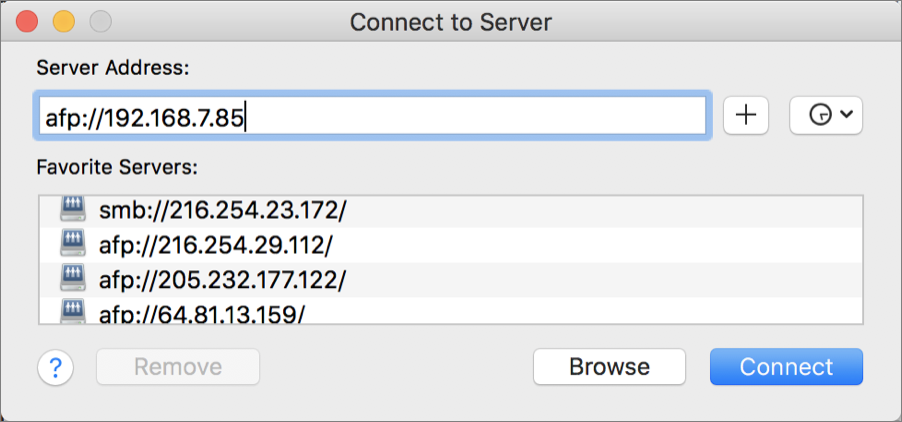
Figure 50: Connect to the NAS using its local IP address. If you don’t know the IP address offhand, click the Browse button, which opens a new Network window in the Finder that should contain the NAS (Figure 51).
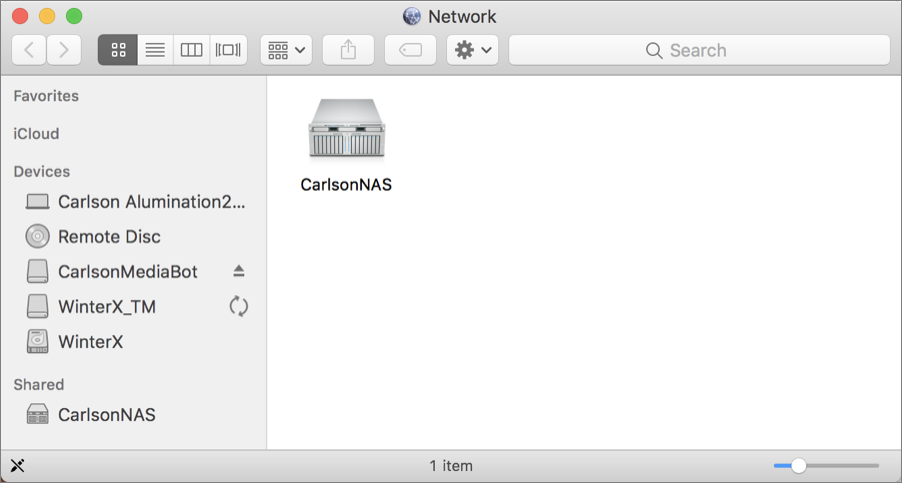
Figure 51: If you click Browse, a Finder window reveals computers (including the NAS) on the network. Click Connect in the Connect to Server dialog, or double-click the icon of the NAS in the Network window.
If you connected via the IP address, enter the username and password of your user account on the NAS. Check “Remember this password in my keychain” to bypass this dialog in the future. Then, click the Connect button.
If you’re in the Network window, click the Connect As button and then confirm that you intend to connect to the NAS (Figure 52). That prompts you to enter the username and password.
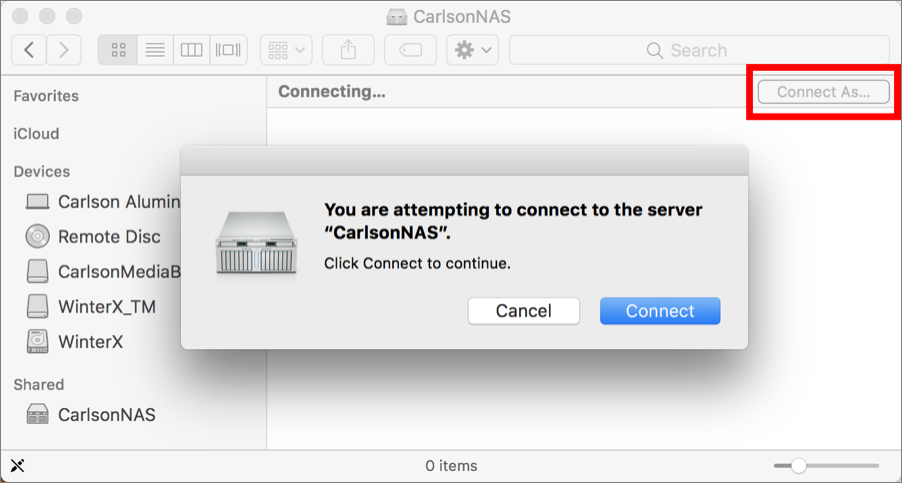
Figure 52: Confirm that you really, honestly, for-sure want to connect to the server in this extra step using the browse method. Select one or more shared folders and click OK (Figure 53); or, in the Finder window, double-click one or more shared folders.

Each folder you chose appears as a volume, which you can open and navigate in the Finder as usual. When you copy files to it, they’re transferred across the network, but it appears as if they’re moving to an external disk.
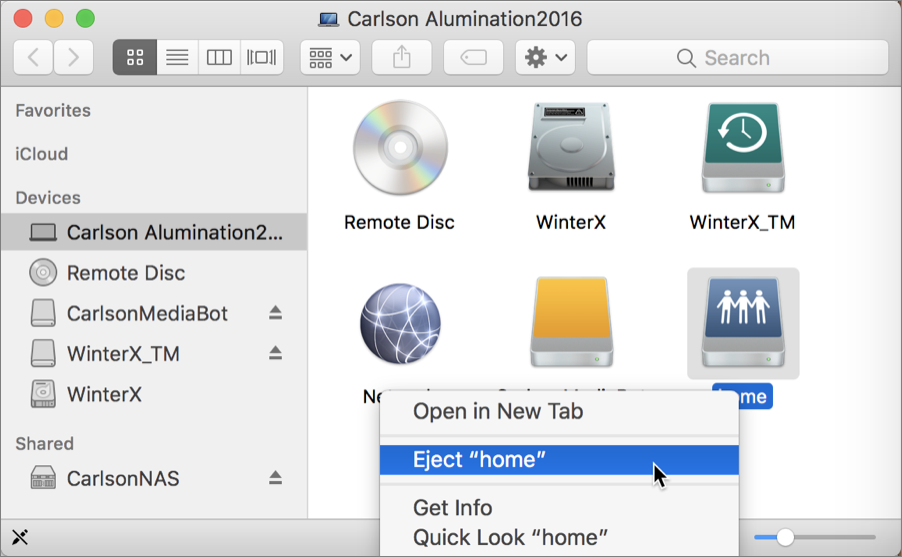
When you want to unmount a volume, right-click (or Control-click) its icon on the Desktop or in a Finder window, or click the Eject ![]() button in the sidebar (Figure 54).
button in the sidebar (Figure 54).
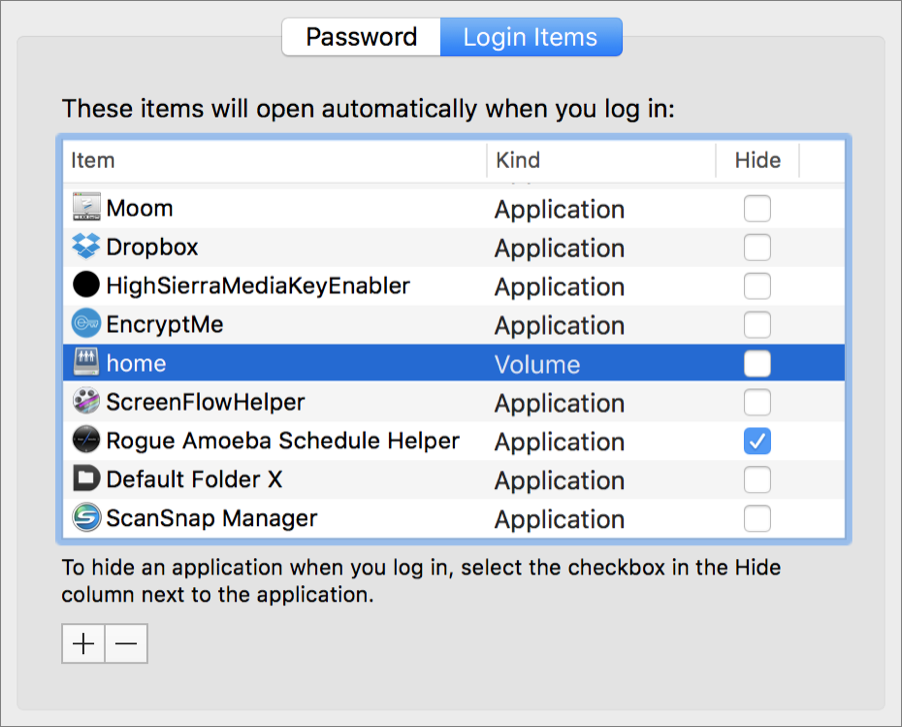
Server volumes are not automatically mounted when the Mac restarts, so normally you need to reconnect each time you want to access them. There is a workaround, although it has a caveat: if you’re not connected to your network, the local address isn’t recognized (see Connect to the NAS Remotely). Here’s how to do it:
Mount the volume(s); make sure you save the login credentials in your keychain, unless you want to provide the username and password each time the Mac starts up.
Open System Preferences > Users & Groups.
With your user selected, click the Login Items tab.
Click the Add
 button and navigate to the volume; click Add. The volume appears in the Login Items (Figure 55).
Connect to the NAS Remotely
How many times have you needed files that are on a disconnected hard disk at home? The rise of services like Dropbox and iCloud Drive has made this less of an issue, since files are centralized in the cloud, but you may have archives or large libraries (such as digital photos) that occupy more cloud storage than you’re willing to pay for. A NAS, being a server, can be accessed when you’re outside the local network, such as when you’re traveling or even at the office.
Fair warning: connecting to a NAS from the outside requires several pieces to be in place, may not be supported on all models, and certainly needs guidance using the manufacturer’s documentation. However, it is possible. Here are the broad strokes, again using my Synology NAS as an example.
The first level is reaching your network from the internet. When your internet modem connects to your internet service provider (ISP), it’s assigned a public IP address—a unique address chosen from a dedicated pool that any computer on the internet can use to connect to that network.
Your router likely uses NAT to create the local network and assign IP numbers to each machine. Incoming traffic is directed by the router to the intended device, in this case the NAS. And because the NAS has a local IP address, instead of a public IP, traffic can’t flow directly to that machine.
Also, the server software has security measures in place to prevent malicious actors from contacting the computer. Different types of traffic, such as AFP, are shuttled into specific ports, which are usually blocked for safety.
So, the solution is twofold:
Open the ports: Connect to the router, via a web interface or perhaps an app, and allow traffic over the correct ports. For example, AFP uses port 548 for traffic. On my home network, I use an eero mesh wireless system as the router; using the eero app, I logged in to my account and set port 548 to be open.
Once the port allows outside traffic, connect to your NAS and look for a feature called Dynamic DNS (DDNS). Once enabled, DDNS provides a fixed domain name (like jeffcarlson.example.com) and then uses software running on your device to keep that domain name updated with the device’s current public IP address.
Back up the NAS
I can’t stress this strongly enough: make sure you have a backup of your NAS. That can be an external or internal drive that’s large enough to contain the NAS data, or even a second NAS or RAID dedicated as a backup. The redundancy built into some RAID levels is not a substitute—it’s just insurance against a single drive failing (see Deal with a Failing Drive).
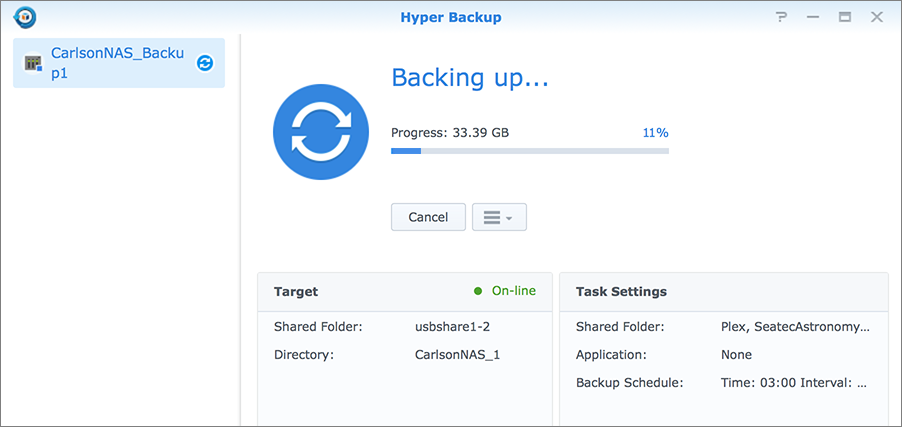
Fortunately, backing up the NAS doesn’t have to be complicated. Unlike your main computer, you don’t need to create a bootable duplicate of the entire volume. Using software built into the NAS, you can back up folders or other subsets of the data, and schedule those backups to occur regularly (Figure 56).
Make sure you’re backing up to a separate physical disk or another NAS, not just another drive within the same unit. That guards against the possibility that the NAS hardware might fail or the unit is stolen.
NAS for Photography
In addition to being a writer, I’m also a photographer (check out Take Control of Your Digital Photos). In fact, I’d argue that we’re all photographers now thanks to the ubiquity of smartphone cameras. That means we have to manage a lot of storage. Photos and video consume a lot of disk space, often more than can fit on a computer’s internal disk, and a NAS (network-attached storage) device can be a great solution. Even if you’re not focused on photos, but you need to store lots of files and make them available at a moment’s notice, this section is for you.
A NAS for photography presents several specific advantages:
You can store your entire photo library on the NAS volume, which can grow in capacity as needed.
When you’re connected to the same network as the NAS, the photos are available just as if you’d connected an external drive directly.
If you’re away from the network, you may be able to connect to the library remotely and get the image files you need.
Of course, there are some downsides, too:
Not all software supports storing photos on a NAS. There are important qualifications with Photos, for instance.
Errors are more likely when copying data over a network than when copying to a drive connected directly to your computer with a cable, and the potential result is corrupted files.
Additionally, you need to make sure you have a good backup system in place for those images. The redundancy features built into most NAS devices aren’t the same as backups.
In this section, I look at three typical situations: accessing photos on a NAS using the Finder, using Lightroom and Lightroom Classic, and using Apple’s Photos app.
Access Originals in the Finder
Accessing your original photos in the Finder is the most straightforward approach, because it doesn’t rely on a photo library manager such as Lightroom or Photos. It works best for workflows where you specify your own folders, such as those based on subjects or events.
When you add photos from your camera to the Mac, use the Image Capture app to copy them to a folder in your mounted NAS volume. From there you can view them in a Finder window using Icon view, Cover Flow, or the Gallery view in macOS Mojave or later.
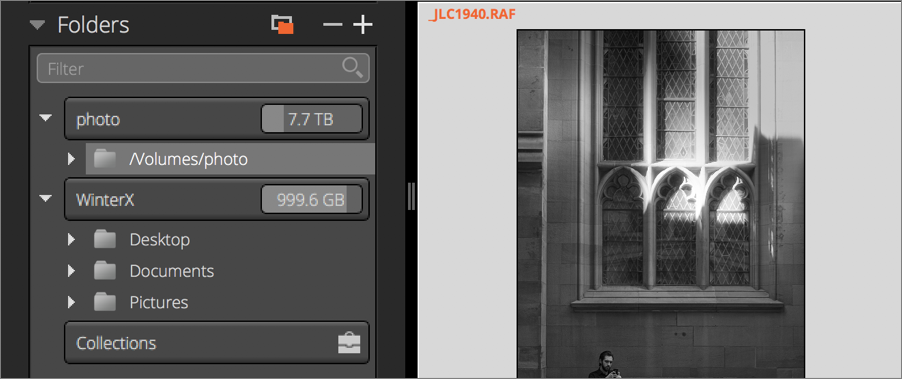
A better approach is to use a photo app that reads directories (versus creating its own library catalog), such as Adobe Bridge or Alien Skin Exposure X4 (Figure 58). Those give you the ability to assign metadata for easily locating files later, and in some cases edit the images directly.
Lightroom and Lightroom Classic
Lightroom Classic, the original version of Lightroom, doesn’t officially support working with a NAS (but see below). The newer, cloud-centric Lightroom version does have Adobe’s blessing for using a NAS.
In both cases, it’s important to point out that a Lightroom library has two parts: a library or catalog file that keeps track of everything, and the original images. The library or catalog file should always reside on your computer; if you’re launching it from a mounted network volume, your library is more likely to become corrupted in the event that the connection is interrupted.
Lightroom
By default, Lightroom stores everything in one big file, Lightroom Library.lrlibrary, typically stored in your ~/Pictures folder. (The library file is actually a package, which in macOS is a folder that looks and acts like a single file in the Finder.) To use a NAS for your images, you must specify the NAS volume as the storage location for the photos, as follows:
Make sure the NAS volume is mapped and mounted on your Mac.
If you haven’t already, create a folder on that volume for storing your original photos, such as
Lightroom Originals.In Lightroom, choose Adobe Lightroom > Preferences.
Click the Local Storage category in the sidebar.
Check the box labeled “Store a copy of all originals at the specified location” (Figure 59).
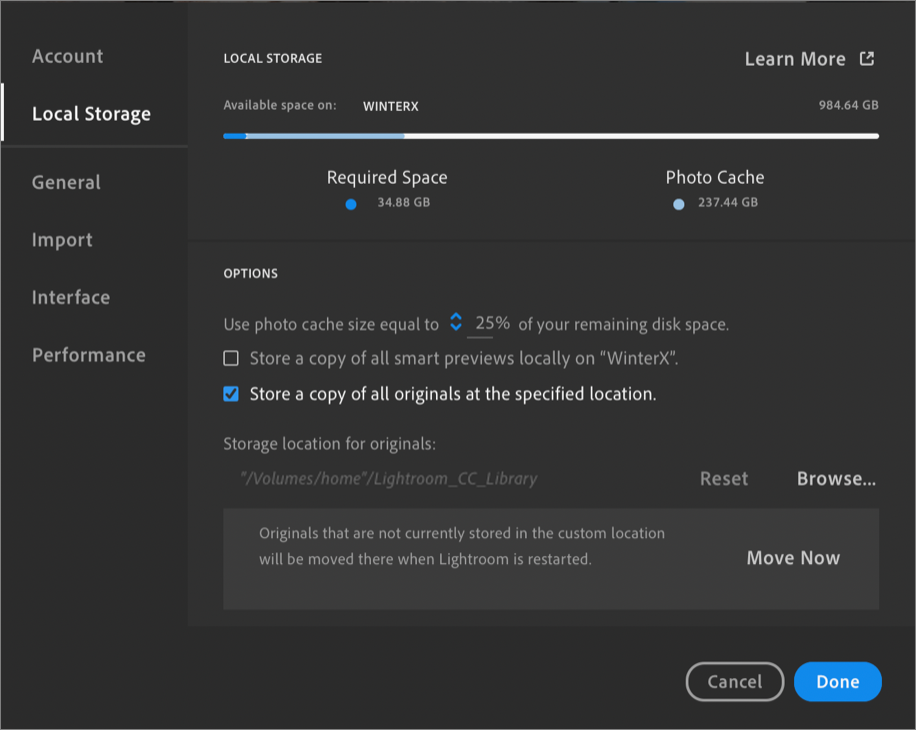
Figure 59: Specify the NAS volume as the new home for the original image files. In the “Storage location for originals” section, click Browse and specify the folder you created on your mounted NAS volume.
Click Done.
Restart Lightroom.
If you open Lightroom at some point and the NAS volume isn’t mounted, the app warns you with a bright banner across the top that reads, “Folder name is disconnected. Originals will be accessed through the cloud.” However, that won’t impede your ability to edit images; if the originals aren’t available locally, Lightroom downloads them from the cloud. Any new imported images are stored locally.
The next time you launch Lightroom with the volume mounted, any new or edited images are copied to the folder where the rest of the originals are stored.
Lightroom Classic
The general idea behind storing photos on a NAS in Lightroom Classic is similar to Lightroom: the app’s catalog file tracks where the original image files are located and which edits have been applied, and the files themselves reside on the internal disk.
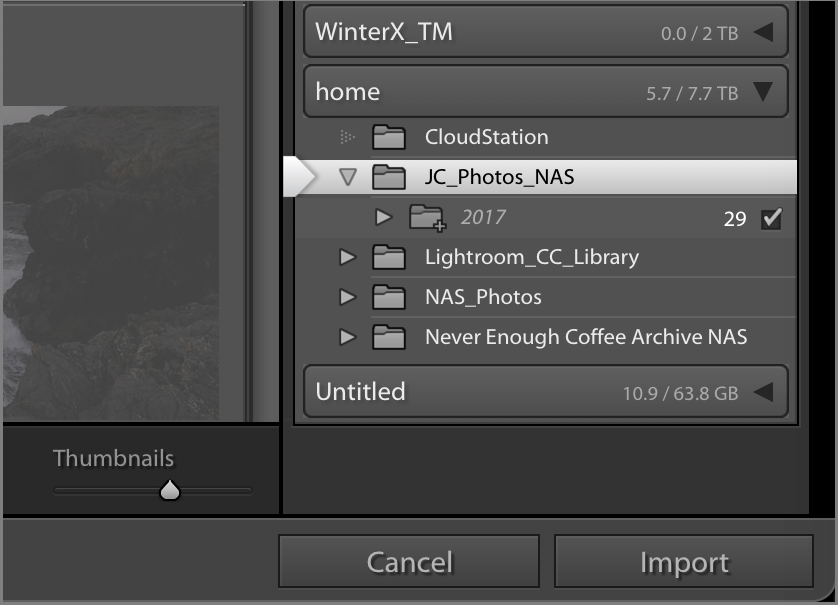
The difference is that you need to specify the network volume as the file destination when importing new images:
Click the Import button.
In the Destination panel, expand the NAS volume and select the folder where you want the original images to reside (Figure 60).
Click Import to copy the files from the memory card or camera to the NAS.
To move photos that you’ve already imported and which are on your startup disk (or external disk), you have two options:
In the Library module, open the Folder panel and expand the disk(s) on which your photos currently live and the network volume. Then drag the folders from the current disk to the network volume. Lightroom Classic moves the images and their folders to the new location. More important, by doing this within Lightroom, the app immediately knows where the files ended up.
The other option is to quit Lightroom Classic, move (not copy) the images from one location to the other in the Finder, and then open Lightroom again. The app expects the images to be in their old location, so it marks them offline. Right-click (or Control-click) the old folder, choose Missing Folder, locate the new destination on the network volume, and click Choose. Lightroom updates its database to reflect the new location for all of the images within that folder.
Apple’s Photos
The short answer to the question of how to use Apple’s Photos app with a NAS is: you don’t. Here’s why:
Photos stores everything in a central library file (a package, like Lightroom uses), which includes original image files, thumbnails, metadata, and more. Storing that file on a NAS risks corrupting the library if the volume drops or there’s a hiccup in the network while data is being written.
There is a method of adding images to a Photos library so the originals are not located in the master library file (see just ahead), but if you use iCloud Photos, they won’t be synced through iCloud and made available to your other Apple devices. Only images stored within the library file on the startup disk can be synced with iCloud Photos.
If iCloud Photos isn’t an option (you may not want to pay for additional cloud storage, perhaps, or your internet bandwidth is limited), you can import photos and leave the original image files outside the library package. The catch is that it works only when you’re importing photos that are already on your disk—not directly from a memory card.
To make this possible, first go to Photos > Preferences > General and uncheck “Copy items to the Photos library.” That ensures the originals stay put.
When you’re ready to import photos from your camera or memory card, do the following:
Make sure the NAS volume is mounted.
Connect the camera or card to the Mac and open Image Capture.
From the Import To pop-up menu, choose Other.
Locate the folder on the NAS volume where you want to store the original image files and click Choose.
In Image Capture, click the Import All button, or select the photos you want to add and click Import. The images are pulled from the camera or card and copied to the NAS volume (Figure 61).
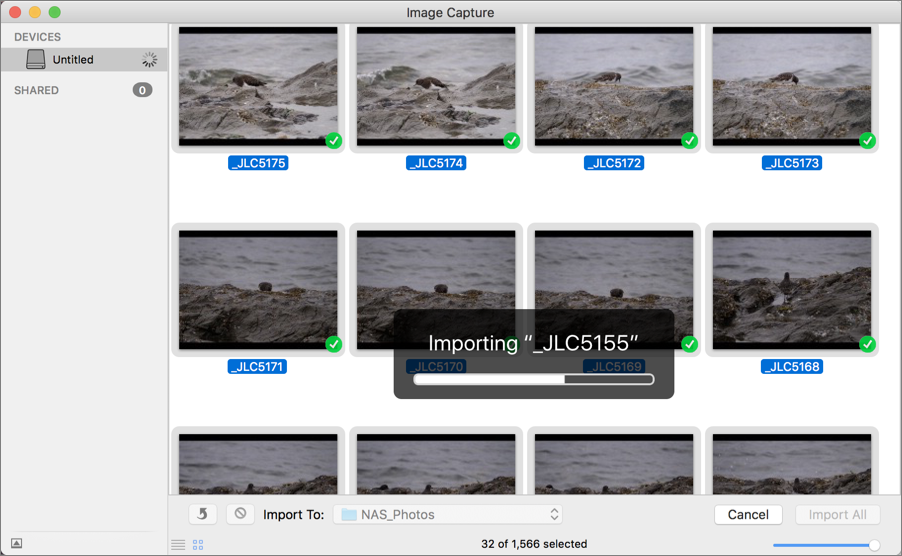
Figure 61: Image Capture is copying the selected photos to the folder NAS_Photos(see the Import To menu at lower left).Open the Photos app.
Choose File > Import and navigate to the folder on the NAS volume where you just copied the photos.
Click Review for Import.
Select images to add to the Photos library and click Import Selected, or click Import All New Photos. After import, those images include a Referenced File icon (Figure 62).

As long as the network volume is mounted, Photos can open and edit those referenced images. If the volume is unavailable, Photos displays an error saying the original is offline or lost, with the option to click Find Original in the latter case. When you reconnect the volume, the images open as normal.