Manage Your Data
At one point, having all your data on one internal disk was sufficient, but smaller-capacity SSDs and other factors have made storage more complicated. In this chapter, I recommend strategies for choosing which data belongs where—internal storage, external storage, or in the cloud—and how to free up disk space. The goal, as much as possible, is to make sure your stuff is easily accessible and to avoid any surprises.
Choose Your Own Storage Adventure
It’s tempting to start shoving data onto other disks when your primary storage fills up, like cramming stuff into a closet when you need to clean a room quickly. That gets the data out of sight, but also out of mind, making it harder to find later. Plus, some types of information need to stay on the internal disk, while others are more suited to external or cloud storage.
Choose Internal Storage
Setting aside nontrivial components like the system itself and apps, you generally want to keep active project files and documents you use on a daily basis on the internal disk. Basically, that includes anything that would interrupt what you need to do on the computer if the data were unavailable. Leave the /System and /Library folders alone.
For performance reasons, you may want to keep local scratch files used by Photoshop or video editing apps on your startup disk, even though those can temporarily occupy a lot of space. The speedy solid-state memory built into the latest MacBook Pro models will give you better performance than mechanical disks. That said, this is highly dependent on your computer, the amount of RAM installed, and the level of editing you’re doing. Serious editing pros typically set up an external drive or a RAID 0 array dedicated solely as a scratch disk.
Choose External Storage
Data you shunt to an external disk is usually old, large, or both. Material you don’t need to access day to day can be archived on an external drive; if you have a NAS, you can easily grab the data when you need it (see Work with Files on a NAS).
Large files seem ideal for transferring to an external disk, since they’re usually the first space hogs that you identify when you’re looking to Free Up Disk Space. However, that approach can be mixed, depending on the data. Some common considerations include:
Virtual machines: The disk images created by Parallels Desktop and VMware Fusion tend to be huge, because they contain entire operating systems and computing environments. Moving them off your internal storage can slow their performance unless the destination is a fast SSD connected via USB 3.0 or Thunderbolt.
Music and videos: Your Music or iTunes library is composed of many music and movie files you probably don’t consume every day, so moving it to an external disk will often free up a lot of disk space. (See Manage and back up your iTunes media library for detailed steps on how to accomplish the move.) However, the library must be on a disk that’s always connected to your Mac, otherwise you can’t access the media.
Another option is to keep the Music or iTunes library database on your internal disk, but reference the media files themselves from an external drive. To do this in the Music app, go to Music > Preferences > Files, and then turn off “Copy files to Music Media folder when adding to library” (Figure 63). In iTunes, go to iTunes > Preferences > Advanced, and then turn off “Copy files to iTunes Media folder when adding to library.” When you import new media using File > Add to Library (iTunes) or File > Import (Music), the app remembers the files’ locations for playback.
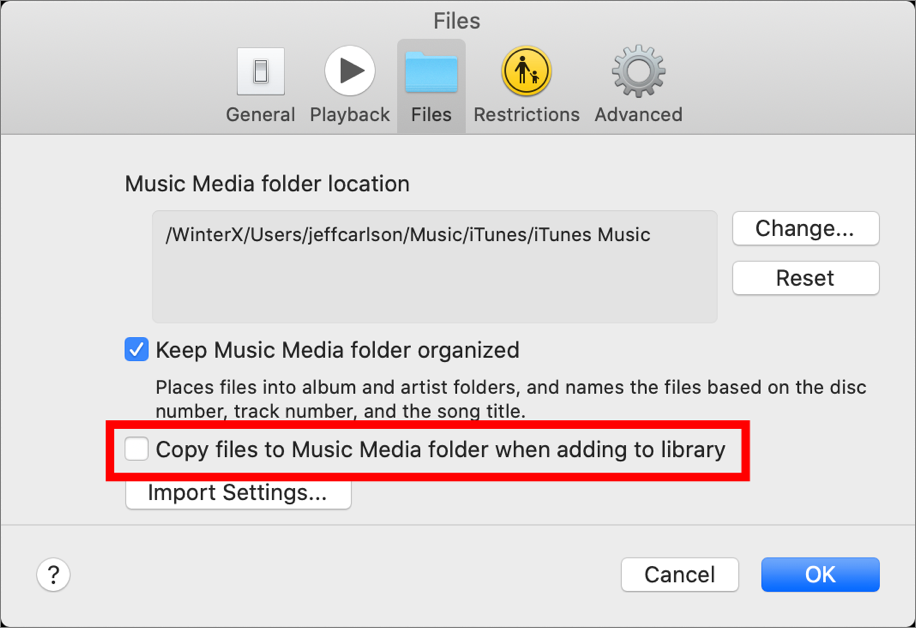
Figure 63: Music references media files in their original locations when this setting is turned off. If that’s not practical, and you have a robust internet connection, consider subscribing to Apple Music (or a service such as Spotify) to stream media without permanently storing the media files on disk. (See Choose Cloud Storage for more detail.)
Digital photos: As I discuss in NAS for Photography, Apple’s Photos has limitations when stored on an external drive. You can make it work with Lightroom and Lightroom Classic, with some caveats; I’ve used an external drive for years with my Lightroom libraries.
iMovie projects and source video: Make sure you follow Apple’s instructions at Move your iMovie for Mac library, because the “Ignore ownership on this volume” option must be enabled for the drive. Note that iMovie won’t work with libraries on a NAS or other network volume, only connected external drives.
Choose Cloud Storage
At first, Dropbox was a novel idea: being able to easily sync files between my computers without requiring a dedicated synchronization app. Then, after I suffered a hard drive failure that resulted in some data loss (and a born-again loyalty to backups), I realized I could put all my work folders into the Dropbox folder and automatically sync my active projects, gaining an off-site backup of that important data in the process. At some point the company added file versions, storing 30 days of revisions (120 days on the Professional plan), which saved my hide just recently, and other features.
As with all storage, data grows to fill every available nook. Whether you use Dropbox, iCloud Drive, Google Drive, Microsoft OneDrive, or others, here are some strategies to choose which data to store in the cloud:
Narrow pipe: Although cloud storage is convenient, if you have limited internet bandwidth, or your internet service provider implements data caps, it may not be practical for you to take advantage of the cloud. Or, you may need to exclude large files from the folder.
Storage cost: Nearly all of the major cloud providers sell additional storage space on top of a (typically low) base level, so factor that next level into your cost calculations.
Web access: One of the best advantages of cloud storage is that you can access your files from a web browser. If your laptop were to completely stop working while traveling, for example, you can access important files using any computer. (That’s also good for consulting itineraries, maps, notes, copies of your passport, and other important material you may need.)
Selective sync: Dropbox’s Selective Sync feature lets you choose which folders appear on a device. Google Drive, and Microsoft OneDrive also offer this feature. If you need to free up some space quickly, use Selective Sync to remove old files. They’re still stored on the server, which presents a conundrum: those remote copies would be your only ones, stored at a location that’s physically out of your control. If you use Selective Sync, make sure your files are also synced to another location, like a second computer or a NAS set to sync with the service.
Optimize storage in iCloud: In macOS 10.12 Sierra and later, iCloud Drive syncs data from the apps with permission to use the service; you can also sync your Desktop and Documents folders. In System Preferences > iCloud > Apple ID (Catalina or later) or System Preferences > iCloud > iCloud Drive > Options (Mojave and earlier), there’s an additional Optimize Mac Storage option (Figure 64).
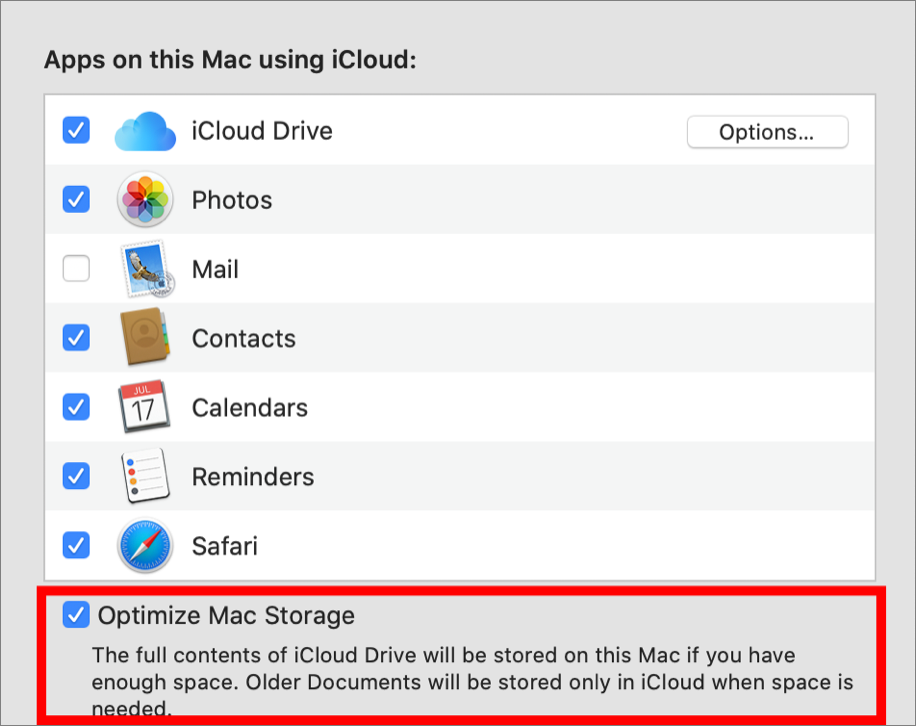
Figure 64: macOS can decide which files to remove from disk when additional storage space is needed. When that’s enabled, macOS selectively deletes local files in the Desktop and Documents folders that have been uploaded to iCloud Drive if it determines your disk is getting too full. As soon as you need one of those deleted files, it’s downloaded from the cloud and made available; or, you can click a download
 icon to pull it down manually. (Dropbox offers a similar Smart Sync feature in its Professional plan, which costs $17 per month.)
Free Up Disk Space
Just as you don’t necessarily want to indiscriminately offload data onto external drives to free up disk space, you don’t want to start trashing files left and right. Joe Kissell covers this topic in depth in Take Control of Maintaining Your Mac, so I’m going to hit the highlights here. It also gives me the opportunity to help clear up a point of confusion regarding optimized storage and free space.
Determine Available Storage
To see how much free space is on a disk in the Finder, make sure View > Show Status Bar is enabled and look at the bottom of a Finder window. However, you may have observed an oddity: sometimes throwing away files and emptying the Trash, or adding large files to the disk, doesn’t make much of a dent in that number.
For a more accurate reading, select your startup volume in the sidebar of a Finder window and choose File > Get Info (Figure 66).
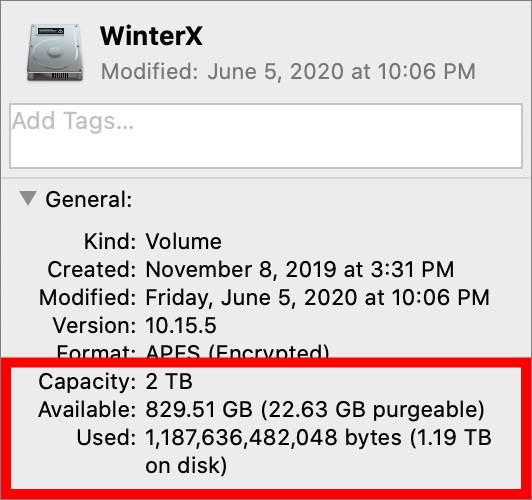
If Optimize Mac Storage is enabled, the Finder includes an amount of “purgeable” space. That number represents the amount of data in your Desktop and Documents folders, Music/iTunes media files, and mail attachments stored on both your drive and on iCloud. If macOS needs to use that space, it will delete those local files, safe in the knowledge that they exist on iCloud.
Strategies for Freeing Disk Space
In the past, I’d occasionally spelunk the folders of my hard disk looking for old or large files and folders to delete. Although that had its own kind of Zen as an activity, I far prefer a more surgical approach these days. Partly that’s helped by macOS, and partly that’s due to third-party utilities. Here are some suggestions:
Choose > About This Mac > Storage and click Manage. In addition to turning on the options to store data in iCloud and to Optimize Mac Storage, you can opt to empty the Trash automatically (discarding items thrown away after 30 days) and also identify large files and downloads (Figure 67).

Figure 67: The storage management tool built into the System Information app provides a lot of fine-tuned options. Run a utility such as CleanMyMac, DaisyDisk, or GrandPerspective to identify large files that can be deleted. CleanMyMac goes several steps further, locating and offering to remove duplicate files, old or unused apps, log files, localization resources for languages you don’t speak, and so forth.
If you use iCloud Photos and turn on its Optimize Mac Storage option, original photos are replaced with small thumbnails; viewing one downloads the full-size version.
Don’t forget that you can move data to external storage; copy files to a NAS and then Mount the NAS Volume in the Finder to access them; use a NAS for Photography to store originals elsewhere; and Choose Cloud Storage to keep select data local and keep the rest in the cloud.
Make Backups
If you can’t tell by now, I’m a big believer in backups, because I’ve gone through the simmering panic associated with having a hard drive fail without any fallback. (I wrote about the ordeal at TidBITS, DriveSavers to the Rescue, and even nearly 20 years later I get twitchy thinking about it.)
Build a Backup System
The succinct overview of a good backup system looks like this:
Buy an inexpensive external hard disk and set it up as a Time Machine backup. That’s a versioned backup, which makes copies of changed files every hour so you can go back in time to a prior version of a file if necessary.
Buy two external hard disks that can be set up as bootable duplicates; I use bare internal drives and mount them using Hard Drive Docking Stations. Copy the contents of your startup disk using SuperDuper! or Carbon Copy Cloner to ensure that it’s a true duplicate that can boot the computer if your startup disk fails.
With both duplicates made, take one to an off-site location, such as an office, a friend’s house, or a safe deposit box.
Set up an online backup service for an additional off-site backup that copies files as they’re changed (or on a schedule you choose). I recommend Backblaze.
Make sure you have backups of any other drives you’ve set up, aside from the Mac’s startup volume.
The detailed and information-packed answer is to buy Joe’s Take Control of Backing Up Your Mac.
Take Advantage of Time Machine Local Snapshots
The APFS format supports a feature called local snapshots, which are records created by macOS of a disk’s state at a specific time. A snapshot isn’t a backup, exactly, but it can serve as a way to restore recent data or get you out of a jam.
The idea behind a snapshot is to create a restore point, so if something like a system update goes sideways, you can return the drive to the state it was in at the last snapshot. It’s a much easier option than resorting to erasing a disk and reinstalling macOS before restoring a full backup. You can also recover earlier versions of files that were saved when the snapshots were created.
Does that last part sound familiar? It roughly describes Time Machine. In fact, Apple calls these “Time Machine local snapshots” because you use the Time Machine interface for recovering files from snapshots.
However, that’s just on the surface. There are a few important differences between snapshots and Time Machine backups:
Snapshots are stored locally on the APFS-formatted startup disk. Time Machine backups are stored on an external disk formatted as Mac OS Extended (Journaled).
When you’re connected to the Time Machine disk, macOS performs a Time Machine backup every hour. If that disk is not connected, macOS saves a local snapshot every hour instead, depending on the startup disk’s available free space. The system holds onto it for 24 hours, and automatically culls old snapshots as needed.
Snapshots are also automatically created before system updates are applied.
macOS notes the location and state of every file on disk, but doesn’t make local copies in a snapshot. Think of it as a map of your data, not a hidden duplicate.
Restore Data from a Snapshot
When your computer isn’t connected to a Time Machine disk, you can access files that would be saved in a local snapshot. Open Time Machine and scroll through the backups listed chronologically along the right edge of the screen (Figure 68).
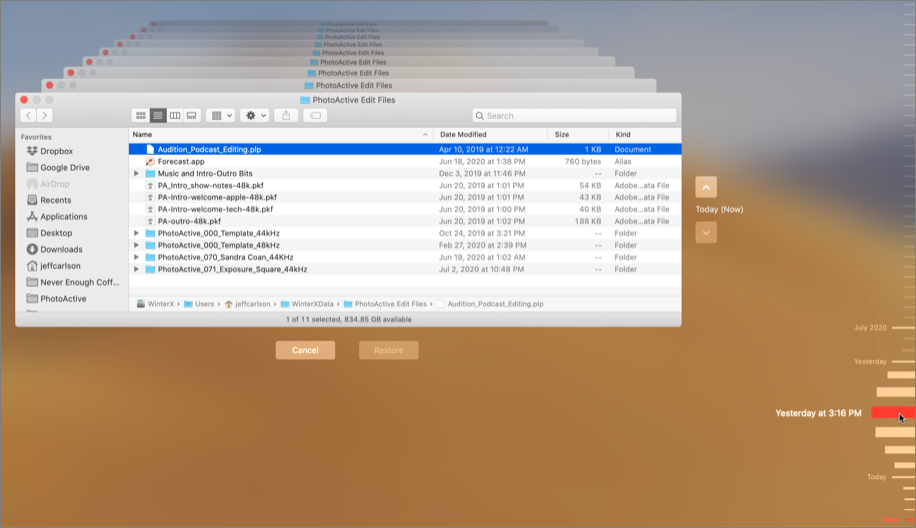
The experience is the same as restoring from a Time Machine backup:
Open the Finder window that contained the file you want to restore. (Or, for apps like Keynote that support Time Machine, open the document for which you want to view earlier saved versions.)
Click the Time Machine app in the Dock or, from the Time Machine menu bar
 icon, choose Enter Time Machine.
Navigate to an earlier state by clicking a date at the right of the screen, or clicking the
 button next to the window.
Select the file or version you’re rescuing and click Restore. The item is copied from the snapshot and put back where it was.
If you need to return an entire disk to a previous state, do the following:
Restart the computer while holding ⌘-R to access macOS Recovery.
On the macOS Utilities screen, choose Restore from Time Machine and click Continue.
Choose the startup volume that contains the snapshot. If it’s encrypted, you’ll need to provide a password. Click Continue.
Select a local snapshot from the list. Click Continue (Figure 69).
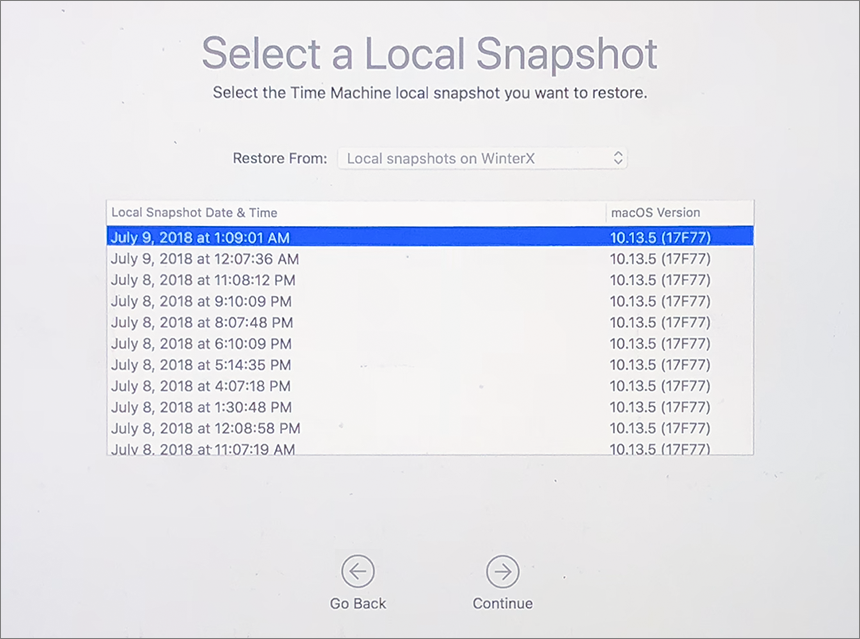
Figure 69: Pick the saved state to which you want to restore. Confirm that you want to restore from the snapshot, and click Continue.
When the restore is complete, the computer restarts.
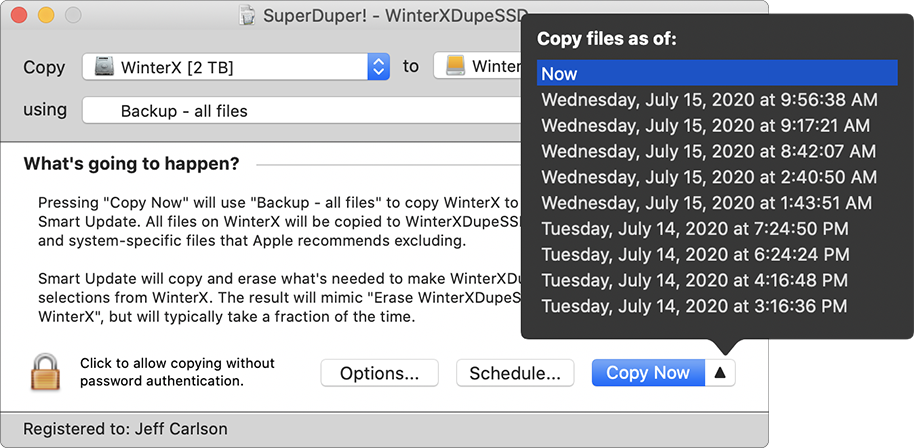
If you use SuperDuper! or Carbon Copy Cloner to create bootable duplicates, you can choose to back up or restore from specific snapshots (Figure 70).
Manage Time Machine Local Snapshots
macOS handles local snapshots entirely in the background; honestly, if you weren’t reading this, you may not even know the feature is there. That knowledge, though, gives you a few other options for working with snapshots.
For one, you can create a local snapshot at any time. Open the Terminal app and enter: tmutil localsnapshot. This is helpful if you’re installing software, particularly beta software, and you want the ability to revert back to the state before the installation occurred.
Another option is to delete snapshots to free up disk space (you’ll need an administrator’s account to do this). Because snapshots occur in the background, a side effect is that the Finder doesn’t always accurately report available storage.
macOS considers snapshots to be purgeable, or disposable, if that space is needed for something more important. I was bitten by this situation once when trying to install an app that ignored whether data was purgeable and looked solely at actual free space on the disk. Although the Finder reported plenty of room, the installer wouldn’t continue.
In a case like that, two options are open to you: delete all the snapshots at once, or manually remove individual snapshots.
To delete all local snapshots, do this:
Choose > System Preferences and click Time Machine; or, choose Time Machine Preferences from the Time Machine menu bar
icon.Uncheck the Back Up Automatically checkbox (or turn the On/Off switch to Off in macOS 10.11 El Capitan and earlier).
Wait for the snapshots to be deleted behind the scenes. Apple says to “wait a few minutes,” but in my experience it can take much longer.
Turn on the Back Up Automatically option (or On/Off switch) to ensure local snapshots are created in the future.
To delete a snapshot manually in Terminal, take these steps:
View a list of snapshots by entering:
tmutil listlocalsnapshots /(Figure 71).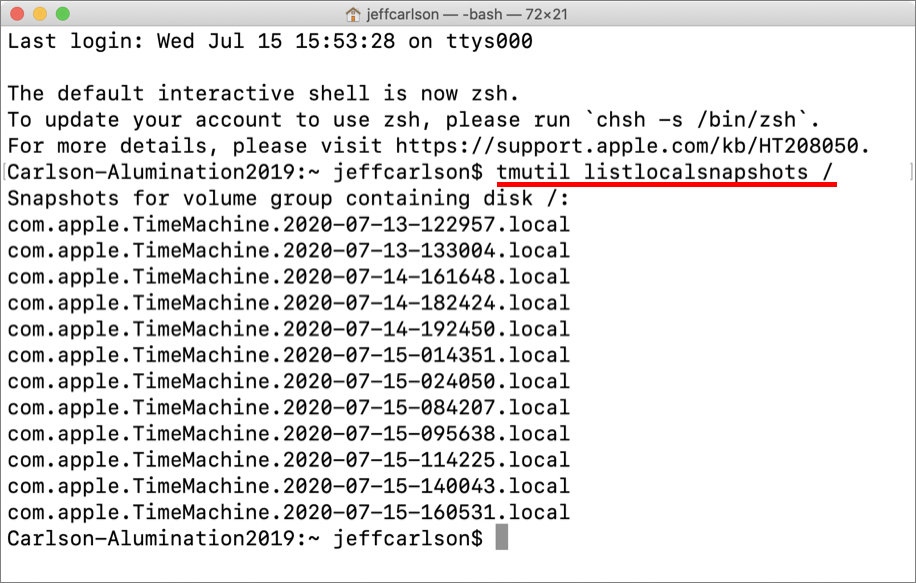
Figure 71: List current local snapshots using Terminal. To remove a snapshot, enter:
sudo tmutil deletelocalsnapshotsfollowed by the timestamp. For example, to delete the oldest snapshot in the list above, you’d enter:sudo tmutil deletelocalsnapshots 2020-07-13-122957. (That timestamp translates to July 13, 2020 at 12:22:57 A.M.)Enter your administrator password at the prompt. If successful, you should see:
Deleted local snapshot '2020-07-13-122957'.If necessary, repeat step 2 to remove other snapshots.
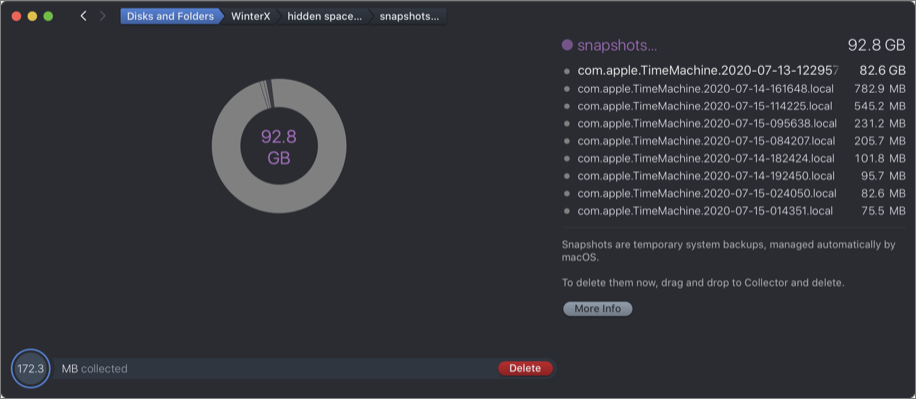
For a graphical approach, I use the app DaisyDisk, which represents folder and file sizes in an attractive circular graph. After you scan the startup disk, click the “hidden space” item and then “snapshots.” You’ll see a list similar to what appears in Terminal, but with the addition of file sizes (Figure 72). Drag a snapshot to the drag-and-drop well in the bottom-left corner, and then click Delete.