Chapter 3
Digging Deeper into Photo Editing
IN THIS CHAPTER
 Fast Photoshop feature guide
Dodging, burning, sharpening, and adjusting
Cleaning, mashing up, and advanced stuff
Cautioning and encouraging
While this chapter is mostly optional, I encourage you to have a good look at it. I can’t tell you how many times I’ve worked on photos in Photoshop after I processed them in Lightroom. In a perfect world, that wouldn’t be necessary.
That’s not to say this chapter is drudgery. I have a ton of fun using Photoshop. So much that I’ve thought about creating a YouTube channel that features me using the Clone Stamp tool for hours on end. It’s creative, and yet it fills me with a down-to-earth sense of accomplishment that I thrive on.
So, have fun with this chapter. Don’t approach it too seriously. I want to share some techniques that I use to make my good photos better. I don’t load bad photos into Photoshop to try to rescue them. Those shots never make it past the initial flagging phase of my operation. Based on what you see here, come up with your own system.
Software for Editing Photos
As with the other chapters in this section, I must make an announcement about the software featured in this chapter before getting started. I’m using Photoshop CC to show tips and tricks on how to edit your photos in ways that are hard or impossible in applications like Lightroom.
It wasn’t a hard choice, really. Photoshop is the premier photo editor and has been for many years. Although there are competitors, because Photoshop itself is available at a reasonable rate, there really is no reason to use another program. If you have Photoshop Elements, PaintShop Pro, or another app, you’ll find most or all of the techniques I share translate with a minimum of fuss.
One final caveat: I assume you’re using an app like Lightroom to perform most tasks required to get your photos into shape. Therefore, I don’t cover issues like correcting exposure, contrast, and so forth in this chapter. If you want to investigate those issues, turn to Book 5, Chapter 2. There is always some crossover, of course, but I want to focus on things that are more suited to using an editor. By and large, use these techniques to make good photos better. Don’t waste your time on bad stuff.
Dealing with the Mundane Stuff
I’ve written this section to address some of the housekeeping chores that support the features in Photoshop that I use in this chapter.
Creating a Photoshop file
Creating a Photoshop file begins, oddly enough, in Lightroom (or your photo processor of choice). Spruce up your best shots first. Ideally, you won’t even need to mess with them in Photoshop. If that’s the case, export them as JPEGs and put them up for people to see.
When you want to open a photo in Photoshop, you can take one of several different paths. I typically export a full-sized 8-bit TIFF with the AdobeRGB color space so that I have a file that I can see on my system. I then drag and drop the file onto Photoshop’s workspace.
However, there are actually more efficient ways of doing this. Such as by choosing Photo ⇒ Edit In ⇒ Adobe Photoshop CC, as shown in Figure 3-1. If you’ve chosen a Raw file, it opens directly in Photoshop. If you have chosen a JPEG or other format, the Edit In menu has a few more options if you want to explore them.
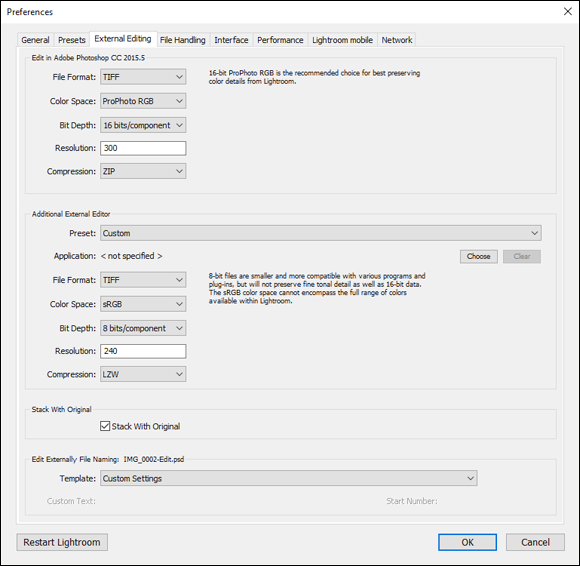
Choose Edit ⇒ Preferences and select the External Editing tab (see Figure 3-2) to view and change the settings Lightroom uses to send photos to Photoshop. It defaults to a compressed 16-bit TIFF at 300 dpi and with the ProPhoto RGB color space. That’s a bit much. All you really need is 8- bits with the AdobeRGB color space. I prefer uncompressed TIFFs, but compressed TIFFs are smaller.
You can also export your photos in Photoshop’s PSD file format. I prefer TIFFs because I like seeing their thumbnails on my system, but you may not need that.
When you get the file open in Photoshop, save it by choosing File⇒ Save As. Change the type to Photoshop (PSD). Choose a location and change the name if you like, and that’s it.
Helpful Photoshop features
Photoshop has so many cool features that it would be impossible to even mention them all, much less tell you anything about them. However, you should be aware of a few key elements of the application that will help you edit photos. They are
- Panels: The Photoshop interface is covered with panels. You can turn them on and off when needed, but you’ll normally want the Tools, Properties, and Layers panels visible at all times.
-
Tools: Photoshop has a Tools panel on the left side of the interface. This is where you select tools like the Eraser and Marquee. Most have a keyboard shortcut. You won’t need all the tools when you work with photos, but I typically need one or more of the selection tools, the Eraser, the Clone Stamp, and the Dodge and Burn tools.
After you select a tool, you can change parameters like brush size and hardness from the Options bar near the top of the screen. Then it’s off to work.
- Keyboard shortcuts: Photoshop is famous for its keyboard shortcuts. If you find yourself using a particular tool or feature all the time, learn the keyboard shortcut. It saves you a lot of time and hassle. My favorites are S for the Clone Stamp tool, M for Marquee, V for the Move tool, Spacebar to switch to the Hand, and Ctrl+Alt+Shift+E/
 +Alt+Shift+E (Win/Mac) to merge visible layers to a new layer.
- Layers: Layers make working with photos in Photoshop worth it. While most other features are available in Lightroom and other photo-processing applications, layers are the realm of photo editors. Layers allow you to stack changes on top of each other, blend them in different ways, and even organize and track your work.
- Adjustments: Adjustments are the tools you use to alter brightness, contrast, color, and so forth. They come in two flavors: direct, which are applied permanently to a normal layer, and adjustment layers, which are non-destructive and can be edited. I prefer the latter.
- Masks: Masks hide parts of layers and allow material beneath to show through. This feature makes many sophisticated editing techniques possible. You can sharpen the layer you’re working on, for example, and mask out areas you don’t want altered. The unsharpened photo beneath shows in the masked areas.
Coping with color management
Color management can be a tricky concept. Normal photo files have what’s called a color profile. Color profiles help hardware like monitors and printers accurately reproduce the colors in the file to the best of their ability. That last part is key. Not every piece of hardware has the same abilities. As a result, a limited color profile was created that would work with just about anything. It’s called sRGB and it has essentially gained default status.
The sRGB color profile works with everything you'll likely view, edit, or print your photos on. Although it has a smaller gamut, or total range of colors, it is essentially foolproof. I set my camera to save JPEGs in this profile. When I save photos for use on the web, I always select this profile for the final JPEG.
The AdobeRGB color profile defines a wider color space and is technically better than sRGB, but there’s no guarantee it will work where you need it to. I work with my photos in Photoshop with this profile. I also send files to the printer in AdobeRGB. The last step in my process when saving a file as a JPEG is to convert the color profile from AdobeRGB to sRGB. It stinks, but it’s necessary.
There are more color profiles available, but you don’t really need to mess with them. Lightroom can use ProPhoto RGB, which has an even wider gamut than AdobeRGB.
One quirky thing to remember before moving on: Raw exposures don’t pick up a profile until you convert and export them as a TIFF or JPEG.
Saving your final images
I prefer saving my working file in Photoshop (PSD) format for safekeeping. When you want a final image to print or post, convert the color profile and crop if necessary, and then flatten the image before saving as a JPEG or TIFF. I prefer naming my final versions with “-final” appended to the name. This keeps the versions straight.
Dodging and Burning
Dodging and burning are two (dangerous-sounding!) techniques that you can use to lighten (dodge) or darken (burn) areas with a brush. I use these tools to subtly elevate brightness in areas I want you to look at, to darken areas for drama, or to balance the photo.
 When dodging and burning, I create a duplicate layer of the photo to dodge and burn on. It allows me to preserve the original photo and blend with opacity if I choose to.
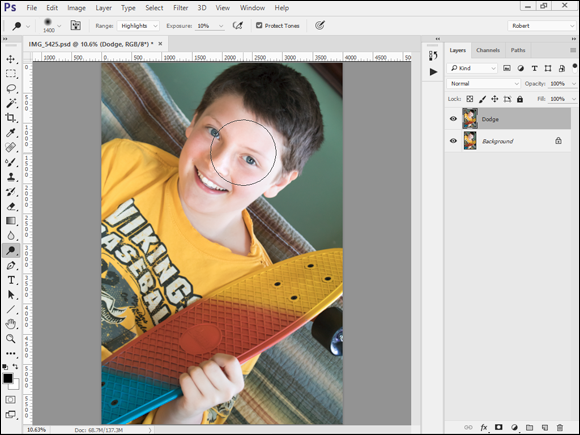
After duplicating the layer, select the Dodge or Burn tool, choose a brush size and hardness, and then select a range. The Range option lets you target specific tones in the image: shadows, midtones, or highlights. All you do is brush it on, as shown in Figure 3-3.
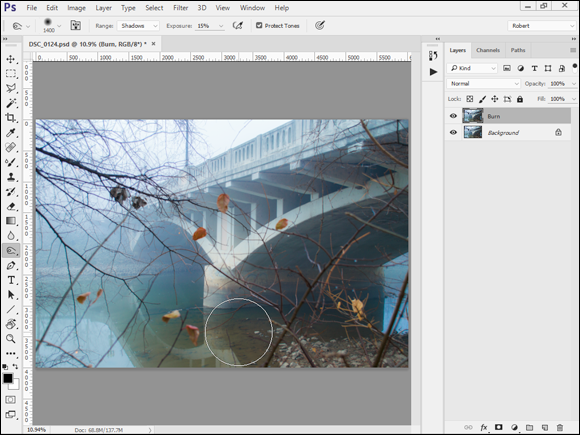
Dodging and burning work well to emphasize rather than correct. In other words, I dodge to brighten highlights in clouds, on water, or elsewhere to accentuate those elements. Quite often, I burn shadows (see Figure 3-4) or midtones for the opposite effect.
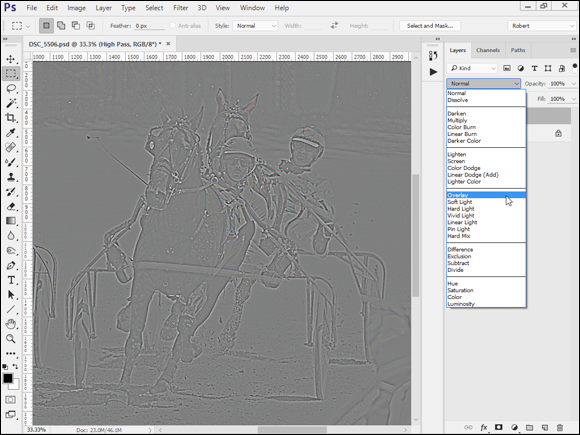
Using High Pass to Sharpen
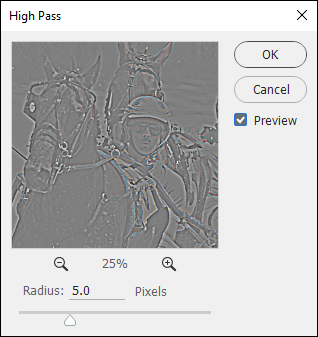
While I generally prefer light sharpening in Lightroom, I sometimes forego it in favor of a technique known as High Pass Sharpen. Here’s how to do it:
- Duplicate the layer you want to sharpen.
-
Choose Filters ⇒ Other ⇒ High Pass.
The High Pass dialog box opens, as shown in Figure 3-5.
-
Select a radius, in pixels, and click OK.
You can think of this as a strength control. I generally choose something around 3 or 5 for light sharpening, or up to 10 for more, but it does depend somewhat on the size of the image. Photos from cameras with vastly different pixel counts behave differently. Experiment with your photos to see what you prefer.
The layer will look odd. That’s okay. Working as intended.
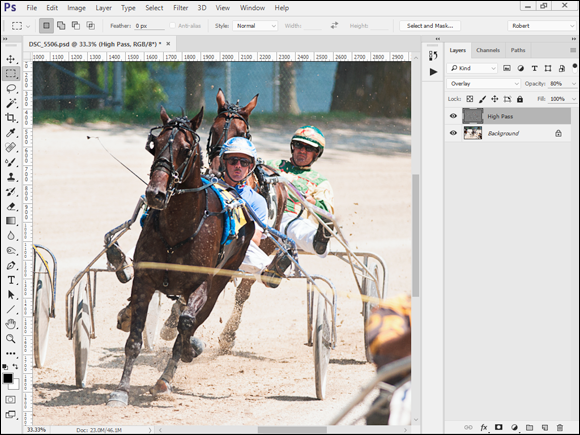
- Change the Blend mode of the sharpened layer to Overlay (see Figure 3-6).
-
Adjust the strength further by lowering the opacity of the sharpened layer (see Figure 3-7).
You can also mask out different areas you don’t want sharpened.
Making Minor Adjustments
Don’t be afraid to make minor adjustments to brightness, contrast, and color. It’s most effective if you use an adjustment layer to accomplish these tasks. When needed, I prefer these:
- Brightness/contrast: If the photo looks like it needs a dab of brightness or contrast, toss a Brightness/Contrast adjustment layer on top. Tweak accordingly.
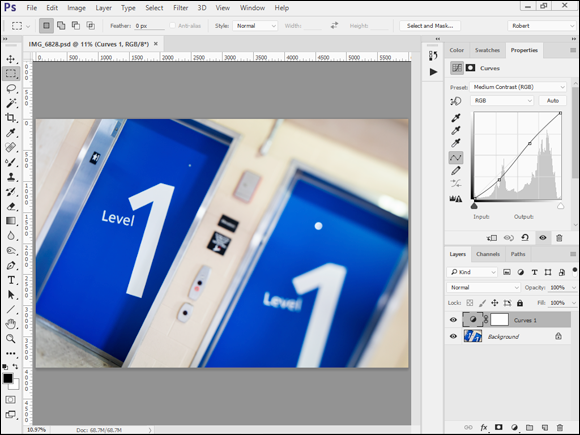
- Levels and curves: These are more complicated adjustments but they are very effective at altering brightness and contrast (see Figure 3-8). Play around with the presets and experiment with the controls. They also can correct color imbalances by setting the white and black points of the photo.
- Vibrance: Shabby or dingy colors make things look dull or prematurely aged. Give your photo a shot of color with the Vibrance/Saturation adjustment layer. Conversely, overly bright colors can be hard to look at. If that is the case, tone them down.
- Photo filters: I like photo filters. They're the digital equivalent of physical filters that you put in front of your lens to filter certain types of light or ambiance. Book 3, Chapter 5 talks more about physical filters. The options in the Photo Filter dialog box are intuitive: Choose a filter type based on the description or a solid color, and then choose a density.
Applying Changes Selectively with Masks
If you don’t need to sharpen an entire photo, don’t. Likewise, if you only need to brighten the sky, keep your adjustments to that area and leave the rest alone. How? Masks.
Masks enable you to apply changes to selective areas of photos. I positively love using masks. They give you the freedom to repair, correct, or enhance specific areas of a photo without unnecessarily altering the entire thing.
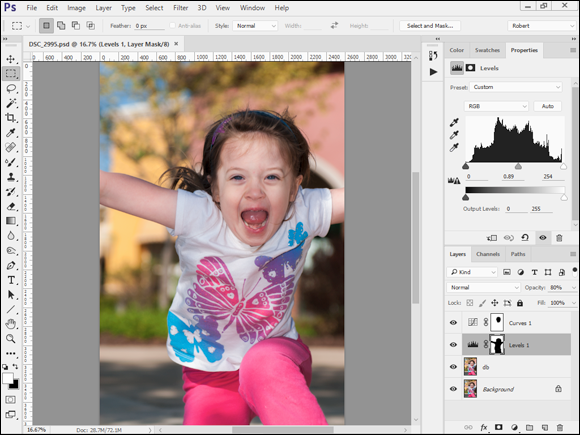
I used two masks on the photo of my daughter in Figure 3-9. I darkened the background a bit with a Levels adjustment layer and increased contrast a small amount with the Curves adjustment layer. I used the mask on both layers to isolate the adjustments to completely different areas of the photo.
Adjustment layers are created with white masks, which have no effect. To mask out areas and prevent them from being affected by the adjustment layer, select the adjustment layer mask from the Layers panel and then paint black on the canvas over the areas you want to hide using the Brush tool (size it according to the area you want to paint). You’ll see the mask update in the panel. Press the Backslash key to toggle the mask on or off as a rubylith overlay.
Mashing Up Versions of the Same Shot
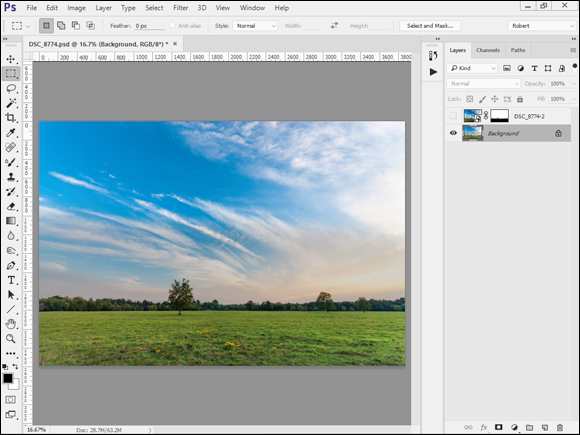
I include this technique as a kind of last resort. I would not go to this trouble ordinarily. However, there are times when you just can’t get a photo to shine the way you know it can by using a version developed as a whole. To wit: Create at least one virtual copy of the original photo in Lightroom. Process each one differently, according to the needs of different areas of the photo.
Quite often, this technique is helpful when working with a bright sky and a dark subject or foreground. Figure 3-10 shows a nice photo of a pasture in Oklahoma that I photographed near sunset. I could get the foreground to look good, or the sky, but not both. So I created a virtual copy and made two sets of adjustments. I exported them both and created a file in Photoshop to blend them together. Figure 3-10 shows the photo optimized for the green pasture and trees. The upper layer is turned off.
Figure 3-11 shows the upper layer turned on. The effect is dramatic. I used a mask to hide the foreground in the top photo, so the bottom layer shows through. Remember, this is the same photo. I didn’t montage two shots together to create this effect.
Stamping Out Imperfections and Distractions
It’s not always possible to keep imperfections and distractions out of photos. While I don’t necessarily encourage you to obsess over every aspect of every photo you take, covering up some imperfections or objects with nearby material is an effective way to improve your shots. The general process is called cloning because the tool you’ll use most often in Photoshop is the Clone Stamp. The Spot Healing Brush and Healing Brush are two other useful cleaning tools. If you can handle the Clone Stamp, you can surely figure those out on your own.
Dusting and cleaning
Dust shows up as a big blob in your photo. It’s most noticeable in the sky, but also appears in other light, evenly toned areas. To remove a dust spot or another small imperfection, follow these steps:
-
Create a new layer above the photo background.
This is purely my preference. You can clone right on the photo layer if you want, but if you do, mistakes are far harder to correct.
-
Select the Clone Stamp Brush.
If cloning on a separate layer, make sure that the Sample is set to Current & Below. This enables you to select a sample from a layer beneath the one you are brushing on.
-
Configure the brush.
Specify a size large enough to cover the dust. In this case (see Figure 3-12), the brush is 220 pixels in size. I prefer using a hardness of 0% when cloning dust. The soft brush blends the new material very effectively. If you’re cloning over textured areas and you can see your brush strokes, you may want to increase the Hardness.
-
Select a sample area.
Press Alt/Option (Win/Mac) and click an area with matching color, lightness, and texture. In this case, I selected a nearby area of the sky. Note that you may have to resample several times to get the tone just right.
-
Paint over the dust spot.
If you see that things aren’t matching, undo and try again. If you’ve gotten a good match, you’ll never know there was a dust spot there to begin with. Figure 3-13 shows the final version of my photo.
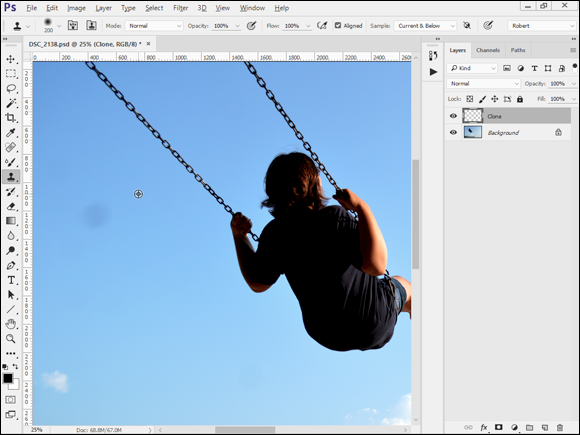
Removing other distractions
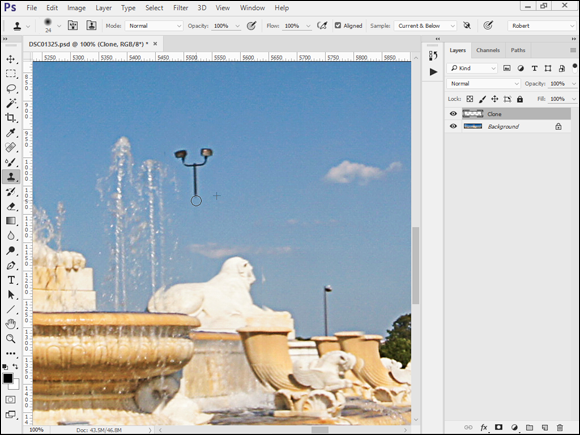
Dust isn’t the only distraction you might want to remove from your photos. Other objects can divert attention from your subject or make the scene less than desirable. Figure 3-14 shows some unsightly light posts that take attention away from an otherwise gorgeous fountain. I am in the process of removing the left post in the figure.
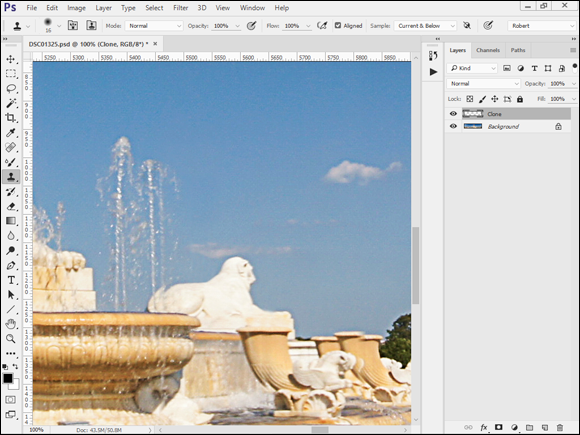
Regularly select a new sample area to hide your work. Mix it up, but pay attention. If the texture and tones don’t match, the replacement will be visible. You want it to be hidden, and you don’t want features to repeat. Figure 3-15 shows the final result of this small section of the photo.
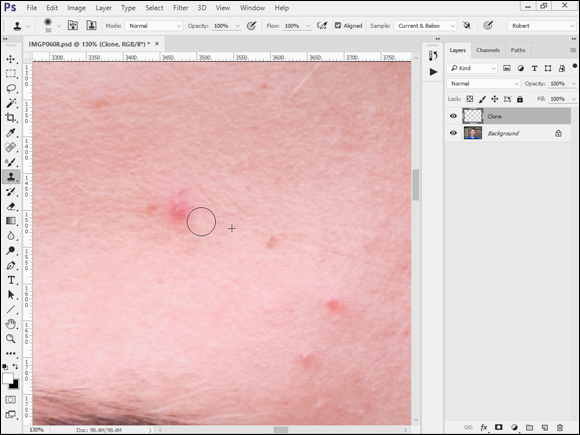
Improving complexions
Another type of imperfection relates to complexion. I don’t give my subjects total makeovers, but I routinely remove minor blemishes. The thing you have to be most careful of is matching the tone of the surrounding skin. The face is a wonderfully complex shape, full of curves. That makes it hard sometimes to remove zits without being obvious. I prefer to use the Clone Stamp, but the Spot Healing Brush is effective when the blemishes are not all packed together. Figure 3-16 shows an area with a handful of blemishes. I’ve created my separate layer and have the tool set up.
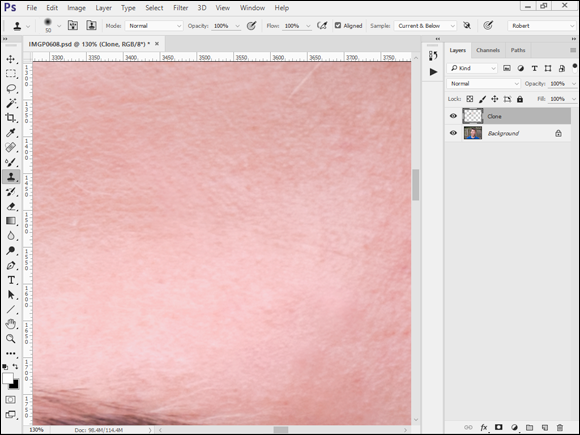
Figure 3-17 shows the final result. While I tried to remove the most noticeable blemishes, I didn’t try to smooth the skin and turn this into a glamour shot. I prefer to leave it as real as possible.
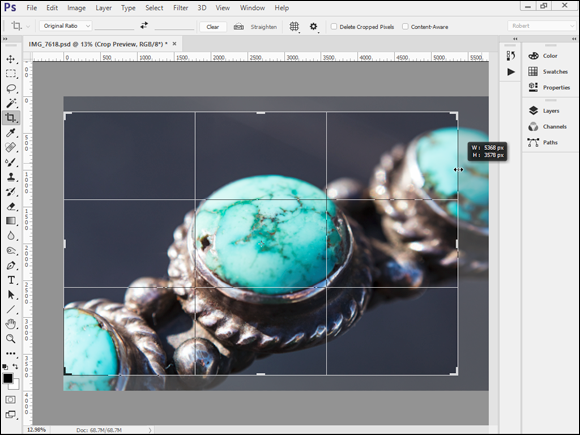
Adjusting Final Composition
I normally aim to finish the composition in Lightroom before editing in Photoshop. However, there are times when you realize after the fact that you want to recompose a bit. Here’s how you can do it:
- Finish all the other work you want to accomplish.
-
Covert the background photo layer to a Smart Object.
Right-click it in the Layers panel and choose Convert to Smart Object.
- Click the Crop tool.
-
Mark the area of the photo you want to preserve.
Do this by drawing a crop area with the tool, as shown in Figure 3-18. You can also drag the corner and edge handles to change the crop boundaries. I prefer to set the tool to keep the original ratio.
-
Uncheck Delete Cropped Pixels from the Options panel.
This makes sure the pixels you crop are preserved. It’s vital that you don’t forget this step.
- Double-click in the crop area to commit the crop.
- If you need to recompose, click the Crop tool and click the photo in the workspace.
You can also convert the bottom photo layer to a Smart Object before cropping.
Words of Caution and Encouragement
 You’re much more likely to ruin a photo by heavy-handed editing than by leaving it alone. As you work with your photos in Photoshop, keep these thoughts in mind:
- Fewer changes are better. If you’re trying to create a realistic interpretation of the photo, the less you mess with it, the better. A great-looking portrait is a perfect example. Resist the temptation to overdo something just because you can.
- Go easy. You run a greater risk of ruining the photo the harder you push things. A perfect example is trying to oversharpen.
- Accepting a photo. The sensible solution is to find the spot where you can look at a photo and accept it for what it is. Not all photos are perfect. Some have noise; some have exposure problems; some have a bit of distortion. That’s a reasonable life-lesson as well.
If you find yourself constantly struggling to make your photos look better in Lightroom or Photoshop, I would encourage you to take a look at your photography. Ask yourself what problems you face in editing and resolve to correct them when you take the photograph.
Here are some tips:
- Take your shots at the lowest possible ISO so that you don’t have to throw noise reduction at everything you shoot.
- Support the camera so that it doesn’t jiggle or jostle. That way, not every photo is blurry.
- Frame well-designed shots so that you don’t have to crop them later.
- Try to keep distracting objects out of the background.
- Hold the camera straight and level so you don’t always have to straighten the photo.
- Although no lens is perfect, use the best lenses you can.
You can do it. Good, even great, photography isn’t only for the most gifted with access to the best equipment shooting at the most stunningly beautiful locations. I’m convinced that everyone can be a good photographer by learning, practicing, observing, and identifying areas to improve in, and then correcting the things that are holding you back.