Chapter 3
Changing the Size of an Image

You can change the size of your image to make it fit on a web page or in a printed document. This chapter shows you how to change the on-screen size, print size, and print resolution, as well as how to crop an image.
Change the On-Screen Size of an Image
Change the Print Size of an Image
Change the Resolution of an Image
Change the Canvas Size of an Image
Change the On-Screen Size of an Image
You can change the on-screen size of an image you are working with in Photoshop to make it better fit the confines of your monitor. Shrinking an image can also lower its file size and make it easier to share via e-mail or on the web.
When you change an image’s on-screen size, Photoshop resamples the image. Resampling is the process of increasing or decreasing the number of pixels in an image. Enlarging or shrinking an image too much can cause a noticeable decrease in image quality, which you can notice by examining details using the Zoom tool. Using the Zoom tool is another way to change the on-screen size. Zooming has no effect on pixel count.
Change the On-Screen Size of an Image

 Click Image.
 Click Image Size.
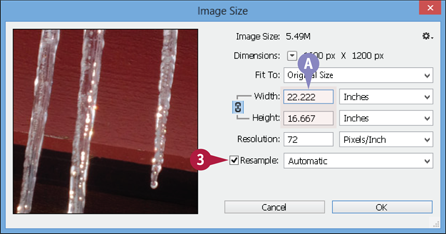
A The Image Size dialog box opens, listing the height and width of the image.
 Make sure Resample is selected (
 changes to
  ) to change the number of pixels in the image.
Changing the number of pixels changes the on-screen size.

 Type a size for a dimension.
B To resize by a certain percentage, click here ( ) to change the units to percent. Changing the units of one menu automatically changes the units of the other.
C You can click the Constrain Proportions button ( ), if it is not already selected, to force the other dimension to change proportionally.
D You can restore the original dialog box settings by pressing and holding  (
( on a Mac) and then clicking Cancel, which changes to Reset.
 Click OK.
Photoshop resizes the image.
Note: Increasing the on-screen size of an image can add blur. To sharpen a resized image, apply sharpening, as covered in Chapter 10.
Change the Print Size of an Image
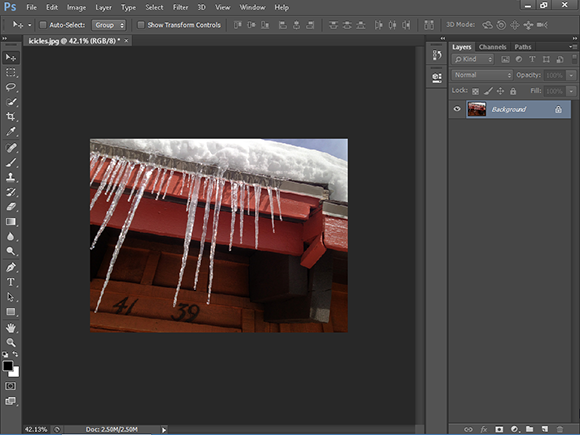
You can change the printed size of an image to determine how it appears on paper. Print size is also called document size in Photoshop. If you change the print size of an image with the Resample option checked, Photoshop adjusts the number of pixels in the image but keeps the resolution the same. If the resampling option is unchecked, the resolution changes but not the number of pixels. Photoshop also gives you resizing options when you print your image. For more about printing, see Chapter 14.
Change the Print Size of an Image
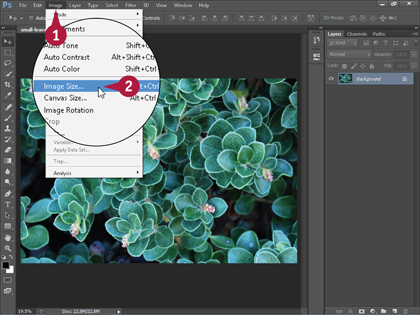
 Click Image.
 Click Image Size.

A The Image Size dialog box opens, listing the current height and width of the printed image.
B You can click here ( ) to change the unit of measurement.
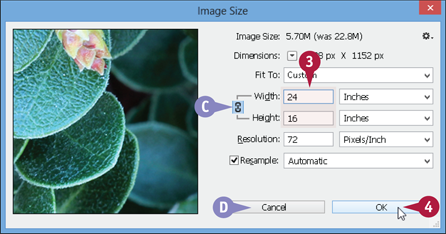
 Type a size for a dimension.
C You can click the Constrain Proportions button ( ), if not already selected, to force the other dimension to change proportionally.
D You can restore the original dialog box settings by pressing and holding  (
( on a Mac) and then clicking Cancel, which changes to Reset.
 Click OK.
Photoshop resizes the image.
Note: Changing the number of pixels in an image can add blur. To sharpen a resized image, apply sharpening, as covered in Chapter 10.
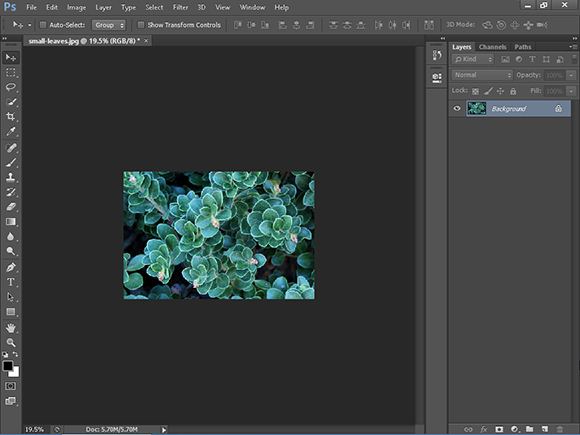
Change the Resolution of an Image
You can change the print resolution of an image to increase or decrease the print quality. The resolution, combined with the number of pixels in an image, determines the size of a printed image. The greater the resolution, the better the image appears on the printed page — up to a limit, which varies with the type of printer you use and the paper on which you are printing.
For more about how Photoshop determines the size of images, see the previous sections, “Change the On-Screen Size of an Image” and “Change the Print Size of an Image.”
Change the Resolution of an Image
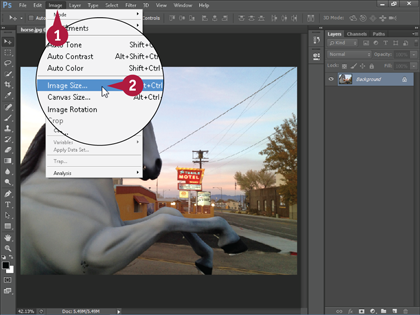
 Click Image.
 Click Image Size.
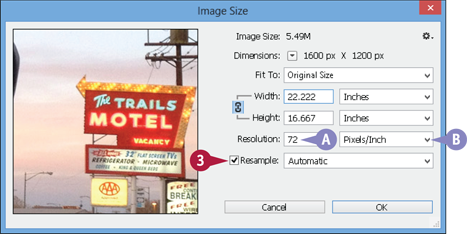
A The Image Size dialog box opens, listing the current resolution of the image.
 Make sure Resample is selected (
 changes to
  ) to change the number of pixels in the image as you adjust the resolution.
B You can click here ( ) to change the resolution units.
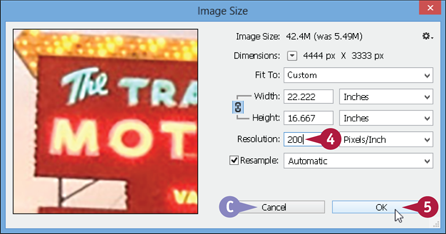
 Type a new resolution.
C You can restore the original dialog box settings by pressing and holding  (
( on a Mac) and then clicking Cancel, which changes to Reset.
 Click OK.
In this example, adjusting the resolution changes the number of pixels in the image. The on-screen image becomes larger or smaller, whereas the print size stays the same.

Crop an Image
You can use the Crop tool to quickly remove unneeded space on the top, bottom, and sides of an image. Cropping is a great way to edit out unwanted background elements. You can also rotate the cropping boundary prior to cropping, which enables you to rotate while you are cropping.
You can also crop an image by changing its canvas size. For more information, see the section Change the Canvas Size of an Image. Another way is by selecting an area with a selection tool, clicking Image, and then clicking Crop. See Chapter 4 for more on making selections.
Crop an Image
Crop Only
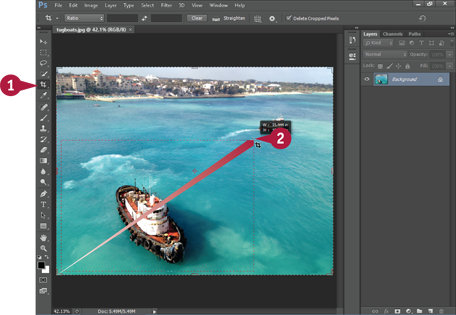
 Click the Crop tool (
 ).
).
 changes to
  .
.
 Click and drag
  to select the area of the image you want to keep.
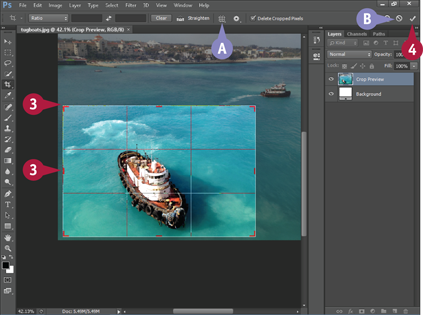
 Click and drag the side and corner handles (
 ) to adjust the size of the cropping boundary.
A You can click the Overlay Options button ( ) to show or hide guides in the tool. From the Overlay Options menu, you can also choose Rule of Thirds to add pairs of horizontal and vertical lines to help line up objects in the image.
B To exit without cropping the image, you can click  or press
  to cancel.
 To accept the crop, click
  or press
  (
( +
+ on a Mac).
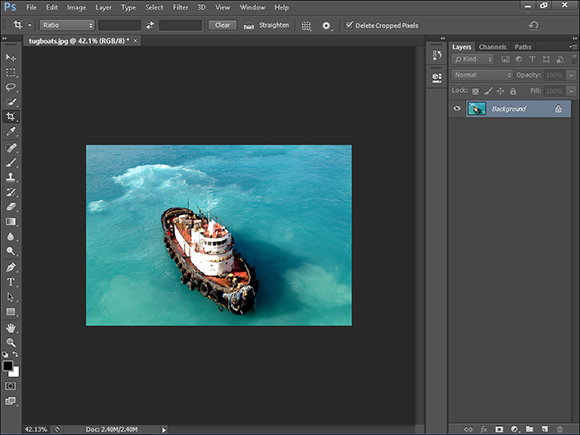
Photoshop crops the image, deleting the pixels outside the cropping boundary.
Rotate and Crop
 Perform steps 1 to 3 in the previous subsection, “Crop Only.”
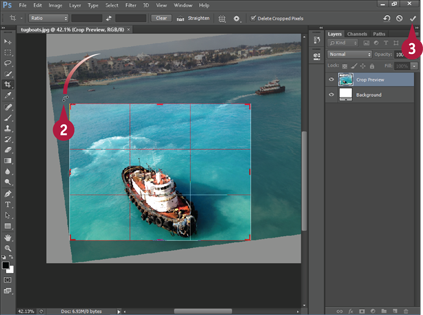
 Click and drag outside the boundary lines.
 To accept, click
  or press
  (
( +
+ on a Mac).
Photoshop rotates the image and crops it.
Crop and Straighten Photos
You can automatically crop and straighten one or more photographs in a Photoshop image. After you finish cropping and straightening the images, Photoshop places each image in its own image window. This feature is useful if you digitize several images at the same time on a scanner and want to separate them.
The feature works best when the images to be cropped and straightened contrast with the background. This is usually the case when you digitize images on a scanner.
Crop and Straighten Photos

 Click File.
 Click Automate.
 Click Crop and Straighten Photos.
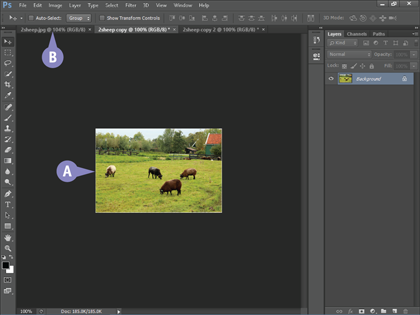
A Photoshop straightens the photos, crops out any blank space, and copies the photos to separate image windows.
Note: For more on saving newly cropped images, see Chapter 14.
B The original image remains in its own window.
Trim an Image
You can use the Trim command to automatically remove any blank space surrounding your image. This can be useful for scanned photos or when you want to minimize the file size of an image. Options enable you to trim space from all four sides or just some of them.
The feature works best when the image to be trimmed contrasts with the background. Trimming is a way to automate what you commonly do with the Crop tool. See the section Crop an Image for more details.
Trim an Image
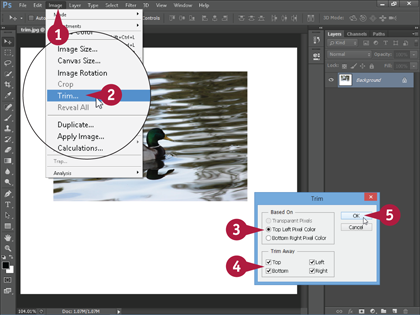
 Click Image.
 Click Trim.
The Trim dialog box opens.
 Specify how to select the type of pixels you want to trim (
 changes to
  ).
).
 Select the areas to trim (
 changes to
  ).
).
 Click OK.
Photoshop trims the image.
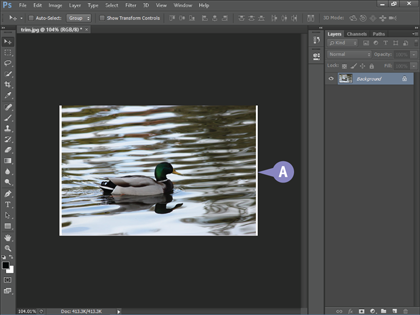
A The Trim command can sometimes leave extra space around the image. You can use the Crop tool to remove it. See the section Crop an Image for details.
Change the Canvas Size of an Image
You can alter the canvas size of an image to change its rectangular shape or add space around its borders. The canvas is the area on which an image sits. Changing the canvas size is one way to crop an image or add matting, which is blank space, around an image.
Photoshop warns you when you decrease the dimensions of the image canvas because this deletes part of the image. You might want to increase the canvas size if you are adding images to make a collage and want the images to overlap one another.
Change the Canvas Size of an Image
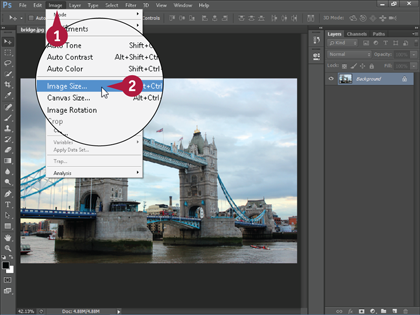
 Click Image.
 Click Canvas Size.
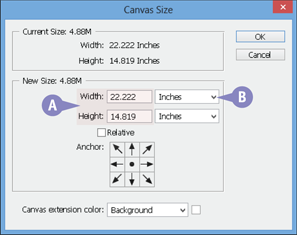
A The Canvas Size dialog box opens, listing the current dimensions of the canvas.
B You can click here ( ) to change the unit of measurement.
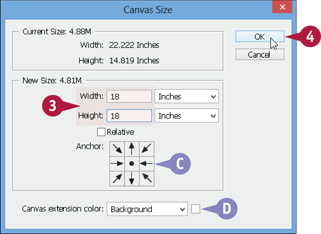
 Type the new canvas dimensions.
C You can modify in what directions Photoshop changes the canvas size by clicking an anchor point.
D You can specify the color with which Photoshop fills any new canvas area if you enlarge a dimension.
 Click OK.
Note: If you decrease a dimension, Photoshop displays a dialog box asking whether you want to proceed. Click Proceed.
Photoshop changes the image’s canvas size.
Because the middle anchor point is selected in this example, the canvas size changes equally on opposite sides.


