Chapter 1
Getting Started

Are you interested in creating, modifying, combining, and/or optimizing digital images on your computer? This chapter introduces you to Photoshop, a popular software application for working with digital images. Adobe Photoshop Creative Cloud is a subscription-based service where you pay a monthly fee to access the most up-to-date version of Photoshop. New Photoshop features are downloaded to your computer over the Internet as Adobe makes them available.
Sort and Filter Images in Bridge
Display a Slide Show in Bridge
Import Images from a Camera in Bridge
Work with Images
Photoshop is a popular photo-editing program you can use to modify, optimize, and organize digital images. You can use the program to make imperfect snapshots clearer and more colorful as well as to retouch and restore older photos. With layers, you can isolate objects in your images and apply special effects just to those objects or combine multiple images into a collage. After you are finished editing your photos, you can save the images to print, share via e-mail, publish online, or view on a mobile device or tablet.
Manipulate Photos

As its name suggests, Photoshop excels at editing digital photographs. The program includes numerous image-editing tools and commands you can apply to manipulate the look of your photos. Whether you import photos from a digital camera or a scanner, you can apply a wide variety of editing techniques to your images, from subtle adjustments in color to elaborate filters that make your snapshots look like paintings. See Chapter 7 for more on adjusting color and Chapter 10 for more on filters.
Paint Pictures

Photoshop’s painting features make it a formidable illustration tool as well as a photo editor. You can apply colors or patterns to your images with a variety of brush styles. See Chapter 6 for more on applying color. In addition, you can use the program’s typographic tools to integrate stylized letters and words into your images. See Chapter 12 for more on type. You can also create geometric shapes, which are covered in Chapter 11.
Create a Digital Collage

You can combine different image elements in Photoshop. Your compositions can include photos, scanned art, text, and anything else you can save on your computer as a digital image. By placing elements in Photoshop onto separate layers, you can move, transform, and customize them independently of one another. See Chapter 8 for more on layers. You can also merge several side-by-side scenes into a seamless panorama, which is covered in Chapter 13.
Access, Organize, and Display Photos

Photoshop’s Bridge interface offers an easy-to-use tool to access and preview images stored on your computer. See the section Browse for an Image in Bridge. With Bridge, you can easily tag your images with descriptive information, such as where or when they were taken. You can then use that information to sort your photos. Photoshop also offers useful ways to display your images after you edit them such as in a PDF presentation or as a slide show. See the section Display a Slide Show in Bridge, later in this chapter, and Chapter 13 for more.
Put Your Images to Work
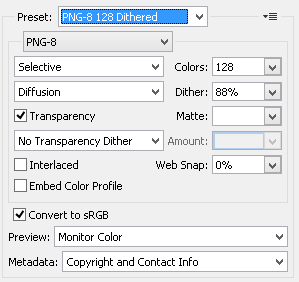
After you edit your work, you can utilize your images in a variety of ways. Photoshop enables you to print your images, save them in a format suitable for placement on a web page or for e-mailing, or prepare them for use in a page-layout program. By using the program’s optimization settings, as shown here, you can ensure that your image files are small in size but still look good. See Chapter 14 for more on saving images in different formats as well as printing them.
Understanding Photoshop
Photoshop’s tools enable you to move, color, stylize, and add text to your images. You can optimize the contrast and lighting in photographs or turn them into interesting works of art by applying filters.
Understanding Pixels

Digital images in Photoshop consist of tiny, solid-color squares called pixels. Photoshop works its magic by rearranging and recoloring these squares. You can edit specific pixels or groups of pixels by selecting the area of the photo you want to edit. If you zoom in close, you can see the pixels that make up your image. For more on the Zoom tool, see Chapter 2.
Choose Your Pixels
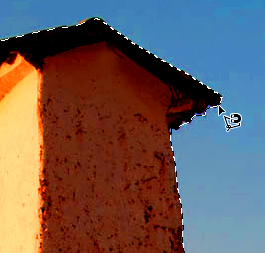
To edit specific pixels in your image, you must first select them by using one of Photoshop’s selection tools. You can make geometric selections by using the Marquee tools or free-form selections by using the Lasso tools. See Chapter 4 for more on these and other selection tools. Photoshop also has a number of commands that help you select specific parts of your image, such as a certain color or range of colors. Special brushes in Photoshop enable you to select objects in your image based on how the colors of those objects contrast with the background.
Paint

After selecting your pixels, you can apply color to them by using Photoshop’s Brush, Mixer Brush, Paint Bucket, and Pencil tools. You can also fill your selections with solid or semitransparent colors, patterns, or pixels copied from another part of your image. Painting is covered in Chapter 6. Special painting tools help you seamlessly cover up objects in your image or eliminate dust specks, tears, and other imperfections from a scanned picture.
Adjust Color
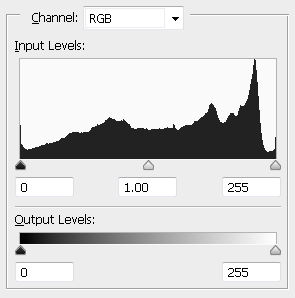
You can brighten, darken, and change the hue of colors in parts of your image with Photoshop’s Dodge tool, Burn tool, and similar tools. Other commands display interactive dialog boxes that let you make wholesale color adjustments so you can correct overly dark or light digital photographs. See Chapter 7 for more. You can also add adjustment layers to your image that enable you to make changes to the color commands later on. See Chapter 8 for more about layers.
Apply Styles and Filters

Photoshop’s layer styles let you easily add drop shadows, frame borders, and other effects to your images. You can also perform complex color manipulations or distortions by using filters. Filters can make your image look like an impressionist painting, sharpen or blur your image, or distort your image in various ways. Chapters 9 and 10 cover styles and filters.
Add Text

Photoshop’s Type tools make it easy to apply titles and labels to your images. With the Character and Paragraph panels, you can control the size, spacing, and alignment of your text. You can combine these tools with the program’s special effects commands to create warped, 3-D, or wildly colored words and characters. You can learn more on adding text in Chapter 12.
Start Photoshop on a PC
After you install Photoshop, you can start it to begin creating and editing digital images. Common ways of obtaining and installing the program include from DVD disc or by downloading it from Adobe over the Internet. On a PC, you can access Photoshop as you do other programs — through the Start screen.
Start Photoshop on a PC
 Open the Windows Start screen.

 Click the Adobe Photoshop button.
Note: Your location of the Photoshop button may be different depending on how the Start screen is configured and the version of Windows you are using.

Photoshop starts.
Note: To learn how to Open an Image and start working, See the section Open an Image.
Start Photoshop on a Mac
After you install Photoshop, you can start it to begin creating and editing digital images. Common ways of obtaining and installing the program include from DVD disc or by downloading it from Adobe over the Internet. On a Mac, you can access Photoshop through the Finder in the Applications folder or by using the Launcher.
Start Photoshop on a Mac

 In the Finder, click Applications.
 Click the Adobe Photoshop folder.
 Double-click Adobe Photoshop.
Note: The exact location of the Photoshop icon may be different depending on how you installed your software.
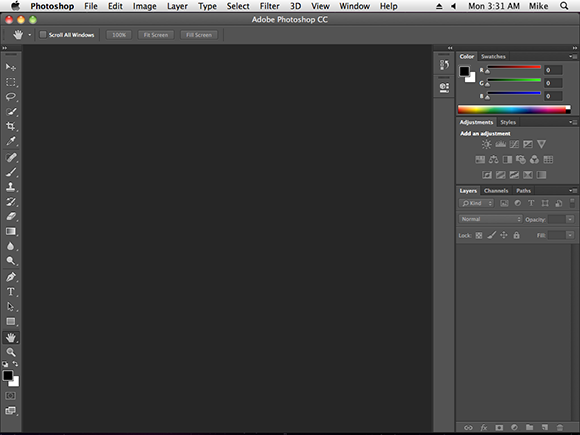
Photoshop starts.
Note: To learn how to Open an Image and start working, see the section Open an Image.
The Photoshop Workspace
In Photoshop, you open your digital images in a main image window and then use a combination of tools, menu commands, and panel-based features to edit the images.

A Application Bar
Displays menus that contain most of Photoshop’s commands and functions.
B Options Bar
Displays controls that let you customize the selected tool in the Toolbox.
C Title Tab
Displays the name, magnification, and color mode of an open image. You can switch between images by clicking their respective tabs.
D Toolbox
Displays a variety of icons, each one representing an image-editing tool. You click and drag inside your image to apply most of the tools. Also displays the current foreground and background colors.
E Image Window
Displays the images you open in Photoshop.
F Status Bar
Displays the magnification of the current image and the amount of computer memory that image is using.
G Panels
Small windows that give you access to common commands and resources. You can click the tabs and icons to display and hide panels.
Find Images for Your Projects
You can get raw material to work with in Photoshop from a variety of sources.
Start from Scratch

You can create your Photoshop image from scratch by opening a blank canvas in the image window. Then, you can apply color and patterns with Photoshop’s painting tools, or cut and paste parts of other images to create a composite. See the section Create a New Image for more on opening a blank canvas.
Digital Camera Photos

Digital cameras are a great way to get digital images on your computer. Most digital cameras save their images in JPEG, TIFF, or RAW format, all of which you can open and edit in Photoshop. The program’s color adjustment tools, covered in Chapter 7, are great for correcting color and exposure flaws in digital camera images.
Scanned Photos and Art

A scanner gives you an inexpensive way to convert existing paper- or slide-based content into digital form. You can scan photos and art into your computer, retouch and stylize them in Photoshop, and then output them to a color printer. To automatically separate and straighten photos that were scanned together as a single image, see Chapter 3.
Affordable Online Photos
Many websites feature images in the public domain or that are available for noncommercial use. Wikimedia Commons (http://commons.wikimedia.org) is one such site. If you have a little money to spend, you can license images from microstock websites, which are known for low-cost, downloadable images. iStockphoto (www.istockphoto.com) is a popular microstock site.
Set Preferences
Photoshop’s Preferences dialog box enables you to change default settings and customize how the program looks. You can set preferences to create a workspace that matches how you like to work.
When you make changes to the program in the preferences, the changes remain after you exit the program and then open it again.
Set Preferences

 Click Edit (Photoshop on a Mac).
 Click Preferences.
 Click General.
The Preferences dialog box opens and displays General options.

 Click here (
 ) to select which dialog box opens when you select a color.
 Select the general options you want to use (
 changes to
  ).
).
 Click Interface.
The Interface options appear.

 Click a color theme.
A You can select from menus ( ) to further customize the interface colors.
 Click check boxes to customize the behavior of menus, panels, and other interface features (
 changes to
  ).
).
 Click Units & Rulers.
The Units & Rulers options appear.
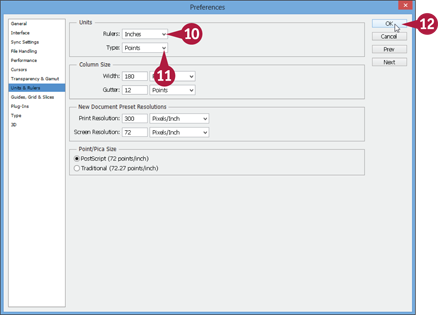
 Click here (
 ) to select the units for the window rulers.
These units become the default units selected when you resize an image.
 Click here (
 ) to select the default units for type.
 Click OK.
Photoshop sets preferences to your specifications.
Save a Workspace
You can position the different Photoshop panels, define keyboard shortcuts, customize your menus, and then save the arrangement as a workspace. This can be helpful if you work on various types of Photoshop projects that require the use of different tools and commands. You can access the different workspaces that you have saved in the Window menu.
Save a Workspace
Save a Workspace

 Arrange the Toolbox and panels in the Photoshop interface.
To define keyboard shortcuts or customize menus, click Edit and then Keyboard Shortcuts or Menus. See Chapter 13 for more information.

 Click Window.
 Click Workspace.
 Click New Workspace.
The New Workspace dialog box opens.

 Type a name for your workspace.
A If you defined keyboard shortcuts or customized menus, select these options ( changes to
  ).
).
 Click Save.
Photoshop saves the workspace.
Select a Workspace
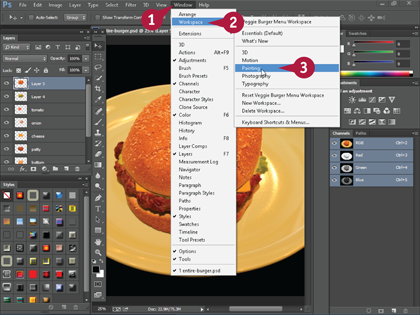
 Click Window.
 Click Workspace.
 Click a workspace.
You can choose a workspace you have defined previously or one of Photoshop’s predefined workspaces.
Photoshop rearranges the workspace.
Open an Image
You can Open an Image in Photoshop to modify it or to use it in a project. After you open the photo, you can adjust its color and lighting, add special effects, and move objects in the photo to separate layers.
You can open more than one photo at a time. You can switch between photos using the title tabs. For information about managing image windows after you open them, see Chapter 2.
Open an Image
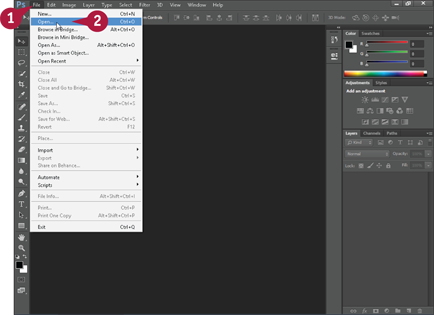
 Click File.
 Click Open.
The Open dialog box appears.
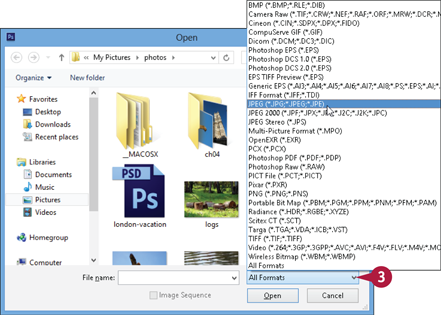
 Click here (
 ) to choose the type of files to display in the window.
All Formats is the default and displays all image and nonimage formats.
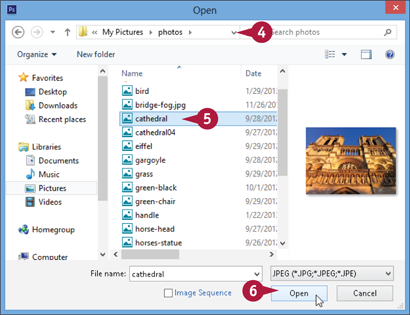
 Click here (
 ) to browse to the folder that contains the image you want to open.
 Click the image you want to open.
 Click Open.
Photoshop opens the image in a window.

A The filename appears in a title tab.
You can specify that images open in floating windows instead of with tabs in the Interface preferences.
Note: For more on preferences, see the section Set Preferences.
Browse for an Image in Bridge
You can open an existing image file by using the Adobe Bridge file browser. Bridge offers a user-friendly way to find and open your images.
In Bridge, you can also add descriptive information to your images and sort them. See the sections that follow in this chapter for more information.
Browse for an Image in Bridge
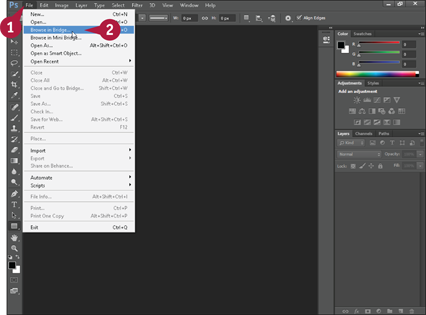
 Click File.
 Click Browse in Bridge.
The Bridge file browser opens.

 Click the Folders tab.
 Click
Click  to open folders on your computer (
 changes to
  ).
).
 Click a folder on your computer to browse.
The folders and files inside the folder appear.

 Click an image.
A A preview and information about the image appear.
In this example, the right panel has been widened slightly to show more image information.
 Double-click the image file to open it.
The image opens in Photoshop.

Sort and Filter Images in Bridge
You can sort your images by filename, date, file size, dimensions, and other characteristics in Bridge. This can be helpful when you are dealing with hundreds or thousands of images in a collection and need to find a particular image quickly. You can also filter the information displayed in Bridge, specifying that it show only images with a particular rating or label.
Sort and Filter Images in Bridge
Sort Images
 Open Bridge.

 Click a folder to display its contents.
Note: For more, see the previous section, “Browse for an Image in Bridge.”
 Click View.
 Click Sort.
 Click a category by which to sort.

A Bridge sorts the images.
B You can also sort images by using the Sort By menu.
Filter Images

 Click a category by which to filter your images (
 changes to
  ).
).
Photoshop displays filter options for the category.
Note: For more on applying ratings, labels, and other categories, see the previous section, “Browse for an Image in Bridge.”

 Click a filter option.
C Bridge filters the images, hiding irrelevant ones.
D A check mark appears next to the clicked filter option.
E You can filter by a rating by clicking Filter Items by Rating ( ).
).
Display a Slide Show in Bridge
You can view a set of images in a folder as a slide show in Bridge. You can control the cycling of the slide show images by using keyboard commands.
Display a Slide Show in Bridge
 Open Bridge.
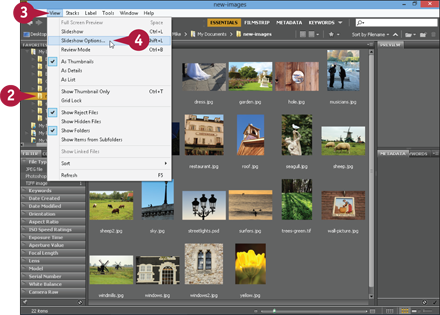
 Click a folder containing the slide show images.
Note: For more, see the section Browse for an Image in Bridge.
 Click View.
 Click Slideshow Options.
The Slideshow Options dialog box opens.
You can specify the duration between slides, alignment, and other settings.
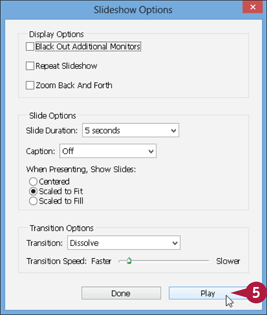
 Click Play to open the first slide.
Note: On a Mac, the position of the Play and Done buttons is reversed in the Slideshow Options dialog box.
Bridge starts the slide show and cycles through the photos in the selected folder.

A You can press  to pause and resume the slide show.
The sort order in Bridge determines the order of the photos.
Note: See the previous section, “Sort and Filter Images in Bridge,” for more.
 Press
Press  .
.

B Bridge displays the slide show keyboard commands.
 Press
Press  .
.
The slide show ends.
Import Images from a Camera in Bridge
You can import images from a digital camera into a folder on your computer using Photoshop. After the import, you can browse and manage the images in Bridge and open them in Photoshop for editing. Most cameras today connect to a computer through a USB port. A typical PC or Mac comes with multiple USB ports. Make sure the device is properly connected before you begin.
On most Macs, the default behavior when connecting a camera is to import photos into iPhoto. You can change this behavior in the iPhoto preferences or in the Image Capture preferences.
Import Images from a Camera in Bridge
 Open Bridge.
Note: For more, see the section Browse for an Image in Bridge.

 Click the Get Photos from Camera button (
 ).
).
The Photo Downloader dialog box appears.
 Click here (
 ) to choose your camera.
By default, Bridge downloads your photos into dated subfolders inside your Pictures folder. The dated subfolders are based on the time stamp associated with each photo.
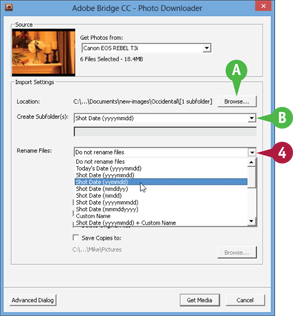
A You can click Browse to select a different download location.
B You can click here ( ) to choose a different naming scheme for the subfolders.
 Click here (
 ) to choose a naming scheme for your files.
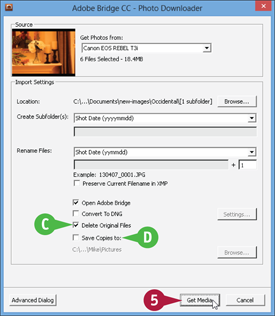
C You can click this option to delete the photos from the camera after downloading ( changes to
  ).
).
D You can click this option to save copies of the imported files to another location ( changes to
  ). This can be useful for archiving.
 Click Get Media.
Bridge downloads the photos from the camera.
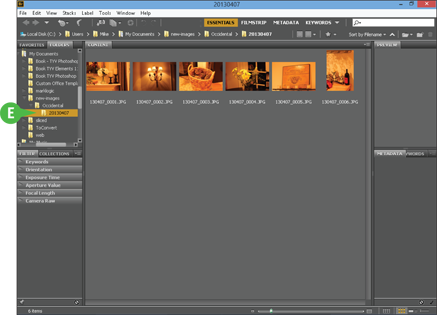
E To view the photos, select the download location under the Folders tab.
Note: For more information, see the section Browse for an Image in Bridge.
Create a New Image
You can start a Photoshop project by creating a blank image and then adding photographic, textual, and other content to it. When you create a blank image, you specify the dimensions and the resolution. Photoshop offers a number of useful preset sizes, including common paper sizes. For more about choosing a resolution, see Chapter 3.
You can add content from other images to your blank image as separate layers. For more on layers, see Chapter 8. You can also use the Brush tool to add streaks of color. See Chapter 6 for information about using and customizing the Brush tool.
Create a New Image
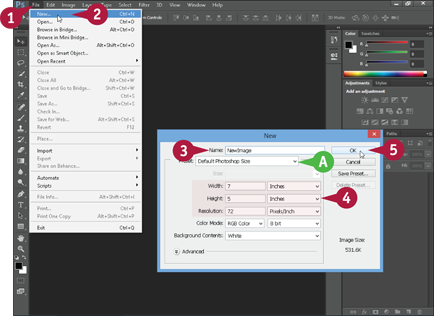
 Click File.
 Click New.
The New dialog box opens.
 Type a name for the new image.
A You can click here ( ) to choose a preset image size.
 Type the dimensions and resolution you want.
Note: For more on dimensions and resolution, see Chapter 3.
 Click OK.
Photoshop creates a new image window at the specified dimensions.

B The image name appears in the title tab.
 Use Photoshop’s tools and commands to create your image.
Note: To learn how to save your image, see Chapter 14.
Exit Photoshop
You can exit Photoshop after you finish using the application. Before exiting, Photoshop alerts you to any open images that have unsaved changes so you can save them.
When you start the application again, it opens with the same Toolbox and panel arrangement as you had when you exited. For more about customizing a workspace, see the section Save a Workspace.
Exit Photoshop
Exit Photoshop on a PC
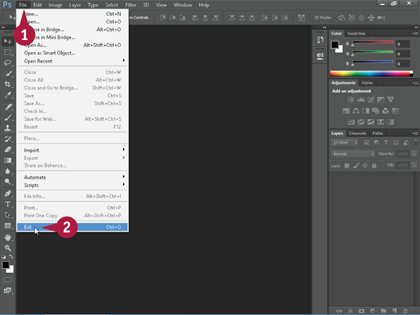
 Click File.
 Click Exit.
Photoshop closes.
Before exiting, Photoshop alerts you to any open images that have unsaved changes so you can save them.
Note: See Chapter 14 to learn how to save image files.
Exit Photoshop on a Mac
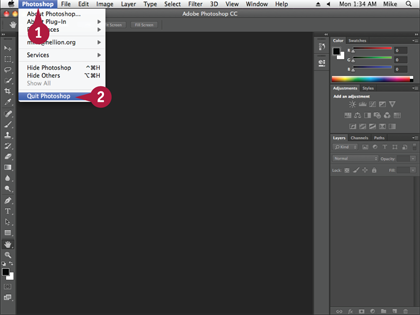
 Click Photoshop.
 Click Quit Photoshop.
Photoshop closes.
Before exiting, Photoshop alerts you to any open images that have unsaved changes so you can save them.
Note: See Chapter 14 to learn how to save image files.

