Part Three
Stopper Knots
Stopper knots are “true knots”—structures tied within the rope itself and not to anything else. Most often tied at the end of a rope, stopper knots get their name from their common function of stopping a rope from running out through a small opening through which they pass, such as a pulley block, a fairlead on a boat, or a grommet on a tarp. Other common uses are to form “knobs” on the rope that can be easily held or pulled, or to add weight to the end so that it can be thrown.
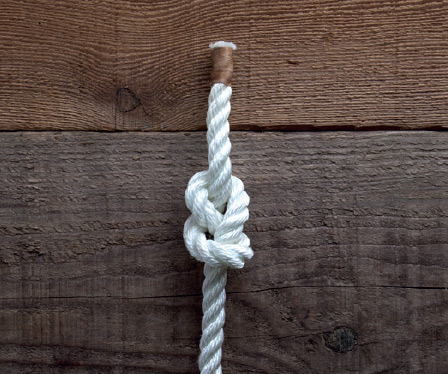
9., 10. Figure 8 Knot (and alternate method)
Uses: stopper for sailboat sheets, fender pennants, tarp guylines; handhold
Pros: quick and easy to tie and untie; reduction of rope strength is small
Cons: will not stop a hole larger than Overhand Knot
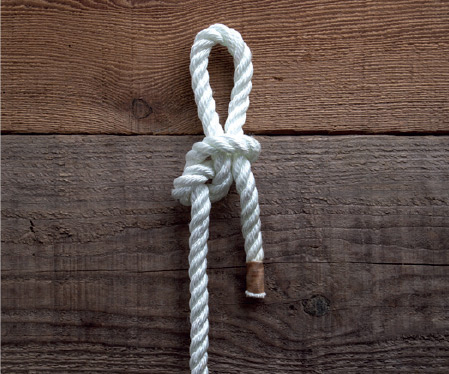
Uses: stopper that can be quickly untied to pull through an opening
Pros: quick and easy to tie; nearly instantaneous to untie
Cons: will not stop a larger hole than Overhand Knot
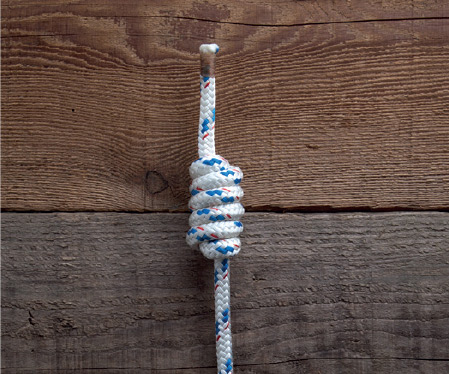
12. Stopper Knot
Uses: stopper, handhold, heaving line
Pros: large, comfortable, attractive; easy to tie
Cons: only good for medium diameter rope; smaller and lighter than a Heaving Line Knot; can create kinks
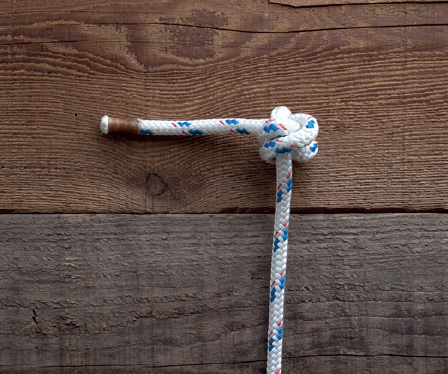
Uses: stopper, especially in thinner rope
Pros: stops larger holes than many other stopper knots
Cons: very difficult to untie
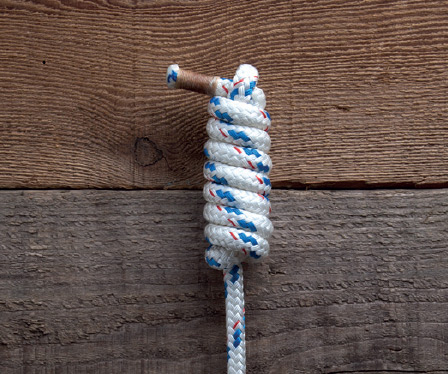
Uses: add weight to the end of a heaving line
Pros: adjustable for size and weight; works with any size cordage
Cons: time-consuming

16. Monkey’s Fist
Uses: add weight to the end of a heaving line; decorative pulls
Pros: easily thrown; weight adjustable with different cores
Cons: complicated and time-consuming
9. Figure 8 Knot
Also known as: Figure of 8 Knot, Flemish Knot
One of the most common and most useful stopper knots, the Figure 8 is simple to tie and remember. It is frequently used to prevent lines from running through small openings, and though it is not much bigger than an Overhand Knot, it is easily untied. It is the basis for a whole family of related knots.
Instructions
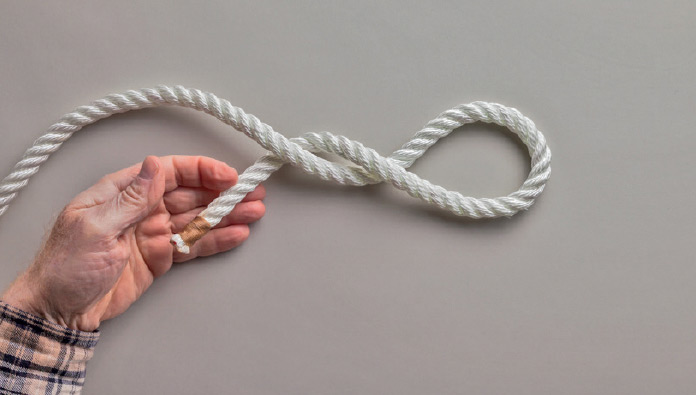
1. Make an overhand crossing turn, then pass the working end back under the standing part.
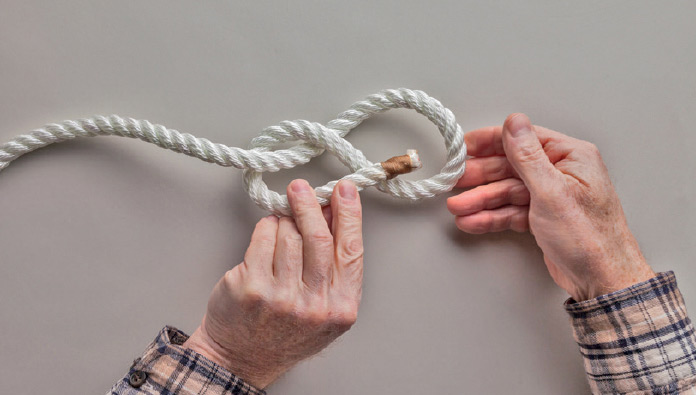
2. Bring the working end forward and over the upper strand of the crossing turn.

3. Pass the working end through the crossing turn.
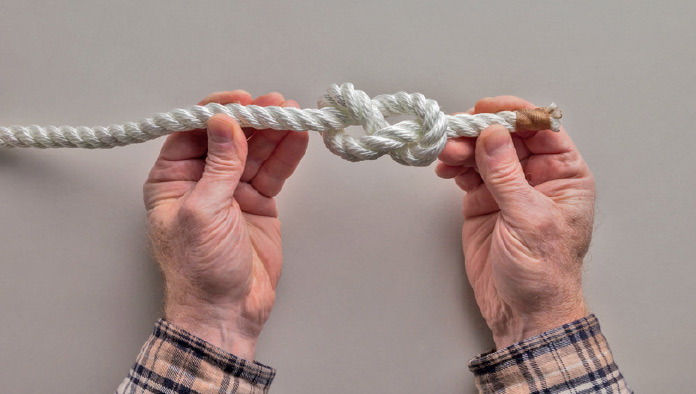
4. Pull both ends to tighten.
10. Figure 8 Knot—Alternate Method
Also known as: Figure of 8 Knot, Flemish Knot
This is simply a different way to manipulate the rope when tying the Figure 8 Knot (opposite). The finished knots are identical. You may or may not find it easier to use, but it’s included to illustrate how different knotting procedures can achieve the same ends.
Instructions
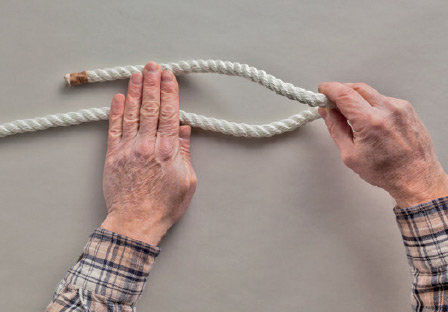
1. Make a bight near the working end of the rope. Grab the end of the bight and begin to twist it around the standing part.

2. Continue twisting so that the working end crosses over the standing part.

3. Continue twisting. A second crossing turn will begin to form.

4. After twisting the bight a full 360 degrees, the working end crosses under and over the standing part.
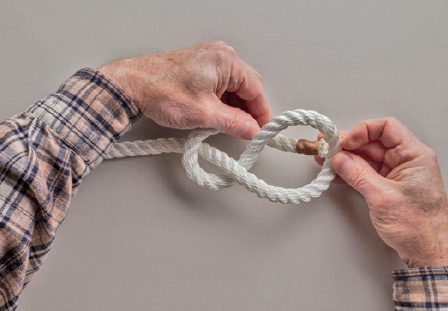
5. Pass the working end through the first crossing turn (i.e., the bight) from back to front. Pull both ends to tighten.
11. Slipped Figure 8 Knot
Also known as: Figure of 8 Knot or Flemish Knot with a Drawloop
As easy as it may be to untie a Figure 8 Knot, placing a drawloop in the working end to “slip” it makes it easier and quicker still.
Instructions
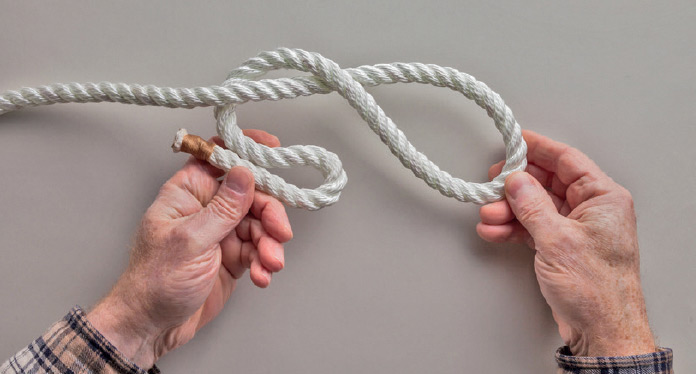
1. Make an overhand crossing turn, pass the working end back under the standing part, and form a bight in the working end.
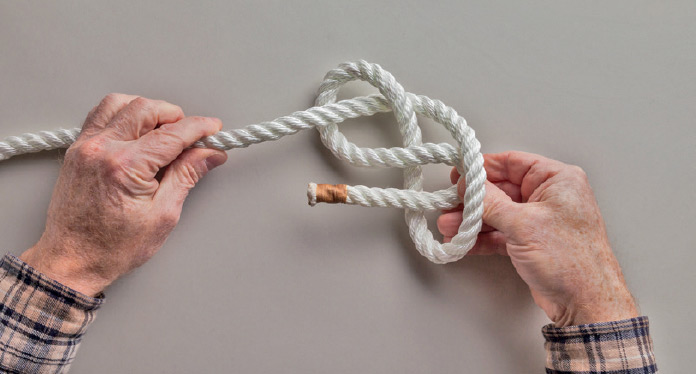
2. Bring the bight forward and partway through the crossing turn from front to back.
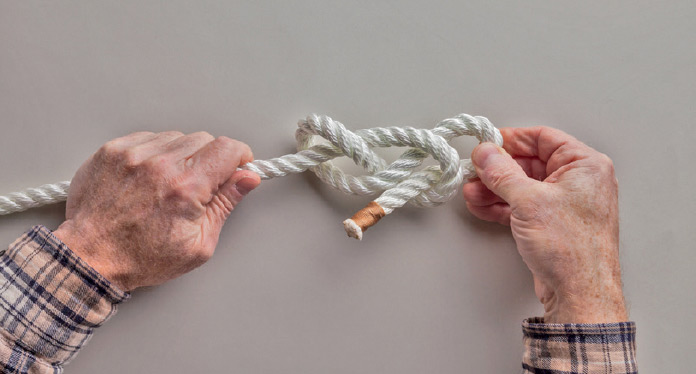
3. Pull the bight and the standing part, being careful not to pull the working end through the first crossing turn.
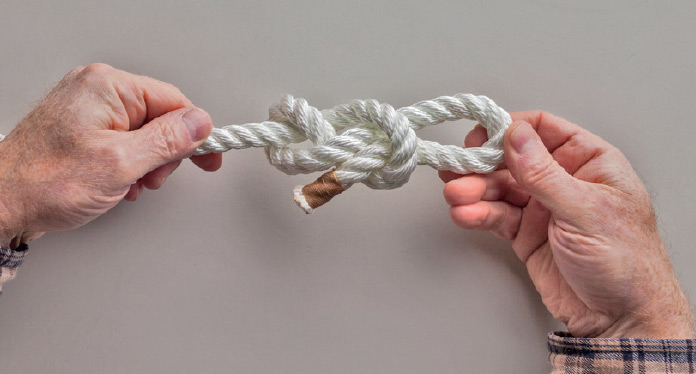
4. Continue pulling the bight and the standing part to tighten.
12. Stopper Knot
This specific stopper knot is named the Stopper Knot. It will stop a hole bigger than an Overhand or Figure 8 Knot, makes an attractive and comfortable “handle” at the end of a rope, and adds enough weight so that the end of the rope can be thrown.
Instructions
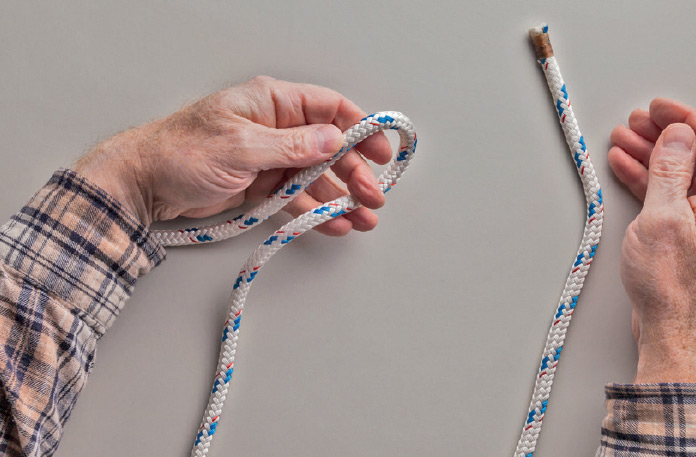
1. Form a bight around one or two fingers, leaving a long working end.
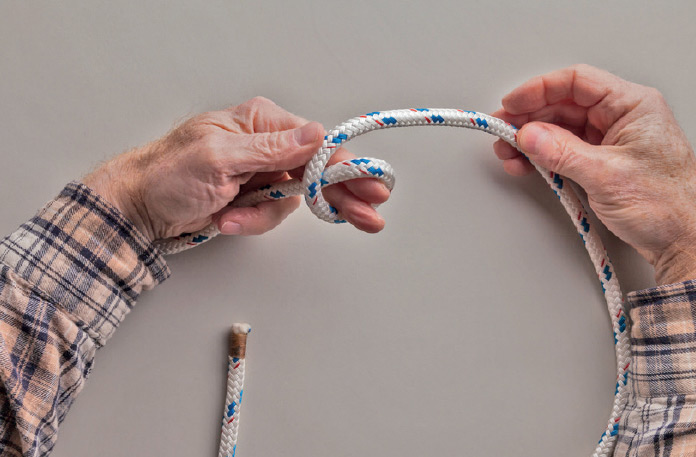
2. Bring the working end over the standing part, forming a crossing turn around your fingers.
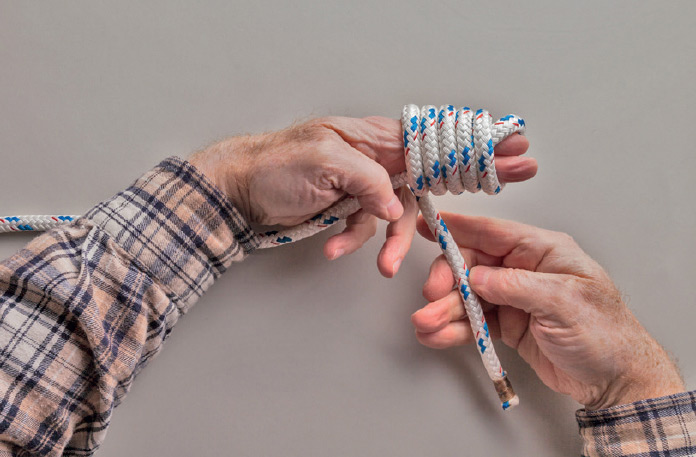
3. Continue wrapping the working end around your fingers, working toward the standing part. Make at least five round turns.
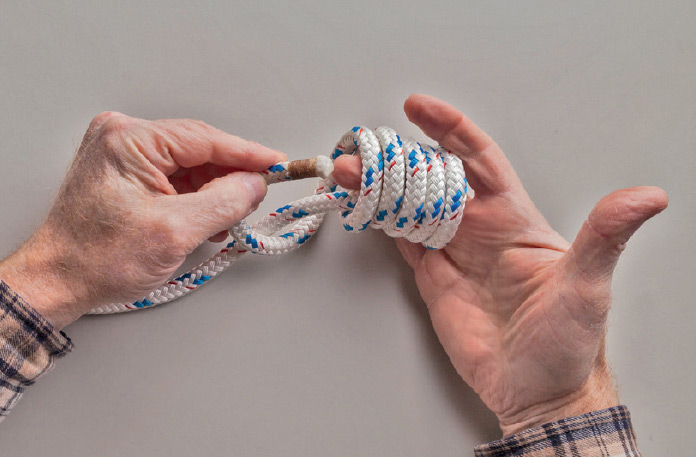
4. Slip the coil onto the fingers of your opposite hand, being careful that it doesn’t fall apart. Take a final turn with the working end around the standing part, then pass it up through the coil along your restraining fingers.
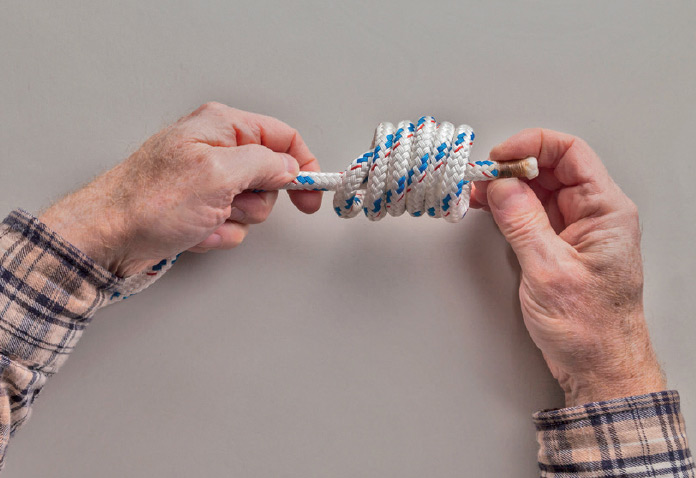
5. Pull the working end through.
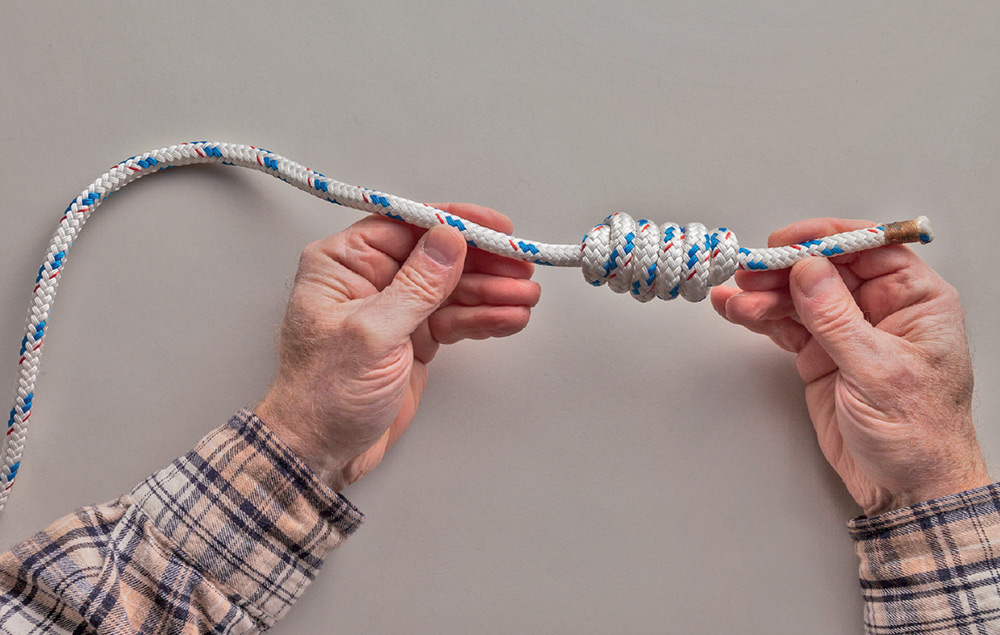
6. Pull both ends. The round turns will need to be worked into shape for a faired knot.
13. Sink Stopper Knot
This stopper knot is larger than Overhand or Figure 8 Knots and will stop a rope through a significantly larger hole, but it’s shorter and less obtrusive than the Stopper Knot.
Instructions
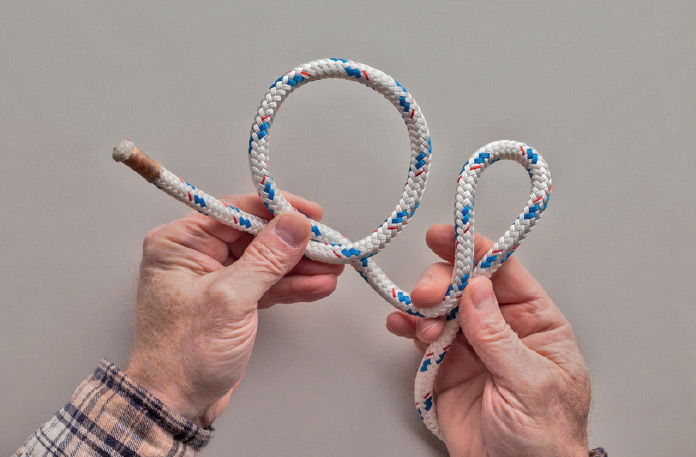
1. Make a counterclockwise overhand crossing turn. Form a bight in the standing part.
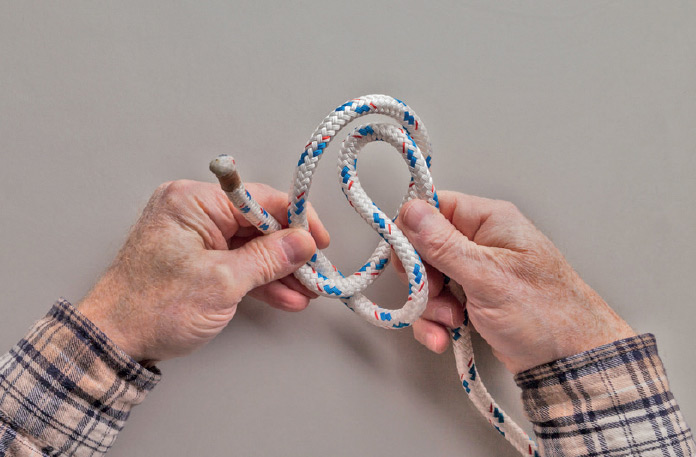
2. Pass the bight into the top of the crossing turn.
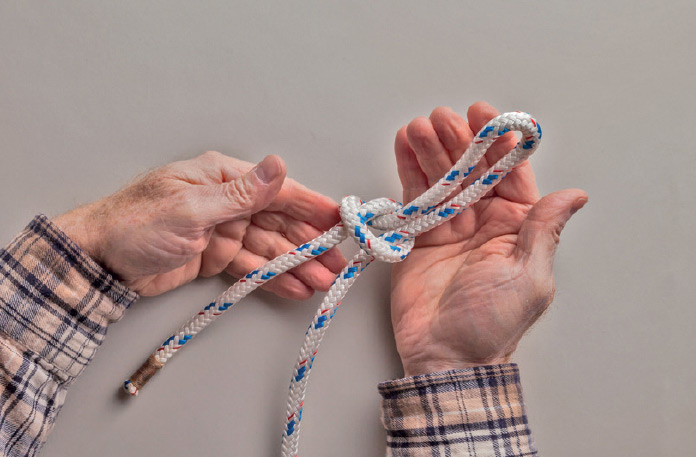
3. Pull the bight through to form a Slipped Overhand Knot.
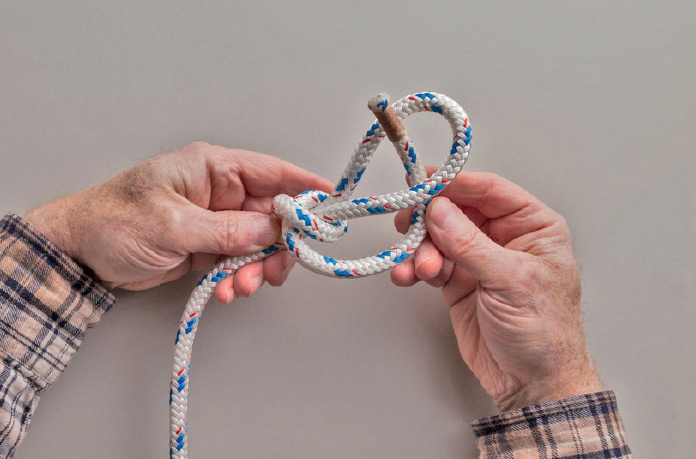
4. Pass the working end across the front of the standing part and through the back of the drawloop.
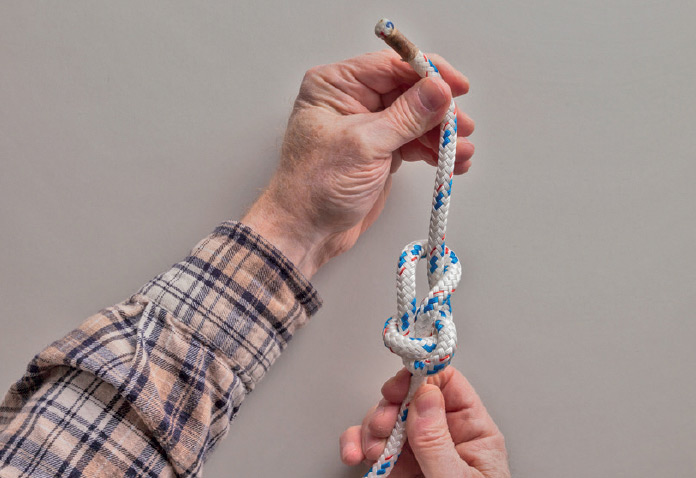
5. Pull both ends to tighten.
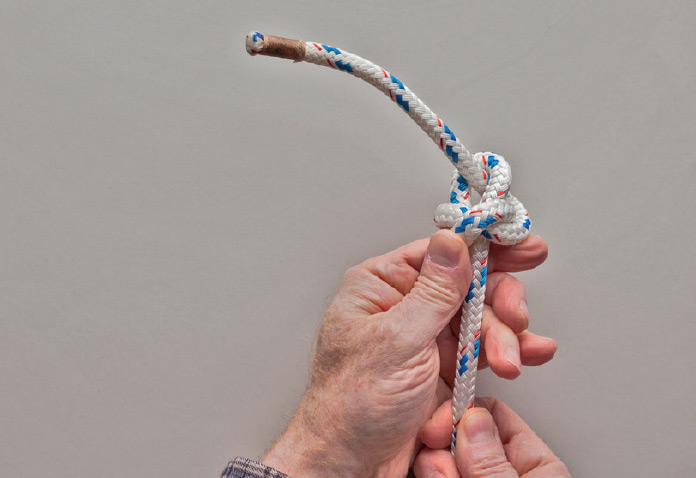
6. Push the knot up from the standing part to fair it.
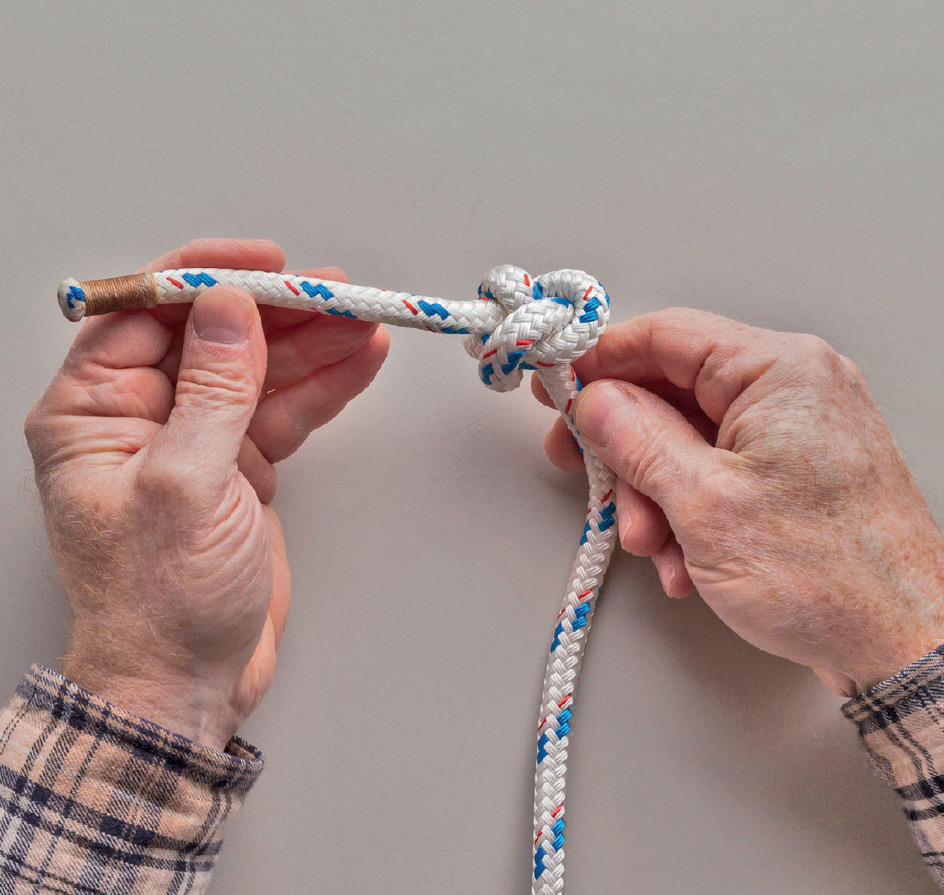
7. The finished knot.
14. Stevedore Knot
Also known as: Stevedore’s Knot
Before cargo was shipped in containers, stevedores unloaded ships with a block and tackle. If the end of a rope slipped through a pulley block, precious time was lost and cargo could come crashing down—hence the need for an effective stopper knot. The Stevedore Knot will stop a hole larger than a Figure 8 Knot but not as large as a Sink Stopper Knot.
Instructions
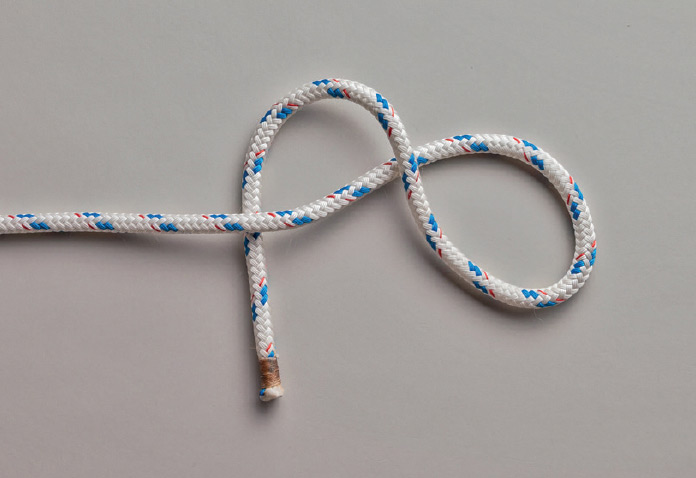
1. Make a clockwise overhand crossing turn and pass the working end back under the standing part, like the first steps in a Figure 8 Knot.
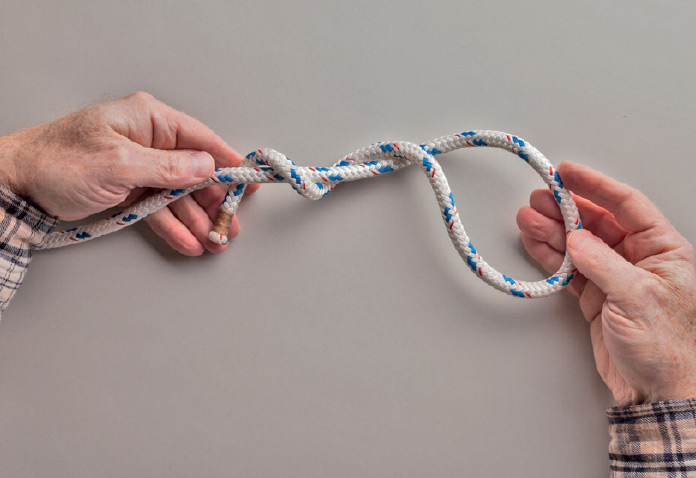
2. Wrap the working end in a round turn around the standing part.
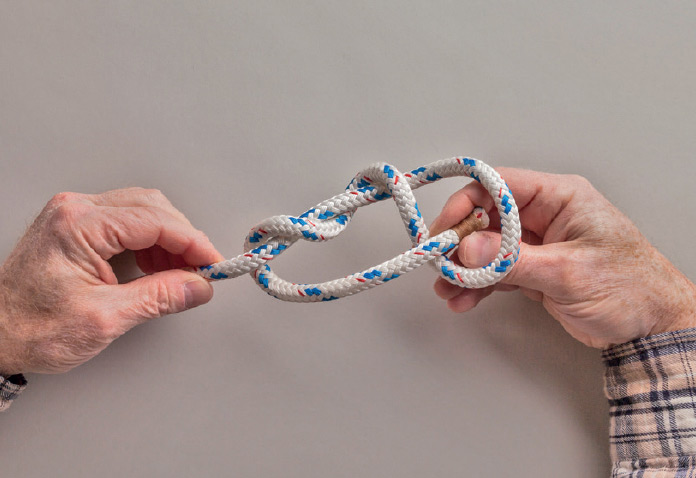
3. Bring the working end forward and pass it through the top of the crossing turn.
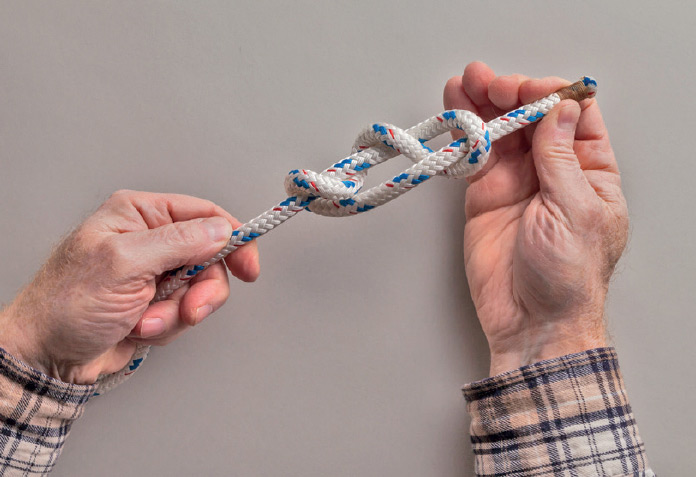
4. Pull both ends to begin tightening.
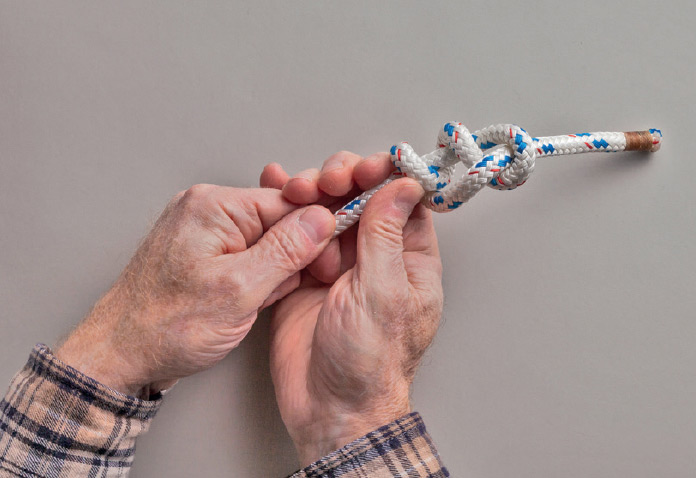
5. Push the knot up from the standing part to fair it.

6. The finished knot.
15. Heaving Line Knot
Also known as: Franciscan Knot
With numerous round turns, the Heaving Line Knot is reminiscent of the Stopper Knot. Both can add weight to the end of a rope so that it can be thrown, but the methods of tying are different, and the Heaving Line Knot can be made much larger by adding round turns. It can be made wider as well, by adding two or four additional, slightly shorter bights before beginning the round turns.
Instructions
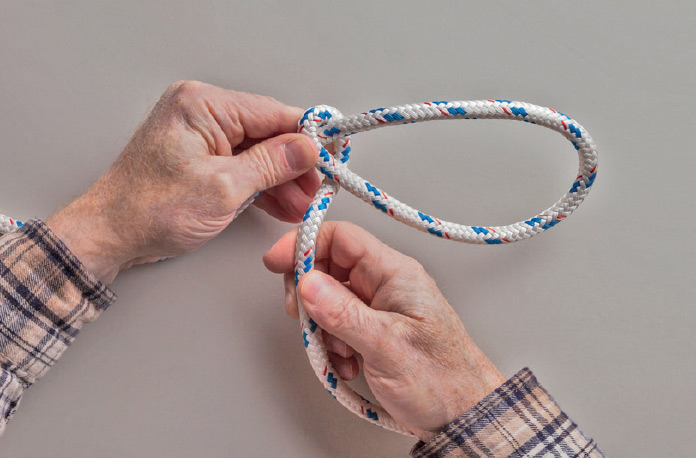
1. Make a clockwise overhand crossing turn and pass the working end back under both strands of the turn.
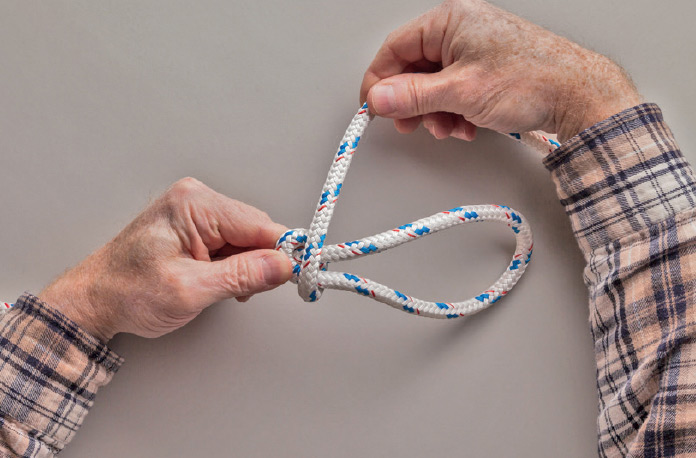
2. Begin wrapping the working end up toward the bight that is formed.
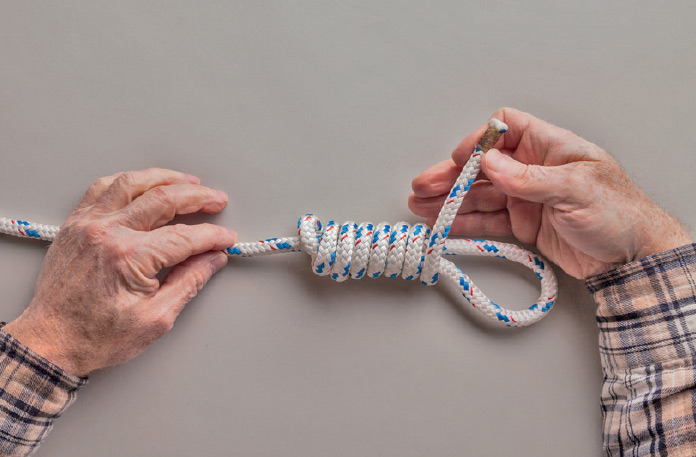
3. Make as many round turns around the bight as the working end allows while leaving a few inches to work with.
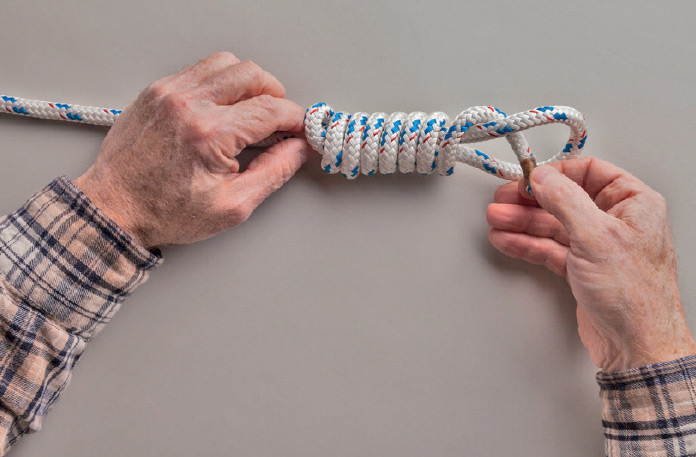
4. Pass the working end through the bight.
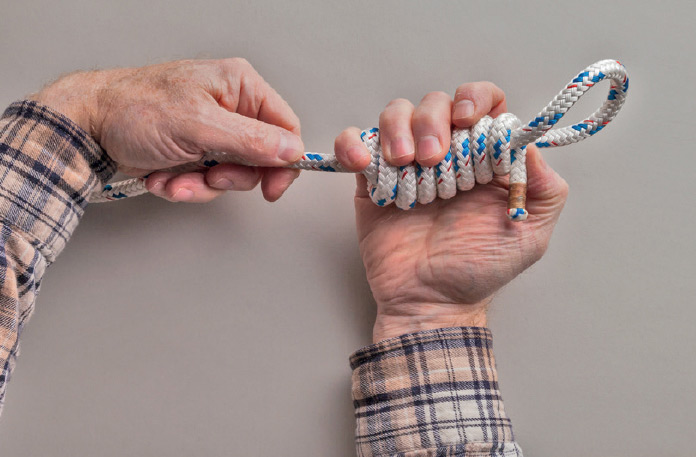
5. Holding the working end against the last round turn, begin pulling the standing part through the coil.
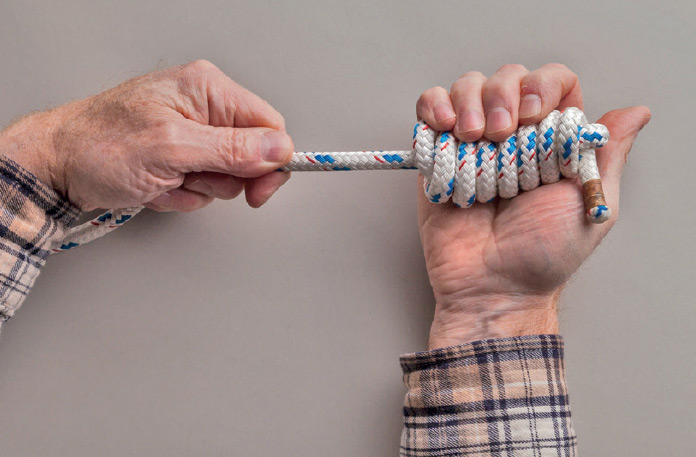
6. Keep pulling until the bight tightens over the working end, locking it in place.
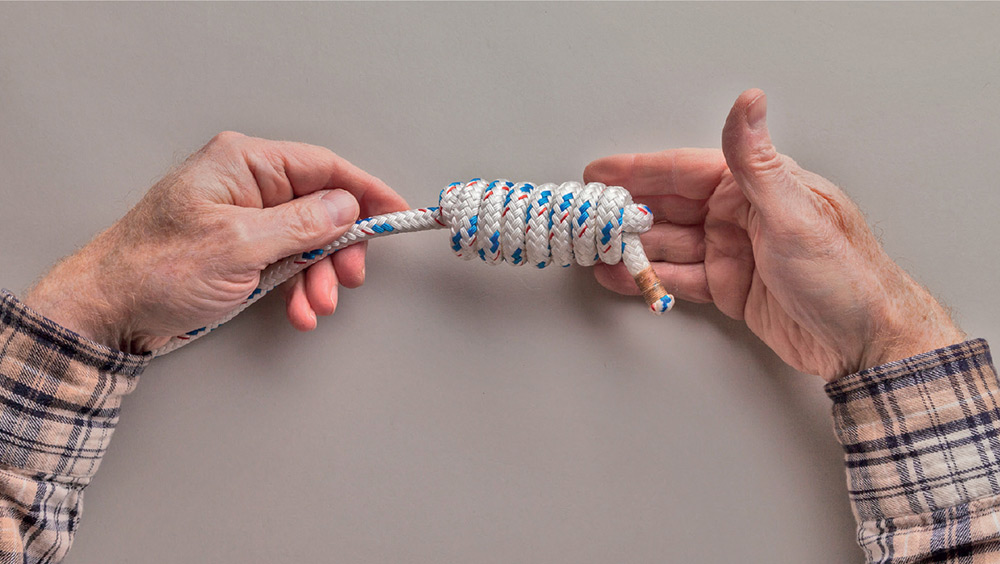
7. The finished knot.
16. Monkey’s Fist
This practical, nearly spherical heaving line knot is so attractive that some folks make tiny decorative versions as key fobs or zipper pulls. It’s designed to hold a weight in its core so that it can be thrown farther, but it uses enough rope so that it works pretty well even with lightweight cores like a ball of aluminum foil. For more weight, use a round stone, a wooden sphere, or a steel ball, but be careful not to hit the recipient with such a heavy knot.
Instructions
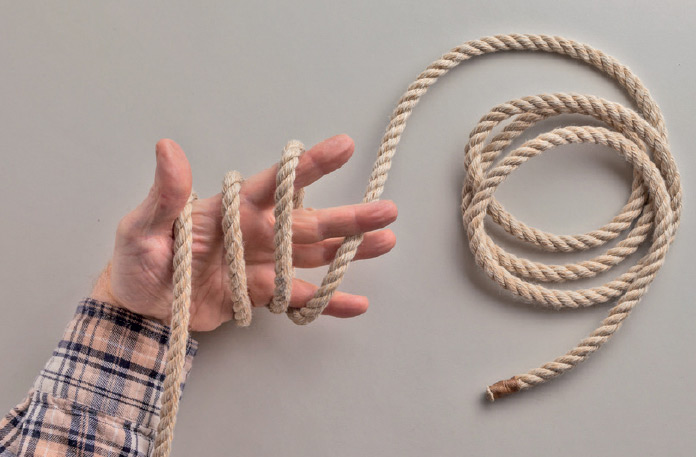
1. Leaving a long working end, make three round turns around your non-dominant hand, working from the wrist toward the fingertips.
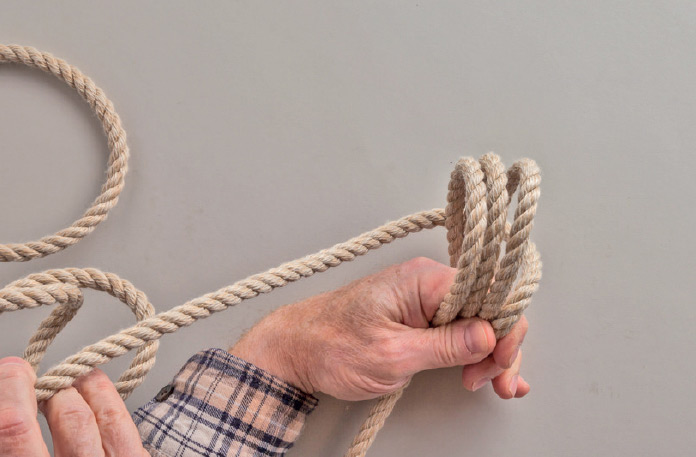
2. Pass the working end around the back of the round turns.

3. Make three round turns at right angles to the first set of round turns, working from bottom to top.
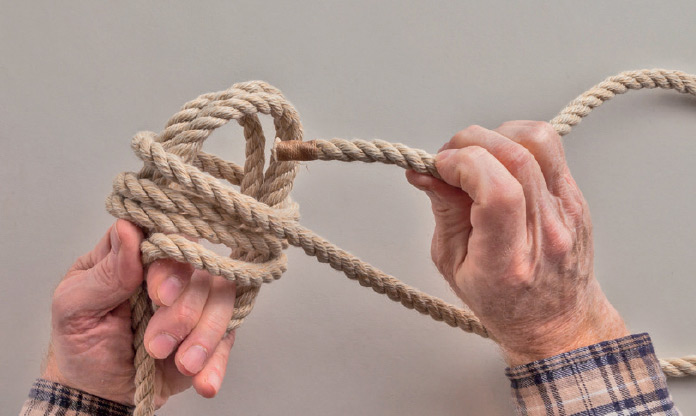
4. Pass the working end through the first set of round turns from front to back.
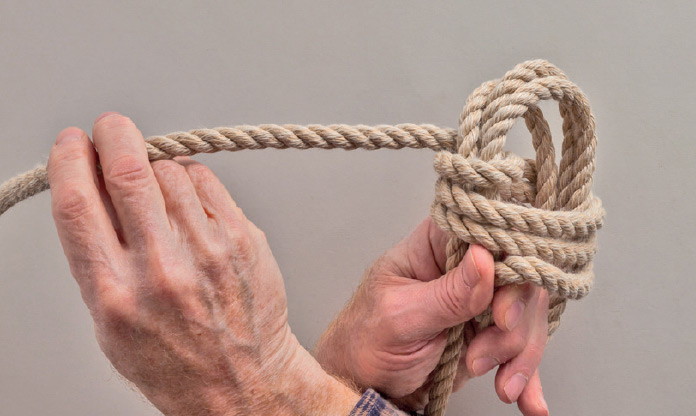
5. The working end will now encircle the strands on one side of the first set of round turns, above the second set of round turns. Don’t pull it tight! The round turns must remain parallel to one another.
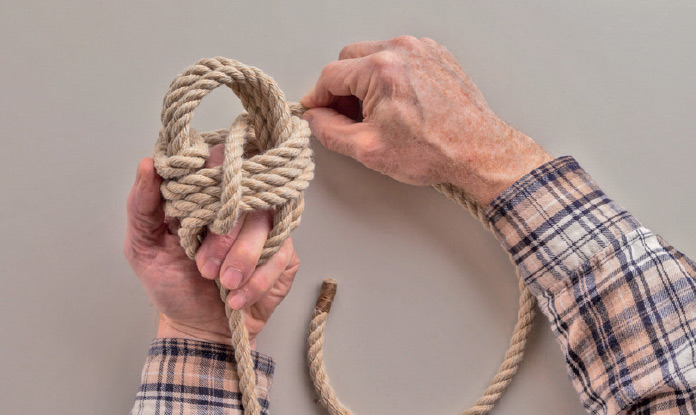
6. Working inside the first set of round turns, pass the working end under the second set of round turns from back to front, and then bring it over the second set of round turns from front to back.
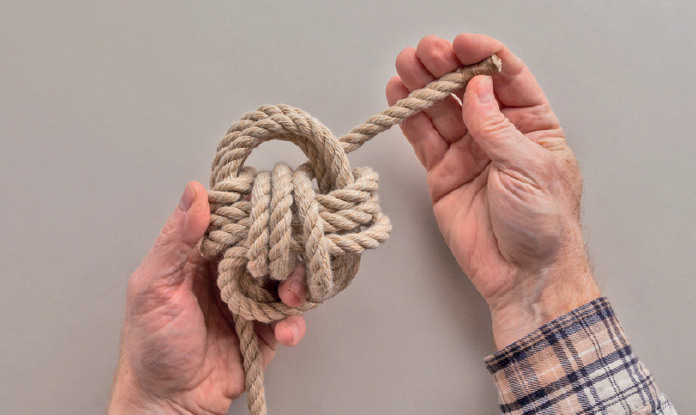
7. Make three round turns around the second set of round turns and inside the first set of round turns, keeping everything fairly loose.
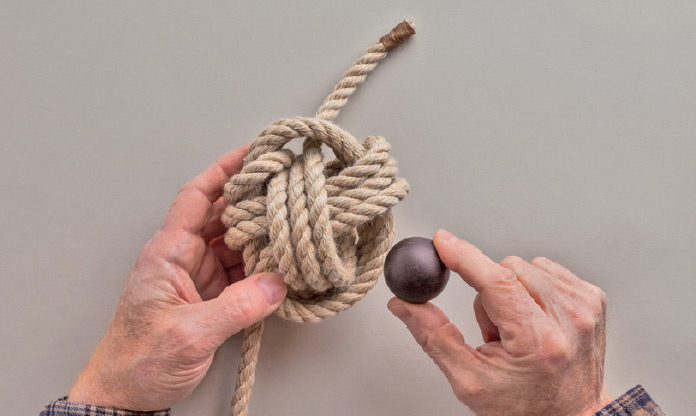
8. Place a sphere into the hollow center of the knot.
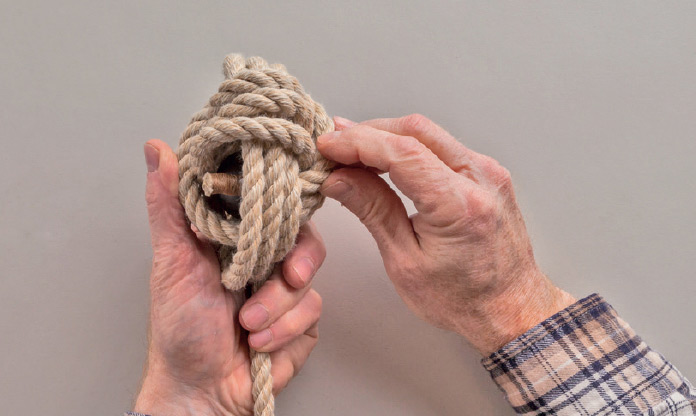
9. Tuck the bitter end under the first set of round turns. (Alternately, leave a long working end and seize it to the standing part when the knot is complete. See Seizing.
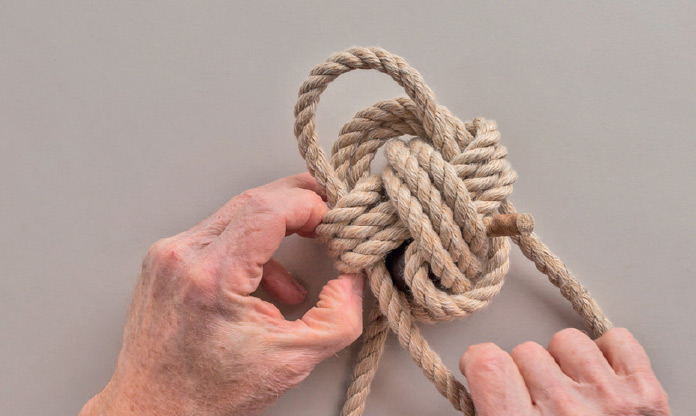
10. Keeping the bitter end in place, tighten the knot by pulling out the slack one round turn at a time, starting at the bitter end and working all the way back to the standing part.
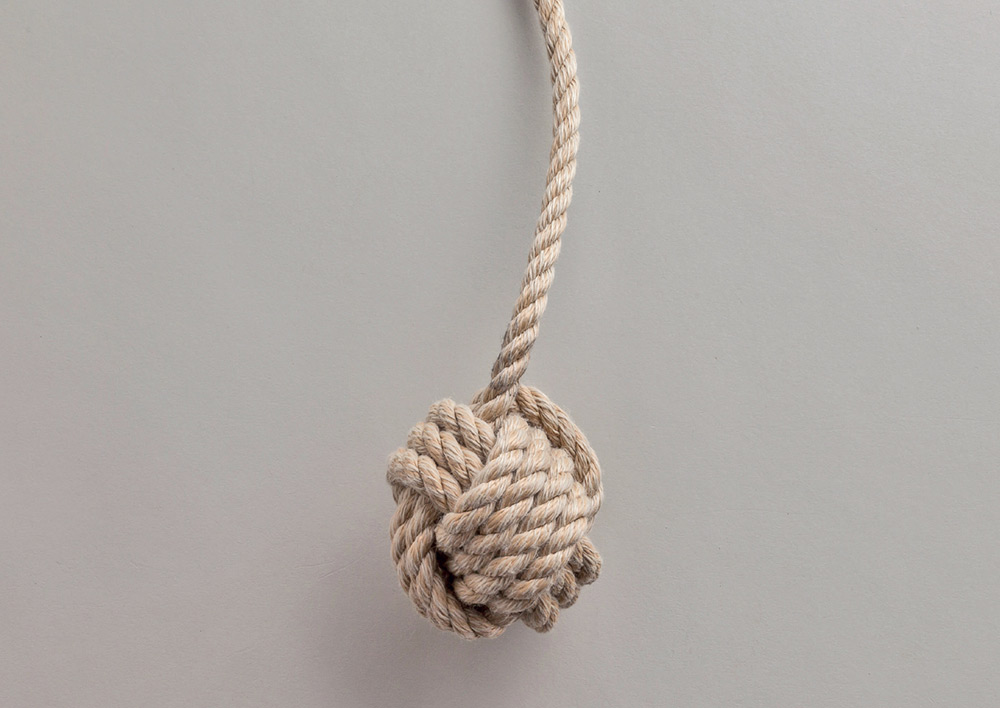
11. The finished Monkey’s Fist.
