Part Five
Loop Knots
Loop knots are easy enough to understand, but difficult to define precisely. Like hitches, they are tied to fit around objects (or people), but they are not intended to bind objects together (that’s the job of binding knots). Loop knots may be tied at the end of a rope or anywhere along its length (on a bight). They may be of a fixed size or they may be adjustable. Unlike a hitch, which is tied on an object and depends upon that object for its structure, loop knots may be tied in the rope itself and then placed on the object when finished. Loop knots are useful for lifting and pulling objects and, in the form of a safety harness or bosun’s chair, to lift or secure people as well. (Observe all safety recommendations in this book when using rope for these purposes.) A pair of interconnected loop knots can also be used in place of a bend to make a strong and durable connection between the ends of two ropes.

Uses: lifting, hauling, hanging gear from doubled line
Pros: easy to tie; works well with small stuff
Cons: difficult to untie; only appropriate on a bight

27. Figure 8 Loop
Uses: lifting, pulling, hanging loop for gear; tie-in point for climbers
Pros: easy to tie in rope of any thickness; fairly easy to untie; very strong
Cons: not as easy to untie as a Bowline

Uses: lifting, pulling, hanging loop for gear; belaying climbers
Pros: very strong and secure
Cons: fussy to tie
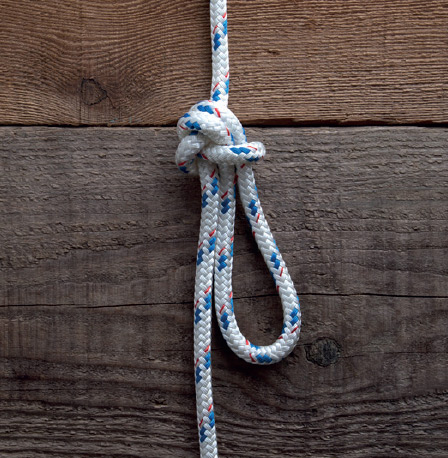
Uses: climbing, lifting, load bearing
Pros: easily tied; very strong
Cons: will slip if loaded in wrong direction; dangerous to careless users; hard to untie
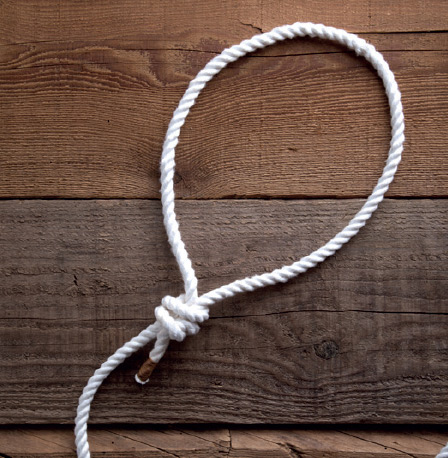
30. Fisherman’s Loop
Uses: general-purpose tie-off or hanging point; fishing tackle
Pros: easy to tie; relatively secure
Cons: hard to make with a small loop; difficult to untie in small stuff; may slip

31. Double Overhand Sliding Loop
Uses: fishing, general-purpose noose
Pros: easy to tie; works well with small stuff; tightens easily
Cons: difficult to untie
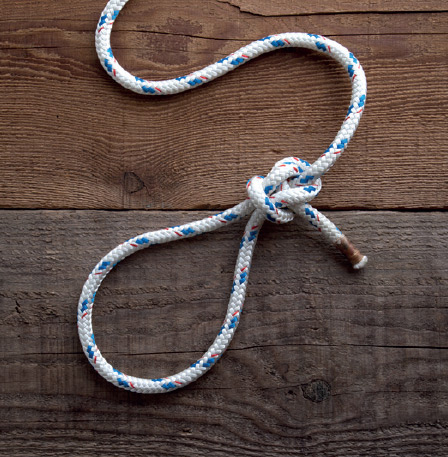
32. Angler’s Loop
Uses: fishing leaders, tippets and hooks, loops in bungee cord
Pros: holds well in any material
Cons: very difficult to untie; hard to fair and tighten in heavy rope
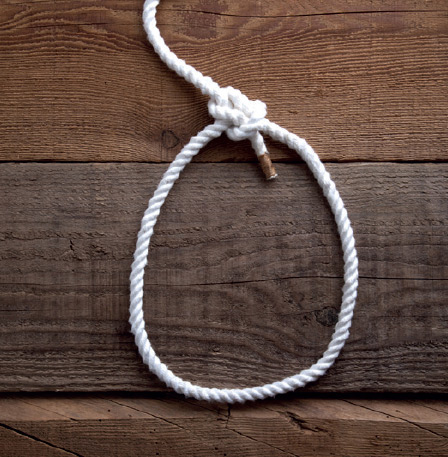
33. Bowline
Uses: lifting, connecting rope ends, sail-to-sheet connections, docklines
Pros: secure under load; easy to tie and untie
Cons: can capsize if not loaded; not the most secure form of bowline

Uses: lifting, personal safety, connecting rope ends; sail-to-sheet connections, docklines
Pros: more secure than standard Bowline; controls excessively long working end
Cons: more time-consuming than standard Bowline

Uses: general lifting, personal safety, connecting ends of two ropes, sail-to-sheet connections, docklines
Pros: secure; easy to tie, easy to untie
Cons: can capsize and slip; not the most secure form of bowline

36. Dutch Bowline
Uses: lifting large, heavy loads
Pros: working end is on outside of loop, unlike standard Bowline
Cons: less secure than standard Bowline
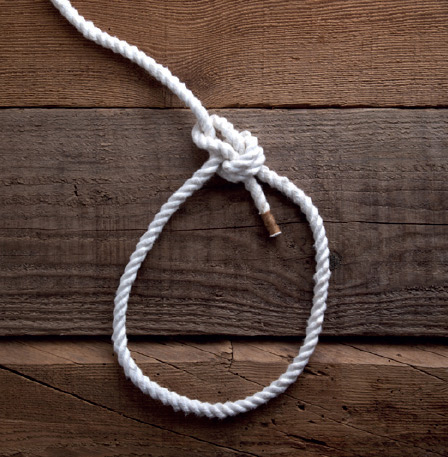
Uses: general lifting, climbing, personal safety
Pros: very secure, easy to untie
Cons: bulkier than standard Bowline; requires more rope

38. Water Bowline
Uses: general lifting and pulling, safety; docklines, especially in wet, slippery rope
Pros: extremely secure
Cons: uses more rope, trickier to tie than regular Bowline
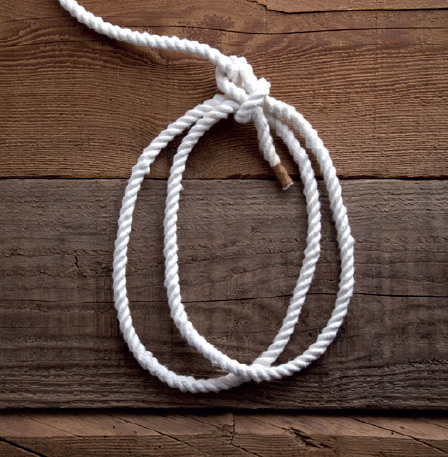
Uses: lifting large, heavy loads
Pros: secure, adjustable size loops, unties readily
Cons: loops can shift
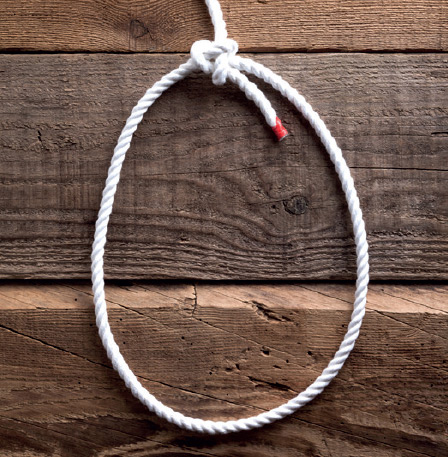
40. Eskimo Bowline
Uses: lifting, pulling, safety; may be used as a hitch
Pros: very secure, especially in slippery rope
Cons: tricky to tie and fair

Uses: lifting, hauling, safety, climbing
Pros: very secure and strong, easy to untie, can use one or both loops
Cons: insecure if both standing parts are not loaded
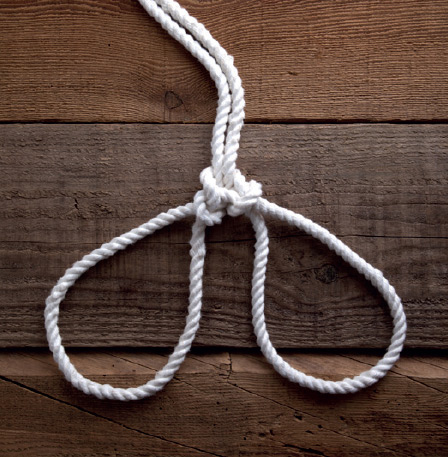
42. Spanish Bowline
Uses: lifting large heavy loads, bosun’s chair, or rescue harness
Pros: loops will not shift under load
Cons: difficult to tie with loops of unequal size

43. Alpine Butterfly
Uses: mid-rope tie-off point, purchase for tightening a line
Pros: easy and quick to tie; suitable for loads in either direction
Cons: only useful on a bight; awkward to tie large loops
26. Double Overhand Loop
Also known as: Overhand Loop, Loop Knot, Double Overhand Knot on a Bight
As easy to tie as a Double Overhand Knot, to which it is very closely related, the Double Overhand Loop shares the liability of most overhand knots in being difficult to untie. It is one of the easiest ways to form a loop on a bight, and fairly attractive withal.
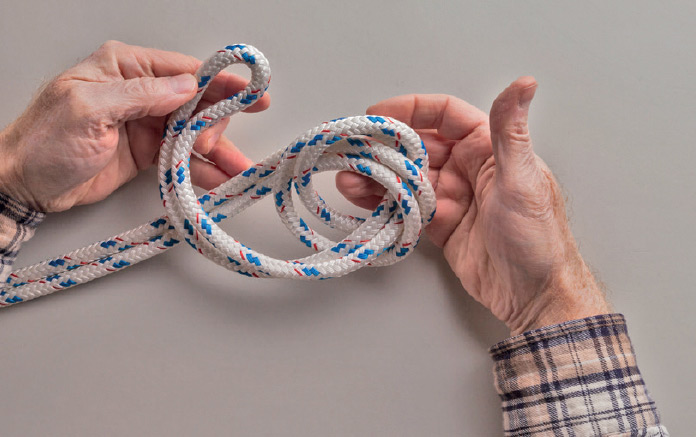
2. Bring the bight around the standing parts.
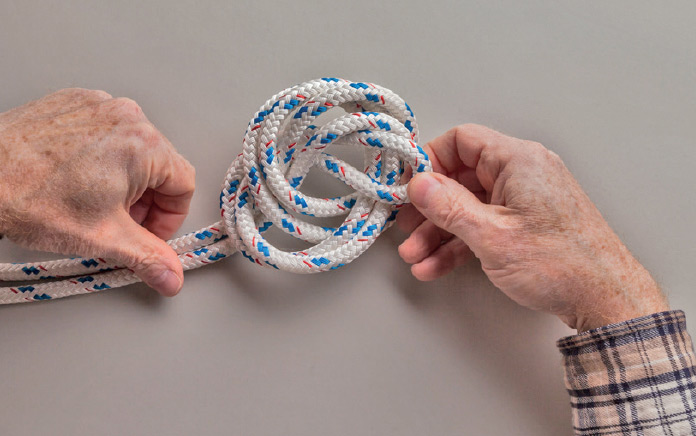
3. Pass the bight a second time through the crossing turn to complete the Double Overhand Knot on the bight.
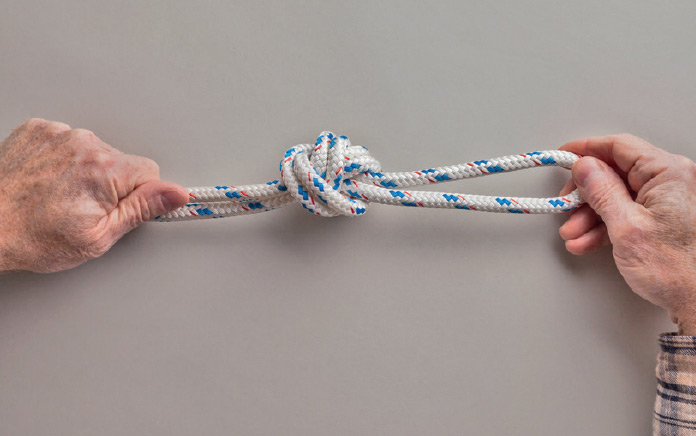
4. Pull the loop against the two standing parts to tighten. Fair the knot by laying the four crossing turns close against each other.
27. Figure 8 Loop
Also known as: Figure 8 on a Bight, Double (or Doubled) Figure 8 Knot, Flemish Loop
This fixed loop is tied just like a Figure 8 Knot, but on a bight. The bight may be placed near the working end of the rope or anywhere along its length. Tied in the middle, it provides a good tie-off point at the bottom of a rope that has been doubled for strength. The knot reduces the strength of the rope less than most other loop knots.
Instructions
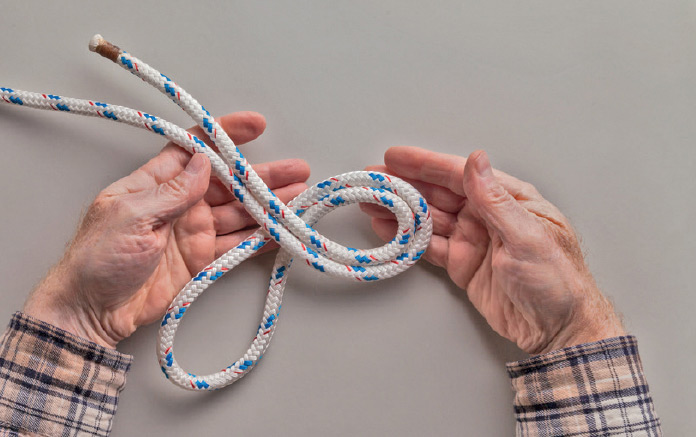
1. Make a bight anywhere along the rope. Make a counterclockwise underhand crossing turn in the bight.
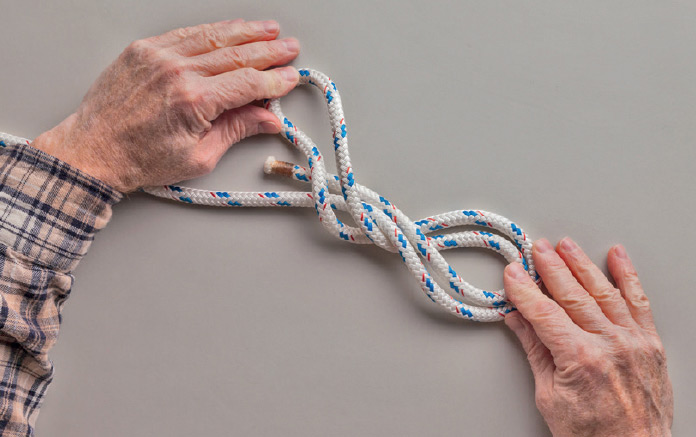
2. Take the end of the bight over the doubled rope.

3. Pass the bight through the doubled crossing turn from back to front to complete the figure 8.
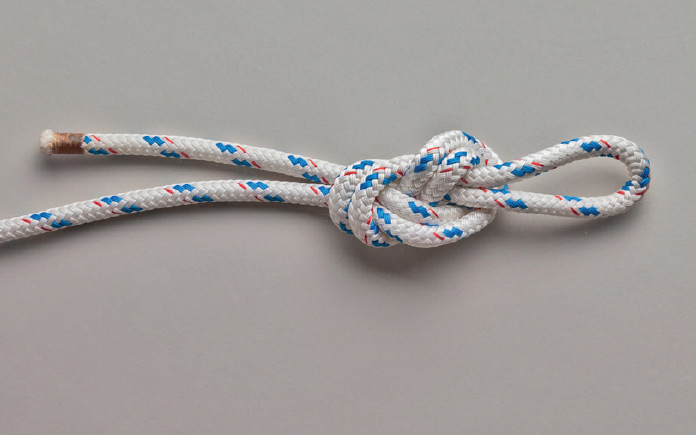
4. Fair the knot so the doubled strands are parallel all the way through.
28. Threaded Figure 8 Loop
This variation on the Figure 8 Loop is tied with the working end, not on a bight, so it can be used to tie off to closed rings, or to make a loop around an object whose end is not accessible. It creates a fixed single loop.
Instructions
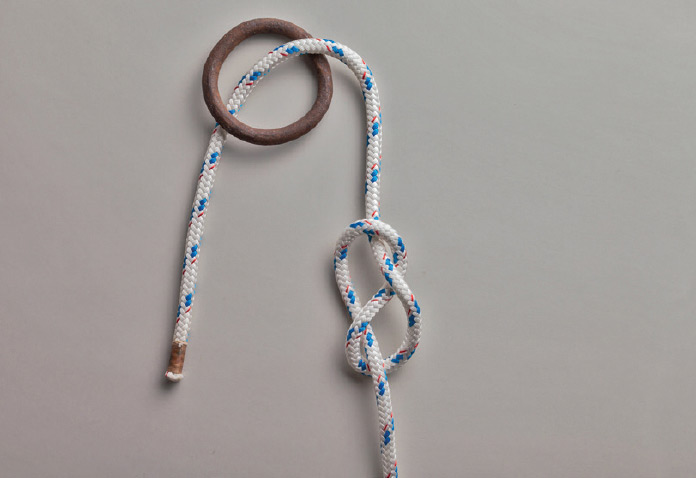
1. Start with a standard Figure 8 Knot, leaving a working end somewhat longer than the desired loop. Pass the working end through the ring or around the tie-off point to form the loop.
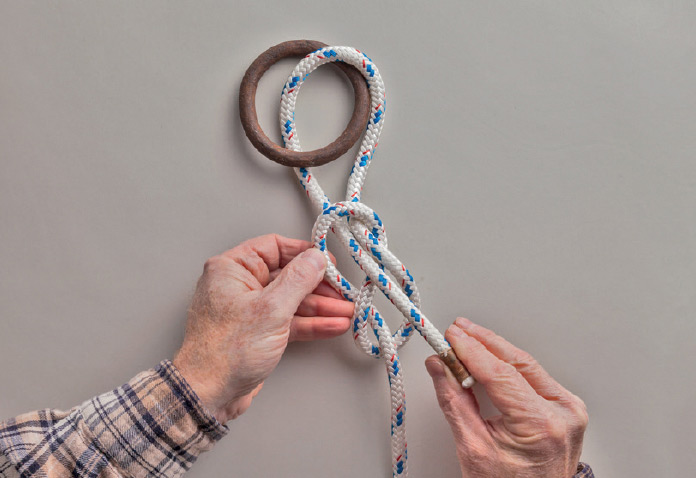
2. Thread the working end back through the upper crossing turn, next to and parallel with the working end where it exits the figure 8, but in the opposite direction.
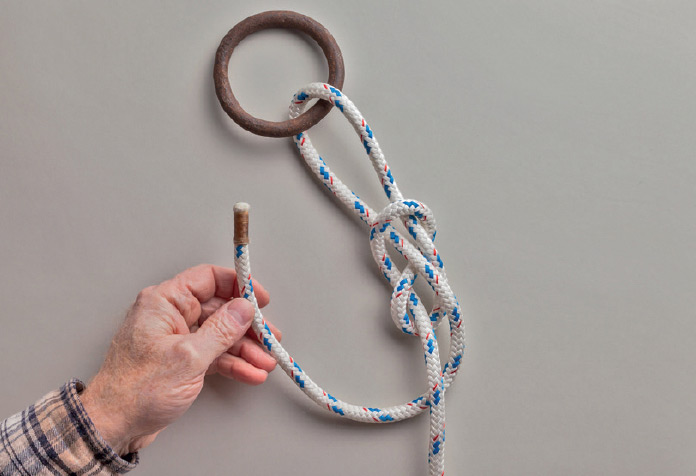
3. Pass the working end behind the standing part, always working parallel to the course of the figure 8.
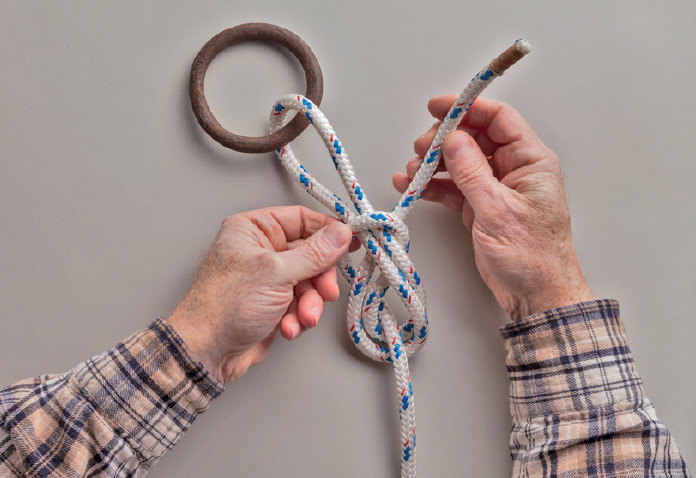
4. Pass the working end through the upper crossing turn of the figure 8, threading it beneath the two strands that form the loop.
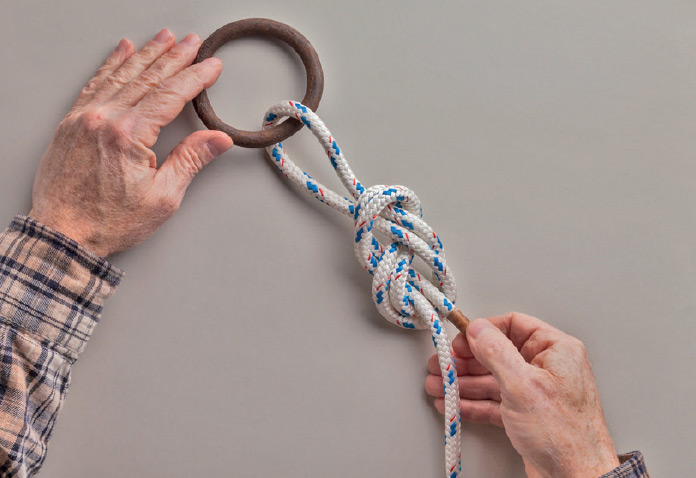
5. Still working parallel to the original figure 8, pass the working end around both legs of the loop, then back down through the (now doubled) lower crossing turn, parallel with the standing part.

6. To tighten, hold the working end together with the standing part and pull against the loop. Then release the working end and pull the standing part against the loop.
29. Directional Figure 8 Loop
Also known as: Inline 8
Tied on a bight, the Directional Figure 8 Loop is meant to bear weight in one direction only. In this role it excels and is favored by climbers. Beware of applying weight in the other direction, however, for the knot will capsize and slide, functioning as an unintentional noose.
Instructions

1. The working end is at the bottom of the photograph. Make a bight in the working end a little longer than the desired loop and pass it under the standing part, forming a counterclockwise crossing turn.
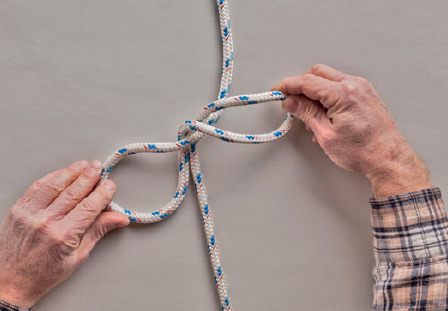
2. Bring the bight forward and across the standing part.
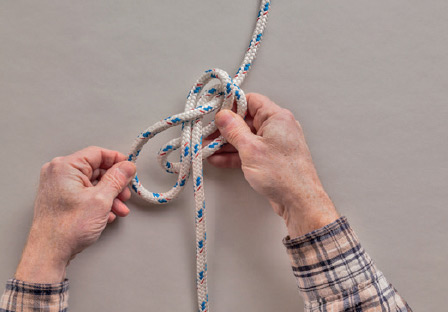
3. Pass the bight through the crossing turn from back to front.
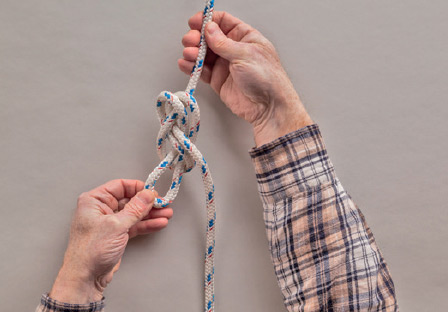
4. Pull the bight through the crossing turn.
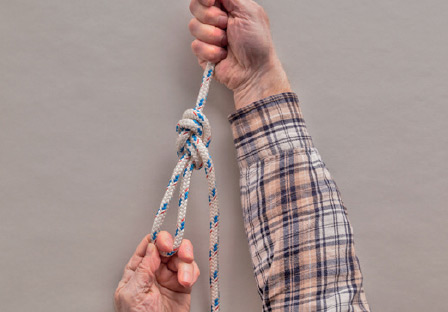
5. Pull both sides of the loop evenly against the standing part to tighten. If tied with a long working end, make sure that the loop bears weight only on the standing part.
30. Fisherman’s Loop
Also known as: Middleman’s Knot, Fisherman’s Eye, Englishman’s Loop
This is another fixed loop that can be tied either at the end or on a bight. Composed of two Overhand Knots, it is simple to tie but a little tricky to get the size of the loop exactly as desired.
Instructions
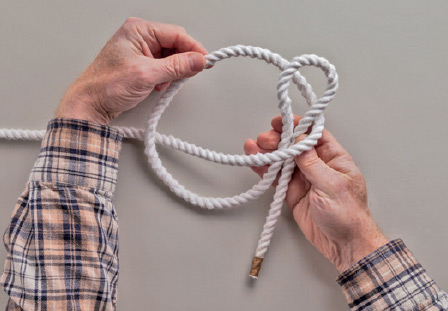
1. Make a counterclockwise overhand crossing turn. Form a bight near the working end and pass it through the turn from back to front. In other words, make a Slipped Overhand Knot and draw it tight.
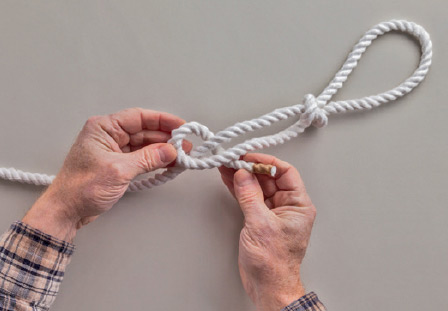
2. Make a clockwise underhand crossing turn with the working end around the standing part.

3. Pass the working end through the crossing turn to form an Overhand Knot.
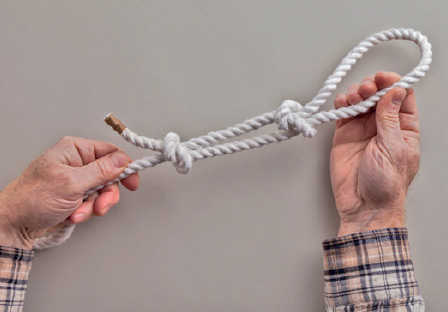
4. Pull the working-end leg of the loop against the standing part of the line to draw the overhand knots against each other.

5. The finished knot.
31. Double Overhand Sliding Loop
This knot is popular among anglers to attach swivels and hooks. When tied in monofilament line, it draws up tight with little effort.
Instructions
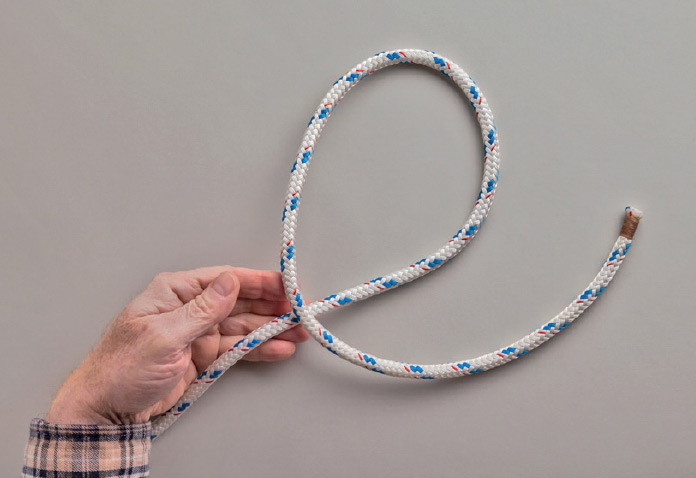
1. Make an overhand counterclockwise crossing turn.
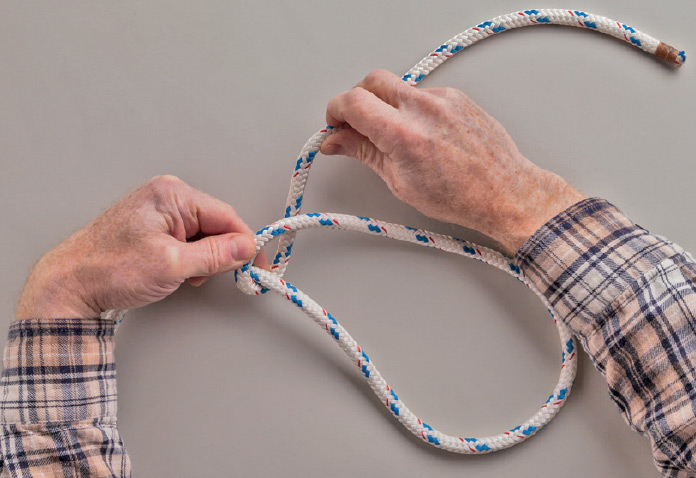
2. Bring the working end around the back to form a crossing turn around the standing part.
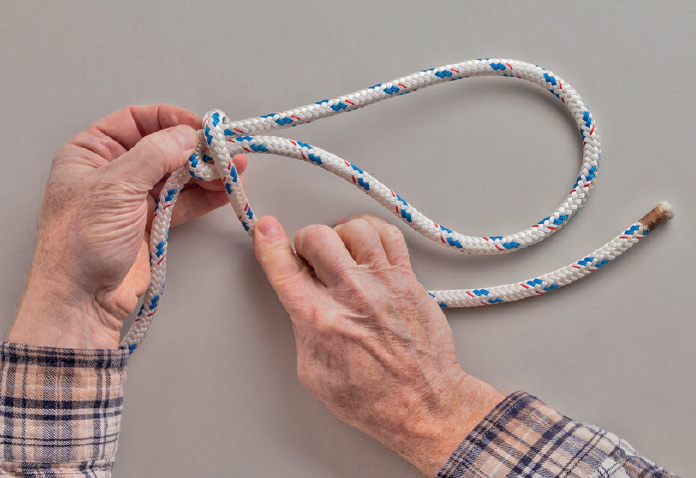
3. Bring the working end forward to form a round turn around the base of the loop.
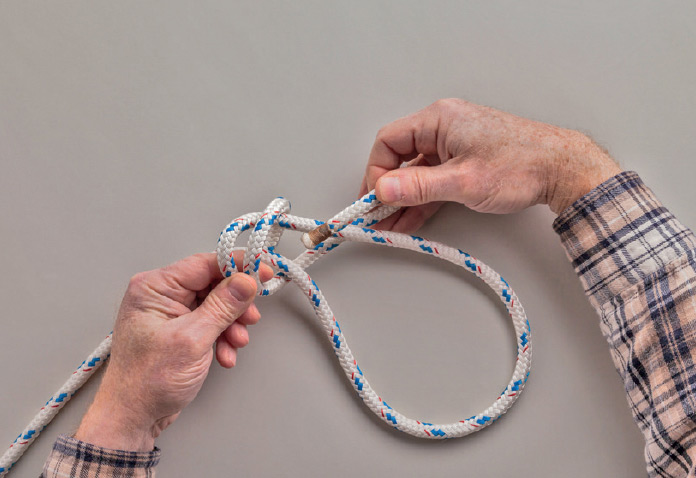
4. Pass the working end behind the loop and bring it forward again.
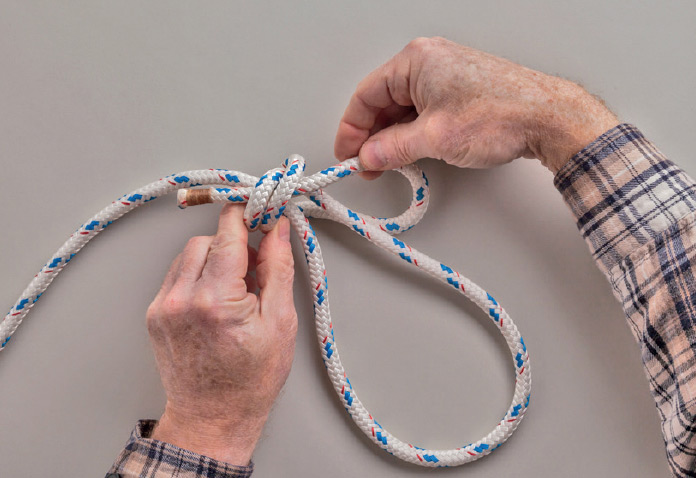
5. Pass the working end through the round turn and the crossing turn.
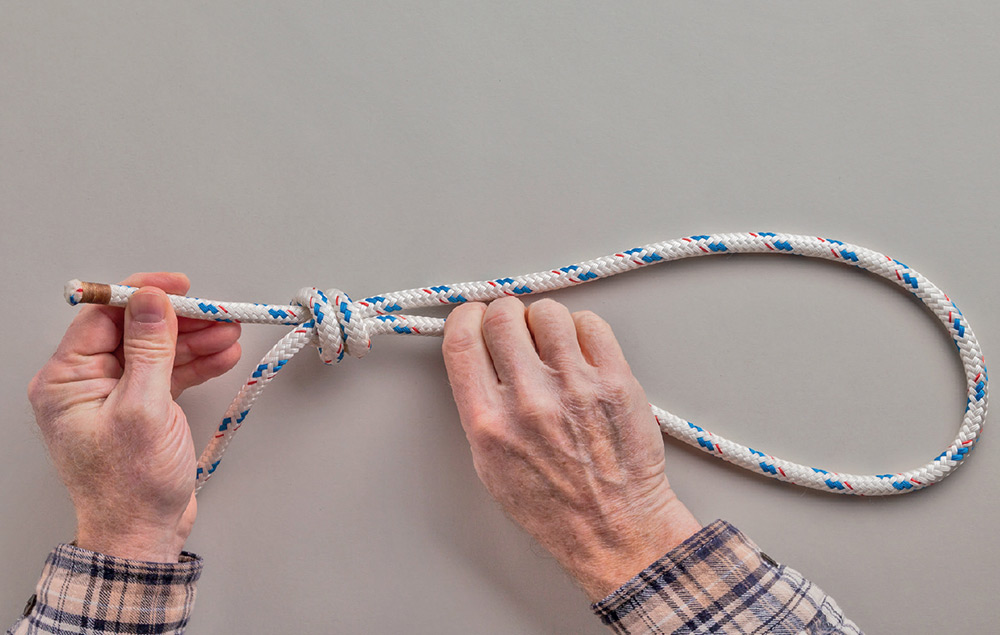
6. Pull the working end against the working-end leg of the loop to secure the knot, as shown. Then pull the standing part of the rope against the working-end leg of the loop to tighten the noose.
32. Angler’s Loop
Also known as: Perfection Loop
Tied in any kind of small stuff, this fixed loop will not slip. It works well with monofilament, bungee cord, and regular cordage. It is difficult to tie in heavier rope but it holds well in that too—so well, in fact, that you should consider it fairly permanent, no matter the type or size of cordage. Usually tied on the working end, it can also be tied on the bight.
Instructions

1. Make a bight of the desired size. (The bight is not the loop, but the loop will be the same size.) Bring the working end forward to create a crossing turn around the standing part.
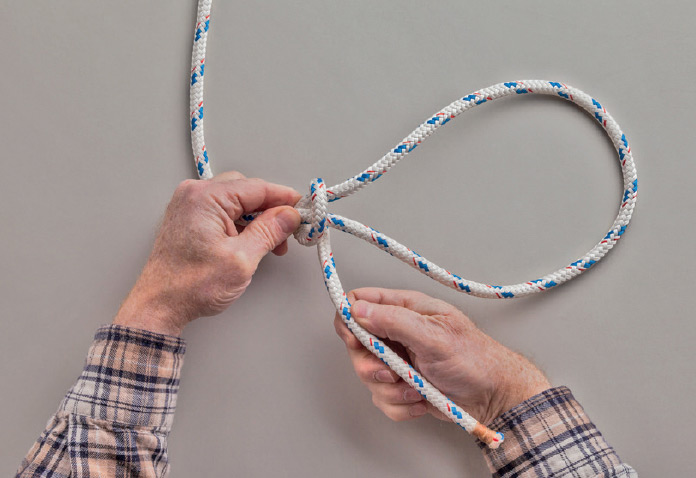
2. Bring the working end behind the bight.
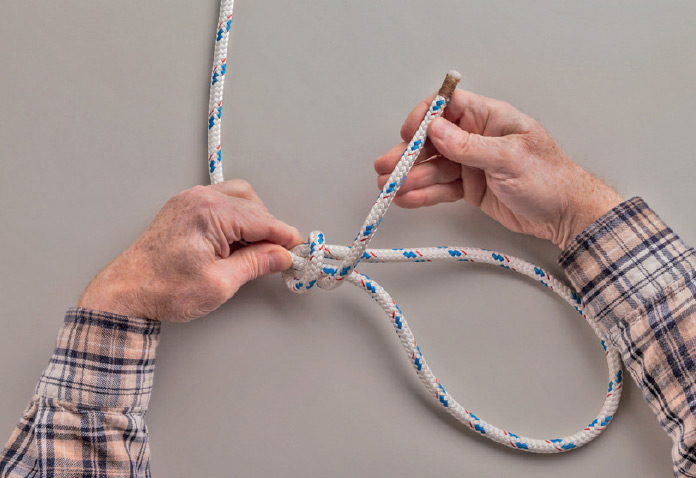
3. Bring the working end across the front of the bight one more time, completing a round turn.
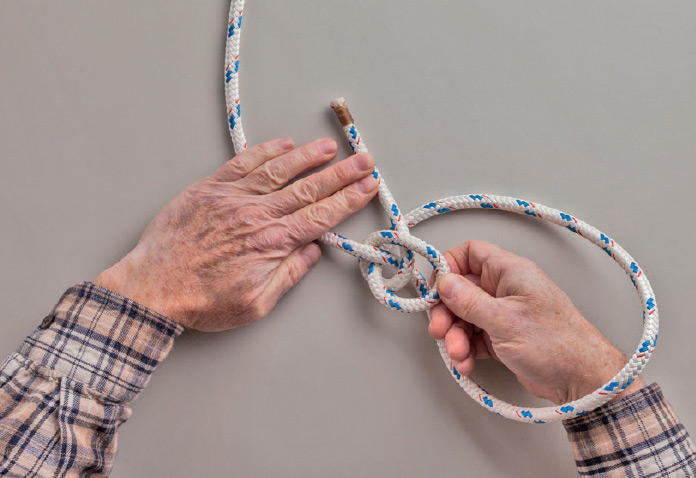
4. Holding the working end down, reach through the bight from back to front with the other hand, grab the crossing turn, and pull it across the working end.
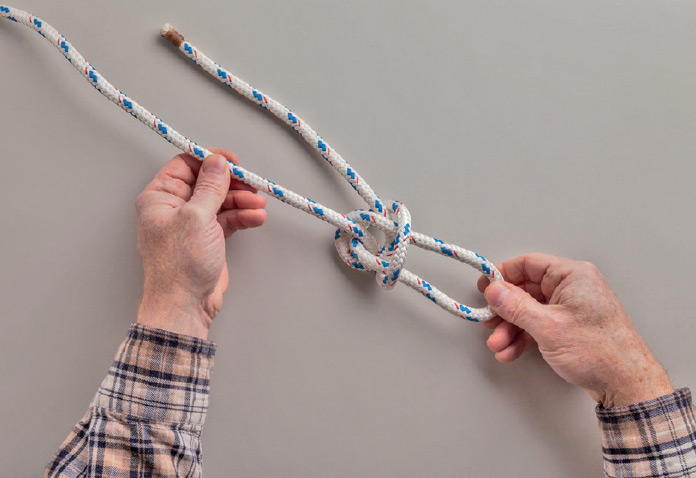
5. Continue pulling the crossing turn through the bight from front to back, pulling all of the slack out of the bight and forming the loop.
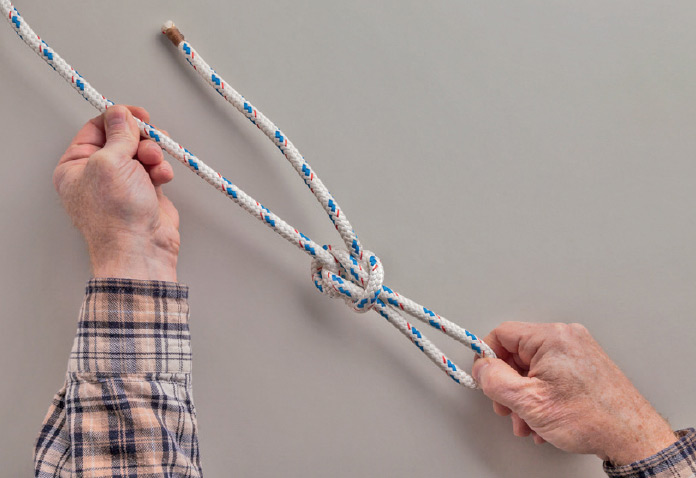
6. Tighten the knot by holding the standing part in one hand, using the other hand to pull the crossing turn through the bight until the bight locks down on the loop.
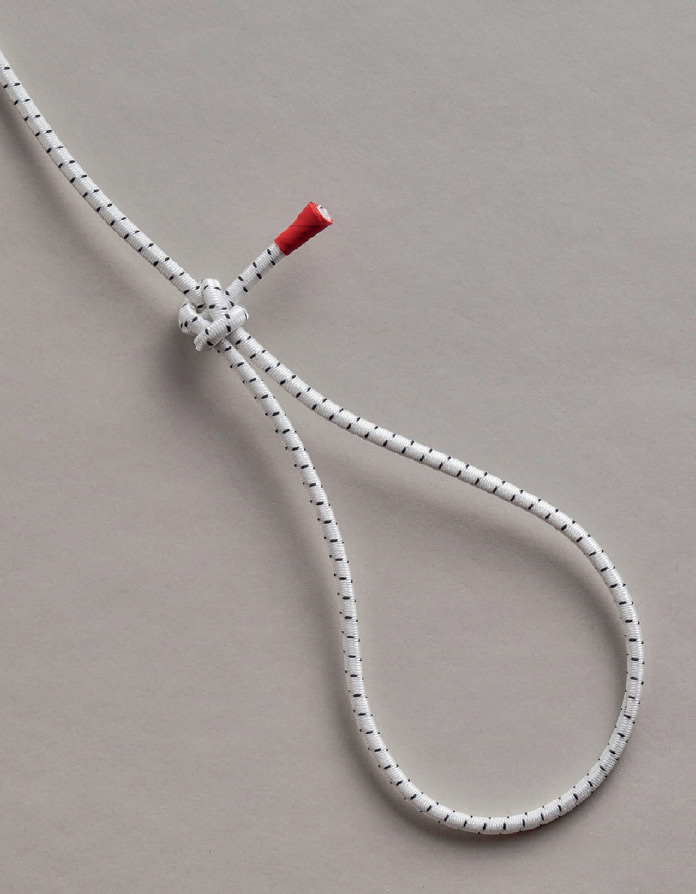
7. When tying the Angler’s Loop in bungee cord, the knot must be faired carefully as it is tightened or it may collapse under load.
33. Bowline
Also known as: Bowline Loop, Bowline Knot
The bowline is one of the most useful fixed-size loops. It is strong, easy to tie in the end of a rope, and it can be readily untied no matter how tight it has been pulled. It has many variations, several of which follow.
Instructions
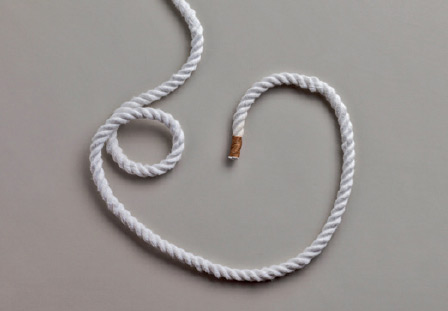
1. Make a counterclockwise overhand crossing turn, leaving a working end long enough to form the loop and complete the knot.
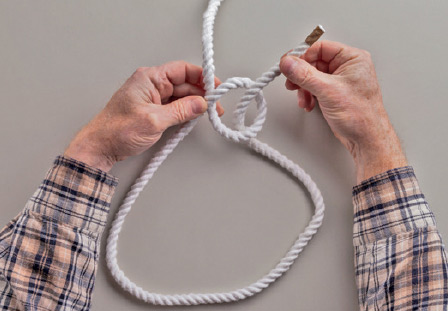
2. Pass the working end through the crossing turn from back to front.
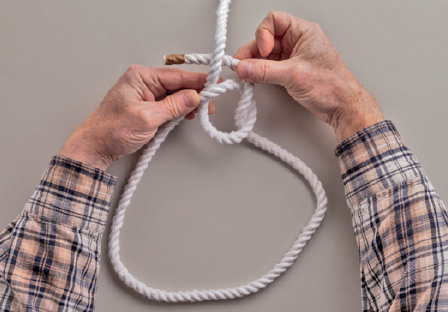
3. Pass the working end behind the standing end.
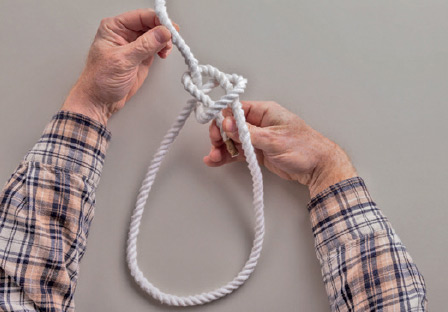
4. Bring the working end down through the crossing turn from front to back.
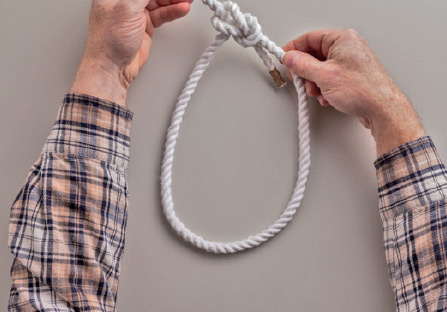
5. To tighten, pull the standing part against the leg of the loop closer to the working end.
34. Bowline with Stopper
Also known as: Bowline Loop or Bowline Knot with End Secured
As good a knot as the Bowline is, it can slip if tied in slippery rope. An Overhand Knot tied in the working end around one strand of the loop will help prevent this. It is also a good way to make the knot tidier if the working end is too long.
Instructions
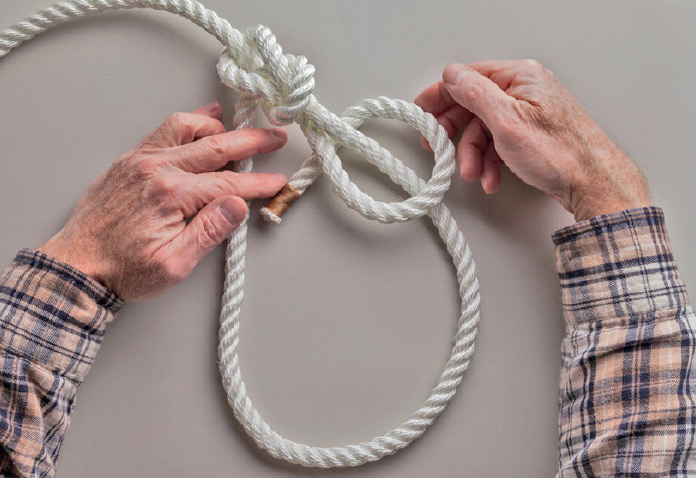
1. Tie a standard Bowline (opposite), leaving a longer working end than usual. Make an underhand crossing turn around the working-end leg of the loop.
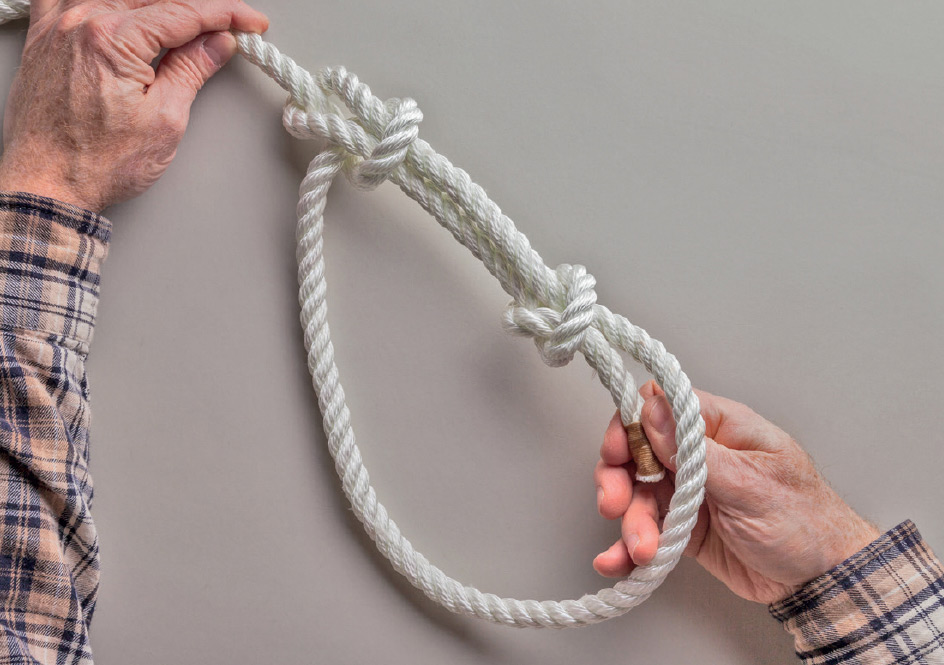
2. Bring the working end forward, and pass it through the crossing turn from front to back to form an Overhand Knot. Hold the standing part of the rope above the Bowline, and pull the Overhand Knot down and tighten.
35. One-handed Bowline
Also known as: Bowline Loop, Bowline Knot
Climbers occasionally need to tie a Bowline with one hand because the other is occupied holding on to something for dear life. This method requires good manual dexterity, but it produces a standard Bowline with all its virtues.
Instructions
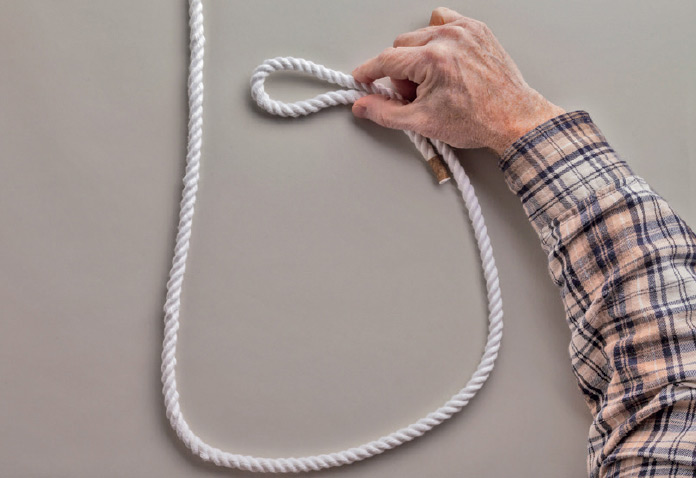
1. Form the body of the loop in the working end of the rope, then make a bight at the very end. (The bight is optional; it doesn’t form a part of the knot, but it’s easier to manipulate the working end this way.)
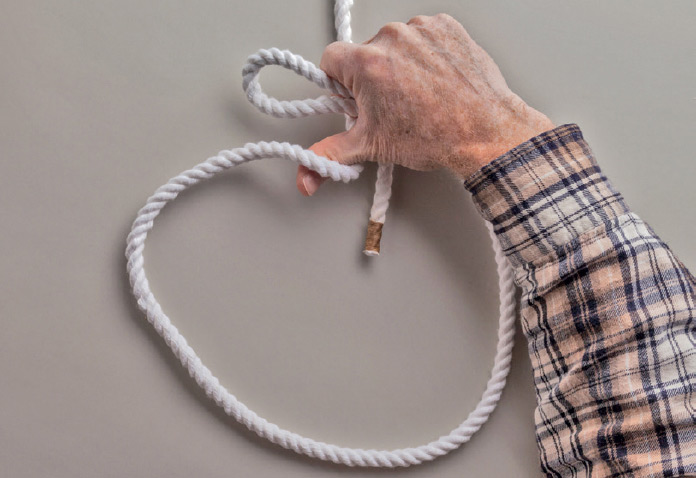
2. Holding the bight with your palm down, use your thumb to lift the standing part of the loop.
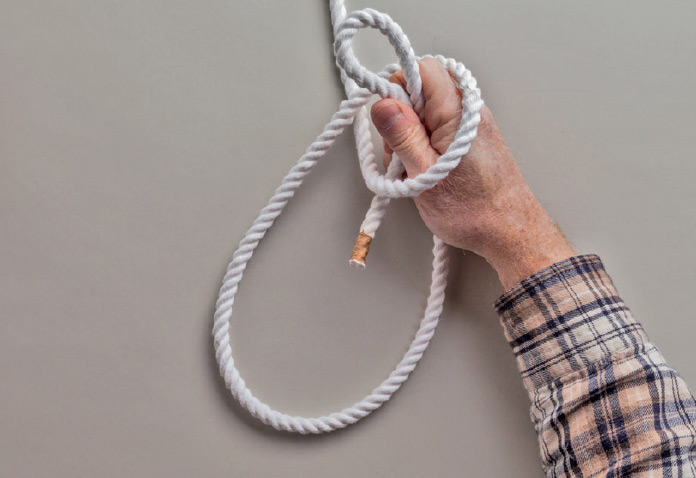
3. Twist your wrist up so that the standing part of the loop forms a counterclockwise overhand crossing turn over the bight in the working end. Be careful that the crossing turn does not form over your wrist, or you could find yourself entrapped.
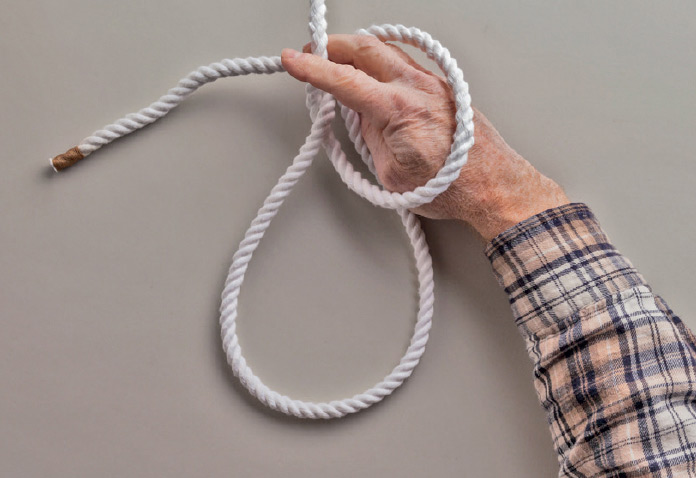
4. Undo the bight and pass the working end behind the standing part.
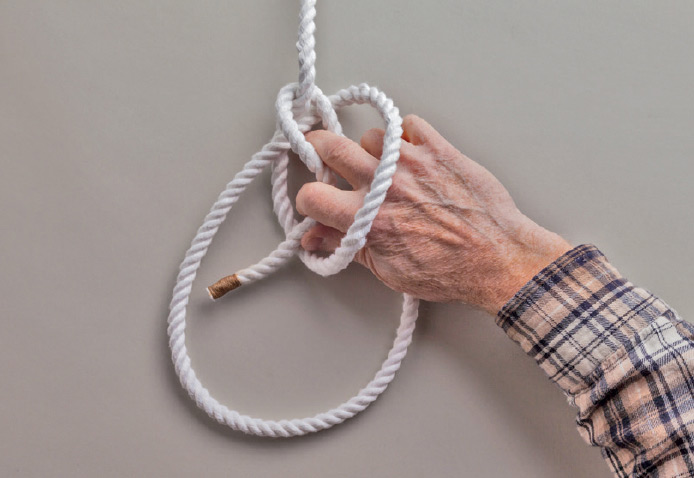
5. Pull the working end through the crossing turn from front to back.

6. Continue to pull the working end through the crossing turn. Depending upon how large you want the loop, you might hold both strands of the new bight that you’ve created around the rope’s standing part and pull them together through the crossing turn.

7. The finished Bowline.
36. Dutch Bowline
Also known as: Backward Bowline
This slight variation of the standard Bowline positions the working end outside the loop. It is said to be somewhat less secure than a standard Bowline, but it does place the loop in more complete contact with the object it surrounds. If used as a safety line, it’s more comfortable this way, with the working end away from the torso.
Instructions
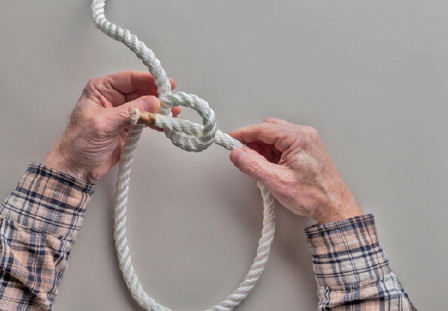
1. Begin like a standard Bowline. Leaving a long working end, make a small overhand counterclockwise crossing turn and pass the working end through the crossing turn from back to front. As the working end passes through the crossing turn, pass it perpendicular to the standing part.
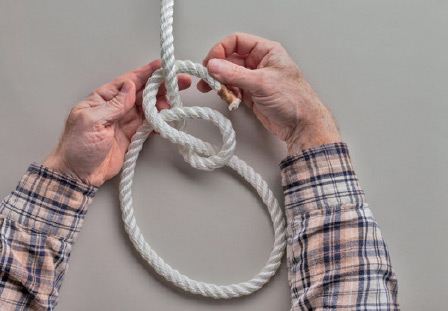
2. Pass the working end behind the standing part and bring it forward.
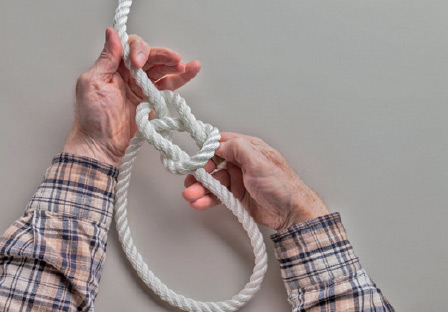
3. Bring the working end back through the crossing turn from front to back.

4. Tighten by pulling on the standing part and working end.
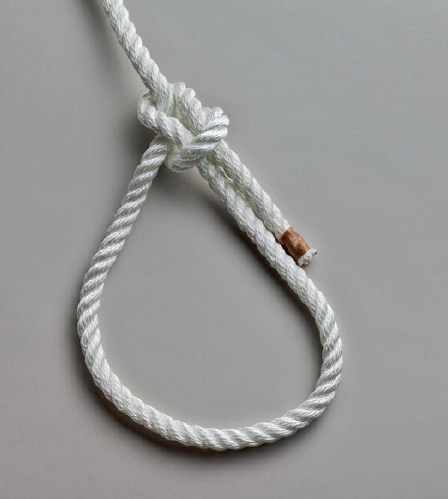
5. The finished knot, with the working end on the outside of the loop.
37. Bowline with Two Turns
Also known as: Double Bowline, Round Turn Bowline
Another bowline variation, this one is stronger, more resistant to slippage, and resists capsizing better. Climbers rely on it for safety. After you’ve learned the standard Bowline, this one’s simple: just replace the initial crossing turn with two round turns.
Instructions
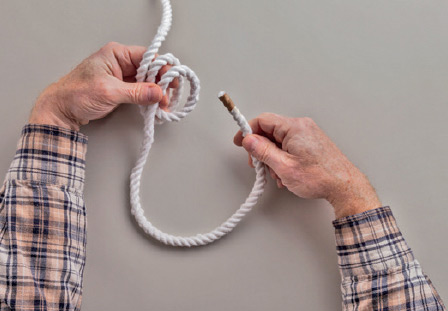
1. Make two counterclockwise round turns in the standing part, leaving the working end long enough to form the loop and complete the knot.
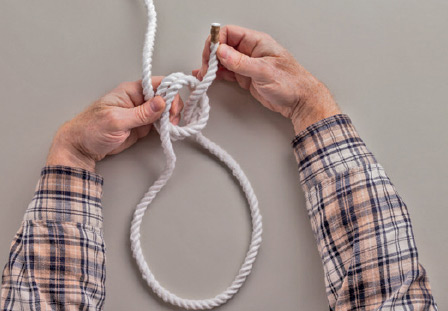
2. Pass the working end through the round turns from back to front.
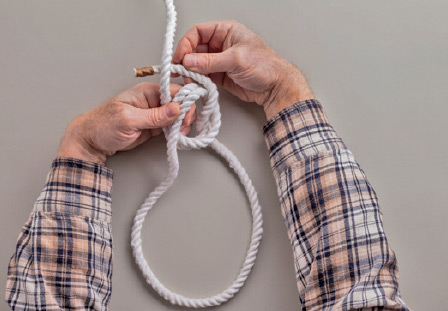
3. Pass the working end behind the standing part and bring it forward.
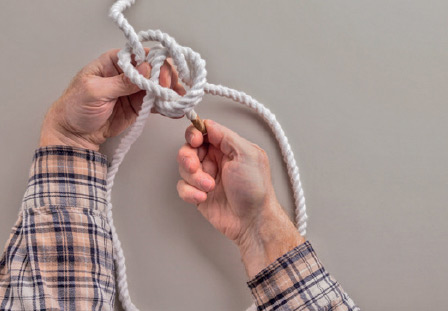
4. Pass the working end through the round turns from front to back.
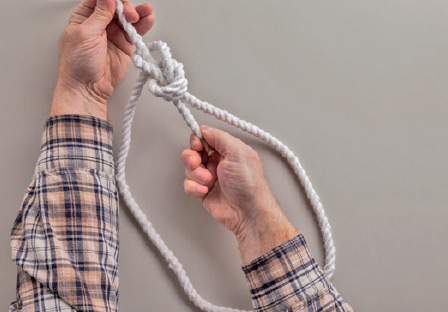
5. Pull the working end and the standing part to tighten. The knot may need to be faired by pulling the standing-part leg of the loop against the standing part of the rope.
38. Water Bowline
Probably the most secure bowline, the Water Bowline forms two Half Hitches around the bight in the working end. It’s especially useful to maintain security in wet, slippery line, yet it can still be untied easily.
Instructions
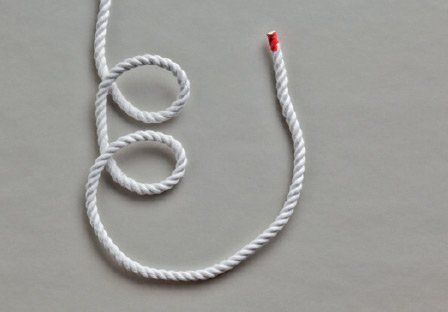
1. Make two counterclockwise overhand crossing turns in the standing part, leaving the working end long enough to form the loop and complete the knot.
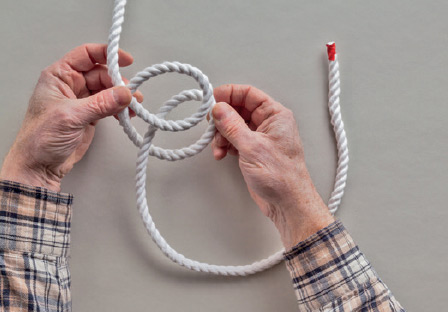
2. Shift the lower crossing turn (the one closer to the working end) under the upper one and hold them together.
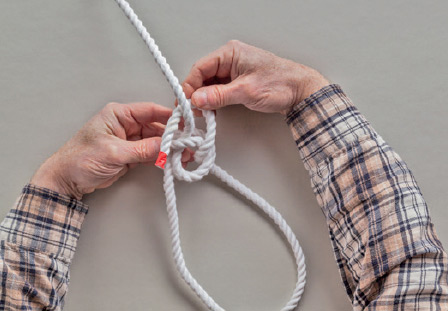
3. The rest of the procedure is the same as a standard Bowline. Pass the working end through the crossing turns from back to front, then behind the standing part.
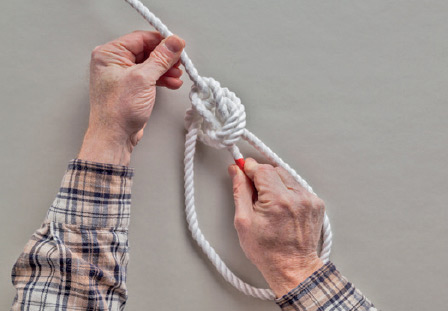
4. Pass the working end through the crossing turns from front to back. Hold both ends of the bight together in one hand while pulling on the standing part of the rope to tighten the upper Half Hitch. Then pull the standing-part leg of the loop to tighten the lower Half Hitch.
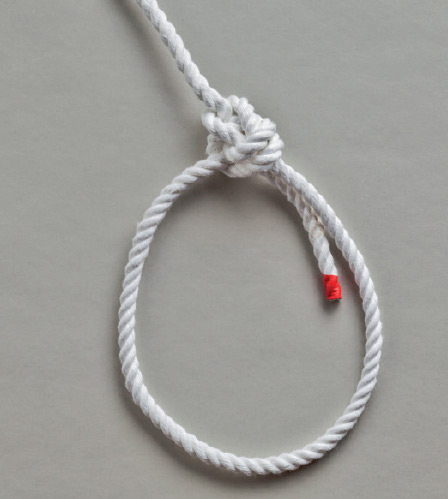
5. The finished Water Bowline. If the working end is too long, it may be secured with an Overhand Knot around the loop, as in the Bowline with Stopper Knot.
39. Portuguese Bowline
Also known as: French Bowline
This double-loop bowline is tied at the working end, not on a bight. It can be tied with both loops of equal size or in any proportion desired for balanced lifting of odd-sized loads. It can be used as a bosun’s chair with two equal loops around the legs. The bosun’s chair is sometimes arranged with one loop around both legs and the other around the torso, but this is dangerous and so not advisable.
Instructions

1. The knot begins just like a standard Bowline, but with the working end long enough to form two loops. Make a counterclockwise crossing turn. Pass the long working end through the crossing turn from back to front and pull it through to form the first loop.
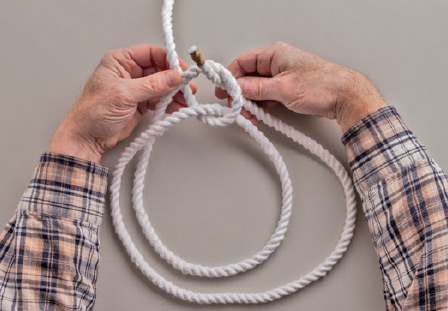
2. Pass the working end through the crossing turn a second time, again from back to front.
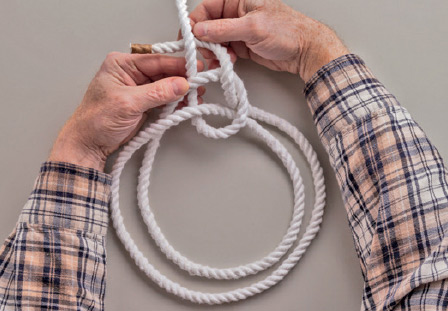
3. Pass the working end behind the standing part and bring it forward.
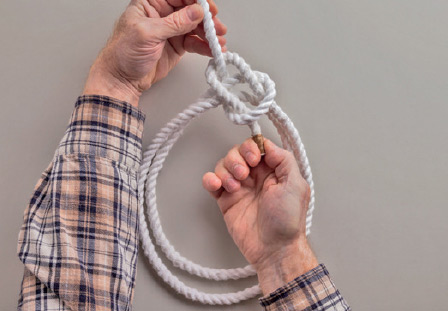
4. The working end now goes back down through the crossing turn from front to back.
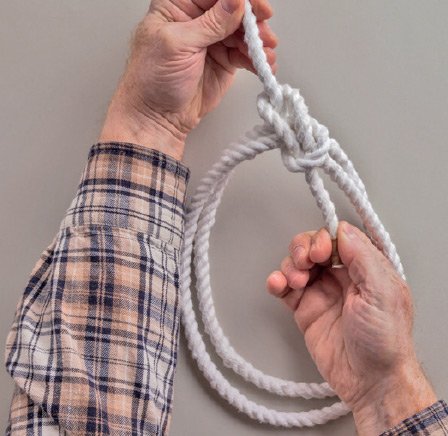
5. Adjust the size of the two loops as needed, then pull the standing part against the working end to tighten and knot and lock the loops.
40. Eskimo Bowline
Also known as: Boas Bowline
Although similar in its final form to a standard Bowline, this knot is tied quite differently, so it’s best to approach it as something new. It is trickier to tie and fair than a standard Bowline, but it is said to be more secure. It is reliably reported as being of true Inuit (i.e., Eskimo) origin, and was tied in rawhide as hitches to assemble dogsleds.
Instructions
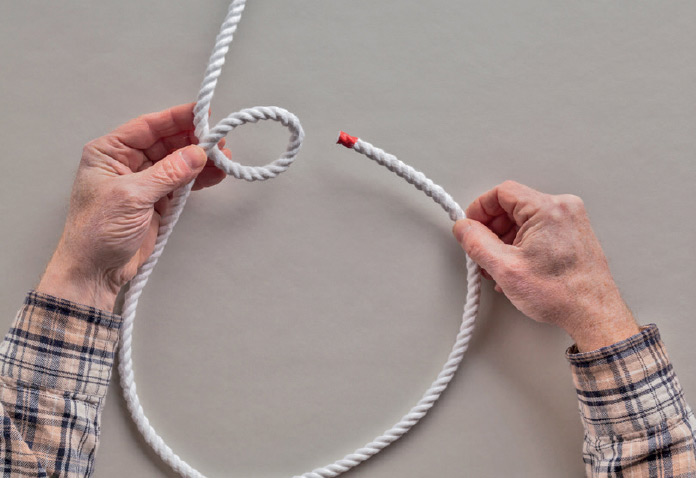
1. Leaving a long working end, make a counterclockwise overhand crossing turn in the standing part.
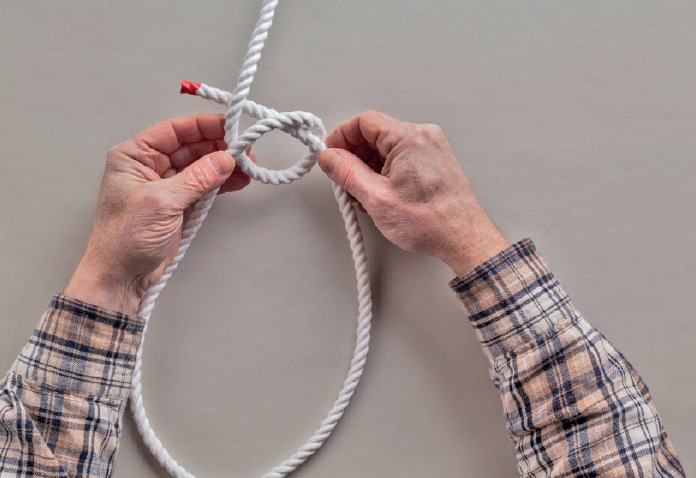
2. Pass the working end through the crossing turn from front to back.
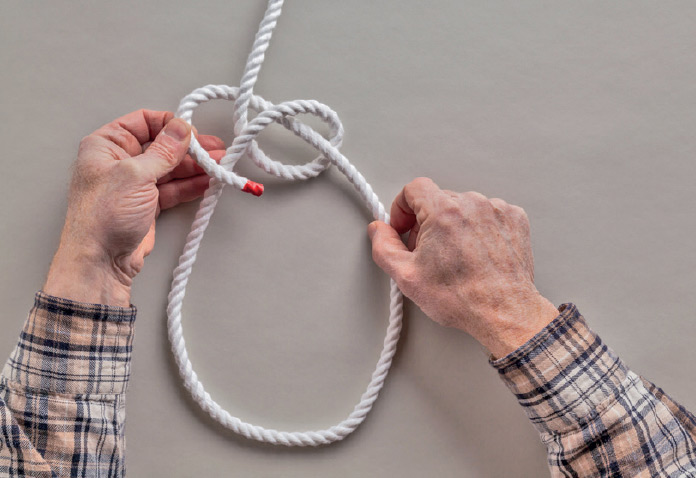
3. Take the working end behind the standing part then bring it forward.
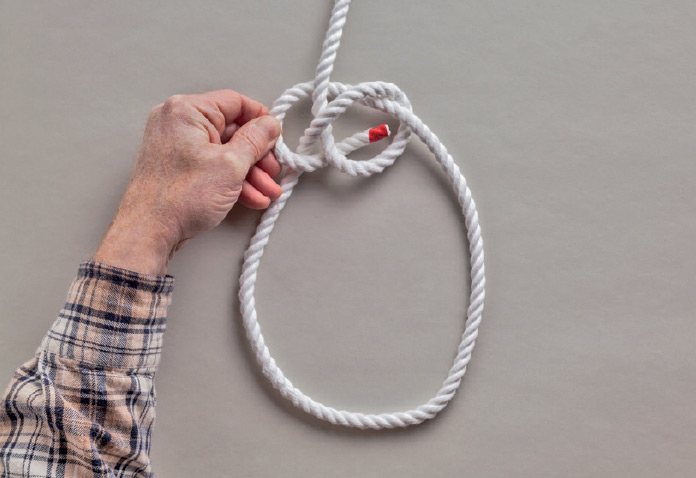
4. Pass the working end through the crossing turn again, this time from back to front.
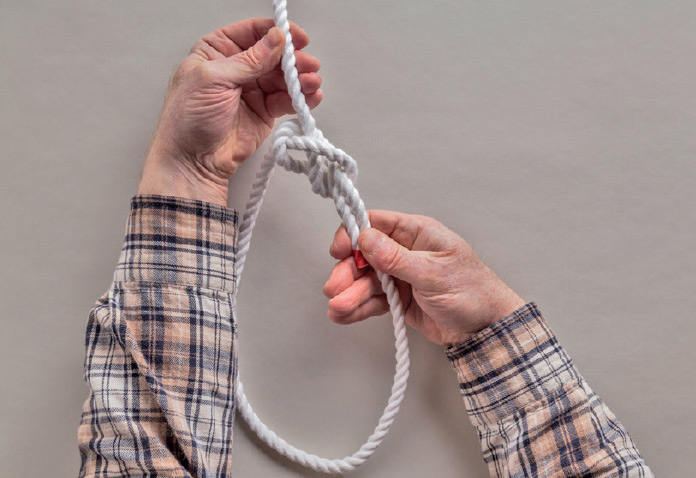
5. Tighten by pulling simultaneously on both parts of the bight in the working end and the standing part of the rope.
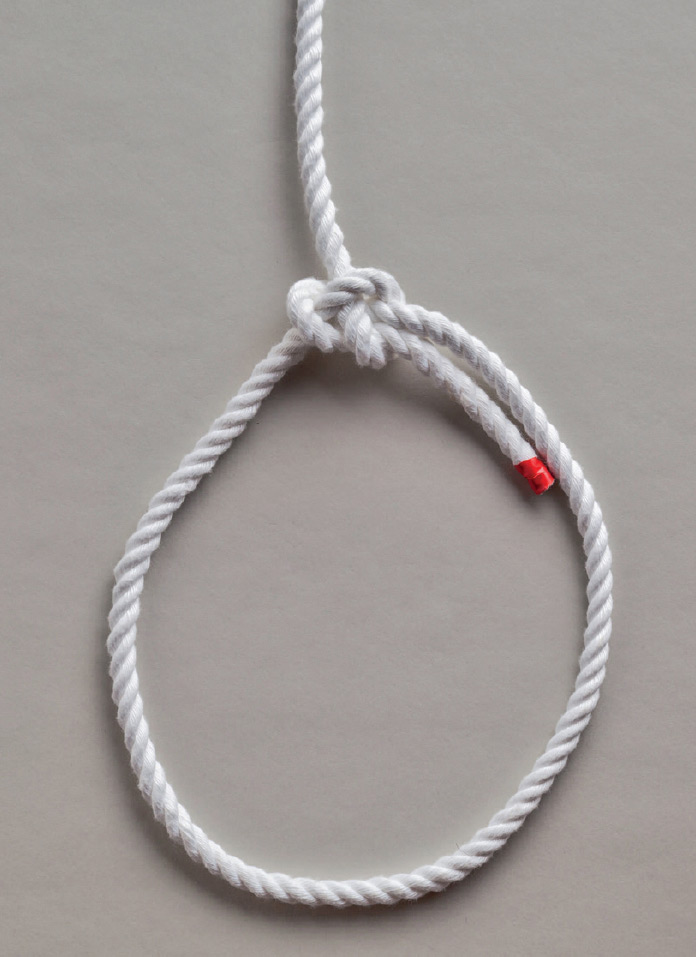
6. The finished knot. When properly faired, the working end forms a neat bight with adjacent, parallel legs.
41. Bowline on a Bight
The diverse and immensely useful bowline family deserves an “on the bight” version. This knot has the advantages of a standard Bowline with the additional benefit of doubled line in both the standing part and in the loop for extra strength and reliability. It can’t possibly slip, and the two fixed-size loops can fit around your thighs as part of a harness for climbing, rescue, or raising a sailor up a mast.
Instructions
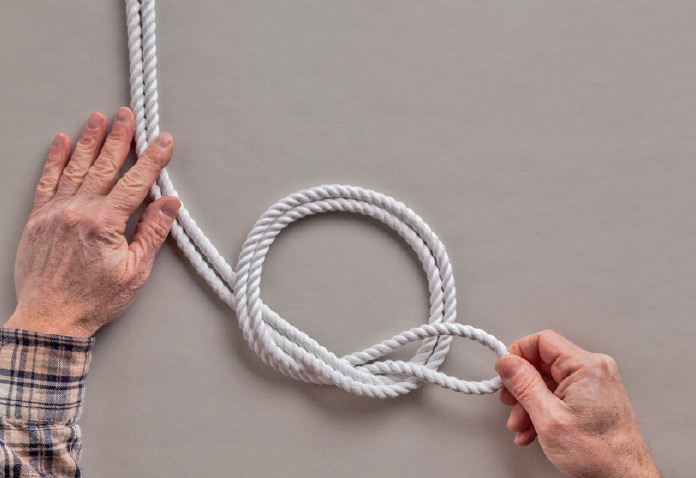
1. Make a counterclockwise overhand crossing turn in a bight and then bring the bight through the crossing turn from back to front to form a loose Overhand Loop. Unlike a standard Bowline, it is the initial crossing turn that will become the final load-bearing loops, so size it accordingly. (We’ll call the initial crossing turn the “loops” henceforth, because another crossing turn will be formed presently.)
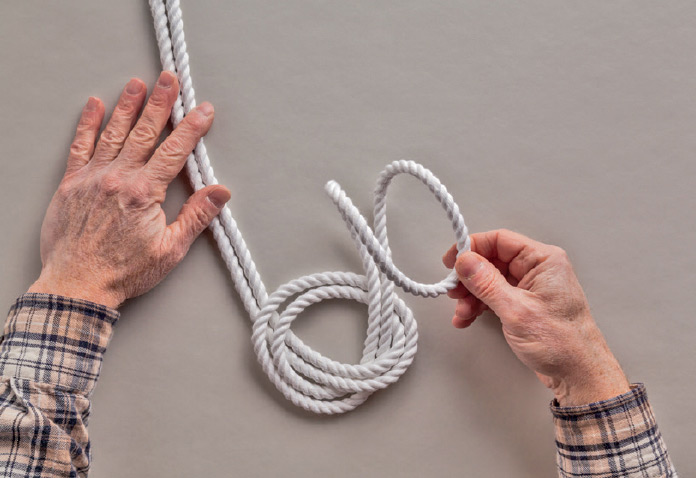
2. Bring the bight down toward the bottom of the loops.
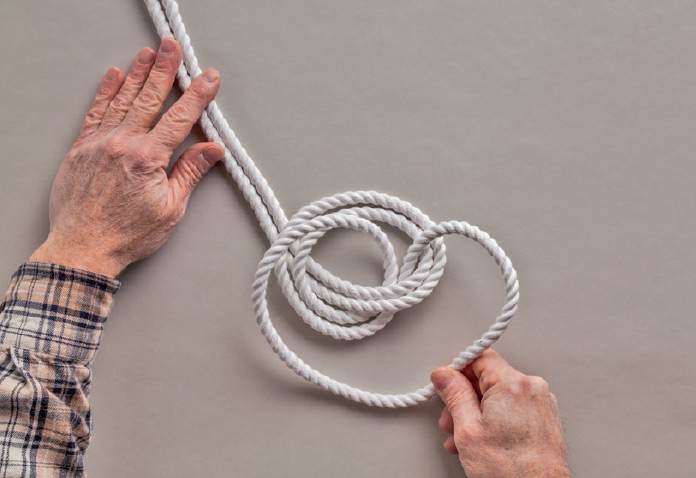
3. Open up the bight wide and pass it under the loops.
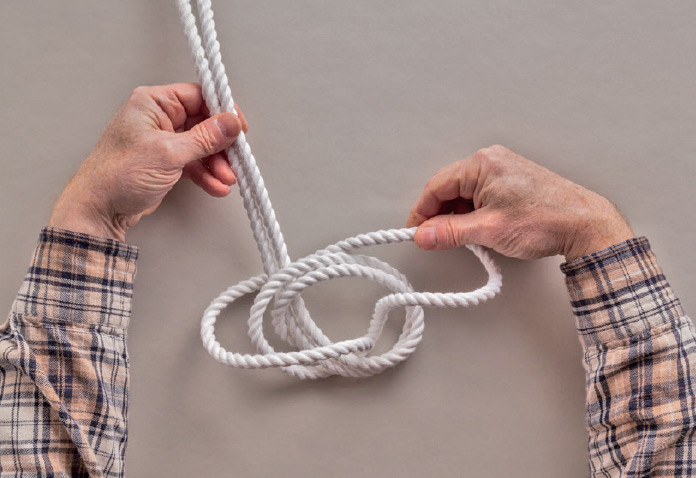
4. Bring the opened bight up behind the loops.
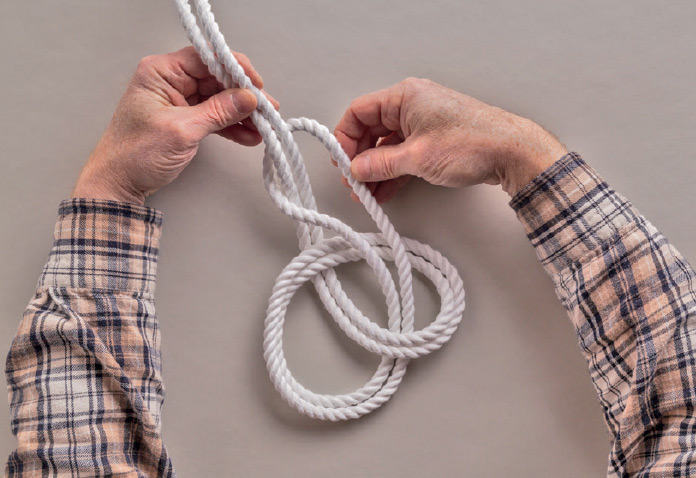
5. Bring the bight completely over the top of the loops and around the standing parts.

6. Holding both loops high near the rope’s standing parts in one hand, tighten the knot by pulling the other end of both loops (near the bight). This will form a new crossing turn in the bight around the standing parts.
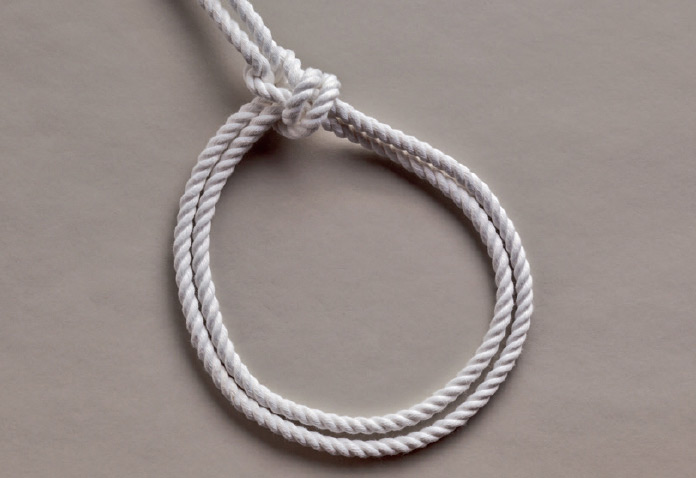
7. The finished knot.
42. Spanish Bowline
Also known as: French Bowline, Double Forked Loop, Chair Knot
This is another double-looped bowline on a bight, offering nearly double the strength of a single Bowline plus the ability to spread a load evenly across two loops. The loops will not shift or tighten under load, and with one’s legs placed through the loops, it makes a good bosun’s chair or rescue harness, although you have to hold onto the standing parts (or tie your upper body to them with another piece of line) to keep from falling out backward.
Instructions
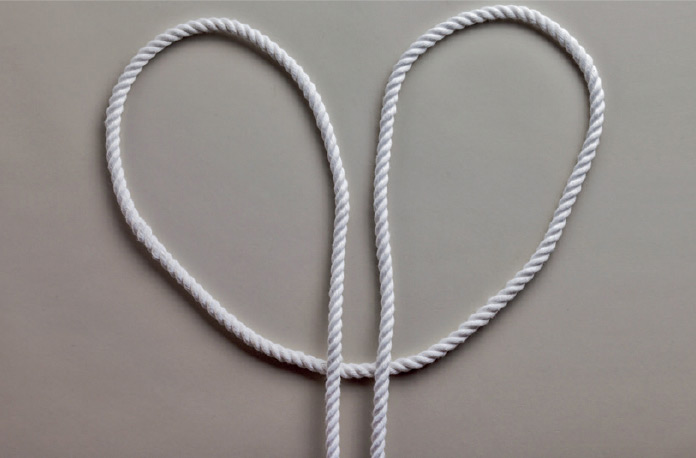
1. Middle the rope, then pull the bight beneath the two standing parts, creating two opposing crossing turns.
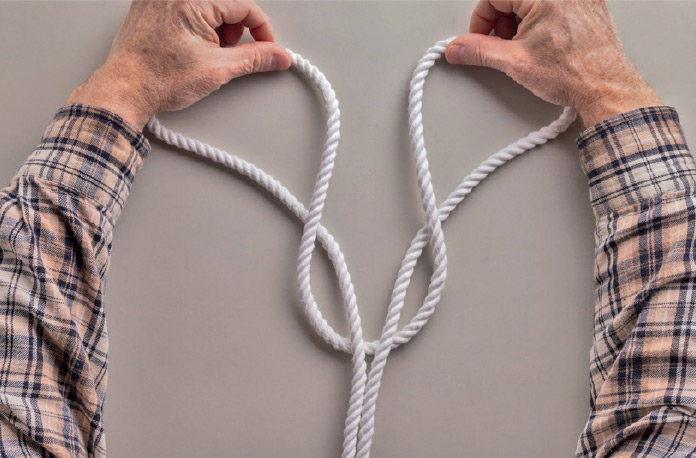
2. Twist both crossing turns inward 180 degrees around their standing parts, to form elbows in both legs.
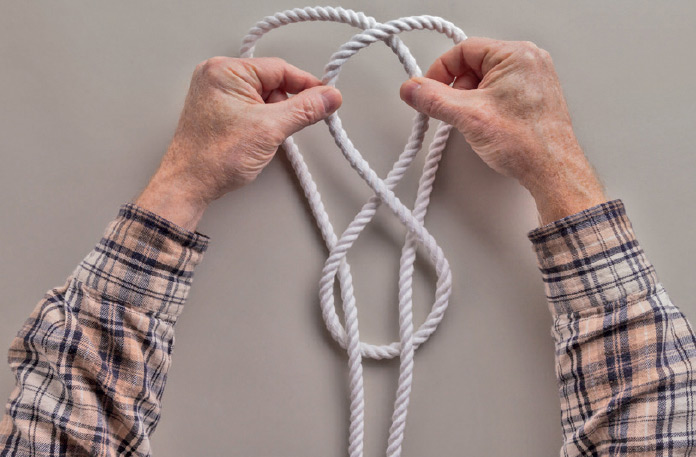
3. Overlap the two crossing turns with the right one over the left. Grab the right leg of the left crossing turn through the right crossing turn and pull it through.

4. With the original left crossing turn pulled through the original right one, there is now a new crossing turn around the standing parts.

5. Reach through the backs of the original twin crossing turns. Grab the right leg of the third crossing turn with the right hand; grab the left side of the third crossing turn with the left hand.
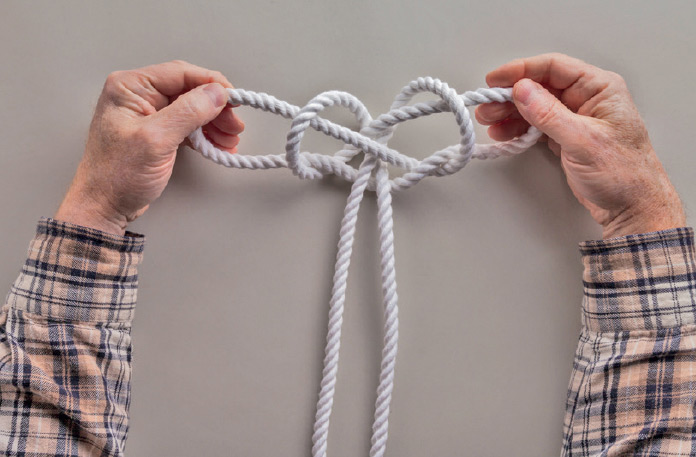
6. Pull both sides of the third crossing turn through the original twin crossing turns to form two loops.
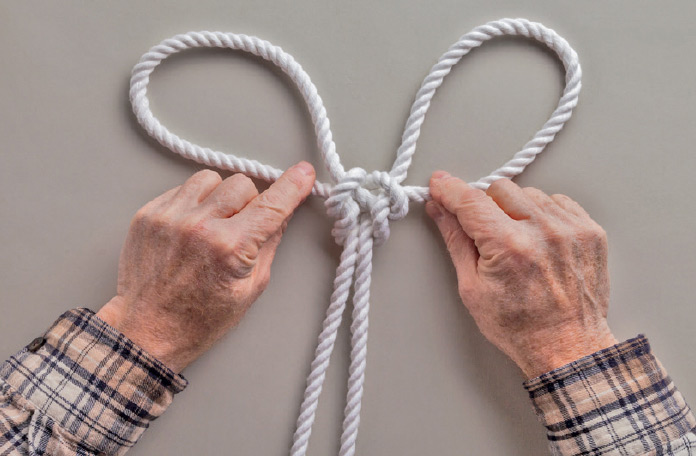
7. Pull the loops tight to finish the knot.
43. Alpine Butterfly
Also known as: Alpine Butterfly Loop, Lineman’s Loop
This is a quick, easy loop to tie on a bight. It’s used by mountaineers to create a tie-in point for a third climber between two others climbers. It serves well as a purchase for lashing boats or cargo to a car’s roof rack and for making a line tight between two trees, to serve as a clothesline or a tarp ridgeline.
Instructions
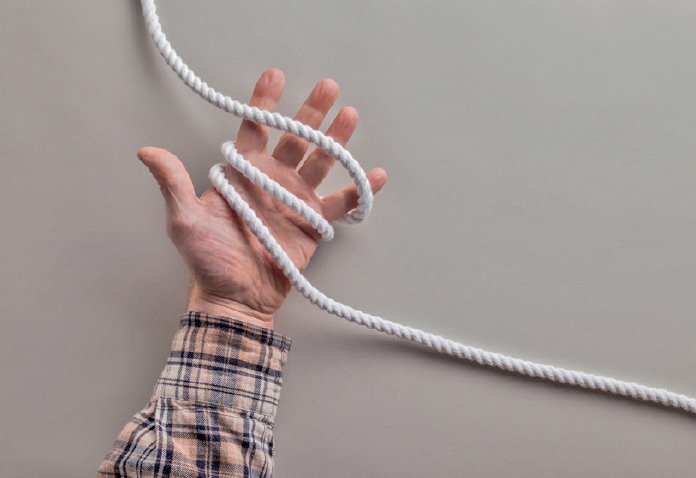
1. Make two round turns around one hand. With the two ends facing opposite directions, there will be three “strands” in total over your hand.
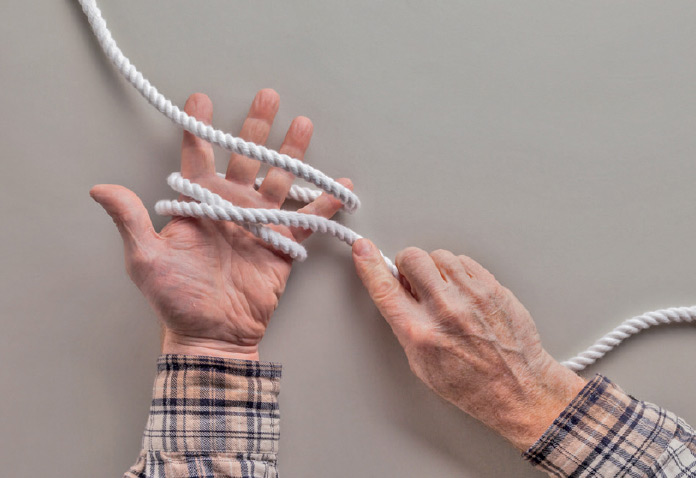
2. Take the left strand and pass it over the middle one, so that it becomes the new middle strand.
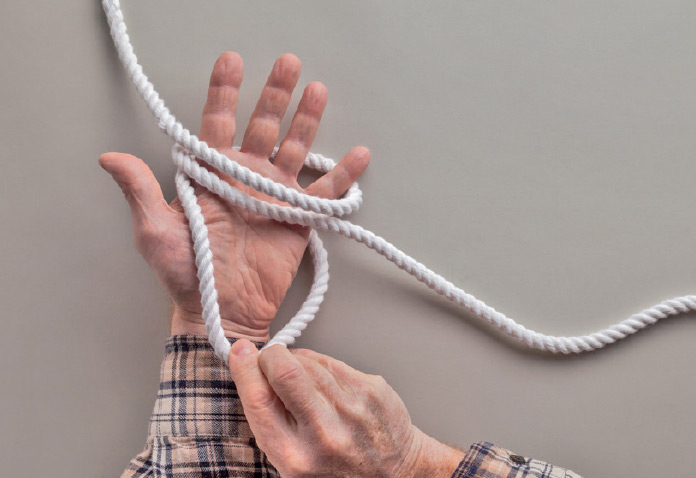
3. Pull slack into the new left strand (originally the middle one) large enough for the loop.
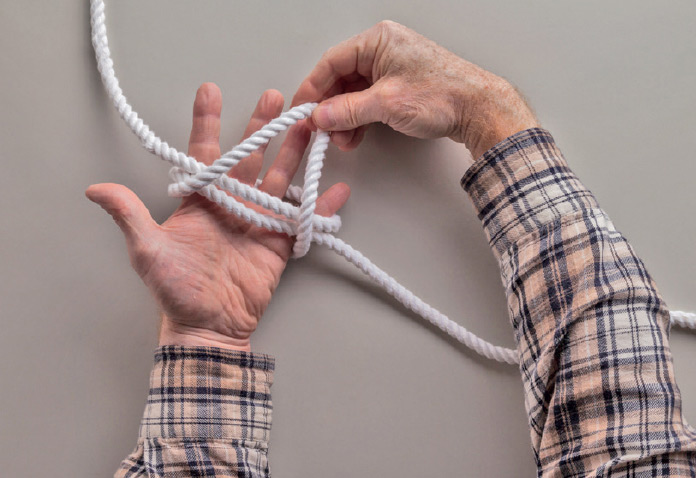
4. Pass this new left strand over the other two strands. We’ll call this strand the loop henceforth.
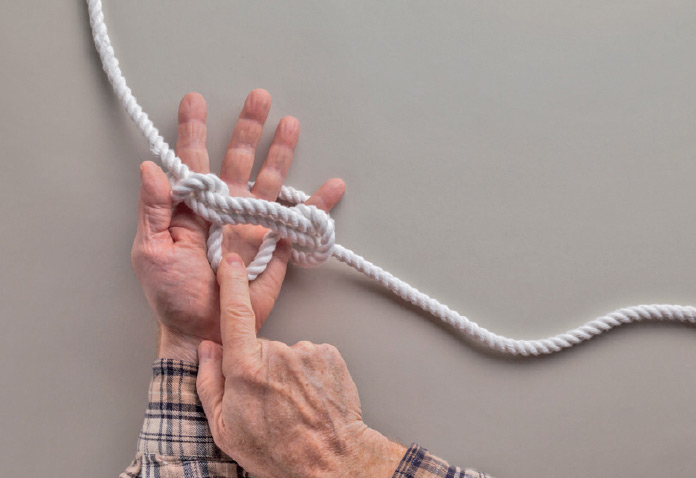
5. Pull the loop beneath and through the other two strands.
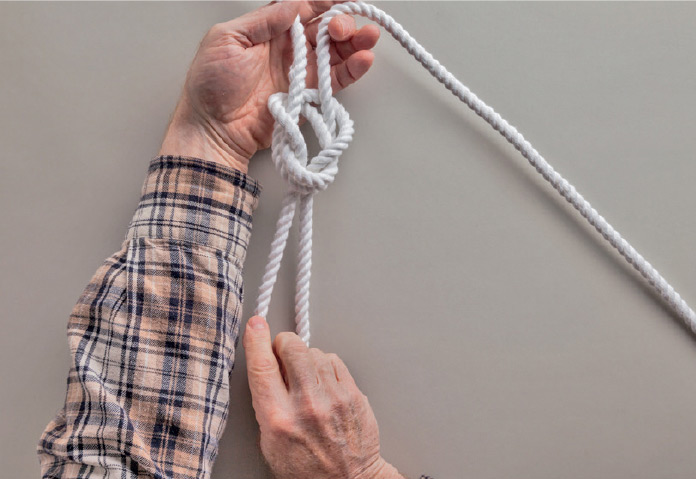
6. Hold both standing parts in one hand and pull the loop tight.
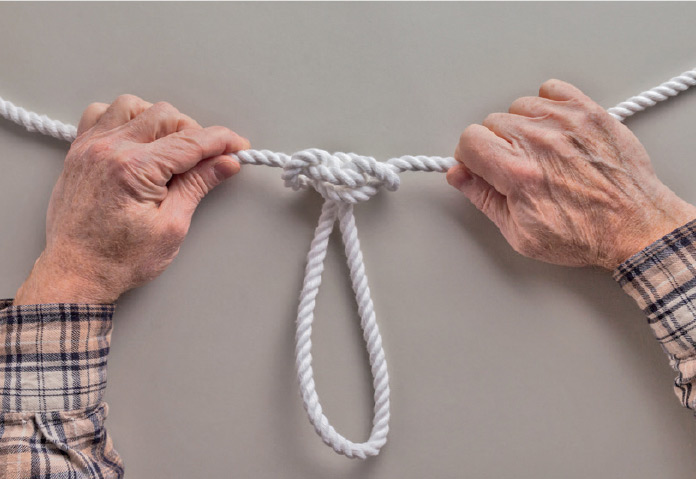
7. The finished knot will bear a load from either standing part and from the loop itself.
