Part Six
Bends
Bends are used to tie the ends of two—or occasionally three—ropes together. In accomplishing this, a bend is generally an easier, quicker, and less bulky solution than tying two loop knots through one another. Some bends work best with ropes of similar diameter, while others are optimized for ropes of different sizes, and some work well in flat materials such as leather straps or nylon webbing.
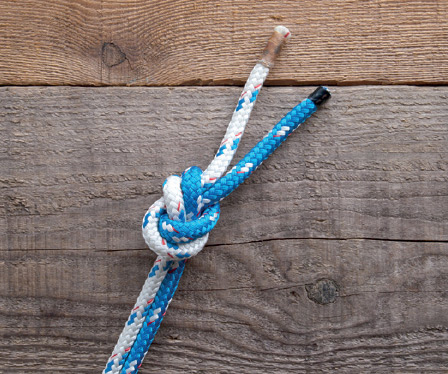
44. Water Knot
Uses: load bearing; bending flat materials or rope
Pros: easy to tie; secure; straps remain flat
Cons: difficult to untie in rope
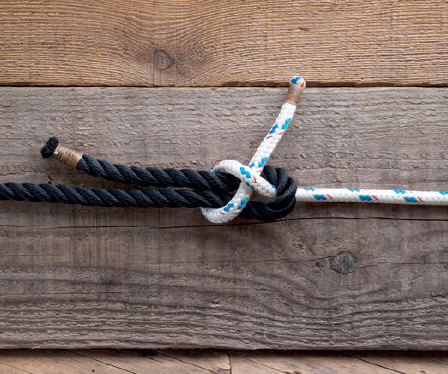
45. Sheet Bend
Uses: temporary light-duty applications where constant load will be maintained
Pros: simple to tie and untie in ropes of equal or different diameter
Cons: insecure when unloaded
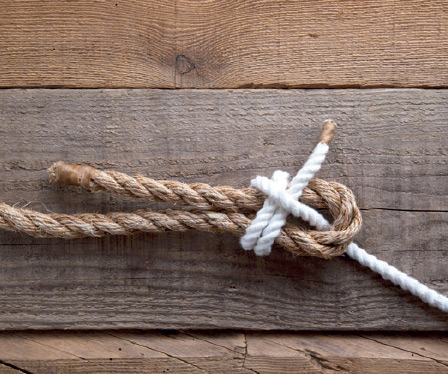
Uses: joining lines of dissimilar diameters; connecting heaving and messenger lines
Pros: less prone to slippage than a Sheet Bend; easy to tie and untie
Cons: relatively insecure when unloaded; may catch on obstructions if it will be dragged
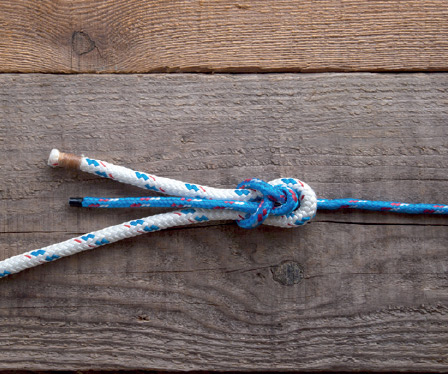
Uses: joining two lines that will be dragged or towed; dinghy painters; towlines
Pros: reduced chance of catching on obstruction, less drag when towed in water
Cons: somewhat insecure if not kept under load
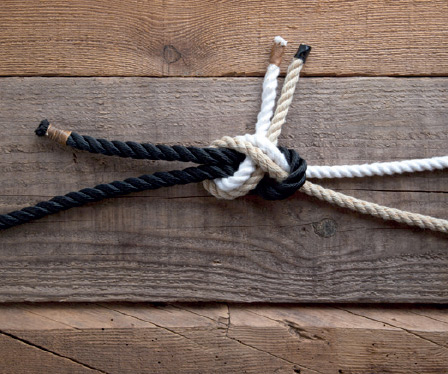
Uses: two-to-one or one-to-two towing
Pros: an easy three-way bend; easy to untie; works with different size ropes
Cons: insecure

49. Flemish Bend
Uses: standing rigging, static and dynamic loads
Pros: secure
Cons: difficult to untie in natural fiber rope; only for ropes of equal diameter
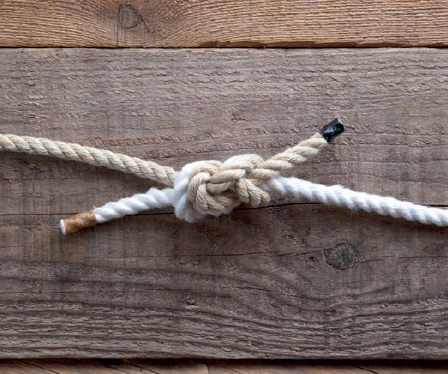
Uses: joining ropes for climbing, mountaineering
Pros: very secure and strong, absorbs shock
Cons: none known
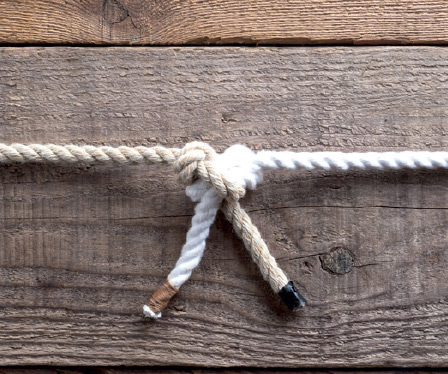
51. Carrick Bend
Uses: joining heavy, stiff ropes
Pros: more secure than Sheet Bend or Reef Knot, easy to untie
Cons: reduces rope strength considerably

52. Zeppelin Bend
Uses: load lifting, safety
Pros: strong; remains secure when unloaded; easily untied
Cons: tricky to tie; bulky; may catch when dragged
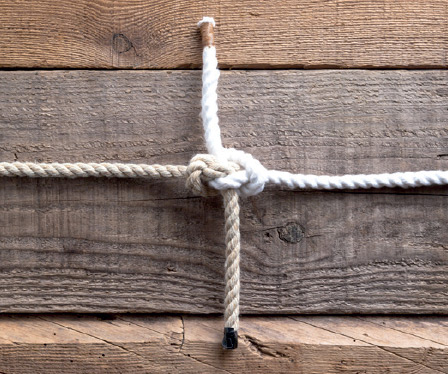
53. Hunter’s Bend
Uses: load bearing
Pros: remains secure with or without load; holds slippery rope well
Cons: fussy to tie in hand; hard to untie
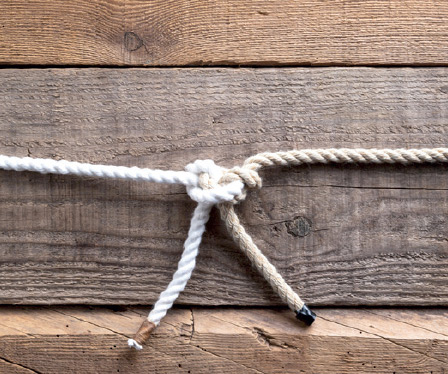
54. Ashley’s Bend
Uses: load bearing in thin rope, bungee cord
Pros: very secure
Cons: fussy to tie in hand, difficult to check; hard to untie
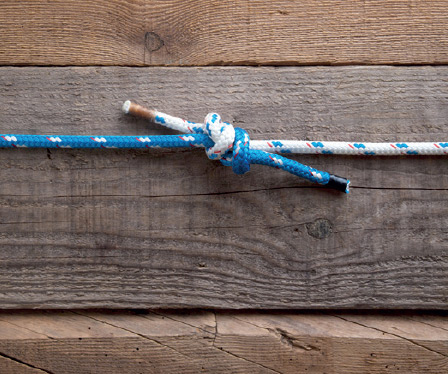
55. Fisherman’s Knot
Uses: joining small or medium cordage
Pros: easy and quick to tie
Cons: can capsize or slip under tension; difficult to untie
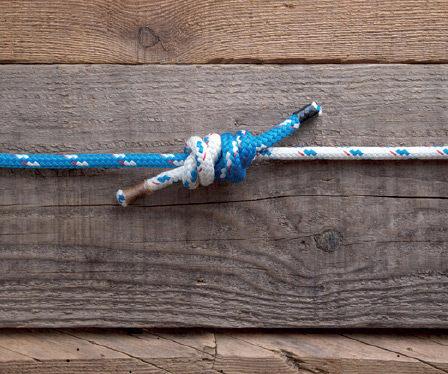
Uses: joining cordage of any weight, including monofilament and anchor lines
Pros: easy to tie, quite secure
Cons: difficult to untie
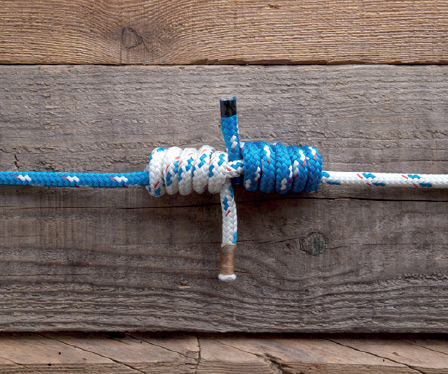
57. Blood Knot
Uses: joining ends of rope of any weight, especially monofilament
Pros: very secure, simple in concept
Cons: difficult to manipulate, very difficult to untie
44. Water Knot
Also known as: Double Overhand Bend, Tape Knot, Tape Bend
This knot works well with flat stuff like nylon webbing and leather straps as well as with conventional rope. It’s used by climbers, but also practical for extending the length of cargo tie-down straps.
Instructions
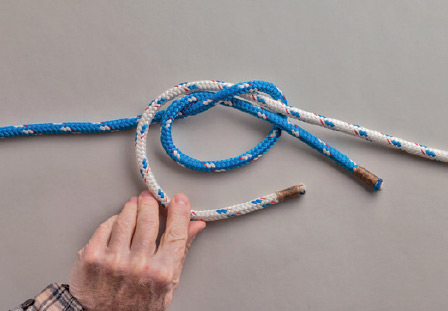
1. Tie an Overhand Knot near the working end of one strap or rope. Working from the opposite direction, thread the other line’s working end through the Overhand Knot, parallel to the first working end.
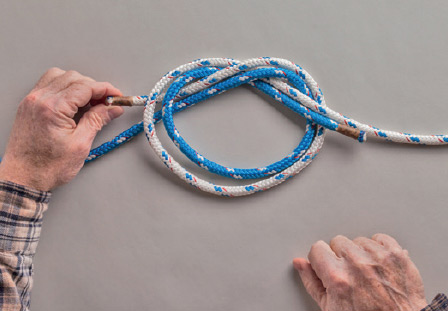
2. Continue threading the second working end parallel to and around the first Overhand Knot so that it forms its own Overhand Knot.

3. Pull the working ends to remove slack, then pull the standing parts to tighten.
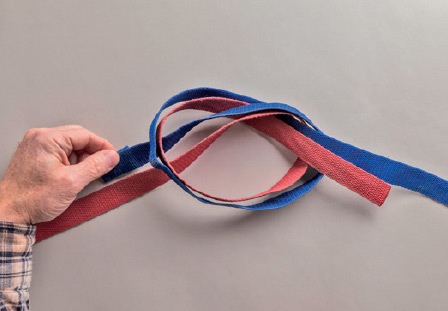
4. When tying in straps or webbing, keep the two lines flat, untwisted, and parallel to one another all the way through the knot.
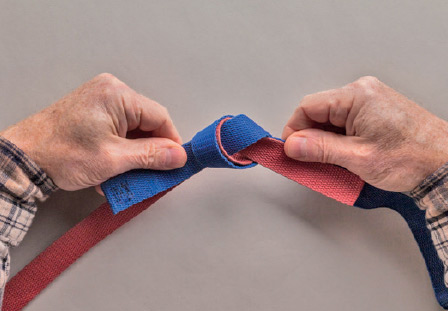
5. To keep flat materials from bunching up, the knot must be tightened gradually and continually faired.
45. Sheet Bend
Also known as: Basket Hitch, Weaver’s Knot
The Sheet Bend is simple to tie but rather insecure, especially if a constant load is not maintained. It forms the basis for several knots that are more secure, so it’s an important one to learn. Often used to join lines of different diameters, it actually holds better in lines of equal size.
Instructions

1. Make a bight in one rope. If the two ropes are of different diameters, make the bight in the heavier one. Pass the working end of the other rope through the bight from back to front, then around the bight, going first over the working end before coming back to the front over the standing part.
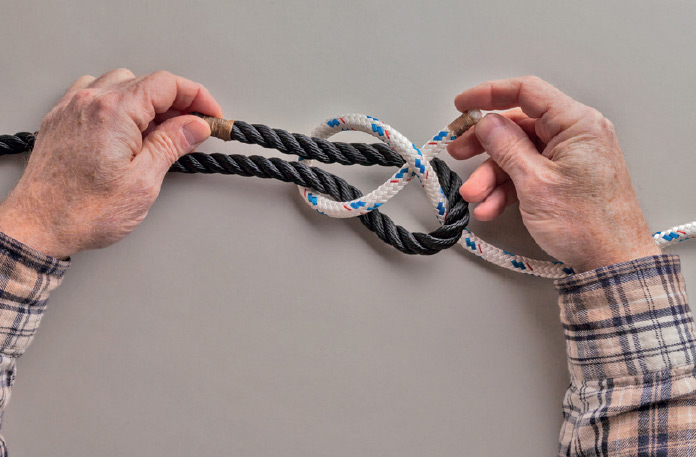
2. Pass the working end of the second rope under itself. The second rope will form an underhand crossing turn over the bight of the first rope. Make sure both working ends exit the knot on the same side.
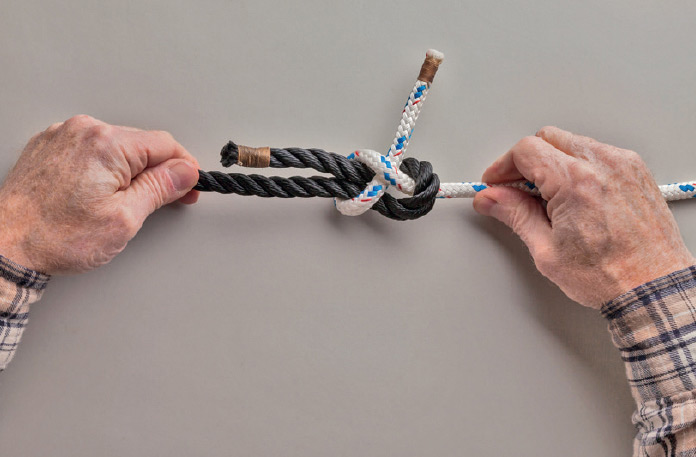
3. Pull the two standing parts to tighten.
46. Double Sheet Bend
Also known as: Doubled Basket Hitch or Weaver’s Knot
Less prone to slippage and more secure than the standard Sheet Bend (opposite), the doubled version is especially useful where one rope is significantly heavier than the other or so stiff that it cannot be bent into a small radius for other types of bends.
Instructions
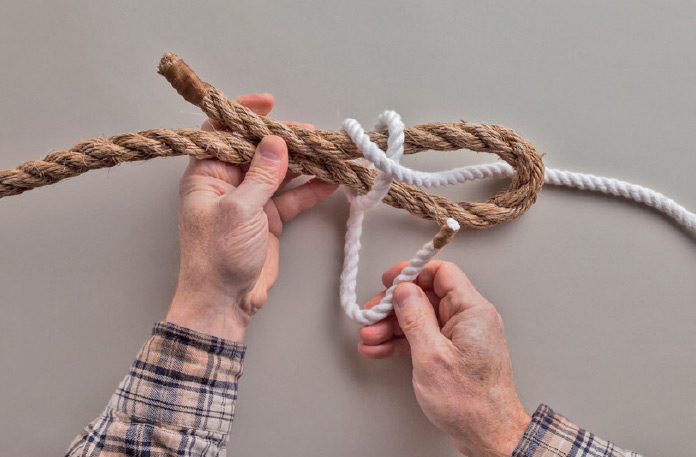
1. Tie a standard Sheet Bend, using a longer working end with the thinner rope. Pass the working end around the bight in the bigger rope, going first around the working end of the bight, then around its standing part before bringing it forward again.
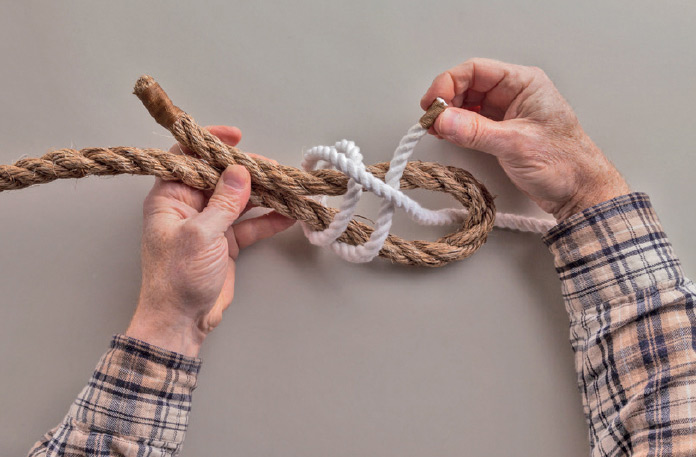
2. Pass the working end of the thinner rope beneath its own standing part, so that there are two crossing turns around the bight.
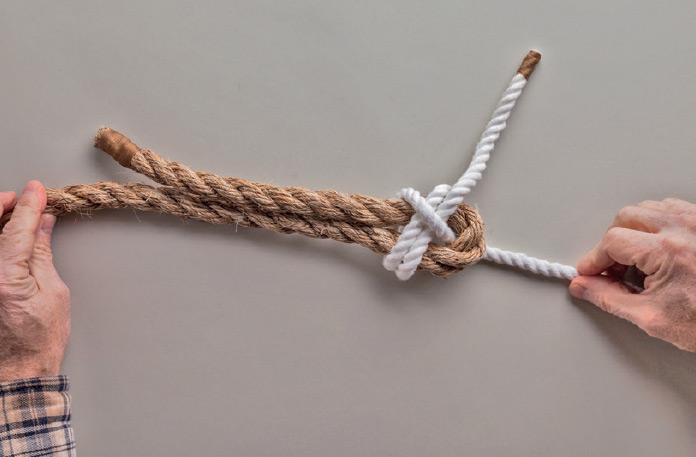
3. Pull the two standing parts to tighten.
47. Tucked Sheet Bend
Also known as: One-way Sheet Bend
This version of the Sheet Bend uses a Figure 8 Knot to reverse the direction of the working end of the thinner rope, so that it faces the same way as the working end of the larger rope. With both working ends facing away from the direction of movement, the knot is less likely to catch on an obstruction if the line is dragged along the ground, and it will create less drag if towed through the water behind a boat.
Instructions
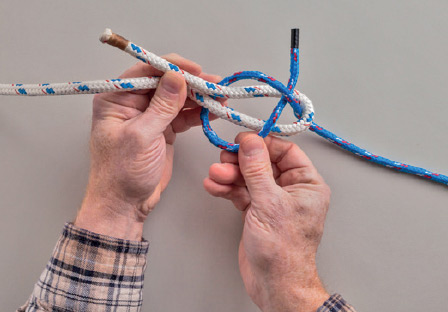
1. Tie a standard Sheet Bend.
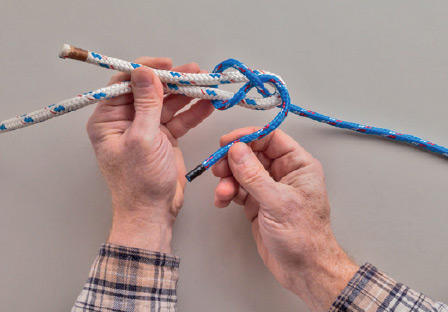
2. Bring the working end of the thinner rope back around its own standing part.
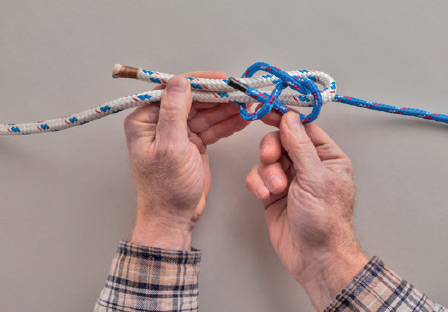
3. Tuck the working end through the crossing turn at the end of the thinner rope from back to front. This completes a Figure 8 Knot in the thinner rope.
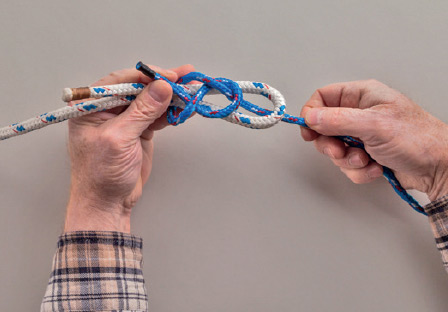
4. Hold both parts of the bight in the thicker rope together with the working end of the thinner rope. Pull the standing part of the thinner rope to tighten.
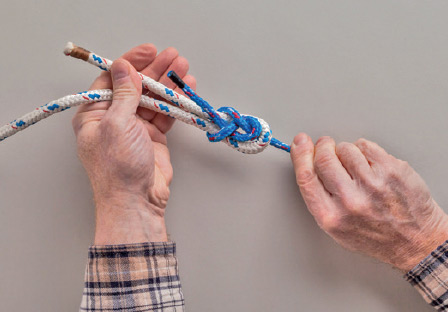
5. The finished knot.
48. Three-way Sheet Bend
This knot can be used to form a towrope joined to a bridle between the port and starboard stern cleats on a boat. Used in the opposite way (with the single line as the anchor and the other two lines trailing), a single strong paddler could tow two weaker ones. It is insecure and prone to slippage, but this can be remedied by finishing the knot as a Tucked Sheet Bend (opposite).
Instructions
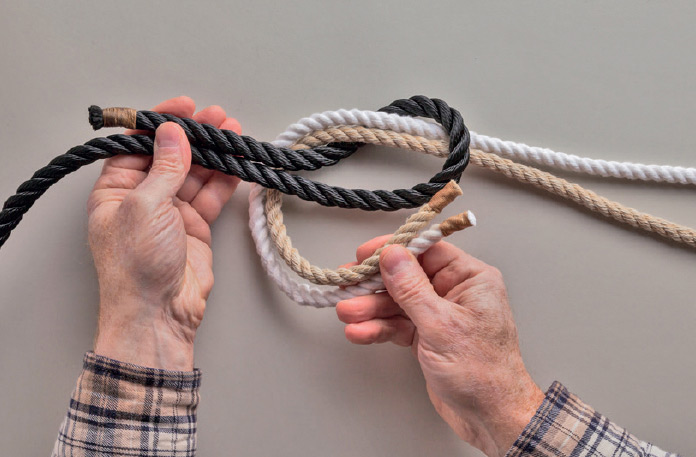
1. Make a bight with the thicker rope. Keeping the two thinner ropes parallel, pass their working ends through the bight from back to front, around the bight’s working end, and then around the standing part of the bight, bringing the two working ends forward.
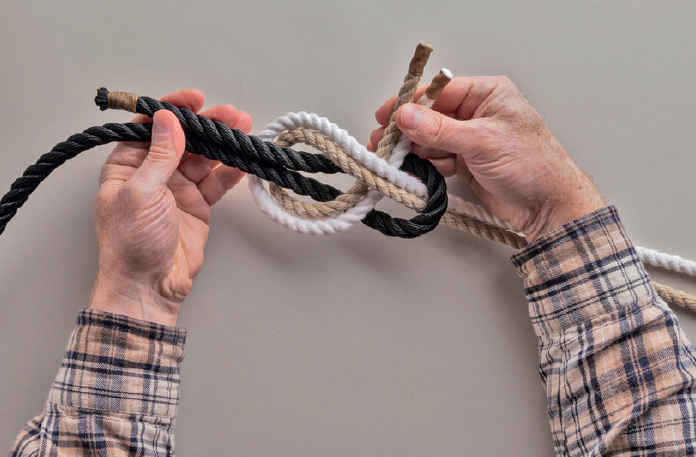
2. Tuck both thinner working ends beneath their own standing parts.
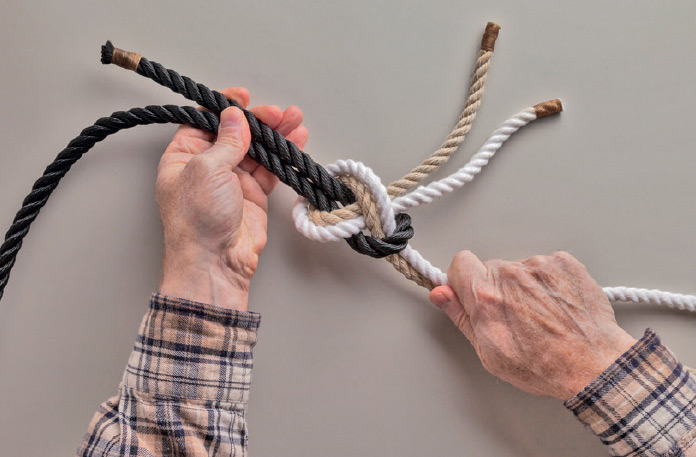
3. To tighten, pull both parts of the bight with one hand, and the standing parts of both thinner ropes with the other. If a tucked finish is desired, the two thinner ropes may be brought forward and passed through their own crossing turn from back to front, so that all three working ends face the same direction.
49. Flemish Bend
Also known as: Flemish Knot, Figure 8 Bend
Popular among climbers and sailors, the Flemish Bend is two intertwined or “threaded” Figure 8 Knots (also known as Flemish Knots) tied in ropes of equal diameter. It’s difficult to untie in natural fiber, but easy enough in slipperier synthetic.
Instructions

1. Tie a Figure 8 Knot in the end of one of the ropes.
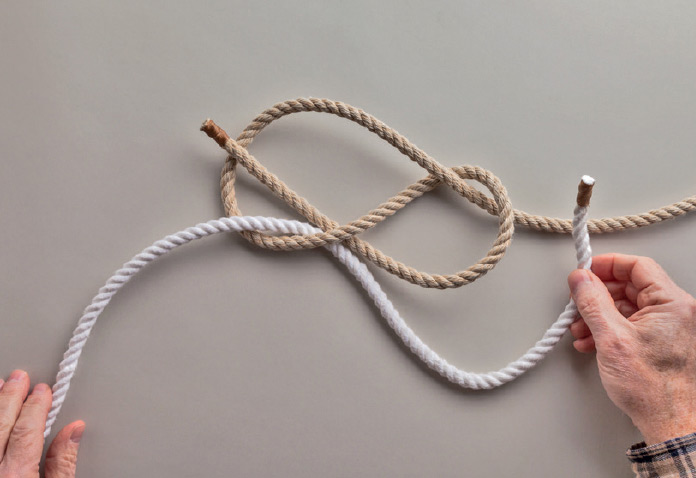
2. Pull a long working end of the other rope through the first crossing turn of the first Figure 8, parallel to the first one’s working end but from the opposite direction.

3. Use the second working end to follow the first figure 8 around in parallel. Go over the first rope’s standing part and follow its second crossing turn, going next through its first crossing turn from back to front.

4. Keep following the first figure 8 with the second working end. The last move takes it back through the second crossing turn of the first rope from front to back.

5. The threaded nature of the knot is apparent before tightening. Both lines run parallel throughout.

6. Tightening requires holding one standing part and pulling alternately on the two strands on the opposite end of the knot, then switching to hold the other standing part and pulling alternately “new” opposite ends.
50. Double Figure 8 Bend
Also known as: Flemish Bend
One of the most secure bends, this is a favorite climbing knot because of its great strength and ability to absorb shock loads. Like the Flemish Bend, it’s composed of two Figure 8 Knots, but here each one is tied around the standing part of the other rope, rather than being threaded together.
Instructions
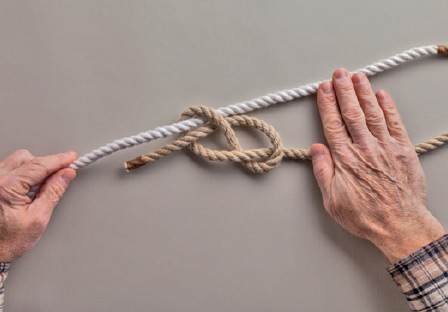
1. Tie a Figure 8 Knot in one rope. Turn it over if necessary, so the working end emerges from the first crossing turn from back to front. Pass the working end of the other rope through the figure 8’s first crossing turn from front to back, parallel with the first working end but in the opposite direction.
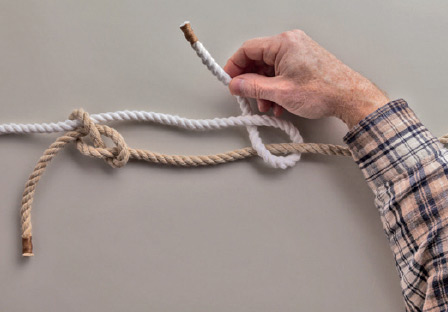
2. Make an underhand clockwise crossing turn with the second rope’s working end around the first rope’s standing part.
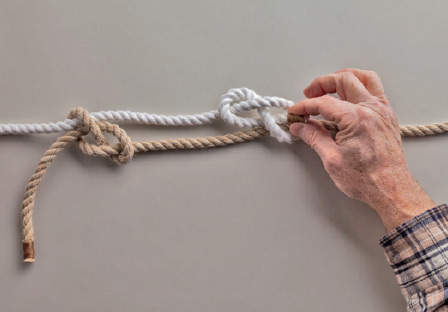
3. Finish the second figure 8 by taking the working end over the front of its own standing part, then drawing it through its first crossing turn from back to front. Tighten both figure 8s separately.
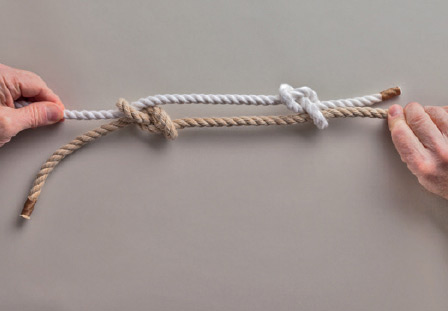
4. Pull the two standing parts to draw the figure 8s together. The two may also be left some inches apart as shown, to absorb shock loads.
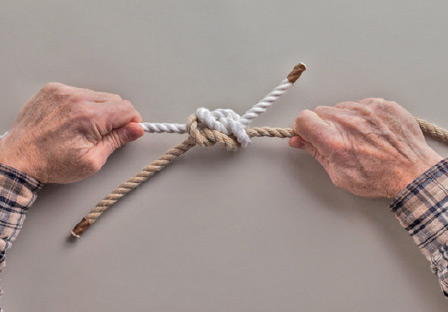
5. The finished knot with the two figure 8s drawn together.
51. Carrick Bend
Also known as: Carrick Bend with Ends Adjacent, Double Carrick Bend, Josephine Knot
Composed entirely of large-radius curves, the Carrick Bend is ideal for joining the ends of stiff ropes of equal diameters that can’t take tight curves. This version places the working ends next to each other when it is tightened. Another version, the Carrick Bend with Ends Opposed, has the working ends pointing in opposite directions and is strictly for decorative use—hence not included here.
Instructions (NB R1 = Rope 1, R2 = Rope 2)
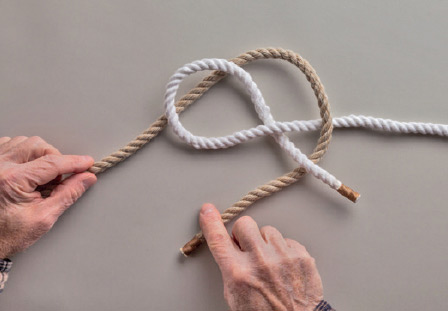
1. Lay the two ropes with working ends facing. Make an underhand clockwise crossing turn in the rope on the right (R1). Pass the standing part of R2 beneath the crossing turn, and take its working end over the standing part and under the working end of R1.
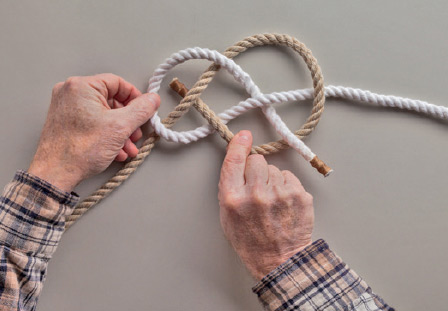
2. Bring the working end of R2 over the standing-part leg of the crossing turn in R1 and under its own standing part.
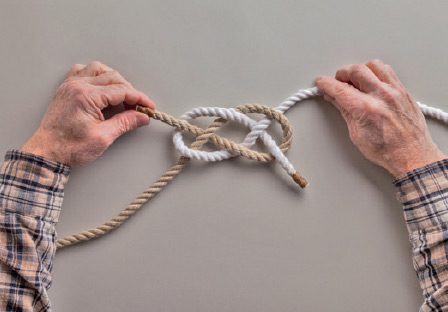
3. Pull the working end of R2 over the opposite leg of the crossing turn in R1 to complete the second of the interlocking crossing turns.
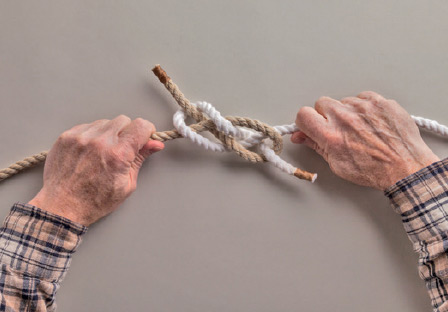
4. Pull both standing parts to tighten.

5. The knot will capsize as it tightens, losing some of the visual appeal it has when loose, but becoming very secure.
52. Zeppelin Bend
Also known as: Rosendahl’s Knot
This is a very strong, secure knot that will snug up and fair itself nicely when first placed under load. It works well in equal-size cordage of any diameter and can be easily untied, but the working ends sticking out in opposite directions at right angles to the standing parts make it inappropriate for dragging over ground or towing through water.
Instructions (NB R1 = Rope 1, R2 = Rope 2)
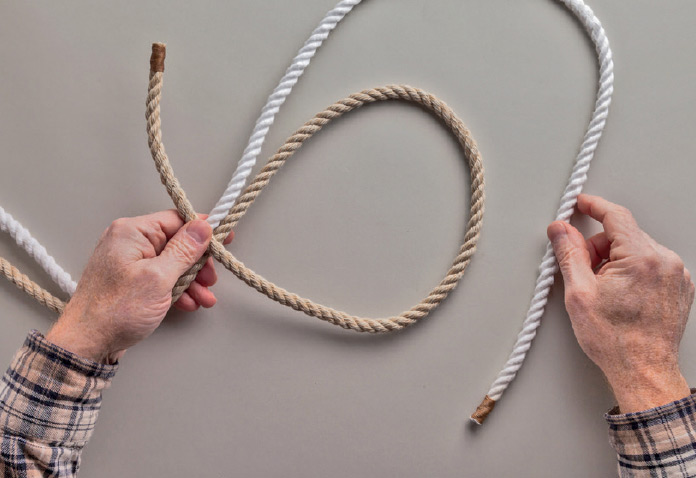
1. Place the two ropes next to each other, facing the same direction. Make an overhand clockwise crossing turn in the lower one (hereafter, R1) so that its working end passes over R2.
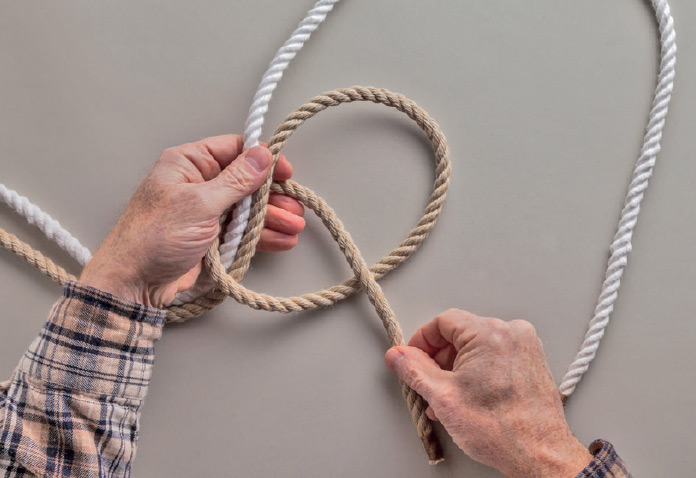
2. Bring the working end of R1 behind both standing parts and tie a loose Overhand Knot around R2.
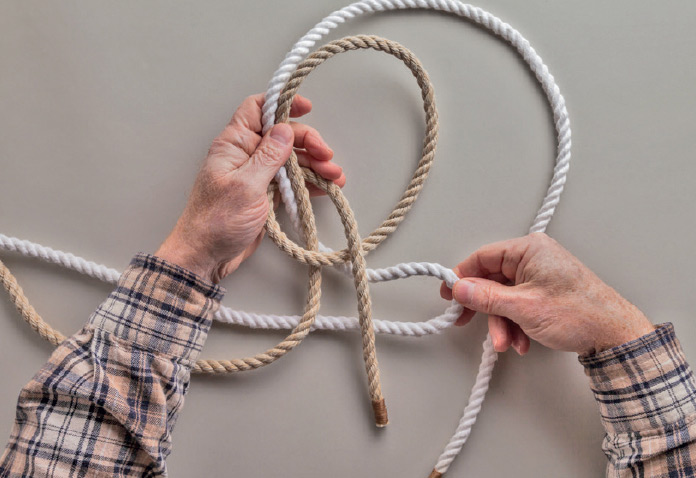
3. Holding the two ropes together at the Overhand Knot, pull a bight into the standing part of R2 below the knot.

4. Pull the working end of R2 through the bight from back to front.

5. Pull the working end of R2 through the Overhand Knot from front to back.
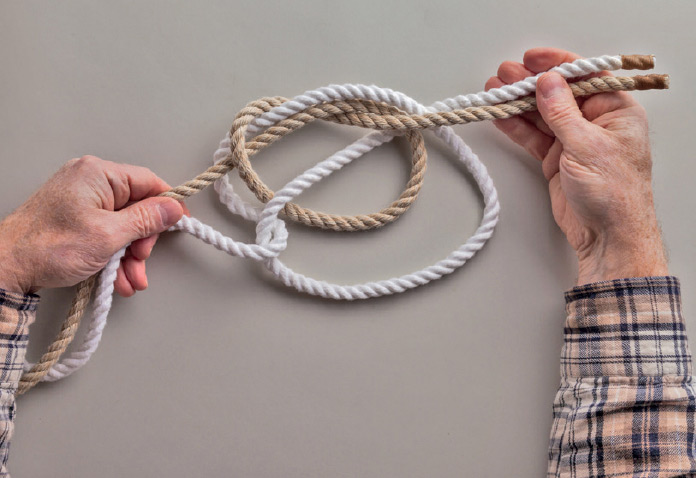
6. Hold both standing parts together in one hand and pull the two working ends tight with the other.

7. The knot assumes its proper shape after the two standing parts are pulled tight in opposite directions.
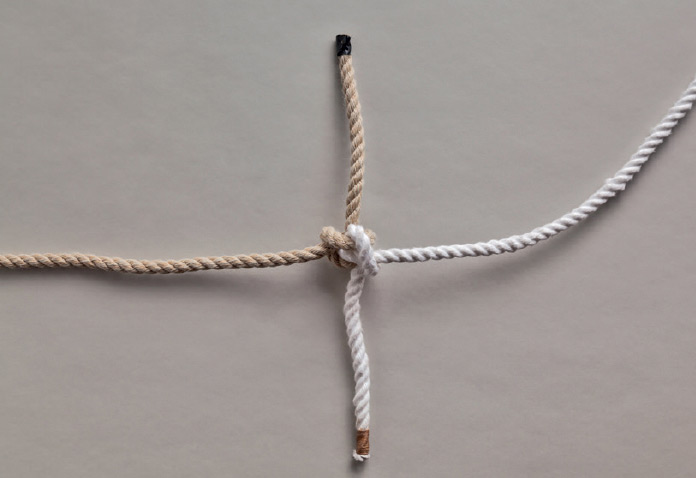
8. The opposite side of the finished knot.
53. Hunter’s Bend
Also known as: Rigger’s Bend
With its working ends facing in opposite directions, perpendicular to the standing parts, the Hunter’s Bend resembles the Zeppelin Bend. Because the opposing crossing turns must remain parallel before tightening, it is best tied on a flat surface. For years it was used by riggers and climbers and not by hunters, but it was popularized by a Dr. Hunter in the 1970s.
Instructions (NB R1 = Rope 1, R2 = Rope 2)

1. Lay out the two ropes with their working ends facing each other and overlapping by a foot (30 cm) or more, with the rope on the right (R1) above the one on the left (R2).
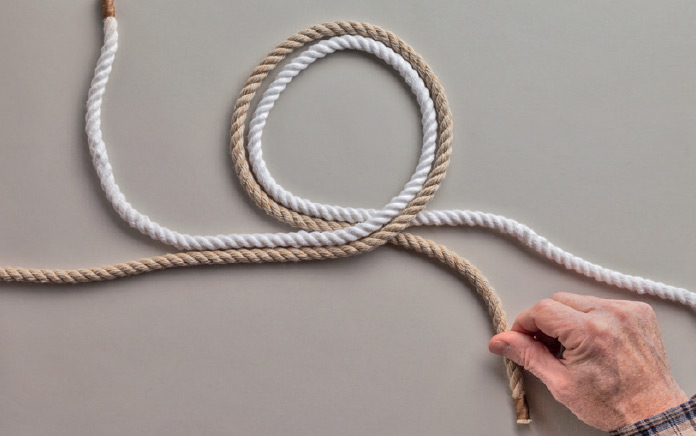
2. Make an overhand clockwise crossing turn with R1, then a counterclockwise underhand crossing turn with R2 parallel to and around the first one. The working ends will continue to face the same direction as in the original layout.

3. Pass the working end of R1 through both crossing turns from back to front.
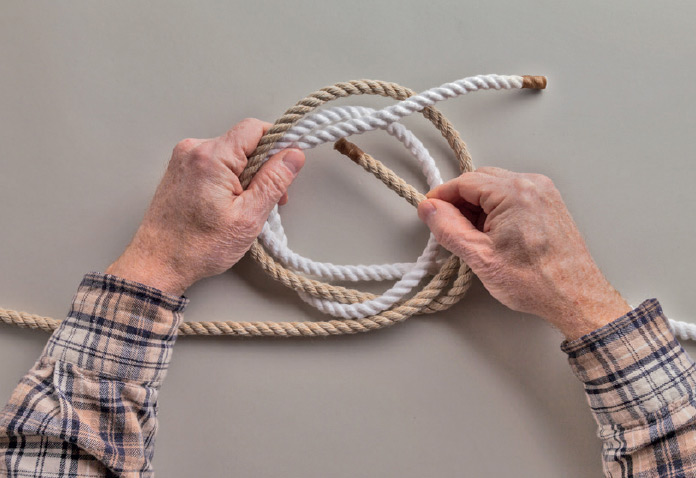
4. Pass the working end of R2 through both crossing turns from front to back.
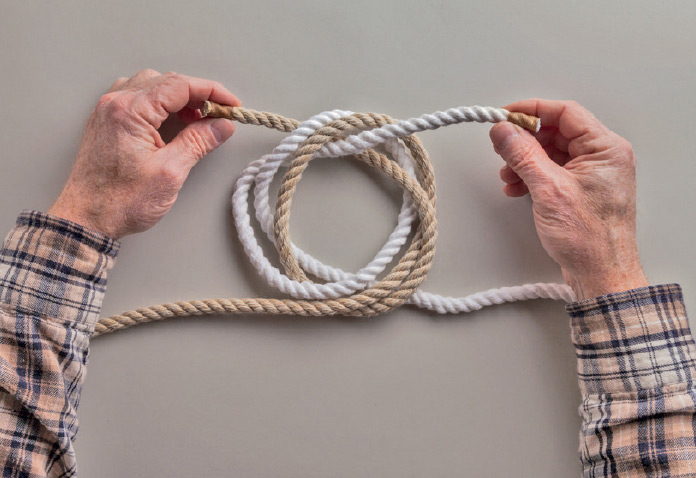
5. The knot before it is tightened.

6. Hold the working ends stationary between thumb and index finger as shown. Grab the standing parts between your other fingers and the heel of your hand, and pull the standing parts to remove all the slack.
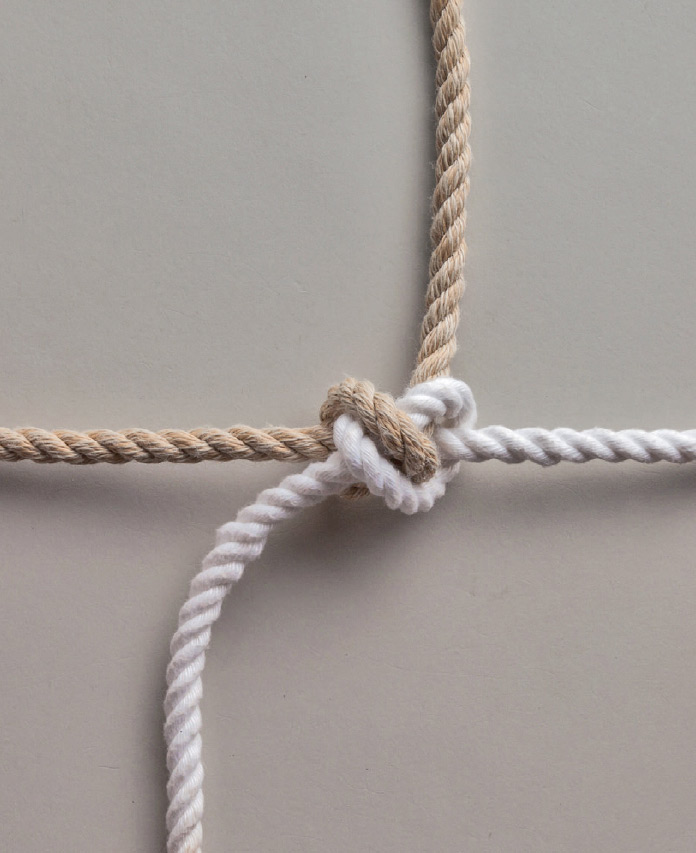
7. The knot will collapse into its proper shape as the slack is removed. Pull the standing parts to tighten.
54. Ashley’s Bend
Ashley’s Bend is secure even if subjected to movement and unloading, and is one of the best for tying in thin stuff and bungee cord. Like the Hunter’s Bend, it consists of two intertwined crossing turns, but in Ashley’s case, the setup places the two ropes in the same direction. The finished knot is somewhat untidy but effective.
Instructions (NB R1 = Rope 1, R2 = Rope 2)
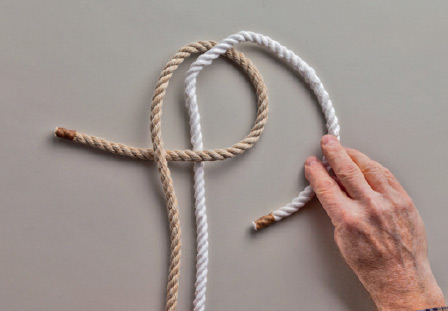
1. Lay the two ropes side by side facing the same direction. Make a clockwise underhand crossing turn with the left rope (R1) around R2.

2. Make a clockwise underhand crossing turn with R2, placing the working end on top of the standing part of R1.
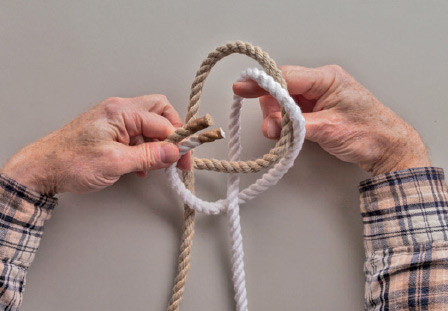
3. Take both working ends and pass them through both crossing turns from front to back.
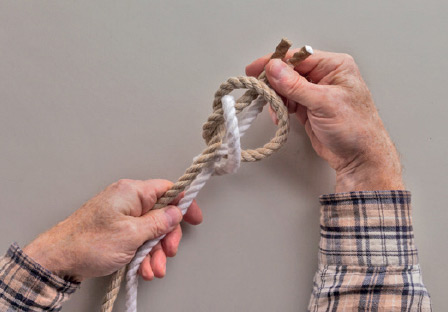
4. Pull both working ends against both standing parts to remove slack.
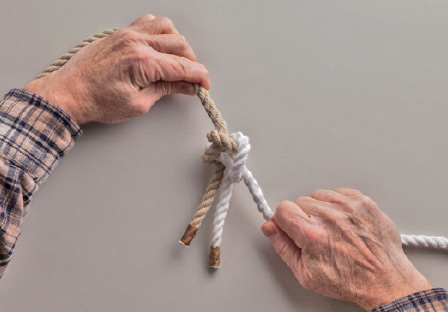
5. Pull the two standing parts to tighten. Fair the knot so that the working ends are parallel and adjacent, with each working end perpendicular and adjacent to its own standing part.
55. Fisherman’s Knot
Also known as: True Lover’s Knot, Water Knot, Waterman’s Knot, English Knot, Englishman’s Knot
This simple but effective bend consists of two Overhand Knots, each tied around the standing part of the other rope. The working ends may be taped against the standing parts for added security.
Instructions
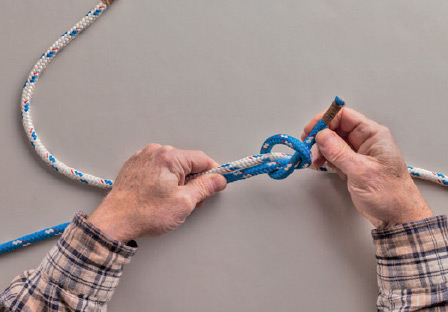
1. With the ropes facing opposite directions, overlap their working ends by several inches. Tie an Overhand Knot in the working end of one rope around the standing part of the other.
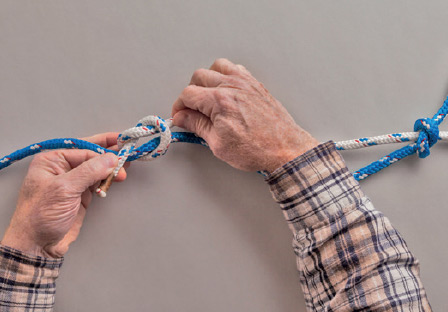
2. Tie a second Overhand Knot in the second rope around the standing part of the first. Tighten both Overhand Knots.
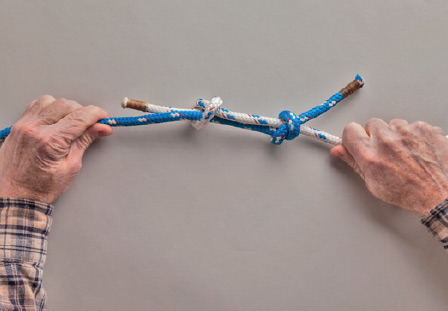
3. Pull the standing parts to draw the Overhand Knots together.
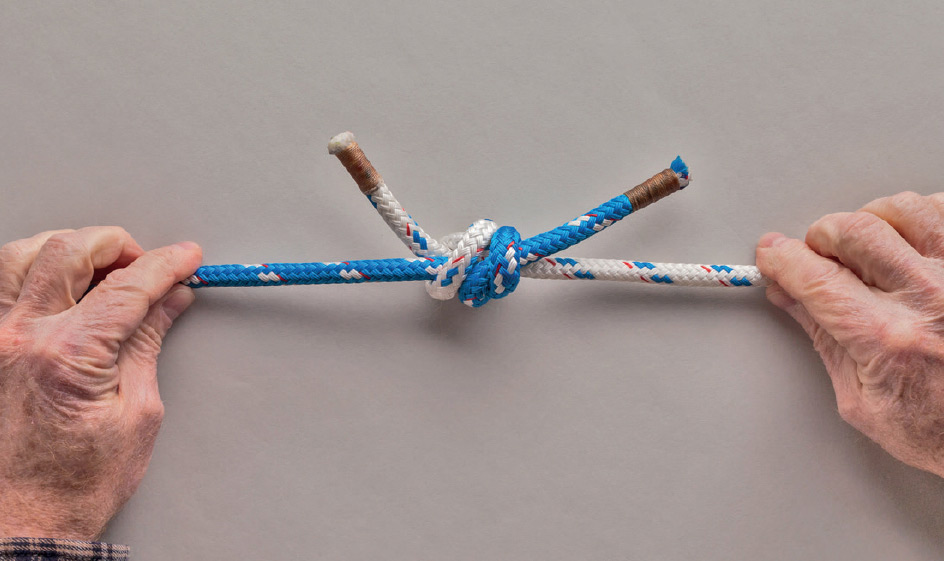
4. The finished knot drawn tight.
56. Double Fisherman’s Knot
Also known as: Grinner Knot, Grapevine Knot, Double English Knot
This simple variation on the Fisherman’s Knot places Double Overhand Knots around the standing parts of the opposite rope. It is much more secure than the standard Fisherman’s Knot and works better in larger rope.
Instructions
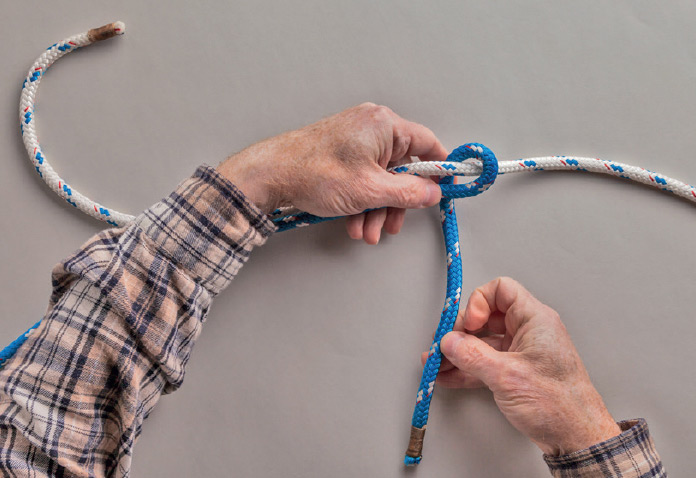
1. With the ropes facing opposite directions, overlap their working ends by several inches. Make a crossing turn with one working end around the standing part of the other rope.
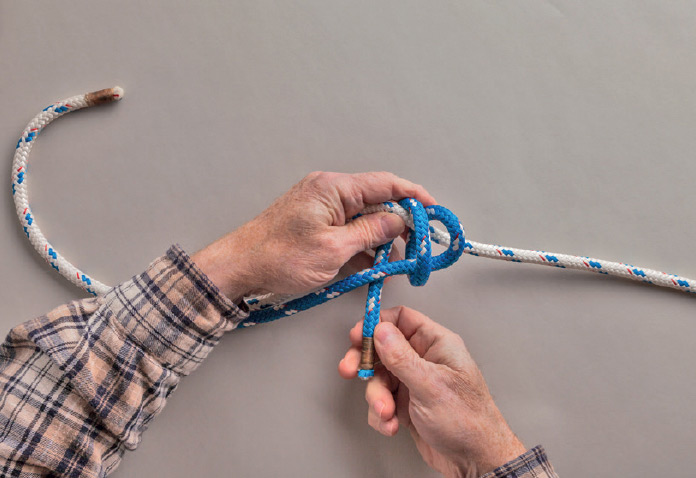
2. Make a round turn around the standing part, working back toward the first rope’s standing part.
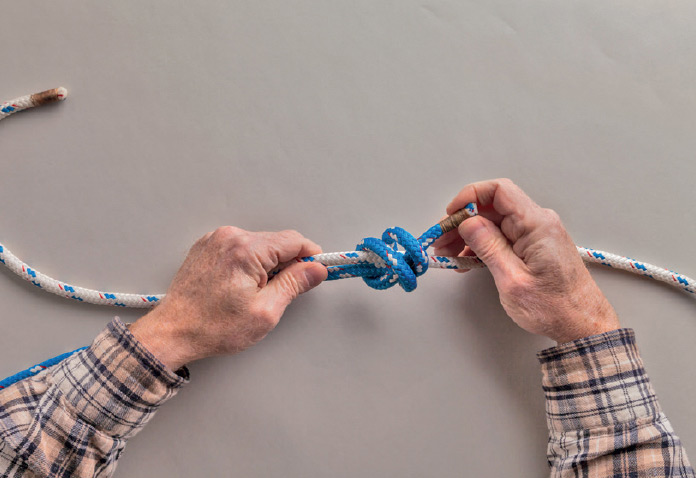
3. Pass the working end through the round turn and the crossing turn to finish the first Double Overhand Knot. Pull it tight.
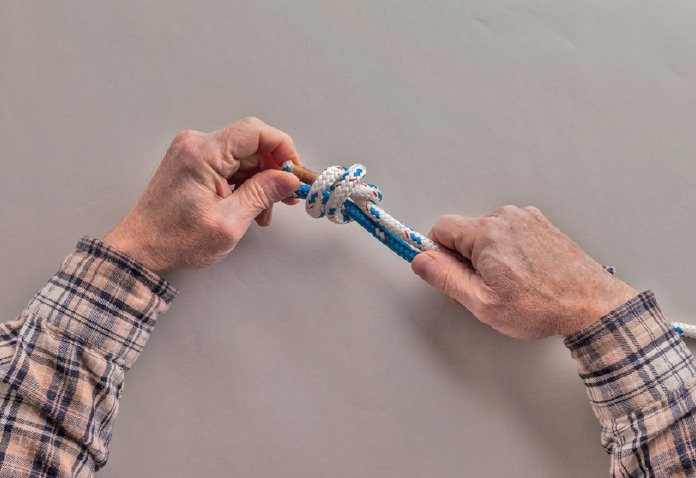
4. Tie an identical Double Overhand Knot in the other working end around the first rope’s standing part.
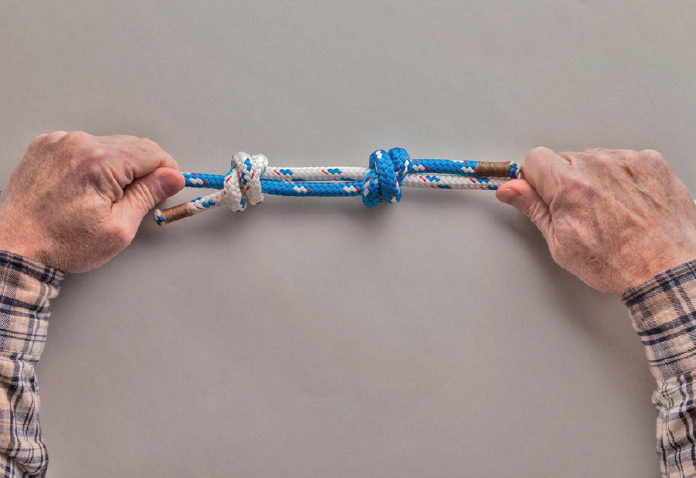
5. Pull the two standing parts to draw the Double Overhand Knots together.

6. The completed knot. Trim the working ends short for fishing line; leave them long for load-bearing applications such as anchor lines.
57. Blood Knot
Also known as: Barrel Knot, Blood Knot with Inward Coil
This is a very popular fishing knot, but it works well in heavier stuff too. It snugs up so tight that it’s quite difficult, if not impossible, to untie.
Instructions
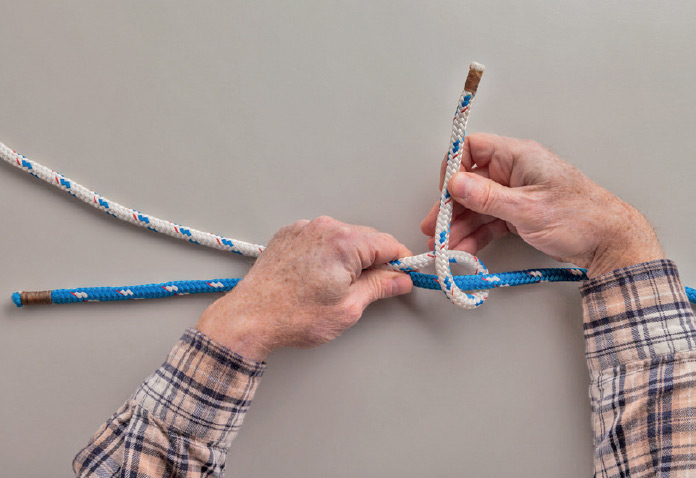
1. With the ropes facing opposite directions, overlap their working ends. Make a crossing turn in one working end around the standing part of the other rope.

2. Pull the crossing turn tight and make a round turn around the other rope’s standing part, working toward the first rope’s standing part.
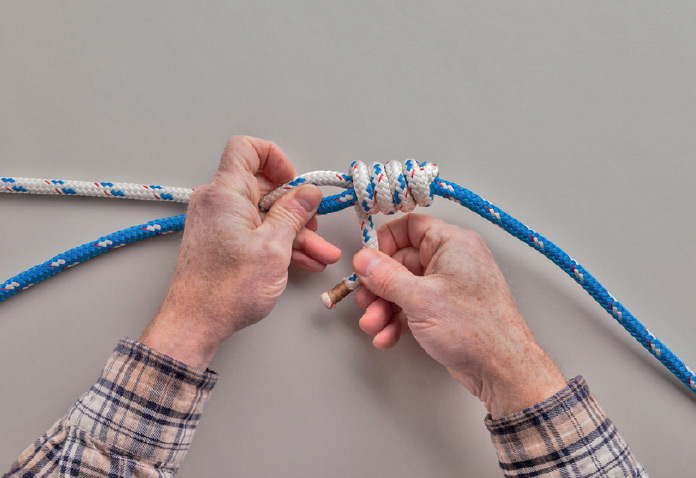
3. Keep wrapping round turns around the standing part of the second rope.
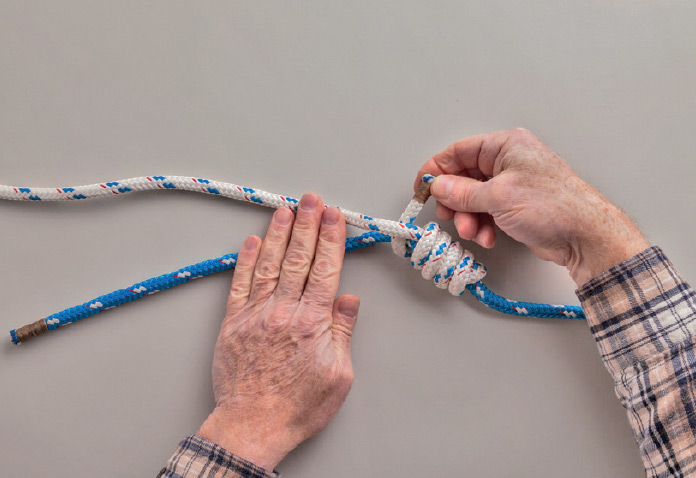
4. With a minimum of five turns altogether (including the original crossing turn), pass the working end between its own standing part and the working end of the other rope.
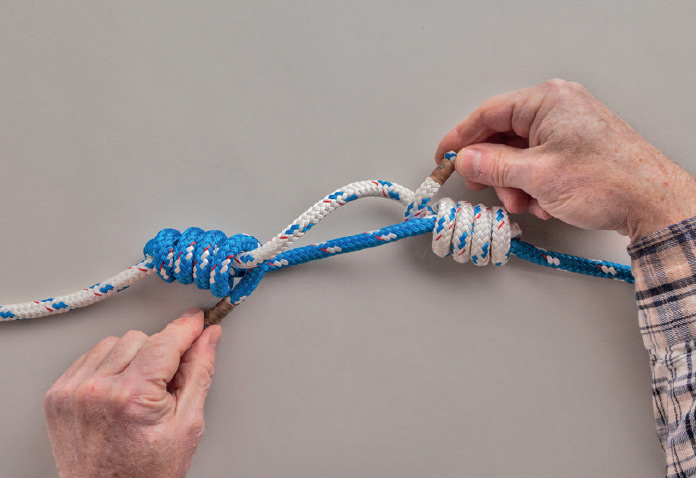
5. Holding the first working end in place, make an identical set of crossing and round turns with the second working end around the standing part of the first rope. This requires some dexterity or a superabundance of fingers.

6. The two working ends should face the same direction between the standing parts as you pull on the standing parts to draw the coils together. If tying in monofilament, a drop of water or spit on the coils will help them slide more easily and tighten more securely.

7. The finished knot.