Part Seven
Hitches
Tie a hitch when you need to connect two objects with a length of rope. Unlike loop knots, in which the rope is tied to itself and is independent of the object encircled, hitches generally depend upon the object to which they are tied for their form and integrity: remove the object, and there is no knot. They are often tied around roughly cylindrical objects like trees, posts, rails, stakes, poles, bitts, and bollards.
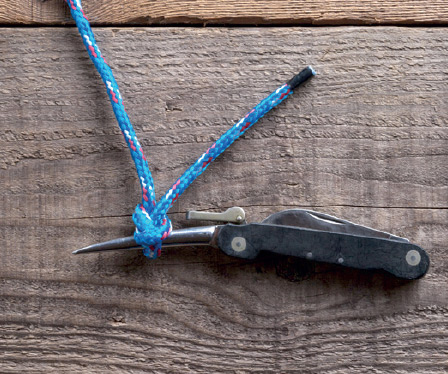
Uses: temporary “handle” for pulling line
Pros: quick, easy, unties instantly
Cons: strictly temporary; can slip
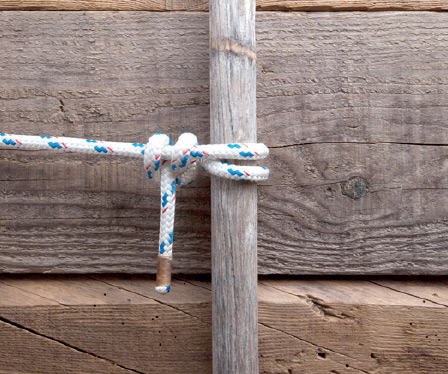
59. Round Turn and Two Half Hitches
Uses: hitch or adjustable noose for perpendicular loads, e.g., boats, tarp ridgelines
Pros: strong and fairly secure, easy to tie and untie, adjustable
Cons: can slip, adjustment not as secure as Taut Line Hitch
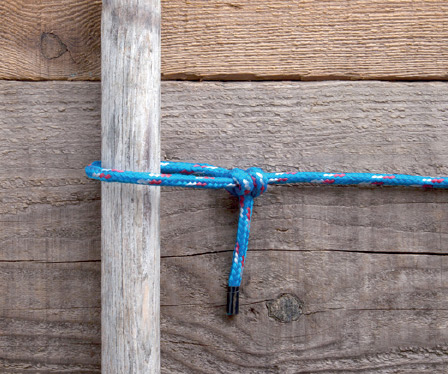
Uses: hitch or adjustable noose for perpendicular loads, e.g., boats, clotheslines
Pros: uses less rope and easier to adjust than Round Turn version
Cons: somewhat less secure than Round Turn version
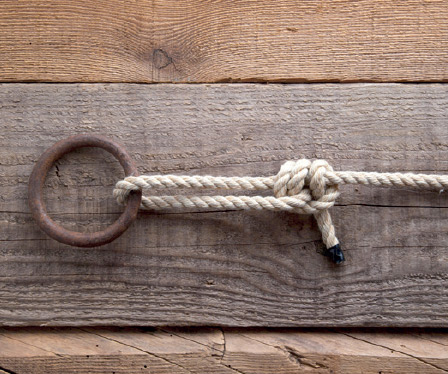
61. Taut Line Hitch
Uses: adjustable hitch; tent and fly guys, cargo tie-down, clotheslines, tarp ridgelines
Pros: tightens easily; holds adjustment better than Two Half Hitches
Cons: can slip, more complicated than Two Half Hitches
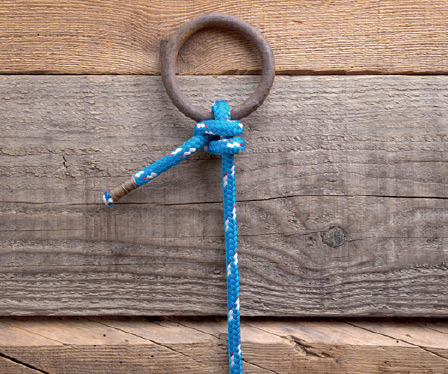
62. Buntline Hitch
Uses: halyards, sail sheets, tarp guy attachment, friction noose
Pros: very secure even if shaken
Cons: difficult to untie
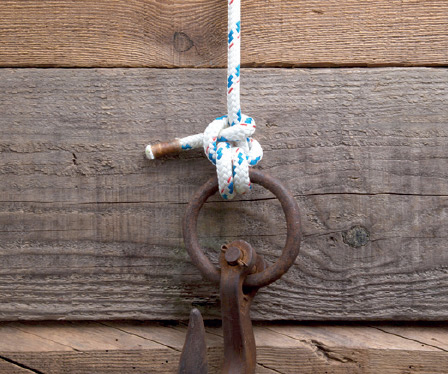
Uses: anchors, grapnels, hitching to a ring
Pros: very secure in slippery line; can be tied loose around the object
Cons: none known
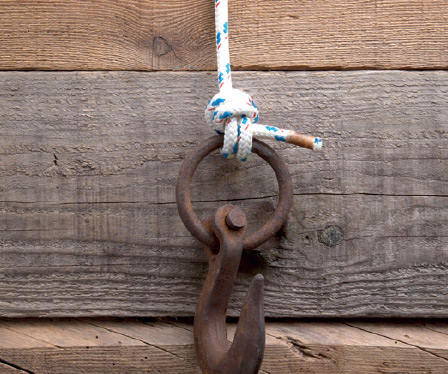
Uses: anchors, grapnels, hitching to a ring
Pros: strong, secure, more compact than Version 1
Cons: strain on rope is greater than Version 1
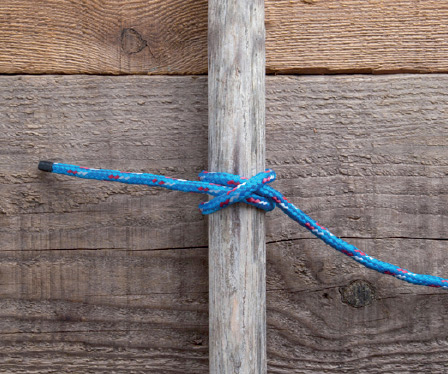
65., 66. Clove Hitch (also on a bight)
Uses: light-duty hitch for boats, hanging gear; binding knot
Pros: easy and quick to tie
Cons: insecure; can jam
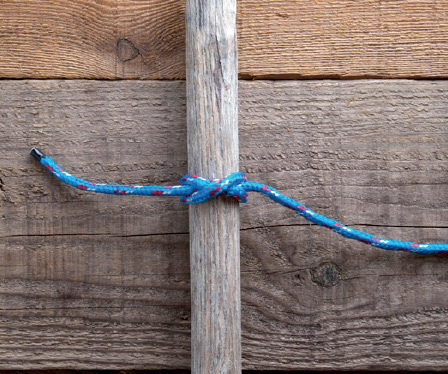
67. Constrictor Knot
Uses: heavy-duty hitch in thin line; binding; seizing
Pros: very secure, easy to tie; ends can be cut short
Cons: very difficult to untie if tightened hard
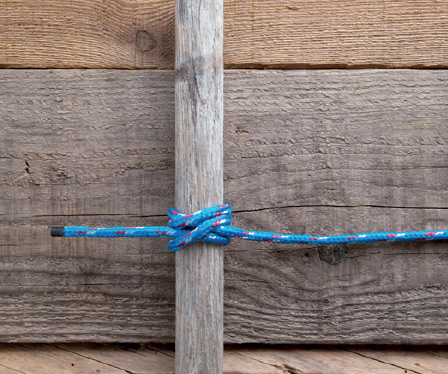
68. Rolling Hitch
Uses: pulling or taking strain off another rope, securing a load in line with fixed object
Pros: secure and easy
Cons: insecure if load is perpendicular to object
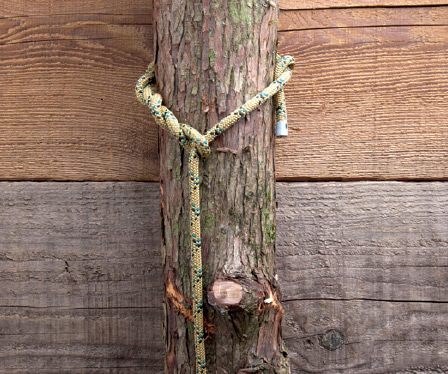
69. Timber Hitch
Uses: hauling and lifting large heavy cylinders
Pros: simple to tie, easy to untie
Cons: insecure if load is perpendicular to object
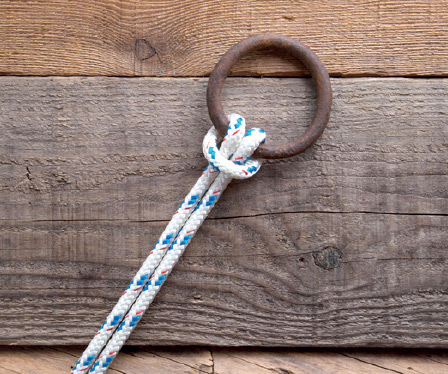
70., 71., 72., 73. Cow Hitch (on a bight, in a sling, over the end, with one working end)
Uses: hitching animals; adding hanging loops or tie-offs to rails, rings, other ropes
Pros: easy and quick to tie by many methods, easy to untie; does not jam
Cons: insecure; unequal loads will shift

Uses: hitching to rails, posts, and rings, hanging gear
Pros: only cow hitch with a single load-bearing part; secure in any direction
Cons: not among the most secure hitches; can be difficult to untie
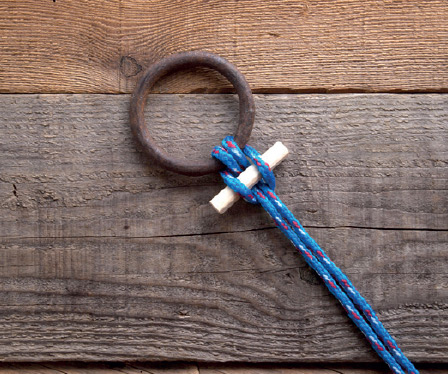
Uses: hanging gear from horizontal ropes or rails
Pros: quick and easy to tie and untie; works when only a bight is available
Cons: insecure; will slip if loaded unevenly; requires a toggle
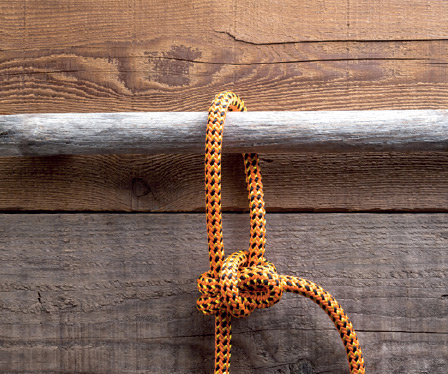
76. Mooring Hitch
Uses: quick-release adjustable hitch for constant light loads
Pros: releases instantly and adjustable far from the fixed object
Cons: insecure
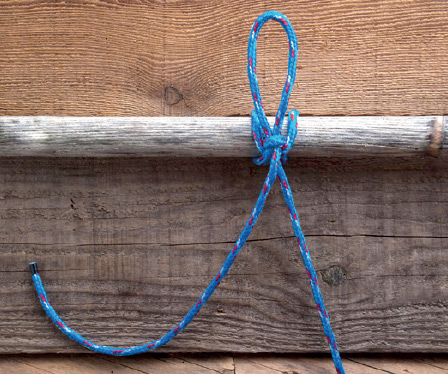
Uses: quick-release hitch for boats or horses
Pros: releases instantly far from the fixed object
Cons: insecure; not adjustable like the Mooring Hitch
58. Marlinespike Hitch
Also known as: Marlingspike Hitch
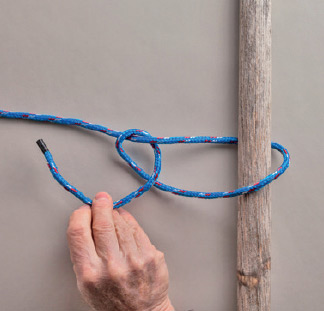
This is a Slipped Overhand Knot with a shaft passed through the drawloop to provide a temporary handle with which to pull the line. It can be used with heavy rope, but its main use is to apply tension on thin stuff that would otherwise cut into your hands. It’s especially useful for pulling thread tight in whippings and seizings (see Part Nine). A screwdriver or any other smooth rod can be used in place of a proper marlinespike.
Instructions
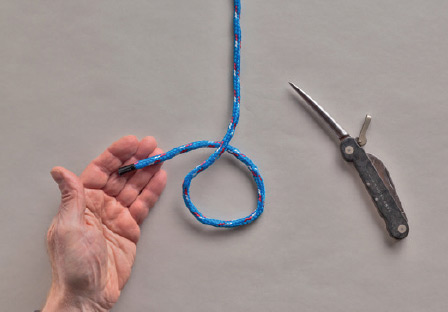
1. Make an underhand crossing turn
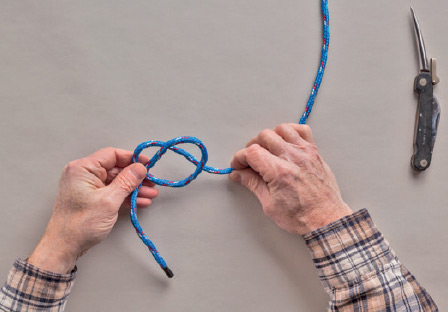
2. Position the standing part beneath the crossing turn to make a “pretzel” shape.
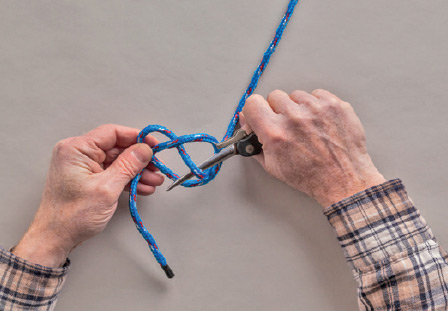
3. Pass the marlinespike over-under-over through the crossing turn: over the top of the crossing turn, under the standing part, and over the bottom of the crossing turn.
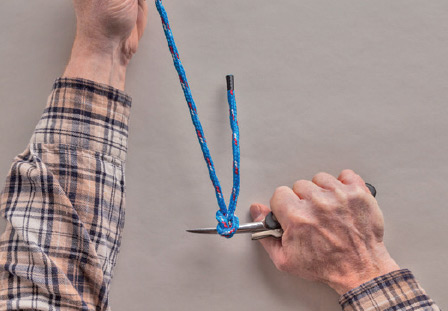
4. Pull the marlinespike so that it draws a bight into the standing part that comes through the crossing turn from back to front. Continue pulling until the crossing turn tightens against the marlinespike.
59. Round Turn and Two Half Hitches
One of the best hitches for loads that are roughly perpendicular to a fixed object, Two Half Hitches are easy to tie and untie, fairly secure, adjustable for tightness or length, and stronger than most hitches, because the load is born by the turns around the object, not by the knot itself. The preferred method begins with a round turn around the object.
Instructions
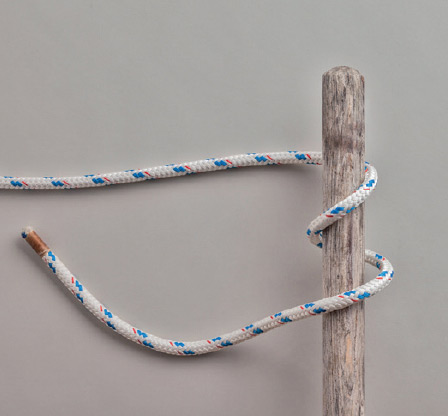
1. Make a round turn around the object. If the object is vertical, it is often more convenient, but not essential, to wind the round turn downward, so that the working end finishes below the standing part.
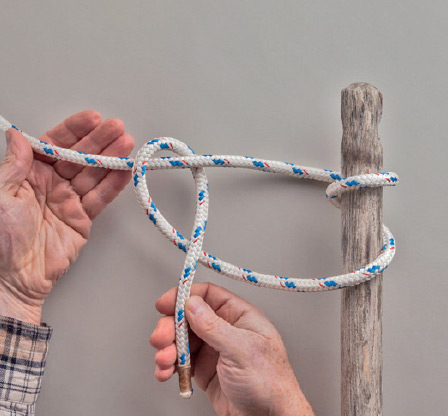
2. Make an overhand crossing turn around the standing part to form the first Half Hitch.
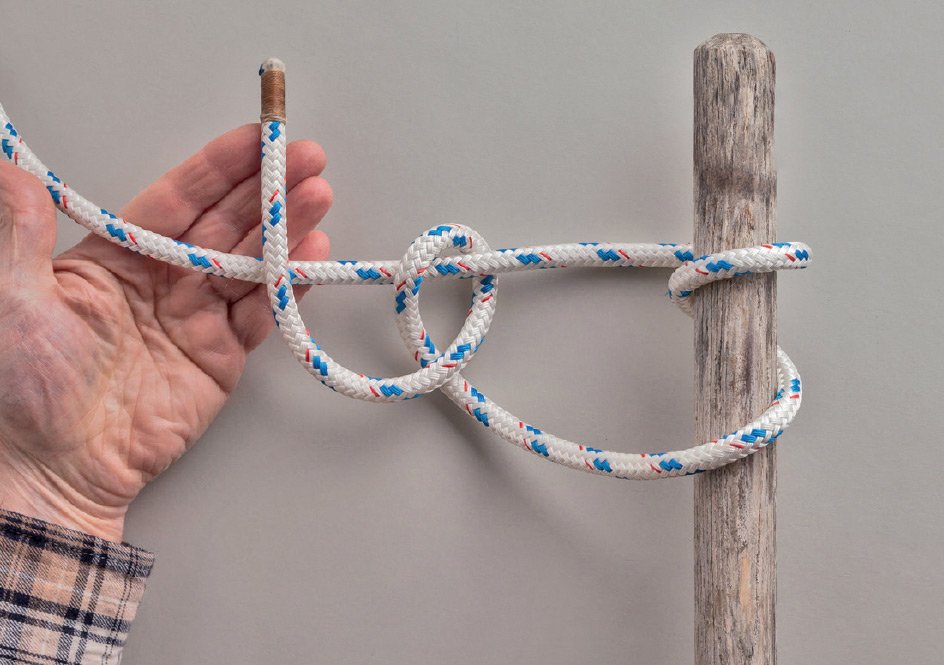
3. Begin the second Half Hitch by taking the working end in front of the standing part again.
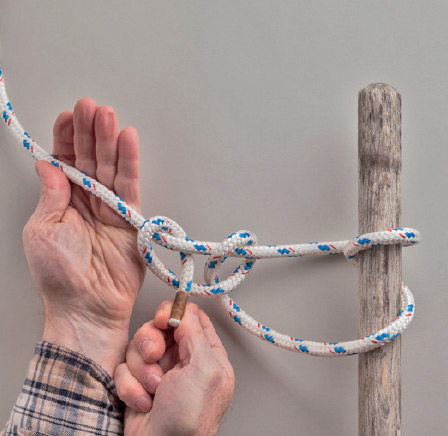
4. Complete the second Half Hitch by making another overhand crossing turn around the standing part.
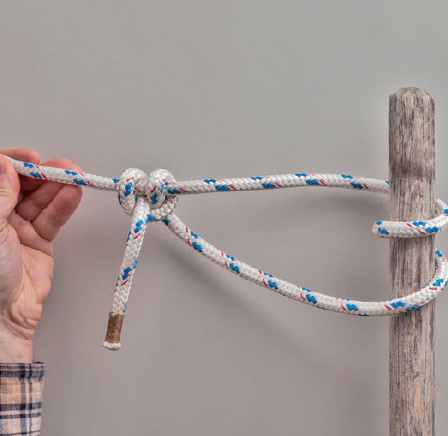
5. Note how the working end is captured between the two crossing turns.
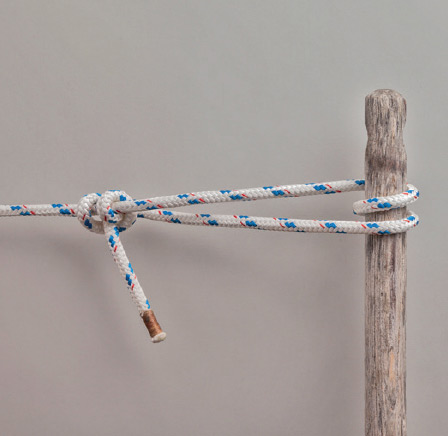
6. To tighten the standing part, slide the Half Hitches away from the anchoring object, feeding slack through the round turn as needed.
This slightly simpler way to tie Two Half Hitches places a single turn—not a round turn—around the fixed object. It’s marginally quicker to tie, requires less rope if it is to be tied around a large object like a tree trunk, and generates less friction against the object, making it less secure but easier to adjust for tension.
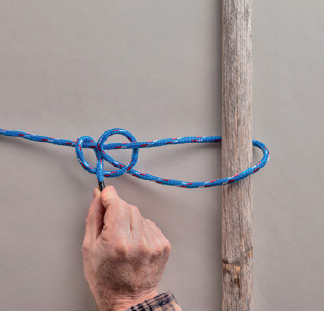
2. Complete the second Half Hitch.
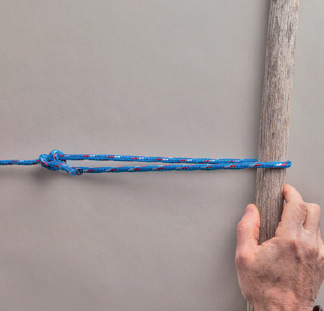
3. Slide the completed knot toward the working part to take up the slack, feeding line around the fixed object.
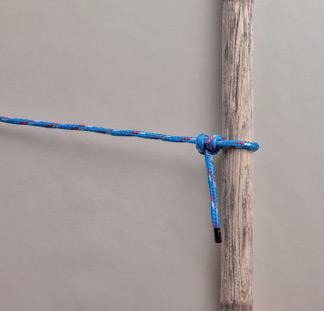
4. Or snug the completed knot against the fixed object for slack in the standing part and greater security in the knot itself.
61. Taut Line Hitch
Also known as: Midshipman’s Hitch, Blackwall’s Hitch
This sliding knot is a little more complicated than Two Half Hitches, but it holds better. It’s a favorite among canoeists and other small boaters to tighten the boat’s bow and stern lines to a car’s towing hooks when car-topping.

2. Lift the working end to make an overhand crossing turn around the standing part, then pass the working end behind the standing part.

3. Bring the working end through the half hitch from back to front without overlapping the crossing turn (i.e., keep the working end farther from the fixed object than the crossing turn).
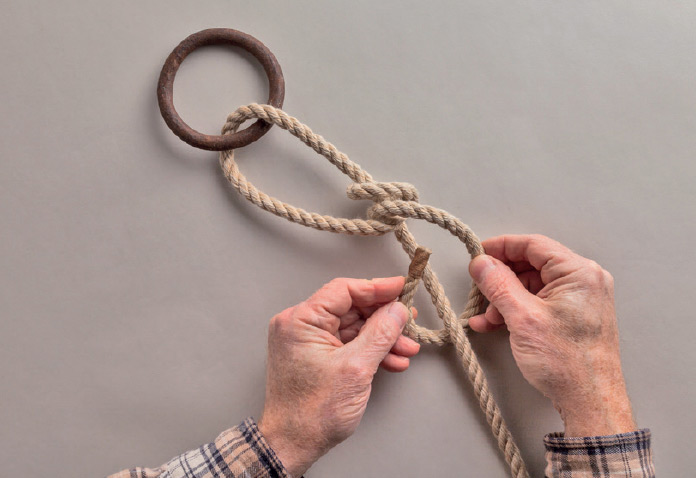
4. The working end pulled tight at this stage.
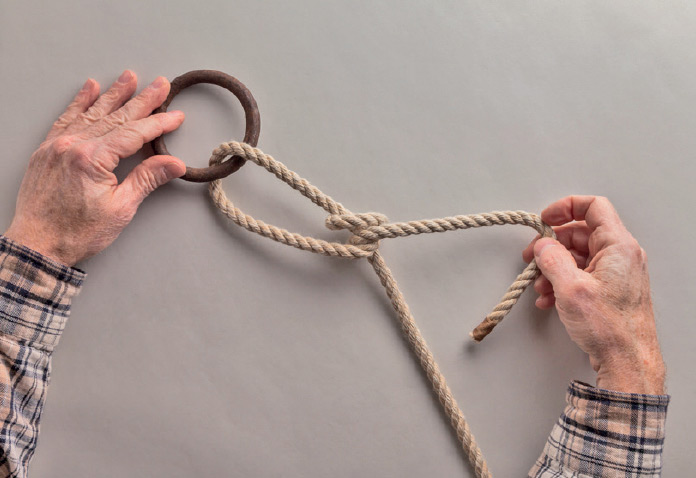
5. Pass the working end behind the standing part and bring it forward again.

6. Pass the working end under itself to complete a Half Hitch around the standing part.

7. The knot resists slipping when load is applied to the standing part. It can be slid toward the standing part to tighten the line, or slid the other way to snug up against the fixed object and put slack in the standing part.
62. Buntline Hitch
The Buntline Hitch holds exceptionally well when snugged up against the object to which it’s tied, which makes it a favorite in jobs where the knot will be subjected to a lot of shaking about, like flag halyards and dining flies. It can also be used as a friction noose, like Two Half Hitches, to tighten the stake end of guylines on tents and flies.
Instructions
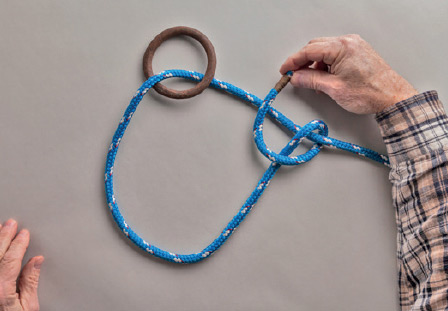
1. Make a turn with the working end around the fixed object or through the ring from back to front. Make an overhand crossing turn in the working end around the standing part. Cross the working end over the standing-part leg of the turn.
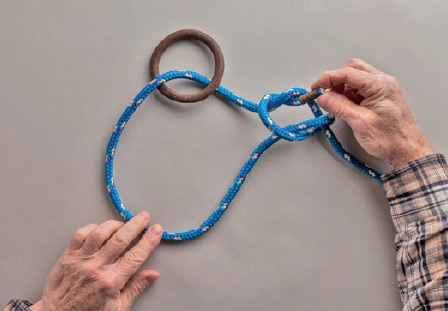
2. Pass the working end under the standing-part leg of the turn and pull it through to tie a Half Knot.
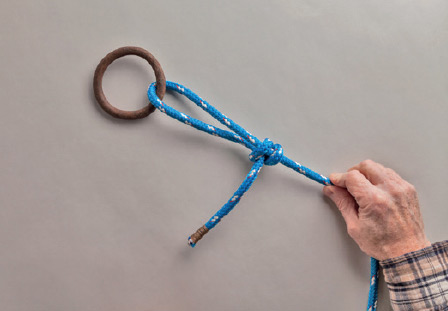
3. Push the Half Knot and the crossing turn together, capturing the working end between them, then pull the working end tight. As shown, the knot functions as a friction noose.
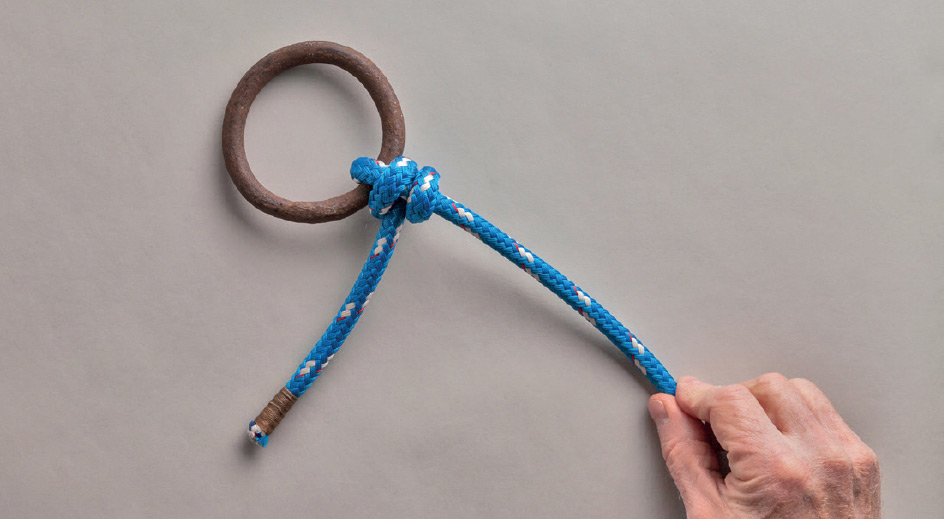
4. If the knot is snugged up tight against the ring, it will hold tenaciously and become very difficult to untie.
63. Anchor Bend—Version 1
Also known as: Fisherman’s Bend
In spite of its name, the Anchor Bend is a hitch, and it is usually tied to a ring. It is ideal for tying an anchor, because the initial round turn is not tightened around the anchor’s ring. This loose connection allows the knot to shift in compensation to a boat’s continual movements when at anchor, reducing strain on the rope.
Instructions
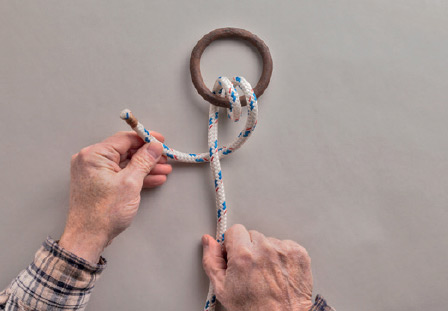
1. Pass the working end through the ring from back to front, then through again to make a round turn. Pass the working end behind the standing part.
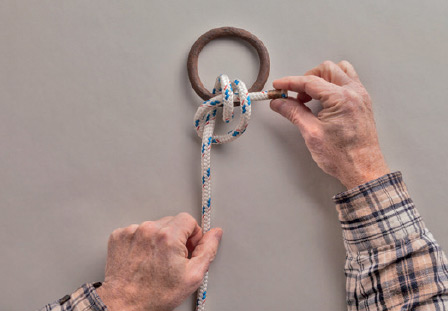
2. Pass the working end through the round turn.
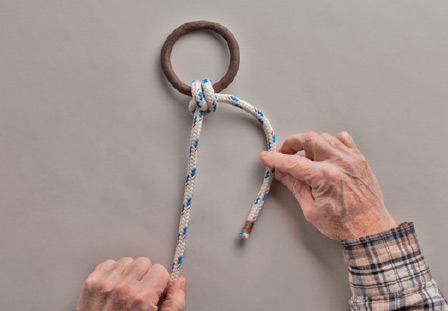
3. The working end may be pulled tight at this point, as shown, if you want the knot to be solid against the ring. If you want the knot to “float” around the ring, leave it loose for now.
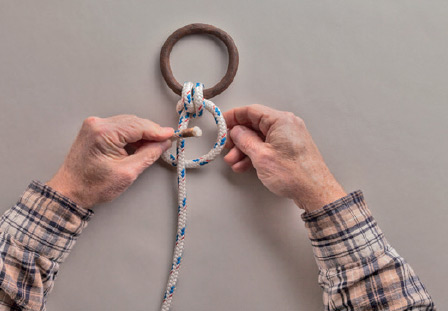
4. Pass the working end behind the standing part, bring it forward, and pass it through to make a single Half Hitch around the standing part.
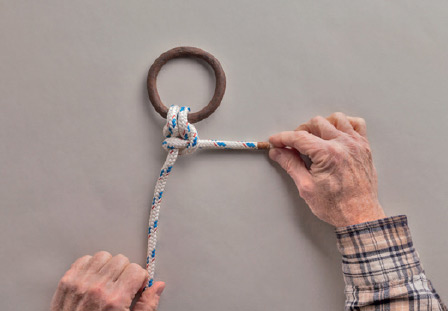
5. Pull the Half Hitch tight against the round turn.
64. Anchor Bend—Version 2
Unlike the standard Anchor Bend, this version does not “float.” It needs to be tightened against the ring. What it gives up in strain reduction it gains in lower abrasion.
Instructions
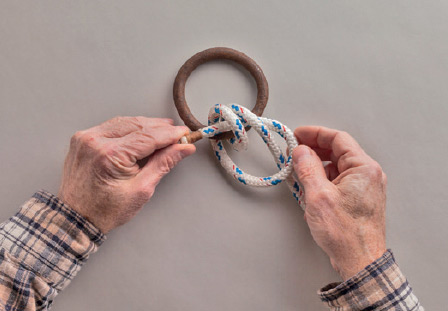
1. Pass the working end through the ring from front to back, then through again to make a round turn. Pass the working end in front of the standing part then through the round turn to make a kind of doubled Half Hitch. Don’t pull it tight yet.
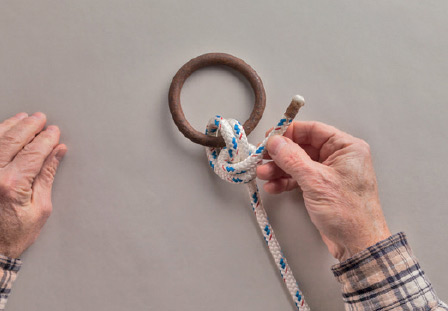
2. Take the working end across and in front of the round turn.
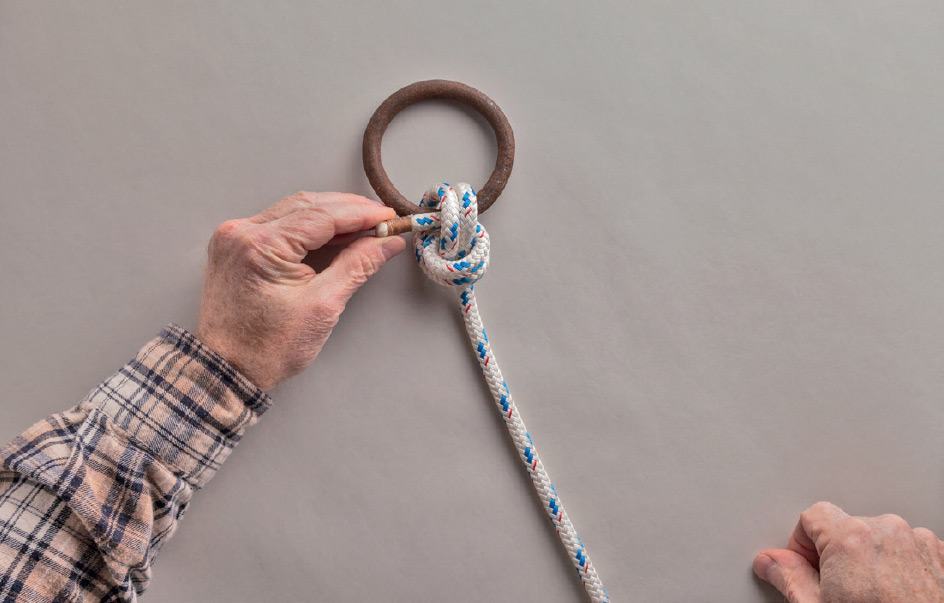
3. Pass the working end through the round turn a second time. The knot must be worked gradually into shape, pulling slack through the round turn and hitches and into the working end and standing parts a bit at a time until the round turn is tight around the ring.
65. Clove Hitch
Also known as: Builder’s Knot, Dry Weather Hitch
This is a useful light-duty hitch for situations where the load will be fairly constant and at right angles to a stationary object, but it can be insecure—or it may jam—in other situations. It’s easy to tie in the end of a rope, as described here, or on a bight, as shown on the following page. It forms the basis for several other hitches and can also serve as a light-duty binding knot.
Instructions
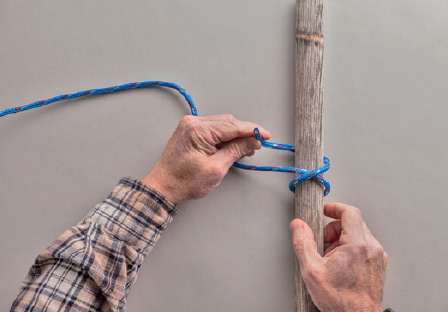
1. Form a Single Hitch with the working end over the standing part. Bring the working end around the object again but do not pull it tight.
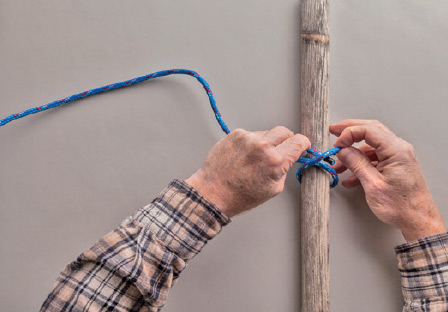
2. Pass the working end underneath itself, beside the standing part. To make the knot easier to untie, the working end may be formed into a bight before passing it through, to make a drawloop.
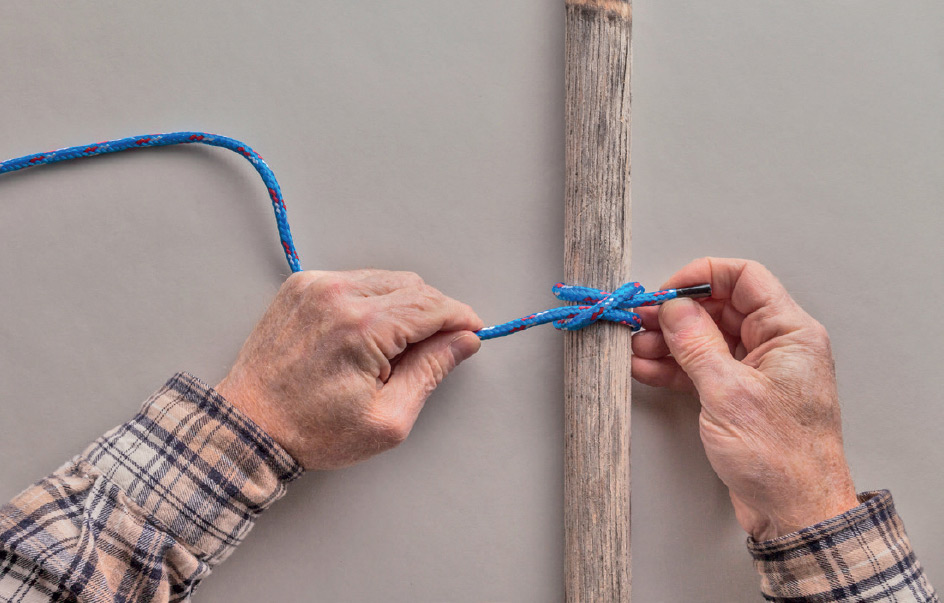
3. Pull both ends to tighten.
66. Clove Hitch on a Bight
Also known as: Builder’s Knot, Dry Weather Hitch
It is sometimes convenient to tie a Clove Hitch on a bight—for example, if the working end is especially long. This method places the rope in its final arrangement before it is slipped over one end of the object, but it results in a knot that’s a proper Clove Hitch.
Instructions
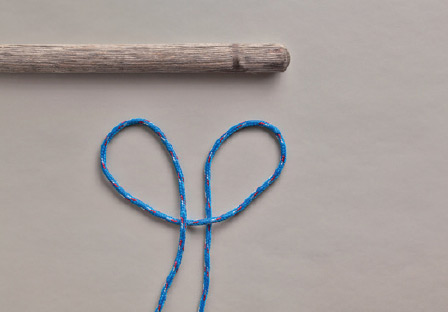
1. In a bight of the rope, make an underhand and an overhand crossing turn next to each other.
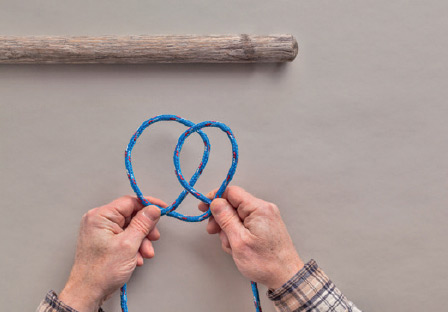
2. Place the underhand crossing turn over the overhand crossing turn.
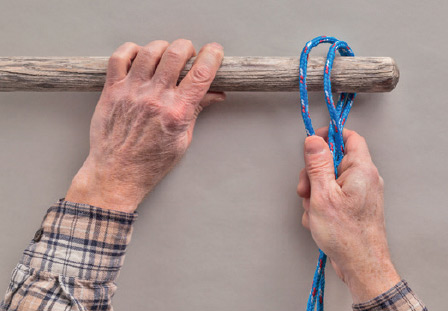
3. Slide both crossing turns over an end of the object
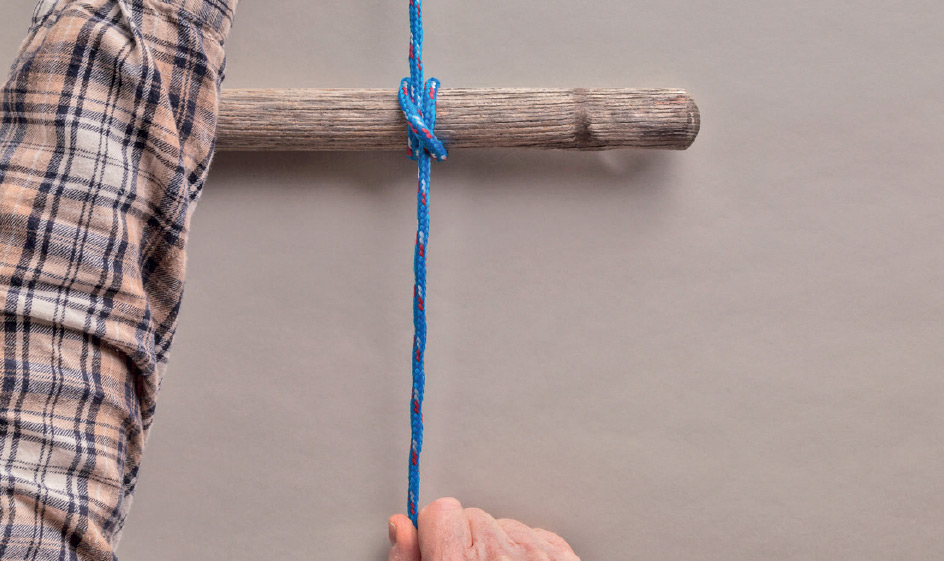
4. Pull both ends to tighten.
67. Constrictor Knot
Also known as: Gunner’s Knot
The Constrictor Knot is far more secure as a hitch than the closely related Clove Hitch and is one of the best binding knots around. It excels in thin line and makes a very effective seizing in the end of a heavier rope to prevent unraveling. If pulled tight, it can be nearly impossible to untie.
Instructions
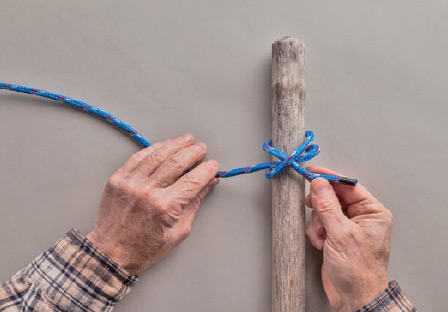
1. Tie a loose Clove Hitch around the object.
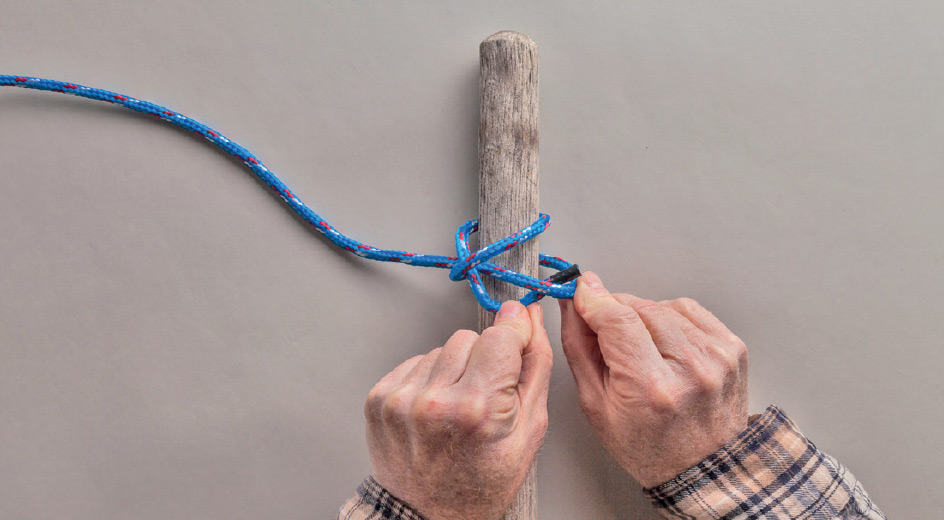
2. Lift the standing part where it begins to make a turn around the object and tuck the working end through.
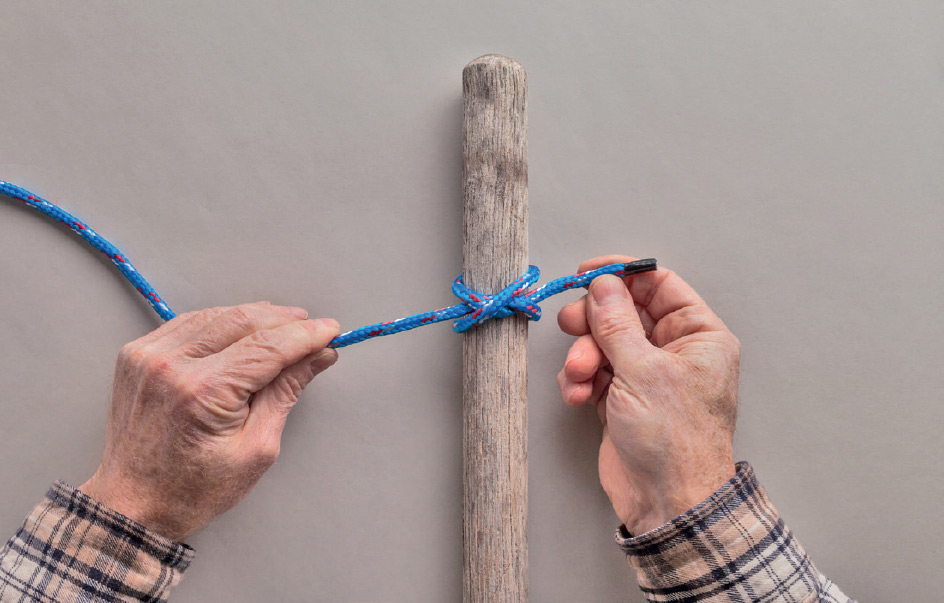
3. Pull both ends tight.
68. Rolling Hitch
Also known as: Magnus Hitch, Magner’s Hitch
Where the Clove Hitch only works well when the load is at nearly a right angle to the object, this cousin knot holds securely when the load and the object are in or near alignment with each other. It therefore works well to hoist spars, pilings, and other poles in a vertical orientation.
Instructions
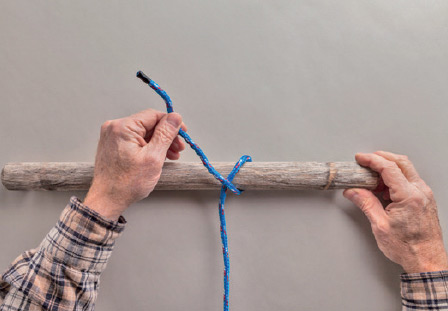
1. Make a Single Hitch around the object or other rope with the working end over the standing part. Ultimately, load will be applied by the standing part from the direction in which the working end overlaps the standing part at this stage (i.e., from the right in the photo).
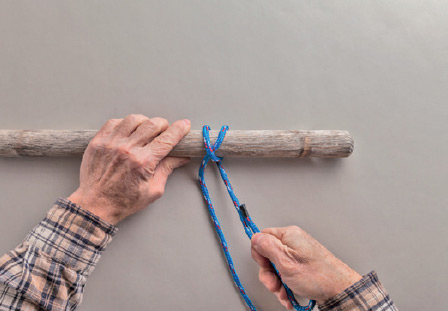
2. Make a turn around the object, bringing the working end between the standing part and the crossing turn.
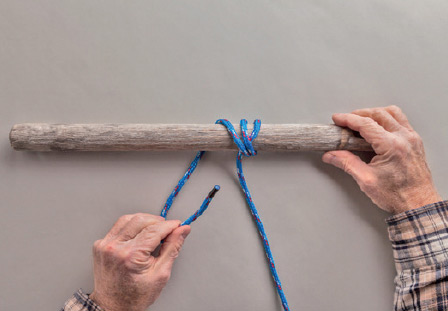
3. Make another turn around the object, this time over the standing part to capture it a second time.

4. Bring the working end under the previous turn, forming a Half Knot. The working end may be formed into a bight to create a drawloop if desired.
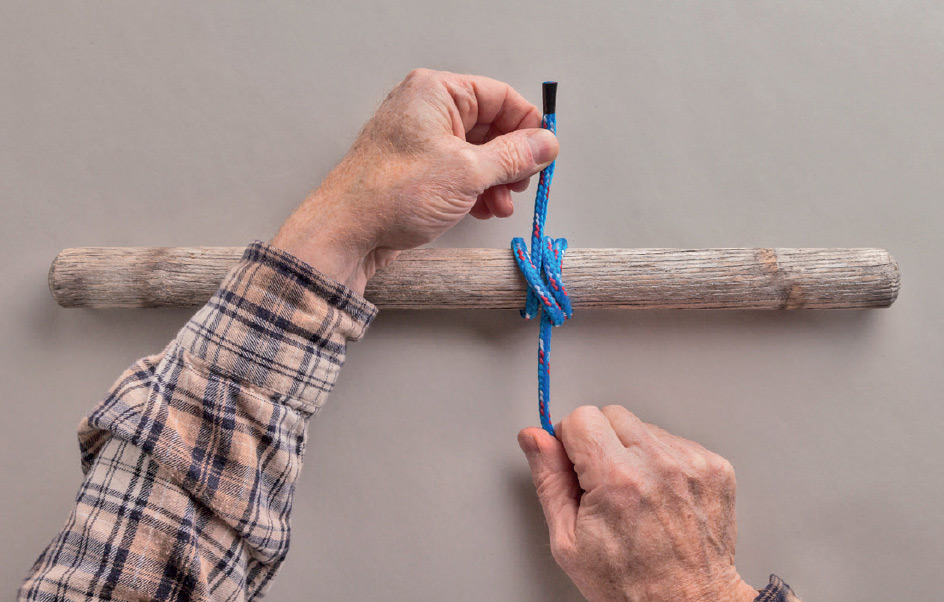
5. Pull both ends to tighten. When load is applied in the proper direction, the standing part will overlap the two turns to the right, not the working end.
69. Timber Hitch
The timber and construction industries use the Timber Hitch regularly for hauling and lifting logs, poles, pilings, and culvert tubes. It cannot be tied tightly around the object, but when load is applied, the pressure of the rope against the object secures it well, and when the load is released, the knot becomes loose again and is easy to undo.
Instructions
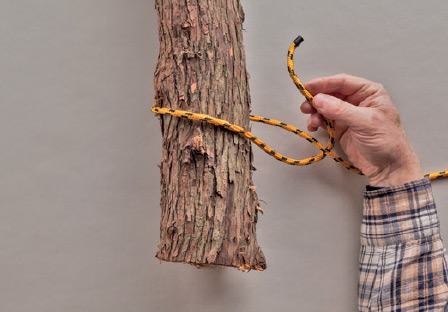
1. Make an underhand crossing turn around the object a little way back from the end from which the object will be pulled.

2. Bring the working end forward to form an overhand crossing turn around the standing part.
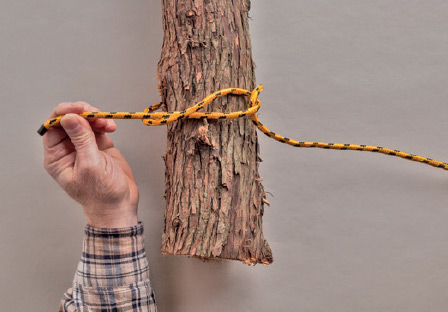
3. Tuck the working end underneath the crossing turn that surrounds the object.
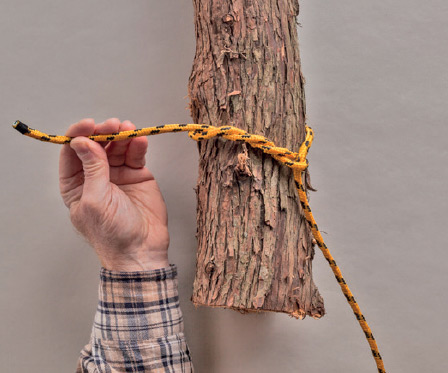
4. Make at least two more tucks around the first crossing turn. More tucks will be more secure.
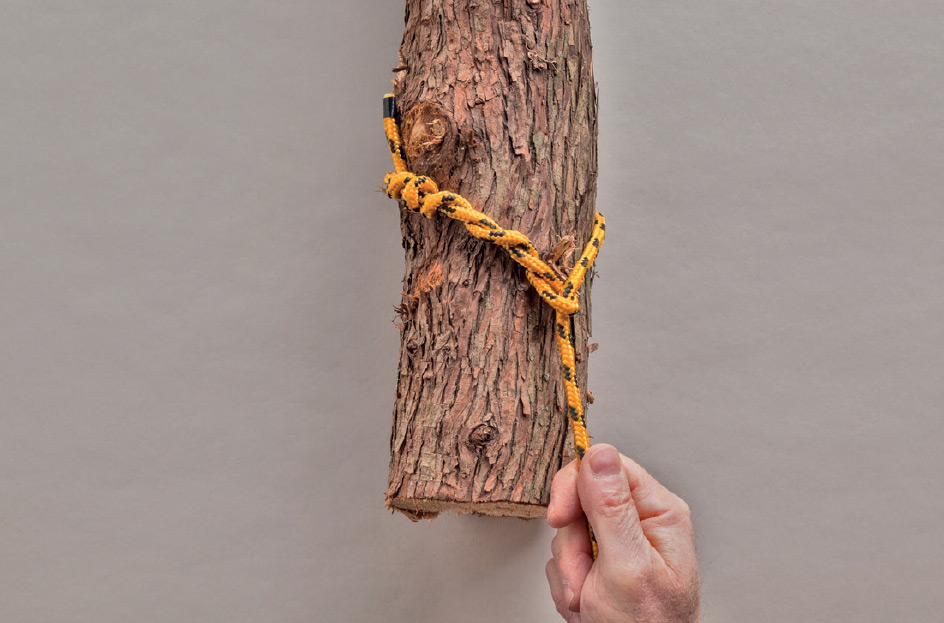
5. Pull the standing part tight and haul the load from the standing part.
70. Cow Hitch
Also known as: Lark’s Head, Lanyard Hitch, Ring Hitch, Tag Hitch, Bale Sling Hitch
The panoply of alternate names for the Cow Hitch hints at its popularity in different trades. It’s a quick, easy way to add a loop or a pair of tie-off points to a fixed object, and it can be tied by several methods, at the end of a rope or on a bight. As long as both working ends are secure, it can’t come undone.
Method 1: On a Bight
Use this method when both working ends are free and will be tied to the object being secured after the hitch is in place.
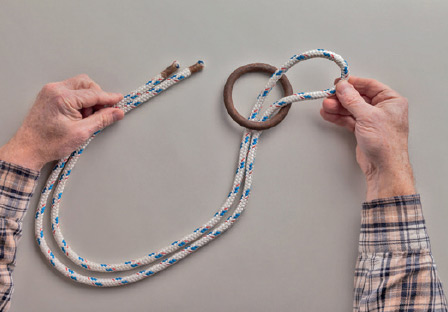
1. Double the rope, making a bight at the halfway point. Pass the bight through or around the fixed object.
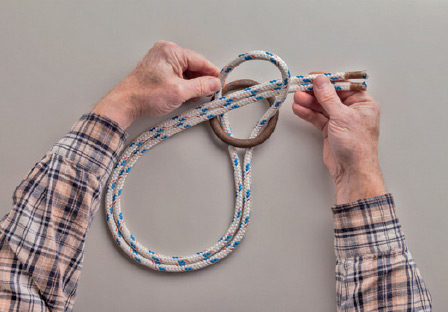
2. Pass both working ends through the bight.
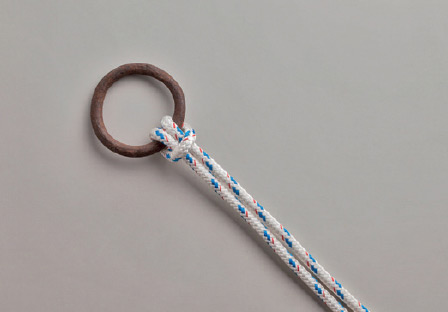
3. Pull both working ends tight to finish the hitch.
71. Method 2: In a Sling
This is a convenient method to add a loop to a fixed object for hanging gear. It’s quite similar to the previous method.
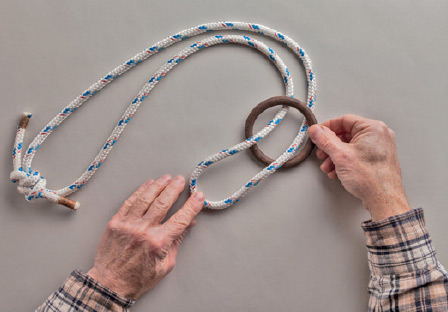
1. Form a bight in the sling and pass it through or around the object.
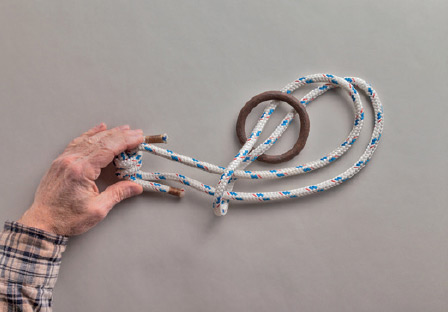
2. Pass the rest of the sling through the bight and pull it tight.
72. Method 3: Over the End
This is a convenient method for hitching to an open-ended object. It works with two free ends or with a closed loop. It’s an effective way to tie a horse’s closed reins to a stake or post.
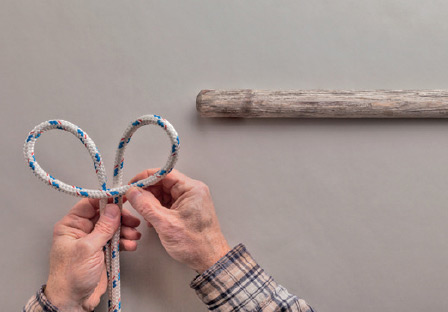
1. Make a bight in the rope, then fold the bight over the two standing parts to form two overhand crossing turns, one clockwise and the other counterclockwise.
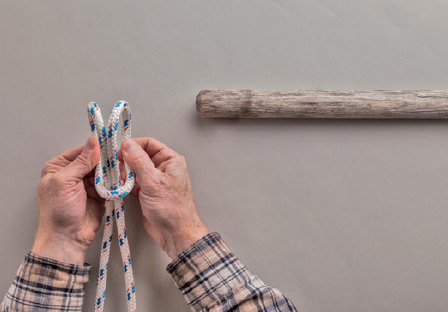
2. Fold the two crossing turns back around the standing parts.
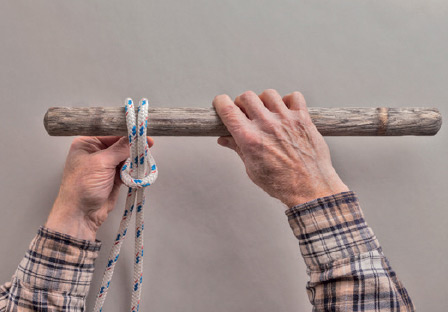
3. Slide the crossing turns over the end of the fixed object and pull the standing parts tight.
73. Method 4: With One Working End
This method is used when one of the rope’s ends is already attached to the object being secured, but the other end is free.

1. Make an overhand crossing turn around the fixed object. Pass the working end behind the object. (The working end is short in the photo for clarity. It would normally be as long as the standing part.)
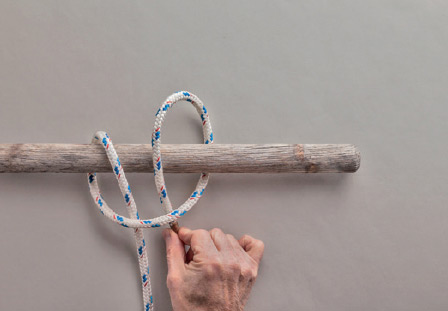
2. Bring the working end forward and down, adjacent and parallel to the standing part. This creates an underhand crossing turn next to the overhand one.
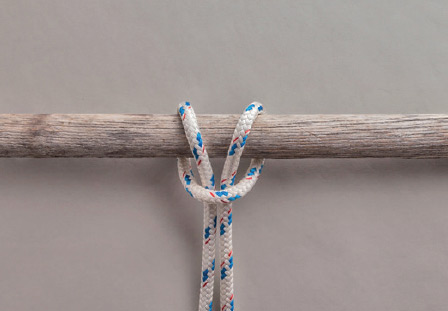
3. Pull both ends tight, then attach the free working end to the object to be restrained.
74. Pedigree Cow Hitch
All other Cow Hitches have two standing parts, both of which must be loaded fairly equally. In contrast, the Pedigree Cow Hitch is designed to be tied with a short working end, and to bear load on a single standing part. It’s often recommended for hanging garden tools from a horizontal pole (with the standing part of the rope permanently attached to the tool handle), but it’s fairly secure no matter what direction the pull is from.
Instructions
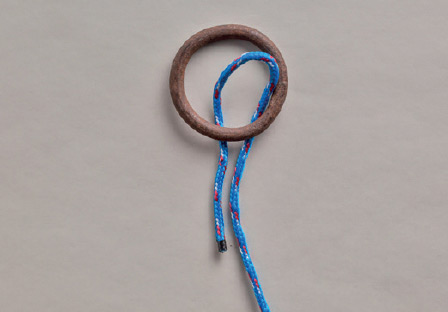
1. Make a bight near the working end of the rope and pass it through the ring from back to front or behind the object to which it will be tied.
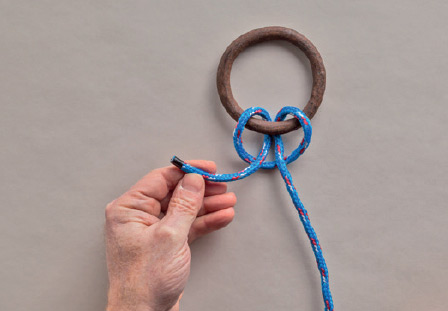
2. Pass both ends of the rope through the bight, forming two crossing turns around the object. (If either end is not available, follow the first two steps of Cow Hitch, Method 4.)
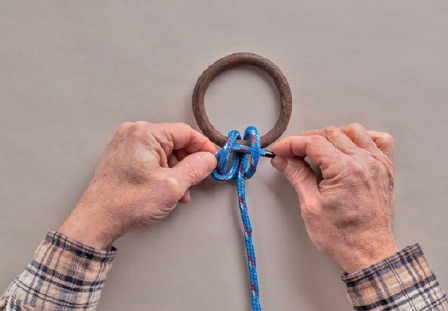
3. Pass the working end through both crossing turns.
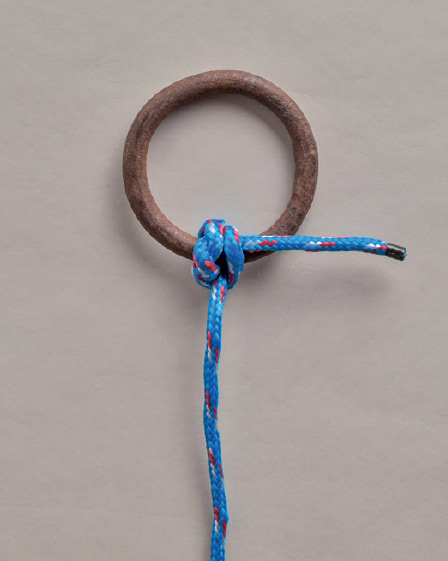
4. Pull the working end tight, then pull the standing part to tighten the knot.
75. Cow Hitch with a Toggle
Sometimes a Cow Hitch is desired and none of the previous methods apply, because the fixed object is closed (like a ring), neither end of the rope is free, and the object being restrained is too large or unwieldy to pass through a bight. This hitch relies on a toggle—a short stick or shaft of some sort—to hold. It’s an excellent method by which gear with a hanging loop already attached can be hung from a horizontal line.
Instructions
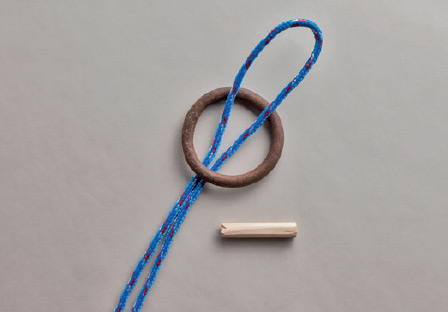
1. Pass the bight through the ring or around the fixed object.
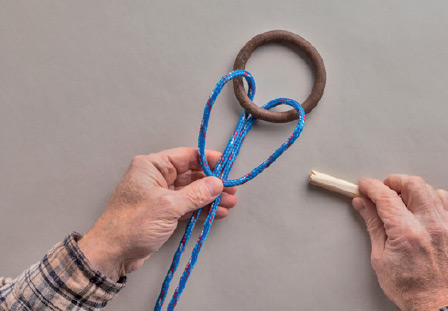
2. Bend the bight down over the two standing parts to make two opposed crossing turns.
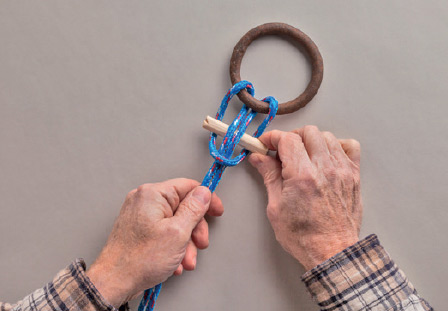
3. Slip the toggle through both crossing turns, going over, under, under, and over the legs in order.
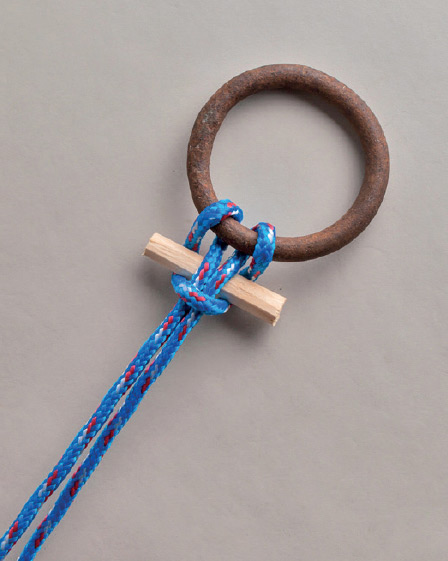
4. Pull the standing parts to secure the toggle.
76. Mooring Hitch
Also known as: High Post Hitch
This hitch is used to tie a boat to a bollard, tree, or post on a shoreline high above the water, especially useful in locks and areas of wide tidal change. If the working end is left long, the knot can be instantly released from the deck. When released, the rope remains around the bollard, until you release the working end and pull it all the way off.
Instructions
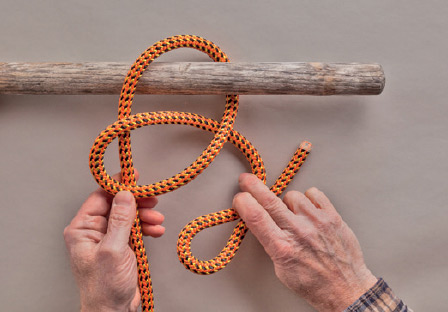
1. Take a turn around the fixed object. Make an underhand crossing turn in the working end and position it over the standing part. Make a bight in the remaining working end just below the crossing turn. (The loop around the object has been made short in the photograph for clarity; in practice, make it long enough so that the knot is close to the boat.)
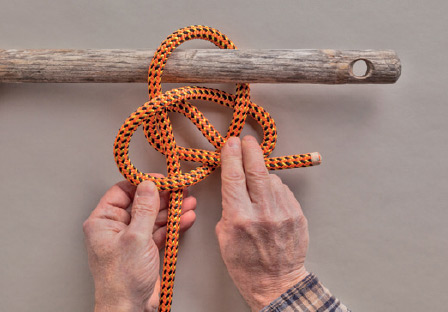
2. Place the bight over-under-over through the crossing turn. The first two parts of that maneuver are shown here: over the standing-part leg of the crossing turn and under the main standing part of the rope.
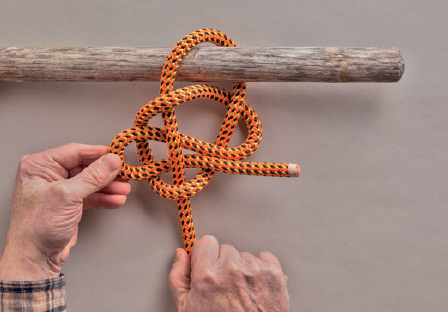
3. As the final part of the over-under-over maneuver, the bight is pulled over the opposite leg of the crossing turn. You have just tied a Marlinespike Hitch, using the bight in place of the spike.
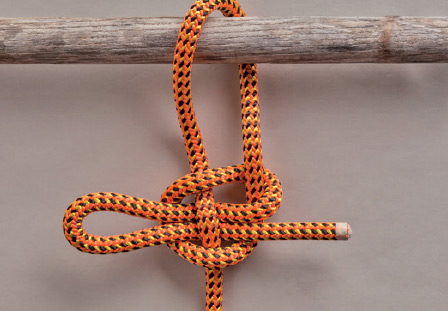
4. In one hand hold the working end against the other leg of the bight where it crosses the turn around the object, and pull the standing part of the rope to tighten the knot. Slide the knot along the standing part to take up or let out slack. Pulling on the working end will instantly release the knot.
77. Highwayman’s Hitch
The Highwayman’s Hitch can be instantly released from a point far from the object to which it is tied. But unlike the Mooring Hitch (opposite), which shares this feature, the Highwayman’s Hitch is snugged against the object, and when released the rope is completely free of the object and does not have to be pulled from around it, allowing a quicker getaway, be it in a canoe or on a horse.
Instructions
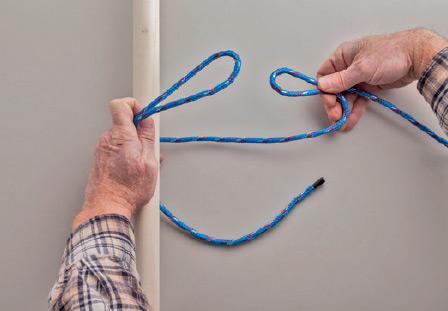
1. Make a bight in the working end and pass it around the fixed object, leaving the working end of the bight behind the object. Make another bight in the standing part. (The working end has been left short in the photograph for clarity, but leave it long enough to reach the boat, horse, or whatever at the far end.)
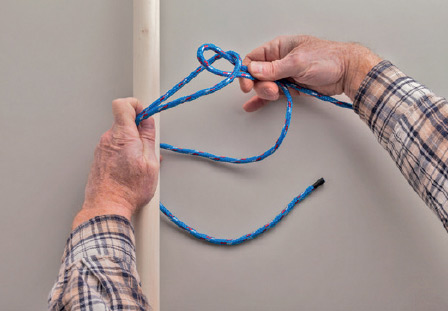
2. Pass the second bight through the first one from back to front.
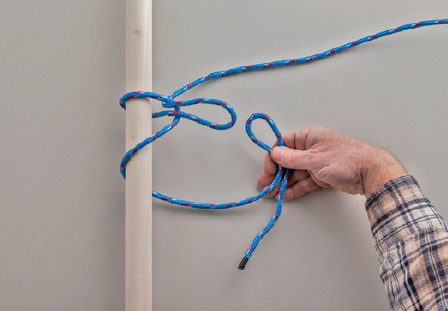
3. Make a third bight in the working end.
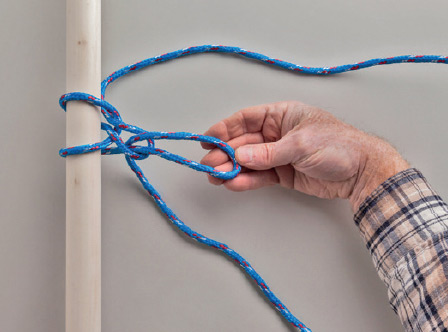
4. Pass it through the second bight from back to front.
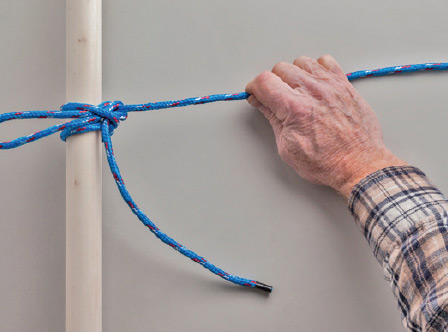
5. Holding the third bight, pull the standing part to tighten the knot.
