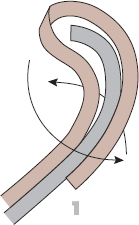
Loops are often employed as hitches, or they may be used in climbing, caving, and rescue operations to create a fixed loop or loops (as in the many variations on the bowline). Other loops offer a slide-and-grip function (for instance, the Tarbuck knot), a noose effect (the tucked double overhand loop), or a loop at the end of fishing line (the Bimini twist).


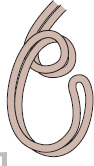
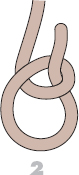
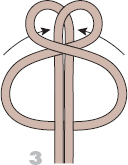
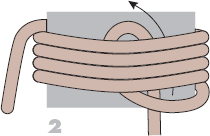
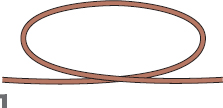
Most suitable for thread, twine, and string, because it is difficult to untie once tightly tied, this quick and easy fixed loop may be used sparingly in larger cordage and rope if it is not to be heavily loaded.
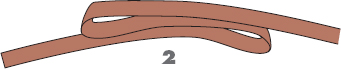
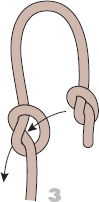
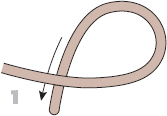
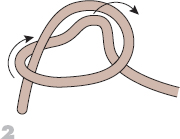
Make a bight in the end of the line (1), then simply tie it in an overhand knot (2, 3). Take care to eliminate unnecessary and undesirable twists before tightening the knot (4), since a messy knot is often a weak one, while a neat finish retains the inherent strength of knot and line.


Basic, even primitive, this loop knot is suitable for coarse string and odd jobs in the garage, workshop, and kitchen, but should not be employed for more demanding outdoor pursuits or sporting purposes.
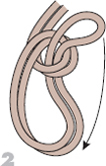
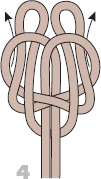
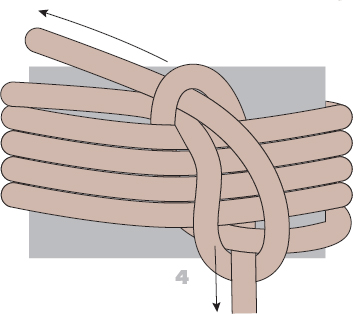
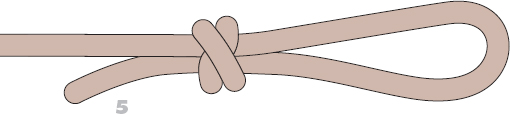
Tie a simple overhand (see page 292) close to the working end (1), then tie another at a distance from the first that is twice as far as the intended final length of the loop required (2). Tuck the knotted end through this second knot so that it lies alongside its own standing part (3). Pull everything tight to finish the stopped loop (4).


A neat accessory to a waist tie that incorporates a Lapp knot (see page 24) is this loop, into which workers of all kinds might slip a hammer, wrench, or other tool. It is another example of combining knots for added effectiveness.
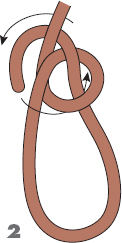
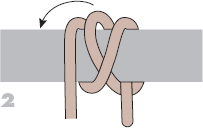
Create a downward tongue or bight, and with the two working ends tie a half-knot so that it passes on either side of the bight (1, 2). Add a second half-knot of opposite handedness (that is, one in which the two entwined parts spiral in the opposite direction) (3), and pull it tight (4).
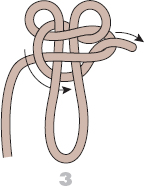
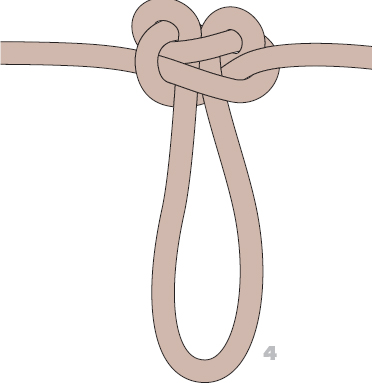

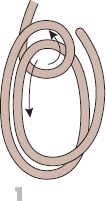
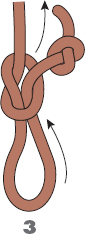
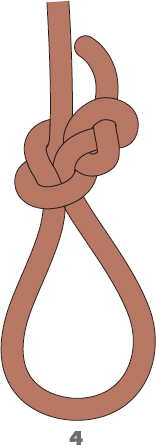
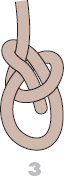
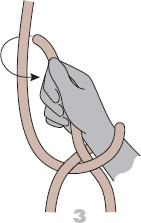
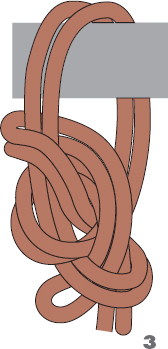
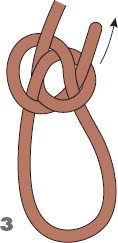
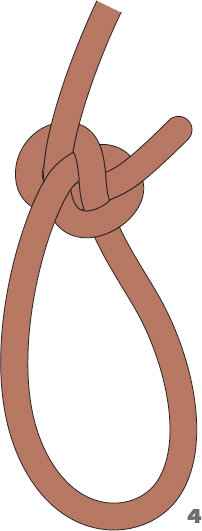
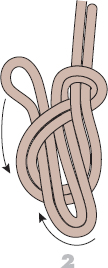
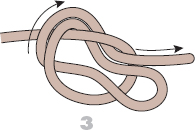
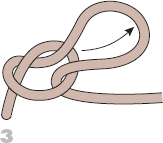
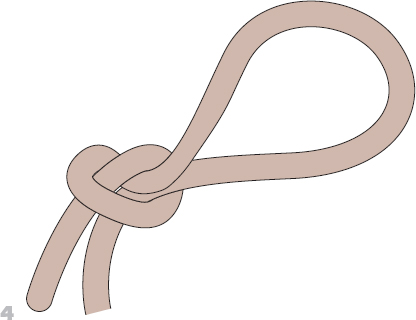
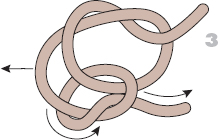
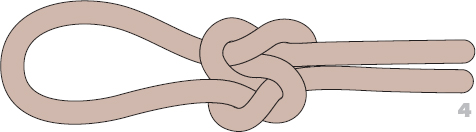
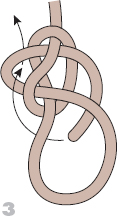
The bowline is an ancient knot with a rich history. The name comes from the lines used to attach the furls of sails to the bow for stabilization. But the knot is probably much older than that, because similar knots are found in prehistoric records. Current uses for the bowline include temporary moorings for small craft, several rescue applications, and whenever a fixed loop is needed that will not close around a waist, leg, or foot.
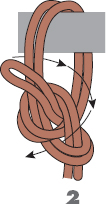
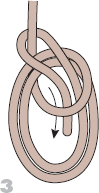
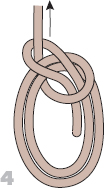
Start the knot by forming a bight of rope, with the working end on the right. In the standing end form a loop, with the remaining part of the standing end leading from beneath the loop (1). Insert the working end through the loop from underneath (2). Bring the working end behind the standing line from right to left and back down through the loop (3). Tighten by pulling down on the large loop created by the knot (4).

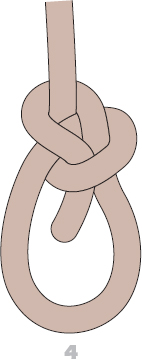
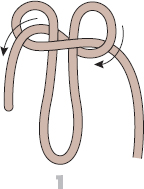
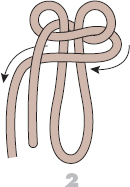
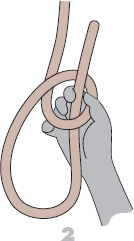
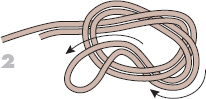
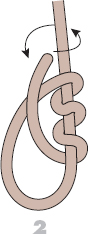
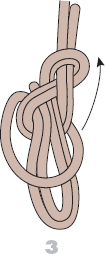
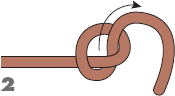
Having learned to tie a bowline whatever way comes easiest, it is helpful to master this one-handed method. A time-honored exhortation to all those working afloat, up trees, or in any other precarious position is “Use one hand for the job, but keep the other for yourself.” In other words, hold on. This technique is for those situations.
Make a loop of the required size, crossing the end over its standing part (1). Then, with a rolling action of hand and wrist, tuck the working end down, around, and up through the large loop; this action creates a smaller loop (2). Still gripping the end, slip the hand up through this secondary loop (3), pass the working end around the standing part, and pull it back down through the small loop (4, 5). For extra security, tie the end to the nearest loop leg with an overhand knot (6).


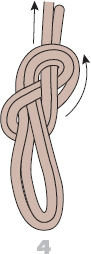
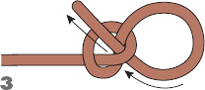
When there is danger of a simple bowline knot coming untied due to abrasion or motion of the knot, then a double bowline is more secure.
Begin by forming two loops in the working end of the line, leaving enough working end to complete the rest of the knot. Each loop should be made with the standing line emerging from underneath, and the second loop should lie on top of the first without being twisted or flipped in any way (1). Feed the working end up through the loops from the bottom. Pass it behind the standing line, then feed it back down through the loops so that the end is within the large loop (2). Pull on the working ends to tighten. For extra security, the knot can be backed up by first passing the remaining working end around the adjacent part of the large loop (3), then feeding it down through the loop just created, to form an overhand around that section (4).


The bowline is used to create a fixed loop that will not slide. When a situation arises where you need a loop that will slide, you can make a running bowline. This knot is used for snares and traps, as well as any time that a secure attachment is needed that will remain under a load.
Start by making a standard bowline knot (see page 63). Then run the standing end through the main loop of the bowline (1). This enables the bowline to be moved up and down the rope (2).

This knot creates two fixed loops in the end of a line. It gives more strength and security than a single bowline, and is used by some climbers as a tie-in point on a rope.
Begin with a large bight at the end of a rope. Make a loop above the bight, with the standing line coming from the bottom of the loop (1). Pass the free end of the bight up through the loop (2). Pass the free loop around the entire knot (3), then pull down on the double loop (4).


There are two principal uses for this contrivance: learn one, get one free. It is an effective shortening, tied in the bight, of any rope or webbing that is overlong for the job in hand; and it may also be used to create a pair of fixed leg loops for a climbing harness.
Form an S-shape in the material to be tied (1) and press it together, taking care to keep the tape or webbing flat and untwisted throughout (2). Tie an overhand knot in the triple thickness, once more ensuring that no unwanted twist occurs (3, 4). Pull everything snug and tight (5).


Learn the common bowline (see page 63), then this version with three loops is easily tied. Each loop can be adjusted to a different size, although it takes time and patience to do so; then the knot can be used as an improvised chair sling for emergency rescues, or as a routine multipoint anchorage for all kinds of boating, climbing, and pioneering activities.
Make a long bight in one end of the rope (1) and then, treating the doubled portion as it if were a single line (2), form a small loop (3). Now tuck the working of the bight up through the loop, from back to front (4), leaving sufficient slack to create large twin loops, and pass it from right to left behind the twin standing parts of the line (5). Finally, tuck the working end of the bight back down through the loop to act as the third loop (6).


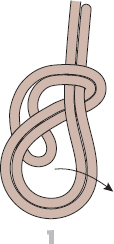
The common bowline is a tried-and-trusted knot, much used by all who have to make rope work for them; although it is not especially strong or secure, it can sometimes jam and be hard to undo. So if it is to be tied in coarse cordage and then heavily loaded, consider using this slipped version.
Pass the working end up through the loop (1), and around behind the standing part of the line (2), as if tying a basic bowline (see page 63), but then tuck a bight (not the end) down through beside the adjacent loop leg (3). Tighten the knot around this bight (4). To release the knot, simply tug the end to remove the drawloop.


This adaptation of a triple-loop bowline was first proposed by Robert Chisnall in the mid-1980s, as an aid to teaching. The adjacent twin loops can be used by a climbing instructor and trainee, while the back-tucked third loop is belayed to a convenient tree or other anchorage.
In a long bight, tie a triple bowline; treating the doubled portion as it if were a single line, form a small loop (1). Now tuck the working of the bight up through the loop, behind the twin standing parts of the line, and back down through the loop to act as the third loop (2). Then tuck the third loop around and back through alongside the working end and standing part of the rope (3).

Knowing the common bowline (see page 63) makes this twin-loop version easier to tie. The loops are adjustable to some extent, although as one is enlarged, the other shrinks.
Make a loop (with the working end uppermost) in the standing part of the rope, and then pass the end through the loop from back to front (1). Take a second similar pass and go around behind the standing part (2). Tuck the end back down beside itself (3, 4). Then pull to tighten the knot (5).


This is a classic twin forked-loop knot from the days of sail, when it was used to improvise a rope chair to hoist crewmen aloft, or to suspend them over the side on ladder staging. It is tied (and untied) in the bight—that is, without the need to use either end of the rope or cord. With practice it is easier to tie than it looks; but, as with all knots, make one wrong twist or tuck and something else (or no knot at all) will result.
Locate the middle of the line and bend a bight backward down behind the twin standing parts to form a couple of loops (1). Twist the left loop clockwise and the right loop counterclockwise (2). Then pass the left-hand loop up through its right-hand partner, from back to front (3). Taking hold of both sides of the large lower loop, pull a bight from front to back through each of the smaller upper loops (4), and then tighten the knot (5).


Knowing the start of a common bowline (see page 63) will make tying this fixed-loop knot easier.
Make a loop with the working end on top (1). Then pass the end up through the loop from back to front and lead it behind its own standing part, from right to left (2). Bring the end around in front of the left-hand leg of the loop and tuck it under-under-over up through the knot (3). Pull on both ends to tighten (4).


This strong knot (also called a spider loop) hails from the days when anglers still used horsehair lines and believed the advice of the Greek biographer Plutarch that the best ones were made from the tails of thoroughbred white stallions. With an extra tuck or two it can still be effective in nylon monofilaments to make a long loop in fishing lines prior to the assembly of a tackle rig.
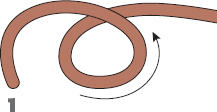
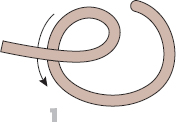
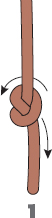
Make a long bight in the end of the line and tie an overhand knot (see page 292) (1). Tuck at least once more (2), then pull the loop away from the remainder of the line to tighten (3). In thinner, slicker lines, add more tucks. Snip the end off short.


British climber and skier Ken Tarbuck devised this adjustable loop knot in 1952 for use in the new nylon climbing ropes; but it proved to be damaging to the more hi-tech kernmantel (core-and-sheath) ropes that superseded them, so it was discarded. It remains an effective slide-and-grip loop, however, to tighten and slacken off such diverse, general-purpose cordage applications as tent guy-lines or clotheslines.
This knot must be wrapped and tucked just so. With the working end, take two full turns around the standing part to form a loop (1). Bring the end up at the front of the knot (2), and pass it around the back of the standing part, before tucking it over and then under itself (3). Methodically tighten all parts of the knot (4). Unloaded, it can be slid along to increase or decrease the size of the loop; loaded, it locks up.


This multipurpose knot can be used to make a temporary fireman’s rescue chair knot, to hobble live animals so that they do not stray, or even to sling dead carcasses to enable them to be carried.
Throw a couple of loops (one overhand, the other underhand) and overlap them (1). Draw the right-hand one down through the left, and the left-hand one up through the right (2). Pull the loops in opposite directions to tighten the knot (3); pull one or both of the ends to adjust the size of the loops.


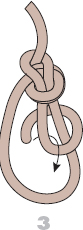
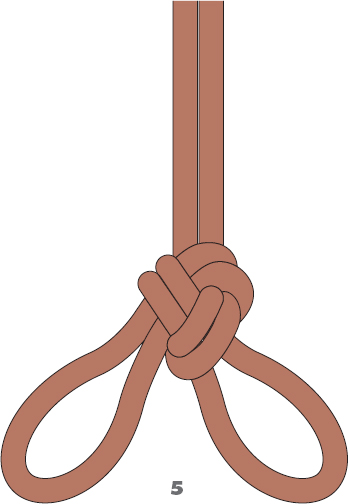
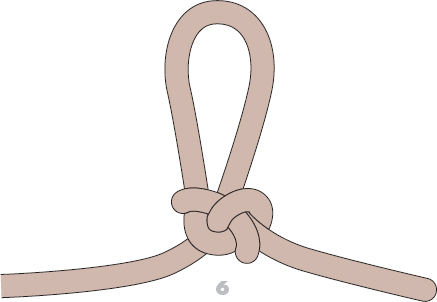
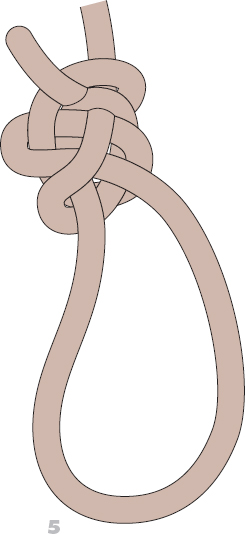
This knot creates a strong loop at the end of a rope. It is used extensively in climbing, caving, and rescue operations, because it is easy to learn and to inspect visually. The only drawback is that it binds tightly under heavy loads and takes some effort to untie.
Start with a bight at the end of the rope to make a loop. Wrap the working end of the loop around the standing part from front to back (1). Bring the working end back around to the front before feeding it through the loop you have created (2). Pull the loop away from the standing line to tighten (3). Contouring of the knot so that the lines are even and parallel will create the strongest knot (4) and will make it easier to untie.


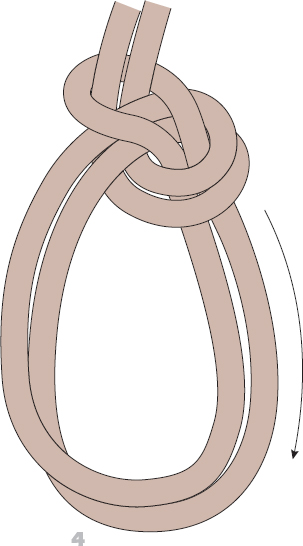
Akin to the bowline on a bight (see pages 68–69), this knot is preferred by some people for climbing, caving, and other outdoor pursuits, because they reason that tying a figure eight is less likely to go wrong.
Take a long bight of rope and form it into a figure-eight knot outline (1). Next, hook and partially pull through the lower half of the figure eight a doubled bight (that is, four sections of rope) (2). Bring the single bight down the front of the almost-completed knot (3), lift the twin bights through it from back to front, and replace the single bight at the top and rear of the knot (4, 5).

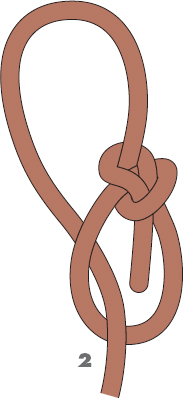
Multiloop knots are employed by climbers—in ways that they never were by seamen—because of their need to anchor or belay (perhaps to several fixed points), as well as to improvise chest and seat harnesses. The figure-eight layout is said to be preferable because it is easy to learn and less likely to be tied wrongly by someone who is wet, cold, almost exhausted, and perhaps temporarily unnerved.
In a long bight, form a figure eight (1), but then pull a doubled bight through to create twin loops (2). Bring the tail end of the initial bight around the front of the knot and tuck it down beside the two loops just made to form a third one (3, 4). If tied with a bight made in the end of the rope and not in the middle, back up the end by tying it to the standing part of the rope.


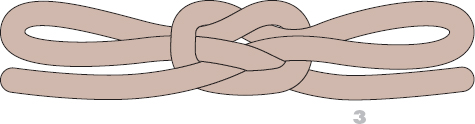
This knot, also known as the alpine butterfly, is used to put a loop in a section of rope where there will be tension along both standing ends. The butterfly does not greatly weaken the strength of the rope, and is often used by mountaineers to attach a team of climbers along a rope, for protection against a fall.
Start by taking a bight of rope and twisting it into a loop (1). Continue twisting in the same direction to make a second loop above the first (2). Bring the top loop down below the twists (3). Then feed the top of the bight up through the first small loop (4). Pull the slack out of the knot, then pull on the standing ends to tighten (5).


Climbers may use this cordage arrangement as an emergency harness of last resort. The discomfort inherent in hanging by it could be somewhat reduced by pulling one of the waist wraps down to form a primitive seat; but anyone suspended by it for too long runs the risk of being dangerously squeezed.
Wrap the rope four times around the waist (1)—although, on a short rope, two or three turns are sufficient—then tuck a loop from the standing part of the rope up beneath these turns (2). Pass the working end down, around the standing part, and back up to tuck through the top of the loop (3). Tighten the knot (4) and then secure the end by tying it around some or all of the waist turns.

These twin splayed loops are distinctly more fun to tie than the Spanish bowline (see pages 78–79) and more good-looking. This knot too is tied, and untied, in the bight.
Start by locating the middle of the rope or cord, then pull down a long bight to create a Y-shape (1). Bring the twin standing parts around and up to lie across the right-hand arm of the Y (2), which in turn is laid down over the Y’s left arm (3). Lastly, tuck the left-hand bight down through the circular space created by the two standing parts (4). Carefully tighten the knot, pulling in turn—a bit at a time—on each of the six strands that emerge from the knot, eliminating unwanted crossovers so that each pair lies neat and parallel (5).


This webbing knot was devised in the 1960s by Tom Frost for use in making the loops from which the short climbing ladders or stirrups known as étriers (see page 98) are suspended. A bulky but strong doubled version is used to tie together separate lengths of webbing for climbers’ chest and seat harnesses.
To create an endless strop or sling with a Frost knot, first form a bight in one end; then merely slip the other end into it (1), and tie all three parts in an overhand knot (2). For a bend or joining knot, make a bight in one end of one piece of webbing and tie it in an overhand knot (3); make a similar bight in one end of the other length and follow the first knot around (entering at the bight and leaving at the standing part) (4). Pull it all tight (5).


This is a French word meaning “stirrup,” but in climbing and caving it refers to a short stepladder; it may also be called an “aider.” Formerly of rope, étriers are now usually made from 1-inch (2.5-cm) webbing, and vary in length from two to five 1-ft (30-cm) foot-loops. Etriers may be factory-made with sewn steps, but can easily be knotted.
Take about 15 ft (4.5 m) of flat, rather than tubular, webbing for a four-step version. Starting with a Frost knot (see pages 96–97), turn the webbing into an endless band, leaving a small loop at the top for the attachment of a carabiner (1). Then tie a series of three overhand knots (see page 292) in both legs of this webbing strop or sling (2, 3), in such a way that one leg of each loop created is shorter than the other (4).


This knot is used when a string loop is needed in a section of standing line, where the load is distributed along the line rather than directly to the loop. It can be used to rig many hooks and weights from a single fishing line. You must have access to one end of the line to tie this knot, so it cannot be tied between two anchored lines.
Begin by creating a large loop in the line (1). Repeatedly wrap the free end through the loop (2). When you have close to eight wraps, spread open the wrap closest to the middle, creating an “eye” (3). Feed the center of the top of the loop through the eye, moisten, and pull the standing ends to tighten (4).


A horseman’s lariat is made by running the standing part of a line through a small fixed loop. The version shown here uses the bowstring loop—the procedure for early American and Spanish horsemen.
Begin with a loop in the standing end, with the working end emerging on top of the loop (1). Pull the working end through the loop from the bottom (2). Feed the working end beneath the adjacent section of knot and it will emerge on the opposite side (3). Then “flip” the knot so that the loop runs over the standing part of the line (4). The adjustment of the knot makes it possible to make the lariat more or less responsive to inertial forces so that it does not collapse on its way to the steer to be roped.


This fixed loop is a quick and simple contrivance to hold a large but docile domestic animal, or to improvise a neck lanyard for whistle, knife, or stopwatch.
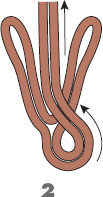
Tie a simple overhand knot at a distance from the end of the rope at least twice the length of the required loop (1). Add a second overhand knot close to the rope’s end (2). Tuck the knotted end through the first knot (3) and pull on either side to tighten it (4).


This is a robust sliding noose knot with a wide variety of uses in the home and garden, at work and at leisure.
First make a bight. Then take the working end down, around to the back, and up (1). Make a second wrapping turn, to the right of the first, enclosing both legs of the bight (2). Tuck the end through the resulting couple of turns to lie alongside its standing part (3). Pull both the end and the related loop leg apart to tighten the knot (4, 5).


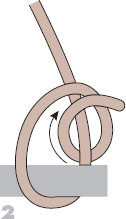
A noose is any loop that slides along the standing part, but holds firmly around it. This simple noose is a useful way to attach a small line. It can be tied extremely quickly with practice, but is secure enough for light loads.
Start with a loop, with the working end emerging from the bottom (1). Pull a bight from the standing part through the loop (2). Pull on the standing part of the bight to create the size of loop desired (3). Pull the loop further to tighten (4).
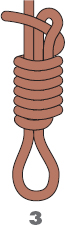
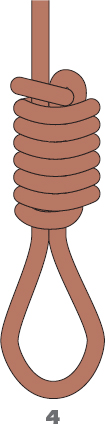
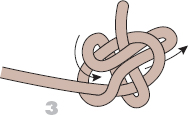
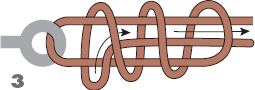
Jack Ketch’s knot is the other name for this noose, after the seventeenth-century English executioner who lives on in Punch & Judy shows. It was—for one obvious reason—designed to withstand a heavy shock-loading in rope; and, tied in fishing monofilaments, it can be an easier alternative to tie than the Bimini twist (see pages 122–123).
Form a long bight in the end of the line and then bring the working end back again (1). Make seven tight wrapping turns, each succeeding one snugly embedded alongside its predecessors, and finish off by tucking the end through the shrinking loop at the top of the knot (2, 3). Pull down on whichever one of the loop legs will tighten the upper loop, then slide the knot by hand to adjust the size of the noose (4).


The Englishman’s loop is an easily adjustable one. The sliding loop is fixed by adding the last overhand, against which any load will pull, further tightening the knot.
Start with a loop (1). Pull a bight from the working end through the loop, making the bight the same size as the loop you need (2). With the remaining working end, make a loop around the standing part. Feed the working end through the last loop (3, 4), and tighten it by pulling it away from the large loop (5). Pull the large loop to slide the last overhand up snug to the knot, holding the loop in place (6).


This is another of those knots intended to be tied in the bight. It has been used to secure the middle one of a trio of climbers, but acquired its name from its earlier use in manhandling field guns, when a series of shoulder loops were created in draglines for men to haul upon. In this way it could also ease the load upon horses struggling to pull coaches and carriages uphill, hence its other name of “manharness” knot or hitch. Another application, by horse riders in the US, has been as a static picket-line knot to tether their steeds at overnight campsites.
Make a loop with the working end on top (1). Then pass it beneath the loop just formed (2). Pull the right-hand section of line under, then over, and up through the original loop (3), to replace it and create the final loop (4). Remove any slack by pulling first on both standing parts of the line, and then by tugging on the loop itself (5).


The angler’s loop, also called a perfection loop, is most often used as a terminal end to the casting line of fly-fishermen. This casting line is connected to a monofilament leader with a perfection loop on the end as well. They are then locked together by threading one through the other.
Begin with a loop with the working end emerging from the bottom of the loop (1). With the working end, wrap the loop from the top to the bottom, then bring the working end to the top and lay it across the main loop (2). Pull the first wrap up through the loop (3), pulling on all the emerging ends to tighten (4). Trim the excess working end as necessary (5).


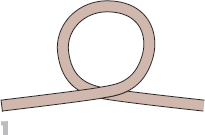
This is a knot with an agricultural pedigree—at home on the farm, but handy whenever a fixed loop is needed that must be tied in the bight.
With the working part of the rope, go twice around a wrist or arm, to create two full round turns (1). Now lift up the center wrapping turn and replace it on the right (2). Next, leapfrog the newly created center turn to the left (3), then shift the resulting center knot partway to the right (4). Finally, pull up what has now become the center turn into the required loop (5), remove the knot from the wrist or arm, and tighten the knot (6).


The scaffold knot forms a string sliding loop that can be place around a metal eye or some other fixed point. It is a triple overhand noose, named for its likeness to a hangman’s knot.
Start with a large loop going through the eye (1). Bring the working end around the whole loop several times (2), working toward the eye. Then feed it through the wraps alongside the standing part (3). Pull the standing line and the working end to tighten (4). Snug the knot up against the eye to finish (5).


This useful loop is another shock-absorbing, slide-and-grip knot (see also the adjustable bend, page 29). Grasp the knot in one hand and you can shift it along the standing part of the rope around which it is tied. Apply a load, however, and it will hold fast—unless overloaded, when it will slide. This characteristic knot can be used to tighten or slacken tent guy-lines and as a third hand in many home repairs. It is not to be confused with the crane-hook hitch of the same name, which was once employed by dock workers handling cargoes between ships and warehouses.
Pass the working end around or through the fixture or load, and cross it in front of the standing part of the line (1). Tuck the end once to encircle the standing part (2), then again above the first turn (3). Take a final turn around the standing part beyond the original crossing point (4). Work the knot snug and tight, since it depends for its friction on creating a dogleg formation in the standing part of the line (5).


Just one of several knots with this name, this consists of twin interlocked overhand or thumb knots, to make a loop in a lanyard or a necklace, from which anything from a lucky mascot to car keys may be suspended.
Locate the middle of the cord and, some distance from the end of the bight, equal to the length of the required loop, tie an overhand knot (1). Pass the other end through this knot, from front to back (2), then tie an identical overhand knot (3); the twin parts in both knots should spiral to the left or counterclockwise. Pull on the left-hand loop and on both ends to tighten the knot (4).


In earlier days archers would string their bows with natural sinew and gut by tying this knot. You can still use it to tie slippery synthetic materials into a small loop to attach to a stake or post. Care must be taken to finish it in the right way, as there are several ways to tie it incorrectly.
Begin with a loop in the standing end, with the working end emerging on top of the loop (1). Pull the working end through the loop from the bottom (2). Feed the working end beneath the adjacent section of knot and it will emerge on the opposite side (3). Pull on the standing end to tighten the knot (4). In slippery materials, the knot can be made tighter even when under a load, but will not loosen.


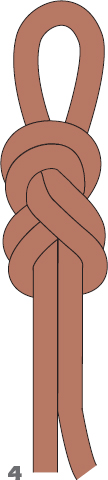
Robert M. Wolfe, MD, of Chicago, Illinois, devised this knot for climbers as an alternative to the figure-eight loop, and began to promote it in 1995. The greater tensile strength of the latest climbing ropes compensates for the fact that the trident loop is somewhat weaker than the one it is intended to replace; however, it is remarkably secure (in shock-loading tests it yielded not a millimeter). Take care that each stage is done correctly: one mistaken tuck or turn will result in something less reliable.
Tie an overhand knot, far enough away from the working end to allow for the size of loop intended (1). Bring the end around to form the loop (2), then lay a small bight over the belly of the initial overhand knot and tuck it through between the two entwined knot parts (3). Tighten the knot a bit at a time until all of the slack has been eliminated. Finally, pass the working end around and in front of the standing part of the line, before tucking it to tie a retaining half hitch (4, 5).


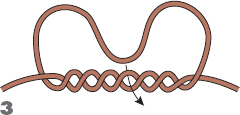
This long loop is the start for any deepwater big game-fishing tackle system. Knots generally weaken, to some degree or other, the lines in which they are tied; but lines in which this knot is tied remain—it is claimed—as strong as if they had never been knotted. Tying this paragon, however, requires coordination.
Make a bight at least 3 ft (1 m) long, which must then be twisted 20 or more times (1). This can be crudely done by inserting a finger and forcing the bight around as if tightening a tourniquet; but is more expertly achieved with two hands by twiddling each leg of the bight in opposite directions. Either way, both feet must then be inserted into the remaining loop and spread sideways, with one hand at the same time bracing the standing end of the line vertical, while the other holds the tag end out sideways (2). These actions create a layer of wrapping turns that—when fed and controlled by the hand holding the tag end—run down and cover the initial twists, some of which are sacrificed to permit this development (3). Add at least three extra wrapping turns to trap the tag end (4, 5). The result is a slender, tubelike loop knot (6).