Container view controllers allow you to split up the functionality of your application into smaller units, which can be useful for the maintenance and flexibility of your code base. You have used a couple of container view controllers in other projects: UITabBarController and UINavigationController. Now you will create a new container view controller.
The container you will create will have an emoji selection control along the bottom of the screen where the user can select and add new mood entries. This container will contain another view controller that will be responsible for adding and displaying the list of mood entries.
Start by creating the user interface. Open Main.storyboard and the library. Drag a Visual Effect View with Blur onto the view controller’s view. Place it at the bottom, underneath the emoji selection control, so that if content underlaps the emoji buttons, the control will still be legible. This is the same technique that standard navigation bars, tab bars, and toolbars use.
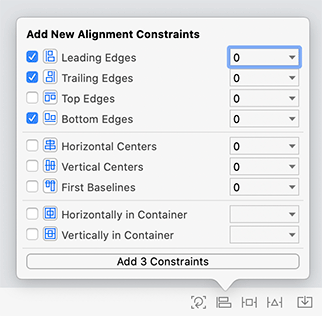
You want the visual effect view to be pinned to the leading, trailing, and bottom edges of the superview. To do this, select the visual effect view and its superview and open the Align menu. Select the leading, trailing, and bottom edges options, and then Add 3 Constraints (Figure 17.5). The visual effect view currently does not have a height, and that is OK; its height will be determined by its subview content, which you will add shortly.
You are going to use a stack view to contain the various emoji buttons. Drag a Horizontal Stack View from the library onto the visual effects view. Open the Add New Constraints menu and configure the constraints as shown in Figure 17.6. Click Add 5 Constraints and the frames for both the visual effect view and the stack view will update.
There are a few changes you need to make to the interface, but it is a little hard to see since everything looks white. To help you see the issues (and the fixes), drag a View from the library onto the stack view and give it a colorful background color in the attributes inspector.
The issue that needs to be addressed is related to the safe area, so you will want to see how the current interface looks on devices with different safe areas. An easy way to do this is by using the Interface Builder preview functionality that you used in Chapter 7.
Still viewing the storyboard, show the preview either by clicking Editor → Preview or with the keyboard shortcut Option-Command-Return. Click the ![]() button in the bottom-left corner of the preview and select iPhone 8. Then hover over each interface preview and click the rotate button in the bottom-left corner to rotate each interface into landscape orientation (Figure 17.7).
button in the bottom-left corner of the preview and select iPhone 8. Then hover over each interface preview and click the rotate button in the bottom-left corner to rotate each interface into landscape orientation (Figure 17.7).
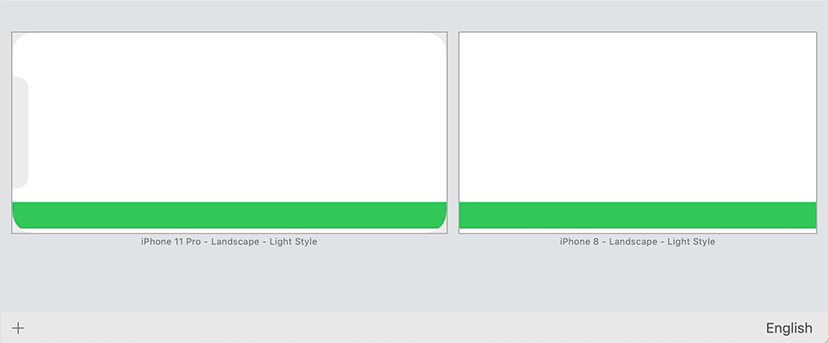
Notice that the colored view extends to the edges of the screen, beyond the safe area. While this is good for the visual effects view, the content of that visual effects view (the stack view and its contents) should stay within the safe area. Let’s fix that.
Back on the canvas, select the stack view’s leading constraint. Open its attributes inspector and find the Superview.Leading entry. Click it and select Relative to margin from the drop-down menu. Then update the Constant to be 0 (Figure 17.8). Do the same for the stack view’s trailing and bottom constraints.

The interface is looking better in the preview, but the colored view is still extending past the safe area. The final change is to update the margins to be relative to the safe area.
Select the visual effects view’s content view (which is the stack view’s superview) and open its size inspector. In the Layout Margins section, check the Safe Area Relative Margins checkbox (Figure 17.9). This will inset the margins from the safe area.

Look at the preview and notice that the colored view is now positioned within the safe area (Figure 17.10).

Feel free to build and run the project at this point; you should see the same interface that you see in the preview.
With that taken care of, delete the colored view from the stack view; it has served its purpose. You can also close the preview (either with Editor → Preview or Option-Command-Return). You will programmatically add buttons to the stack view in just a bit. First, make a few more interface changes.
You want all the emoji buttons in the stack view to have an equal width. Select the stack view, open its attributes inspector, and give it a Fill Equally distribution. Set the Alignment to Center and set the Spacing to 12.
Once the user has selected their current mood, they will tap a button to store that mood entry.
Drag a new Button from the library and place it above the visual effects view. Add constraints to pin the button 20 points above the visual effects view, center it horizontally in its container, and give it a fixed height of 48 points.
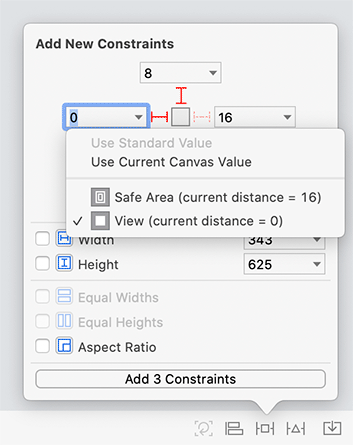
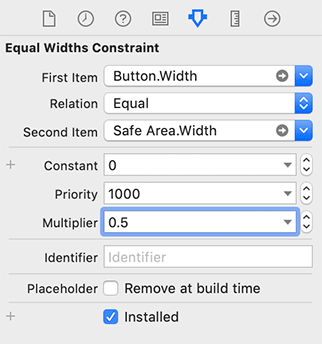
Now you want to constrain the button’s width to be half of the safe area’s width. This is something that you have not yet done. To create this constraint, select the Button and the Safe Area in the document outline and open the Add New Constraints menu. Choose Equal Widths and click Add 1 Constraint. To make the button be half of the safe area’s width, instead of the full width, select the newly created constraint and open its attributes inspector. Confirm that the First Item is Button.Width. (If it is Safe Area.Width, select that and choose Reverse First And Second Item.) Finally, set the Multiplier to be 0.5 (Figure 17.11).
Select the button and open the attributes inspector. Set its Title to be Add Mood and the Text Color to be white. Feel free to give the button a colorful background color as well so you can see the text in Interface Builder; the exact color choice does not matter as you will be updating the background color in code.
The interface is just about done. But before you finish it, turn your attention to the programmatic side of things for a bit.
Open ViewController.swift. To begin, rename this class: Control-click the class name and select Refactor → Rename…. Name it MoodSelectionViewController and click Rename.
Declare the outlets that the MoodSelectionViewController class will need for its basic UI as well as an array of available moods and the buttons that will be used to represent them:
Listing 17.10 Adding mood properties (MoodSelectionViewController.swift)
class MoodSelectionViewController: UIViewController {

    @IBOutlet var stackView: UIStackView!
    @IBOutlet var addMoodButton: UIButton!

    var moods: [Mood] = []
    var moodButtons: [UIButton] = []

    override func viewDidLoad() {
        super.viewDidLoad()
        // Do any additional setup after loading the view.
    }

}
When the moods are set, you will want to update the buttons to display each mood. You can easily accomplish this using property observers.
Add a property observer to update the mood buttons when the moods array is updated.
Listing 17.11 Updating the mood buttons (MoodSelectionViewController.swift)
var moods: [Mood] = [] {
    didSet {
        moodButtons = moods.map { mood in
            let moodButton = UIButton()
            moodButton.setImage(mood.image, for: .normal)
            moodButton.imageView?.contentMode = .scaleAspectFit
            moodButton.adjustsImageWhenHighlighted = false
            return moodButton
        }
    }
}
Here you are using the map(_:) method on Array to transform one array into another array. This code:
    let numbers = [1, 2, 3, 4, 5]
    let strings = numbers.map { number in
        return "\(number)"
    }
has the same result as this code:
    let numbers = [1, 2, 3, 4, 5]
    var strings: [String] = []
    for number in numbers {
        strings.append("\(number)")
    }
When the moodButtons array is set, the existing buttons need to be removed from the stack view and the new buttons need to be added. Add a property observer to moodButtons to do this.
Listing 17.12 Updating the stack view’s buttons (MoodSelectionViewController.swift)
var moodButtons: [UIButton] = [] {
    didSet {
        oldValue.forEach { $0.removeFromSuperview() }
        moodButtons.forEach { stackView.addArrangedSubview($0)}
    }
}
There are a couple of new concepts in the code above. The forEach(_:) method acts on an array very similarly to a normal for loop, except it has a closure parameter that is called for each element in the array. This code:
    let numbers = [1, 2, 3, 4, 5]
    numbers.forEach { number in
        print(number)
    }
has the same result as this code:
    let numbers = [1, 2, 3, 4, 5]
    for number in numbers {
        print(number)
    }
The forEach(_:) method is most useful when you have a single action that you need to perform on each element, as seen in the moodButtons property observer above.
The $0 in the closure is a shorthand way of accessing the arguments of the closure. If there are two parameters, for example, their arguments can be accessed by $0 and $1. So this code:
    let numbers = [1, 2, 3, 4, 5]
    numbers.forEach { print($0) }
also has the same result as this code:
    let numbers = [1, 2, 3, 4, 5]
    numbers.forEach { number in
        print(number)
    }
With the infrastructure now in place, setting the moods array will now update the UI. Update viewDidLoad(), set the available moods via the moods array, and apply some styling to the add mood button.
Listing 17.13 Declaring the moods to display (MoodSelectionViewController.swift)
override func viewDidLoad() {
    super.viewDidLoad()
    // Do any additional setup after loading the view.

    moods = [.happy, .sad, .angry, .goofy, .crying, .confused, .sleepy, .meh]

    addMoodButton.layer.cornerRadius = addMoodButton.bounds.height / 2
}
When the moods array is set, it will trigger the property observers that you declared on both moods and moodButtons, which will then add the appropriate buttons to the stack view.
While you can tap the emoji buttons, they are not currently wired up to do anything. Let’s address that.
When the user taps one of the images, you will update the currently selected mood. This will then update the addMoodButton to display the name of the selected mood, and it will change the button’s background color to match the selected mood.
Add the code to accomplish this in MoodSelectionViewController.swift.
Start by adding a currentMood property and a method that you will use to update the currentMood when the control’s selection changes:
Listing 17.14 Updating the currently selected mood (MoodSelectionViewController.swift)
var currentMood: Mood? {
    didSet {
        guard let currentMood = currentMood else {
            addMoodButton?.setTitle(nil, for: .normal)
            addMoodButton?.backgroundColor = nil
            return
        }

        addMoodButton?.setTitle("I'm \(currentMood.name)", for: .normal)
        addMoodButton?.backgroundColor = currentMood.color
    }
}

@objc func moodSelectionChanged(_ sender: UIButton) {
    guard let selectedIndex = moodButtons.firstIndex(of: sender) else {
        preconditionFailure(
                "Unable to find the tapped button in the buttons array.")
    }

    currentMood = moods[selectedIndex]
}
Next, ensure that the currentMood is updated when the control’s selection changes. You will also want to update the currentMood whenever the moods array is set.
Listing 17.15 Connecting the current mood to the selection (MoodSelectionViewController.swift)
var moods: [Mood] = [] {
    didSet {
        currentMood = moods.first
        moodButtons = moods.map { mood in
            let moodButton = UIButton()
            moodButton.setImage(mood.image, for: .normal)
            moodButton.imageView?.contentMode = .scaleAspectFit
            moodButton.adjustsImageWhenHighlighted = false
            moodButton.addTarget(self,
                                 action: #selector(moodSelectionChanged(_:)),
                                 for: .touchUpInside)
            return moodButton
        }
    }
}
Now, open Main.storyboard and connect the stackView and addMoodButton outlets.
Build and run the application. You will see the buttons along the bottom, and as you tap them the add mood button will be updated to reflect the current selection (Figure 17.12).

The MoodSelectionViewController is just about done. In the next section, you will create the table view controller that will display the historical list of mood entries. Then you will connect these two view controllers together.
The table view controller will display a list of MoodEntry instances. Create a new Swift file named MoodListViewController and declare the UITableViewController subclass. Implement the table view data source methods.
Listing 17.16 Implementing the MoodListViewController class (MoodListViewController.swift)
import Foundationimport UIKit class MoodListViewController: UITableViewController { var moodEntries: [MoodEntry] = [] override func tableView(_ tableView: UITableView, numberOfRowsInSection section: Int) -> Int { return moodEntries.count } override func tableView(_ tableView: UITableView, cellForRowAt indexPath: IndexPath) -> UITableViewCell { let moodEntry = moodEntries[indexPath.row] let cell = tableView.dequeueReusableCell(withIdentifier: "UITableViewCell", for: indexPath) cell.imageView?.image = moodEntry.mood.image cell.textLabel?.text = "I was \(moodEntry.mood.name)" let dateString = DateFormatter.localizedString(from: moodEntry.timestamp, dateStyle: .medium, timeStyle: .short) cell.detailTextLabel?.text = "on \(dateString)" return cell } }
Now, set up the interface to go along with the MoodListViewController. Open Main.storyboard and drag a Table View Controller onto the canvas. With the table view controller selected, open its identity inspector and set the Class to MoodListViewController.
Select the prototype cell. Open its attributes inspector and set the Style to Subtitle and the Identifier to UITableViewCell.
Now find the Container View in the library. Drag one of these onto the view of the Mood Selection View Controller. Notice that there is now an embed segue from the container view to a new view controller, and the size of that new view controller matches the size of the container view (Figure 17.13).

Next, resize and lay out the container view. Select the container view on the canvas, open the Editor menu and select Arrange → Send to Back. This will position the container view behind everything else. (As of Xcode 11.4, you must select the view on the canvas, not the document outline, to use the Editor → Arrange menu.)
You can also rearrange views in the document outline. If you look at the elements in the Mood Selection View Controller’s View, you will see that they are arranged back to front: Safe Area, Add Mood Button, Visual Effect View, Container View. In other words, the safe area is the back-most layer, with the add mood button and visual effect view in front of it (closer to the user). The container view is in front of everything else (unless you already moved it); to move it back, drag the Container View in the document outline to be between the Safe Area and the Visual Effect View.
To finish laying out the container view, you need to pin the container view to the edges of its superview. Selecting both views, open the Align menu, select the four edge constraints, and then Add 4 Constraints.
You want the embedded view controller to be the table view controller, so select the view controller currently wired up to the embed segue and delete it. To set the table view controller as the embedded view controller, Control-drag from the container view to the table view controller. Select Embed from the menu in the panel that appears (Figure 17.14).

Build and run the application. While you cannot yet add mood entries to the table view, you should see an empty table view embedded within the container view.
You need a way to add mood entries to the table view controller. To accomplish this, you will store a reference to the MoodListViewController within the MoodSelectionViewController. But instead of storing the reference types as MoodListViewControllers, you will use a protocol to abstract away the specific view controller needed.
By doing this, you are making the MoodSelectionViewController more flexible; the MoodSelectionViewController is not coupled with a specific UIViewController subclass, but rather a protocol that any view controller can conform to.
Create a new Swift file named MoodsConfigurable and declare a protocol with one method, add(_:), that will allow a MoodEntry to be added.
Listing 17.17 Implementing a new protocol (MoodsConfigurable.swift)
import Foundation

protocol MoodsConfigurable {
    func add(_ moodEntry: MoodEntry)
}
Now that you have created this protocol, make MoodListViewController conform to it and implement the add(_:) method.
Open MoodListViewController.swift and declare an extension at the bottom of the file. Use this extension to conform to the MoodsConfigurable protocol and implement the add(_:) method.
Listing 17.18 Conforming to the MoodsConfigurable protocol (MoodListViewController.swift)
class MoodListViewController: UIViewController {
    ...
}

extension MoodListViewController: MoodsConfigurable {

    func add(_ moodEntry: MoodEntry) {
        moodEntries.insert(moodEntry, at: 0)
        tableView.insertRows(at: [IndexPath(row: 0, section: 0)], with: .automatic)
    }

}
With the protocol created and conformed to, you can use it within the MoodSelectionViewController class. Earlier, you set up an embed segue from the MoodSelectionViewController to the MoodListViewController. Embed segues trigger prepare(for:sender:), just as other segues do, and you will use this to get a reference to the MoodListViewController.
Open Main.storyboard and select the embed segue. Open its attributes inspector and set its Identifier to embedContainerViewController.
Now open MoodSelectionViewController.swift. Declare a new property of type MoodsConfigurable and implement prepare(for:sender:).
Listing 17.19 Handling the embed segue (MoodSelectionViewController.swift)
var moodsConfigurable: MoodsConfigurable!

override func prepare(for segue: UIStoryboardSegue, sender: Any?) {
    switch segue.identifier {
    case "embedContainerViewController":
        guard let moodsConfigurable = segue.destination as? MoodsConfigurable else {
            preconditionFailure(
                    "View controller expected to conform to MoodsConfigurable")
        }
        self.moodsConfigurable = moodsConfigurable
        segue.destination.additionalSafeAreaInsets =
                UIEdgeInsets(top: 0, left: 0, bottom: 160, right: 0)
    default:
        preconditionFailure("Unexpected segue identifier")
    }
}
Here you verify that the destination view controller conforms to the MoodsConfigurable protocol and then store this destination in the moodsConfigurable property.
You also set the additional safe area insets on the destination view controller to account for the control and button at the bottom of the interface.
Implement a method that will be triggered when the add button is tapped. This will create a new MoodEntry and add it to the table view controller via the protocol.
Listing 17.20 Adding new mood entries (MoodSelectionViewController.swift)
@IBAction func addMoodTapped(_ sender: Any) {
    guard let currentMood = currentMood else {
        return
    }

    let newMoodEntry = MoodEntry(mood: currentMood, timestamp: Date())
    moodsConfigurable.add(newMoodEntry)
}
Open Main.storyboard and connect the add mood button to the addMoodTapped: action.
Build and run the application. Select various emoji from the emoji selection control and tap the add mood button. Each mood will be added to an ongoing list of mood entries (Figure 17.15).

In the next few chapters, you will rework the emoji selection control to be a UIControl subclass. In doing so, you will clean up the view controller code and create a reusable control that works with any array of images.