Now that we’ve covered some of the basic principles of flash exposure and manual shooting with flash, let’s delve into some of the mechanics behind your flash so that you can better understand how your portable electronic flash works (or what considerations you should make when purchasing a new flash).
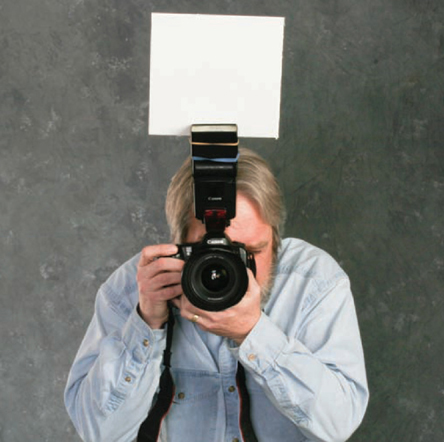
An important element is flash power, which relates to the total distance your flash light can travel. The guide number describes your flash’s total power output. The higher the guide number, the more power the flash possesses. A flash’s power is analogous to the horsepower of a car: The bigger the engine, the greater the horsepower and the more powerful the vehicle. A more powerful flash gives you more shooting options because it provides the requisite flash output for more situations without forcing you to adjust other exposure settings. It’s my feeling that a guide number of 110 or higher will give your flash “engine” plenty of muscle.
The flash range refers to the closest and the farthest points a subject can be from the flash to obtain an acceptable exposure. Each flash unit has a certain range of flash ability based on the total power it can produce. As just noted, the higher the guide number, the higher the flash output. Following up on that, the higher the flash output, the greater the distance the flash can travel (the greater the flash range). On the other hand, the lower the guide number, the lower the flash output. The lower the flash output, the shorter the distance the flash can send light.
The guide number for my Nikon Speedlight SB-900 is 157, and it has a range of roughly 2 to 65 feet based on an ISO of 100. So for the SB-900, 2 feet is the closest a subject can be; anything closer will be over-flashed. And 65 feet is the farthest the subject can be (unless I increase my ISO). Beyond 65 feet, the light falloff (based on the Inverse Square Law) will be too great to properly expose the subject.
The camera settings that affect your flash range for a specific exposure are aperture and ISO. Adjusting aperture affects the range because you are widening or constricting the hole through which light travels to reach your image sensor, thus allowing more or less light to reach it. For example, changing your aperture from f/4 to f/11 shortens the flash range because f/11 allows in less of the flash light while the shutter is open, so it requires a greater amount of your flash’s total light output because that light has to squeeze through the tiny f/11 opening for a proper exposure. Go the other way, from f/11 to f/4, and you extend the flash range substantially because it takes less of the flash’s light to slide through the wider f/4 opening, allowing the light to reach much farther.
ISO impacts flash range because a higher ISO makes your image sensor more sensitive to light, so less flash output is required to properly expose an image. As a result, a higher ISO increases the flash range.
To determine your flash range for a given exposure setting, you could go through a series of calculations before every click of the shutter. Or if you’re like me and don’t want to crunch numbers before every flash picture, you could just use the automated distance scale on the back of your electronic flash. The flash manufacturers have already done the math for you, and all the information you need is right there.
If you determine your flash can’t reach a particular subject, the easiest thing to do is change the flash-to-subject distance by moving closer and bringing your subject within range. If moving closer isn’t an option—say you’re photographing wildlife and you can’t just walk up to the animal—you can increase your flash range by widening your aperture or increasing your ISO. Just be careful of depth-of-field concerns if you’re opening up your aperture and shooting a subject that requires a bit more depth of field. Many modern DLSRs let you go up to ISO 1600 with very little noise, opening up a wealth of long-distance shooting options by combining flash and high ISO.
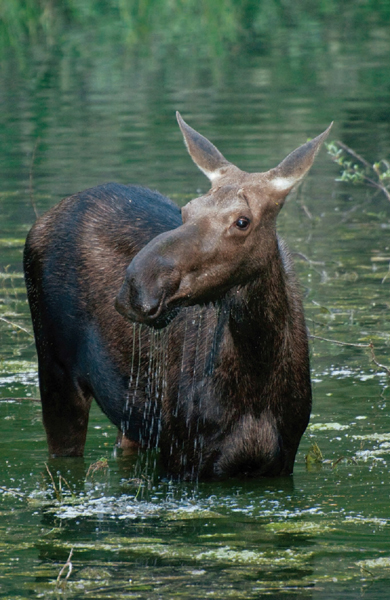
I came upon this moose feeding in a small pond just off Going-to-the-Sun Highway in Glacier National Park. It was near dusk, so the available light was minimal at best. Plus, the moose was about 90 feet away from the road. With my camera and lens on tripod and ISO 200, I set the lens wide open at f/5.6 and adjusted my shutter speed until 1/15 sec. indicated a correct exposure. Motion blur wasn’t a risk; the moose was moving through the water at a speed that would make a snail look like it was breaking the sound barrier. Unfortunately, the somewhat flat light was far from flattering. I could use my flash, giving the moose a bit of a “pop” that would also include catchlights in the eyes, but with ISO 200, my flash would never reach the moose. However, once I increased my ISO to 800 on both the camera and the flash, the flash distance scale offered up a new setting that indicated a correct flash exposure was now possible far beyond 66 feet. As this image shows, my flash exposure of f/5.6 for 1/30 sec. not only gave the moose a bit of a pop but it also provided that catchlight in the eye.
Nikon D300S, 70–300mm lens, ISO 200, f/5.6 for 1/30 sec., Speedlight SB-900
Another consideration is the speed of your flash when making multiple exposures. Recycle time and flash duration are the two things to consider here. Recycle time refers to how long it takes for the flash to return to full power between flashes. Most flashes, on a fresh pair of batteries, will return to full power easily within several seconds. However, if you’re planning to shoot in rapid succession over the course of an hour or longer, don’t expect your flash to keep up with you beyond the first 15 or 20 minutes.
Think of a portable electronic flash’s recycle time as a person with healthy lungs about to blow out fifty birthday candles on a cake. The person sits back in the chair, takes a really deep breath, and then blows across the cake. Sure enough, that person has extinguished all fifty candles with a single, powerful breath. But wait! No sooner are the candles blown out when another cake is brought out, and those candles have to be blown out quickly because another cake is in on the way—and then another and another and still another. You can imagine that even someone with the healthiest of lungs will soon be feeling faint and need to stop to rest a bit just to regroup to full power. And while our lungs can fully recover after a few moments of rest, the batteries in the flash expel quite a bit of power, diminishing their initial “full power” and requiring longer recycle times.
You can dramatically shorten or even eliminate a flash’s recycle time by hooking it up to a separate battery pack. Using a powerful battery pack, such as those made by Quantum Instruments, would be like hooking up our candle blower to a pure-oxygen pump that constantly refreshed the blower’s air supply. These battery packs can be expensive, though, and they probably only make sense if you’re planning to do a lot of rapid shooting for long periods of time, as do wedding photographers, sports photojournalists, and event photographers.
For the most part, when I talk about portable electronic flash in this book, I’m referring to flashes that use four AA batteries. You’ll quickly discover—and often at the wrong time—that these portable flashes love to feast on AA batteries. Some photographers buy only alkaline batteries, and lots of them, while others use AA rechargeable batteries—either nickel-cadmium (NiCd) or the higher-capacity nickel-metal hydride (NiMh)—with a backup set or two of alkaline AAs. Regardless of how you power your flash, you should always have an extra set of AA batteries in your bag. (And note: Just because the recycle time slows down significantly in between each flash, that doesn’t mean the AA batteries are spent. There’s still plenty of juice left in them to operate your TV remote control or other small battery-operated devices, so don’t be so quick to throw the batteries in the recycle bin just because they no longer fire the flash.)
Flash duration describes the actual speed of that burst of light, the flash “bang,” released by the strobe when you press the shutter release on your camera. On average, when a flash is set to full power, the duration lasts for around 1/1000 sec. That’s blazingly fast, at least when compared to the blink of an eye, which is around 1/100 sec. Some of you may own a flash whose duration at full power is 1/8000 sec., while others have a flash duration of 1/2000 sec. Again, this duration is based on the flash being set to full power (1/1).
When you reduce the flash’s power, you’re able to work closer to a subject and still maintain a correct exposure. As we’ve already learned, proper flash exposure relates to flash-to-subject distance, so the logic here is that a less powerful flash burst from a closer distance will achieve the same illumination results as a more powerful flash burst from farther away. However, something else that’s noteworthy also occurs when you reduce power on your flash: The flash duration shortens. A shorter flash duration opens up a whole new world of freezing-action opportunities. Why? The bang of the flash is shorter in its duration and the recycle time is also much faster, since the powered-down flash expended a lower amount of power. So a shorter flash duration combined with a much faster recycle time means you can fire off more frames more quickly without waiting for the flash to recycle every 2, 4, or 8 seconds. This makes a significant difference when you’re trying to shoot a sequence of a fast-moving subject.
Note that the only way to shorten the flash duration is to decrease the power. You can assume that with every power decrease—from 1/1 (full power) to 1/2 to 1/4 to 1/8 power and so on—the flash duration gets shorter and shorter. Using an average flash duration time of 1/800 sec. (for most flashes at full power), you can assume the duration decreases by half for each halving of the power setting. So if the duration is 1/800 sec. at 1/1, then it’s 1/1600 sec. at 1/2, 1/3200 sec. at 1/4 power, and so on.

Catching the splash of a simple drop of water from the kitchen faucet as it falls into a glass bowl of water is a snap when you power down your flash! To set up this shot in my kitchen sink, I covered a small cardboard box with one of my bright Hawaiian shirts to make a colorful backdrop. I placed a glass bowl filled with water on top of the shirt and box and adjusted the faucet so that it produced a steady drip of water.
Although this is a two-light setup (first image), rest assured that I’ve also been successful with a single electronic flash. With both flashes powered down to 1/16 power and loaded with fresh batteries, the recycle time was remarkably fast—almost as fast as the motor drive on my camera, which I fired at 4 frames per second. Based on the distance from the flash units to the water drop, and based on the reduced-power settings on the flashes, the scales on the back of the flashes indicated a correct exposure of the subject at an aperture of f/11. With my shutter speed set to 1/250 sec., I was able to fire off three quick frames as the water drop hit the surface of the water in the bowl. The exposure of the resulting upward splash right is one of my favorites.
Nikon D300S, 105mm lens, ISO 200, f/11 for 1/250 sec., two Speedlight SB-900s
Up until now, I’ve conveyed the idea that your choice in shutter speed should be based solely on how you wish to manipulate the ambient light. But there’s another factor that will influence your choice in shutter speeds: the flash synchronization (sync) speed. The flash sync speed is the fastest shutter speed you can set on your camera while using flash without fear of losing part of your composition to darkness. (This shutter speed will vary depending on the particular situation and lighting conditions.)
To get a better understanding of this, let’s review the science of flash photography. Whether you have a portable flash or several powerful studio flashes, something called the capacitor stores up energy inside the flash head. When you press the shutter release, the flash head emits the flash burst. Depending on the make and model of your flash, the rate of speed at which the flash light is expelled might be as high as 1/40000 sec. or as low as 1/800 sec.
Given these speeds, it might seem logical to then assume that the camera’s shutter will be open both before and after the flash has fired. This is true, but only when you’re using shutter speeds that are “in sync” with the flash. By in sync, what’s meant is that the shutters are fully open at the same time the flash goes off.
Let’s break this down a little. The shutter of every camera has two curtains. Think of your shutter opening and closing in much the same way as two stagehands opening and closing the stage curtains in a dark theater. The first curtain begins in a closed position, and the second curtain begins in an opened position. At a designated signal, the first stagehand begins to open the first curtain, moving left to right. Once that curtain has gotten to the end of the stage, fully exposing the dark stage, a spotlight from the back of the theater quickly flashes on and off, briefly illuminating everything onstage. The shutter speed in use will then determine just how quickly the second stagehand begins closing the second curtain, also moving left to right so that it covers the stage that was exposed by the opening of the first curtain.
In this analogy, the signal to open and close the curtains is the pressing of the shutter release button on your camera. The speed at which the second stagehand begins to close that second curtain is determined by the choice in shutter speed. It might be 1/60 sec. or 15 seconds or any other shutter speed that’s in sync with the flash when it fires. When you use a shutter speed that’s not in sync with the flash (faster than the maximum sync speed of your camera), then the second stagehand has already begun closing the second curtain before the first stagehand was able to fully open the first curtain and reveal everything on the stage. And since the second stagehand has already started closing the second curtain when the spotlight briefly turns on and off, a portion of the stage will never be illuminated. In your picture, this unilluminated area will record as black, because it never saw the flash go off. In other words, the shutter was already closing on that part of the frame when the flash burst occurred.
By now you may be understandably concerned over your ability to remember to set the correct sync speed on your camera, but this fear may be unwarranted. Many newer cameras won’t let you take a photo at an incorrect sync speed when your portable electronic flash is attached to your camera. These cameras automatically reset the shutter speed dial to the maximum sync speed when the flash is in the camera’s hot shoe or tethered to the hot shoe via a flash cord. (The problem of not being in sync is more likely to happen when you use the flash off camera, via remote triggers. I’ll get to some techniques for working with off-camera flash via remote on this page. For now, just remember that when using the flash off camera, you should add this one-liner to your checklist: Before I shoot the mink in the rink, make sure I’m in sync!)
For an example of this auto sync-speed resetting, assume for a moment that you’re shooting your son’s soccer game at the blazingly fast shutter speed of 1/2000 sec. Then the game ends, and you want to shoot a team photo. It’s midday, with the sun directly overhead, so your subjects have the raccoon eyes that we discussed earlier. You reach for your flash to provide some fill light to illuminate those under-eye shadows, and as soon as you attach the flash to your camera, it may automatically reset from 1/2000 sec. to its maximum sync speed for flash. Your cutting-edge camera just saved you from making an out-of-sync exposure.
To check your camera’s automatic max sync-speed settings, set the shutter speed to 1/1000 sec., attach the flash, and turn it on. See if the shutter speed resets and to what speed. If it did reset, that’s your max sync speed. To return to the higher shutter speed, just turn off the flash, and the shutter speed should reset to the previous speed. Older camera models may act differently and not reset to the max sync speed when you turn on the flash. If this is the case, when you take a picture at the faster, out-of-sync speed, you’ll have a black border along the long edge of your picture showing the shutter closing before the flash duration was complete.
There are an abundance of sync speeds—currently, often as fast as 1/200 sec. or 1/250 sec. Most modern DSLRs also include a high-speed sync feature that allows you to use your flash at any shutter speed and still be in sync. There’s more on high-speed sync, but basically, when engaged, high-speed sync lets you use flash at any shutter speed—yep, at 1/500 sec., 1/8000 sec., and anywhere in between. You could turn on high-speed sync, leave it on, and, lo and behold, you’d never have to worry about your sync speed again. Now, you may be thinking that you’re liberated, free from the confines of having to even think about your designated sync speed, but there’s a catch: When high-speed sync is on, you will lose at least half of the flash’s power—even more as you increase the shutter speed. That’s because, as mentioned before, the only way to shorten the flash duration is to reduce the flash power. That’s a big trade-off. Since I often need all my Nikon Speedlight SB-900’s output ability, I leave high-speed sync turned off and only use it when needed. High-speed sync is a useful feature, but in all likelihood, you’ll do 95 percent of your flash work within the range of the normal sync speeds.


On location in the New Zealand forest outside of Christchurch, this young man named William was kind enough to make repeated leaps while, one by one, my students and I made flash exposures from a low angle. Because I wanted to combine the correct exposure for freezing action with the correct exposure for the surrounding natural light in the forest, I first set my shutter speed to 1/250 sec., the fastest normal sync speed, which is fast enough to freeze most subjects when using flash.
Before William started his leaps, and with my shutter speed already set, I adjusted my aperture until f/16 indicated a correct exposure for the light of the surrounding forest. That aperture dictated that I also set the flash to f/16 so that the light output of the flash and the ambient light of the forest would record the same exposure. All that was left to do was note the suggested flash-to-subject distance on the distance scale—7 feet in this case—and place the flash at that distance from William. So I placed the flash 7 feet from the spot at which I expected William to be in peak form and made the exposure.
Nikon D300, Nikkor 14mm fish-eye lens, ISO 400, f/16 for 1/250 sec., Speedlight SB-900
Exposure compensation (EC) is used to increase or decrease your exposure beyond what the camera recommends. It has nothing to do with flash exposure. The term bracketing indicates that you’re “compensating the exposure” by shooting at the camera’s recommended normal exposure, then underexposing the next image, and overexposing a third image. When you do this, you’re using EC. There’s no EC button on your camera; EC is simply a name for the process of changing the exposure from what the camera suggests by intentionally underexposing or overexposing.
You can use either aperture or shutter speed to compensate your exposure, but with flash, EC often refers to a shutter-speed adjustment to compensate for the ambient-light exposure. So, when the camera’s light meter recommends an exposure setting based on its interpretation of the scene, you set that exposure in Manual mode by turning the appropriate dials until the camera’s exposure scale indicates a proper exposure. (Aperture Priority and Shutter Priority modes set the rest of the accurate exposure automatically once you set the “priority” setting—i.e., aperture in Aperture Priority mode and shutter speed in Shutter Priority mode.) If you want to then override these recommendations, that’s when EC comes into play as you adjust (most likely) your shutter speed to change the ambient-light exposure (1 stop faster for 1-stop underexposure and 1 stop slower for 1-stop overexposure).
If shutter speed controls the ambient-light exposure and aperture controls the flash exposure, which element would you adjust if you wanted to darken the background behind your subject? Shutter speed. Since your flash doesn’t always reach the background behind your subject (depending on the flash-to-subject distance), the background isn’t affected by any changes you make to the flash output. So if your subject is perfectly exposed by the flash but the background is brighter than you wish (first image), then you can use exposure compensation and adjust the shutter speed, making it faster by 1 or 2 stops to darken the background.
Note that if the background were too dark for your tastes, you could also do the reverse, adjusting the shutter speed to be slower by 1 or 2 stops to brighten up the background. It’s your choice as to what’s a “correctly exposed” background, as long as you remember to adjust only the shutter speed. This will result in changing only the ambient light in the overall exposure, thus leaving the flash exposure unchanged.
In the case of Hampton the bulldog here, I decided on a 2-stop underexposure of the ambient light after seeing my first exposure. In my opinion, a far more dramatic flash/ambient-light exposure resulted from this underexposure. If you’re shooting a scene like this in either Aperture or Shutter Priority mode, you would set the autoexposure override to -2. Just don’t forget to return the override back to zero when finished, otherwise all of your subsequent shots will be 2-stops underexposed, too.
Both photos: Nikon D300S, 16–35mm lens, ISO 200, Speedlight SB-900. First image: f/16 for 1/30 sec. Second image: f/16 for 1/125 sec.
In all lighting, the main light is called key light; this is typically the brightest, most dominant light on the subject. Any other light source is secondary. Imagine that you’re at your daughter’s choral concert, and she has a solo. As she comes from backstage, she walks into the spotlight shining on the microphone—a future singing idol brilliantly illuminated, you are certain. This bright spotlight is the key light. Any other lights, including your portable electronic flash, are supplemental light sources.
When you use your flash as the key light in a scene, you can create some very interesting photographs. When you have your digital camera set to Program (P) mode and you turn on the flash and snap a photo, the result is usually what’s called a “flash-key” photo: The subject is bright from the on-camera flash, and the background is darker. In a flash-key photo, the flash is the dominant light source, and it’s this “flashed” look that we commonly associate with on-camera flash photography. Fortunately, you can use flash key to create very interesting effects with exposure compensation through shutter speed to lighten or darken the background.
The method is simple and involves flashing the subject by manipulating the ambient exposure—making the part of the subject you light appear brighter than the ambient light on the scene. To achieve a flash-key lighting look, meter the scene and adjust your shutter speed to a minus (–) exposure compensation (EC) setting from the meter’s recommended shutter speed. This will darken the background ambient-light exposure. For example, if your metered settings are f/11 for 1/60 sec., change the shutter speed 1 stop (-1 EC) to 1/125 sec., and the background will be darker without affecting the flash exposure on the subject. This shutter-speed adjustment makes the flash appear brighter than the ambient light on the scene, and this added contrast between light and dark emphasizes the flash as the key light.
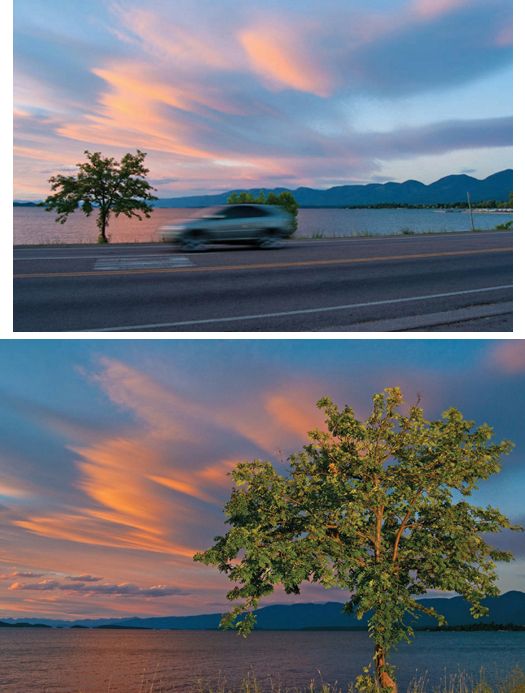
When some clouds parted on this scene Kalispell Lake in Montana, I quickly opted to record a flash shot of the one lone tree on the shoulder of the road. Why flash? I didn’t like the silhouetted look I was getting with just an ambient-light exposure (top). I wanted to kick up the contrast between the sky and the tree, and the best way to do that was to illuminate the tree with my flash.
With my camera and lens on tripod, and with my aperture set to f/22, the available-light exposure for the beautiful sky was 1/2 sec. So with my flash now set for f/22, the flash distance scale indicated a flash-to-subject distance of 4.4 feet. Since I was only about 4 feet away, I was good to go. As you can see at right, the tree was illuminated against that beautiful sky.
Bottom: Nikon D300S, 12–24mm lens, f/22 for 1/2 sec., Speedlight SB-900
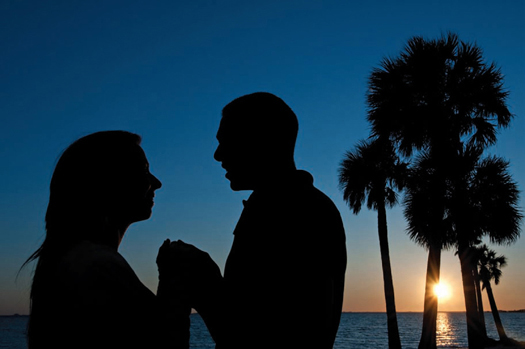
Let’s take a look at a really simple example that’s perhaps familiar to us all. You find yourself out on a family picnic at the beach and your teenage daughter’s boyfriend has tagged along. (Hey, it’s far better than letting her stay home alone with the guy!) Everyone has a great time, and the day is about to come to a close as you see the sun getting low to the horizon. Your daughter comes rushing over to ask you to take a picture of her and Chaz against the sunset that she can put on her Facebook page. As you frame them against the background palm trees and setting sun, you choose an aperture of f/22 to render sharpness from front to back. As you adjust your shutter speed, the light meter indicates 1/160 sec. for a correct exposure, based on ISO 100. But your daughter is not happy with the results, which have turned her and Chaz into silhouettes. She wants a shot that shows all the world that she is with Chaz!
So, since you know that 1/160 sec. is one of the many sync speeds, using your flash to “fill” in their silhouettes is a clear option. If you positioned them off center to the left (as I’ve done here), you’ll also need to place the flash off center to the left. And you have several options: You could fire the flash with the aid of a flash cord running from the flash to the camera’s hot shoe. Or you could use a remote radio, such as those made by PocketWizard, and have someone hold the flash in position for you. Or if you own a Canon 7-D camera and Canon 580 flash or a Nikon and the Nikon Speedlight SB-900, you could fire the flash wirelessly, since the flash will be within close range of you.
At this close range, the flash will indicate that at a flash-to-subject distance of about 5 feet, you need an aperture of f/22, which matches what you needed for the natural-light exposure, so it’s all systems go. Press the shutter release, and it’s bingo bango bongo time; sure enough, your subjects are illuminated, the shot is up on Facebook, and you are your daughter’s hero!
Nikon D300S, 24–85mm lens at 35mm, f/22 for 1/160 sec., Speedlight SB-900
On this page I mentioned the range of light, from shadows to highlights, that our eyes can see (around 16 stops) versus what the camera records (around 7 stops). This difference between shadows and highlights is referred to as dynamic range. The dynamic range is quite broad (or high) on a bright, clear day and more limited (or low) on a foggy morning. Your camera will have trouble properly exposing all the highlights and shadows on a bright day that has high dynamic range (a lot of contrast), while it can more accurately “see” and expose the full range on a cloudy day that has low dynamic range (less contrast between highlight and shadow).
When you photograph a scene with great contrast (high dynamic range), the image often works better when the exposure is closer to what works best for the highlights over what works best for the shadows. This results in perfect highlights at the expense of the shadows, which is more visually pleasing than good shadow detail and blown-out highlights.
So how do you get both well-exposed highlights and well-exposed shadows? Use flash to fill in those dark shadows and lower the dynamic range by exposing the shadow detail. Flash used in this way is called fill flash or fill light, and it’s one of the most common uses of flash. (You can also create fill light without flash by using a reflector to bounce light into shadow areas.)
Using the example of your daughter’s concert from this page, again, there you are, ready with your camera and flash, sitting in the audience waiting for her to walk up to the microphone for her solo. The spotlight that lights your child so brightly from above (the key light) is, like the sun on a bright day, quite high in contrast. It can produce some dark shadows on her face and possibly even the raccoon-eyes effect I mentioned earlier. Thankfully, you have your portable electronic flash so you can fill in the light and reduce the contrast from this strong overhead light.
Fill flash has many other uses, as well. For example, backlit subjects can benefit from fill flash when you aim flash into the shadow side of the subject (the shadow side is the front side with backlit subjects). And wildlife photographers are known to use fill flash simply to add a “catchlight” (an eye highlight) for that little bit of sparkle in an animal’s eyes.

Trying to get a good portrait of anyone—whether it’s the wife, kids, or complete strangers—in harsh midday light isn’t so much a challenge as much as a foregone conclusion: It just doesn’t work. Time for fill flash!
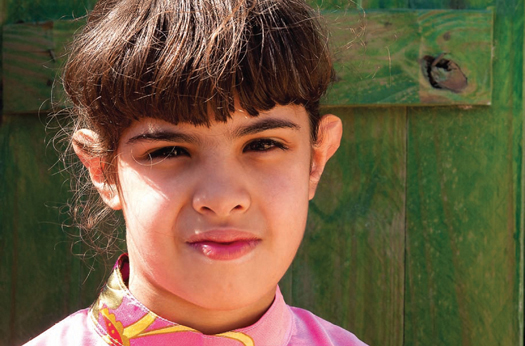
Without the benefit of any flash (top), this exposure of a young girl at a camel festival in the United Arab Emirates has all of the telltale signs of midday light: high contrast between light and dark areas—and the squinty eyes in heavy shadow. If you think of ambient light as the key light (or main light), while any fill flash is secondary light, this first exposure was set for the key light. And it’s a technically correct but far from flattering exposure of this little girl. When I added flash (bottom), I “filled in” the shadow areas and created a far more flattering image.
Note that, as is often the case when shooting basic fill flash, I didn’t shoot the flash exposure at the recommended setting but rather at a 1-stop underexposed. In this scenario, the available-light exposure was f/16 for 1/200 sec. without flash, and I wanted just enough flash to fill the shadow areas. So rather than set the flash to f/16 at the indicated flash-to-subject distance, I set it to f/11 while keeping my camera exposure setting at f/16. This essentially tricked the flash into thinking that it needed to put out less light for the more open aperture of f/11. The flash power was, in effect, reduced by 1 stop. By keeping my lens set at the smaller aperture of f/16, I prevented my flash from overpowering the natural light present in the scene and washing out the subject. This filled in the shadows nicely and lowered the dynamic range (the contrast between light and dark areas), giving the image a more natural and less “flashed” appearance. The key point here is to adjust the flash’s output—not the camera’s exposure setting—when trying to achieve a more evenly lit exposure with fill flash.
Both photos: f/16 for 1/200 sec. Bottom: with Speedlight SB-900

Watch out for those subjects in hats! The human eye is an amazing machine in its ability to see light and dark simultaneously. Your camera doesn’t see the full dynamic range as well, so scenes in which the subject is in partial shadow (under the brim of a hat) may need a little extra illumination.
When I set my aperture to f/8 and adjusted my shutter speed until 1/160 sec. indicated a correct exposure in the camera’s meter, it was immediately apparent that the subject’s hat was causing an underexposure on his face. Since I wanted to keep the hat in place, fill flash came to the rescue. Staying with the available-light exposure I’d just made, I dialed in f/5.6 on the back of my flash—again, lowering the flash power so as not to over-flash the subject. Based on this setting, the distance scale on my flash told me I needed to be at 27 feet at full power, 19 feet at 1/2 power, and 13 feet at 1/4 power. Since I was about 12 feet from the subject, I used the 1/4 power setting. And since I was actually using an aperture of f/8 on my lens, this flash-to-subject distance resulted in a 1-stop underexposure—just enough to fill in his face with some illumination without overpowering the scene with flash light.
Both photos: Nikon D300S, 24–85mm lens at 32mm, f/8 for 1/160 sec. Bottom: with Speedlight SB-900
Many times, fill flash is something that readily comes to mind when the main subject is in harsh midday light. But fill flash can also be used to shed some light on dark backgrounds. Here, my subject, Cliff, was sitting in open shade beneath an overhanging roof. The many items on display for sale behind him were also in open shade, but since they were farther back on the porch, they were in even darker shade than Cliff. At f/8 for 1/90 sec. with no flash, a pleasant exposure of Cliff resulted, but not surprisingly, the background behind him recorded quite dark, since 1/90 sec. wasn’t enough to correctly expose that part of the first composition.
Directing some fill flash into the background area above, lit up the background with just enough light to match the available-light exposure of Cliff’s face (third image). It’s a simple fill-flash exposure, really: I dialed f/8 into my flash, and the distance scale indicated that the flash needed to be about 9 feet from the subject. I also added a light-amber gel to the flash to create a warmer light in the background. My son stood to the right of Cliff, holding the remote flash up high at a distance of about 9 feet while pointing it downward at a 45-degree angle, and I fired away at f/8 for 1/90 sec. What was once hidden was revealed by the “sunlight” from my flash.
Both photos: Nikon D300S, 24–85mm lens at 45mm, f/8 for 1/90 sec. Third image: with Speedlight SB-900

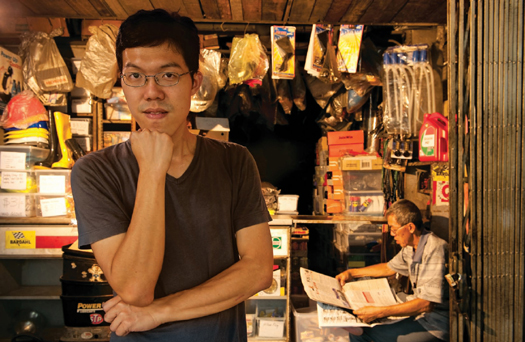
In this example, made during a workshop in Singapore, I at first set my aperture to f/11 and adjusted my shutter speed to 1/60 sec., and shot using only the natural light. Note the darker background in the resulting portrait. The overcast ambient light was sufficient for the subject but not for the backdrop of this motorcycle-parts business, which gets lost in the darkness due to light falloff.
For the second attempt, I had one of my students hold up a flash to spread light behind my subject (second image). I was then able not only to render the pleasing natural-light portrait of my subject but also to achieve some degree of illumination behind him, revealing his shop and even his father reading a paper in the lower right corner of the scene.
Combining the ambient exposure with the flash exposure is, again, an easy proposition. With my lens at f/11 and my shutter speed set for the ambient light falling on the main subject, I simply set the flash to f/11 and had my student/assistant hold the flash about 6 feet from the background. The flash indicated I should power it down to 1/4 power, and as you can see, that was correct.
Both photos: 24–70mm lens at 35mm, ISO 200, f/11 for 1/60 sec. Third image: with Speedlight SB-900

Located along Chicago’s eclectic Western Avenue, Manny’s Used Cars is one of the many mom-and-pop businesses on the street that demonstrate Chicago’s diverse culture. Manny said “No thanks” to my photo request but was quick to offer up Jorge, one of his salesmen. Working in direct midday sunlight, I wanted to elevate Jorge and shoot from down low as he looked up, so I placed him on a ladder. As you can see in the first image, the light on Jorge’s face was harsh. So I had my assistant, Jim, hold my Nikon Speedlight SB-900 and a diffuser panel (second image). Firing the flash through this diffuser made the normally unflattering light of a bare, direct flash softer and more flattering. It also spread out the light so that it wasn’t such a direct beam on Jorge’s face. As you can see below, the fill flash did a nice job of cleaning up the harsh light and filling in the shadows with good light.
Note that normally I’d adjust the flash power to 1/2 power in this type of situation yet remain at the flash-to-subject distance indicated for 1/1 power to avoid washing out my subject with too-powerful flash light. However, since the diffuser will easily eat up about 1 stop of the light passing through it, this wasn’t necessary. With both the camera and flash in Manual mode, I chose f/22 for the depth of field I wanted, and the camera’s light meter responded with 1/100 sec. as a correct exposure for the available light. At f/22, the distance scale on the back of the flash told me the flash needed to be 8 feet from the subject. I then had Jim position the flash to fire through the diffuser from this 8-foot distance, and not surprisingly, the flash illuminated Jorge just enough (a 1-stop underexposure) to “fill in” the deep shadows that were once across his face.
Both photos: Nikon D300, 17–35mm lens at 35mm, ISO 200, f/22 for 1/100 sec. Third image: with Speedlight SB-900 and diffuser
One of the most common compositional choices is to isolate a subject from an otherwise busy scene. Isolation or singular-theme compositions owe their impact in large part to simply having one subject as the center of attention—if done well, there really is nothing else to detract from the subject and distract the eye/brain as it views the resulting image.
Effective isolation relies in large part on the photographer’s ability to combine both proper lens choice and proper aperture (most often a telephoto lens and a large lens opening, such as f/4 or f/5.6) with a background that can be rendered into out-of-focus tones or shapes. Sometimes, if not making use of a background like this, a photographer can search out a subject that is frontlit or sidelit and choose a point of view that showcases the sunlit subjects against a background of open shade; since the exposure in these cases is made for the much brighter foreground subject, the area of open shade behind the subject records as a very dark (if not black) underexposure. It is this extreme contrast between light and dark that can also be used to isolate a subject from an otherwise busy and chaotic scene. And you can also create this lighting contrast using your flash.
When mixing flash and ambient light, it’s helpful to understand proper daylight exposure. For manual shooters, the Sunny 16 Rule provides a great starting place for ambient-light exposure on a bright sunny day. Sunny 16 states that when shooting in natural light on a sunny day, beginning about 1 hour after sunrise and lasting up to 1 hour before sunset, all frontlit and sidelit scenes will record a correct exposure at f/16 with a shutter speed denominator that matches your ISO. So for example, if you point your camera toward the blue sky to the west at 10:00 AM using f/16 and ISO 200, your meter should give you a shutter speed of 1/200 sec. for a correct exposure. If you’re using ISO 100, then your shutter speed should be 1/100 sec. If nothing else, the Sunny 16 Rule is a great way to check if your in-camera meter is working correctly.
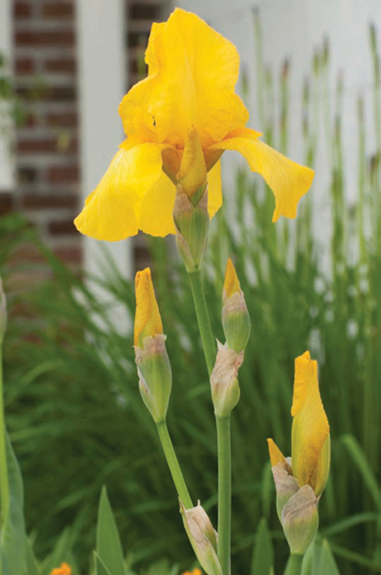
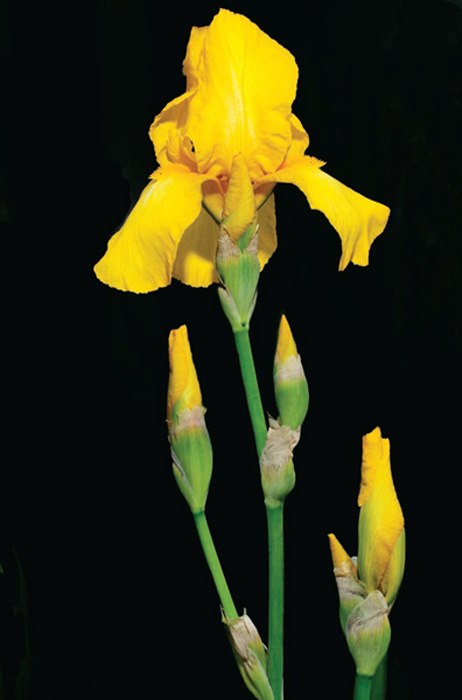
When I caught sight of this bright yellow bearded iris, try as I might, I couldn’t isolate a lone flower from the background, even when shooting at f/4 with my 70–300mm lens at the 300mm focal length. The background was “flat” with no real opportunity to render out-of-focus tones, and the soft overcast light didn’t offer up any opportunities to isolate the flower via contrast. It was then that I realized that I could, in fact, isolate this lone flower by illuminating it with the aid of my flash—my miniature sun—while at the same time selecting a shutter speed that was fast enough to severely underexpose the ambient light surrounding it.
In the first, far-from-compelling photo, I set my aperture to f/8 and adjusted my shutter speed until 1/15 sec. indicated a correct exposure. It is flat, lifeless, and without contrast, and since it is a flower against a plain wall, there are no out-of-focus tones in the background. Tome to call in the flash.
Since I intended to use flash as the sole light source, I also wanted to force a severe underexposure of the ambient light. So, once again, with my aperture set to f/8 and my camera on tripod, I was quick to determine that I could easily shoot at the much faster shutter speed of 1/250 sec., thereby killing the ambient light (by 4 stops, in this case!), and all that remained was to adjust the flash power for the 4-foot flash-to-flower distance at which I would be holding the flash off to the left. As I dialed in f/8 on the flash, the flash told me that at 4 feet I’d need to power down the flash to 1/8 power.
Thanks to the Inverse Square Law, the light output from my flash quickly fell off, never reaching the background. Since no light reached the background, the ambient light could only record as a severe underexposure, because the shutter speed was too fast. And voilà! I no longer have a distracting background. The underexposed background comes out black, in marked contrast to the vibrant yellow bearded iris.
Both photos: Nikon D300S, 70–300mm lens, ISO 200. First image: f/8 for 1/15 sec. Second image: f/8 for 1/250 sec., Speedlight SB-900
In the previous topic the goal was to lose a daylight background entirely. But the beautiful colors of sunrise and sunset skies are something you don’t want to miss—you want to “hold” all that striking color. You might think you’re limited to silhouetting your foreground subjects in these low-light situations, but I’m here to tell you that with flash you’re most certainly not!
Within the first few days of my picking up a camera many years ago, I was shooting a sunset! Not surprisingly, not a lot has changed in my more than thirty-five years of shooting. I’m still drawn to sunsets (and sunrises) like a moth to a flame. Years of teaching workshops, as well as operating my on-line photography school, have also assured me that I am far from alone in my pursuit of the magical and often surprising colors that both sunsets and sunrises can produce. Kodak stated some years ago that, next to photographs of our family and friends, sunsets were the most-photographed subject.
Sure, some sunsets and sunrises have been real duds, but it’s rare—extremely rare, in fact—that predawn sunrise or end-of-day sunset light cannot produce a stunning image when combined with flash! A close look at any experienced photographer’s portfolio will reveal at least one if not several striking flash portraits taken against the backdrop of a predawn sky or of the red and magenta afterglow of sunset. It isn’t just the colors of the sky that draw our attention to these profound compositions but the extreme contrast between the flashed subject and the remaining ambient light. It’s no accident that you’ve seen the combination of flash and sunset or sunrise ambient light more than a few times throughout this book. And I’m sure that within a few weeks—in not days!—you, too, will have captured many profound flash/ambient exposures taken at these times of day.
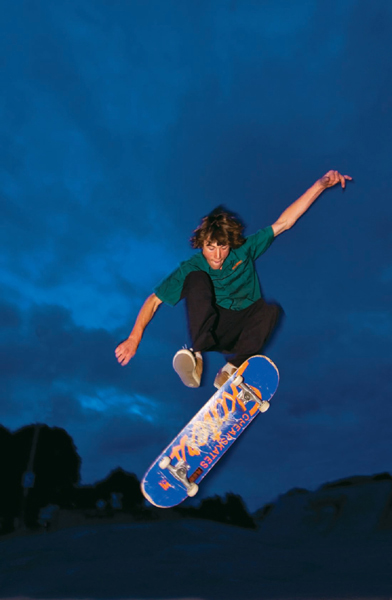
If you live near a skateboard park, I know of no better location to hone your skills with flash photography and rear-curtain sync, which I cover in more detail. On this occasion, it was getting late in the evening, and while the cloudy-yet-dusky sky wasn’t quite as blue I wanted, I also didn’t want to lose what color there was behind my subject. So with a quick switch of my camera’s white balance (WB) from the Cloudy setting to Tungsten, I was able to add some more blue to the sky. Since flash imitates daylight but my WB was set to Tungsten, I needed to balance the flash’s daylight to account for the Tungsten. So I placed an amber gel on the flash. If I hadn’t, the flash’s light output would have recorded blue, making Slade (a local skateboarder) a cool blue tint rather than the warm tone you see here. (Note that changing your white balance does not affect the light-meter readings of your camera—ever! White balance is strictly about the color temperature of your shot. If you change your white balance from one shot to the next, it only affects the color temperature and not the light-meter reading.)
Then after asking Slade to perform a few jumps, I lay down low on the concrete to shoot up at him as he did a midair flip of his skateboard. My flash was mounted on the camera’s hot shoe and set to rear-curtain sync, and based on my distance to Slade (about 11 feet) and with the zoom of the flash set to 24mm (see this page for more on zooming the flash), the flash indicated an aperture of f/9. At f/9 while pointing the camera to the sky, the camera meter suggested a shutter speed of 1/15 sec. for a correct flash exposure. However, in the interest of contrast, I wanted a really dark (but not black) sky, so I opted to shoot at 1/40 sec., underexposing the sky for a more dramatic look in the background while still maintaining color there.
D300, 12–24mm lens, f/9 for 1/40 sec., Speedlight SB-900
For years I’d seen my share of photographs of Peggy’s Cove and its famed lighthouse in Nova Scotia. But it wasn’t until the fall of 2010 that I experienced Peggy’s Cove firsthand—and I wasn’t the least bit disappointed!
One evening following sunset at the lighthouse, my attention turned to the east, where there remained some wonderful cyan and magenta colors in the sky. The lighthouse was still fairly illuminated by the much brighter sky to the west, but the rocky landscape surrounding it had turned dark (first image). But even though the sun had set, that certainly didn’t mean I couldn’t re-create that sunset and its low-angled light.
For that first exposure, with my camera and lens on tripod, I chose an aperture of f/22 for maximum front-to-back depth of field. I took my meter reading while pointing my camera to the eastern sky above the lighthouse and adjusted my shutter speed until the camera’s light meter indicated 2 seconds as the correct exposure.
I then pulled out my flash, dialed in the aperture of f/22, and found that at full power I could illuminate the rocks with a flash-to-subject distance of 7 feet. Holding the flash out to the left at about the nine-o’clock position, and with the camera in Commander remote firing mode, I fired the shutter at the same exposure as I had previously used—and voilà, the flash lit up the foreground rocks in much the same way as the sun had done only 10 minutes earlier. And the sidelighting created by the nine-o’clock flash position also emphasized the rocks’ texture.
Both photos: 16–35mm lens, f/22 for 2 seconds. Second image: with Speedlight SB-900
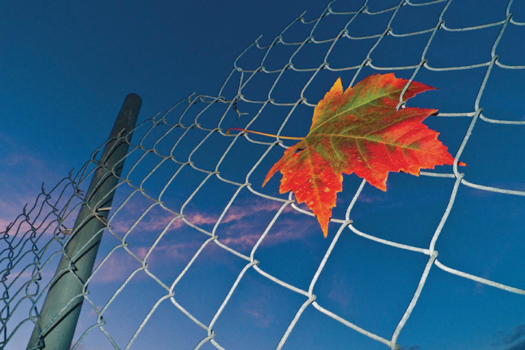
There I was, in an industrial area near downtown Portland, and the rain clouds had finally cleared out right at sunset, leaving a wonderful dusky blue sky behind. There wasn’t much to shoot in this location, other than a cyclone fence, until a nice autumn-colored leaf flew by on the wind and I got the idea to place it on the fence in front of me. With my camera in Manual exposure mode, I set the aperture to f/22 (because I wanted a lot of depth of field) and adjusted my shutter speed until my camera’s meter indicated a correct exposure at 2 seconds. Although this was the correct exposure for the dusky blue sky, it was not the correct exposure for the gray fence and vibrantly colored leaf, which became silhouettes at that exposure (top).
I could have come back in the morning and shot this scene again with the sun behind me, rising in the east and subsequently lighting up the fence and leaf—or I could re-create that early morning sunlight by using flash. The flash distance scale indicated that at f/22 the flash would light up subjects 3 feet away. So, working at that distance, I took the next picture with the flash turned on. What a difference! You may also notice here some minor light falloff in the corners of the frame, especially in the upper right; this is our good friend the Inverse Square Law at work, and at least in this case, this light falloff works in my favor, as it creates a kind of vignette effect.
Both photos: Nikon D300, 12–24mm lens at 12mm, ISO 200, f/22 for 2 seconds. Bottom: with Speedlight SB-900
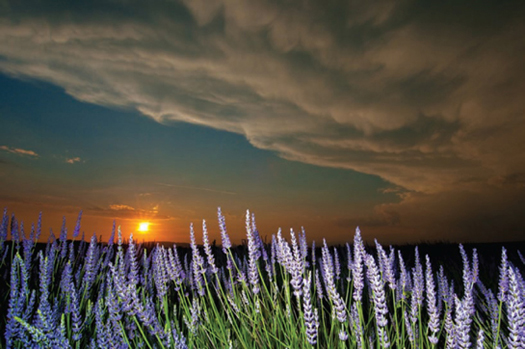
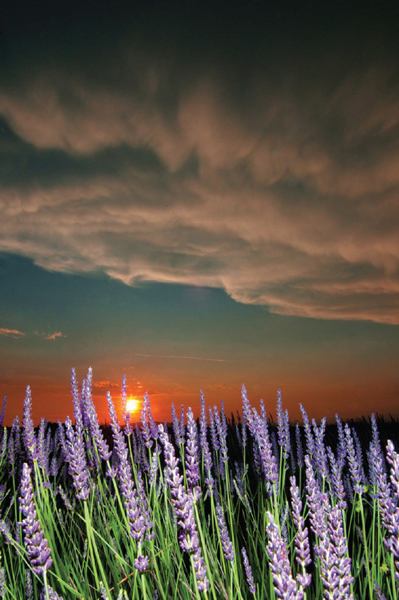
Atop the Valensole Plain near the town of Valensole in Provence, France, I set up my camera and tripod right in front of some lavender flowers. Following several hours of thunderstorms, the clouds were parting just as the sun was beginning to set. With my wide-angle lens in place and an aperture of f/22, I first made an exposure for the sunset sky that resulted in a nice exposure of the sky but a silhouetted exposure of the flowers. Since the sky was much brighter than the flowers below, this was no surprise. I then dialed f/22 into my flash, and the distance scale indicted a flash-to-subject distance of 4.4 feet. All that was left to do was raise the flash about 4 feet from the flowers at a 45-degree angle rather than straight on, and this angled position makes for a more pleasing and natural look from the strobe’s light. As you can see, I was able to record a correct exposure of both the sunset sky and the foreground lavender flowers lit by the flash.
Note, too, the slight light falloff in the horizontal version in the second image. Despite zooming my flash to the widest-angle coverage (17mm), it was just not enough to cover the entire foreground frame of flowers, since the lens I was using had an angle of view of 12mm. However, since the angle of view in the vertical version is within range of the 17mm angle of flash output, there is no falloff recorded there and for this most obvious reason, I prefer the vertical version.
All photos: Nikon D300S, 12–24mm lens at 12mm, ISO 200, f/22 for 1/250 sec. Second image and third image: with Speedlight SB-900
What is bounce flash? It’s rather simple, actually. Bounce flash refers to flash that, rather than being aimed dead at the subject, is pointed toward a nearby wall or angled up at the ceiling. The light from the flash then “bounces” off the wall or ceiling and hits your subject indirectly. You can also bounce flash light off reflectors or an attachment that sits above the flash. After flash light bounces off a wall, ceiling, reflector, or attachment, it fans out into a much softer and more even light. So perfect bounce flash will always produce a more flattering light on your subject.
Think about it this way: Try to visualize what it looks like when you’re outside at midday and the harsh sun shines down on your friend. Now imagine an overcast day and the soft quality of light a cloudy sky creates as the clouds disperse the light traveling through them. Soft shadows with low contrast make for nice pictures. Flash works the same way: When pointed directly at your subject, it’s often harsh and unappealing, but bounced, it becomes dispersed, soft, lower in contrast, and more flattering.
Getting that perfect bounce flash can test your patience. Do not attempt bouncing the flash for the first time on the day of your child’s birthday party. Instead, several days before the party, start practicing the technique. As an experiment, place a teddy bear, other doll, or any “model” in a chair. Now frame up the shot just the way you’d hope to frame it during the upcoming party. With your camera in Manual mode, establish your correct flash exposure based on the distance between the flash and teddy bear, and then set the corresponding aperture on your lens. Next, aim, focus, and photograph the teddy bear. Let’s assume that your flash-to-subject distance dictated f/16. With the lens set to f/16 and your shutter speed set to 1/60 sec., you’ll no doubt be quick to notice that the image on your digital monitor is very familiar—it’s that deer-in-headlights look (or, in this case, a bear-in-headlights look) discussed earlier. The teddy bear is stark, is full of contrast, and has left its mark: a shadow on the wall behind the chair.
Obviously, you no longer want to point the flash directly at any of your subjects, at least when shooting indoors. You don’t want those dark backgrounds or looming dark shadows on the wall behind your subjects. You want an even exposure throughout the entire composition, if possible. With well-executed bounce flash, you not only light your subject, but you can light the room around your subject, as well—without any of those hard shadows you’d otherwise see. However—and this is vitally important when you use bounce flash—based as usual on the flash-to-subject distance, you must open the aperture up about 2 stops prior to shooting your subject.
Back to the teddy bear in its chair: An aperture of f/16 was indicated, but now you’re going to bounce the flash, so you open the aperture up 2 stops, from f/16 to f/8. This is necessary because the flash is first traveling upward and then spreading across the wall or ceiling of the room. By the time the flash’s light hits this surface and bounces back down from above, our good friend the Inverse Sqaure Law has eaten up about 2 stops of light. But by setting the lens to that larger aperture (f/8, in this example), you can still record enough light for a pleasing, soft exposure.
Note that the height of your ceilings—whether 7, 8, 9, or even 12 feet—will of course impact the aperture choice, too. You may discover, depending on your location, that opening the lens 2 stops was too much, or maybe even not enough. A successful bounce flash exposure often requires some subtle tweaking, some fine-tuning, so don’t be surprised if you’re working with a 1/3- or 2/3-stop difference on either side of the recommended 2-stop increase in your aperture.
And just how do you position the flash to bounce it? Push in on both sides of your portable electronic flash, right where it makes that 90-degree bend, and pull your flash head back so that it points straight up. Unless your ceiling is extremely high (more than 10 or 15 feet), the light will shoot up, bounce off the ceiling, and then shower down in a more spread-out, even manner.
Bouncing the flash light off the ceiling (or a wall) spreads it out and creates softer, more even lighting. Bounced flash imitates the softer light produced by an overcast sky, because it spreads out after hitting a surface, dispersing in a wider, less-concentrated manner than when it left the flash—much like clouds disperse the sun’s rays. This larger “light spread” results in less contrast.
Any time you bounce a flash off a nearby wall or ceiling, you must be aware of the color of those surfaces. Why? The light output of your electronic flash is incredibly “sociable” and loves to “pick up” colors from the walls or ceiling as it journeys around the room. If these surfaces are painted, say, orange, pink, yellow, or light blue, you run the risk of contaminating your subject with that same color. White and off-white generally work fine, with no influencing color, but if you’re bouncing your flash off the pink walls in your daughter’s ballerina-themed room, you’ll record a pink cast on her clothes and skin.
On the other hand, if a room has dark walls—maybe deep red, purple, chocolate, or black—the incredibly social flash will be the one getting “picked up” along the way. Just like a sponge, really dark rooms soak up the light of the flash. With what little light is left, the subject appears underexposed. When bouncing flash in a room full of dark paint, you’ll want to open the aperture up at least 1 stop, maybe 2 stops, to compensate for the absorption of light.

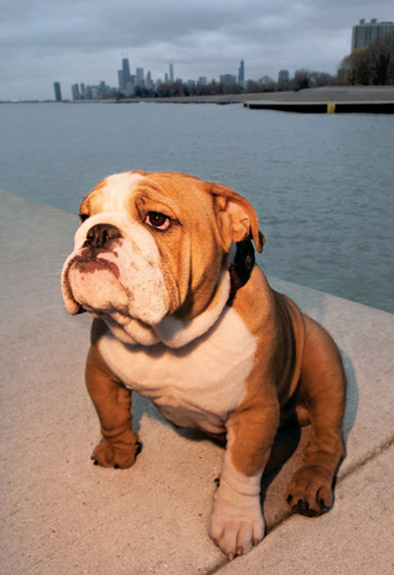
An effective flash bounce helped me turn my daughter Sophie from a deer in headlights (top) back into a young lady (bottom). With my portable flash mounted on the camera’s hot shoe and pointed straight up toward the ceiling, the light cascaded down from above, akin to having a cloudy sky overhead. With the flash directly pointed at Sophie, I got washed-out skin tones, high-contrast light, a dark background, and harsh black shadows (for example, under her chin). Bouncing my flash off the ceiling produced a more even exposure, softer light, and better-illuminated backgrounds with no black shadows.
Both photos: Nikon D300S, 20–35mm lens at 35mm. Top: ISO 200, f/11 for 1/80 sec. Bottom: ISO 400, f/5.6 for 1/80 sec.
Your flash just might have a diffuser hidden from view in a slot at the top of the flash head. Once you discover it, you’ll find that it serves two purposes as it covers the strobe head: (1) It spreads out (or disperses) the light at the widest possible angle, and (2) it also softens the light.
Pulling out this diffuser on certain flash units will also reveal a white panel known as a catchlight panel. To use just the catchlight panel, hold it with one hand while pushing the diffuser back into the same slot. The purpose of this panel is to stop the light that would normally spill out of the flash behind you and redirect it forward so that more light is illuminating the area in front of you. Since the card is so small, it’s important to understand just how effective it is. Primarily, it’s designed for bouncing a subtle amount of light at your subject and creating a catchlight in the eyes—producing that sparkle that every portrait photographer strives for. It won’t replace a large white reflector, which is often used in the studio to spread light farther and wider, but it works well in smaller productions.

Many flash units have a hidden diffuser card in a slot at the top of the flash unit.
If your flash unit doesn’t have a catchlight panel, or if you want a bigger diffuser, you can easily cut a piece of white cardboard and attached it to your flash with the aid of a rubber band. This simple and cheap solution works as effectively as some large commercial diffusers.

During a workshop in Austin, Texas, several students and I decided to eat lunch at Coyote Ugly on Sixth Street. One student wanted to photograph one of the bartenders but was worried about using his flash in such a dark place with such high ceilings. I told him about the little white card in his flash head. As you can see in the first image, with that card extended, we placed the flash on a small light stand level with the counter so that the flash wouldn’t be visible in the mirror behind the bartender. Also, pulling out the white card directed most of the flash power up toward the 16-foot ceiling, with some light heading forward toward the subject. Although the flash–to-subject distance dictated an aperture of f/11, I chose f/5.6, because the flash was being bounced into the ceiling, causing about a 2-stop loss of light output in this case. The result (second image) was a flattering, well-lit portrait.
Nikon D300S, 24–85mm lens at 70mm, ISO 200, f/5.6 for 1/60 sec., Speedlight SB-900

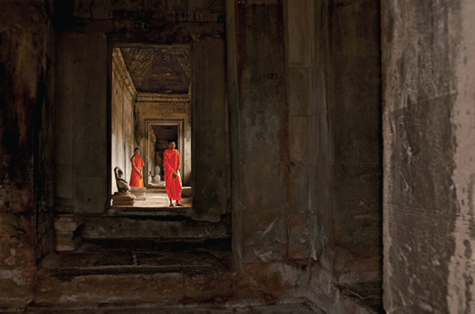
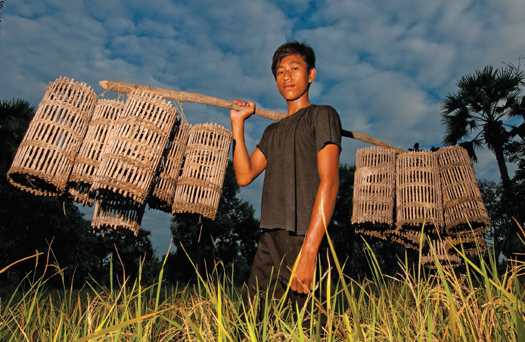
In the fall of 2010, I conducted a small workshop in the town of Siem Reap, Cambodia, most noted for its proximity to the famous ruins of Angkor Wat. Within a short walking distance of the temples of Angkor Wat is a dormitory for Buddhist monks, and not surprisingly, you will also find the orange-clad monks mingling among the crowds of tourists who visit Angkor Wat daily.
One of the area’s locations that I picked for photography included a large but dark foreground of stone walls and doorways. For this shot, beyond the dark foreground doorway and at some distance from it, two monks stood in position among several stone sculptures and in front of several large windows, where the light was much brighter, as you can see in the top image, made only with available light.
Although one could certainly argue that this dark foreground helps call attention to the brighter monks due to the extreme contrast, as one who believes that texture helps the viewer get a better feel for a subject, I felt this was the time to light up the texture in the foreground. As you can see in the second example (bottom), light it up is what I did! With the same exposure setting, I simply mounted the flash to my camera’s hot shoe and pointed it straight up—with my white bounce card pulled out of the flash head. With the flash set to full power, I fired the camera, and sure enough, the flash illuminated the dark foreground, revealing the various textures therein. Given the choice between the two, I prefer that second shot.
Both photos: Nikon D300S, 16–35mm lens, ISO 200, f/22 for 1/125 sec. Bottom: with Speedlight SB-900 with bounce card
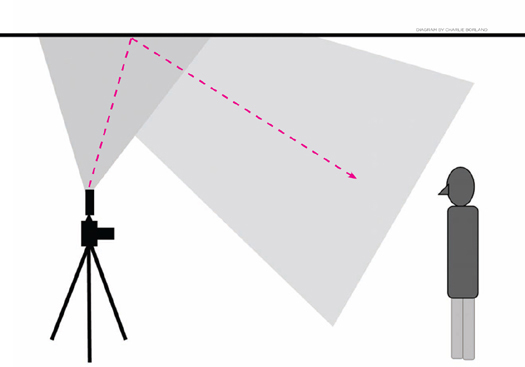
Another reason to get the flash off camera has to do with light “shape.” The farther the flash is from the lens, the more shape there is to the lighting. What do I mean by light shape? On-camera flash is very flat, consisting of mostly highlights with few shadows. A well-lit subject has a perfect balance of highlights and shadows, giving the subject a three-dimensional appearance.
A flash placed off axis to the lens provides light with more shape and dimension, because it creates a highlight side and a shadow side to the subject’s form. As the flash gets farther to the side of the camera, it creates more shadows as the angle between the light and subject increases. Using a flash in this manner is a technique favored by wedding and press photographers for creating more dimensional documentary portraits.
To that end, adding a flash bracket to a flash system makes sense for many photographers, especially when shooting weddings, parties, or groups of people. A flash bracket attaches to the bottom of your camera, and then your flash attaches to the side of the bracket, which connects to the camera with a cord. There are numerous manufacturers of brackets. The most notable is Tiffen, which makes a wide variety of flash brackets and accessories, including the well-known Stroboframe.

Although I’ve referred to this point many times already throughout this book, I wanted to have a section dedicated to one of the most important aspects of successful flash exposures: off-camera flash. This one aspect has everything to do with the light and its direction, and if one thing is clear in these three examples of my daughter Sophie, it’s this: Shooting any flash exposure with the flash pointed directly at the subject (even when the flash is housed in a small softbox, as it is here) will more often than not result in a stark deer-in-headlights portrait (first image).
Note the radical shift in the mood in the next two photographs, with the flash positioned just off to my left at about a 75-degree angle to her face (above, left) and just off to my right at about a 75-degree angle to her face (above, right). The strong sidelight positioning of the flash produces images of great contrast, with a range from bright highlights to very dark shadows. Both sidelit exposures showcase the form and soft textures in Sophie’s face and hair, which is in marked contrast to the flat light of the first image, for which the flash was pointed directly at Sophie.
All photos: Nikon D300S, 24–85mm lens at 85mm, ISO 200, f/11 for 1/160 sec.
It wasn’t just the “Wildflower Explosion” that brought me to a halt as I toured South Glacier National Park but also the impending storm. This was a great opportunity to use the storytelling aperture of f/22—and when combined with the flash illuminating the foreground (shaping and directing it from a low left-hand angle) and a deliberate underexposure of the ambient light, a potentially dramatic landscape was in the making.
Since I wanted to record a somewhat narrow flash beam, I zoomed the flash head toward the narrower angle of view of 135mm. This much narrower angle of flash output (versus setting the zoom to the 28mm setting, for example), would ensure that I recorded a beam of light as it crossed over the flowers (rather than capturing the much larger swath of light expected from a wide-angle setting of the flash zoom head).
Even with the aperture dial on the back of the flash set to f/22, I noticed my flash-to-subject distance was still a whopping 10 feet at full power. No worries, since I quickly discovered that by powering down to 1/8 power, my flash-to-subject distance could be 3½ feet. With my tripod set low to the ground and with my lens set to f/22, I preset the focus on my lens to one meter (this would ensure my recording sharpness from 18 inches to infinity). I then adjusted my shutter speed until my camera’s light meter indicated a correct exposure with 1/30 sec. But since I wanted to add further drama to the overall scene, with its impending storm, I chose to deliberately set an exposure that would be 2 stops underexposed. This meant I’d be using a shutter speed of 1/125 sec.
Without benefit of any flash, you can see that this 2-stop underexposure is hardly compelling (first image). But with my flash held out and away from the flowers in my left hand at about the nine-o’clock position and a distance of about 4 feet, the difference is clear (second image). This image serves as a reminder that correct flash exposure is about the right aperture that corresponds to the chosen flash-to-subject distance and that shutter speed’s role in flash photography is still limited to controlling only exposure of the ambient light.
Second image: Nikon D300S, 12–24mm lens at 15mm, f/22 for 1/125 sec., Speedlight SB-900
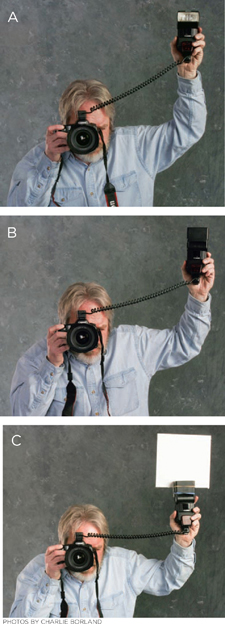
There are various options for handholding a flash off camera. The top image (A) shows direct flash, meaning the off-camera flash is aimed directly at the subject. The center image (B) shows bounce flash aimed at the ceiling. An off-camera bounce flash position produces different highlights and shadows than on-camera bounce flash, and it helps avoid the deer-in-headlights look of on-camera flash. The bottom image (C) demonstrates bounce flash aimed at the ceiling in combination with the use of a diffuser panel. Using a diffuser panel when holding your flash off camera produces a better quality of light, because the bounced light fills the room while also providing an angled directional light source on your subject.
As I mentioned on this page, cameras come with focal-plane shutters that contain two curtains. The first curtain opens when you press the shutter release, and the second curtain closes the shutter once the exposure has been recorded. Normally, the flash fires immediately after the first curtain has fully opened. Now imagine for a moment that when the first curtain fully opens the flash doesn’t fire. Instead, it waits to fire until the second curtain begins to close. In other words, rather than the flash firing at the beginning of the exposure, it fires at the end. Why, you ask, would you care about this? One reason and one reason only: You wish to make a longer-than-normal exposure in which motion is present.
Combining motion with flash is still, for many, uncharted territory. When you wish to combine motion and flash, particularly in low light, you’ll want to make use of second-curtain or rear-curtain sync mode. Simply put, this mode allows time for a low-light ambient exposure to record first, and once that part of the exposure is finished, the second curtain sends a signal to the flash that it’s about to close. At that point, the flash finally fires.
So what difference does it make if the flash fires at the beginning of the low-light exposure or at the end? After all, flash is flash, right? Yes, flash is flash, but keep in mind that we have, in effect, two exposures going on here. The first is the exposure that we calculated for the natural light, and the second is the flash exposure.
Imagine that you’re shooting your son riding his bike. He’s wearing his helmet, and you’ve attached one of those headlamps to it that not only lights up a bit of the sidewalk in front of him but also makes him easy to see. You grab your camera and are going to try this really cool idea of panning him as he goes by. Let’s say you’re photographing him from 12 feet away, and you find that you need an aperture of f/16, ISO 200, and a shutter speed of 1/15 sec. for a correct exposure of the natural light. Okay, you’re all set and tell your son to start riding. You pan along with his motion, and as he passes in front of you at 12 feet away, you fire the shutter release. You’ve captured a really nice panning shot of your son, or have you? When you check the image on your LCD screen, you see a long light streak running into his head. Why is the light from the headlamp streaking across his head? Because you’re shooting with your flash in first-curtain sync instead of second- (or rear-) curtain sync, which would be more practical in this situation.
Had you shot this image in rear-curtain sync, that streaking light atop your son’s helmet would have been allowed to “streak” across the frame during the entire length of the exposure before being lit by the flash. Instead of seeing your son running into the streaking headlamp, the streaking headlamp would follow him, since the flash exposure in rear-curtain sync is made at the end of the exposure. Using first-curtain sync where any motion is involved is a bad idea, since it allows for all that motion to overlap and interfere with your flash exposure. If all of that motion stuff is allowed to do its thing first, then the flash exposure that comes in at the end will be so much cleaner.
I’m often asked if it’s okay to leave the flash and camera set for rear-curtain sync all the time. Personally, I have yet to find a reason why you can’t, although some may argue that if the camera was meant to remain in rear-curtain sync, then why didn’t the manufacturers just make it so? It’s a valid question, but I haven’t seen any danger or bad flash exposures caused by being permanently set to rear-curtain sync. Even when shooting at the fastest “normal” sync speed (1/250 sec. in the case of Nikon), rear-curtain sync remains a good idea, because if there’s any movement going on, the subject will always be illuminated at the end of the exposure, thus eliminating any possible ghosting or subject overlap. In addition, since you normally want to use rear-curtain (a.k.a. second curtain) sync when shooting in low-light situations, you’ll have one less setting to fiddle with in the dark if rear-curtain is already engaged.
My studio is literally right next to the elevated train in Chicago. I thought, Since I have a front row seat to a Chicago icon, why not photograph it? I chose dusk to make these two images with rear-curtain sync in mind. With my camera mounted securely on a tripod and my flash set to first-curtain sync atop the camera’s hot shoe, I judged the flash-to-subject distance to be about 11 feet. Based on this distance, my camera’s meter indicated an aperture of f/18.
With my camera in Manual mode and the lens now set to f/18, I pointed the camera to the dusky blue sky above and adjusted my shutter speed until 2 seconds indicated a correct exposure. I now had both my natural light exposure and my flash exposure all set. I was ready for the approaching train. This is an eleven-car train, so I waited a few seconds as the first ten cars passed and then tripped the shutter release as the eleventh car went by.
Since I was in first-curtain sync, remember, the flash fired immediately at the start of the 2-second exposure. Over the remainder of the 2 seconds, the red and yellow taillights of the last car merged with the already-exposed train car (top). It’s a messy exposure in which the “painted wood” had not had a chance to dry.
In the six minutes I had before the next train, I made several changes: I changed to rear-curtain sync mode. And since the flash would fire at the end of the exposure, I also needed to account for the train being farther away from the flash when the flash finally fired. I estimated that during this 2-second exposure, the train would travel from 11 feet to roughly 21 feet away from the flash by the time it fired. The flash distance scale indicated an aperture of f/11 for a correct exposure at 21 feet. With this aperture set on my lens, I took a new meter reading off the dusky blue sky (in six minutes the sky had gotten a bit darker), and a 2-second exposure was indicated. As the bottom image clearly shows, when the flash fired in rear-curtain sync at the absolute end of that 2-second exposure, the taillight streaks trailed that last car instead of starting in the middle of it.
Both photos: Nikon D300S, 24–85mm lens at 35mm, Speedlight SB-900. Top: f/18 for 2 seconds in first-curtain sync. Bottom: f/11 for 2 seconds in rear-curtain sync
Deliberately composing this passing car as it crossed one of the many bridges in downtown Chicago created a motion-filled image that relied on a slow shutter speed, panning, and rear-curtain sync. The trailing lights of the car are indicative of rear-curtain sync, but more than that, they’re indicative of not panning at the same rate as the speed of the car. Had I followed the car with my camera at the same rate of speed, I wouldn’t have had any trailing lights, since the lights would have been in the same spot in my overall composition throughout the exposure. Generally speaking, the perfect panning shot (usually made at around 1/30 sec.) will show the subject tack sharp and only the background blurry. But with the 1/2-sec. exposure you see here, I’m unable to keep the car perfectly positioned in the same spot in the frame as I move the camera left to right during such a long exposure. As a result, the car and lights are a bit wobbly. But I like a lot of implied motion in my panning shots. I also knew that at the end of the exposure, the flash would fire, further illuminating the car.
Nikon D300S, 12–24mm lens at 24mm, ISO 200, f/11 for 1/2 sec.
Panning is when you photograph any moving subject at a relatively slow shutter speed (such as 1/15 sec.) and stay focused on the moving subject while moving the camera in the same direction as that subject. This will often result in a relatively sharp subject against a background of blurry streaks. When you combine the use of your flash with these slow, panning shutter speeds, you not only get your background motion streaks, but you also get that extra “pop” of light on the main subject, which in turn makes it stand out.
The key to a successful rear-curtain sync panning exposure is that the background behind the subject must be busy and full of contrast so that the moving subject stands out. Panning against a clear sky is a wasted effort—a solid color won’t offer up any interesting streaks when you move the camera. For your panning backgrounds, choose walls of graffiti, frame-filling city skylines, busy intersections filled with traffic, sidewalks along lighted storefronts and marquees, autumn-colored forests—you get the picture
You don’t have to be limited by the absence of the more common, readily visible movement, since you can always create your own brand of motion. When both flash and available light are involved, the possibilities are truly endless. For example, shortly after moving into a new studio, my daughter Chloë and I decided to have some fun with Christmas-tree lights. I attached the string of fifty lights to a 1/4-inch piece of plywood with the intention of using them as a motion-filled, amusement-park-like background. As you can see above, I positioned the plywood with the lights against a wall and had Chloë stand about 10 feet away from them in front of a small softbox containing a single Nikon Speedlight SB-900.
Based on the distance between Chloë and the softbox, my distance scale indicated an aperture of f/22. But since the flash would be passing through a softbox, I knew I’d experience some degree of light loss. How much? Most small softboxes will diminish flash output by about 1 full stop. In addition, I had placed a red gel over the strobe and that would account for another full stop of light loss (see more on gels). With that in mind, I set the lens to f/11, recovering the 2 stops of light, and immediately took a test shot of Chloë. The result was a correct flash exposure of her face, but I also wanted to inject some motion and record colorful spinning lights in the background.
So I turned off the studio’s overhead lights and pointed the camera at the Christmas lights. I adjusted my shutter speed until a 2-second exposure indicated a correct exposure with f/11. That would get me a correct exposure of Chloë and at the same time render a correct exposure of the spinning lights. (As long as the flash-to-subject distance was set for the correct aperture and the shutter speed was set for the ambient light of the tree lights, a correct exposure of both Chloë and the tree lights was ensured.) With my exposure set and my camera securely on tripod, I tripped the camera’s self-timer for a 10-second delay. During this delay, I rushed to the end of the studio, picked up the 1/4-inch piece of plywood with the lights attached, and swirled it like crazy. Since the camera was set to rear-curtain sync, the flash didn’t fire until the end of the 2-second exposure. The background result is reminiscent of a science fair or amusement park.
Nikon D300S, 105mm lens, f/11 for 2 seconds, Speedlight SB-900
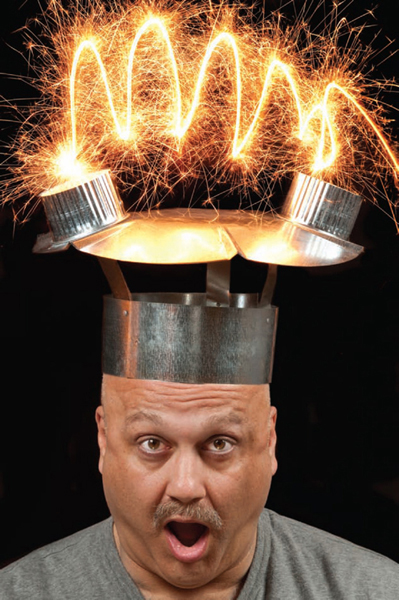
Sometimes, out of nowhere it seems, I get these ridiculous ideas. While in a hardware store, I came upon a cheap metal chimney hood and thought about how silly it would look if someone were to wear it as a hat. Just a few feet away I spotted several metal cups. Then I thought about how cool it would be to glue them atop the chimney hood and create an “electrically charged” portrait.
I called my friend John, who agreed to play the role of the mad scientist in this crazy composition. I fitted the metal “hat” on his head and placed my camera on tripod. Then on each side of John, I put a Nikon Speedlight SB-900 on a light stand, pointing each one into an attached umbrella. I also had John hold a silver reflector in his lap, facing up. So when the flash exposure was made, the light from both flashes lit each side of his face, while the reflector bounced some of the light from each flash up toward his face, filling in the area under his chin with light.
Based on my flash-to subject distance of 5 feet, I set my aperture to f/16, ensuring that my flash exposure would be correct. However, I also intended to create an “electrical charge” between the two cups by moving a sparkler through the area, and I judged that I’d need a 2-second exposure to get the right effect. With the aperture set for f/16, I set the shutter speed to 4 seconds. With the flash set on rear-curtain sync, I turned off all the studio lights, set the camera’s self-timer for a 10-second delay, immediately got behind John, and then lit the sparkler. I placed the lit sparkler inside the metal cup on the left, and as soon as I heard the shutter open, I raised the sparkler out of that cup and started moving it quickly toward the other cup, jostling it in an up-and-down motion. Just before the 4 seconds expired, I pulled the sparkler behind John, out of view, and bent down behind him. At this time, both flashes fired, perfectly illuminating John’s face for an exposure that combined the ambient light of the sparklers with the flash exposure of John’s expression.
Nikon D300S, 105mm lens, ISO 200, f/16 for 4 seconds, two Speedlight SB-900s
Arriving at Venice Beach about thirty minutes before sunrise, we were greeted by a predawn sky. I was photographing the members of the band WaldoBliss and was quick to ask all four band members to walk atop some short log posts. I knew they would be set against a backdrop of palm trees and dusky blue sky. With my aperture set to f/5.6, I adjusted my shutter speed until the camera meter indicated 1/2 sec. as the correct shutter speed. I quickly set up a single strobe on a small light stand, and after dialing in my aperture (f/5.6), the flash indicated a flash-to-subject distance of 11 feet, so I placed the light stand about 11 feet directly in front of them. I asked them to walk slowly, and as they did, I fired the camera and quickly “jerked” it upward during the exposure. Since the flash was set for rear-curtain sync, I was able to record a ghosting blur of the trees and band members, knowing that, at the end of the exposure, the flash would light up and freeze the band members in perfect detail. This effect is often referred to as dragging the shutter, and as you can see, it’s an easy technique. It has been my experience, however, that it seldom works consistently with shutter speeds other than 1 second, 1/2 sec., or 1/4 sec. Faster speeds don’t allow enough time to record the ghosting effect, and slower shutter speeds allow too much ghosting to take place—so much so that the overall exposure looks muddied.
Nikon D300S, 12–24mm lens at 12mm, f/5.6 for 1/2 sec., Speedlight SB-900