CHAPTER 13
Laboratory Skills
Even though it is fun to learn chemistry in the classroom with the use of a textbook, nothing beats the hands-on laboratory experience!
Laboratory Safety
The laboratory experience can be all the fun of taking a course in chemistry. This chapter will review a number of experiments and procedures. But before going into any detailed laboratory setups or experiments, it is important to first review laboratory safety. Although it is impossible to cover every safety rule for every experiment, here are some common safety rules everyone should know.
• Wear goggles, footwear that covers the entire foot, gloves, and lab coats or aprons at all times.
• Never eat or drink in the lab.
• Pour all chemicals over a sink.
• Perform experiments under a fume hood at all times.
• Never point a heated test tube at yourself or others.
• Never heat a corked test tube.
• Know where the fire extinguisher, eyewash station, and fire blankets are located.
• Read all labels carefully.
• Never rest bottle tops or stoppers on the table top.
• Always add acid to water and never water to an acid.
• Never push glass tubing or a thermometer through a stopper or cork.
• Handle hot materials with tongs or a test tube holder.
• Chemicals that come in touch with your skin must be flushed with water immediately.
• Note the odors of substances cautiously.
The Meniscus
Because adhesive forces can exist between liquids and glassware, a pronounced curvature of a liquid can form when the liquid is in a narrow cylinder or burette. This curvature is called the meniscus. A few important things to remember when reading the meniscus are that the meniscus should always be read at eye level while the glassware and setup is on a level surface. Also, make sure that you read the bottom of the meniscus (if it is curved downward) as shown in Figure 13.1.
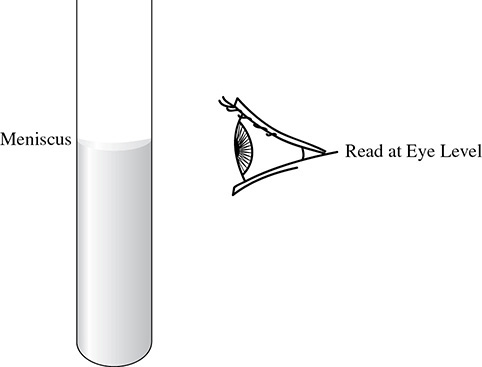
Figure 13.1 Reading a Meniscus
In some cases the meniscus can be curved upward. Should this happen, read the top of the meniscus. Finally, when using dark liquids, it may be impossible to read the meniscus. In this case, read the top of the level of the liquid.
Collecting Gases
Gases for use in experiments may be collected in a variety of ways. Two things that should be kept in mind when collecting a gas are the density and the polarity of the gas. For example, you would not collect a polar gas (such as ammonia) in water because water and ammonia have like polarities that allow the two substances to mix.
Hydrogen and oxygen gases can be collected by water displacement as shown in Figure 13.2. The reaction that produces the gases takes place in the bottle on the left. An outlet tube leads to the collection bottle on the right that has first been filled with water, turned upside down, and placed so that the mouth of the bottle is under water in a trough. The oxygen and hydrogen gas molecules are nonpolar molecules and will not dissolve very well in the water.

Figure 13.2 Collection of Hydrogen and Oxygen by Water Displacement
After collection, the collection bottle is stoppered or a glass plate is slid under the mouth of the bottle. This must be done while the mouth is still under water, facing downward.
Carbon dioxide is a heavy gas, so you do not need to collect it by water displacement. Instead it can be collected by an upward displacement of air, as shown in Figure 13.3. In this case the tubing from the reaction bottle leads to the bottom of the collection bottle. As the carbon dioxide gas is collected, the air already in the collection bottle is displaced upward.
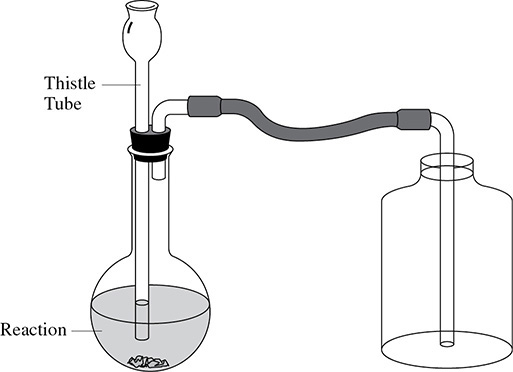
Figure 13.3 Collection of Carbon Dioxide by Upward Displacement of Air
If a small flame, such as a lit match, is held just inside the mouth of the collection bottle and the flame is extinguished, this means that the carbon dioxide has filled the bottle.
Ammonia is collected by downward displacement of air as shown in Figure 13.4. Because the preparation of ammonia gas requires a gentle heating of the reactants, the reaction chamber cannot be an ordinary bottle. Instead a test tube must be used. As the ammonia is collected, the air already in the collection tube is displaced downward. Water displacement is not a suitable method for collecting a polar substance like ammonia because the ammonia will dissolve in the water.
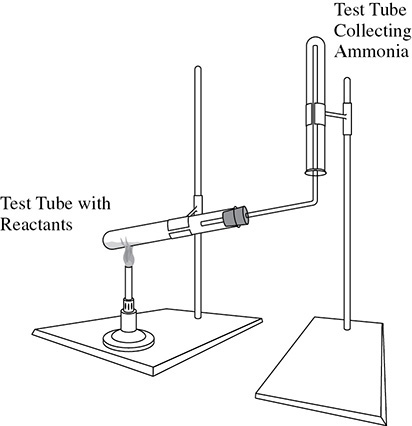
Figure 13.4 Collection of Ammonia by the Downward Displacement of Air
To test for a full test tube of ammonia, hold a piece of red litmus paper near the mouth of the test tube. When the red litmus turns blue, the basic ammonia has filled the test tube.
Dehydration of a Salt
A common laboratory experiment calls for finding the formula of a hydrated salt. In this experiment a crucible and its cover (see Figure 13.5) are weighed. A sample of a hydrated salt is added to the crucible, and the new mass is found. The crucible is placed on a wire triangle that has been mounted on an iron ring clamped to a ring stand. The crucible cover is placed on the crucible with a slight opening to allow steam to escape. The sample is heated until no more steam is produced. The setup is allowed to cool and the crucible, cover, and salt are reweighed.
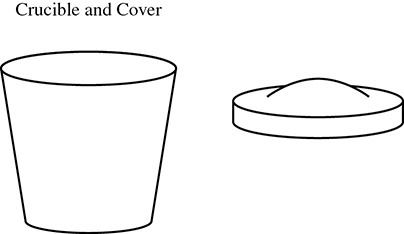
Figure 13.5 A Crucible and Cover
The difference in the mass of the setup is the mass of the water. This mass can be converted to find the number of moles of water lost. The difference in the mass of the salt can be found and converted to moles as well. This will give the formula of the salt: X SALT · Y H2O. A sample data collection table for the dehydration of copper sulfate pentahydrate looks like this:

Methods for Separation
There are a number of ways to separate substances that have been combined or mixed together. Three properties of substances that can be called upon to complete a separation are solubility in water, density, and boiling point. Consider a mixture of sand and sodium chloride. Is it feasible to pick out all of the grains of sand with tweezers? Because the NaCl is soluble in water and the sand is not, the sample could be placed into a beaker of water and stirred. This would dissolve the salt but not the sand. The mixture is then filtered through moist filter paper that has been fit to the inside of a funnel. The filtrate that passes through the filter paper contains the NaCl. This filtrate is captured and can later be evaporated so that the salt is left behind. The residue, or sand in this case, is what is left behind in the filter paper. Because it does not dissolve in water, the residue can be washed from the filter paper. It can then be dried and analyzed.
When two different liquids with different polarities are put together, they will not mix and one of the liquids will float on top of the other. You can take advantage of this by using a separatory funnel to separate the two substances. The separatory funnel (see Figure 13.6) has a stopcock at the bottom of the apparatus. This allows the liquid with the greater density to be drained through the bottom once the stopcock has been opened (and the stopper top has been removed as well).

Figure 13.6 Separatory Funnel
To obtain the liquid with the lower density, the liquid is poured out through the top of the separatory funnel.
Distillation separates substances based on their boiling points. A distillation flask is set up with a thermometer and rubber stopper closing off the top of the flask. A condenser is set up with cold water running through it. Finally, a beaker or graduated cylinder is used to collect the distillate as shown in Figure 13.7.

Figure 13.7 Distillation
As the mixture of liquids is heated, one of the liquids will reach its boiling point before the other. The temperature on the thermometer will rise and then stay constant as the first liquid distills. When the temperature starts to increase again, the collection flask is changed and the next substance is captured as it distills.
Titration
The titration process was discussed in detail in Chapter 9. Figure 13.8 is a setup showing the two burettes used in the experiment, one for the acid and one for the base. They are clamped to a ring stand via a burette clamp. The titration is performed using a flask because the angled sides of the flask avoid splashing while the flask is being stirred continuously as the drops of acid and base are added. Finally, not shown, is a white piece of paper. Placing the flask on a white piece of paper makes it easier to see the color changes of the indicator.
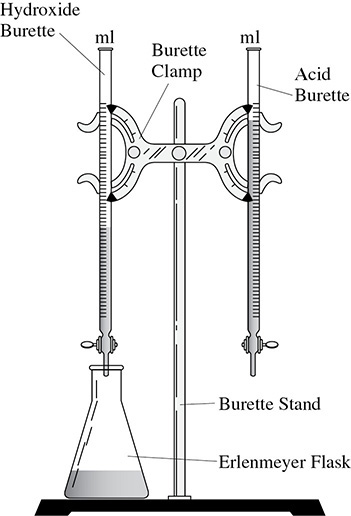
Figure 13.8 Titration
The Metric System
Three common metric system units used in the laboratory are grams to measure mass, milliliters to measure volume, and meters to measure length or distance. Other commonly used units include kilograms (for measuring larger amounts of mass) and liters (for measuring larger amounts of volume). Recall that in the metric system, prefixes are used to indicate powers of 10 times a given unit. For example, the prefix milli- in “milliliter” indicates that a milliliter is equal to 1 liter × 10−3 or one one-thousandth of a liter. The prefix kilo- in “kilogram” indicates that a kilogram is equal to 1 gram × 103 or one thousand grams. The following chart shows the prefixes in units of measure commonly used in the laboratory, the symbol for each prefix, and the power of 10 that each one indicates.

The prefix micro-, for example, is useful when determining the parts per million of an ion or substance in drinking water. You have already used the prefix nano- when you looked at the spectral lines produced by the return of an electron from the excited state to the ground state. The line spectrum for hydrogen showed that there is an emission with the wavelength of 656 nm (nanometers). This comes out to be 0.000000656 meters! A method for converting from one unit to another is covered in Appendix 1, Mathematical Skills Review.
Dimensional Analysis
When converting the units of the metric system (or units of any system) from one to another, we can use a dimensional analysis. The key to the dimensional analysis is that the units in the numerator(s) and/or denominator(s) will cancel and leave behind the unit that is desired. Three examples follow:
1. How many kilometers are there in 1,500 meters?
1,500 meters  = 1.500 kilometers. Notice how the meters canceled out, leaving kilometers as the only units remaining.
2. How many milliliters are there in 4 quarts?
4 quarts 
 = 3,800 milliliters. Notice the use of both the metric system and the American system for measurements. Again, all units cancel out, except for the desired unit.
3. How many seconds are there in one day?
1 day 

 = 86,400 seconds. This is a three-step problem, but it still holds the procedures of a true dimensional analysis.
Percent Error
Quite often when you perform an experiment, your results come close to, but do not actually match, a particular value that you are looking for. You will then want to find out how far off the mark your results were; that is, the percent error. For example, suppose you know that the accepted value for the boiling point of vanillin is 83°C, but in your experiment you measured it as 85°C. You could say that you were “off by two degrees.” Instead, you calculate a percent error by using the formula:

Calculate your percent error for the melting point of vanillin by substituting into the equation:

The percent error is 2.41%. In general, a percent error under 5% indicates that the experiment was performed with proper technique and procedure.
Accuracy versus Precision
Anyone who has taken a course in quantitative analysis will tell you about repeating an experiment over and over again to get a large sample of data. It’s not uncommon for experiments requiring a titration to be repeated anywhere from 7 to 10 times! Once a number of experiments have been completed, you then want to compare the results to see if they are both accurate and precise. Accuracy is the term used to define how close the data have come to the accepted value. Precision is the term used to define how closely the data agree with data obtained from other performances of the same experiment. Hopefully your data will be both accurate and precise. Look at the following data a student obtained from a titration experiment involving an acid and base:

If the actual molarity of the acid is 0.125 M HCl, you can conclude that while the data are precise, they are far from accurate (you could take an average of the results and calculate a percent error to confirm this). This shows that the student performed the experiment consistently but with a built-in error.
Significant Figures
There are eight rules for learning significant figures. Learning the rules will help you understand how many decimal places and/or numbers to include in your calculations. All significant figures are underlined below.
1. All non-zero digits are significant. Examples: 1, 2, 3, 4 . . .
2. All zeros between non-zero digits are significant. Examples: 304, 2007, etc.
3. Initial zeros are not significant because they can be replaced with scientific notation. Example: 0.0203 has just three significant figures because it can be rewritten as 2.03 × 10⁻².
4. Final zeros are not significant if there is no decimal present. Examples: 2,500 has just two significant figures and can be rewritten as 2.5 × 10³.
5. Final zero are significant if a decimal is present. Examples: 2,500 and 3,070 have four significant figures.
6. Final zeros after a decimal are significant. Examples: 4.90, 15.680, 23.710, etc.
7. When adding or subtracting focus on the number of decimal places and not significant figures. The answer has the same number of decimal places as the number with the fewest number of decimal places. Round off as needed.
Example: 34.34 cm + 2.6 cm + 1.341 cm = 38.281 cm → 38.3 cm (using just one decimal place and rounding off)
8. When multiplying or dividing focus on the number of significant figures only—and not the number of decimal places. The answer has the same number of significant figures as the number with the fewest number of significant figures.
Example: 6.24 m × 4.3 m = 26.832 m2. Because we can only use two significant figures, the answer rounds off to 27 m2.
REVIEW QUESTIONS
1. For which two pieces of equipment is it critical to read the meniscus correctly?
(A) Spatula and Bunsen burner
(B) Graduated cylinder and stopcock
(C) Burette and graduated cylinder
(D) Thistle tube and trough
(E) Crucible and cover
2. Which is not necessarily needed for a titration?
(A) An appropriate indicator
(B) Erlenmeyer flask
(C) Acid
(D) Base
(E) Mortar and pestle
3. A student finds the percent hydration of a salt to be 67% water. The accepted value for percent hydration is 55% water. What is the student’s percent error?
(A) 12%
(B) 21.8%
(C) −12%
(D) 2.41%
(E) 0.218%
4. To deliver amounts of liquids one would NOT use a
(A) volumetric pipet
(B) burette
(C) graduated cylinder
(D) evaporating dish
(E) beaker
5. A student wants to heat up a sample of water to boiling over a certain amount of time to get an idea of how much heat is released by the flame per minute. Which of these items is not needed for this experiment?
(A) A time-keeping device
(B) The value of the specific heat of water
(C) The change in temperature of the water
(D) The mass of the sample of water
(E) The volume of water in its gas phase
6. A student took a melting point of an organic compound four times. His work produced the following results: 97°C, 99°C, 100°C, and 97°C. If the real melting point of this compound is 88°C, then his results can be summarized as
(A) both accurate and precise
(B) neither accurate nor precise
(C) accurate but not precise
(D) precise but not accurate
(E) extrapolated

ANSWERS AND EXPLANATIONS
1. (B) Of the equipment listed, only the Burette and graduated cylinder have graduations that need to be read at eye level so that the meniscus is clearly seen.
2. (E) A mortar and pestle are most likely not going to be needed for a titration as they are used to grind down solids. However, all of the other choices are going to be needed for a titration.
3. (B) The measured value is 67%. Subtract from this the accepted value, 55%. This gives a difference of 12%. Then divide by the accepted value of 55% to get 12/55 = 0.218. Multiply by 100% to complete the problem and get 21.8% error.
4. (D) An evaporating dish is not used to pour liquids. Instead, a liquid is put on the dish so that the liquid can evaporate and allow one to see if a solid is left behind.
5. (E) Because this experiment involves a rate of change over time, a timer is needed. The specific heat of water, c, is needed along with the sample’s mass, m, and change in temperature, ΔT. These values will allow calculations to be made using q = mcΔT.
6. (D) Because the values are close together, they are considered to be precise. But because they are not even close to the accepted value, they are not considered to be accurate.
7. (T, F) 1,100 grams times  is equal to 1.100 kilograms. However, the conversion factor is 1,000 and not 100.
8. (F, F) It is vital never to lose any substances from a reaction as this will impact the amount of product made and/or results obtained.
9. (T, F) Water soluble and water insoluble substances can be separated by adding them to water, stirring, and then filtering the solution made. The water insoluble substance will be caught in the filter paper while the water-soluble substance will be contained in solution.
10. (T, T, CE) This procedure is correct and helps to minimize injury.