Chapter Two
Wood Fences
Humankind has been constructing fences out of wood for thousands of years, and I’m happy to report that this is one of those things we seem to be improving on rather than messing up. Wood is accessible, affordable, and easy to shape and repair, and wood fences can be adapted to just about any style. They can also be strong, and with proper planning and care can last a long time. Perhaps best of all, building a durable and attractive wood fence does not require advanced carpentry skills.
Choosing the Wood
Wood can last for a long, long time under controlled circumstances. Although all wood decays when it is outdoors, some types of wood withstand decay better than others. Choose wisely or you might invest time and money in a structure that is destined for the compost pile too soon after it is completed.
Cedar and Redwood
The most widely available decay-resistant woods today are cedar and redwood, both of which are lightweight, dimensionally stable, and attractive. Either of them is good material for fence infill boards. Most fence builders use pressure-treated lumber (see Pressure-Treated Wood) for the posts.
While you often pay a premium for cedar or redwood, you may not be getting what you think you’re paying for. Even well-meaning lumber dealers tout the rot-resistance of these woods as though it was a given fact, but it isn’t. As a tree matures its core changes from sapwood to heartwood. Such a change means that the core no longer conducts sap nor contains living cells. In cedar and redwood (and some other species), the heartwood contains extractives that are naturally decay-resistant. But it’s important to note that the sapwood of cedar and redwood is really no more resistant to fungi and insects than any other wood species. If you want decay resistance, you need to choose lumber that contains all, or at least a high percentage of, heartwood.
Cedar and redwood lumber that contains most or all heartwood often is graded as “heart” or “all-heart” and tends to be the highest grade. As the grades descend, the lumber typically contains more and more sapwood and less heartwood. Ask your lumber supplier about what’s available, and choose the best product for your project and budget. You can learn more about redwood grading on the California Redwood Association’s (CRA) website (see Resources).
Pressure-Treated Wood
Pressure treating is a factory process in which chemical preservatives are pushed deep into the wood cells. This process imparts reliable decay resistance to inexpensive and fast-growing species, such as pine. Pressure-treated (PT) lumber offers an attractive balance of durability, strength, and low cost, making it the best choice for wood fence posts. It can be stained (or painted) to help it blend with the fence panel materials. If left untreated, PT lumber turns gray over time, just like redwood and cedar. Note: PT posts must be rated for “ground contact,” meaning they’re a suitable grade for burial.
In years past, PT lumber was treated with chromated copper arsenate (CCA), which contains arsenic. This treatment has been out of use in consumer lumber products for some time. Today’s standard treatments do not contain arsenic and are generally considered to be less toxic than CCA. Even so, it’s a good idea to wear a mask or respirator and gloves when cutting and working with treated lumber, and you should never burn scraps of the material.
Newer treatment chemicals can quickly corrode many types of fasteners, so it’s important to use only hot-dipped galvanized or stainless fasteners (see Fasteners for All Seasons), or proprietary fasteners guaranteed for use with your type of lumber. When in doubt, consult a good lumber dealer.
Tips for Choosing Boards
When shopping for fence boards (1×4s, 1×6s, or other sizes), all you really need to know is that looks matter. Straight, clean boards with a few small, tight knots cost more than boards with large, loose knots, holes, and a bit of crookedness.
Flat-sawn or flat-grain boards have growth rings that are nearly parallel to the face of the board and are more likely to warp. Quarter-sawn or vertical-grain boards have growth rings that are nearly perpendicular to the face of the board and are less likely to warp.
Application
Perhaps more important than the lumber’s natural resistance is where the wood will be located and how it will be used. Wood that is kept away from ground contact and is cleaned and coated with a water-repellent sealer regularly will last much longer than wood set on the ground and left unfinished. For most fence styles, decay resistance is the top priority when shopping for posts. For other parts of the fence, balance your finish and maintenance commitment with the level of weather resistance offered by the wood.
Fasteners for All Seasons
The two principal concerns with exterior-grade fasteners are corrosion resistance and holding power. Fasteners that rust will discolor a fence and eventually disintegrate, and those that are too weak for the job will jeopardize the standing (literally speaking!) of the fence you build.
Corrosion Resistance
Hot-dipped (HD) galvanized nails are the best choice for most fences. These fasteners offer good durability at a decent cost. Electroplated or electrogalvanized (EG) and hot galvanized (HG) nails also have a galvanized finish, but they don’t stand up to the elements as well as HD products and typically are not recommended for use with pressure-treated lumber.
Stainless-steel nails are pricey, but they can be worth their weight in gold when building in damp or salty environments (along the coast, for example). Stainless steel is highly recommended for use with redwood or cedar, which contain tannic acids that react with galvanized and other types of fasteners, resulting in ugly stains (staining can be a factor even on a painted fence).
Manufacturers offer two grades of stainless steel: Type 304 is the standard, while type 316 has a bit more nickel, which stands up better to a salty environment. As for cost, the same fasteners that cost you $10 in galvanized will cost about $25 in stainless.
When choosing screws, look for those with either stainless steel or a galvanized finish and a weatherproof resin. I have not had great success using low-cost “decking screws” with a yellow zinc coating. In my experience, this coating seems to chip off or wear through as soon as the screw is driven into the wood.
Holding Power
Holding power relates to how well a fastener keeps wood parts held together as the wood swells and shrinks with moisture levels. It’s hard to beat screws for holding power, and they make it easy to disassemble parts of a fence, if necessary. Ring-shank or spiral-shank nails are a good choice if you prefer to use nails. Nails with smooth shanks offer the least holding power and are prone to popping. For fastening pickets and fence boards, I typically use top-quality HD galvanized ring-shank wood siding nails that have been double dipped in zinc. But I would certainly use stainless steel if I were working with redwood or cedar, or if I didn’t plan to paint the wood.
Other Hardware
Some fences require heavy-duty brackets or fasteners, such as carriage bolts or lag screws. Carriage bolts are set in a predrilled hole and secured with a nut. The head has a smooth, round finish and goes on the most visible side of the connection. Lag screws do not require a nut and are not quite as strong as carriage bolts. But they are often a better choice than normal screws for attaching large rails to posts. Again, stick with stainless steel or hot-dipped galvanized materials. Electroplated bolts (identified by their shiny surface) tend to rust quickly.
Setting Posts
Posts are the basic structural component of most fences. Wood posts can be used with both wood and metal fences. Depending on the fence design, posts can be a prominent visual element or barely noticeable. Regardless, they always serve a critical function. Set the posts right, and the rest of the fence building will be easier and more rewarding. Set the posts wrong, and you will regret the errors for a long time. Setting the posts right means placing them in a straight line, spacing them evenly and properly, embedding them securely in the ground, and positioning them perfectly plumb.
Size and Spacing
The size of posts and the spacing between them often are aesthetic decisions, but first and foremost they are structural factors. Keep in mind that your local building code may have minimal requirements other than those given here.
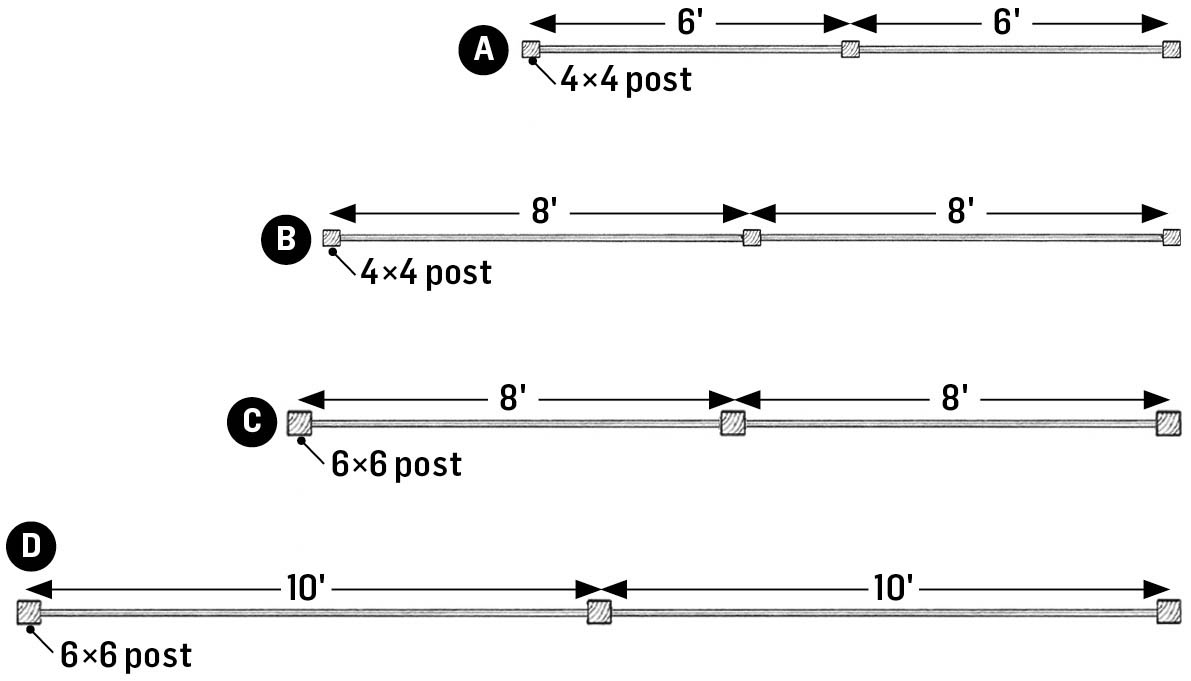
There are two categories of fence posts. Terminal posts are located on both sides of the gate, at all corners, and at the ends. Because these posts generally carry the heaviest load and receive the most abuse, they should be set deeper into the ground and often should be sized larger than the intermediate posts, as shown in the illustration.
Fence Post Rules of Thumb
- Use only pressure-treated wood that is rated for ground contact. Budget permitting, consider “premium” PT posts with a water-repellent factory finish.
- Choose the posts yourself. Eyeball each one lengthwise to find the straightest specimens. Avoid posts with excessive splitting, checking, or knotholes.
- Buy posts a little longer than you need and cut them to length later. Setting posts so their tops are perfectly aligned is a very difficult and frustrating task. For the same reason, avoid posts with precut decorative tops. You can easily add decorative tops after the posts are set and the tops have been cut straight.
- When in doubt about post size, go bigger. Oversized posts aren’t a problem; undersized posts are.
- Bury posts as deeply as reasonably possible.
Footings
The footing is the all-important connection of the post to the earth. There are several ways to form a footing. Each has its pros and cons, and none has an iron-clad guarantee of perfection. I won’t try to convince you to set your posts one way or the other, but I will help you make an educated decision.
First and foremost, posts must be buried in the ground — and the deeper, the better. Decks are built with posts set in metal bases attached to concrete piers, but this is not a good way to handle fence posts because they need the lateral support that deep burial affords. Likewise, I would not set fence posts in metal brackets that are hammered into the ground. I have my mailbox installed using one of these, but it is not what I consider a solid connection.
Comparing Backfill Choices
The next questions involve how deep to dig the holes, how wide, and what materials to use as backfill. The traditional choices for backfilling include alternating layers of tamped earth and gravel, filling the holes with concrete, or using a combination of tamped earth and gravel plus concrete. The depth and width of the postholes are based on the type of footing material.
Earth-and-gravel footings (or earth alone) require relatively slim holes (roughly twice the width of the posts), which reduces digging time. The only expense involved is for a bit of gravel, as the earth component can come from the dirt that you dig out of the hole. The posts also can be dug up easily for future repairs.
Earth-and-gravel footings work best in relatively dry, undisturbed soil that compacts well. This footing is less effective in light soil that contains a lot of sand or organic material; soil that has been disturbed (that is, dug up and backfilled before); or heavy soil that contains a lot of clay. Heavy soil drains poorly and loses much of its strength and holding power when wet.
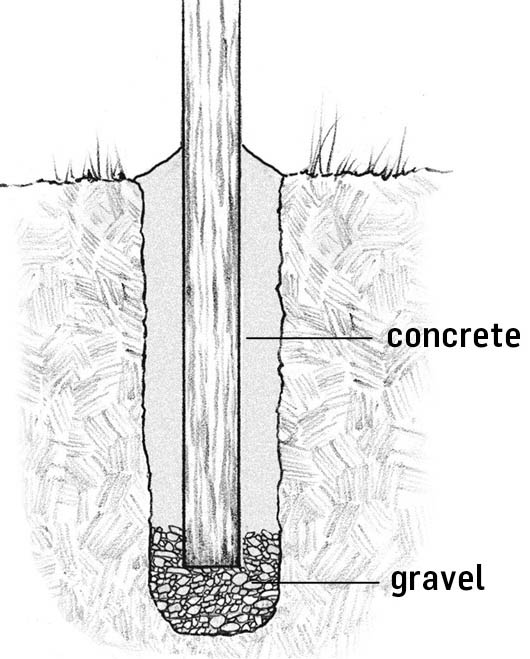
Setting posts in concrete is a reasonable option in most conditions, but especially when the soil is less than ideal. It generally takes less time to set posts in concrete than it does to set posts in earth and gravel (backfilling and tamping of earth and gravel can be time consuming). On the downside, the holes must be wider. For a 4×4 post, for example, you’ll need a 12"-diameter hole for a concrete footing versus an 8"-diameter hole for an earth-and-gravel footing. Also, encasing any kind of wood in concrete can lead to premature rot and/or insect infestation (namely carpenter ants). Concrete is porous and can trap water around the post, and seasonal wood shrinkage allows additional water in through the gap between the post and the footing at ground level (though this can be reduced by shaping the concrete so that it sheds water away from the post and by sealing the joint with caulk).
Understanding Frost Heave
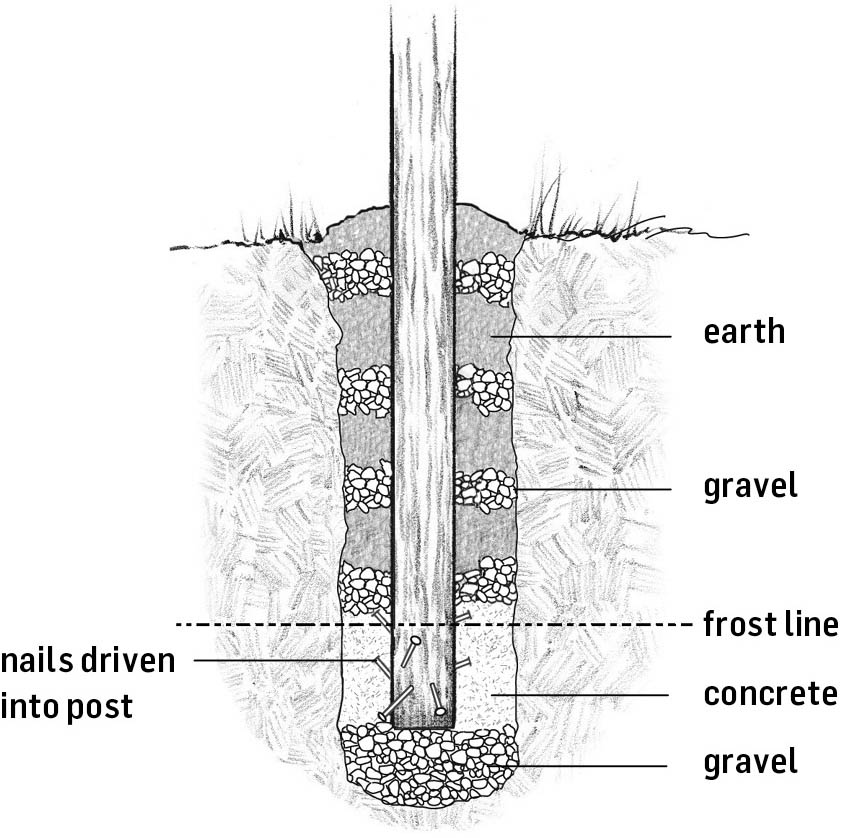
In cold climates, concrete footings are prone to the powerful effects of frost heave. The colder it gets, the more the moisture in the soil will freeze and expand. This force exerts enough pressure underground to lift houses and roads, not to mention fence posts. The simpler-said-than-done antidote to frost heave is to set the bottoms of footings below the frost line, the deepest point at which frost is likely to form. Your local building department can give you the local frost depth and may require you to set posts at or below this level. In some climates, digging below the frost line can require holes that are 4, 5, or even 6 feet deep.
Frost heave is the subject of ongoing debate. Some experts recommend placing one-third of the buried portion below the frost line (for example, 41⁄2-foot deep burial for a 3-foot frost line). Others point to the lateral forces pushing against the side of a footing, as well as the pressure from below, and claim that a deeper footing is more prone to heaving. In any case, there are no guarantees.
Frost heave can affect any type of footing, but my instincts tell me that earth-and-gravel footings would fare better than concrete, due to the latter’s larger surface against which frost heave forces can push. Even if I’m wrong about this, at the very least earth-and-gravel footings make it much easier to reset any dislocated posts.
My general recommendation is to bury at least one-third of the overall length of the posts. For a 6-foot finished fence, bury the posts 3 feet (using 9-foot posts). This means the holes must be about 31⁄2 feet deep to allow for a bottom layer of gravel. With good soil conditions and careful attention to detail, short picket fences 3 to 4 feet tall could be supported by posts buried no less than 2 feet deep in holes that extend an additional 6" for gravel.
For terminal posts (posts at the gate, corners, and ends), the strongest installation is to set them in concrete 6" to 12" below the frost line, regardless of which technique you use with the other footings.
Digging Holes
For many do-it-yourselfers, no part of fence building is more difficult and discouraging than digging deep, narrow, straight, nicely aligned holes in the ground. There are a few basic options for tackling this job. You’ve marked your utility lines, right? (See Before You Start Digging.)
Manual digging. A garden spade is the best manual tool for breaking through sod and getting a hole started. But once you get down a foot or so, switch to a clamshell digger. Hold the digger with the handles together and stab it into the hole. Spread the handles apart and carefully lift out the dirt. If you run into large rocks or hard soil, use a digging bar, which is a 6-foot solid steel (or iron) bar with a chisel-like blade on one end and a tamping head (handy for backfilling the hole) on the other. A digging bar is also useful for loosening soil before removing it with a shovel or posthole digger.
As you dig, pile the dirt on a piece of plastic or in a wheelbarrow or garden cart. Don’t make the holes any wider than necessary. With earth-and-gravel footings, part of the strength comes from leaving the surrounding soil undisturbed. With concrete footings, the wider the hole, the more concrete it needs. Aim for holes that are as close to cylindrical as possible. And keep a close eye on your fence line: you want the centers of all holes to be aligned as closely as possible.
Tools for Tough Digging
- The NU Boston Digger is similar to a clamshell digger, but one handle has a lever that operates a scoop on the bottom for dirt removal. Pros use these in the famously hard, rocky earth of New England.
- Tackle really hard soil by pouring water into the hole and letting it soak in for a few hours or overnight. It’s muddy, messy work, but easier than hacking through hard soil.
- Cut out tree roots with a pruning saw or a reciprocating saw equipped with a special pruning blade.
- Consider your options if you run into bedrock (or ledge): Sometimes you can chip away at the rock with a digging bar and create a hole deep and wide enough to hold some concrete for the post. Another option is to drill a hole in the ledge, cement a rod or pin in the hole, and secure the post to the rod. (Consult a pro about this option.)
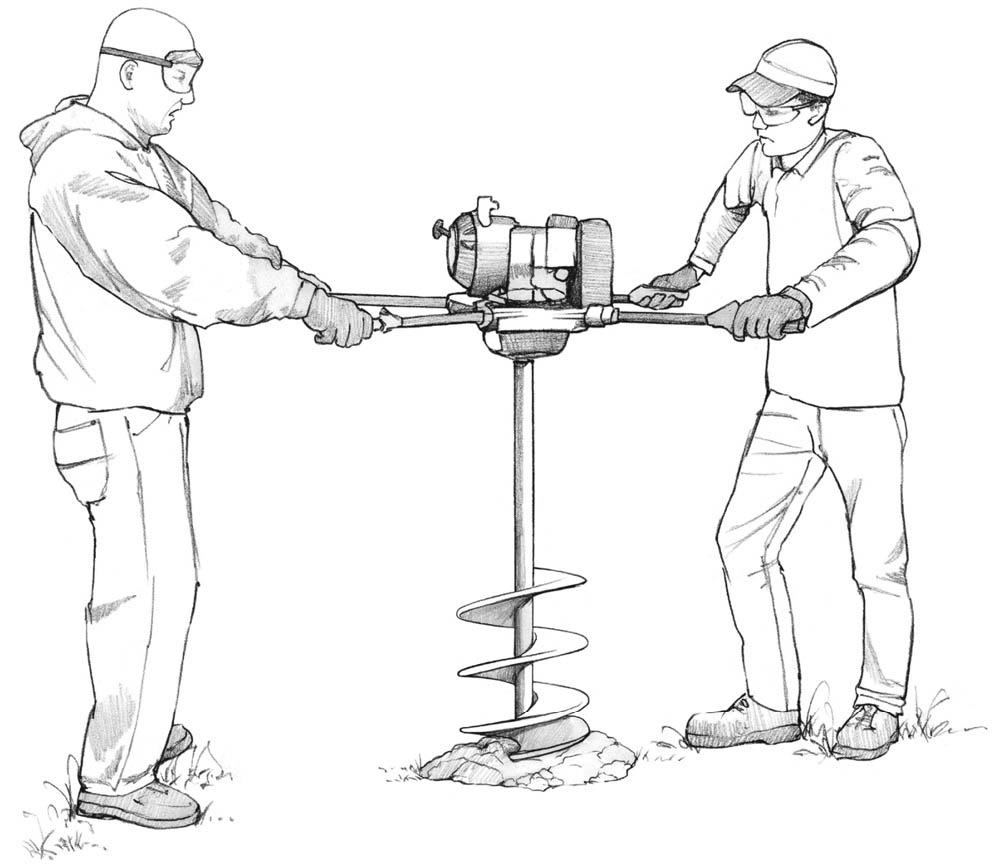
Power augering. Using a power auger can be much faster than manual digging, which is not to imply it makes the job easy. Tool rental stores usually have at least one type of power auger available. Be sure to select an auger bit that matches the depth and diameter of the holes you need to dig. Often, the biggest bit you can find is 3 feet long and 8" in diameter. If you need to dig 12"-wide holes, you can rock the auger back and forth a little as it works itself deeper into the hole. (In truth, you may not have any choice on this because most rental stores do not carry larger diameter bits.)
There are both one- and two-person power augers available. One-person augers with the engine mounted on top of the tool scare me, and I would not use one. Two-person versions of the same design are much safer and easier to use, but it’s still backbreaking work that requires careful attention and a good grip on the machine.
If you must work alone, a flexible-shaft auger is worth looking for. The engine is separated from the auger, making it fairly easy to handle. You may need a trailer hitch to tow the tool home.
Drill into soil as though you’re drilling a deep hole in wood or metal: Advance into the hole a little, then withdraw the bit to clear the loose debris, then advance a little more. Also, do not try to clear big rocks with the auger; use a digging bar for that work. Finally, take regular breaks.
Hiring out the digging. The last option for digging holes is my favorite. Hire someone with an auger accessory that they mount on a truck, tractor, or skid-steer loader, and let them dig the holes quickly while you sip lemonade. Yes, you have to write a check to get these holes dug, but it may be a smaller amount than you anticipate. This strategy works only if the vehicle can get to the site. You might have to hunt a bit for the contractor; contact local fence-building contractors, or talk to local farmers or building contractors for recommendations.
Preparing the Hole
Ideally, every posthole will be at least 30" deep and preferably 12" or more below the frost line. In the real world, however, some of the holes may not be as deep as you would like due to obstacles such as immovable rocks. It’s not a catastrophe to leave a hole or two short, but always strive for at least 2 feet of depth. Just don’t deviate on the depth of the holes for terminal posts. Make an extra effort to create an adequate hole, and if that’s not feasible, consider relocating the post.
With all the holes dug, set up your string lines again to check the alignment. Add a 6" layer of crushed rock into the bottom of each hole — for any type of footing. Start with 4" of rock, tamp it well with a 2×4, then add 2" more after the post has been set in the hole and braced. The rock allows water that reaches the bottom of the post to drain away. One caveat: if the surrounding soil is regularly on the wet side, you might not want to use gravel; this material can actually attract water to the base of the post.
Bracing and Plumbing Posts
Use your string lines to help align the posts as you set them. With 4×4 posts, simply move the string lines 4" to one side, then make sure the face of each post remains 1⁄2" away from the string line (a 4×4 post measures 31⁄2" × 31⁄2"). The 1⁄2" offset prevents the posts from interfering with the string. Posts must be perfectly plumb and securely braced before you backfill or add concrete. There are two ways to do this, both of which are much more easily done if you enlist a helper.
Shim bracing. This simple technique works for earth-and-gravel backfill. It requires cutting at least four bracing shims that are sized to fit the space between the posts and the surrounding hole edges. For 8" holes and 4×4 posts, use a 30" length of 1×6 (or 1⁄2" plywood). Cut the piece of wood in half lengthwise, then cut two shims from each of the boards.
Center a post in its hole and hold it plumb with a level while your partner slips one shim into the hole directly under the level and another shim on the opposite side. Move the level to an adjacent side and repeat the process. Begin backfilling the hole, tamping as you go. When the backfill nearly reaches the bottoms of the shims, carefully remove them to finish filling the hole.
Lumber bracing. Traditional bracing is better than the shim method when you have wide holes or are backfilling with concrete. I usually use 1×4s for braces. For posts that will be 6 feet or more above ground level, use 8-foot-long braces. You need two braces at each post, along with stakes hammered into the ground. Use 1×2s for stakes, cutting one end to a point.
Center the post at its hole and hold it plumb. Place one brace at an angle alongside the post. Drive a stake into the ground alongside the bottom of the brace, and then drive a nail or screw through the brace into the stake. Check the post for plumb with a level on the side facing the stake, and then drive a screw through the brace and into the post. Repeat with another brace placed at a right angle to the first.
Installing Earth-and-Gravel Footings
Earth (soil) and gravel work together to provide stability and drainage. The keys to success with this type of footing are alternating layers of each material and tamping each layer to ensure a well-compacted and snug bed for the post.
It’s important to use the right kind of gravel. Crushed rock has jagged edges and is ideal for drainage at the bottom of the hole; the jagged edges create large voids that allow water to pass through quickly. Crushed rock is often screened and graded for size; the larger the rocks, the better the drainage. Be sure to tamp it thoroughly.
The best gravel for the backfill layers is bank-run gravel, or bank gravel (which also works for the hole bottoms). It’s a mix of rounded large and small rocks that compact nicely but also drain well. If bank-run gravel is hard to find, pea gravel (a graded product of fairly small gravel) is a suitable alternative and can usually be found in small bags at home centers and garden suppliers.
With the post sitting on a level layer of gravel, braced and plumb, add another 2" of gravel in the hole. Tamp the gravel well, and then shovel in about 4" of soil. Tamp that layer, and then add more gravel. Continue this work until the hole is filled.
You can tamp with a 2×4, but a digging bar with a tamping head on one end is better for the tight confines of a posthole. Regardless of the tool you use, try to avoid hitting the post. Work your way little by little around the post as you tamp, rather than trying to tamp one side completely before moving to another. Tamp each layer as much as possible, periodically checking the post to make sure it stays plumb. If it shifts during backfilling, you may have to adjust your bracing and possibly remove some dirt and gravel before resuming. The more material that fills the hole, the more immovable the post becomes.
Overfill the top layer with dirt and compact it carefully to create a slope away from the post. This encourages water to drain away from both the post and the hole. This top layer may need to be refreshed from time to time with some fresh dirt and a renewed slope.
Using Concrete Footings
If you plan to set your fence posts in concrete, you must decide whether or not to mix your own concrete and, if so, how to do it.
Ordering ready-mix concrete. Sometimes it makes sense to have ready-mix concrete delivered by truck. Depending on the job, ready-mix can save time and be not much more costly than the alternatives. Ready-mix is ordered by the cubic yard; a yard is typically the minimal amount you must order. One cubic yard equals 27 cubic feet (or 46,656 cubic inches). Assuming that your 4×4 posts are going into 36"-deep × 12"-diameter holes that have 6" of gravel in the bottom, then a yard of concrete can fill about 151⁄2 holes. However, plan on it filling 13 or 14 holes to allow some extra for a bit of overfilling for each hole, inevitable spills, and a small safety margin.
Have all your posts braced and ready before the concrete truck arrives, and make sure the truck can get fairly close to the holes without driving through your yard. Also have a small crew ready to help, equipped with shovels and a couple of wheelbarrows. If you keep the truck waiting too long while you work to unload it, you may have to pay extra for that idle time.
The typical process for unloading ready-mix involves sliding a wheelbarrow under the truck’s chute, filling it with a manageable amount of concrete, wheeling over to the hole, and shoveling in the concrete. The process then repeats until the holes are filled. Helpers can work a second wheelbarrow as well as finish the tops of the filled holes.
Mixing your own concrete with a power mixer. If you have a lot of holes to fill but prefer a more leisurely pace, rent an electric or gas-powered concrete mixer. Although you can throw bags of concrete mix (premixed concrete) into the mixer, it is cheaper to mix your own dry ingredients: 1 part portland cement, 2 parts sand, and 3 parts coarse gravel. The dry ingredients are sold at some lumberyards, home centers, and through masonry materials suppliers. Add the dry ingredients into the mixer, and then slowly add water until you reach the right consistency. When you can form a small pile of concrete that holds its shape, the mixture is ready to use. If water starts pooling on the surface of the mix, it’s too wet. Dump the mixed concrete into a wheelbarrow. If available, use a mixer that can dump directly into the postholes. The clock starts ticking as soon as you add water to the mix (or the concrete truck arrives). Concrete begins hardening in 45 minutes, or less in warm weather.
Using bags of premixed concrete. For fewer holes, it’s easiest to buy bags of concrete mix. Empty the contents into a mortar tub or wheelbarrow, add a little water, and mix the ingredients with a hoe (a mortar hoe, which has two holes in its blade, is the best tool for this, but a standard garden hoe works just fine). Bagged concrete comes in 40- to 90-pound bags. One large bag yields about 2/3 cubic feet.
Use only full bags to ensure the proper proportions, and mix the dry ingredients well before adding water as directed. Start with about 90 percent of the recommended amount of water, and then add small amounts as needed until you reach the right consistency (able to hold its own shape without water pooling on the surface).
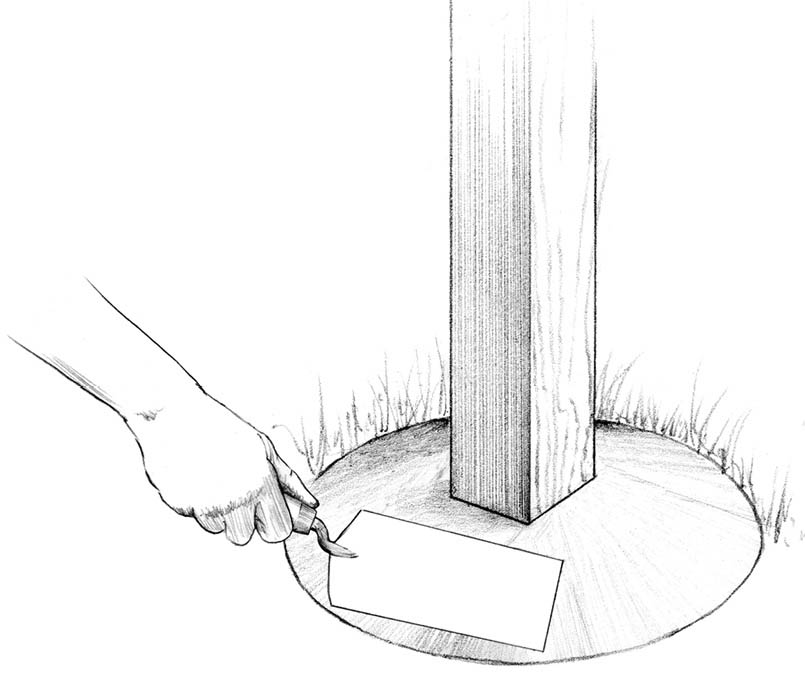
Pouring and finishing the concrete. Overfill each hole slightly, and then use a margin trowel or a putty knife to mound the top into a smooth dome that will shed water away from the post. Leave the post undisturbed for at least two days. When the concrete has cured, apply a bead of clear silicone caulk at the joint between the post and concrete. Renew the caulk anytime you start to see a gap developing at the joint.
Preparing Hybrid Footings
Some fence builders have found that a footing that combines concrete with tamped earth and gravel stands up well to frost heave. Dig the holes about 12" below the frost line and shovel 6" of gravel in the hole. Brace the post in the hole and add a 2" layer of gravel. Now pour a 4-inch layer of concrete into the hole. When the concrete cures, fill the hole with alternating layers of earth and gravel, as described in Installing Earth-and-Gravel Footings.
To better embed the post in the concrete, drive some large nails into each side of the post before pouring the concrete. Use hot-dipped galvanized or stainless-steel nails (16d or larger). Alternatively, you can insert short pieces of 1⁄2" rebar through holes you drill in the post.
How Much Concrete Do I Need?
To determine the amount of concrete you need for a posthole (or any other cylinder), begin by determining the volume of the hole:
radius2 × depth of hole (in inches) × 3.14 = hole volume (in cubic inches)
Next, determine the volume of the post:
post length × post width × post height (below ground) = post volume (in cubic inches)
Then, assuming the hole is a perfect cylinder (which it never is) and your measurements are exact (they might be close), determine your net hole volume:
hole volume – post volume = net hole volume (in cubic inches)
This calculation tells you how much concrete is needed (ideally) to fill one hole to ground level. But you want to overfill each hole a bit to account for settling and for making a sloped top — meaning that you should add 5 or 10 percent to your estimate. And because mixed concrete is sold by the cubic foot rather than the cubic inch, divide your total by 1,728 (one cubic foot = 1,728 cubic inches).
After you have completed the calculations for a single hole, multiply the amount needed for one hole by the total number of holes. The result determines your total concrete needs.
Here’s an example for a single typically sized hole:
hole volume: 62 × 30 × 3.14 = 3,391.2 cubic inches
post volume: 3.5 × 3.5 × 26 = 318.5 cubic inches
net hole volume: 3,391.2 – 318.5 = 3,072.7 cubic inches
volume of concrete needed plus 10%: 3,072.7 + (3,072.7 × .1) = 3,072.7 + 307.27 = 3,379.97 cubic inches
volume of concrete needed in cubic feet: 3,379.97 ÷ 1,728 = 1.96 cubic feet per hole
Attaching Rails
Rails are the cross-members of a fence that span from post to post. In a basic post-and-rail fence, the rails constitute the entire infill and are therefore the principal visual element of the fence. In most other wood fence styles, the rails are primarily a structural element that stiffens the whole assembly and provides a surface for attaching infill boards or pickets.
To make a strong fence before metal fasteners were available, rails were passed through holes or mortises that were cut into or through the posts. Today rails typically are nailed or screwed onto posts.
Rail-Only Fences
The basic rail fence is a longtime fixture of rural life and remains a functional style for controlling horses and other animals. Rail-only fences are also popular for modest boundaries and garden markers. The standard construction method involves setting all of the posts along the fence line, then nailing the rails to the faces of the posts.
The height of the fence and the rail spacing are entirely up to you, although rail fences tend to be fairly low. The most common type of rail fence used for animal enclosure has 4×4 posts set on 8-foot centers, with three or four 1×6 horizontal rails evenly spaced. For decorative fences, two rails are often sufficient. You should be able to find boards that are 16 feet long, which can speed up installation. If you’d like to break up the horizontal lines of the fence a bit, consider adding one or more angled cross-rails.
Structural Rails
For rails that serve a strictly structural role, you can choose to install them either flat or on edge. Flat rails offer some symmetrical appeal and may simplify some types of fence construction, but generally I recommend installing the rails on edge. Flat rails are almost guaranteed to sag over time, as people tend to lean against or sit on rails. Infill boards add their own weight, which also encourages sag. If you’re set on flat rails, consider using 4×4s for at least the bottom rail, then install the top rail to the tops of the posts. You can also reduce the span between posts to help minimize sagging.
Rails that are mounted on their edge also offer more choices for mounting infill boards or pickets. Often, the infill goes on the most visible side of the fence, meaning that you probably won’t see the rails. Another option is to center the edge-mounted rails inside the posts so the infill is nearly flush with the faces of the posts, making the fence identical on both sides.
For a typical picket fence, plan for two rails. For a high fence, especially if it will be filled with boards, use three rails.
Options in Joinery
The strongest joints between rails and posts are those that use holes or mortises in the posts, especially if the rails are installed on edge. These joints require a lot of work to make. It takes time to cut the holes or mortises, and they must be aligned perfectly for the rails to fit correctly. Simpler joinery, such as butted joints or those that use metal brackets, requires less work and is more typical for standard board fences.
Through-mortised posts create a somewhat rustic fence that might need no additional fasteners. For this joinery style, I recommend using 6×6 posts, which can accommodate mortises for two 2×4 rails. To cut the mortises, mark the outline on the post, drill a fairly large hole through one corner of the layout, and use a long wood-cutting blade in a reciprocating saw to finish the cut. Alternatively, drill a series of closely spaced holes, then clean out the mortise with a chisel. Cut the rails about 2 feet longer than the distance between posts, and slip them into the mortises. You can use this technique to set rails flat or on edge.
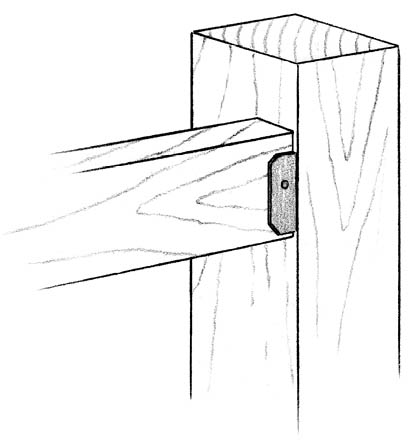
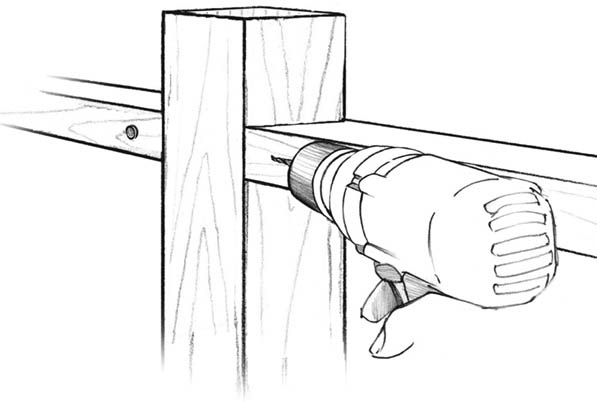
Butt joints are the most common means of joining rails to posts. Rails are cut to fit exactly between the posts and are fastened with nails, screws, or special metal brackets. Fence brackets are inexpensive, are easy to install, and create a strong connection. They don’t look great, but you can stain or paint them to blend with the fence (prime them first with a metal primer). If you use just nails or screws, drive them at an angle (called toenailing) through the rail and into the post. Drill pilot holes to prevent splitting the wood.
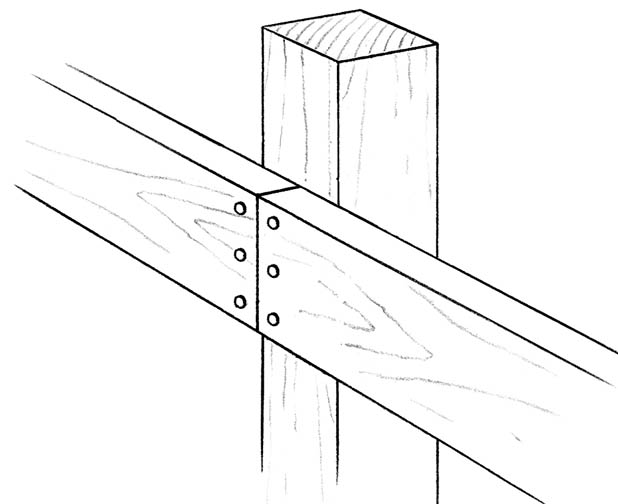
Face nailing is the quickest approach for installing rails on edge. Normally, the rails are attached to the back sides of the posts, with boards or pickets going on the other side. Again, drill pilot holes to prevent splitting. For strength combined with neat appearance, I like to set rails into notches that are cut into the posts.
Notching a Post
Rail notches must be laid out and cut carefully for all the parts to fit together perfectly. The most foolproof (if not the most efficient) approach is to finish one post before moving on to the next.
Instructions
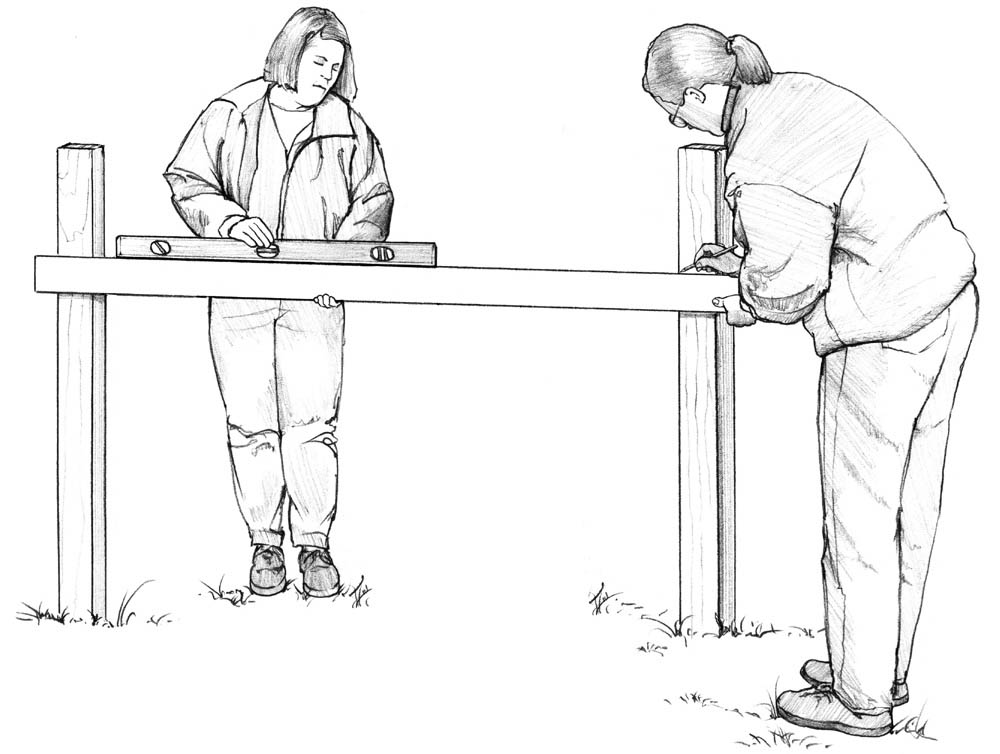
- 1. Begin by marking a layout on the first post. Hold a piece of rail stock in place perpendicular to and across the face of a post. Make sure it is level, then use a pencil to mark its top and bottom edges on the post.
- 2. With a circular saw set to cut exactly 11⁄2" deep (or the measured thickness of the rail material), make a series of closely spaced passes between the lines.
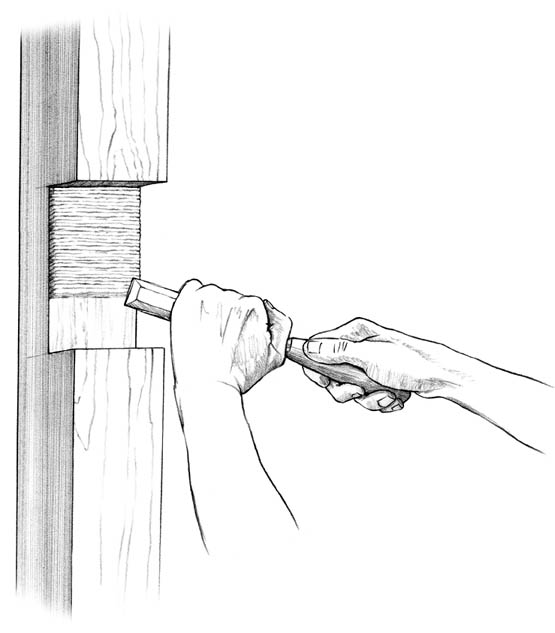
- 3. Use a hammer to knock out pieces of cut wood, then clean out the notch with a chisel and hammer. A flat wood rasp might come in handy on this chore as well.
- 4. Test-fit the rail in the notch, and adjust the notch depth if necessary. Place the next rail section in the other side of the notch and use a level on the rail to guide the layout for the notch on the next post. Attach the rails with nails or screws.
Post Top Details
Depending on the design of your fence, the posts may be virtually inconspicuous, moderately noticeable, or prominently displayed. In any case, the post tops deserve special consideration. With lumber, the end grain area is the most vulnerable to water infiltration and damage. The end grain at the top end of a post is fully exposed to the elements and can soak up a lot of water over time. The simple solution is to cut the post tops at an angle (to promote drainage) or to cover the ends with plain or decorative post caps.
Cutting post tops, especially at an angle, can be a bit challenging. You can use a circular saw, a reciprocating saw, or a sharp handsaw; I prefer either of the power tools for this work. Use a level and a long 2×4 or a water level (see Using a Water Level) to establish a level line from post to post. If cutting at an angle, use a combination square or Speed Square to mark a consistent 45-degree line on both sides of the level line.
Using just a standard circular saw (with a 71⁄4" blade), set the blade depth to the deepest cut possible. Make one pass with the saw up one angled line, then move to the other side and cut down the other angled line. If you are very careful, the two passes will produce a reasonably clean surface. If one side is a bit higher than the other, trim a little more off the higher side.
With a reciprocating saw equipped with a long wood-cutting blade, you can make this cut with a single pass. Be warned that the blade of a reciprocating saw has a tendency to wander off-line a bit. Try to hold the saw at a consistent angle, keep the speed high, and move slowly through the post.
If you are not experienced with using either of these two types of saw, make practice cuts on a scrap 4×4. When cutting 6×6 posts, you can’t cut to the center with a circular saw alone, meaning that using a reciprocating saw (or handsaw) is also mandatory.
Decorative Post Tops
Decorative post tops cover and protect the end grain while giving a special look to the fence. As mentioned, you can buy 4×4 posts with decorative features milled into them, but it’s much easier to set longer-than-needed posts in the ground, and then trim them to finished height before adding the post tops. Most lumberyards and home centers stock a few post cap styles, or you can special-order for a wider selection.
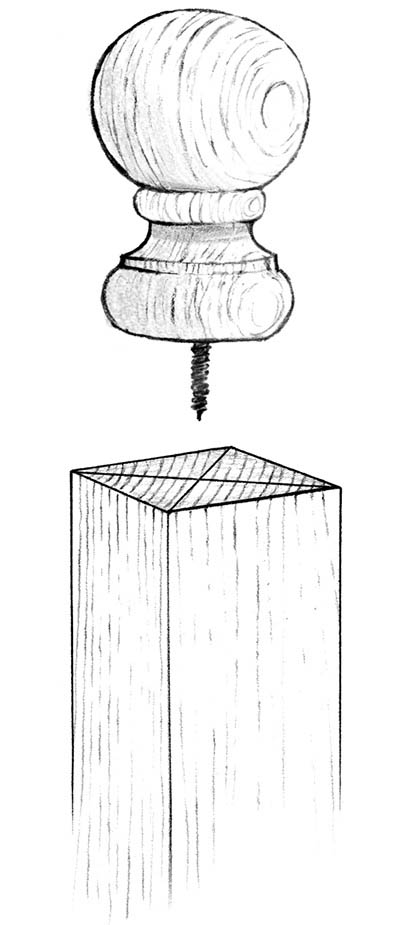
Some prefabricated post caps have a screw in the end, so all you have to do is drill a pilot hole in the center of the post top and thread it in. Add a little exterior-grade adhesive to improve the strength of this connection. You can also make your own custom caps. Simple squares cut from 1×6 boards can serve as the basis for any number of finished tops. With a power miter saw or a table saw, you can produce uniformly sized pieces of wood trim very quickly. Cove or quarter-round molding adds a nice touch. Using a circular saw or a router, you can create a nice shadow line with a shallow cut.
The Picket Fence
Picket fences are, by and large, front-yard fences. They mark the boundary between the private residence and the public street. They are intended to look nice, keep people from wandering into the yard, and perhaps offer a bit of protection to a garden. Picket fences typically are 3 to 4 feet tall, and the pickets lend themselves well to creative embellishment, allowing you to make a one-of-a-kind statement by designing a distinctive pattern or cut to the pickets.
Making Pickets
Pickets are normally made from 1×3 or 1×4 boards, although 1" to 11⁄2" squares can work well, too. The tops can be flat but are usually cut in some decorative pattern both for looks and to help shed water from exposed end grain. You can buy pickets in a limited number of shapes and standard lengths from lumberyards and home centers. But if you’re building your own picket fence, why not design and make your own? Even if you choose a standard picket style, making your own allows you to use good-quality wood and to customize the lengths to follow ground contours.
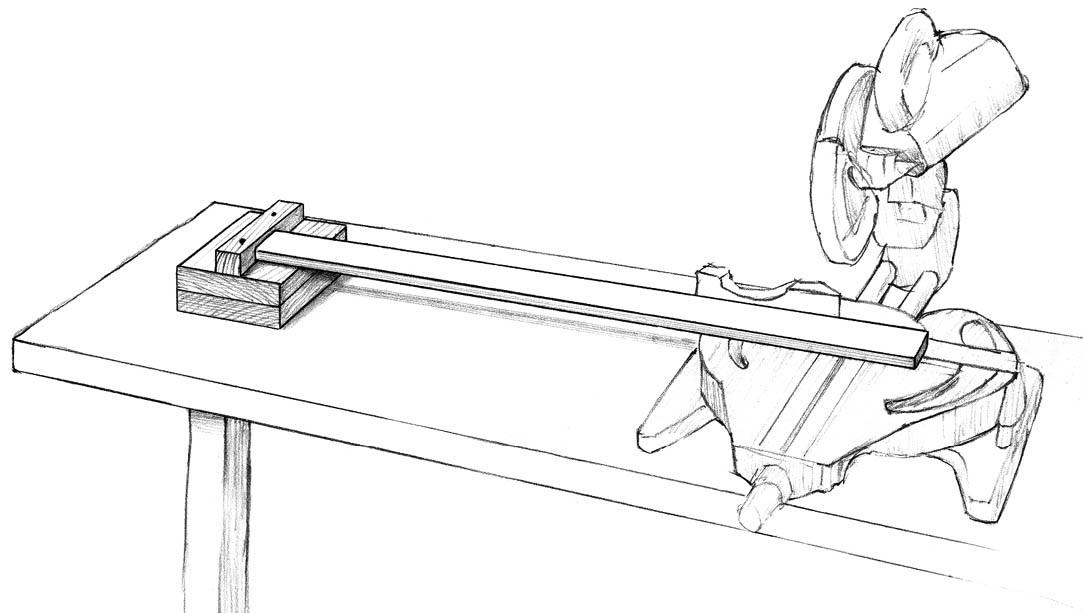
The quickest way to cut pickets with pointed or angled tops with a consistent length is to set up a power miter saw with a stop block. Adjust the saw to the proper angle, clamp or nail the stop block into place, and then start cutting. For pointed tops, cut one side of a board, flip it over, and cut the other. To create a pyramid-type shape on 1" to 11⁄2" square pickets, make the same cut on all four sides.
For more elaborate designs that require pickets to be cut one at a time, make a template out of 1⁄4" hardboard or plywood. Use the template to trace the design onto each board, and then make the cuts with a jigsaw or band saw (for curved cuts). Usually it’s easiest to cut the pickets before installing them, but if the fence covers irregular terrain, you may want to install overly long pickets first, then cut them to length and trim them into their final shape.
To create a curved top edge to a section of pickets, it helps to have an uncomplicated design. Simply install the pickets, mark the layout, and make the cuts. To mark a curve, cut a thin strip of wood a little longer than the spacing between posts, bend the strip into the desired shape and tack it to the posts. Trace along the curved strip to mark the pickets for cutting.
Attaching Pickets
To install pickets with their tops level, the basic approach is to attach a string line from post to post and then align each picket with the string. For an alternating-height style, use more than one string line. If you plan to cut a shape along previously installed pickets, run all of the pickets a little long so each one gets a full cut.
Pickets may be all the same width and length, or they may have multiple widths and alternating lengths, depending on your design. In any case, I recommend uniformity of spacing between pickets. Irregular spacing tends to make the fence look like it was created haphazardly. Use a spacer board to set the gaps between pickets. For a traditional, relatively open look, use a spare picket for the spacer. For a bit more privacy, use a thinner spacer. An all-in-one picket jig lets you set the spacing and height at once.
Attach pickets to the rails with galvanized ring-shank nails. For 1× pickets and 2× rails — a total thickness of 21⁄4" — use 6d (2"-long) nails. Two nails at each rail junction should suffice. To be on the safe side, check the pickets with a level periodically to confirm they’re plumb.
Vertical-Board Fences
Vertical-board fences typically are higher than picket fences, with their boards more closely spaced. Thus, they are most often thought of as backyard fences, intended to ensure privacy, add some security, and keep kids and pets from wandering off. That said, there is no reason why boards cannot be treated like pickets, with decorative top cuts and with some spacing between boards to allow air currents and sunlight to pass through. This design also allows for seeing between the boards, if that is your intention. See the section on picket fences for suggestions on cutting and installing the boards.
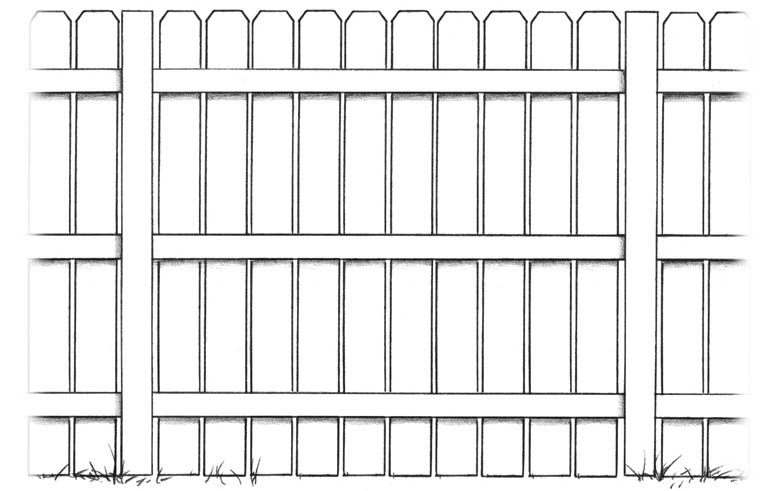
Boards for vertical-board fences can be purchased in standard sizes (typically 1×4, 1×6, or 1×8). These boards are attached to rails (preferably three rails for a high fence, two for a picket fence) and can be cut to size, if necessary, quite quickly. You can simply create a wall of solid boards, but to make a more stylistic fence, the board tops can be cut into points, clipped (dog-eared) at the corners, or rounded. Alternating widths of boards in either random or organized sequences can create a nice visual effect.
The board-on-board (or staggered) pattern is one I particularly like. Depending on how the boards are installed, this design can completely block views or offer slim glimpses from a right angle. At the same time, this design allows air to circulate and has a nice rhythmic look, with some contrast in light and shadow. It is also easy to build. Attach the boards with galvanized ring-shank nails or exterior-grade screws.
Prefab Panels
Preassembled fence panels are a time-saving option, and you can find them in just about any style at home centers and lumberyards. However, before you invest in any prefab fence product, make sure its rails are adequately sized for the weight of the fence and the span between posts, and make sure the fasteners are high quality.
Louvered Fences
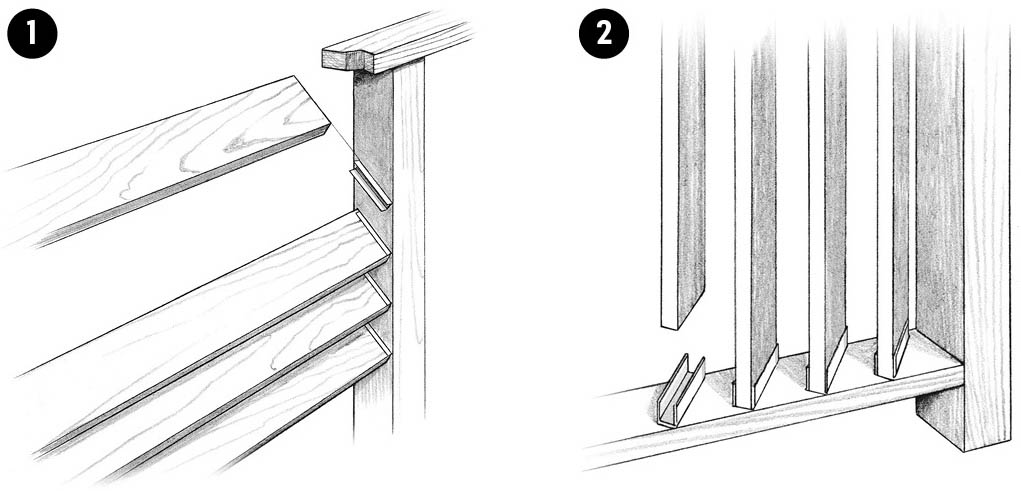
Louvered fences are functionally much like the board-on-board style previously mentioned. They offer substantial privacy, yet still allow air to pass through. I think they look best around houses with modern architectural design. Louvered boards, typically either 1×4s or 1×6s, can be installed either horizontally or vertically. Both styles require careful layout and installation. Louvered fences use more wood and take longer to build than a flat style of board fence. Unless you have a strong reason for doing otherwise, I suggest placing the louvered boards at a 45-degree angle.
Installing Louvers
When installing 1×4 or 1×6 louvered boards horizontally, space the posts no more than 6 feet apart. (However, stay away from this style altogether if you think it might inspire someone to try to climb over this type of fence.) Metal brackets made specifically for attaching louvered fence boards to posts are the best way to handle horizontal boards, but you can also use wood spacers.
Start at the bottom, and make sure the first louver is level. Use a short, custom-cut board as a spacer so that you can set consistent gaps between boards. With a level bottom louver and accurate spacer, you should be assured of an attractive result.
To install vertical louvers, you can use metal brackets or wood spacers cut from 1×4 lumber. Cut the spacers on a power miter saw for accuracy and efficiency.
Basketweave Fences
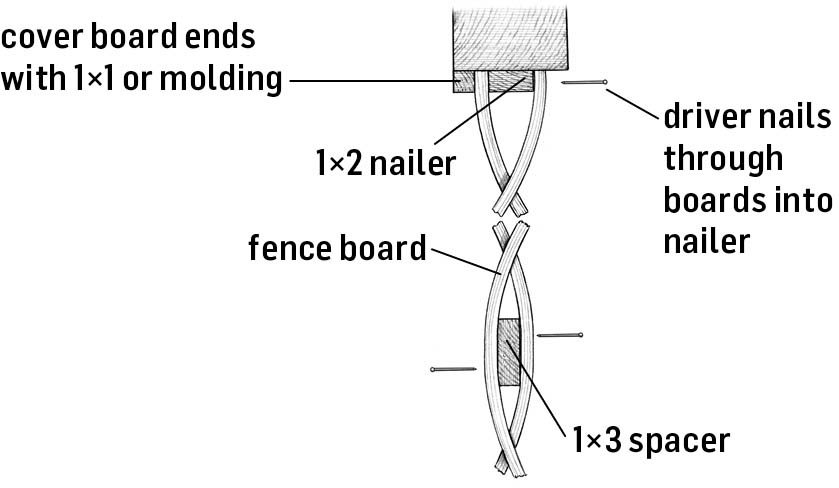
Basketweave is another type of board fence that combines texture and pattern with privacy and security. It requires thin boards (3⁄8" to 1⁄2" thick), 4" or 5" wide. These boards are not commonly carried at lumber suppliers, so you may need to special order from a sawmill.
Attach a 1×2 nailer down the center on the inside faces of each post, and install a vertical 1×3 spacer centered between posts. Place the centers of each board on alternating sides of the spacer, then attach the ends to alternating sides of the nailers using galvanized ring-shank nails.
Lattice Fences
Lattice fences provide a quick and easy method for screening an area. Standard lattice panels are not very strong and are best suited for infill material rather than freestanding structures. Lattice fences are ideal for enclosing and concealing small eyesores, such as garbage cans, or to fill small sections of a fence to break up the monotony of solid-board infill. Using lattice as a fence topper may mean you can exceed the maximum fence height allowed by your local building codes. You can also create a nice privacy screen by installing a 4×6-foot panel of lattice between posts that are spaced 4 feet apart. The open grid of lattice is ideal for support of climbing vines or flowers.
The most commonly available lattice panels are 1⁄2" thick, made up of two layers of 1⁄4"-thick slats. A much better choice for fencing is 1"-thick lattice, composed of 1⁄2"-thick slats. Lattice can have large or small openings, for providing varying degrees of privacy. While diagonally oriented patterns are most common, lattice with a square orientation often looks better on a finished fence. Vinyl lattice is also readily available in several colors and might be a good choice for a fence topper.
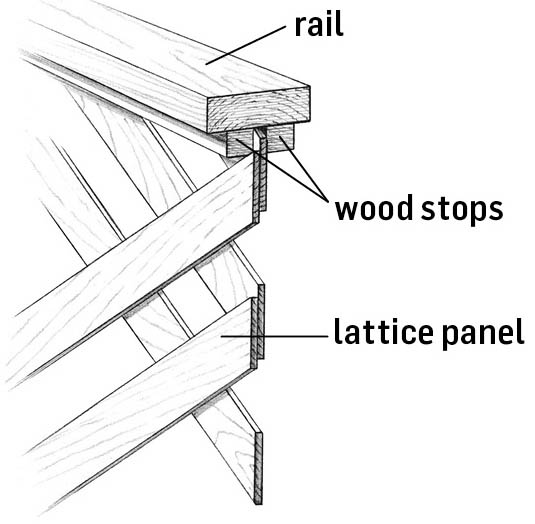
The best way to install lattice panels is to trap them between wood stops that are attached to rails and posts. Install the stops on one side, attach the lattice, and then attach stops on the other side. You may also be able to find channel stock at your lumberyard. Channel stock has a groove already cut into it for holding lattice panels in place.
Attaching Lattice with Wood Stops
Attach the first 1×1 wood stop to the rail, insert the lattice panel, then attach the second 1×1 wood stop to the rail.
Attaching Lattice with Channel Stock
Cut the channel stock to fit the panel (mitering the corners), attach it with glue to the panel, then drive nails or screws through the channel stock and into the posts and rails.
Cutting Lattice
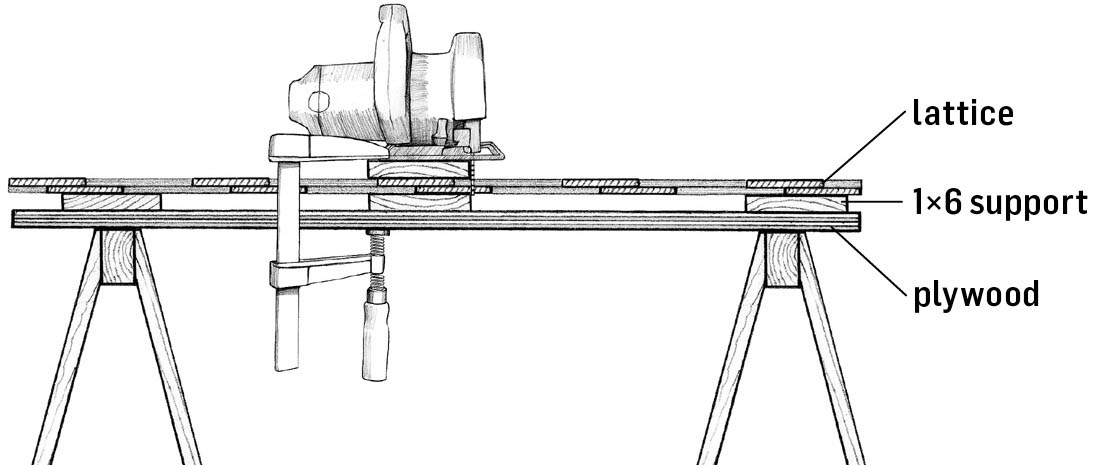
Lattice can be tricky to cut. I’ve had the best success using a circular saw while supporting the panel on both sides of the cut line.
Instructions
- 1. Set a sheet of plywood across two sawhorses. Place the lattice panel on the plywood. Measure and mark your cut line.
- 2. Clamp 1×6 boards on top of and underneath the lattice, next to the cut line, so that the lattice is sandwiched in between. Set one or two 1×6 boards beneath the lattice nearby to keep the whole panel level.
- 3. Set your blade to cut just deep enough to clear the bottom edge of the lattice when your saw is set on the top board, and then make the cut, pushing your saw along the smooth surface of the top board. The boards help keep the lattice from flapping around and separating while you are cutting.
A standard wood blade easily cuts through the staples that hold the slats together, but watch out for sparks — and always wear eye protection.
Vinyl and Other Wood Alternatives
Polyvinyl chloride, or pvc, poly, or vinyl, keeps showing up in an ever-growing number of products in and around our houses: flooring, siding, piping, window frames, and, increasingly, decks and fences. Whether or not vinyl is your cup of tea, in these uses one must admit that it offers strength, ease of installation, long life, low cost, and low maintenance.
Vinyl fences are available in just about any size, shape, or style you can imagine. You will almost certainly pay more initially for vinyl over a similar wood fence, but over the long term you may well save time and money in maintenance and repairs. Vinyl fences do not have to be painted or stained, they will not rot or rust, and they can be effectively washed with a good rainfall. Finally, unlike with wood, you can expect to receive a warranty with your vinyl fence — but be aware that the warranty may require that your fence is professionally installed.
Vinyl fences are sold as complete kits that can include posts, post caps, rails, rail brackets, panel sections, gates, and gate hardware, along with step-by-step instructions. Typically, you set the posts in concrete, allow the concrete to cure, attach brackets to the posts, and then add the rails or panel sections. Post caps and other accessories are normally attached with PVC cement.
Other Wood-Fence Alternatives
An alternative to PVC from within the general family of plastics is high-density polyethylene (HDPE). Fences made with HDPE offer the same benefits as PVC, but they are generally stronger and more durable. The HDPE material performs better in extreme temperatures and stands up well to impact. It is available in a much wider range of colors, including dark colors. I have seen HDPE panels that have a woodlike texture, unlike the smooth, glossy appearance of PVC. And HDPE is nontoxic and easily recyclable.
Composite fencing is yet another alternative to wood. Composite fencing material is made with a combination of wood particles and (largely) recycled plastic, the same material used in the popular decking material. Composites offer the same low-maintenance and durability benefits as vinyl fencing but are made from a more environmentally friendly material. Style and installation options vary by manufacturer and product line.
Rustic Fences
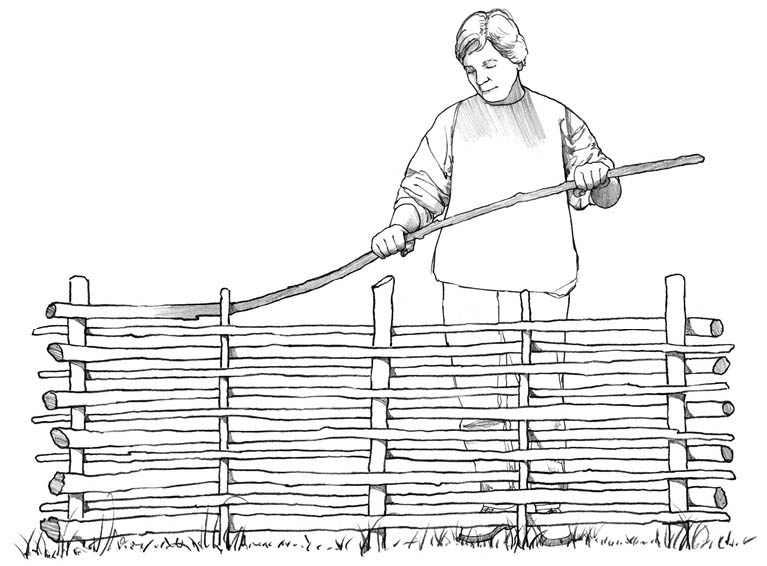
A rustic fence may be inspired by age-old techniques and materials, utilizing few tools and little if any hardware. These fences are often permitted to show their wrinkles through natural aging and weathering. Often made low with natural, unmilled wood, rustic fences make great garden borders and ornamental landscape features.
Choosing and Applying a Finish
Exterior wood finishes fall into two basic categories: film-forming and penetrating. Penetrating finishes soak into the wood to provide deep protection, while film-forming finishes create a protective barrier on the wood’s surface. Either type of finish can be used on a fence, with different visual effects and different levels of protection and longevity.
Penetrating Finishes
Penetrating finishes allow the wood to breathe and the wood grain to show through. Since they sink into the wood rather than forming a surface film, they do not peel or chip as they age.
Clear penetrating finishes protect wood while retaining the wood’s natural color. Basic clear wood finishes provide protection against water damage only and will not prevent fading from sun exposure. They are the least durable choices and need to be reapplied every year or 2. Water-repellent preservatives containing mildewcide, ultraviolet (UV) stabilizers, and other decay-fighting ingredients provide extra protection.
Semitransparent stains contain pigments that help the finish provide significantly more protection against sun damage than clear finishes, including those with UV stabilizers. An oil-based semitransparent stain with a mildewcide is the best choice for a fence (unless you want to paint). Semitransparent stains typically need to be renewed every 2 to 5 years.
Film-Forming Finishes
Both paints and solid-color (opaque) stains are film-forming finishes that seal wood with a protective layer on its surface. Solid-color stains contain more pigment than semitransparent stains but less than paint. Lacquer, urethane, and shellac are also film-forming finishes, but they should not be used on outdoor structures.
Because it does not allow the wood to breathe, the surface of a film-forming finish is prone to cracking and peeling, which can be an eyesore, particularly with paint. When it’s time to recoat, stained wood generally does not require as much preparation as paint: the surface needs to be cleaned, but usually not scraped or stripped, as with paint. Solid-color stains can last about 3 to 6 years before needing a recoat.
For longevity, nothing beats a careful paint job, which should be good for 5 to 8 years. It’s best to start with a coat of paintable water-repellent preservative, followed by a coat of stain-blocking latex primer, and then two coats of 100 percent acrylic latex paint. I like to apply the preservative and let it dry in warm, sunny weather for a couple of days, and then add a stain-blocking latex primer and the first coat of paint before I even assemble the fence. Using this method, every surface is protected. The second coat of paint can be applied after the fence is completed. Note: Read the labels carefully when shopping for a water-repellent preservative, as most of these products are not suitable for painting.
Tips for Applying Finishes
- Finish standard, dry lumber as soon as possible. Waiting is advisable only if the wood is “green” (unseasoned) or if it received factory-applied water repellent.
- Use a brush for the first — and most important — coat. You can follow with a paint sprayer, roller, or pump sprayer on some fences, but sprayers waste too much paint on fences with spaced boards. Follow spraying with a brush to ensure complete coverage.
- To remove any surface glaze that can inhibit absorption, sand smooth-planed lumber lightly before applying the first coat. Rough-sawn lumber does not need sanding.
- Apply a penetrating finish as directed. With solid-color stains, prime the wood first, then apply two coats of stain. Avoid permanent lap marks (dark splotches created when wet stain is applied over dried stain) by working in the shade and applying finish on small sections at a time.
- Hide knots in painted finishes by applying a stain-blocking primer designed to stop bleed-through from wood tannins.

