 The HTML5 Web page JQAnimate1.html on the CD illustrates how to use the jQuery animate() function in order to create animation effects on two PNG files.
ANIMATION EFFECTS WITH
JQUERY AND CSS3
This chapter shows you how to create HTML5 Web pages that create animation effects and also provide interactivity for users. You’ll see an assortment of jQuery functions that create various animation effects, which you can easily incorporate in your HTML5 Web pages. This eclectic chapter is intended to provide you with many animation effects, along with an assortment of code samples and code fragments that you can incorporate into your other HTML5 Web pages.
The first part of this chapter shows you how to use jQuery in order to manipulate the attributes of an element by setting the values of properties in CSS3 selectors, along with examples of creating animation effects using animate and effect. You’ll see code examples that create slide-based and fade-related (fadeIn, fadeOut, fadeTo) animation effects. This section also illustrates how to create 2D animation effects using jQuery together with CSS3 keyframes.
The second part of this chapter illustrates how to create a “follow the mouse” HTML5 Web page that uses CSS3 for the visual effect and jQuery for updating the location of the gradient-filled rectangle. Remember that the CSS3 examples in the chapters of this book are specifically for WebKit-based browsers, but you can modify the code samples to include vendor-specific prefixes so that the code samples will run in other browsers. The last example in this chapter illustrates how to render SVG with jQuery using a jQuery plugin.
Note that this chapter covers jQuery animation effects and chapter seven contains some corresponding animation effects using jQuery Mobile, and that both chapters contain CSS3-based animation effects as well. Due to space constraints, this chapter covers only a portion of the animation-related functionality that is available in jQuery. You can learn more about jQuery animation by reading the online jQuery documentation or by performing an Internet search for additional tutorials and articles.
Working with CSS3 Selectors in jQuery
This section contains code samples that illustrate how to use jQuery to programmatically create HTML elements and to style them with CSS3 to create various effects, such as rounded corners, gradients, and shadow effects. By manually creating the required CSS3 selectors and the HTML elements, you can leverage the power of jQuery to create even more sophisticated visual effects.
Basic Animation Effects in jQuery
This section contains code fragments rather than complete code listings, and these code fragments illustrate how to create animation effects in jQuery using the functions hide() and show(), and also how to set the animation speed. You’ll also learn how to use the jQuery toggle() function to toggle CSS properties.
Keep in mind that this section covers only a portion of the rich set of functionality that is available with jQuery functions that create animation effects. Be sure to read the jQuery online documentation to learn about many other features that are supported.
The jQuery hide() and show() functions enable you to change the visibility of elements in an HTML page. For example, the following code block hides the second button when users click the first button; when users double click on the first button, the second button becomes visible:
$("#myButton1").click(function() {
$(#myButton2").hide();
});
$("#myButton1").dblclick(function() {
$(#myButton2").show();
});
The jQuery toggle function can handle two or more occurrences of the same event on an element. For example, the following code fragment handles one, two, or three click events on an element with the specified id value:
$("#myDiv1").toggle(
function() {
$("myText").text("First click");
},
function() {
$("#myText").text("Second click");
},
function() {
$("#myText").text("Third click");
}
});
Two other useful jQuery methods are removeClass() and addClass(), which remove or add CSS classes, respectively, and an example is here:
$("#myDiv1").toggle(
function() {
$("myText").addClass("shiny");
},
function() {
$("#myText").addClass("dark");
}
});
The jQuery addClass() method adds a CSS class, whereas the toggleClass() method “toggles” the CSS class; i.e., the class is added if it’s not present, and it’s removed if it is already included.
Other related jQuery methods include fadeClass(), which uses a fading effect, and slideClass(), which creates a sliding effect.
Many jQuery functions (including hide(), show(), toggle(), and slide-related functions) enable you to specify a callback function that is executed after the specified action is completed. For example, you can define the following code block:
$("#myButton1").click(function() {
$(#myButton2").hide('slow',
function callback() {
// do something else
});
});
When users click on an element whose id is myButton1, the preceding code block slowly hides the element whose id is myButton2, and after the animation is completed, the code in the callback function is executed.
This book contains WebKit-based code samples, but if you decide to use the preceding code block with IE, keep in mind that there is a bug involving the use of named functions in callbacks in IE. The following article provides useful information regarding named functions:
jQuery Fade and Slide Animation Effects
The jQuery fade-related and slide-related effects are easy to create, and if you define them appropriately, they can create very nice visual effects in your Web pages.
The following example combines the jQuery, .fadeIn(), and .fadeOut() functions and also shows you how to chain these functions so that you can create multiple animation effects.
The fadeIn(), fadeOut(), and fadeToggle() Functions
The three jQuery functions .fadeIn(), fadeOut (), and fadeToggle() methods can specify three parameters, and their syntax is shown here:
jQuery(list-of-elements).fadeIn(speed);
jQuery(list-of-elements).fadeOut(speed);
jquery(list-of-elements).fadeTo(speed);
The following code block illustrates how to use these three jQuery functions:
$("#something").click(function() {
$(this).fadeIn('slow');
});
$("#something").click(function() {
$(this).fadeOut('slow');
});
$("#something").click(function() {
$(this).fadeTo('slow', .65);
});
Listing 3.1 displays the contents of FadeInOut.html, and illustrates how to perform simple and chained fading effects in jQuery.
LISTING 3.1 FadeInOut.html
<!DOCTYPE html>
<html lang="en">
<head>
<meta charset="utf-8" />
<title>jQuery Fade-Related Effects</title>
<script src="http://code.jquery.com/jquery-2.0.0b1.js">
</script>
<script
src="http://code.jquery.com/jquery-migrate-1.1.0.js">
</script>
</head>
<body>
<div>
<div> <p>Hello World from jQuery (hover on me)</p> </div>
<div> <p>Goodbye World from jQuery (hover on me)</p> </div>
<div>
<input type="button" id="button1" value="Hide Me" />
</div>
</div>
<script>
var para = $("div > p");
para.each(function(){
var p = $(this);
p.append('<span style="color:red;font-size:18px"'+
'>This Text Will Fade on Hover</span>');
});
para.hover(function() {
// you can use 'slow' or 'fast'
//$(this).find("span").fadeIn("slow");
$(this).find("span").fadeIn(3000).fadeOut("fast")
.fadeIn("slow");
}, function() {
//$(this).find("span").hide();
$(this).find("span").fadeOut(2000).fadeIn("slow")
.fadeOut("fast").fadeIn(2000)
.fadeOut("slow");
});
$("#button1").click(function() {
$(this).fadeOut(500, function() {
//$(this).remove();
});
});
});
</script>
</body>
</html>
Listing 3.1 starts with two HTML <div> elements and an HTML <button> elements, followed by jQuery code for applying fade-related effects to the HTML <p> elements. The first point to notice is the JavaScript variable para that stores a reference to the HTML <p> elements that are direct child elements of HTML <div> elements, as shown here:
$(document).ready(function(){
var para = $("div > p");
// code omitted
}
The next code block dynamically adds an HTML <span> element to the HTML <p> elements that are referenced in the para variable:
para.each(function(){
var p = $(this);
p.append('<span style="color:red;font-size:18px"'+
'>This Text Will Fade on Hover</span>');
});
When users hover over any of the HTML <p> elements, the jQuery code creates multiple fade-related effects for the HTML <p> elements using jQuery method chaining. An example is shown below:
$(this).find("span").fadeOut(2000).fadeIn("slow")
.fadeOut("fast").fadeIn(2000)
.fadeOut("slow");
You can use jQuery methods to apply effects to elements other than the element that has the current focus. For example, if you want to hide a sibling element during a hover event, you can do something like this:
$(this).next().fade();
The next section shows you how to use jQuery slide-related functions in order to create slide-related animation effects.
jQuery Slide-Related Functions
The jQuery slideUp(), slideDown(), and slideToggle() methods can specify three parameters, and they have the following syntax:
jQuery(elements).slideUp([milliseconds], [easing-function],
[callback-function]);
jQuery(elements).slideDown([milliseconds],
[easing-function],
[callback-function]);
jQuery(elements).slideToggle([milliseconds],
[easing-function],
[callback-function]);
The value milliseconds specifies the duration of the animation effect, and the callback-function is an optional JavaScript function that is executed after the animation is completed.
Listing 3.2 displays the contents of JQSlideUpDown.html, and illustrates how to perform simple and chained sliding effects in jQuery.
LISTING 3.2 JQSlideUpDown.html
<!DOCTYPE html>
<html lang="en">
<head>
<meta charset="utf-8" />
<title>jQuery Slide-Related Effects</title>
<script src="http://code.jquery.com/jquery-2.0.0b1.js">
</script>
<script
src="http://code.jquery.com/jquery-migrate-1.1.0.js">
</script>
</head>
<body>
<div>
<div> <p>Hello World from jQuery (hover on me)</p> </div>
<div> <p>Goodbye World from jQuery (hover on me)</p> </div>
<div>
<input type="button" id="button1"
value="Click to Slide Me Up and Hide Me" />
</div>
</div>
<script>
$(document).ready(function(){
var para = $("div > p");
para.each(function(){
var p = $(this);
p.append('<span style="color:red;font-size:18px">'+
'This Text Will Slide on Hover</span>');
});
para.hover(function() {
// you can use 'slow' or 'fast'
//$(this).find("span").slideDown("slow");
$(this).find("span").slideDown(3000).slideUp("fast")
.slideDown("slow");
}, function() {
//$(this).find("span").hide();
$(this).find("span").slideUp(2000).slideDown("slow")
.slideUp("fast").slideDown(2000)
.slideUp("slow");
});
$("#button1").click(function() {
$(this).slideUp(2000, function() {
//$(this).remove();
});
});
});
</script>
</body>
</html>
Listing 3.2 is similar to Listing 3.1, except that slide-related jQuery methods are used instead of fade-related jQuery methods, and the description of this code sample is analogous to the description of Listing 3.1.
One point to keep in mind is that sliding effects do not always work as expected (some jerkiness may occur) for elements that have CSS padding or margin properties or a width property that is not set to a fixed width. Experiment with these scenarios to see if the resultant behavior is what you expect, or if it is acceptable for your Web pages.
jQuery supports a set of so-called “easing” functions that provide different types of animation effects. In general terms, an easing function uses some type of equation as the path for an animation effect. For example, you can use a linear equation to create animation with constant speed. You can also use a quadratic equation (a polynomial of degree two, whose general form is a*x*x+b*x+c) to create animation effects with acceleration or for quadratic Bezier curves, and cubic equations for cubic Bezier curves.
jQuery also provides easing functions for animation whose speed is more complex (slow, fast, slow) at different positions of an easing function. Before you search for jQuery plugins, it’s well worth your time to explore the existing jQuery easing functions, some of which are: linear, easeInQuad, easeOutQuad, easeInCubic, easeOutCubic, easeInOutCubic, easeInSine, easeOutSine, easeInOutSine, easeInElastic, easeOutElastic, and easeInOutElastic.
You can find numerous links that provide an extensive set of demonstration of jQuery easing functions, including the one shown here:
http://jqueryui.com/demos/effect/easing.html
In addition, there are many jQuery plugins available for custom animation-related easing functions, or you can create your own jQuery plugin if you cannot find one that fits your needs.
The jQuery animate() method can take four parameters, and they look like this:
jQuery(elements).animate([properties],
[milliseconds],
[easing-function],
[complete-function]);
The properties parameter contains the list of properties to animate, and the milliseconds parameter specifies the duration of the animation effect. The easing-function parameter specifies one of the easing functions discussed in the previous section, and the complete-function specifies the JavaScript callback function to execute when the animation effect has completed.
The HTML5 Web page JQAnimate1.html on the CD illustrates how to use the jQuery animate() function in order to create animation effects on two PNG files.
This HTML5 Web page contains two PNG images, along with jQuery click handlers for two HTML <button> elements. Whenever users click on the left button, the jQuery code decreases the PNG opacity from 1.0 to 0.25, shifts the image file 50 units to the right, and increases its height by 100 units during a five-second interval, as shown here:
$('#text1').animate({
opacity: 0.25,
left: '+=50',
height: '+=100'
}, 5000, function() {
// Animation complete (do something else)
});
Whenever users click on the second button, the jQuery code performs similar animation effects on the right-side image file. Launch the code in Listing 3.2 and click the buttons to see the animation effects.
You can see a variation of the animation effects in Listing 3.2 in the HTML5 Web page JQAnimate2.html, as well as sequential and parallel animation effects in the HTML5 Web page JQAnimate2.html, both of which are available on the CD.
You can use the jQuery animate() function to create other interesting visual effects by changing different CSS properties of HTML elements. For example, the following code block create a “wobbling” effect with list items that are part of an HTML <ul> element:
$('#mylist li').hover(function() {
$(this).animate({paddingLeft: '+=15px'}, 200);
}, function() {
$(this).animate({paddingLeft: '-=15px'}, 200);
});
You can also create linear and swing animation effects, as shown here:
$('p:first').toggle(function() {
$(this).animate({'height':'+=150px'}, 1000, 'linear');
}, function() {
$(this).animate({'height':'-=150px'}, 1000, 'swing');
});
Custom CSS Animation Using the .animate() Function
You can use jQuery to animate many CSS properties, including border-width, bottom, font-size, height, margin, opacity, padding, right, top, width, and word-spacing. In addition, you can specify the duration with slow, fast, or an integer value that represents milliseconds.
The following code animates the width and height attributes of an HTML <div> element so that their final values will be 500 and 300, respectively:
$("#myDiv").click(function() {
$(this).animate({
width:'500px', height: '300px'
});
});
In the preceding jQuery code snippet, the width will increase to 500px if its initial value is less than 500px; otherwise it will decrease the width to 500px. (The same holds true for the height attribute).
This section illustrates a variety of animation effects that you can create with CSS3, where the code samples use CSS3 @keyframes rules and 2D/3D transforms.
Animation Effects with CSS3 Keyframes and 2D Transforms
Listing 3.3 displays the contents of JQButtonAnimation1.html, and illustrates how to create button-related animation effects that are triggered by the hover pseudo-class.
LISTING 3.3 JQButtonAnimation1.html
<!DOCTYPE html>
<html lang="en">
<head>
<meta charset="utf-8" />
<title>jQuery Button Animation Effect</title>
<script src="http://code.jquery.com/jquery-2.0.0b1.js">
</script>
<script
src="http://code.jquery.com/jquery-migrate-1.1.0.js">
</script>
<style>
@-webkit-keyframes AnimButton {
0% {
font-size: 18px;
background-color: #0f0;
-webkit-transform: translate(0px,0px) rotate(-60deg)
skew(-15deg,0);
}
25% {
font-size: 24px;
-webkit-transform: translate(100px,100px)
rotate(-180deg) skew(-15deg,0);
}
50% {
font-size: 32x;
-webkit-transform: translate(50px,50px) rotate(-120deg)
skew(-25deg,0);
background-color: #00f;
}
75% {
font-size: 24px;
background-color: #0ff;
-webkit-transform: translate(100px,100px)
rotate(-180deg)
skew(-15deg,0);
}
100% {
font-size: 18px;
-webkit-transform: translate(0px,0px) rotate(0)
skew(0,0);
background-color: #f00;
}
}
#button1 {
font-size: 12px;
background-color: #f00;
}
#button1:hover {
font-size: 36px;
background-color: #00f;
-webkit-animation-name: AnimButton;
-webkit-animation-duration: 4s;
}
#button2 {
font-size: 12px;
background-color: #00f;
}
#button2:hover {
font-size: 24px;
background-color: #00f;
-webkit-animation-name: AnimButton;
-webkit-animation-duration: 2s;
</style>
</head>
<body>
<div>
<input type="button" id="button1"
value="Click Me or Hover Over Me" />
</div>
<div>
<input type="button" id="button2"
value="Click Me or Hover Over Me" />
</div>
</div>
<script>
$(document).ready(function(){
$("#button1").click(function() {
$(this).fadeOut(500, function() {
//$(this).remove();
});
});
$("#button2").click(function() {
$(this).fadeOut(500, function() {
//$(this).remove();
});
});
});
</script>
</body>
</html>
Listing 3.3 contains an HTML <style> element with a CSS3 keyframes definition (which you could also move to a separate CSS stylesheet), followed by two HTML <input> elements of type button, both of which have click event handlers defined in the <script> element in Listing 3.3.
Whenever users click on either button, the CSS3 keyframes definition is applied to the button. This in turn creates animation effects using combinations of the functions translate(), rotate(), and skew() for the time periods (either 2 seconds or 4 seconds) specified in the associated selectors. In addition, the click handlers create a fading effect that lasts for 500 milliseconds.
When you launch the HTML Web page JQButtonAnimation1.html in a browser, you will see the animation effect whenever you hover over either of the buttons.
2D Transforms with CSS3 and jQuery
The code sample in this section shows you how to apply CSS transforms directly to elements (based on user-initiated events) using the jQuery css() function.
Listing 3.4 displays the contents of JQTransforms2D1.css, which contains CSS3 selectors that are applied to the HTML5 Web page JQTransforms2D1.html, shown in Listing 3.4.
LISTING 3.4 JQTransforms2D1.css
#outer {
position: absolute;
left: 50px;
top: 150px;
}
#inner1 {
float: left;
background-color:#F00;
width: 200px;
height:150px;
}
#inner2 {
float: left;
background-color:#FF0;
width: 200px;
height:150px;
}
#inner3 {
float: left;
background-color:#00F;
width: 200px;
height:150px;
}
Listing 3.4 is very straightforward: several properties, such as the width and height, are specified for three HTML <div> elements that are defined in Listing 3.5.
LISTING 3.5 JQTransforms2D1.html
<!DOCTYPE html>
<html lang="en">
<head>
<meta charset="utf-8" />
<title>jQuery Transform Effects</title>
<link href="Transforms1.css" rel="stylesheet" type="text/css">
<script src="http://code.jquery.com/jquery-2.0.0b1.js">
</script>
<script
src="http://code.jquery.com/jquery-migrate-1.1.0.js">
</script>
</head>
<body>
<h1>Click Inside Any of the Rectangles:</h1>
<div id="outer">
<div id="inner1"></div>
<div id="inner2"></div>
<div id="inner3"></div>
</div>
</div>
<script>
$(document).ready(function() {
$("#inner1").click(function() {
$("div").css({height: '300px',
'webkit-transform': 'scale(0.5, 0.5) skew(-10deg,
20deg)'
});
});
$("#inner2").click(function() {
$("div").css({height: '200px',
width: '250px',
'webkit-transform': 'scale(0.5, 0.8) rotate(-45deg)'
});
});
$("#inner3").click(function() {
$("div").css({height: '100px',
width: '250px',
'webkit-transform': 'skew(-10deg, 10deg) rotate(-45deg)'
});
});
});
</script>
</body>
</html>
Listing 3.5 defines event handlers for the click event for three HTML <div> elements, all of which invoke the jQuery css() function in order to update properties of the <div> element that received a click event.
For example, the first HTML <div> element is updated as follows whenever users click on this element:
$("div").css({height: '300px',
'webkit-transform': 'scale(0.5, 0.5) skew(-10deg, 20deg)'
});
As you can see, the height property is set to 300px, and transforms are applied to the <div> elements when users click on them.
Keep in mind that you can move the CSS3 code, referenced in the click handlers in Listing 3.5, to a separate CSS stylesheet. This makes it easier to maintain the CSS3 code in a single file, and you can also reference the same CSS stylesheet in multiple HTML Web pages.
In addition to CSS3 2D animation effects, you can obviously create CSS3 3D animation effects. Experiment with the code in Listing 3.5 by adding some of the 3D effects that are available in code chapters in Chapter 2, or from the following open source project:
http://code.google.com/p/css3-graphics
Figure 3.1 displays JQTransforms2D1.html in the Chrome browser on a MacBook.
The remainder of this chapter contains examples that are different from the previous code samples. Listing 3.4 and Listing 3.5 involve mouse-related functionality and how to handle mouse events programmatically. Listing 3.6 in the next section shows you a very rudimentary game-oriented code sample that combines JavaScript, jQuery, and CSS3 more extensively than earlier examples.
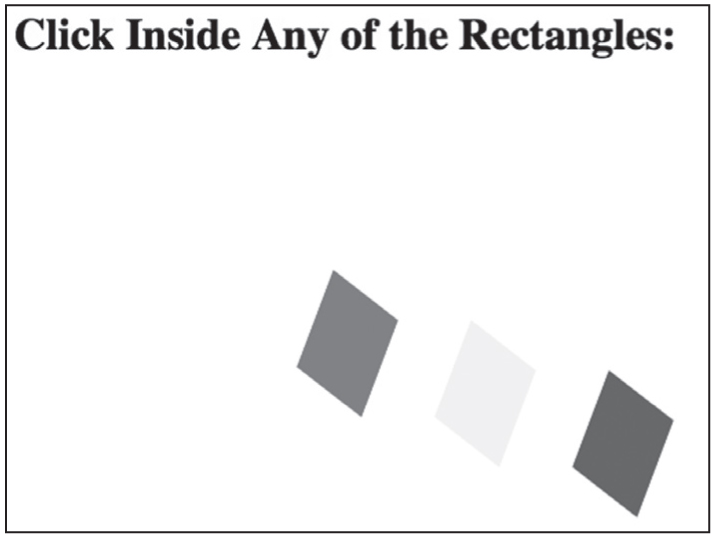
Figure 3.1 Transformed rectangles in jQuery in the Chrome browser on a MacBook.
A Follow-the-Mouse Example with jQuery
The code sample in this section extends the functionality introduced in the previous section by showing you how to programmatically create HTML <div> elements and append them to the DOM.
Listing 3.6 displays the contents of JQSketchFollowMouse1.html that illustrates how to render a <div> element under the current location of a user’s mouse using jQuery and CSS3 in an HTML5 Web page.
LISTING 3.6 JQSketchFollowMouse1.html
<!DOCTYPE html>
<html lang="en">
<head>
<meta charset="utf-8" />
<title>jQuery Follow the Mouse Example</title>
<script src="http://code.jquery.com/jquery-2.0.0b1.js">
</script>
<script
src="http://code.jquery.com/jquery-migrate-1.1.0.js">
</script>
</head>
<body>
<div></div>
<script>
// see commentary about the preceding empty <div> element
$(document).ready(function() {
var rectWidth = 20;
var rectHeight = 20;
var moveCount = 0;
var insertNode = true;
var currColor = "";
var rectColors = new Array('#ff0000', '#ffff00',
'#00ff00', '#0000ff');
var newNode;
$(document).mousemove(function(e) {
++moveCount;
// are users are moving their mouse?
if(insertNode == true) {
// create a rectangle at the current position
newNode = $('<div id=newNode>').css({'position':'absolute',
'background-color':'#ff0000',
'width':rectWidth+'px',
'height':rectHeight+'px',
top: e.pageY,
left: e.pageX
});
//append the rectangle to body with this code:
$("div").append(newNode);
//do not append the rectangle to body with this code:
//$(document.body).append(newNode);
insertNode = false;
} else {
currColor = rectColors[moveCount % rectColors.length];
$('div').each(function() {
$(this).css({top: e.pageY,
left: e.pageX,
'background-color': currColor
});
});
}
});
});
</script>
</body>
</html>
Listing 3.6 initializes some JavaScript variables and then uses the jQuery css() method to dynamically create an HTML <div> element whose upper-left vertex has the same coordinates of the point where a mousemove event occurs, thereby creating a follow-the-mouse effect. The key point to note is that the event object (called e in this code sample) gives us access to the coordinates of the current move position. We can use the attributes e.pageX and e.pageY to set the CSS properties left and top, respectively.
Notice also the inclusion of an empty HTML <div> element immediately after the HTML <body> element in Listing 3.6. This element is required because UI elements added after a script are known to disappear in some older browsers. The solution is to include the empty <div> element and then append content to that element.
Handling Other Events with jQuery
You have seen code samples that illustrate how to use jQuery to handle various events. jQuery provides extensive support for mouse-related events and also support for keyboard events, as described in the next two sections.
jQuery supports the following common mouse events that are probably familiar to you: mousedown, mouseenter, mouseleave, mousemove, mouseout, mouseover, and mouseup. You can detect each of these mouse events in jQuery using the following jQuery code constructs:
$("#myInput").mousedown(function() {
// do something
});
$("#myInput").mouseenter(function() {
// do something
});
$("#myInput").mouseleave(function() {
// do something
});
$("#myInput").mousemove(function() {
// do something
});
$("#myInput").mouseout(function() {
// do something
});
$("#myInput").mouseover(function() {
// do something
});
$("#myInput").mouseup(function() {
// do something
});
You can include any of the preceding code snippets that you need in your HTML Web pages and then add the processing logic to provide the intended functionality.
You can also detect keypress, keyup, and keydown events in jQuery. For example, this code displays an alert when users click on the uppercase “Z” key:
$("#myInput").keypress(function(e) {
if (e.which == 90) alert ('Z was typed.')
});
You can check for other key events, keeping in mind that uppercase A is decimal 65 (hexadecimal 41), lowercase a is decimal 97 (hexadecimal 61), and lowercase z is decimal 122 (hexadecimal 7A).
You can also add many other effects, including the animation effects that are available in previous code samples in this chapter.
Additional Code Samples on the CD
The HTML5 Web page JQSlideShow1.html illustrates how to create a slideshow with JPG images using jQuery, which uses the following code block to determine the next HTML <img> element (which wraps around to the first image in the list when we reach the right-most image) and adds the show attribute, as shown here:
next = curr.next().length ? curr.next() :
curr.parent().children(':first');
next.addClass("show");
The HTML5 Web page JQSketchSolid1.html on the CD illustrates how to create a rudimentary sketching program with jQuery and CSS3 in an HTML5 Web page.
Figure 3.2 displays JQSketchSolid1.html in the Chrome browser on a MacBook.
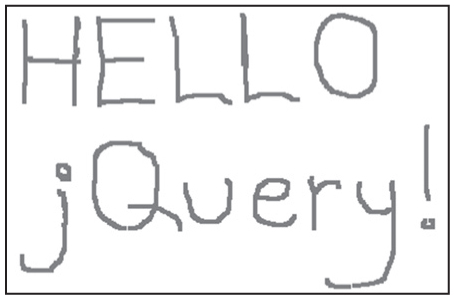
Figure 3.2 Sketching with jQuery in the Chrome browser on a MacBook.
The jQuery plugin rotate3di for 3D animation enables you to animate HTML content, along with other visual effects, and its homepage is here:
http://www.zachstronaut.com/projects/rotate3di/
You can also combine jQuery with SVG instead of dynamically creating <div> elements that are styled with CSS3 selectors. The accompanying CD contains the HTML5 Web page JQArchDoubleEllipse1Rotate1.html that illustrates how to combine jQuery with SVG. However, this code is similar to earlier code samples, so its contents are omitted from this chapter.
The HTML5 Web page JQBouncingBalls1.html on the CD illustrates how to render a set of vertically bouncing balls in a jQuery HTML5 Web page. Figure 3.3 displays the result of rendering this HTML5 Web page on an Asus Prime tablet with Android ICS.
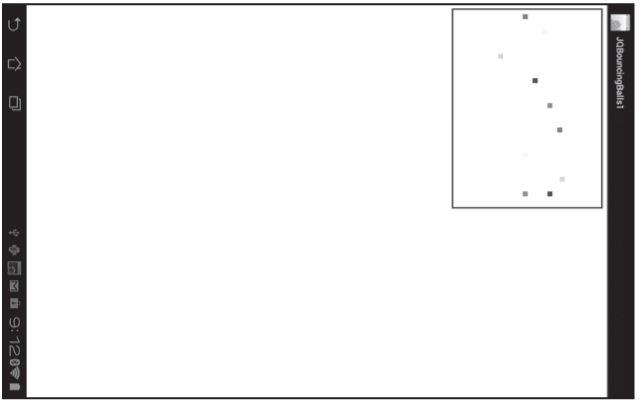
Figure 3.3 Bouncing balls on an Asus Prime tablet with Android ICS.
The jQuery plugin PFold provides a nice paper-folding effect, and it’s downloadable here:
http://tympanus.net/Development/PFold/index.html
Animation: Comparing CSS3 with jQuery
The performance differences between CSS3 and jQuery are an interesting and obviously important topic, especially if you plan to develop an HTML Web page or application that contains many animation effects. This section provides three links with various tips and some performance benchmarks.
The first link is an article written by Christian Heilmann that contains five performance-related tips:
http://christianheilmann.com/2013/01/25/five-things-you-can-do-to-make-html5-perform-better/
The second link provides performance benchmarks (and it differs slightly from one of Christian’s recommendations):
The third link is in an article on Opera’s Website, comparing the performance of CSS3 and jQuery animation:
“CSS3 wins the race by lengths. The huge difference in performance is because the browser’s CSS processor is written in C++ and native code executes very fast whereas jQuery (JavaScript) is an interpreted language and the browser can’t predict JavaScript ahead in time, in terms of what event will occur next.”
The preceding quote is from the following Website:
http://dev.opera.com/articles/view/css3-vs-jquery-animations/#comments
The preceding Website also states the following:
“Although the results above indicate that you should use CSS3 for animations, you should bear in mind the advantages and disadvantages we discussed earlier on in the article. You need to keep in mind that a fair amount of people still use Internet Explorer 7 and 8, so you should use jQuery if your animations absolutely need to work the same in those older browsers.”
The preceding links provide guidelines for improving the performance of your HTML5 Web pages. However, you might need to perform a more detailed analysis of the contents of your HTML5 Web page in order to fine-tune its performance. Perform an Internet search for articles that discuss performance issues in Web pages with similar animation effects.
This chapter introduced you to jQuery graphics and animation effects, along with code samples that illustrated how to use jQuery functions to create simple animation effects. In particular, you learned how to do the following:
The next chapter introduces you to various jQuery UI Controls, along with code samples that show how to render some jQuery UI controls in HTML5 Web pages.