Chapter 3
AROUND THE TABLE: FOOD AND COOKBOOK MEMOIRS
— By Dianne Hennessy King —
There are so many reasons to create a food memoir: as a family legacy, as a bridal or graduation gift, as a remembrance of your travels, or as a record of entertaining friends and family in your own home. You already have the creativity and motivation, now you just need a little know-how.
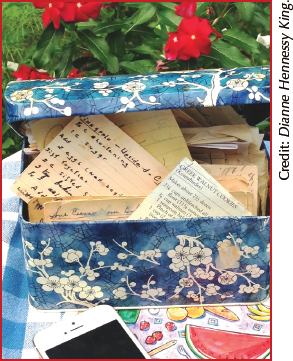
Whether you have a half-dozen recipes or a shoebox full of notes, newspaper clippings, and scribbled cards handed down from your family, you can create a food memoir that tells the stories of who you are, what meals you shared at the kitchen table, when and where you lived, and how you celebrated special events.
You might be wondering what a food memoir is. Usually it has more of a theme, more personal stories, and more of the personality of the person or persons creating it than a traditional cookbook. It can be a slice of life of a certain time or place, like your summer vacations as a kid visiting your grandparents in Mississippi, or the summer vacation you are planning for this year. Maybe you’re looking back on your first year of cooking on your own or forward to making cookies with your kids. Whoever you are, whatever your reasons, and whatever form you choose, your voice should be the one the reader or listener hears.
Recipe collection. Begin your memoir by gathering your recipe notes, clippings, emails, and stories.
Granted, a lot of famous people like Julia Child or former Gourmet editor-in-chief Ruth Reichl write bestselling food memoirs. You also see reviews of books by people going off to France, Timbuktu, or wherever to answer their life’s questions while learning how to make the perfect loaf of bread, but that’s probably not the case for most of us. More of us are like my student, Janice. She wanted to remember her grandmother Maude and Maude’s life during the Depression and war years in the same region depicted in the television program The Waltons, written by Earl Hamner, Jr. Another student, Lydia, put together a notebook of favorite foods for her thirty-year-old daughter to keep alive the stories of Lydia and her Ukrainian family’s emigration to northern Minnesota from a refugee camp after World War II. We want to share our recipes, but we also want to tell what the foods mean to us. Who made it for us, where were we, why do we want to tell about it? Memoir/Memories. There’s a reason those words are so connected.
In this chapter you will find a list of ten questions to jog memories of shared meals, tips on food photography made easy, and guidelines for recipe writing and clear layouts. All of that information will help you no matter what type of food memoir project you pick. You will learn how you can create your food memoir as a cookbook, an essay, a cooking video, a CD, a quilt, an oral history, or a blog. Included are photos of homemade memoir cookbooks and examples of ways to personalize your food memoir with family stories, maps, documents, photos and more.
Find Your Memories: Ten Questions That Will Trigger Your Memories (and Your Taste Buds)
We all eat meals every day, and yet we can be stumped when someone asks us what we ate last week or when we were a child. This list of ten questions will help you start remembering.
1. What is your earliest memory of food? Do you remember where you lived at the time?
Was it Halloween candy in a sack or your big brother pouring cereal? French fries at the beach or your mom feeding you warm rice? It can take some time to think back to when you were little. Don’t forget to also ask your family and friends what their earliest memories are to jog your own memory and theirs.
2. What did you usually eat for breakfast? For lunch?
Did you eat breakfast in the kitchen? Who else was at the table with you? What did you see when you looked out the window—apartment buildings, trees, a road? Did you have a favorite food that went into your lunchbox, and was Roy Rogers or Star Wars on the cover? Or did you walk home for lunch, or buy school lunches?
3. Did you absolutely hate any foods as a child? Did you have to eat them? Did you later change your mind about any of the foods?
So many of us have memories of hating something like peas or broccoli as a child and having to sit at the table until they were eaten. Ugh. Are you surprised that some of those foods taste good to you now? Or are you unrepentant in your dislike of peas?
4. Can you remember a “first time” for tasting a specific food or dish that seemed exotic or strange to you?
Think about how it felt on the tongue, whether or not you liked it, and who gave it to you. Was it an avocado, sushi, or a margarita? You might have been someplace different (on a vacation or visiting relatives in Kansas), but it also might have been food from the next-door neighbors.
5. Do you connect certain foods with certain people in your childhood?
For someone, it is homemade bread baked with a grandmother; for another whose father traveled a lot, it was the barbecue chicken his dad made when he was home.
6. Do you associate certain foods with particular civic or national holidays like Independence Day, New Year’s Day, Memorial Day, or Labor Day?
I had hot dogs and hamburgers every Fourth of July—did you? Were you always at a picnic on Memorial or Labor Day? Instead of January 1st, maybe your New Year’s Day followed a lunar calendar like Chinese and Persian celebrations.
7. Are there any foods you connect with religious or cultural holidays?
Was it turkey or lasagna for Thanksgiving, and was the salad always lime Jell-O? Hanukkah, Christmas, Diwali? Were special foods served for a Bar Mitzvah or Quinceañera celebration? Or fusion foods like green bagels for St. Patrick’s Day?
8. Did your family have any food preferences for family celebrations?
Maybe a child got to pick out the menu for his or her birthday meal or eat take-out every other day when on vacation? First day of spring picnic? Special desserts for good grades on Report Card Day?
9. What was your greatest comfort with routine?
For example, “On Sunday, we always had …?” What was your greatest enjoyment in breaking a routine, like eating dessert before dinner?
10. Did your family use any particular foods or drinks for when people weren’t feeling well? Any foods or drinks that were meant to help keep you healthy and strong?
Giving good food has always been a way we take care of ourselves and our loved ones. We all have our favorite cures for colds, such as garlic or lemons, special herbs, and chicken soup. What are your family’s favorite foods to keep you well or to help when you’re feeling sick?
Find Your Own Voice
After you have gathered a whole lot of memories by asking those ten questions, you are in a better position to start telling your stories. One thing to remember about writing a food memoir, as with all memoirs, is the importance of trusting your own voice. Your book or article or video doesn’t need to sound like anyone else and, in fact, you don’t want it to sound like anyone else.
Just to show you that no two voices or experiences are alike, here are a couple of stories from two of my students, both of them talking about a recipe for molasses cookies, both trying to capture the voices and charms of childhood.

Two stories of childhood molasses cookies show that no two voices or experiences are alike.
The first is a story from a wonderful newspaper reporter, Jane, who took my cookbook writing class and who delighted us all with her infectious sense of humor. Her son Jon loved her homemade pizza and molasses cookies when he was young. To accompany Jane’s recipe for molasses cookies, she gave us a little background.
The story behind the molasses cookies is two-fold: Jon at two could not say molasses and called them “moss cookies.” And, he was quite taken with the picture of the rabbit on the molasses jar label. When we lived in Colorado, we spent many a snowy afternoon baking cookies.
The second and longer story about molasses cookies was by another mother looking back at her childhood. She, too, tells her story in her own wonderful way. This story accompanied Mary’s family recipe for molasses cookies.
When I was a very little girl (maybe four years old), I was taken by my grandparents to their church picnic. I did not know anyone there other than my grandparents, and I was the only child present. After dinner, the men and women separated into two groups, and I went with the ladies group to something called a “prayer circle.” There must have been thirty women and me in this group.
I didn’t know what a “prayer circle” was, but I soon learned that we all were to hold hands, sit in a large circle, and each person had to say something for which she was grateful. I could think of a few things I was grateful for (my family, my friends, my pets), but they got used up by the first several ladies, and Grandma and I were almost at the end of the circle. I was only four, and I was really scared, because I didn’t want to embarrass my grandmother by admitting that I was clean out of gratitude. Four-year-olds can’t always come up with world peace, freedom from tyranny, beauty, truth, justice, etc.—especially on such short notice. Most of these women had seventy or eighty years of things to be grateful for, and I felt very disadvantaged.
I knew that if I didn’t say something really acceptable, my mother and father would be disappointed in me, and the rest of my life would probably be filled with lectures on what an ungrateful and undeserving person I was. Several of my relatives were already way too good at those lectures, and I just hated to give them more ammunition. The circle kept moving, and people were grateful for the nice weather, for birds, and trees, and gardens, and for the opportunity to be together (which, as you might imagine, was not high on my list at the time). Nothing was inspiring me. I thought about running away, but knew I’d eventually have to return. There was no getting out of it. There was not a darned thing I could think of that made me grateful.
Then, when it was my turn, I blurted out that I was grateful that my Grandma had brought such good molasses cookies. The ladies liked it. I was saved by divine inspiration. I have always been grateful for these cookies.
If you can talk about it, you can write about it, the same as if you were telling a friend.
Show Us the Food
When writing your food memoir, consider using photos to “show” as well as “tell” your story. Here are some ways to use photos in your food memoir.
Cover Photo
What’s your food memoir going to be about? Is it the story of your family history, or is it a collection of friends’ recipes for a bride and groom, or will the book be a fundraiser for your favorite cause? Choose a cover photo to reflect that idea.
This photo is of a painting by a grandmother that shows her teaching her granddaughter how to make tortillas. Grandma’s guiding hands are passing on her experience and history to the future generation. We put this image on the cover of a class cookbook called Cooking from Memories. Cover photos aren’t just for books; they can be used as the opening page of a calendar, a CD, or any other memoir format you choose.
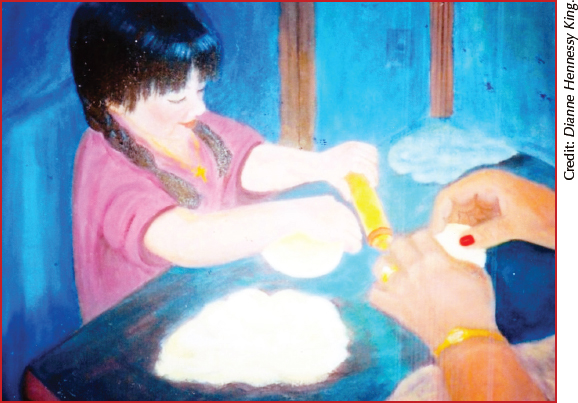
Use images to show and tell your story. A grandmother painted this picture in which she is teaching her granddaughter the traditional way to make tortillas.
Sometimes you want to simply give the mood of a time and place to the beginning of your project. This photo of cherry blossoms blooming in April adorned the cover of a handmade cookbook from a springtime class in Washington, D.C. The blossoms indicate the time and the Washington Monument in the background of the photo tell you the setting.

Give a sense of a time and place. Cherry blossoms are blooming on the cover of a handmade cookbook from a springtime class in Washington, D.C.
You might want a book cover that conveys a more modern tone, because the beautiful food is being shown in a fresh way in an unusual setting.
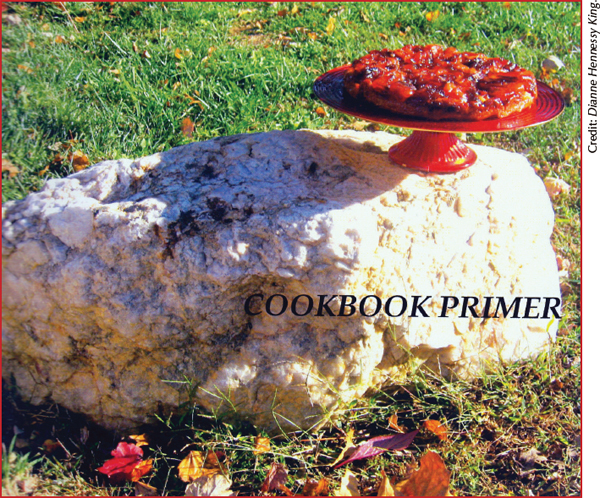
Show food in an eye-catching way. This cookbook cover features an apple cake shown outdoors.
This apple cake is shown outdoors and the soft, delicate cake is in contrast to the beautiful white stone boulder. The photo is also more attention-getting because the food is not directly in the center of the scene.
You Can Do It Yourself
Every food memoir needs lots of good pictures that make you want to jump in and start cooking. Take a look at your favorite cookbooks and magazines to see how the photography was done. But here’s the good news—you can do it yourself! You don’t need a professional test kitchen or studio set-up to capture some beautiful shots for your own food project.
Photography Tips
These tips will help you get professional-looking results.
• Shoot photos outdoors or with daylight coming through a window. If you need just a touch of extra light, place something white—a white napkin or teapot—next to the part of the close-up scene that is in a shadow and the white will help bounce up the light. Keep an eye on the background in order to include flowers, landscapes, tabletops, people, or whatever helps tell your story.
• Take lots of pictures! Especially with digital cameras and mobile phone cameras, there’s no extra cost for film, so keep snapping the shutter. Check out smartphone apps that can transform your photos. For example, an app called Waterlogue can turn your realistic photo into a watercolor painting. My advice to all food photographers would be an echo of Julia Child’s direction to cooks reading her memoir: “This is my invariable advice to people: Learn how to cook—try new recipes, learn from your mistakes, be fearless, and above all, have fun.” Substitute “take photos” for “cook” and “photos” for “recipes,” and that about sums it all up.
• Shoot from above. Carefully stand on a step stool to shoot the photo, although you can also get good close-ups from above when you are standing on the floor or ground.
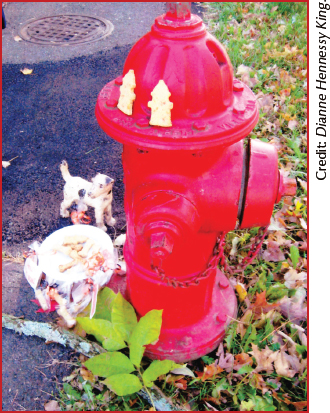
Choose meaningful objects to photograph with the food. This fire hydrant and china dog reinforce the distinctiveness of healthy, homemade dog biscuits made in the shape of a fire hydrant.
• Shoot from the side. Take shots two, three, and four feet away from the food. Also, try shooting with unusual objects surrounding the food so you can tell a story. The photo of the dog biscuits is for a homemade and healthy pet food booklet inspired by a pet owner’s efforts to nurse her dog back to health.
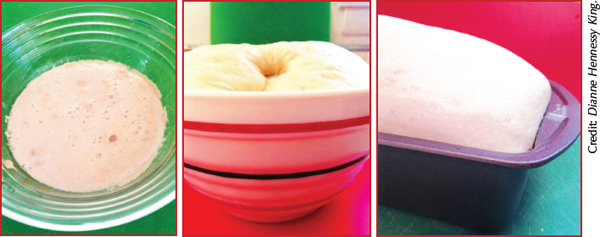
Show the steps. How-to photos show bread dough in three stages. Yeast proofing. First rise with thumb indentation. Second rise; ready to bake.
• Shoot a series of how-to photos to explain a cooking technique like making a sauce, such as hollandaise or hot fudge, or a dough for cinnamon rolls. It is helpful to have step-by-step photos (or drawings) for any recipe where the changes in shape or color of the ingredients tell you whether you’re making the recipe correctly—or not.
• Take photos in black-and-white as well as color. Using a black-and-white or sepia version of your ingredients can give the recipe a feeling of going back in time, in addition to showing the beauty of the food. Adjustments to color filters can also give photos a “retro” look.
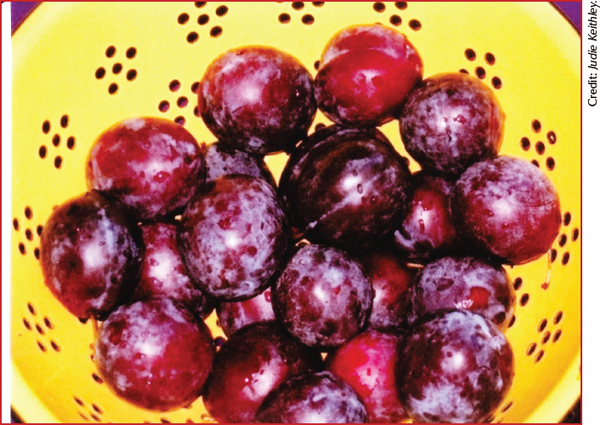
Purple plums. Take photos of ingredients before and after they are used in a recipe.

Plum cake.
• Before and after. Take photos of ingredients like these purple plums before they are baked into a German Plum Cake. This is one of the easiest ways to let the beauty of food just shine.
Other Illustrations
Add old magazine or advertising illustrations that are from a similar time to one of your collected recipes. If you save an illustration from the internet, make sure it’s in the public domain with no copyright. The good news is that most graphics and old maps and historical advertisements are in the public domain. The online photography and old-time graphics collection at the Library of Congress (www.loc.gov) is one of several excellent resources. See the Appendix for more.
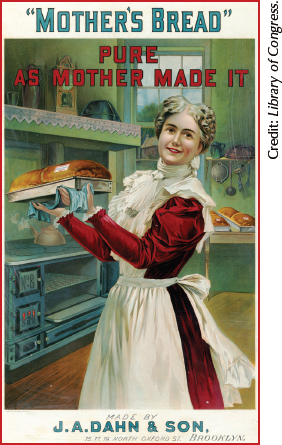
Add old magazine or advertising illustrations. Use images that are in the public domain and relevant to the recipe, story, or time period.
To give your food stories a sense of time, place, and background, you can include not just food photos and family photos, but also hometown maps, family trees, and scanned documents like a birth certificate or the deed to the family farm. Online newspaper archives are a terrific source for headlines and articles about your history.
When you use an image from the internet, make sure to save the highest quality version you can find. Download files from the source, like the Library of Congress, instead of right-clicking and copying from a simple web search. This will make your images crisp and clear when you print out your memoir.
How to Write a Recipe
Now that you have your stories and your graphics, how do you explain to someone how he or she can actually make this food that means so much to you? Well, recipes can be written in many different ways. Take a look at some of your favorite cookbooks or food blogs and try to figure out what appeals to you. No matter which layout pattern you choose, here are some basic guidelines to follow:
• Introductory description—can include origin of recipe (relative, book, friend)
• Preparation time, cooking time, number of servings
• Ingredients list
• Step-by-step method for chopping, mixing, etc.
• Family story connected to recipe: you fixed it for your brother’s thirtieth birthday, or you always had it at a favorite restaurant on summer vacation at your grandparents’ house
• A photo, if possible, of either the food itself or a gathering or occasion when the food might have been served
Putting Your Collection Together in Print
Here are some page layout basics to give your cookbook a professional look.
Font
Font is the print style of the letters of the alphabet. You’ve probably noticed these styles in the “formatting ribbon” that is part of a word processing program—you’ll see names like “Book Antiqua” or “Times New Roman” or “Helvetica,” for example.
Plain print that is clear and not squiggly helps cooks who are busy in the kitchen! Most importantly, choose a font style that pleases you and helps the reader clearly understand your recipes and stories. Nowadays, there are so many beautiful fonts that will help you create a unique project that reflects your personality and voice.
Font Color
While we’re talking about font, pay attention to the color of the letters and the color of the background. In recent years, the art departments of magazines and books have gone a little color crazy. Have you struggled to read ingredients written in “sunshine” yellow placed against an “eggplant” background? White or grey letters on a black background? It may look artistic, but it is just making life harder for the cook. Please, put yourself in your reader’s shoes before you pick out styles, sizes, and colors.
Font Size
Recipe titles should be a little bit bigger than the text and list of ingredients. A two-point spread is good, but you can make the difference larger if you wish. For example, you could set the title in 13 point and the main recipe in 11 point font. Other examples: 16 or 18 point (title)/10 or 12 point (list of ingredients). Whatever you choose, keep it consistent.
Headnotes and Sidebars
You might want to use one or both of these to convey additional information about either the specific recipe or the theme of the book. You can use different type treatments such as italic or bold to create a consistently identifiable thread throughout the book. The HEADNOTE can offer all kinds of information, from oddities of ingredients and shopping or serving advice to recipe history or background or a simple description of how the finished dish looks or tastes. The SIDEBAR (often in the shape of a box) can offer information on anything from the fishermen of Savannah to the history of basil in Italian cooking, depending on the theme and layout of your book. SIDEBARS do not have to be on the side of the page.
Columns
Choose a one- or two-column format for the ingredient list. You may want to do a trial format of both methods for one whole chapter before you make your final decision. You can waste a lot of space with a one-column list, but if you want a good amount of white space on a page and you want no confusion with the ingredients, you might want to choose the single column. However, you can conserve space by using two columns, and you might want to use the two-column format if your book will be wider than tall.
Page Layout
Decide on the margin size. Decide left or right justification (alignment) of text. Decide portrait (tall) or landscape (wide) orientation; that decision often depends on the final page size you have selected for the book.
Headers and Footers
Decide where your page breaks will go. Do you want the book title on top of every page, or only on each right-hand page? Decide if you want a chapter title on every page or perhaps only on the left- or right-hand pages, or not at all. Decide if you want the recipe title at the top of each page in addition to placing it above the list of ingredients. Decide if your page number is to be at the center bottom of the page or at the corner bottom, top center, or corner top (your word processing program will give you options in the header and footer menu).
Example of a Page Layout
Let’s imagine the following recipe has been included in a book called Home Cooking. The book title is flush left on each page; the chapter title and page number are flush right; the headnote is in italics below the recipe title; font is Book Antiqua, size 10 and the recipe title is size 14, centered, ingredients size 11, in a single column, flush left. Method is written in narrative style rather than Steps 1, 2, 3 … .
If you arrange the ingredients in a two-column layout, any photos or sidebars would likely be at top or bottom of page or on the facing page. If you arrange the ingredients in a one-column layout as shown here, you could have space to put photos or sidebars to the side of the ingredients. Also, in a one-column layout, you have room to spell out tablespoon and teaspoon. In the old days, one often omitted serving numbers for familiar foods such as a pie. You can always add servings and directions that weren’t present in the original recipes but that might be useful to modern cooks, such as “Serves 6–8” and “Mix all ingredients together and pour into an unbaked pie shell.”
Home Cooking |
Pies Page 43 |
|
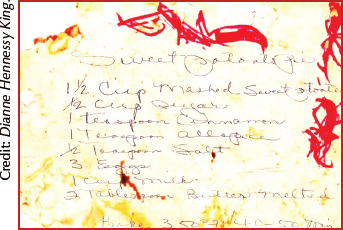
Sarah Walker Mercer’s |
||
Sweet Potato Pie |
Sarah Walker Mercer was a custodian at Louise Archer Elementary School in Vienna, Virginia. Mrs. Mercer was a beloved member of the entire community and a mentor, confidante, and supporter of children and teachers. A park that is close to the school is named in her honor. One day, years ago, when Nadine James (“Nurturing the Young Storyteller”) was a teacher at Louise Archer, the school was going to celebrate Louise Archer Day. Nadine said, “I was unsure of what to bring to the soul food luncheon, and Sarah wrote down this recipe for me. I baked her sweet potato pie for the event, and I have been sharing it with my family and friends ever since. When she passed away years later, I still was using her original handwritten recipe as my guide.”
1½ cups mashed sweet potatoes
½ cup sugar
1 teaspoon cinnamon
1 teaspoon allspice
½ teaspoon salt
3 eggs
1 cup milk
2 Tablespoons butter, melted
Layouts of recipes and photos. Place a food photo above, to the side, below, or with text wrapped around the recipe in a page layout.
Method: Bake at 350° for 40–50 minutes.
Add personal touches, such as a story about when the dish was served or a handwritten copy of the recipe.
Food Memoir Your Way
Now that you know what a food memoir is, how to decide on a theme and find your voice, how to take photos and find graphics, and how to write a recipe that works, let’s have even more fun in creating a Memoir Your Way. Choose a way that appeals to you.
Make an Oral History Around Food That Links Family Generations Together
If you want to choose a family project, you might want to start with taking a closer look at the “Find Your Memories: Ten Questions That Will Trigger Your Memories (and Your Taste Buds).” These are questions to ask yourself, but they are also great questions for a child to ask her grandparents, aunts, and uncles. Sometimes grandparents become shy or hesitant when asked questions such as “What was it like way back then?” The Greatest Generation doesn’t tend to talk about themselves. I can guarantee you, though, that asking “What was your favorite food?” will get the conversation started, and one memory leads to another. You can write down some oral histories but you can also just do an audio recording via any sort of a tape recorder. See chapter 7, “Nurturing the Young Storyteller,” for some more techniques.
You don’t have to skip a generation for the food questions to be helpful. One of my students said she had known her mother-in-law for twenty years, but it wasn’t until she had asked her the ten food memory questions that she learned so much more about her husband’s family history. Food can be a comforting, familiar subject, and once you begin to talk about it, so many connecting stories appear. Who helped with the harvest, what did the home country’s bread taste like, how did we make do when times were hard or celebrate when times were good?
Videotape Your Own Food Network
Think how great it would be to see and hear your brother tell you how he makes his barbecue—mixing up the sauce or spice rub, lighting the grill, setting up the direct and indirect heat and maybe the wood chips, what the food looks like just at the perfect point before you flip it to the other side. It feels as if you’re standing right beside him, taking in all his secrets, and once you’ve taped it, you have his voice, smile, and advice forever.
Maybe it’s your best friend who’s a whiz at making bread. You know you have followed the exact same recipe that she uses, and yet your bread never tastes as good as hers. Go ahead and videotape the key steps, using a camera or a smartphone or tablet. What does proofed yeast look like, anyway? Flat? Furry? Fuzzy? Jumping around? Does she rotate the dough every time she kneads the dough towards her and then away? If she sticks her fingertips in the dough to test if it has risen enough, what do the holes in the dough look like? What does “hollow” sound like if she thumps each loaf of bread in the oven to hear if it’s cooked enough? Have her tell you how she learned to make bread and record your laughs about how you’ve each baked a few bricks of fallen dough. Whether you’re capturing on video someone making bread or making barbecue, all that’s missing are the great smells.
Create CDs for Special Occasions
These are great for bridal and baby showers, graduations, birthdays, community groups, travelogues, and personal mementos. When you want a written record from a community—you ask all the people invited to a gathering to contribute recipes and photos for the guest of honor—simply scan their material into your computer (if they have sent it to you by snail mail) and create a CD. If the friends or family of the mother-to-be (for example) are scattered all over the country and are somewhat computer savvy, they can easily send you their recipes, photos, and stories online to collect into the gift CD. Once you create a file for the CD, you can then send the file online to anyone, anywhere. No books to ship and no delivery delays. Remember, a written record doesn’t necessarily mean a printed-out record.
For community groups such as schools or churches, you can make a CD of recipes and photos of bake sales and use the CD as an additional fundraiser. It is easy to take a photo of each of the foods before the bake sale begins. Have each donor either scan her own recipe and send it to you, or the donor can write out his recipe and then you can scan it and match all the recipes with the matching photos. Just like that, you have a recipe collection created in one day. Take orders for the recipe collection CD file at the bake sale and you won’t even have to do any follow-up sales!
Write a Book, a Booklet, or an Article
You would be surprised at how many books started with someone simply writing a short article for a school project or a newsletter or as genealogy research. Earlier I mentioned my student Janice who wanted to write about her grandmother Maude and her recipes. When she started my class, she had already gathered a sheaf of recipes and photos, but she gradually came to see that if she told the fuller story of Maude’s life and times, it would be even more interesting. The point is to start where you are—you can always add to the basic story later as you find out more. Janice went on to add all sorts of fun information, such as the fact that Albemarle Pippin apples from rural Virginia were a favorite at Queen Victoria’s table. Who knew?
You might also prefer to start by writing a short article, for example, about the history of a traditional family recipe. Where did it come from and how did it change over geography and time? For example, did the recipe for spaghetti sauce originate in Sicily with homegrown tomatoes and lots of fresh herbs? When the family moved to Detroit, how did it change to accommodate American life in terms of taste, available ingredients, and available free time?
And then, there are always books. Food memoirs can be centered on one person, one or many families, or community-based memoirs. You can have ten recipes or five hundred. One of my students, along with a few friends, created a fundraising book to help pay for the church choir to travel to Italy. If you set up a template for a recipe layout (see sample layout on pages 54–55), you can have each contributor give a recipe in exactly the same format, which makes coordination a lot simpler. If you are working with a smaller group of contributors, let’s say under a dozen, you could set up a Google Drive or other collaborative online document so that you could all work on the same food memoir and keep track of any changes any of you make.
However, when you are the only author, you get to make all the decisions. And that’s how a majority of food memoirs are made.
Quilt a Food Memoir
A cookbook might be the first thing we think of as a food memoir, but it isn’t the only way to go. Take a look at the quilting chapter for inspiration for beginners, and then turn a favorite recipe into a quilt design. For example, you could make a recipe-inspired appliqué that would transform your favorite recipe into a small art quilt that could be a great wall hanging, framed exhibit, or the center of a table runner.
Cut shapes of simplified recipe ingredients using interesting fabrics and stitch the shapes onto a background fabric. You might choose a shaft of wheat, a basket of red apples, a stick of yellow butter, and a rolling pin as the partners for a cut-out shape of your best apple pie in your favorite pie pan. Who knew that quilts could be mouth-watering? Every time you look at your quilt on the wall or on the table, you’ll be reminded of all the times you made your apple pie for friends and family.
Photo Storybooks
Printed and online photo books are often created as travel mementos. When you travel, the food of a region or country is always tied up with the history of a place and is a reflection of the daily lives of the people of that region or country. There has been a nice expansion of format options on offer in just the last few years. Before, the templates were narrowly set and you couldn’t add much more than a caption to the photo or a paragraph of description. In new books, you can add just about any written material that you want. Plan one of these photo books now, before your next trip, and you’ll have much more fun eating your way through the cities and back roads of wherever you travel.
Create a Food Blog
Food blogs barely existed ten years ago; now there are thousands upon thousands of them. It is such a fast-growing form of communication, because blogs can be so immediate, personal, interactive, inexpensive, and completely independent of geography. You can find a way to blog almost anywhere you might live.
If you are unfamiliar with blogs, type “Top 100 Food Blogs” into your search engine and start reading. If you are already a visitor to a number of the more popular food blogs like The Pioneer Woman, you could check out PBS’s list, “Ten Blogs You Should Be Reading, But Might Not Know About” as well as nominees and winners of Saveur’s blog awards. The writing is almost always less formal than in memoir books and more spontaneous because blog posts are often “posted” every day and are usually very reflective of the author. Go to a site like wordpress.com or blogspot.com, set up your own blog, and start writing. Everything you learned in this chapter about memories, voice, photography, and recipe-writing will help you create a livelier, more informative, and eye-catching blog.
Keep in Mind
• Choose a photo for the cover that shows the theme of the cookbook and/or sets the time and place.
• Use questions to bring out details in your food memories. Remember that your food memoir doesn’t have to sound like anyone else’s, so trust your voice.
• If you are creating a printed food memoir, follow a consistent format in writing recipes and choosing fonts and page layouts to give it a professional look. Include lots of photographs and other graphics to make it inviting.
• Remember that your food memoir doesn’t always have to be a book or something that’s printed on paper. You can use your smartphone or your digital camera to create short cooking videos that you can download. Create a CD, record your child or grandparents talking about favorite foods, or make a simple quilt or a scrapbook for yourself. Whether you create a food memoir as a book, article, quilt, scrapbook, or video, it can all be easily shared online with family and friends.
• Food is love. It’s as simple as that. Whatever way you choose to share that love and however you create your food memoir, you will have accomplished something wonderful, lasting, generous, and true.