If you make a film containing many interviews, you will almost certainly work from transcripts. In Chapter 32: From Transcript to Assembly there is a way to quite quickly make them into an initial script for assembly by the editor. Long projects are procedurally similar to short ones, but naturally pose more problems of structure, length, and dramatic balance. They are also more likely to need a narrator, so Chapter 33: Creating Narration describes various methods of developing them. For films in need of music, there is Chapter 34: Using Music and Working with a Composer. Then, to balance your story and test its effect on audiences, there is Chapter 35: Editing Refinements and Structural Solutions.
The more interviews, events, and elements you must orchestrate in your documentary, the more experiment you will need to fully explore your material’s potential. Initially this means making the shots and topics labeled and thoroughly accessible. Take time to figure out how best to develop any indexes, graphics, guides, and color-coding you think will help, since this saves time and energy for creative matters. This I learned as an editor for the soccer World Cup documentary Goal (Ross Devenish and Abidin Dino, UK, 1967), when hired to edit the final game between England and West Germany. It comprised 70,000 feet (13 hours) of 35 mm film shot mostly silent from 17 camera positions. The only orientation was a shot of a clock face at the beginning of each 1,000-foot roll.
Before I cut anything, my assistant Robert Giles and I spent a week up to our armpits in film, making a diagram of the stadium and coding each major event as it appeared in the various angles. The game went into overtime due to a foul, and it was eventually my luck to establish that, during this most decisive of moments, not one of the 17 cameras was rolling. So, using sports reports and Robert’s masterly grasp of the game, we used an assortment of close shots to manufacture a facsimile of the missing foul. Luckily, nobody guessed we’d had to fake it. That project was an editor’s deathtrap, and without my feature film training in making a good retrieval system, the men in white coats would have carted us away in the legendary rubber bus. Filing and indexing digital material is the modern equivalency, and just as important.
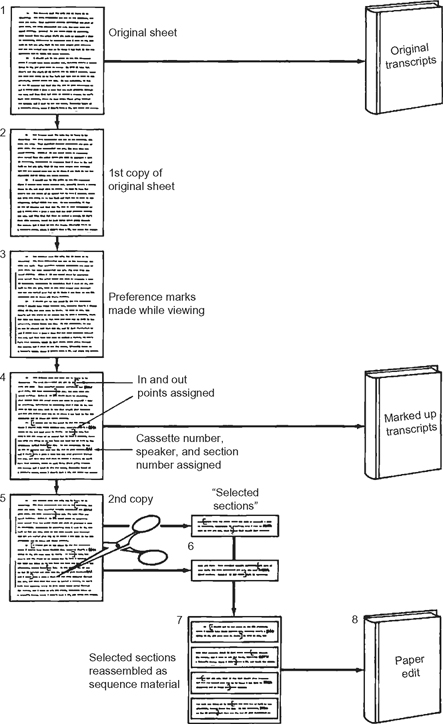
Following is how to carve up transcript copies so you can narrow your choices and make a workable blueprint called a paper edit. Figure 32-1 is a flow chart illustrating the procedure, designed to minimize your effort in quickly producing a long first cut. As with all filing systems, stick with one system for the duration of the project, and make improvements only when you start a new project.
These should be made verbatim, including all the ums, wells, you-knows, and other verbal curlicues that people use while their mind assembles what they want to say. Punctuation should follow the way a person speaks, and never be adapted to make his presumed intentions clearer on paper.
Whenever a speaker plainly starts a new line of thought, start a new paragraph; otherwise keep typing in long paragraphs. Remember, it is not literature, and you aren’t laying it out for easy reading. You are trying to record verbatim what someone said. The temptation to edit and clarify as you transcribe is ever-present, so resist, because making a passage clearer on paper than it really is will only make more work later for the film editor.
Every frame of video you shoot will have its own timecode, which is like each frame’s street address on a road called Time. In transcriptions you only need interpolate a timecode occasionally, and even then only in minutes and approximate seconds. A TC reference is useful at:
● The beginning and end of each interview.
● Questions, because they often initiate a new topic.
● Every half-minute or so in lengthy material, to help the editor navigate the text.
Word processing can provide a legal line-numbering feature that might be valuable when you have many speakers. I once made a film with over 20 characters telling the convoluted story of the conscientious objector movement in World War I.1 Had each interview transcript been line-numbered, the origin of even the smallest sections would have been far easier to track—a lifesaver on a really big project.
If you’re working with a modest amount of source material, you may get by with nothing more technical than a yellow highlighter and Post-It® notes. For a series like the Michael Apted Up series that draws on a gargantuan base of common transcript and archive material, you would need to customize an all-purpose database program such as Filemaker Pro. By defining your chosen fields, and filing your information in them, you can then search with incredible speed, making your priority perhaps person, period, location, or key words. You can display the results of your search as a list, a table, or as index cards—however you set up the system. Of course, data entry takes time and effort, but there’s nothing like it for helping you to internalize your resources. As you transfer the details, you gestate creative ideas, and can put them into effect efficiently and thoroughly because any of your material is at your fingertips.
Now you can make a paper edit, a blueprint from which the editor constructs a first, loose assembly. The flexibility of the paper edit system lets you move slips of paper around like the raw materials for a mosaic. Each round of experimental juxtapositioning sets you thinking and gives you ideas. To avoid your film becoming wall-to-wall talking, handle the process in two stages: (1) choose and assemble the action and behavioral material to establish the temporal spine of your film, and then (2) choose interview “rib” material that will illuminate and expand on the spine where necessary.
Stage 1: Make an action assembly: that is,
Prepare a list of action sequences and code them for easy identification. The sequences in college for a woman called Jane might look something like this:
1/Jane/1 Jane’s graduation speech
1/Jane/2 Jane has dinner with boyfriend’s family
1/Jane/3 Conversation between Jane and English teacher
2/Jane/1 Conversation, Jane and Dad
Now loosely edit them so each has a beginning, middle, and end, and assemble them in chronological order so they move logically through time.
View the action or behavioral assembly several times to establish its narrative possibilities and its deficiencies firmly in your mind.
Stage 2: Mark up the interview transcripts:
Step A: Place a complete printout of the transcript files (Frame 1) in a binder titled Original Transcripts. This represents the as-is transcription from the original recording.
Step B: Take a second printout (Frame 2) and read it while playing its interview. Put a quick, rough vertical preference mark in the margin of any section you find effective (Frame 3). Don’t analyze your reactions, respond with a mark, and keep listening.
Step C: As in Frame 4, (a) designate good in- and out-points to bracket each preferred section, then (b) give each a section ID consisting of original reel number, character’s name, and section number (‘6/Ted/3’ say), and (c) add a handwritten tag description, such as “Ted’s descript. of Farmer Wills.” Tags let you sort and structure slips of paper when you face dozens or hundreds of them, and the section IDs tell you where to find the material in the video files (Figure 32-2).
Step D: Make a photocopy of the fully marked-up preferred section sheets (Frame 5), filing the uncut parent copy (Frame 4) for future reference in a binder titled Marked-Up Transcripts.
Step E: Scissor the marked sections (Frame 5) into individual slips of paper (Frame 6), ready for sorting and grouping. Each carries an ID, so you know at a glance what it is, what it can do, and where it came from.
Step F: Match your chosen interview sections with your assembly of action material (Frame 7) without worrying about length or redundancy. Your object is to get likely material in roughly the right place, since future judgments can only be made by repeatedly screening the material, not from anything on paper. Your paper files and searchable database remain on hand as tools for mining your resources.
Step G: Staple all your material to sequentially numbered sheets of paper, dividing them into sequences. Place all this in a third binder (Frame 8) called the Paper Edit, ready for rapid execution on the computer as the first rough assembly of chosen materials.
Now you have a rudimentary story, and can rule lines between sequences and even group the sequences into scenes and acts.
From this approximate master plan you begin making a loose, baggy monster of an assembly. Until you retrieve each selected section you won’t know whether you can execute the chosen in-and out-points. Maybe you can’t lose all those verbal warm-ups before the in-point; maybe your out-point leaves Ted on a rising voice inflection so that his statement sounds strange and unfinished. Don’t worry if it is all vastly too long and repetitious. This is normal; refined decisions can only come from screening the material during editing proper.
Be cautious and conservative with your first structure. If your film is about a rural girl going to the big city to become a college student, stay true to the events’ chronology rather than, say, making the events unfold according to their importance to her. At this early stage, that would be a leap in the dark.
As a rule when editing, only fix the top layer of problems in any one pass. Expect to make repeated passes, each tackling a more subtle level of disorder. Make the crown first, cut and polish the jewels later.
Certain pieces of interview or conversational exchange gravitate toward certain pieces of action, either because the location is the same or because one comments on the other. This “comment” may be literally a spoken comment, or better, implied nonverbally through ironic juxtaposition (of action or speech) that makes its own point in the viewer’s mind.
An example would be a scene in which our student Jane faces having to make a graduation speech before the whole school, a prospect she admits scares her. A literal comment would simply interject some of the interview shot later in which she confesses how nervous she felt. A non-literal comment might take the same rehearsal and intercut her mother saying how calm and confident she usually is. A visual comment during the rehearsal might show that she is flustered when the microphone is the wrong height and that her hands shake when she turns the pages of her speech. What’s the difference? The literal comment is show-and-tell, since it merely illustrates what Jane tells us. The non-literal comment is far more interesting because it supplies us with conflicting information and asks us to make a judgment. Her mother enviously imagines that Jane can handle anything, but we notice signs that the poor girl is under strain. Either the mother is overrating the girl’s confidence or she is out of touch with her child’s inner life. This privileged insight, discreetly shared with the audience, gives us behavioral evidence that all is not well, that the girl is suffering, and makes us scrutinize the family dynamics more critically. The guiding philosophy is that human life is a cover for the struggle and turmoil beneath. Too often we deceive ourselves and each other, and a sympathetic dramatist’s job is to hint at the hidden complexities.
The order and juxtaposition of materials have potent consequences. How you eventually present and use your material reveals your ideas about the people and the premise you are exploring, but it also signals how you intend to relate to your audience as their Storyteller. Here you can juxtapose mismatching pieces of evidence like a lawyer piquing the interest and involvement of the jury, your audience. Good evidentiary juxtaposition provides sharp impressions, challenges the jury’s judgment, and removes much of the need to explain.
When you can better see how the material plays, you might intercut her high school graduation, conversations with a teacher, discussions with her father, and leaving home along with the development of her first semester as a college drama student. You would then have two parallel stories to tell, one in the “present” and one in the “past.” It is still too risky to do all this yet.
Notice that instead of first developing a narrative wordplay and illustrating it with action material—which is the instinct of the teacher and journalist—we created the best possible narrative from pure action, and then used speech to fill out its deficiencies. The difference onscreen will be highly significant because we made full use of the cinema as a medium.
1. Prisoners of Conscience (“Yesterday’s Witness” series, GB, 1969).