CHAPTER 3
SPLITTING BATCHES
ONE OF THE MOST COMMON PROBLEMS for veteran homebrewers is the insatiable demand that exists for our beer. Between festivals, parties, club functions, and work functions, it feels like we’re always on call for producing lots of different beers in a hurry. Of course, you also have to make beer for yourself, and what fun is that without experimenting from time to time? So to make the most of your limited time and resources, we must find creative ways to split batches! We like to think of it as The Brewing Tree.
In physics, there’s a notion called the multiverse, which states that the universe we live in is but one of many universes. A possible driving force splitting the universe is the many different choices that we make. Each roll of the die, each different decision that we make creates a multitude of universes. While we may not be creating anything as profound as a new universe, we can create different beers by following different branches of exploration. For the most part, you’ll probably only follow one or two branches that diverge on any one batch. But for the truly ambitious, you can try as many as you’d like!
MASHING
Splitting at the mashing stage gives you the most flexibility, but it also requires more equipment. You’ll need to have at least two boil kettles and maybe additional other vessels in order to deal with the extra grain and fluids you’re generating.
In a pinch, if you only have the one boil rig, hold your additional wort to the side in food-grade containers (buckets, pots, and so on). Then bring each batch of wort to a boil as fast as you’re able, to prevent the naturally occurring Lactobacillus from taking hold!
PARTI-GYLE
This is the granddaddy of all the split mash techniques. Until the turn of the twentieth century, this was how beer was brewed. One mash created multiple beers. Before the inventions of the thermometer and the hydrometer, brewers knew that they could draw a certain volume of wort to make a strong beer, another volume to produce a slightly weaker beer, and then finally one last draw to get a table-strength beer. Many breweries also mixed these batches to create their different offerings. For example, to this day Fuller’s line of beers—Chiswick Bitter, London Pride, and Fuller’s ESB—involves mixing between the three “coppers” that they pull in order to create the final blend. (If you batch-sparge and calculate your water additions correctly, you’re already running multiple gyles; you’re just blending them together!)
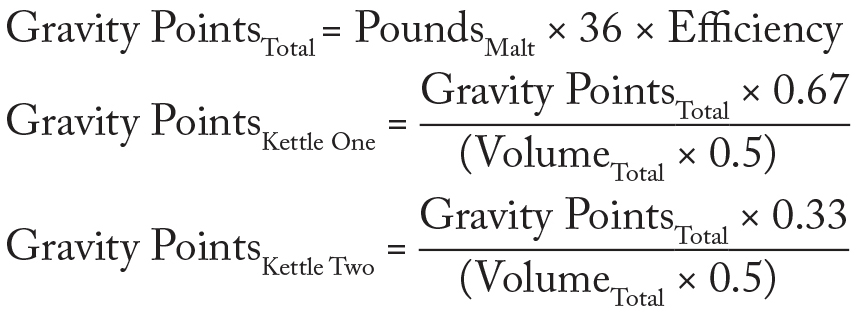
Here’s the primary rule you need to keep in mind. For an evenly split batch (for example, 5.5 gallons of beer one and 5.5 gallons of beer two), you can reliably predict that two-thirds of the total sugar will go to the first part and the remaining third will go to the second half. In other words, if you mash 20 pounds of pale malt, that should yield at 70 percent efficiency about 504 gravity points from the mash. Collected entirely in an 11-gallon batch, that would be a gravity of 1.046 (504/11). But if you collect the first 6 gallons for your 5.5 gallons of beer, it should contain 338 gravity points for a starting gravity of 1.061 (338/5.5). The second 5.5 gallons will contain 166 points or a gravity of 1.030. In other words:
Example for an 11-gallon batch with 20 pounds of malt on a 70 percent efficiency system:
The math may seem confusing at first, but it works. If your gravity falls a little short, add some sugar or extract. It’s all good! For those of you who are about to object: yes, the math is simplified for the rule of thumb. To be more accurate, your Total Gravity Points should be calculated by factoring in the differing gravity contributions of your malts instead of assuming a flat contribution of 36 points per pound.
Note: If you want the ultimate set of calculations for parti-gyle brewing, do a search for the terms Randy Mosher parti-gyle. The first result should be Randy’s Brewing Techniques article, “Parti-Gyle Brewing,” with full calculations.
CAPPING
Think back to the days when you used to steep grains and then rinse them for your extract brews. Remember, you just couldn’t throw any grain in there; some grains had to be mashed, since they need their starches converted to sugars. Here’s the rule: if it’s a base grain, flaked, or an adjunct, it needs to be mashed. If it’s a crystal or roasted malt, steeping is okay. The same is true of carapils malts and Melanoidin malt.
This technique is a return, in part, to those early days. As you mash, grind up a second addition of grain. Draw your first runnings into one kettle. After you collect your desired first beer, stop the outflow and then add your second addition of grain.
What can this get you? Think about mashing a DIPA and then capping the mash with 1/2 pound of Carafa II Dehusked Malt. When you collect your second batch of runnings, you’ll miraculously have a Black IPA waiting for you. Worried about your gravity being too low in your second batch? Just blend in some of your first runnings to pick up the second beer.
Also, it’s not uncommon for the second beer of a parti-gyle to be a bit on the thin side. So even if you’re making two different-strength variants of the same beer, there’s a good argument to be made for capping the mash with some crystal or carapils malt before doing the second runoff. Since those malts don’t need to be mashed, it doesn’t slow down the process much, and it adds the body the second runnings beer needs.
SIDE MASH
Let’s say that you want to cap a mash to make an oatmeal stout. On its face, it seems to have the same flaw as most extract-based oatmeal stouts: steeping will extract the fattiness desired from oats but carries with it a load of starch just ready for spoilage bacteria to chew on. Flaked oats, oatmeal, and malted oats all need to be mashed before they can be used. Unless you want your first beer to be an oat beer as well, you’ll need to mash those oats separately before you use them.
That’s right, it’s as simple as a little minimash on the side. Your main concern for a side mash is to make sure you have enough diastatic power (aka enzymes) to convert your specialty grain starches into sugars. The calculation is easy: for each grain, multiply its Litner rating (a measure of enzymes) by the weight. Add those values together and divide by the weight. If the resulting value is above 30, you’re golden. If not, add some more base malt, such as a 2- or 6-row.
Once you know you have the appropriate diastatic power, the rest of the mash is fairly straightforward. You could go whole hog and build a minimash tun, but how about using this as an easy opportunity to explore the brew in a bag (BIAB) method? (See page 15.) Most of your side mashes should be 5 or fewer pounds, which is small enough to fit in a traditional nylon grain sack readily available at the homebrew shop. Just mash in a pot with your grain contained in the bag, drain, and add the side mash to the desired portion of beer.
HALF SOUR MASH
If you’ve ever forgotten to clean your mash tun, you know that as little as a day later, the resulting warm mass of grain can smell like something straight out of a zombie movie. But there’s a magical point—around twelve to eighteen hours—at which the wort drawn from a leftover mash is naturally soured by the Lactobacillus that is everywhere on a malt husk.
If you are looking to get into sour beers, you can create a normal-strength beer from the first runnings and leave a second mash overnight (combined with the sparge water). Drain and boil the next day for a light, tart brew.
BOILING AND CHILLING
Even once you hit the boil kettle(s), you have a lot of flexibility. Maybe not as much as if you started in the mash, but from this point out, your splitting techniques become a little simpler to execute. And for the most part, your different split beers are more easily repeatable. (For example, imagine you brew a parti-gyle beer, and you’re fond of only half of the beer. How do you brew it without remaking both halves?) Beers split at the boil or beyond require little additional tinkering to recreate. Just scale up your next batch based on the small batch you preferred.
One important note before you begin: If you’re running two separate boils, make sure you stagger the starts of your boils to allow you time to chill the first beer before chilling the second. If it takes you 20 minutes to chill, kick off the second batch’s boil about 20 minutes after the first one. This allows you to chill the first beer completely and be ready to go on the second, instead of allowing the second beer to steep at a near-boil for longer than you intended.
TWO POTS
This is one of the simplest and easiest splits that you can do. Take two pots and boil half the wort in each. This allows you to hop one beer one way and another completely differently. You can explore flavors and techniques with far less work and far more consistency thanks to an identical starting point before the boil. In order to reduce possible variables, you should keep your boils equal in terms of volume, gravity, boil vigor, pot shape, and so on.
Note: To ensure an equal gravity, the easiest thing to do is collect all the wort in one giant pot and stir it to avoid stratified layers of density. Once this is done, measure your wort and split it. Don’t have a big enough pot? Grab a couple of buckets or pots and carefully scoop and stir the wort back and forth. Check the gravity. After a few back-and-forths, you should reach equilibrium.
WATERED-DOWN HIGH-GRAVITY BREWING
Just because you create a 1.070 wort, that doesn’t mean that you have to ferment a 1.070 wort! All you need is dechlorinated water, a spare kettle, and a little math.
Let’s say you’ve made a 1.080 DIPA wort and want to also boil a portion as a 1.050 pale ale wort. You know you want to create 5 gallons of pale ale. So …
PointsTarget = GravityTarget × VolumeTarget
VolumeAddition = PointsTarget / GravityOriginal
In our example we see:
50 × 5 = 250 pts
250 / 80 = 3.125
You need just over 3 gallons of DIPA wort to have 5 gallons at 1.050.
Don’t forget, when you’re diluting preboil, to add enough extra water to account for your boil-off. If you boil off a gallon during an hour of boiling your pale ale above, make sure you add 1 extra gallon in addition to the 1.875 gallons you’ve added to reduce the target gravity to 1.050.
However, nobody says you have to dilute at the beginning of the boil. You can also use water after the boil to dilute a portion of beer. It’s a great way to extend the amount of beer you’re producing without needing larger pots and mash tuns. Just think about a four-person brew day where you want everyone to go home with beer, but you can only make 10-gallon batches. If you make your beer twice as strong and dilute with freshly boiled and chilled water in the fermenters, you can take 10 gallons of 1.080 wort and produce 20 gallons of 1.040 beer. Or (stick with us here) you can take those same 10 gallons and produce 5 gallons of 1.080 beer and 10 gallons of 1.040 beer! Not only did you produce more beer, but you produced two beers out of one mash. It’s a brew day miracle!
SPLIT CHILLING AND ADDITIONS
Let’s say that you don’t care to futz early in the boil. Maybe you don’t have the extra pots and pans necessary to pull off two near-simultaneous boils. Well, that’s what the end of the boil is for!
The obvious trick for the end of the boil is to take advantage of the leftover heat in the pot and dissolve some goodies, such as hop oils. You know in your beery adventures the radical impact a jolt of late hops can make. A last-minute splash of Citra makes the beer tropical and fruity, while a dose of Columbus makes the beer dank and dark.
To make a clear difference in your two beers, just follow this practice. Kill the boil and whirlpool your beer as normal. Chill half the beer either by flowing half the batch through a counterflow chiller or by transferring half the batch to another kettle, where you can cool it with an immersion chiller. Shut off the flow, add 1 to 2 ounces of your hop, and start another whirlpool by stirring hard. Let the hops sit for at least 10 minutes before resuming chilling. Run that beer into a second fermentation vessel.
The last-minute hopping technique is going to be a little different with an immersion chiller rig, but as with all experimentation, there’s a way. Run half your wort while it’s still hot to another pot or heatproof container before starting this process. Chill the original pot while adding hops to the second pot (or hop both with different hops).
Don’t stop at just hops! While you’re thinking last-minute splits, you can boost gravities and change colors as well. Think of this as boil capping. You can add sugar and preboiled malt extracts (like cold-steeped Carafa malt). For example, you can make a Belgian Dubbel–inspired ale and then hit the second half with a dark Belgian candi syrup to boost the gravity and darken the color to make a Quadruple.
Note: We wouldn’t recommend adding fruit here because of haze and loss of fruit character during the ferment. However, if you want to go for it (’cause who says we’re right), you’ll want to let the boil kettle heat drop to around 170°F so that you can pasteurize the fruit with less chance of activating the fruit’s pectin and turning your beer into hazy, fruity snot.
FERMENTING
Remember the old saying “Brewers make wort, yeast makes beer”? It’s true, and that means fermentation is one of the key times that we can affect beer’s flavor. For all these techniques, you just split wort across different fermentation vessels. And just as in splitting a batch at the boil, if you discover one of the portions that you made is delicious and another isn’t, you can easily replicate what you liked without ever rebrewing what you didn’t like.
SPLIT YEASTS
Fermenting the same beer with wildly different yeasts is probably the first idea that occurs for a split batch fermentation. All you need to do is make two yeast starters and pitch them in the respective carboys. Just remember that for some yeasts you may need to hit different temperature ranges for the ferment.
What if you don’t want two radically different beers? It turns out that pitching two different strains can also be the best way to appreciate the subtle differences between similar strains—or the same strain produced by different companies. Is there any difference between WLP001, WY1056, and Safale US-05? All are purported to be the same strain, or at least have the same origin. The only way you’ll ever know to your own satisfaction is to carry out this experiment.
If you’re feeling ambitious, you can go large and brew a really mondo batch. Enlist the help of your homebrew club or partner up with a commercial brewery to pitch a dozen different saison yeasts to find the differences between the strains or discover the secret of avoiding the dreaded saison stall. (Spoiler alert: Use a vigorous starter and skip the airlock. The combination of backpressure and carbon dioxide (CO2) toxicity seems to force Dupont and similar strains—namely WLP565 Belgian Saison and WY3724 Belgian Saison—to go dormant.)
DIFFERENT TEMPERATURES
Instead of varying the yeast strains, why not vary the fermentation temperature? You could even be radical and swing for the fences with two samples at 35°F and 105°F. (Fun fact: It turns out that you can actually find experiments like these extreme temperature swings from the major lager breweries, which constantly seek newer, better ways to get their beers market-ready in a hurry.)
Back in the world of sane temperatures, let’s look at an example. For Bavarian Hefeweizen strains, the usual argument is ferment cooler (62°F–63°F) to favor clove, ferment warmer to favor banana (67°F–68°F). Does it work? Or what happens when a lager strain is fermented a bit warmer (58°F)? These experiments are so easy to do, there’s no reason not to try.
Remember to keep your fermentation temps consistent, within a few degrees. Yeast generally produce better results in a steady, warmer environment than in a fluctuating, cooler one. Don’t believe us? Try it for yourself by setting one beer to ferment in a warmer fridge (69°F) and the other in an ice bath that drops to 60°F but rises to 68°F.
DRY HOPS
Just like the hops at the end of the boil, you can swing a beer’s character by the addition of hops, lack of hops, or different types of hops added during the fermentation. Again, this is pretty simple and can yield some surprising results.
To use this technique at its most basic, simply choose one variety of hops per fermenter and dose with 1–2 ounces after primary fermentation has subsided or you’ve transferred to secondary. The choice to use a hop bag or not is up to you. Bags are convenient but may reduce the utilization.
Hops experimentation can be not only about variety, but also about schedule. There’s a fair amount of debate over what is a proper dry hop schedule. Traditionally, the rule has been 1 ounce per 5 gallons for 2 weeks at fermentation temperature and then rack. However, others insist that you can leave the dry hops in the keg for 6 months and as long as it’s cold, the beer tastes great. (We’ve both done that.) Still others have aggressive schedules along the lines of 5 days on a few ounces of hops at serving temperature, rack and hop again with a few more ounces for another 5 days. The goal is always to extract valuable aromatic oils with minimal extraction of the less desirable chlorophyll and grassy flavors that can show up with extended hopping.
If you have fermenters larger than your single share of wort (for example, 10-gallon cornies fermenting 8 gallons apiece intended for 5-gallon kegs), you can wait until kegging to dry hop as well. Monitor the progress of the hop flavor and rack the beer to a new keg if you begin to detect any excessive grassy flavors. For the love of all that’s beery, if you dry hop in a keg, make sure to bag the hops or attach a filter to the keg dip tube. The Internet is full of horror stories of hop particles—including pellet particles—getting stuck in dip tubes and causing poor pouring and beer geysers.
SUGAR FEED
Until a few years ago, the master plan for every high-gravity homebrew revolved around getting every last molecule of sugar that you intended to ferment into the boil kettle. Thanks to a better understanding of yeast mechanics, recent procedures for big, strong sugar-infused beers, like a Belgian Tripel, evolved to include an additional step of sugar feeding during fermentation.
The theory goes: High starting gravities induce a fair amount of osmotic pressure on the yeast cell walls. This can damage or kill a number of the yeast cells introduced by the brewer, leading to increased stress responses from the survivors, including fusel alcohols, phenols, higher than normal finishing gravities, and so on. Instead of hitting the yeast with all that stress up front, start them in a lower-gravity wort (your recipe without the sugar) and then add the sugar in the form of a syrup a few days into primary fermentation. By that point, the yeast are at an increased population with maximum viability. Since the yeast are in consumption mode, there’s less risk of off-flavors from stressed yeast.
Remember our candi syrup example from the end of the boil (page 47)? There’s no reason you can’t do the same thing here. Take your sugar source and, if it’s not already a syrup, dissolve it in water by boiling it for at least 10 minutes. We recommend about half the volume of water to dissolve the sugar (for example, 2 cups of water for 4 cups of sugar). Pop open your target fermenter, pour in the liquid sugar, and swirl. Don’t worry about superchilling the sugar syrup. Since it will be such a small portion of the wort, it won’t really move the temperature of the whole batch. Just let it cool, covered, for 20 minutes or so, and that’s enough.
If you’re using unopened commercial prepackaged syrup such as maple, corn, Belgian candi syrup, and so on, there’s no need to boil. Just take care to sanitize the outside of the package before opening it and add it to the fermenter. You never know what’s settled on the surface of the bag, bottle, or pouch.
FLAVOR ADDITIONS
Up to this point, everything we’ve done has been fairly Reinheitsgebot-friendly. (If you care about such a thing—we don’t.) But now, let’s say you had done nothing else to split your beer. Following the primary fermentation, your options are wide open. This is where you can add any number of flavors.
We’ll cover more about the ingredients in Chapter 7, but keep this in mind as you’re making your beer. If you can figure out how to add new flavors to smaller portion of your batches, you never have to commit yourself to 5 gallons of Pomegranate White Chocolate Chile Brown. Instead, by cleverly splitting your batch into parts, you can safely explore almost suicidally complex combinations of flavors. (And if you make the aforementioned pomegranate beer expecting it to be good, we’ll expect you to surrender your IGOR card.)
GOING WILD
In Stephen H. Buhner’s interesting and assumption-challenging Sacred and Herbal Healing Beers, there is an interesting dismissal of modern fermentation practices that he summarizes as a “need for Teutonic authoritarian … controls.” Even if you don’t necessarily agree with his hypothesis (we don’t), he is accurate in his description of the strict control modern brewers try to exercise.
However, folks seem to be loosening up and trying to embrace the wild side of brewing. Of course, they’re doing it with carefully isolated and nurtured laboratory cultures of things like Brettanomyces (Brett), Lactobacillus, or Pediococcus. After all, control is hard to let go of completely.
If you want to have a little fun without betting your whole batch on crazy critters, this is the perfect way to do it. You can treat your new cultures as you would a yeast strain and pitch separately. However, it’s worth noting that Brettanomyces becomes muted in terms of all the crazy wild characters you’re hoping to find when it’s used as your main fermentation strain. For more intensity, pitch a normal yeast strain instead. Then, when the primary ferment begins to slow, add the Brett and a little food. Take your pick: about a quart of wort, a pound of sugar, or a few pounds of fruit should suffice. This will ensure that your culture addition has something to snack on while getting down to its funky business.
For the daring and really paleo-minded, you can try capturing cultures right from the sky. Remember, humans made beer for years without proper lab equipment or an understanding of microbiology. Brewers inspired by the example of Belgium’s lambic producers leave their fermenter tops open to the air and let what floats in, float in. This usually leads to less-than-ideal results, so we recommend cheating a bit. Create your own wild culture by exposing a small portion of your wort in a Mason jar or suitable smaller vessel. If the resulting culture produces an interesting result, you can then pitch the culture into a larger vessel of beer to make your full batch wild. If the culture doesn’t do well? It’s easy enough to try again! Note: Our limited trials have shown that exposing wort to the air seems to work better in rural areas. How does a brewery in the middle of Brussels get away with it? Their culture seems to be stored largely in their oak barrels.