CHAPTER 8
EXPERIMENTAL INGREDIENTS
TO SAY HOMEBREWERS are a creative group is an understatement. We’ve all seen posts like this on brewing forums: “I want to brew a Dijon mustard red wine celery beer. How much red wine should I use? Should I add the celery to the boil or dry celery in secondary?” Just as you’re about to post an answer to the effect of, “On what planet would this be considered a good idea?” someone will post a reply saying, “Well, when I used Dijon mustard, red wine, and celery, I did it like this.” So, in the spirit of keeping an open mind, this chapter will look at some ingredients you may not have considered and the ways they can be used in your beer.
GET YOUR PRODUCE ON
Fruits and vegetables exist primarily for one purpose: to ensure the spreading of a plant’s genetic material (seeds). Lucky for us, they do so in packages that exhibit diverse flavors and aromas. The trick is how to get the flavors and aromas into your beer.
Needless to say, you should start with the best sources of produce. Hit the farmers market late in the day to strike a deal and choose produce not for looks, but for flavor. If the brew day is imminent, look for fruit so ripe it’s about to turn south. Don’t have a farmers market handy? Don’t fret. Despite the fresh is best mantra of the culinary media, individually quick frozen (IQF) techniques have ratcheted up the quality of frozen fruits and vegetables in the past decade. When a particular fruit or vegetable is out of season, frozen is not only easier, it’s also cheaper and tastes better than those god awful specimens that fly thousands of miles and are picked by dint of being able to survive the trip.
Before we get into the how much question, let’s tackle how to use produce:
1. You must wash your produce. Some fruits and vegetables, like apples and cucumbers, come coated in a food-grade wax that serves both as a protectant and beautifier. The rule of thumb is if it’s pretty and glossy, it’s coated. Simply wash with cold water and use a clean produce brush on your shellacked produce.
2. If the produce is large, or if the flesh isn’t exposed, it’s time to chop. Use a clean knife and cutting board and tackle the fruit or veg. Don’t worry about cutting a perfect brunoise—give everything a good chop to get it into 1/2 to 1-inch pieces.
3. Unless you’re dealing with fresh, leafy items, give everything a freeze. The average home freezer is horribly inefficient and we’re going to take advantage of that. When water in the produce is frozen slowly, it has time to form large crystals. These crystals pierce the cell walls of your produce. When you thaw and the crystals disappear, the juices and other interior goo will rush out of the mangled cells, giving you better flavor extraction. Vacuum packing will help encourage full goo-ifcation of your source matter. Alternatively, if you have a home juice machine that works by pulverizing the produce, you can create your own fruit and vegetable juice for use. Just make sure the machine is cleaned and sanitized before using (or freeze the juice before adding it).
Note: If you feel the need to sanitize the fruit before adding it, avoid heating it. That can set the pectin in the fruit and make it a gooey mess in your beer. Instead, soak the fruit in vodka to sanitize it. Or give the fruit a light spray of a sanitizer like Star San if you must. However, the two of us usually depend on the alcohol content and lowered pH of the fermented beer to keep things safe.
4. That’s it for the prep work for almost all fruits and non-starchy vegetables. We’ll cover the exceptions in a moment, but let’s finish this happy path with a trip to the fermenter. Although you may not normally use a secondary fermenter, this is one time that a secondary can be valuable. Adding fruit will often trigger a true secondary fermentation. Using another primary fermenter for your secondary is not a bad idea. Be sure that whatever venting mechanism you’re using—airlock, blowoff tube, etc—won’t clog. If your excitable ferment throws raspberry flesh into the airlock port, it could jam the airlock, creating a truly explosive situation. You do not want to come home to a wall full of glass shards or a ceiling full of Raspberry Imperial Stout!
Note: Some folks like to use big mesh bags to hold their additions to retain clarity. However, we generally prefer to add the produce directly. If you want clear beer, then you’ll need to be vigilant and patient enough to allow the beer to settle or be annoyed enough to filter. Truth be told, the mesh bags won’t spare you this pain either.
OTHER PRODUCE PROCESSES
Citrus zest is a great way to add citrus fruit flavor. In fact, almost the entire orange flavor that we picture when we think of a fresh orange is locked in essential oils like limonene in the outer peel. Use a fruit zester or microplane grater to create citrus zest. Start with the zest of two fruits before adjusting up or down. It can either go in during the last 2–3 minutes of the boil or be added to the fermenter after fermentation has died down.
Remember that the zest is the outermost part of the fruit rind, where the oils are concentrated, and not the white, bitter pith. However, you can take a cue from brewers like Mark Jilg of Craftsman Brewing, who uses the whole orange—including the pith—to provide an extra bitterness to his fruity and hoppy Orange Grove Pale Ale.
Dried fruits and vegetables can be another great way to skip the annoyance of fresh produce, and they don’t add any moisture to the brew! Using them is as simple as opening a bag and dumping them into the beer. You’re effectively using the beer to rehydrate them and create an alcoholic tincture. Use roughly the amount called for in the table (see 166).
Be careful when buying dried fruit; make sure to grab unsulfured varieties. You don’t want to add sulfur compounds to your beer, do you? From a visual perspective, the unsulfured version isn’t as bright and fresh-looking, but fortunately you’ll be drinking it, not staring at it. With dried vegetables, make sure you’re buying dehydrated vegetables and not oil- and salt-coated roasted vegetables. That would be bad juju for your beer.
Roots like potatoes, carrots, beets, or parsnips should be cooked first and smashed to ensure complete access to their goodness. Mashing starchy vegetables helps you avoid flooding your beer with starches.
PRODUCE QUANTITY
Now you get to see why we seemed so obsessive about cost. To get fruit flavor in a beer, you need a lot of it. For a 5-gallon batch, we’re talking a minimum of 2.5 pounds of cranberries on the low side to nearly 20 pounds of apples on the high side.
The general rule of thumb with fruit is to use 1 pound for each gallon of beer, but for very subtly flavored fruits like blueberries or blackberries, you might want to increase that amount to 2 or 3 pounds per gallon. If you’re wondering about the impact on your beer’s gravity, you have to remember that a good portion of fruit is water. The rough average of fruit juice gravity is in the 1.040–1.050 range.
Vegetables are a little trickier to gauge. Many of them contain green flavors like chlorophyll (spinach) or sulfur compounds (garlic), which are less-than-desirable in a finished beer. Others, like chile peppers, will punish you horribly for overuse. Sometimes a single pepper (such as a ghost pepper) is enough to drive a full batch into hotter-than-hell territory. To determine a dosing rate that’s appropriate for your needs, create a purée or juice and then follow our sample calculation rules with a pint of similar beer.
Think about increasing the amount even more if you’re adding it to a strongly flavored beer like a stout or porter. One pound of blueberries per gallon in a porter produces a very restrained blueberry flavor and virtually no aroma. To really make them stand out, using 2 pounds per gallon of finished beer isn’t out of line.
To use the following charts, know that the amounts are listed per gallon. The low number is intended to be for a more subtle flavor. The high number is for when you want to leave no doubt in your drinker’s mind as to what you’ve added. Think of it as: “Would you like some beer with your raspberry?” Also, don’t forget: these fruits have endless subvarieties. Take a chance on a new variety you’ve never tried before, like the freaky Buddha’s hand citron or a candy cane beet. These are guidelines, after all, not Procrustean strictures.
Fruit Additions: Whole, Chopped, Puréed, or Juiced
type |
Pounds Needed per Gallon (Low to High) |
Average Gravity |
Notes |
One of humanity’s oldest fruits, apple shines best in simple beers. Try crabapples for their intensity.
Apricot is difficult to capture. It’s delicate and fades quickly. Artificial apricot flavor will help.
blackberry |
1/2–2 lbs |
1.040 |
Tart and tannic with a bright berry aroma and flavor, blackberries are a crowd favorite.
Blueberries are delicate. Use the smallest berries you can find. (Wild is best.) A great blueberry is all about the pepper bite.
cranberry |
1/2–2 lbs |
1.044 |
These are tart and tannic fruit bombs. Begin with just a touch and then add more once you understand their intensity.
To avoid blowing your head off, use less of the sour cherries found in Michigan than the ubiquitous sweet varieties like Bing and Rainer.
This one’s a little unusual, since it doesn’t really have a juice. Add toasted coconut flakes (unsweetened) into the secondary. Toast in a 300°F oven for 10–15 minutes until golden.
Dates have been part of the beer-making process since the Sumerians wrote the “Hymn to Ninkasi.” Chop these up fine in order to maximally extract their sweetness.
Figs were another ingredient found in early beer making as well. Make sure you get super ripe figs that fall apart when you look at them.
Take a clue from wine makers and find smaller grapes; like blueberries, the juice will be more concentrated and flavorful. No wine grapes in your area? Raisins are an interesting alternative.
Everyone’s old-school bitter breakfast fruit has changed. Use varieties like the giant pomelo or ruby red for a softer grapefruit flavor. The pith is extraordinaly bitter.
There’s a reason you see lemons used all the time in cooking. Their bright aroma and acid wake flavors up. Varieties like Meyer lemons are softer and less acidic, so you can push them more.
Like the lemon, the lime wakes up your aroma and flavor, but lime is more aggressive. Key limes offer a softer flavor than the classic Persian lime.
Earthy, acidic, and a little funky, these can make an interestingly sweet-tart addition to your beer.
Who doesn’t love a sweet, crisp, fruity melon? It’s easy to make a purée: blend honeydews, cataloupe, and so on for a more complex profile from the delicate aromas.
The classic citrus bred from the original citron. Oranges can vary in tartness and sweetness, so taste first!
passionfruit |
1/2–1.5 lbs |
1.061 |
The tropics captured in a fruit. Deeply odd and intoxicating with just a little bit of tartness.
Like apricots, peaches are fleeting, so be prepared to boost the flavor.
pineapple |
1/2–2 lbs |
1.057 |
Look up how these grow, and tell me we haven’t mistreated this wonderfully bright fruit with all the canning we do to it!
plums/prunes |
1–2 lbs |
1.057/1.079 |
Since we already find this flavor in so many of our darker Belgians, it shouldn’t be surprising it works well in beer.
pomegranate |
1/2–2 lbs |
1.074 |
Pomegranate is loaded with antioxidants and an acidic punch.
raspberry |
1/2–2 lbs |
1.044 |
Lend a great big punch of color and acid to your beer with black or red raspberries. They’re quite possibly the most popular fruit flavor in beer!
Everyone wants to make a strawberry beer, but it’s an elusive flavor to capture. If you want strong strawberry flavor, use more than you’d ever think necessary or get your hands on flavoring extracts.
We prefer purée and juicing the fruit fresh, but be careful not to get any of the rind, which will taste like jalapeños mixed with grass. The flavor is potent and will ruin all the other flavors.
Vegetable Additions: Whole, Chopped, Puréed, or Juiced
type |
Amount Needed per Gallon (Low to High) |
Must Be Mashed? (Yes or No) |
Notes |
You’ll notice we didn’t provide any ppg for the vegetable chart, and for good reason: You’re not going to get much of a contribution. Aside from carrot and corn (.012–.015ppg), you’re looking at about .08ppg or less. So think of vegetables as a flavoring and not a fermentable. So why mash them? Even though you’ll get little fermentable sugar and mainly flavor, you still need to mash them to convert starch in them to sugar. Otherwise, the starch can provide food for bacteria and increase the likelihood of an infected beer. For vegetables with no starch content (like cucumbers or spinach), those can be added like fruits as juices, purees, or chunks into the secondary!
Aloe vera juice has a very distinctive bitter bite that usually is found in digestifs. It should be added late in the boil to allow the gooey aspect of the juice to dissolve.
No amount of Internet searching turns up a beer made with beans, but that doesn’t mean you can’t make one. Beans are mainly a starch with a bit of protein. That means that a mash can convert the starch to sugar. If you use fresh or canned beans, rinse them well, then smash them up thoroughly before adding them to the mash. Dried beans should be lightly broken up or coarsely milled before adding them to the mash.
Lend a purplish pink (mostly pink) color and a sweet earthy flavor to your beer with fresh steamed beets. Make sure to trim the beet and peel the root before adding.
Carrots are best done either as a juice or as a mash addition to help break up the hard root. Peel the carrots before processing to avoid extra earthiness.
Celery is the vegetable that always gets beaten up in school. That’s a shame, because celery is actually a wonderful vegetable with aromatic properties that puzzle the drinker.
chili peppers |
1/4–4 pieces |
N |
(The number of pieces depends on heat and taste.) Peppers can be tricky to prepare. Go easy until you get a sense of them, and use deseeded, deveined, sliced peppers in the secondary or keg. Go easy to avoid blasting off your friends’ faces.
Corn has a long history in the brewing traditions of the Americas, from the Chicas of South America to modern lager brewing practice. They’re light and sweet with a soft impact, but a big body reduction. Use cornmeal, fresh corn, frozen corn, even corn tortillas or chips (low salt, please).
Cukes have a surprising amount of bitterness in the peel. Juice, washed skin and all. Blend into a light fruity beer for a beery Pimm’s cup!
Lettuce in beer? Yup. It’s been known to happen. Lettuce—particularly darker varieties—carries some potent bitter compounds that really jump out at you. It does take a lot to carry an impact, though, and really: avoid the iceberg.
Believe it or not, English peas are a traditional ingredient in beer, dating back hundreds of years. Either fresh peas or dried split peas can be used. Smash up fresh peas before adding them to the mash. The pods can be used as well as the peas themselves.
This seems like a joke, but potatoes and sweet potatoes are another product that has been used to make beer. Because it’s a hardy crop, you could always count on its availability. A word of warning about making a potato beer: not only does the potato need to be cooked first, but potatoes contain a huge amount of water. You might want to run this as a secondary American cereal mash to control your liquid levels.
pumpkin / squashes |
1/4–1/2 lb |
Y/N |
Everyone’s favorite fall flavor, pumpkin was a staple of the American craft beer scene for years and years before coffee shops got involved. What most people really mean when they say they want a pumpkin pie beer is that they want the mélange of pie spices (cinnamon, nutmeg, allspice, ginger, mace). Pumpkin (and other squashes) are best roasted in an oven to bring out a caramel sweetness. For pumpkins, avoid the common jack-o’-lantern pumpkin and buy pie pumpkins. (As a cheat, canned pumpkin works in a pinch and can go straight into the boil.)
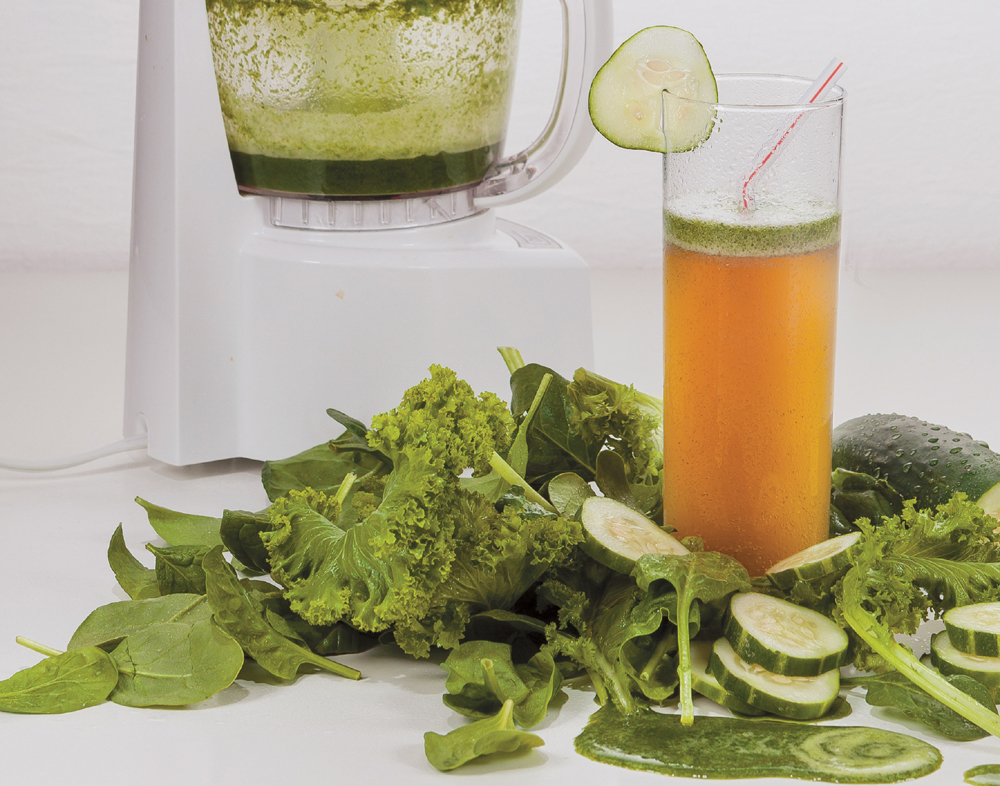
spinach / kale / chard |
1/4–11/2 lbs |
N |
These leafy greens pack a hell of a punch. Not only do they contain assertive flavors, but they also contain a fair amount of minerals. Be careful and give them a sample in a previously created beer first to see if the mineral richness agrees with you.
A popular, citrusy sweet-sour fruit that’s usually sold as a paste and used extensively in Latin and Thai cuisines. Use it at the last minute in the boil to great effect in a pale beer or use more to provide pop in a darker brown beer.
MEAN GREEN BEER
By Drew
Before we leave the world of vegetables, can we talk about the atrocity that’s foisted on the American public every March 17? We know it; you know it: it’s the scourge of green beer. If you’re lucky, it’s Harp with green dye injected into the keg. If you’re not, it’s some outstandingly bad American lager with the same green dye. Walk away from the green dye, people. Instead, take a chance and bulk up a golden ale with some body components like oats or wheat, and then hit it with fresh cucumber, spinach, and kale juice. Add some ginger to pull focus from the green, and voila, Irish eyes are smiling with a real Mean Green Beer.
For 5.5 gallons at 1.057, 27 IBUs, 3.8 SRM, 5.9% ABV
GRAIN BILL
11.0 lbs |
2-Row Pale Malt |
1.5 lbs |
Flaked oats |
1.5 lbs |
Flaked wheat |
MASH SCHEDULE
HOPS
0.50 oz |
Warrior |
Pellet |
15% AA |
60 minutes |
1.00 oz |
Columbus |
|
14% AA |
0 minutes |
YEAST
WY1272 American Ale II
OTHER INGREDIENTS
1 bunch kale
2 bunches spinach
4 large English cucumbers
1 knuckle sized piece ginger, peeled
ADDITIONAL INSTRUCTIONS
On the day of packaging, take all of the extra other ingredients and juice them. Add the juice to the keg or bottling bucket and rack in on top of it. Carbonate to 2.5 volumes and enjoy!
RAID THE SPICE CABINET
While herbs and spices are usually added late in the boil, 5-10 minutes before flameout, we recommend experimenting by adding them to the fermenter or at packaging via a tea or tincture (see page 74). No matter how you add them, think about the effects carefully before adding spices or herbs to a recipe. Just because you like to eat a pickle when you drink beer doesn’t necessarily mean that a pickle beer will be great!
But if you think a pickle beer is what you want, sneak up on it. Start on the low side (1/4 teaspoon for most spices, 1/8 teaspoon for anything particularly pungent) with the herbs and spices. Brew a batch and assess it. Brew again and add or subtract herbs and spices based on what you tasted in the first batch. Our experience is that these additions can be tricky and this is where repeated test batches can really help.
Another word of advice: make sure you’re using fresh herbs and spices! Their aromatic and flavor powers come from volatile essential oils that dissipate over time. Shy away from those packs of brewers’ spices that have sat in your homebrew shop for who knows how long and avoid the grocery store for the same reason. Buy fresh spices from a reputable spice shop like Penzey’s or the Spice House. Whole is preferred over pre-ground for flavor preservation. Grind just before use! You can pick up a cheap coffee grinder to grind the spices into powder if the mortar and pestle is too much work.
Watch out for certain super-potent spice oils like anethole (licorice) and eugenol (clove oil). Both can so easily override other tastes in your beer. In fact, clove oil is used as a dental anesthetic.
Here are several spices you can try:
• Anise is one of the many plants that carry the essential oil anethole, which is perceived by the palate as black licorice. A little goes a long, long way. Extracts work very well here. Note that star anise, which is even more potent and commonly used in Chinese cooking, is a completely different plant.
• Black pepper is one of the most significant spices in history. This Indian spice was the thing kings sent ships around the world to find. Even today it is one of the most widely traded spices globally. It can lend an instant vicious heat to beer, but after a short time aging, the effect of its piperine fades into a deeply earthy flavor.
• Caraway seed is technically a caraway fruit, a close relative of the carrot. Caraway pairs beautifully with rye to invoke the familiar Jewish deli bread.
• Cardamom is a strange little package of seeds within another seed. Cardamom is a warming, supremely aromatic spice that remains subtle and unidentifiable, despite being a key component of Indian cuisine and western Christmas desserts. Christmas ales are the most obvious application, but think of anything you’d want to have an ineffable spice quality—like a completely blasphemous German winter doppelbock. Start with just 0.2 ounce of cardamom and adjust in the next batch if you think the beer needs it. Too much cardamon can make your beer taste like cola!
• Chamomile is the well-known “secret” ingredient of the famous Belgian white beers. Found in both German and Roman varieties, the flavor is of apple and flowers, and it provides a lightly sweet note that helps reinforce the orange of the coriander and orange peel.
• Cinnamon is another spice widely prized and fought over in the past. Today, cinnamon is available in seemingly endless quantities. There are two primary varieties: cassia (Cinnamomum cassia) and true cinnamon (C. verum). Both are evergreen plants that have their inner bark harvested for the potent punch of cinnamaldehyde and ethyl cinnamate. Most of what the world knows as cinnamon is actually the thick and pungent cassia, originally from China. True cinnamon or Ceylon cinnamon is a subtler creature with less direct fire but more complex aromatics. Which you want is up to you! Why not mix them together for greater coverage?
• Clove pieces as we know and love them are the buds of the Syzygium aromaticum tree, and they’re incredibly strong. The primary oil, eugenol, numbs the taste buds; therefore, you really must use clove sparingly. We generally recommend no more than 1/8 teaspoon for 5 gallons as a start.
• Coriander is the fruit of the leafy herb cilantro. It’s one of the fundamental spices of humanity, going back to the Neolithic period. Of the many varieties, the best advice we can give you is to try and find the slightly longer Indian coriander and not the typical grocery store Mexican variety. The latter tends to be less complex and more citrus-flavored.
• Cumin is a parsley cousin with ties to the ancient Greeks. The dried fruit gives no hint of cumin’s powerful impact until it’s crushed. Major components are cuminaldehyde and cuminic alcohol, safranal, and pinene. It is the world’s second most popular spice, only behind black pepper.
• Fennel can be used as both the wispy leaves and the seeds of a fennel plant. The seeds are hardier, and their licorice-like flavor is less likely to get lost. Like anise and star anise, fennel provides a punch of anethole, but it’s not nearly potent as that of anise or star anise.
• Fenugreek is an Indian plant used in multiple dishes, especially curries. In Western food processing, fenugreek seed is used for the chemical soloton (C6H8O3), which is commonly used as a maple substitute.
• Galangal and ginger are both rhizomes of the Zingiberaceae family. You’ll recognize the taste and smell of ginger from Christmas cookies or any Asian cuisine. Galangal is closely associated with Thailand. We put these together because of their close-cousin status, but be aware that the flavors of galangal are stronger when fresh, as galangin is potent raw. However, ginger picks up its potency when cooked or dried, because its supply of gingerol is transformed to zingerone (cooked) or shogaol (dried). Gingerol is a closely related to both capascian (chiles) and piperine (black pepper).
• Grains of paradise are another member of the Zingiberaceae family. The grains are actually seeds that combine an intensely peppery flavor with a hint of citrus. In recent years, they’ve become popular in witbiers. Lightly crush them and toss them in at the end of the boil for a few minutes.
• Jasmine is an intensely aromatic flowering plant found worldwide. It is closely associated with the Chinese, who make a green tea perfumed with jasmine blossoms. If you want to use your own jasmine bushes, take a lesson from the Chinese and harvest your blossoms in the early evening, when they’ve just opened and the aroma is most intense. Since the many compounds in jasmine are particularly fragile, it would be best to avoid a high heat; whirlpool the flowers only in an off-boil kettle of wort. Alternatively, you can find jasmine syrup to use as a late addition to the kettle or even the fermenter.
• Juniper berries, the primary flavor of gin and Finnish sahti, contain a number of oils similar to those found in hops, both the piney pinene as well as the myrcene and limonene found in many American-style hops. Maybe this is why some of us hopheads also like gin!
• Lavender is a wonderfully soothing herb, prized by herbalists as a mild anxiolytic. Despite its calming nature, lavender has a strong flavor; you must use it sparingly to achieve a pleasing effect.
• Lemon verbena, or Aloysia citrodora, is a member of the verbena family, which, like our favorite hops, is rich in citral (lemon/citrus), nerol (fresh rose), and gerianol (floral, like geranium). The leaves carry the oils and perfume the air when bruised, so rub them a little before adding to the kettle or to a tincture. It is also remarkably easy to grow in a container garden.
• Mace and nutmeg are both products of the Myristica fragrans tree. Nutmeg is the seed and mace is the weblike coating that protects the seed. The two spices have similar flavors, though nutmeg is more potent and sweeter, and mace is more subtle. The list of flavor compounds found in the spice includes: camphene, pinene, terpineol, geraniol, safrol, and myristicin. Like cloves, nutmeg also contains a fair amount of eugenol, which can numb the palate.
• Mustard seeds (Brassica nigra, B. juncea, and B. hirta) are black, brown, or white. The characteristic burn that we associate with mustard is from a set of compounds that are activated only in the presence of water. Used whole, their impact is more earth and less fire. Like many other bitter or sharp spices, mustard used to be a common ingredient in beer, a tradition that survives only in a few beers from Belgium.
• Pink pepper isn’t really a proper pepper of the Piper genus. It is the fruit of the Peruvian peppertree. It has a pepper bite, but not the same heat level as black pepper. Pink pepper has a fruiter flavor as well. Historically it has been used to flavor a few different South American indigenous beery beverages, such as the corn-based Chica.
• Rose oil is extraordinarily expensive, because it takes over sixty thousand roses to make just 1 ounce of oil. But homebrewers can either grab a few pounds (1 pound per gallon) of rose petals (from a friendly florist) or hit the nearest Middle Eastern or Jewish market for rose water (add it to taste at packaging).
• Saffron is made of the stigmas of the Crocus sativus. Saffron is an ancient spice that once was one of the most expensive things you could buy by the ounce. It makes sense when you realize that it takes 1 pound of flowers to get 0.2 ounces of dried saffron. Its intense, sweet hay flavor comes from picrocrocin, while the aroma comes from safranal.
PEPPER PILE PALE ALE
By Denny and Drew
Let’s get blazing! Here we’ll combine two of our favorite forms of heat, chiles and peppercorns. The trick to avoid blowing your top and get more sweet pepper bite is to use ripe red jalapenos. We’re also using Szechuan pepper for its lemony citrus character, which will back up the American hop experience!
For 5.5 gallons at 1.055, 30 IBUs, 10 SRM, 5.7% ABV
GRAIN BILL
6.0 lbs |
2-Row Pale Malt |
5.0 lbs |
Munich Malt |
1.0 lbs |
Crystal 40°L Malt |
MASH SCHEDULE
HOPS
0.5 oz |
Warrior |
Pellet |
15% AA |
60 minutes |
2.0 oz |
Crystal |
Pellet |
3.5% AA |
0 minutes |
OTHER INGREDIENTS
1/2 tablet |
Whirlfloc |
10 minutes |
5 |
Ripe red jalapenos, seeded and ribs removed |
0 minutes |
1 oz |
Szechuan pepper |
0 minutes |
1/2 oz |
Black peppercorns |
0 minutes |
1/2 oz |
Pink peppercorns |
0 minutes |
YEAST
WY1056 American Ale or WLP001 California Ale
ADDITIONAL INSTRUCTIONS
• At the end of the boil, turn off the heat and add the chiles and the peppercorns. For easier cleanup, consider adding the peppers to a mesh bag. Chill and leave the chile and peppers in the fermenter.
• Ferment in primary for 2 weeks at 64°F. Package at 2.5 volumes and serve with a slice of Red Jalapeno.
HOP GENEVER OAT ALE
By Drew
One of my favorite memories in Belgium was having a beery lunch at t’Hommelhof in the village of Watou. The restaurant is a palace of biere cuisine and in the middle of what remains of Belgium hop farm country. To close off the meal, I threw back a post lunch digestif of an ice cold hop infused Genever (aka Dutch style gin). Bracing, cool, and refreshing!
For 5.5 gallons at 1.056, 17 IBUs, 5.3 SRM, 5.7% ABV
GRAIN BILL
9.0 lbs |
Pilsner Malt |
2.0 lbs |
Flaked oats |
1.0 lbs |
Caravienne Malt |
MASH SCHEDULE
HOPS
0.5 oz |
Northern Brewer |
Pellet |
8.5% AA |
60 minutes |
1.0 oz |
Styrian Goldings |
Pellet |
5.4% AA |
0 minutes |
OTHER INGREDIENTS
1/2 tablet |
Whirlfloc |
10 minutes |
0.5 oz |
Orange peel |
10 minutes |
1.0 oz |
Juniper berries |
10 minutes |
YEAST
WY1214 Belgian Abby Ale
ADDITIONAL INSTRUCTIONS
• When 10 minutes remain in the boil, add the juniper and orange peel.
• Ferment in the mid 60°Fs and then package with a high carbonation (~3 volumes) to pop the juniper aroma.
BRATTY BRAT BEER
By Drew
This beer was born of a silly commercial that lampooned homebrewers with one crazy brewer offering his buddies a Bratwurst beer. It was meant as an “ohh, look at this wild crazy thing.” Naturally, I took that as a challenge and made this deconstructed bratwurst beer using all the spices of a German brat with hint of bread and grain and spicy rye.
For 5.5 Gallons at 1.057 O.G., 13.8 IBUs, 4.0 SRM, 5.9% ABV
GRAIN BILL
6.0 lbs |
Pilsner Malt |
5.0 lbs |
Wheat Malt |
1.0 lbs |
Rye Malt |
MASH SCHEDULE
Rest |
124°F |
20 minutes |
Rest |
150°F |
60 minutes (raise via decoction) |
HOPS
0.25 oz |
Magnum |
14% AA |
60 minutes |
OTHER INGREDIENTS
1/2 tablet |
Whirlfloc |
10 minutes |
1/8 tsp |
Allspice, lightly crushed |
5 minutes |
1/8 tsp |
Black pepper, lightly crushed |
5 minutes |
1/8 tsp |
Caraway seed, lightly crushed |
5 minutes |
1/8 tsp |
Celery seed, lightly crushed |
5 minutes |
1/8 tsp |
Clove, powdered |
5 minutes |
1/8 tsp |
Ginger, powdered |
5 minutes |
1/8 tsp |
Nutmeg, grated |
5 minutes |
YEAST
WY1010 American Wheat for a neutral profile, WLP380 Hefeweizen IV for a mild German Hefe profile, or WLP410 Belgian Wit II for a spicier finish
ADDITIONAL INSTRUCTIONS
• Take the first quart of runnings and reduce to a cup, allow it to get scary dark to add a bit of smokey complexity to the beer.
• Ferment cool and check spicing. Adjust via tincture.
SAISON GUACAMOLE
By Drew
A huge hit at the National Homebrewer’s Convention, this beer was designed to catch people’s attention. The spice level on this should be restrained—just enough to let you know it’s there, just enough to provide an extra pop, but not enough to keep you away from another glass.
For 5.5 gallons at 1.055, 19.4 SRM, 28 IBUs, 6.2% ABV, 90 minute boil
GRAIN BILL
9.0 lbs |
Pilsner Malt |
1.5 lbs |
Oat Malt |
8.0 oz |
Pale Chocolate Malt |
8.0 oz |
Flaked Rye |
4.0 oz |
Carafa II Special Malt |
1.0 lbs |
Dark avocado honey (added at flameout) |
MASH SCHEDULE
HOPS
0.5 oz |
Magnum |
Pellet |
12.9% AA |
60 minutes |
1.0 oz |
Hallertau Saphir |
Pellet |
4.4% AA |
10 minutes |
YEAST
WLP568 Saison Blend
OTHER INGREDIENTS
1/2 tablet |
Whirlfloc |
10 minutes |
SPICE TINCTURE:
1.5 tsp |
Black pepper, coarsely crushed |
1.5 tsp |
Cilantro |
1.5 tsp |
Coriander, coarsely crushed |
1.5 tsp |
Dried chile peppers, coarsely crushed |
1.5 tsp |
Cumin, coarsely crushed |
2 |
Limes, zested |
1.5 tsp |
Sun dried tomatoes (not the oil-packed variety!) |
ADDITIONAL INSTRUCTIONS
Add everything for the spice tincture to 3/4 cup of vodka. Soak for one week, shaking frequently. Filter twice through coffee filters and add to the beer at packaging.
• Sichuan peppercorn is another not-pepper! (You should have a sense now of how valuable pepper was, because so many things were named pepper.) The Sichuan peppercorn is the seed of the Zanthoxylum simulans and Z. bungeanum. Oddly, instead of using the seed, we use the seed coat, which imparts a light lemony flavor and an electrical numbing tingle on the lips and tongue. This is thanks to an unusual compound, hydroxy alpha sanshool, that appears to bind with pain receptors in the mouth. Sichuan peppercorn was banned for nearly forty years from the United States due to worries that it could carry citrus canker and threaten U.S. agriculture. It is now required to be heat-treated before importation.
• Thyme, or plants of the Thymus genus, are a common component in many Western cuisines and were thought by the ancient Greeks and Egyptians to provide courage and good health. Thyme contains our old friend myrcene, linalool, and a new oil, thymol. It is closely related to mint and carries a potent aroma that depends on the variety. When you think of a vague herb aroma, thyme is the hallmark.
• Common wormwood, or Artemisia absinthium, is infamous in alcohol production circles for being the magic ingredient in the anise-flavored liquor known as absinthe. It contains a compound, thujone, which acts similarly to THC. However, you’d have to add a lot in order to extract enough of the substance to have any effect and would become sick from other causes before achieving a high. Wormwood is an extraordinarily bitter plant that has been used in gruits and other beer bittering concoctions for centuries. You can think of an ounce being the equivalent of 20–30 IBUs when added at 60 minutes.
COFFEE OR BEER? WHY NOT BOTH?
For coffee aroma, you have a couple options. You can do the coffee version of dry hopping (dry beaning?) by adding 4–5 ounces of coarsely cracked coffee beans in a muslin bag to the fermenter after the activity of primary fermentation has subsided. Start tasting after about 4–5 days. Once the beer has the level of aroma you’re after, either remove the beans or rack the beer.
You can also add brewed coffee when you package the beer. Brew the coffee stronger than you normally might. Cold brewing is favored by some homebrewers. Pour four 2-ounce samples of the beer (before adding your priming sugar if you’re bottling). Add a different, measured dose of the coffee to each sample and taste critically. Maybe even have someone else taste, too, so you can find a consensus amount. Then scale the amount of flavoring in the sample you prefer up to the size of your entire batch.
Drew: If you want to avoid heat altogether, take a page out of my morning breakfast routine. The night before, mix 1 cup of coarsely ground coffee with 2–3 cups of cold filtered water in a French press. In the morning (or 8 hours later), press the coffee and pour off the newly saturated coffee concentrate. For breakfast, that gets poured over ice and diluted with a little water, but for the beer, it goes straight into the carboy. The advantage of the procedure is that cold water extraction avoids all of the harsher, bitter compounds and leaves you with the sweeter, fruity coffee tones.
THE NOT-SO-BORING WORLD OF VANILLA
Vanilla can be used in several different forms. You should always start by obtaining the best vanilla you can find, whether it’s vanilla beans or extract. Beans should be moist, pliable, fat, and juicy. We recommend that you buy beans online because they are generally cheaper and of higher quality than anything you’ll find in the grocery store. Another bonus: You can usually find Grade B beans, which aren’t as pretty as Grade A but work dandy. They’re a lot cheaper, too—usually around a third of the price!
For extracts, the way to go is the homemade tincture recipe on page 179 with the best beans you can find. However, if you go store-bought, you need to look for the more expensive varieties made with just vanilla bean. Here are a few warning signs for extracts you should avoid:
• Avoid ingredients other than vanilla, such as fake aromas or flavors.
• Avoid extracts made with wood byproducts. Although some of these may be good, a lot of them are not. Do some research and be prepared to audition different forms from different sources to make your choice.
• Avoid extracts that don’t list vanilla bean, or that explicitly list tonka bean. Tonka is a fake vanilla flavor that also contributes coumarin, a powerful liver toxin.
Okay, so you know all about quality. It’s time to move on to the exciting world of vanilla varieties. Each of the bean types that follow offers a different flavor profile that you can use to generate a different effect. Even better, you can blend them in different ratios to achieve yet more complexity. Imagine a Belgian tripel spiced with a touch of Ugandan vanilla and a big splash of Tahitian vanilla. With a cool ferment you’d end up with a light vanilla and chocolate cake aroma topped with flowers. If that doesn’t say special occasion, what does?
• Bourbon vanilla, made from the Vanilla planifolia orchid, is the classic when you think vanilla. It’s a big potent blast of vanillin, the main active flavorant associated with vanilla. The bold character makes it perfect for anything that you want people to smell, taste, and immediately say, “Vanilla!” Historical note: The Bourbon name has little to do with Bourbon whiskey. Both Bourbon County, Kentucky, and Bourbon Island (Réunion Island off the coast of Madgascar) get their name from the French Royal House of Bourbon.
• Mexican vanilla is made from the same V. planifolia orchid as the Bourbon vanillas. The Mexican vanilla flavor is lightly smoky and not as buttery as the Bourbon variety.
• Tahitian vanilla comes from the V. tahitiensis orchid. Tahitian vanilla is softer and more perfumy than Bourbon, with a strong floral note that makes it a favorite of pastry chefs for subtle applications. This is the one you reach for when you want your tasters to be puzzled and pleased.
• Ugandan vanilla is also grown from a variety of V. planifolia. The Ugandan beans are considered the world’s most potent vanilla. They provide an additional tone of chocolate from the dark, leathery bean.
TAHITIAN BLISS TRIPEL
By Drew
One of my favorite commercial beers is Allagash’s Curieux, a bourbon barrel aged tripel. This beer is a deconstruction of wood aging, since a chief contributor to wood aging is Vanillin, the compound that smells and tastes like vanilla. By using straight vanilla, we can get that impact without the rest of the flavors, like bourbon. Using the Tahitian vanilla gives you a softer, more floral sensory experience than the bold Bourbon vanillas.
For 5.5 gallons at 1.075, 33 IBUs, 4.7 SRM, 8.2% ABV
GRAIN BILL
13.5 lbs |
Belgian Pilsner Malt |
1.0 lbs |
Sugar |
8.0 oz |
Biscuit Malt |
MASH SCHEDULE
HOPS
0.5 oz |
Herkules |
Pellet |
17% AA |
60 minutes |
YEAST
WY3787 Trappist High Gravity
OTHER INGREDIENTS
1/2 tablet |
Whirlfloc |
10 minutes |
2.0 oz |
Homemade Tahitian Vanilla Extract (see page 179) |
ADDITIONAL INSTRUCTIONS
• Mash the grains as normal and collect the runnings in the boil kettle. Add the sugar to a nylon sack and suspend in the boil to dissolve. Otherwise boil and chill as normal. Chill the beer to 64°F before pitching and keep the fermentation below 66°F to suppress excessive yeast character.
• When kegging or bottling, add the vanilla extract just before carbonating.
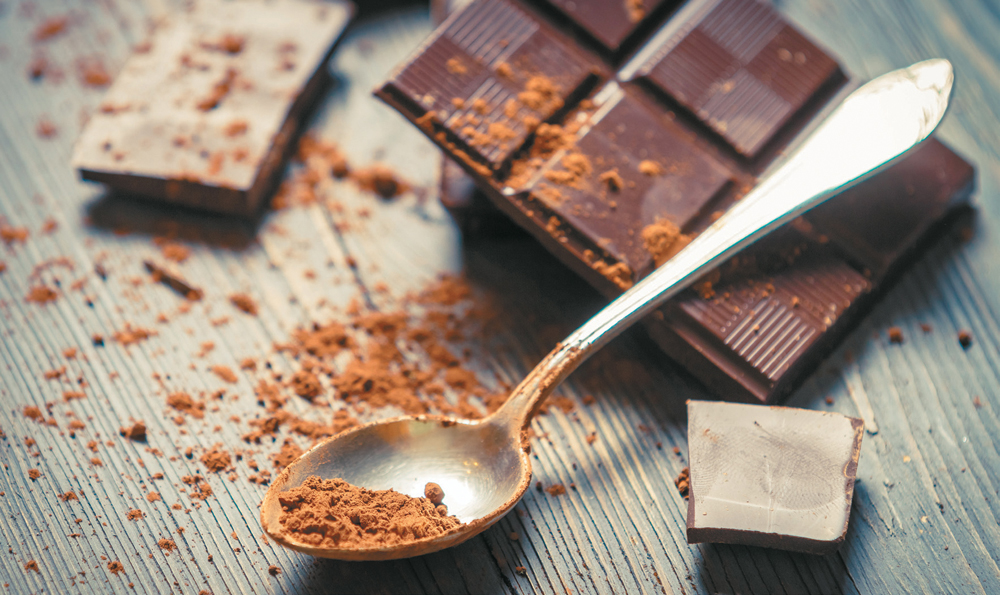
BEER AND THE CHOCOLATE FACTORY
Chocolate can be used in several different forms. You can use cacao nibs, cocoa powder, or chocolate extract. Each has its advantages and disadvantages. Processed chocolates, including baking chocolate, candy bars, and chocolate chips, contain oils. If you really want to use them anyway, a long, vigorous boil is recommended to volatilize as much of the oils as possible.
But why worry about oils? Oils and fats can cause head forming problems—no bubbles and foam. Chocolate has a ton of fat (cocoa butter), and we’ll want to do everything we can to avoid it.
• Cacao nibs are the crushed seeds from a cacao plant. They can be added to the mash or boil, although adding them to the fermenter may be the best choice. If you use them in the boil or mash, make sure to account for the bitterness they add. It may take a couple test batches to find a balance between the hops and the cacao. If you decide to use cacao nibs in the keg or fermenter, start with 4 ounces per 5 gallons of beer. They should stay in the keg or fermenter for at least a couple of weeks, but there are reports of successfully leaving them in for up to eight months. Drew: For the record, I think anything over 2 weeks is begging to leech the harsh tannins carried in nibs.
QUATTRO CRAZY
By Drew
Since anhydrous caffeine doesn’t like dissolving in cold liquid, boil some water and dissolve the powder in it along with the drink mix. Throw the toxic sludge into the malt liquor, hold your nose, and mix incredibly well. Remember that caffeine powder is dangerous!
For 5.5 gallons at 1.112 OG, 30 IBUs, 6.0 SRM, 12.0% ABV
GRAIN BILL
20.0 lbs |
Domestic Pilsner Malt |
5.0 lbs |
Flaked Corn |
MASH SCHEDULE
HOPS
0.75 oz |
Magnum |
Pellet |
11.6% AA |
60 minutes |
YEAST
WLP833 German Bock Yeast or WLP855 Zurich Lager Yeast if you can ferment lagers (or switch to WLP001 California Ale or WY1056 American Ale for an ale)
OTHER INGREDIENTS
1/2 tablet |
Whirlfloc |
10 minutes |
|
Yeast nutrient |
20 minutes |
Drink mix packets in the flavor of your choice, to taste 4.2 g (or less) Anhydrous caffeine powder
• Ground cocoa will add a dark, bitter flavor to the beer with less perception of chocolate flavor than using nibs. Again, you want to account for how it will interact with the hops. Try adding 8 ounces of cocoa powder to the boil. It will likely leave some sludge in the bottom of your kettle, but most of the powder will dissolve in the wort. One of the advantages of using powder is that it is almost always defatted. That means you won’t have to deal with the oils in your beer.
• While you might not want to hear it, chocolate extract is probably the best way to obtain chocolate flavor and aroma. It’s even used by Rogue Ales in their award-winning chocolate stout. Be sure you get a good-quality chocolate extract to avoid strange flavors. The Star Kay White brand is very good and is available online. To determine the amount to put in your bottling bucket or keg, use the technique outlined on page 190 for using liquor.
BUZZ BUZZ GOES THE BEER
Two of our favorite beer ingredients, chocolate and coffee, share a common bond. It’s the stuff that makes the world go round: caffeine. Here are some fun facts:
• 57 percent of Americans drink coffee.
• 62 percent of Americans drink alcohol.
• 100 percent of you reading this book like beer!
From these facts, we can infer that you love to get your buzz on. Judging by the continued popularity of Red Bull and Vodka cocktails, a number of club-goers agree. And what would drinking be without some kind of moral panic?
Back in 2010, America found just that when Four Loko suddenly became popular. Four Loko was a 12 percent malt liquor that came in Grape, Fruit Punch, Watermelon, and Blue Lemonade. The kicker was that it also contained the caffeine punch of two cups of coffee. All of this in a 24-ounce tall boy earned it the nickname “Blackout in a Can.” The worry, hospitalization, and one death caused various government agencies to ban the product. Finally, the FDA stepped in and forbade the combination of alcohol and caffeine for commercial sale.
Of course, everyone can still go and buy caffeine powder online. If you truly miss the fun of something like Four Loko, then here’s your chance to give it a shot. Last caffeine fun fact: Powdered caffeine is quite literally one of the most bitter things you can ingest and is used as the gold-standard bitterness reference.
Warning: Pure caffeine powder is dangerous, and it’s a cheap, quick way to cause heart issues, including the ever-popular death due to ventricular fibrillation. Use a really accurate scale, and don’t go overboard. Save the macho for the hops. Use 4.2 grams in 5 gallons to mimic the published levels of caffeine in fully leaded Four Loko (156 milligrams in 23.5 ounces). Remember the FDA’s recommendation is 200–300 milligrams of caffeine daily for adults.
WEE SHROOMY
By Denny
This beer uses a couple of different experimental techniques. One is the boiling down of a gallon of first runnings to a thick syrup, then adding it back to the main wort to enrich the flavor. The other is the treatment of the mushrooms. While traditionally the way to use adjuncts like this is to soak them in vodka and add a tincture, I found in my trials that the vodka added a harshness that conflicted with the smooth, malty character of the beer. So I just add the mushrooms themselves instead! Between the high alcohol content of the beer, the low pH post-fermentation, and the freezing of the mushrooms, I have never had a problem with the mushrooms infecting the beer. If you’re a worry wort (pun intended), you can give the chopped mushrooms a very light spray of Star San, but make sure they aren’t wet going into the freezer. So, with thanks to Randy Mosher and Scott Abene, here’s Wee Shroomy.
For 5.5 gallons, 26 IBU, 15.9 SRM, 9.6% ABV
GRAIN BILL
20 lbs Simpson’s Golden Promise Malt (see Notes)
4 oz Roasted Barley (450°L)
HOPS
1.1 oz |
Northern Brewer |
Pellet |
10% AA |
45 minutes |
OTHER INGREDIENTS
1/2 tablet |
Whirlfloc |
10 minutes |
2 lbs |
Chantrelle mushrooms (see Notes) |
YEAST
WY1728 Scottish Ale in 3-qt starter
INSTRUCTIONS
• Mash for 90 minutes, vorlauf until free of grain pieces, then run off wort to boil kettle.
• Remove 1 gallon of first runnings to a separate pot for boil-down. (See Notes.)
• Boil for 90 minutes. You can add the wort previously removed for the boil-down at any point during the main wort boil.
• Chill to 55°F–58°F. Pitch decanted yeast starter.
• Aerate well with the method of your choice.
NOTES
• This is a high-gravity beer, and aeration is crucial to a good fermentation. Ferment at 55°F until final gravity is reached. This could take 2–4 weeks. When final gravity is reached, add 2 pounds of prepared chanterelle mushrooms (see note) to a sanitized secondary container and rack the beer onto the mushrooms. Leave the mushrooms in for 2 weeks, then transfer the beer to another container for cold conditioning. Condition at 35°F–40°F for at least a month. Keg or bottle with a moderate carbonation level.
• While this recipe can be made without Simpson’s Golden Promise malt (and I’ve done that several times), the results are so much better using Golden Promise that I urge you to seek it out and use it for this recipe. Between the Golden Promise and the chanterelles, this is not an inexpensive beer to brew, but the results are worth every penny you spend.
• For the boil-down, remove 1 gallon of the first runnings to a separate pot. Boil until the wort is reduced to a quart or less. It should be almost a syrup by the time you get done. Add to the boil kettle during the main boil, before chilling the wort.
• For the mushrooms, thoroughly brush the dirt off 2 pounds of chanterelle mushrooms. Do not wash them, or if you must, use as little water as possible. Roughly chop the mushrooms. At this point, you can give them a light spray of Star San if you wish, but make sure the mushrooms are very dry. Put them in a vacuum-sealed bag, seal it, and freeze the mushrooms for at least a week. Remove the mushrooms from the freezer at least a day before adding them to the beer. Put the mushrooms and any liquid in the bag in a sanitized secondary container and rack the beer onto them.
• Depending on what your water chemistry is like, you may need to add some calcium chloride (CaCl2) to the mash and/or kettle. Shoot for a total of about 50 ppm each of calcium and chloride.
• If you have access to other varieties of mushrooms, try a porter with candy cap mushrooms. Use the same mushroom procedure I describe for the Wee Shroomy and apply it to your favorite robust porter recipe.
BECAUSE I’M A FUN GUY WITH DENNY
When I was a new homebrewer, I was like a lot of other homebrewers in one respect: I started thinking about brewing beer using any flavor that I found appealing. What I hadn’t learned at that point was to think about how that flavor might work in a beer. Consequently, I ended up making things like a porter with molasses and spruce tips in it, among other things. My main recollection of that beer is that it tasted like menthol smells.
But one weird combination I had read about really worked. Randy Mosher had a recipe called Nirvana. It was a wee heavy Scotch ale that had chanterelle mushrooms added to it. Living in the Pacific Northwest, I had already developed a love of chanterelles. They have an aroma with notes of apricot and a rich, sweet flavor. I could almost taste the combination in my mind. And I was right. Well, really, Randy was right. The malty wee heavy and earthy, apricot-y chanterelles seemed like a combination of flavors that was meant to be. I also found that when I mentioned this beer to people, the reactions went from mild amusement to outright disgust. Oh, ye of little faith!
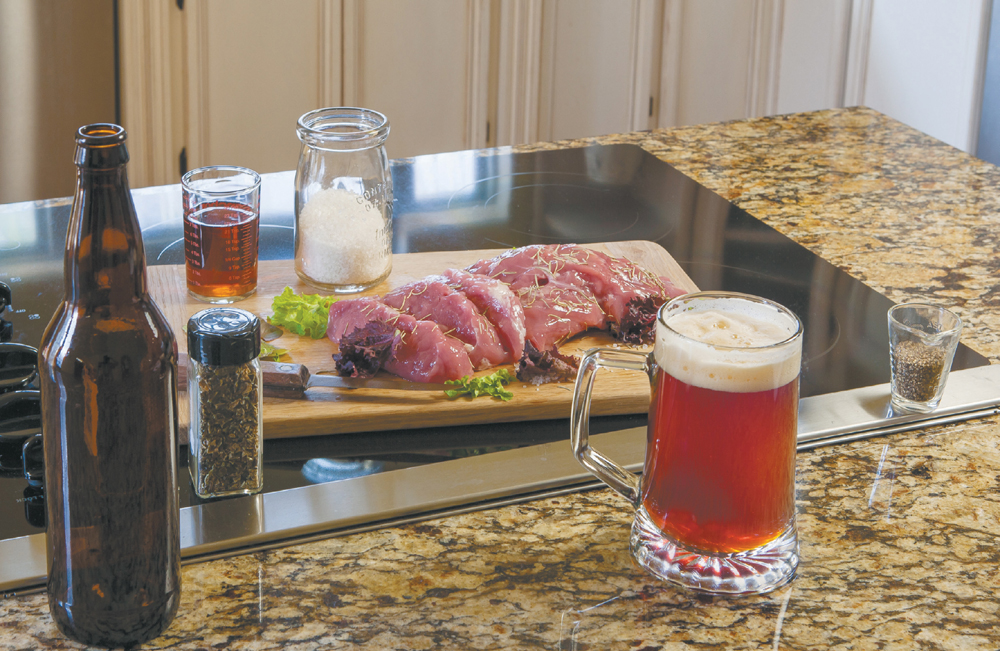
BREWING WITH MEAT
We racked our brains to come up with a joke to start this section. We thought about meat puns, meat double entendres, and meat stories. Then we realized that the joke is brewing with meat!
For years Denny has run an Iron Chef–type brewing competition for his homebrew club. Teams of brewers show up with equipment and basic ingredients for brewing and are given a secret ingredient to incorporate into their beers (the secret ingredient is often not something they’d normally use in a beer). He had joked for several years about giving the brewers pork chops as a secret ingredient. It was strange enough to amuse people, and it was obvious that no one would ever brew with pork chops. Right?
One club member, Jeremiah Marsden, took the joke seriously and made a batch of beer he called “Pork Soda.” Jeremiah is apparently an otherwise sane person, but you can see his recipe and comments on the next page.
PORK SODA
By Jeremiah Marsden
I wanted the essence of pork chop to come through—savory, herbal, and smoky. So I chose what is basically a brown ale with fairly low IBUs as a base. The pork chops were seasoned with black pepper, sage, and rosemary and then grilled. They were added only to the mash. The grain bill included smoked malt to enhance the smoky grilled flavor, some darker crystal, and pale chocolate. Black pepper, seeds of paradise, and sage were added at the end of the boil, and then a sage-vodka tincture was added in the secondary. It was a nice savory beer; the sage came through very well, as did the light smoke. Make sure to mash high to enhance the malt, since the smoke and herbs dry it out a bit.
For 5.5 gallons at 1.055, 27 IBU, 6.3% ABV
GRAIN BILL
8.25 lbs |
2 Row Pale Malt |
1.65 lbs |
Cherrywood Smoked Malt |
1.1 lbs |
Caramel/Crystal Malt 40°L |
4.0 oz |
Caramel/Crystal Malt 120°L |
4.0 oz |
Chocolate Malt (350 SRM) |
4.0 oz |
Pale Chocolate (170 SRM) |
4.0 oz |
Special Roast (50 SRM) |
MASH SCHEDULE
HOPS
2.2 oz |
Tettnang |
Pellet |
2.90% AA |
60 minutes |
0.75 oz |
Saaz |
Pellet |
2.20% AA |
30 minutes |
0.75 oz |
Saaz |
Pellet |
2.20% AA |
2 minutes |
OTHER INGREDIENTS
1.00 lbs |
Pork chops |
5 minutes |
2.00 oz |
Grains of paradise |
5 minutes |
1.00 oz |
Ground sage |
5 minutes |
0.50 tsp |
Black peppercorn |
5 minutes |
2.00 oz |
Ground sage |
Secondary, 5 days |
YEAST
WY1450 Denny’s Favorite in 2-qt starter
INSTRUCTIONS
Chill to 62°F–65°F. Pitch decanted yeast starter. Aerate well with the method of your choice. Ferment at 62°F–65°F for approximately 1–2 weeks. Transfer the beer to a sanitized secondary fermenter and add 2 ounces sage. Let the beer sit for 5 days, then bottle or keg. Use sugar or force-carbonate to about 2.5 volumes of CO2.
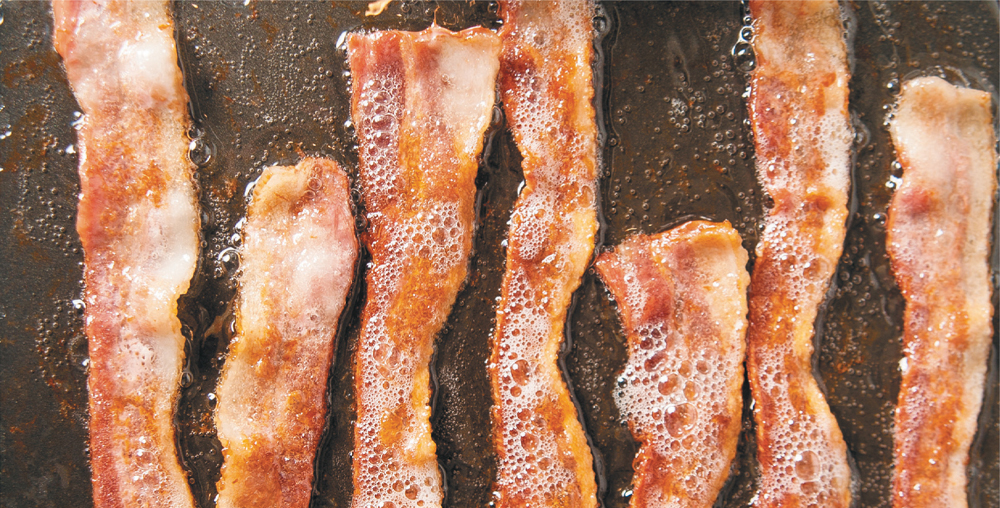
BACON HELLES
By Charlie Essers
Sage of the ages, Homer Simpson, when told that ham, pork chops, and bacon all come from the same animal expressed disbelief that such a magical animal could exist. Out of the three, bacon seems to be everyone’s favorite ingredient, and that means you have to find a way to get it into a beer. Charlie Essers, aka Push Eject of the Brewing Network, found a clever way of safely adding bacon to his Helles recipe. The bacon itself was baked to ensure even cooking with no charring. (Since the Helles is a delicate beer, any char would translate into an unpleasant, in-your-face burned aroma.) The bacon wasn’t added directly to the beer either; it was crumbled and soaked in vodka for a few days first to dissolve the bacony essence. The resulting tincture was then added to a half portion of the helles to allow Charlie to serve both the regular Helles and Schweinchen Helles at the same time.
For 5.5 gallons at 1.050, 18 IBUs, 4 SRM, 5.0% ABV
GRAIN BILL
10.0 lbs |
Weyermann Pilsner Malt |
12.0 oz |
Munich Malt |
4.0 oz |
Melanoidin Malt |
MASH SCHEDULE
HOPS
0.3 oz |
Magnum |
Pellet |
14% |
60 minutes |
YEAST
WLP820 Oktoberfest Lager
OTHER INGREDIENTS
2 Strips of bacon, thick cut (see Additional Instructions)
ADDITIONAL INSTRUCTIONS
• Chill the beer to about 50°F before pitching a large (1/2 gallon or more) starter. Allow the beer to ferment in primary for 2 weeks at 48°F-50°F. Raise the fermentation temperature to 65°F for 2 days and then slowly lower to 35°F for 4 weeks.
• Create the bacon tincture by cooking the bacon on a rack in the oven at 320°F for 40–50 minutes or until perfectly crispy (but not burnt!). Pat off the grease and allow it to cool. Crumble the bacon and cover with the vodka. Shake every day until packaging the beer.
• On packaging day, filter the bacon tincture through a sieve and coffee filter and add to the keg or bottling bucket. Proceed as normal.
MEAT IN HISTORY
Now before you run away, thinking we’re being silly for the sake of being silly, meat in fermented beverages has great historical precedence. If you search online, you’ll find recipes for Cock Ale, which was made in Britain around the 1600s and 1700s. The recipe calls for ale to be boiled with an old rooster, fruits like dates and raisins, sack (sherry), and spices like nutmeg and clove. It was considered a fine drink with medicinal qualities. Also, some cider makers used to throw raw pork sides into their ciders when the ferment had gone wrong. Turns out that what these brewers had stumbled on before they understood it was the power of protein and the clarifying impact of collagen and gelatin.
The introduction of the meat also added valuable amino acids that allowed the yeast to rise up and do their thing more effectively. (Remember, this is one hundred to two hundred years before yeast was even recognized as a key cause of beer.) These guys weren’t carefully growing up pure cultured yeast starters with ideal cell counts, high viability, proper nutrition, and so on. They were either using the stuff from the air or stuff that lived in the vats or from previously fermenting beer. All of it was less than healthy and needed all the help it could get. Yeast exposed to meat fermented more strongly, producing a drier, clearer ale that would be rated as fine.
DIGBY’S COCK-ALE, MODERNIZED
By Drew and Denny
Sir Kenhelm Digby may have invented the modern wine bottle and been a strange enchanting figure of the English religious civil wars, but he didn’t have the knowledge to fear raw chicken like we do—so in his honor we present this beer.
For 5.5 gallons at 1.080, 42 IBUs, 12 SRM, 8.3% ABV
GRAIN BILL
14.00 lbs |
Maris Otter Malt |
1.00 lbs |
Crisp Brown Malt |
1.00 lbs |
Weyermann Rauch Malt |
MASH SCHEDULE
HOPS
1.0 oz |
Target |
Pellet |
11% AA |
60 minutes |
YEAST
WY1275 Thames Valley
OTHER INGREDIENTS
5.0 lbs |
Bone-in chicken parts |
2.5 lbs |
Raisins |
6.0 oz |
Dates |
1/4 |
Nutmeg, grated |
1 |
Mace |
2 750ml bottles |
Sweet sherry |
ADDITIONAL INSTRUCTIONS
• After primary fermentation, take the chicken and bring to a gentle boil for 2 hours to make a broth and make everything, including the bones, soft.
• Smash the chicken bones with a cleaver and throw the chicken into a food processor along with the raisins, dates, spice, and 1/4 bottle of sherry. Do this in batches according to food processor size. Create a rough mince by pulsing the mix several times. Make it resemble a sticky ground beef.
• Add the mix and the rest of the wine to a bucket and rack the beer onto the mix. Let age for a week before racking off and packaging as usual.
As for recreating this fine ale today, you’ll have a big problem. Commercial birds aren’t allowed to get old. The average age of a factory raised bird is about 6 to 7 weeks. Compared to a hen or rooster of the Cock Ale period, that’s insanely young. A rooster destined for the pot would be a few years old. And that age is important! As the bird ages, the meat becomes tougher and laden with connective tissue—the home of collagen. It’s this collagen and the gelatin from the bones that aids in the clarification of the beer. If you can find a stewing hen, you’ll be much closer but still a little off. Stewing hen breeds are usually birds raised for egg laying, but when their productivity dips (after about 20 months), they consume more feed than their egg output warrants, and off they go, ready for the pot.
PEANUT BUTTER
If you want to approach the fringe, how about a peanut butter beer? Well, beer aficionados, beer judges, and Cicerones will all tell you that the faintest trace of fat in a glass absolutely murders the head of a beer, and hence your glasses need to be “beer clean,” which involves secret chants, powerful chemicals, and lots of hot water. (Okay, really just a solid scrub with a nonsoap cleaner and lots of rinsing and air drying.)
For that reason, adding incredibly fat-laden peanut butter is probably not the world’s best idea. There are liquid peanut butter flavorings available. However, they lack the classic peanut butter richness. But now there’s a dried, defatted peanut butter powder called PB2. Developed for culinary and dietary purposes, it is 98 percent fat-free. It’s meant to be rehydrated with water or yogurt to create a thick, peanut-butter-like concoction. Brewers of the Brewing Enthusiasts of the Antelope Valley Region (BEAVR) homebrewing club gained attention a few years back with the Chocolate Covered BEAVR Nuts recipe that used PB2. For that, they dump a few jars of the stuff into the boil kettle and let it boil for a few minutes.
MARY MEET JANE
With the rise of medical marijuana, and even recreational marijuana, in a number of states, apparently homebrewers have decided that the thing to do is combine their herbal medicine with their homebrew. After all, hops and marijuana are biological cousins, both being part of the Cannabaceae family. (Incidentally, so are hackberry trees. Who knew?)
Now, obviously, there are many, many aspects of the government and society that have a rather unhappy view of these sorts of activities, so proceed under that veil of warning. Neither of us have actually done this, but we’re sick of answering the question online. So here’s our response: Umm, don’t. It’s a waste of everything and bound to get you in trouble with someone. The results reported back by those foolish enough to do this via dry hopping or tinctures concur that it’s not worth the result and the taste is pretty nasty. If you medicate, we recommend enjoying all your meds in their prescribed forms.
PEANUT BUTTER JELLY TIME
By Drew
Okay, let’s take that peanut butter idea a step further and turn it into a peanut butter and jelly sandwich. Using a fruity English yeast to ferment out a crispy, toasty brown ale base gets you a jammy, fruity beer. Borrowing a technique from IGOR Donald Boyle, I soak a 12-ounce bag of PB2 in the highest-proof neutral grain spirit I can find, like an Everclear or 151, for a few days. Then it’s just a matter of adding the slurry to a keg, racking the beer on top, and shaking it to mix. Let it settle cold for a week and then rack to a clean keg. Pure peanut butter and jelly time!
For 5.5 gallons at 1.058, 28 IBUs, 8.1 SRM, 5.7% ABV
GRAIN BILL
9.5 lbs |
Maris Otter Malt |
2.5 lbs |
Rye Malt |
8 oz |
Crystal 55°L |
4 oz |
Aromatic Malt |
MASH SCHEDULE
HOPS
0.75 oz |
Magnum |
Pellet |
11.8% AA |
60 minutes |
YEAST
WLP002 English Ale
OTHER INGREDIENTS
12 oz |
PB2 defatted peanut butter powder |
6 oz |
150 proof neutral grain spirit |
ADDITIONAL INSTRUCTIONS
On brew day, blend the PB2 and spirit and store in a jar. After primary fermentation, add the PB2 slurry to a keg and rack the beer onto it. Age for one week on the PB2 before racking and carbonating in another keg.
CANDY IS DANDY, BUT LIQUOR …
Since the discovery of distillation in the ancient Middle East, human kind has discovered a number of different hard alcohol preparations with different flavors, different impacts, etc. There’s even a whole industry built around the idea of delivering booze without you realizing you’re drinking it (see the five thousand varieties of flavored vodka on the shop of your liquor mart). When it comes to brewing, think about what flavor you really want to promote with a booze addition. Is it a high heat and burnt sugar, like rum? Is it a fruit flavoring like raspberry? Or maybe you want to capture the sweet almond flavor of amaretto? Here are a few rules of thumb:
• Avoid the white spirits. They tend to be easily lost in the mad flavor rush of a beer.
• Don’t reach for the top shelf unless there’s a very specific flavor you’re aiming for. People will be hard pressed to tell the difference between Pappy Van Winkle and Ten High Bourbon when it’s put into a brew.
• Add the booze when you’ll lose the least from it—meaning in secondary or at packaging.
• Make sure to give any sweet liqueurs a chance to either ferment out or keep the beer cold after introducing the sugar to avoid it fermenting out.
When using liquor as a flavoring, you can figure out the additional alcohol content as follows. Take the amount of liquor you add and multiply by the alcohol content of the liquor. So, if you add 500 ml of 80 proof (40 percent alcohol), you can think of it as 40 × 0.5 liters = 20 points. If you are adding it to a 5-gallon (19-liter) batch that is 7 percent alcohol, the beer already has 7 × 19 = 133 points. Add them together and you have 19.5 liters with 153 points, which works out to 153/19.5 = ~7.85 percent alcohol in the final batch. The formula is:
Breaking the equation into steps: