
The horse is among the most popular animals to draw. It’s also challenging for many beginning artists. Though I used to feel the same way, I now find the horse one of the easier animals to illustrate. Once I learned and understood horse anatomy, and it really made sense to me, could I construct the horse body as easily as if I were playing with a set of blocks. Don’t worry, you can, too.
With horses, nothing is hiding their anatomy. It’s all out there for everyone to see—with no fur or fat covering it up and making it a mystery. This gives artists a distinct advantage. Once you know where everything goes, anatomically, you can see the evidence of it on the animal just by looking at it.
The common mistake people make when drawing the horse is beginning with too complex a shape. But you can draw the overall shape of the horse’s head with just a few lines. And, once that’s in place, the rest is just a matter of “carving” and shaping.
Like the dog, the horse has an elongated head with a pronounced muzzle that is often easier to capture in the side view, so we’ll start with that.

Start with what is, basically, a tapered rectangle. The eye is an almond shape and is angled vertically.

“Carve” contours into the underside of the head and jaw. We do this because this is where much of the “action” is on the horse’s head.

Next, delineate the brow. Then, start to tweak the nostril and mouth area. Note that the horse has a visible overbite that must be indicated. Now, after barely starting, you’re already seeing your drawing start to take shape. By drawing into the initial rectangular shape, rather than drawing outward from it, you’re much less likely to go wrong with the proportions.

Note that the nostril isn’t a circle but an irregular oval. The contours around the eye circle back around toward the nose. A small bone above the eye turns back toward the ear and blends back into the head, causing a deep indentation right above the eye that’s visible on all horses. The arrows in the sketch indicate these things.

Add some finishing details to the mare and to the eye.

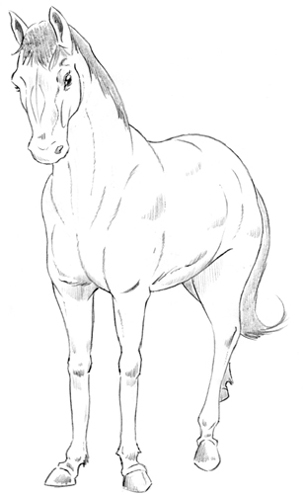
In the front view, you can see how long and thin the horse’s head actually is. This angle is tailor-made for a precise step-by-step approach. Of course, you can always draw things more loosely if you’d like, but if you want a sure-fire method to learn the front view, try the shapes and proportions here.

Start with two simple overlapping diamond shapes.

In the front view, you can see just how far to the sides of the head the eyes fall—almost past the edge of the head. Draw connecting lines to connect the two diamond shapes together.

With a wider forehead and nostrils, the head is now beginning to take shape.

In this step, begin to add the details, like the large lip, and fill out the muzzle.
The horse’s face is long, and without any markings there is a lot of empty space. In order to add some visual interest, I like to add a ring around the muzzle or a spot on the forehead.


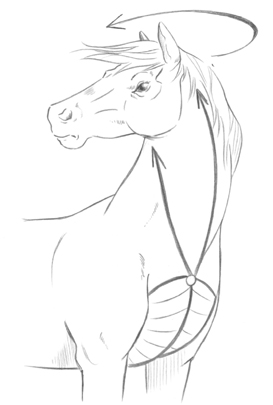
This is a striking head angle for the horse, primarily because it highlights the sweeping way in which the neck curves as it attaches to the head.

It’s crucial to sketch in the center line here to maintain the balance of the shape and help with locating the features. The two short diagonal lines that converge at the center line denote the different plane of the forehead.

Since we’re looking down slightly on the horse in this view, the eyelid is visible.

The neck attaches high on top of the head.

The stretched oval in the middle of the horse’s face is a good guideline for the interior contour lines of the bridge of the nose, which will be visible in the final drawing.

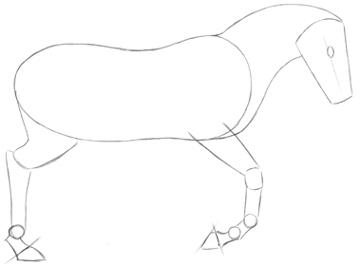
Now that the drawng looks like a horse, we begin to add the details to turn the basic construction into a drawing. Define the contours, add details, and refine the lines with subtle curves.

Horse anatomy should remind you a great deal of the dog anatomy we covered previously. As you start to notice the similarities across the range of species in this book, you’ll develop the intuitive understanding necessary to draw animals without having to constantly stop and refer to anatomy books.
To represent the contours of the horse’s body, it helps to look at the lines of the muscles—what I call the “line flows.” These line flows indicate the way the muscles show through to the surface of the animal, creating the contours we see. They’re affected by the way the horse moves, bends, twists, and carries itself—and by gravity.

The long torso results in considerable sway in the horse’s belly.

Underlying bones and muscles, as shown above, create the contours seen on the surface.

The lines of the neck flow into the chest. The line of the neck continues down to become the center line of the chest.

For the final drawing, break up some of the connected lines you drew in the previous step. The viewer’s eye will connect the dots without us having to do it for them.
The horse’s neck is thick and impressively muscular. The contours resulting from these muscles run down the length of the neck and are apparent to the eye. They also add to the grace of the neck, so use them to your advantage by letting them flow from the neck to the chest. When one line connects seamlessly to another, the result is always pleasing to the eye. Horses also have thick and clearly defined chest muscles, especially at the point at which the neck and chest meet. When you draw the horse at any angle in which the neck and chest are visible, you must also indicate the chest muscles; they give the horse its stature.

The neck muscles travel down from the base of each ear to the center of the chest, where they meet the chest muscles.
Be sure to draw the horse’s chest with two separate muscle groups.

When the horse turns its head to one side, the neck muscles still travel around the neck to the base of the ears.
It’s helpful to view the neck and chest as part of the whole system. So, here’s a nice 3/4 view of the entire body. Note how prominent the chest is. Were you to leave out the defining features of the chest muscles, your horse would lose a lot of its “horseness.”


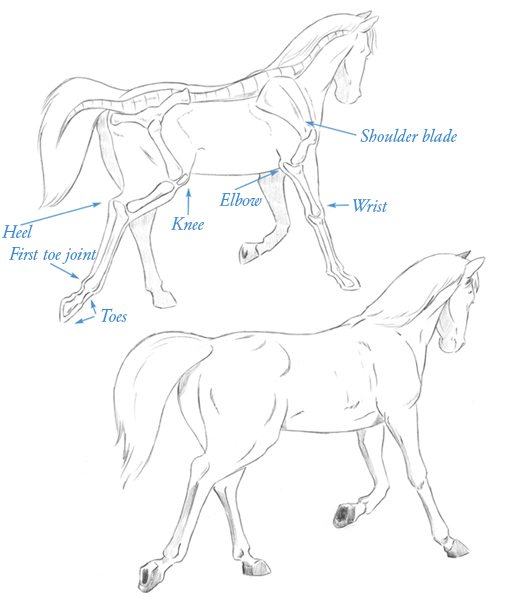
To draw a horse’s legs convincingly, pay attention to the direction of the leg bones. In the following examples, I’ve used arrows to indicate—in a simplified way—the angles of the different sections of the legs. This should help you begin to understand which way the limbs should be configured, no matter what kind of stance or posture the horse assumes. Drawing arrows, or any simple stick shapes, as simplified legs, is a helpful way to begin any sketch. If you mess up, these guidelines are easy to erase and adjust. Better to start this way than to render a beautiful foreleg, only to realize later that you laid out some of the joints incorrectly and must redraw the entire limb. Once the sticks are in place and look right, draw the legs around them and erase the sticks.


Part of the legs amd the horse’s fore- and hindquarters are large, muscular areas composed of many individual muscle groups. But you can draw them as two general masses (the gray areas to the left) without sacrificing any of the animal’s power and grace.

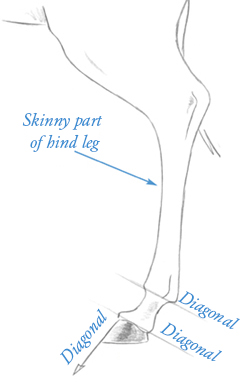
The lower hind legs of a horse—like those of most ungulates (hoofed animals)—are very skinny. This is due to the fact that top of the “heel” bone is higher off the ground on the horse than it is on most nonhoofed mammals. Compare it to that of the elephant, bear, and human. The horse’s heel is the highest.

As previously mentioned, and unlike the dog and cat (or bear and elephant), the horse is a hoofed animal. It doesn’t have “hands” and “feet” with “fingers” and “toes”; its “fingers” and “toes” are “fused together” in the hoof, rather than made up of individual bones. And do you know what a hoof really is? One gigantic, hard-as-rocks nail.

The most important thing to note here is the angle at which the hoof meets the leg: It’s always at a diagonal. If the hoof you’ve drawn looks like a block or is a little off, chances are you haven’t drawn it at the correct angle. Show the most hoof in the front, and from there, angle back, on a diagonal, toward the rear—where the hoof narrows.
This sounds obvious, yet it’s remarkably easy to overlook: When a four-legged animal walks, it must have at least one leg from each side of its body on the ground at all times. If, at any point in the walk, it were to have, say, its left front and left rear legs off the ground at the same time, it would topple over! When the back leg lands, the front leg on the same side rises. When the front leg hits the ground, the rear leg on the same side rises, and so on. If you keep it that simple, you’ll avoid confusion and create clear, convincing poses.

The shoulder blade rises as the front leg moves forward.

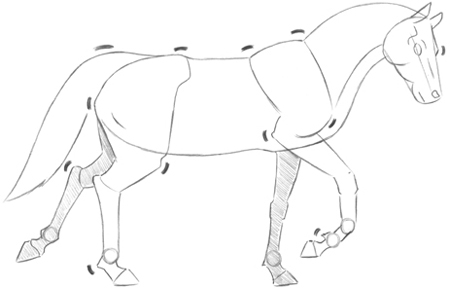
Note the small bumps all around the body where the bones “show through” to the surface area.
This horse follows the rules, maintaining its equilibrium by keeping one leg on the ground on each side of its body.

As the horse takes another step, the feet that were off the ground come down, while the ones that were on the ground rise.

Here’s where the horse puts the pedal to the metal. When galloping, all of its “feet” are off the ground at the same time. Once again, when comparing animals to humans, we find the same hold true for us. At some point, both of our legs are off the ground when running. Notice the placement of legs underneath the horse.


The body compresses at the high point in the run and elongates as it reaches to make contact with the ground. Like in all poses, the horse continues to remain composed and elegant.


