MIX IT UP
Julie Picarello, Wendy Wallin Malinow, and Judy Belcher
At first glance, Julie, Wendy, and Judy undoubtedly present as unlikely collaborators. Julie has a calm and muted palette that plays beautifully off the metal she incorporates in her jewelry. She sketches out her ideas roughly but won’t commit a design to polymer until she can almost completely envision it. Wendy creates finely detailed sketches that she eventually transfers into mixed-media jewelry and sculpture that is visually lush in high-energy colors. Judy brings her vibrant and active jewelry designs to life in polymer rather than on paper, working hands-on through each phase.
Would this union prove to be a recipe for collaborative disaster? Hardly! Differing design approaches aside, this team was closely aligned in temperament, personality, and background—perhaps more so than any other. The years each had spent navigating the corporate jungle gave them skills akin to gardening. One person planted a seed of an idea; the others watered it until it sprouted and flowered—or, if discovered to be a weed, gently but firmly uprooted it. Their common approach to collaborating gave them absolute freedom to mix it up—aesthetically and in terms of process. The end result was described best by Wendy as a “cabinet of curiosities.” Watching each piece move and acknowledging the wonder it produces in viewers’ eyes, the team agreed this collaboration was worth each late night.
|
SHOWCASE JULIE PICARELLO |
My career as an integrated circuit designer appeals greatly to my logical and analytical nature, yet there are times that—even for me—it is too intensely left-brained. To compensate over the years, I have balanced my engineering world with forays into artistic pursuits such as glassblowing, lampworking, silversmithing, metal etching, bookmaking, enameling, and more.
It wasn’t until 2004 and my introduction to polymer that I became truly passionate about an art medium. My love of color, symmetry, and clean lines as well as the joy of mixing media are all reflected in my work. Inspired by the
mokume gane technique of
Tory Hughes, I began experimenting with various tools and methods of creating controlled, rather than random, patterns, and adding depth and dimension to my polymer designs. In 2006 I also began repurposing metal objects such as washers, vintage watch parts, and miniature car and railroad parts into my jewelry. I believe that transitioning a functional object into a decorative element adds a sense of whimsy to a design. It becomes art with attitude and plays a joyful tune of its own.
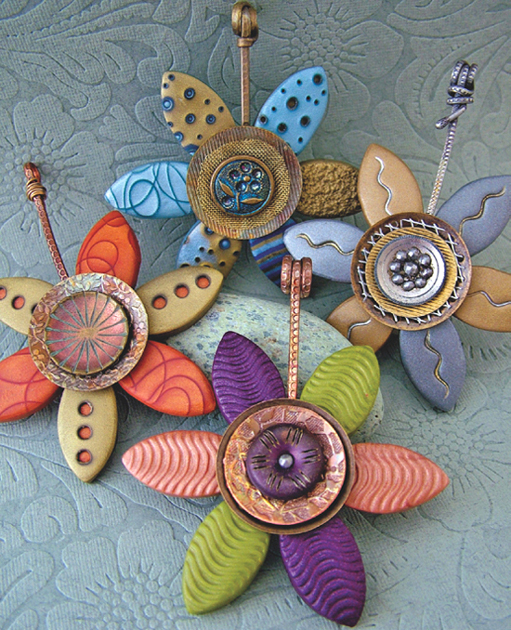
Button Blossoms, 2011; polymer, sterling silver, copper, and bronze wire, vintage buttons, textured metal with patina, wire mesh, and filigree; dimensions variable. Photograph by Julie Picarello. Rather than utilizing a wire rivet, these blossoms are joined with a “polymer rivet” that anchors them together.
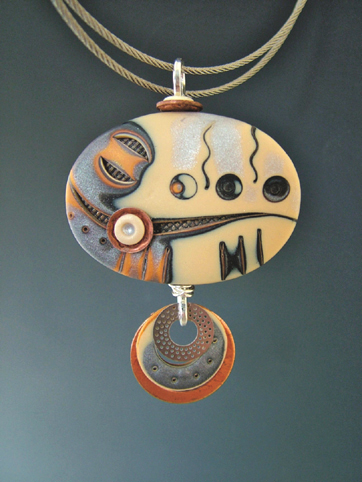
Ada, 2009; polymer, steel cable, hammered sterling, copper, bone, and metallic pulver; 2 × 1½ inches (5 × 3.8cm). Photograph by Julie Picarello. Using ivory as negative background space brings the design forward and gives it more impact.
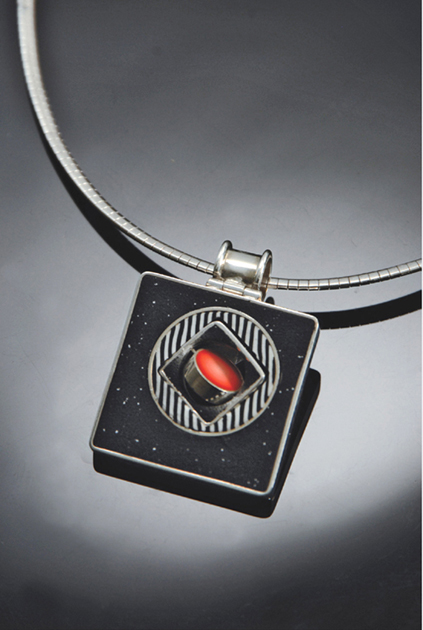
Jordan’s Hope, 2011; polymer, sterling silver, hammered steel, plaster washer, ceramic bead, and hand-dyed silk; 2½ × 1½ inches (6.5 × 3.8cm). Photograph by Julie Picarello. The polymer in this work was inspired by and custom-mixed to match the hand-dyed silk. This piece was created to raise funds for a young woman’s trip to the Mayo Clinic.
|
SHOWCASE WENDY WALLIN MALINOW |
I grew up on the Oregon coast, and nature is a big part of who I am and what I create. Growing up in a family of artists, obtaining a fine arts education in drawing and painting, and then having a career as an illustrator and art director led to a somewhat fragmented path of artistic pursuit. I started working with polymer in the late 1980s when I saw
Pier Voulkos’s work in an exhibit in Portland, Oregon. Polymer, as a medium, allowed me to continue my sculpting in a smaller format as well as integrate favorite materials and imagery. I was hooked!
For conceptual inspiration,
The Artist’s Way author
Julia Cameron suggests continually filling your “well”—a stockpile of internalized images and ideas to draw from in your art. Some of the things that inspire me are children’s art, nature, friends’ spirits and their stories, other respected artists’ creative pursuits, melody and lyrics, winter wonderlands, anything that sparkles or shines (frost, water, dew, and so forth), Dr. Seuss,
The Wizard of Oz, the zoo, trolls, human anatomy and physics, weird science, chaos theory, glitter, spangles, and always,
always, candy. These all help to stock the visual stew that slowly swirls around in my head.
Row, Row, Row Your Log, 2011; polymer; 4 × 2 × ½ × 11 inches (10.2 × 6.4 × 28cm). Photograph by Courtney Frisse. The log canoe is actually a box whose watery lid of polymer “rowers” opens to reveal a spring-green “meadow” with flowers, sky, daisies, and a robin’s egg hidden inside.
My Happy Place, 2011; polymer and glitter; 5½ × 5½ inches (14 × 14cm). Photograph by Courtney Frisse. The outside of this cuff is a lush, surreal landscape, with a pastel snail, Life Saver candy, mushroom, striped grass, and so forth; the inside is hollow and filled with dirt, skulls, worms, and roots—the underbelly of nature or happiness.
Sugar Links, 2011; polymer and glitter; 1¾ × 28 inches (4.5 × 71cm). Photograph by Courtney Frisse. This chain necklace features hand-sculpted links of textured and embellished polymer. I added a patina of glass glitter for a subtle sheen.
|
SHOWCASE JUDY BELCHER |
My parents nurtured a childhood filled with creative endeavors—after-school art classes, trips to museums, and summers filled with travel. As I grew older, my sensible choice of a degree in finance was equally satisfying to me, but I filled my evenings in the studio with friends from the fine arts department. I balanced twenty years as an accountant with evening workshops learning about ceramics (the wheel was not kind to me, but I loved the slab roller and extruder) and watercolor painting (where I formed an appreciation of blending colors).
I love that I have found a way of incorporating equally the left and right sides of my brain to sculpt a career in polymer. My meticulously crafted jewelry is filled with bright and joyful colors, celebrating techniques and designs that employ logic and spontaneity. Similarly, I have balanced that solitary work by surrounding myself with people. I truly enjoy coordinating conferences and teaching workshops, and I enjoyed organizing everyone for this book. Rather than squelching the constant struggle that must go on inside my head, I embrace it and claim the mantle of “creatively organized.”
Twirl in Red, 2008; polymer and sterling silver; pendant: 1½ × 1⅛ inches (3.8 × 2.9cm); chain: 18 inches (45.5cm). Photograph by Greg Staley. This piece is from a kinetic line of jewelry featuring central beads that twirl independently of the pendant to reveal different canework.
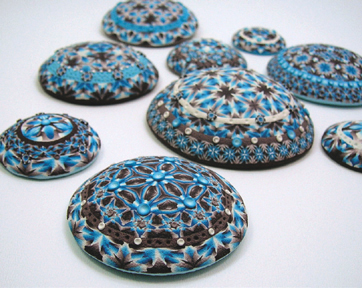
Fancy Stones, 2011; polymer; dimensions variable. Photograph by Judy Belcher. These “stones,” which range in diameter from 3 to 5 inches [7.5 to 12.5cm] and are made to hang flat, flowing down a wall, were inspired by Cynthia’s use of polymer in her home.
Polymer Knitting, 2011, polymer and gunmetal chain, 24 × 4 (at the widest) inches (61 × 10cm). Photograph by Judy Belcher. “I am not a knitter, but I love Missoni knits and wanted to replicate the look and feel in polymer. I’m thrilled with how this necklace does just that,” says Belcher.
“If you imagine metal and polymer mediums as music, then metal is a marching band, full of force and vigor.… Polymer is like an ever-changing radio dial, with the ability to morph from primitive drums to elegant arias to bluesy jazz without missing a beat.”
Julie Picarello,
Imprint Mokume Totem Necklace; polymer, hammered copper tubing, punched silver disks, copper mesh, disk break, copper wire, vintage copper chain, and hand-forged copper clasp; pendant: 2 × 2½ inches (5 × 6.5cm); chain: 18 inches (45.5cm). Photograph by Richard K. Honaman Jr.
Imprint Mokume Totem Necklace
To me, there is a perfect, almost indescribable, sense of rightness when working with metal and polymer. If you imagine metal and polymer mediums as music, then metal is a marching band, full of force and vigor. It tempts the listener to use sharp tools and hot torches, to abandon restraint and hammer with glee. Polymer is like an ever-changing radio dial, with the ability to morph from primitive drums to elegant arias to bluesy jazz without missing a beat. Play them together, and they hum with endless possibilities of color, texture, and form.
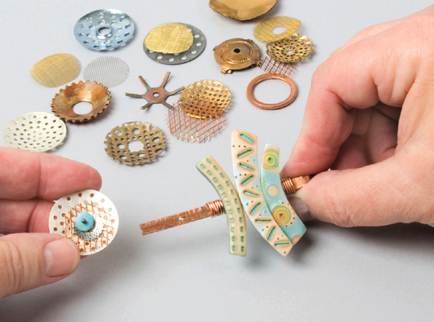
This project incorporates sticks of patterned polymer, hammered and textured metal tubing, and a variety of repurposed and riveted metal pieces to form an asymmetrical totem pendant. Collect and choose items from hardware stores, hobby shops, and vintage stores—anywhere your eye leads you and whatever works with your design.
- polymer: 2 oz. (57g) turquoise; 1 oz. (28g) gold; 1 oz. (28g) ecru; 1 oz. (28g) pearl; 1 oz. (28g) peacock pearl; 1 oz. (28g) 18K gold; 1 oz. (28g) cadmium red (I used Premo! Sculpey, as it imparts a smooth fusion between layers when it is sliced.)
- measuring tool
- smooth ceramic tile
- spray bottle filled with water
- tools of your choice for imprinting (cutters with clean edges, brass tubing, carving tools, hardware, and so forth)
- nonslip pad
- deli paper (4)
- texturing material (i.e., linen fabric, scrubbing sponge)
- wet/dry sandpaper, 400-, 600-, 800-, and 1000-grit
- soft cloth
- round copper tubing, 1/32-inch (0.8mm) diameter, 4 inches (10cm)
- steel bench block
- ball-peen hammer
- riveting hammer
- metal shears
- jeweler’s file
- round-nose pliers
- half-hard copper wire, 20-gauge, 6 inches (15cm)
- liquid polymer
- ball stylus
- dust mask
- metal pulver
- metal accent pieces (see
image for some of my favorites)
- variable-speed drill
- drill bits, #50 and #65
- permanent marker
- nail set
- table vise
- chain or necklace
Optional (for making a ball-tip headpin)
- butane torch
- butane fuel
- flush cutters
- sterling silver round wire, 20-gauge
- insulated tweezers with fiber grip
- fiber block or heatproof tile
- bowl filled with cold water
- soap
- polishing cloth
IMPRINT MOKUME STICKS
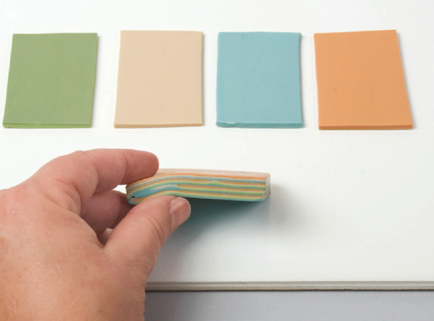
1. To replicate the four soft and muted colors shown below, combine turquoise, gold, and ecru (for color #1); ecru and pearl (for color #2); peacock pearl and ecru (for color #3); and cadmium red, 18K gold, and ecru (for color #4). Roll each of your four colors through the thickest setting of the pasta machine, and then cut them into 2 × 3–inch (5 × 7.5cm) rectangles. Stack a darker and lighter shade rectangle together and roll them through the pasta machine on the thickest setting. Repeat with the other two rectangles. Maintaining the dark and light ordering, stack the resulting 2 sheets and roll through the pasta machine one last time. This will result in a single, very long, four-color strip. Cut it into 4 equal sections and stack them, still maintaining the same ordering.
2. Using an acrylic brayer, firmly roll the stack until it is securely adhered to a smooth ceramic tile. Trim the edges so they are uniform and even. Lightly spritz the stack with water. The water will work as a release and keep your tools from sticking to the polymer. Impress a variety of tools into the stack of polymer. Keep your finished design in mind as you work. Be sure to keep your impressions in a row so each row can complete a “stick” when they are cut in step 4.
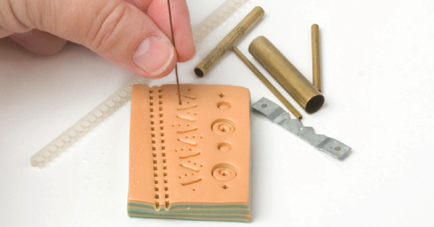
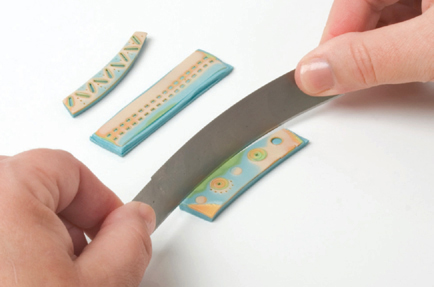
3. Place the ceramic tile onto a nonslip pad. Carefully grip the ends of the tissue blade with two hands, between the thumb and index fingers. Set your hands on the work surface on either side of the stack, with the edges of your little fingers touching the work surface. The key is not how thin or thick the slice is, but rather that you maintain a consistent thickness throughout the slice. Set the blade into the back edge of the polymer, approximately
1/
16 inch (1.5mm) from the top of the stack, and pull the blade toward you through the polymer. As you remove slices from the stack, set them aside on a piece of deli paper. Typically, each stack will yield 4 to 8 slices, depending on the thickness desired.
TIP: To facilitate consistency, focus on your hands rather than your blade as you slice. If your hands are set firmly on the work surface as you draw them toward you, the blade will follow along and maintain an even depth throughout the slice.
4. For strength, the sticks need to be at least ⅛ inch (3mm) thick. To add thickness to your slices, roll out a sheet of turquoise polymer on the thickest setting. Texture one side of the polymer sheet (optional) and place it texture side down onto a piece of deli paper. Set the imprinted slice of polymer (from step 3) onto the polymer sheet, lay a piece of deli paper over the slice, and use your fingers or an acrylic brayer to gently smooth the two layers together.
Cut the imprinted slices into 3 sticks, each approx-imately 1½ inches (3.8cm) long. When cutting, carefully bend the tissue blade into a shallow curve and cut slightly inward to bevel the top edge of the polymer stack.
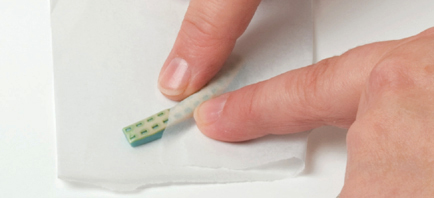
5. Place a piece of deli paper over the cut piece and use it to help smooth the beveled edges down, creating a clean and slightly rounded edge. Cure the sticks according to manufacturer’s instructions. Using 400-, 600-, 800-, and 1000-grit wet/dry sandpaper in progression, sand the sticks, and then gently buff with a soft cloth for a gentle sheen.
TUBULAR TOTEMS
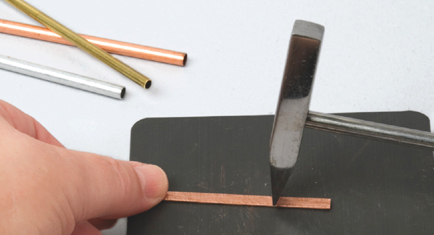
1. To create the supporting spine for the sticks, place the copper tubing on a steel bench block, and using the flat edge of a ball-peen hammer, slowly hammer up and down the length of the tubing until it is almost completely flat. Use the narrow edge of a riveting hammer to add lines of texture to the metal.
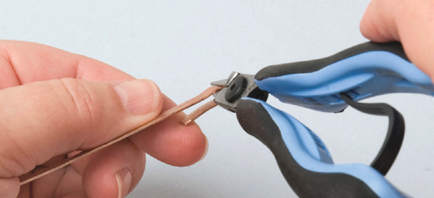
2. Using metal shears, trim one end of the spine, and then smooth it with a jeweler’s file. Use round-nose pliers on that end to form a loop for the hanger/bail.
3. Wrap a length of 20-gauge copper wire around the support below the bail. Cut with metal shears and file the ends of the wire smooth.
4. Place the cured sticks, imprint side down, onto a sheet of copy paper; then rest the support, centered, on top of the sticks. Roll a new sheet of turquoise polymer on a medium setting, and texture, if desired. Cut 3 strips slightly smaller than the height of each stick and just long enough to cover the width of the support, with ¼ inch (6mm) extra on each side. Dab a bit of liquid polymer onto each stick, just outside the metal spine; then gently set the strip of polymer over the support. Tap down to secure the two polymer layers together.
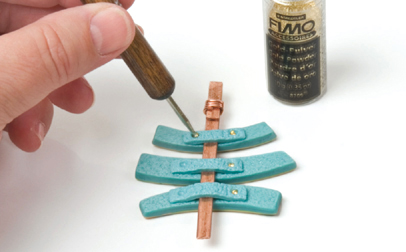
Where the polymer strip was connected with liquid polymer, press down with a ball stylus to form a rounded indentation. Put on a dust mask. Dip the ball stylus into the metal pulver, tap off the excess, and press the stylus into the indentation. This will create the look of a metal rivet while ensuring a solid connection between cured and uncured polymer. Carefully transfer the paper with the sticks and support in place onto a tile or baking tray, cure a second time, and allow to cool. Using 20-gauge wire, wrap again below the sticks to keep them from sliding off the support.
5. Now here comes the difficult part—deciding which combination of metal accent pieces to use! Some of my favorites include a disk brake set from a miniature railroad, vintage chain pieces, pipe screen mesh, and corrugated metal. For this necklace I chose a small punched-silver disk, copper wire mesh, and a disk brake.
6. Once you have selected your pieces, use a variable-speed drill fitted with a #50 drill bit to drill center holes in each piece, as needed. Stack the pieces on the spine below the sticks to finalize placement. Use a permanent marker to indicate the drill point(s) on the spine. Drill the hole(s) in the spine using a variable-speed drill fitted with a #65 drill bit. Use metal shears to trim the spine so that it ends just below the rivet point, and file smooth.
7. To create a fancy rivet, follow the instructions Technique:
Drawing a Bead on a Wire, below, to create a ball-tip headpin; otherwise you can use a purchased headpin. Insert the headpin through the decorative pieces and the metal support.
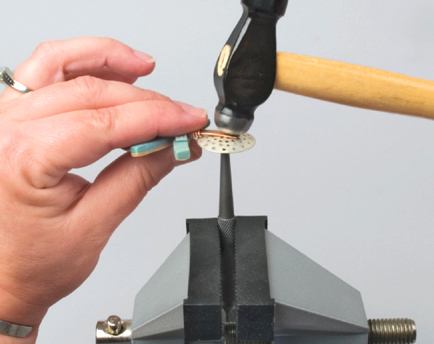
Clamp a nail set into a table vise. Place the assembled pieces, face down, so the ball-tip of the headpin rests in the nail set. Trim the headpin so about ⅛ inch (3mm) of wire remains above the support. Angle a ball-peen hammer and gently tap the wire in a circular motion. This will splay the metal out from the center so it flattens and becomes wider than the drill hole.
String the pendant on a chain or a necklace of your choice.
Wendy Wallin Malinow,
Subverted Bracelet, 2011; polymer, powders, and resin; dimensions variable. Photograph by Richard K. Honaman Jr.
“In terms of my own work process, I receive the most pleasure and delight from thinking ‘outside the lightbulb’ (or ‘outside the box,’ whatever the phrase), just to somehow make my work different—to subvert an existing visual or idea.”
Subverted Bracelet
Sometimes I find my worktable filled with many undefined blobs of polymer sprawled about and a gaping, empty workspace directly in front of me. Where do I go now? The ever-changing and sometimes elusive goal for me is to progress, grow, and basically try to please my eyes and delight my brain—and, with luck, please other viewers as well.
In terms of my own work process, I receive the most pleasure and delight from thinking “outside the lightbulb” (or “outside the box,” whatever the phrase), just to somehow make my work different—to subvert an existing visual or idea. To me, subverting means working out of, and going beyond, your comfort zone. In practical terms, this can mean transforming the material in a new way, doing the opposite of what you’re comfortable with, finding a different angle, a fresh style, something unexpected, a different execution.
Nothing is weirder than nature in all of its glory, especially aquatic forms, which is why I’m sharing this particular project. There is no end to the variation of shape and color. Plus, unlike, say, sculpting a human head, there is no “correct” shape to hold you back. The subject matter frees up the artist to go out of his or her particular comfort zone. The discussion should begin with what you, the individual, want to tweak visually. What do you want to evoke within your own artistic path and/or your viewer’s reaction?
- polymer: 2 oz. (57g) pearl; 2 oz. (57g) translucent; 1 oz. (28g) turquoise; 1 oz. (28g) purple; 1 oz. (28g) wasabi; 1 oz. (28g) cadmium red; 1 oz. (28g) orange; 1 oz. (28g) alizarin crimson; 1 oz. (28g) white; plus an occasional pinch of beige (I used Premo! Sculpey, as I like that it is malleable right out of the package.)
- Pearl Ex powders, interference and iridescent
- small paintbrush
- cone-shaped rubber tool or knitting needle, US #5 (3.75mm)
- polyester fiberfill
- needle tool
- aluminum foil
- flat-nose pliers
- small disposable craft paintbrush
- white glue
- texturing tools (i.e., scrubbing sponge, metal scouring pad, etc.)
- variable-speed or hand drill
- drill bit, #70
- clear resin (I prefers ICE Resin, as it cures clear and is self-leveling) fabric-covered elastic cord
- watchmaker’s glue
TENTACLE BEADS
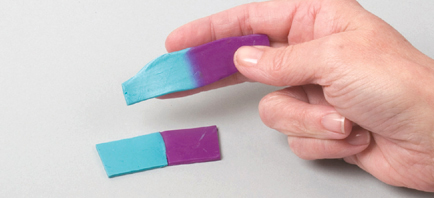
1. On the thickest setting of the pasta machine, condition, mix, and roll 2 pearlized sheets of polymer—first, turquoise and pearl, then purple and pearl (each in a ratio of 1:1.5). Trim each sheet to a 1 × ¾–inch (2.5 × 2cm) rectangle. Butt the short end of the sheets next to each other; then fold and roll on the thickest setting of the pasta machine, slightly blending where the two colors meet.
2. Working from a long end, roll up the resulting blended sheet into a snake, matching colors as you go. Smooth and blend the seam. Continue rolling, pushing each end toward the center, forming tapered ends with a thicker middle and keeping the roll to approximately 2 inches (5cm) long. One tapered end should be shorter and thicker than the other. Form the thicker taper into a spiral; twist and slightly spiral the other end.

3. Condition and roll translucent polymer into a ⅛-inch- (3mm-) diameter snake. Roll cadmium red polymer on a thin setting of the pasta machine and trim to match the length of the snake. Place the snake on the sheet of polymer, and then gently roll this assembly forward, past where the seam of the outline color should be. Roll the polymer backward, which will create a line of demarcation where the sheet of polymer overlaps itself; trim the polymer at this mark. Join the 2 edges of the outline sheet in a butted seam and roll gently to smooth the polymer so no seam is evident.
TIP: When creating the suckers, you can either make a variety of colors or use just one that complements the tentacle, as I did with the wasabi green in step 4.
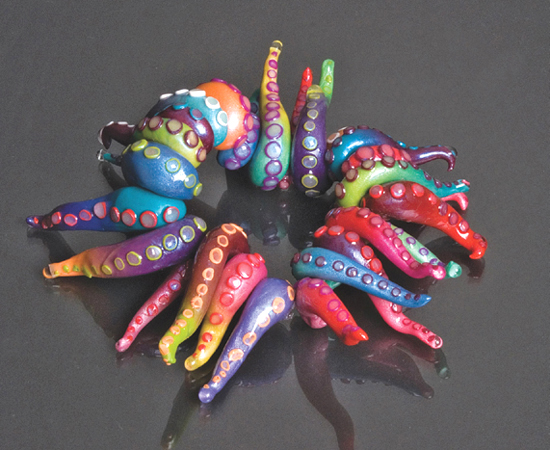
4. Roll and taper one end of the resulting bull’s-eye cane to form suckers in graduated sizes. Cut 1/16-inch- (1.5mm-) thick slices, and apply them to the length of each tentacle, placing the larger suckers at the thicker end of the tentacle and the smaller suckers as you work down the length of the tentacle. Brush the suckers with Pearl Ex powders. Set beads aside.
CORAL BEADS
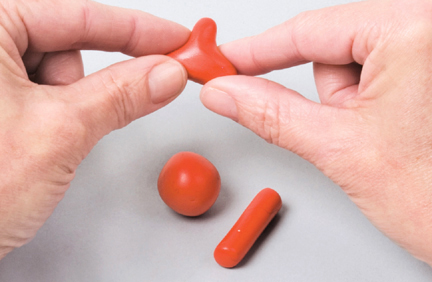
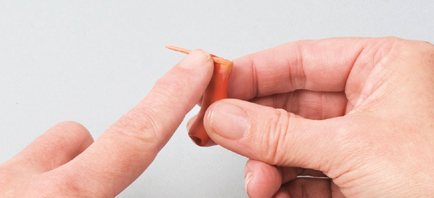
1. Condition cadmium red polymer and roll it into a 1-inch- (2.5cm-) diameter sphere. Make sure the sphere is completely smooth and there are no seams. Pinch out 3 extensions, forming a triad shape. Roll each point of the triad between your fingers, forming a simple ⅜-inch- (9mm-) diameter extension. Or create a simple cylinder.
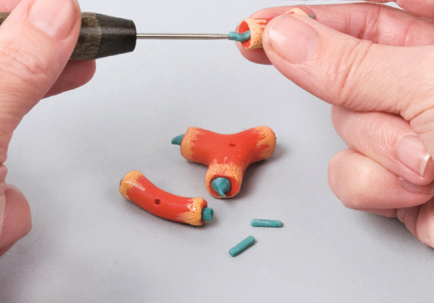
2. Using a cone-shaped tool or knitting needle, indent the end of each extension approximately ¼ inch (6mm) to resemble a hollow tube shape. Place the beads onto polyester fiberfill and cure according to manufacturer’s instructions. Allow the beads to cool.
3. Condition and mix a pea-size amount of orange polymer with a walnut-size amount of cream-colored polymer (made by mixing white with a pinch of beige). For this step I prefer to use Sculpey III, as it smears well. You can mix different ratios according to your own color preferences. Roll the polymer into a 1/16 × 1–inch (1.5mm × 2.5cm) snake. Wrap the snake around the end of a tube and smear it down the side a bit so it blends into the bead. Texture the raw polymer by dragging and dotting with a needle tool. Apply a small amount of interference powder with a small brush.
4. Condition and mix 3 parts pearl with 1 part turquoise polymer. Roll into a thin snake. Cut the snake into ⅛-inch- (3mm-) long sections, and roll the sections into small tubes and spike shapes. Using a needle tool, insert them into the ends of the tube forms or perhaps leave some tubes open. Set beads aside.
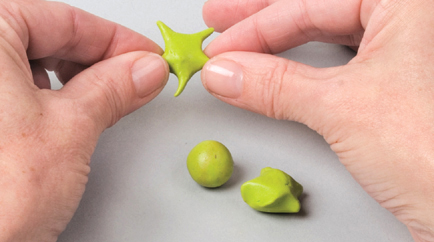
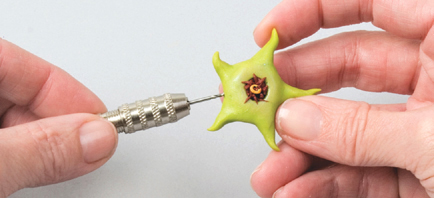
1. Condition and mix 1 part wasabi (green) with 10 parts pearl polymer. Roll this into a sphere approximately 1 inch (2.5cm) in diameter. Make sure there are no seams and that the sphere is completely smooth. Pinch out 5 extensions, forming a 5-pointed star shape. Elongate each extension by rolling and pulling each point between your fingers. Continue to smooth as you shape. Shape each pointed end into a slight curve.
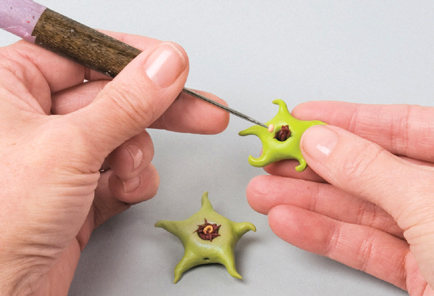
2. Using a cone-shaped tool or fat knitting needle, form a deep indention in the middle of the star. For texture and added interest, roll small balls and spikes of alizarin crimson polymer and place in the middle of the depression. Add a dot of light orange (created for the coral beads) to the center of the cluster of balls and spikes, and add a hole in the middle of the dot with a needle tool. Set beads aside.
TIDE POOL BEADS
1. Condition and mix a walnut-size piece of cream-colored polymer (as described in step 3 of
Coral Beads) with a pea-size amount of orange polymer. Roll the polymer on a medium-thick setting of your pasta machine. Form a 1-inch- (2.5cm-) diameter aluminum foil ball, and then roll to compress, shaping into an organic sphere, with a few bumps and crannies. Wrap the polymer sheet around the foil ball, trimming and smoothing seams as you go.
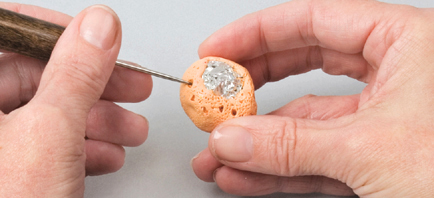
2. Using variously sized pointed tools—a needle tool, knitting needle, even a small straw—pierce holes in the polymer, working all the way down to the foil to create texture and “windows.” Carve out a bigger opening so you can fill the interior later with detail. Cure according to manufacturer’s instructions and allow the bead to cool.
3. Insert an X-Acto knife into the middle of the foil ball and twist, cutting the foil up a bit. Using a needle tool, pick out the foil pieces. Use flat-nose pliers to twist and pull out hard-to-reach foil bits. This process can be a bit painstaking, but be patient—it eventually comes out and reveals an interesting hollow bead.
4. Condition alizarin crimson and roll into a thin sheet. Using a craft paintbrush, paint a thin layer of white glue along the inside of the cavity of the bead—this will offer grip for the new layer of polymer. Inlay and smooth the alizarin sheet to line the interior cavity of the bead completely.
5. Add spikes and balls to the layer of crimson for added elements inside the bead. Brush on Pearl Ex iridescent powder to highlight the interior details. Set beads aside.
SUBVERTED BRACELET
1. Gather the various beads, and place them on a piece of fiberfill. Cure according to the manufacturer’s instructions and allow to cool. Using a drill and #70 drill bit, drill each bead in an appropriate place, keeping in mind how you would like the bead to hang on the bracelet.
2. Finish each bead as you would like. Consider sanding, or sanding and then buffing, adding resin to some beads for a slimy effect. String each bead onto elastic cording. Tie the ends together using a surgeon’s knot; then add a dab of watchmaker’s glue to secure the bracelet. Alternatively, choose one shape, play with it, and repeat these beads for a chunky bracelet.
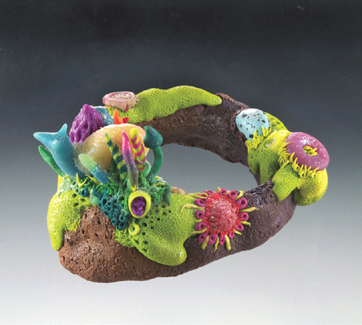
Wendy made tentacles using various Skinner Blend combinations, applied resin to the finished pieces for that “slimy” effect, and then strung them all together to create this bracelet of vibrant tentacles. Photograph by Richard K. Honaman Jr.
Judy Belcher,
Twirling Necklace, 2010; polymer and glass beads; 1½ × 28 inches (3.8 × 71cm). Photograph by Richard K. Honaman Jr.
“Much of the jewelry I create celebrates both left-brain and right-brain ways of approaching the creative process—it is visually planned and structured, yet playful and tactile.”
Twirling Necklace
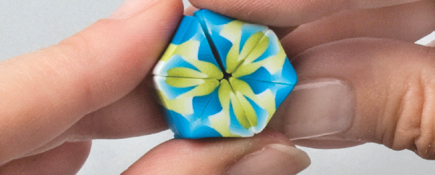
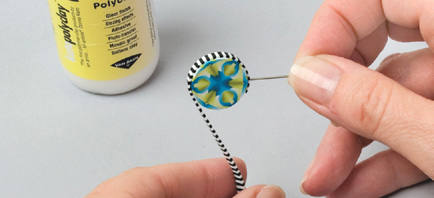
Much of the jewelry I create celebrates both left-brain and right-brain ways of approaching the creative process. This twirling necklace perfectly symbolizes these two tendencies—it is visually planned and structured, yet playful and tactile (quite literally, as you can spin it while you are wearing it).
If you rely more on left-brained thinking, you might enjoy making lists and drawings to plan out this necklace on paper. Consider in what order the beads will lie, keeping in mind color, pattern, size, and shape; remember that each “framing bead” and each interior “twirling center bead” can spin independently. Or you can draw on your right brain, dive in, and just make those decisions spontaneously while you are forming each bead.
Similar left-brain/right-brain strategies can be employed when making the tessellated beads. Use the left side of your brain to cut, mirror, and list the various ways your original cane can be recombined. Or exercise the right side by smashing and morphing the original cane into a new triangle and create dozens more tessellations.
- polymer: 8 oz. (226g) scrap; 6 oz. (170g) white; 6 oz. (170g) black; 6 oz. (170g) turquoise; 6 oz. (1a70g) yellow (I used Kato Polyclay, as it holds even minute details clearly during the caning process and firms up quickly so I can immediately slice the cane.)
- round and square Kemper plunger-style cutters (graduated size sets)
- wet/dry sandpaper, 220-grit
- copy paper
- pen or pencil
- painter’s tape
- variable-speed or hand drill
- drill bit, #70
- paintbrush
- repel gel
- headpin, 21-gauge (16)
- copy paper
- uncoated deli paper
- liquid polymer
- texturing material (I used Clay Yo Texture Sponges)
- round, square, and oval Ateco nesting cutters
- cornstarch
- soft medium paintbrush
- wire cutters
- flexible beading wire, .014 49-strand clasp
- black O-rings, 5mm (at least 20)
- purchased or hand-made clasp (see
this page)
- crimp beads (2)
- glass seed beads (2)
- crimping pliers
- Optional
- craft stick or dowel
- double-sided tape
STRIPED AND CHECKERBOARD CANES
1. Condition and roll the black polymer on the thickest setting of the pasta machine. Repeat, conditioning and sheeting the white polymer. To create a simple striped cane, cut a 2 × 4–inch (5 × 10cm) sheet of each color and stack on top of each other. Roll across the surface with an acrylic rod to eliminate any air pockets that may be trapped between the layers. Cut this stack in half; then stack one-half on top of the other, making sure the colors alternate. Repeat so the cane has 8 layers in total.
TIP: If you are going to cut this stack in even slices, don’t stack too many layers, as it makes it more difficult to cut the slices evenly.
2. Repeat step 1 to create at least 4 other striped canes, adjusting the thickness of each stripe to alter the finished look of each cane. Using thicker (or more) sheets of either color will cause the cane to read darker or lighter.
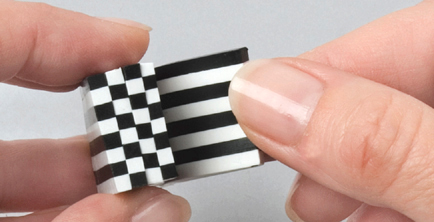
3. Create a simple checkerboard cane by starting with an evenly striped cane made in step 1. Using a stiff blade, slice straight down from the top to the bottom of the cane, working across the stripes and creating a slice that is as wide as the thickness of each stripe.
Sit or stand so that you are looking directly down onto the cane. This will ensure that, as you slice, your blade remains exactly perpendicular to the work surface. If you are cutting straight, the blade will almost disappear.
TIP: Cut a thin slice of the cane; then cut 2 small strips from the slice to be used as guides. Place the guides on top of the cane so they go down the length of each side. Use the distance between each layer as a guide for how thick to cut each slice from the cane.
4. Reassemble the slices, flipping every other one so the rows of black and white alternate from slice to slice. Gradually ease the slices together, working from back to front and making sure each line in the cane matches (black to white and white to black).
VARIOUS JELLY ROLLS
1. Roll a sheet of black polymer on the thickest setting of the pasta machine. Repeat to create a thick sheet of white. Cut a 2 × 2–inch (5 × 5cm) sheet of each color and stack them together. Roll the stack through the pasta machine two times, reducing the setting of the pasta machine with each pass, resulting in a 2 × 4–inch (5 × 10cm) sheet. With the black polymer against your work surface, angle a stiff blade and trim each short side of the sheet to create a bevel cut. Fashion a 1/32-inch- (0.8mm-) diameter snake of white polymer. Place the snake at the edge of the sheet, and then roll up the sheet into a spiral jelly roll.
TIP: To create a variation of this spiral jelly roll, flip the sheets over so the white polymer is against the work surface and use a black snake of clay.
2. Mix 6 oz. (170g) of yellow polymer with ½ oz. (14g) of turquoise polymer to create the lime green color. (This will make enough of that color for the rest of the project.) Create 2 Skinner Blend jelly rolls: 1 in lime green and 1 in turquoise, by following steps 1 and 2 of
Folded Beads.
TESSELLATED MASTER CANE
1. Following the Two-Color Skinner Blend
instructions, create various hues of lime green polymer and, with the pasta machine, roll each color to a 1 × 3–inch (2.5 × 7.5cm) strip on a medium thickness. Stack each strip, beginning with white and gradually getting darker, ending with the original color, to create a gradated cane. Repeat to create a gradated cane in turquoise.
2. Turn 1 gradated cane on its side and cut 3 triangular-shaped wedges. Reserve some of each cane to use in the framing beads. Repeat for the other color.
3. To create a master cane that will be recombined into many tessellated or mirrored canes, combine the wedges, making sure they remain straight throughout the cane. Work toward a form that loosely resembles a triangle. Compress the cane, folding over any edges that stick out, as they will form curved elements that are lovely when repeated. Choose a point of the triangle and use your fingers in a pinching motion to refine the point and press down against the work surface to flatten the opposite side to form it into an equilateral triangle. Turn the cane and continue to refine. Reduce the cane so each of its sides is ½ inch (13mm). Refer to
Technique: Elongating a Block for tips on reducing canes. Cut off the distorted ends of the cane, as they will not mirror well.

4. Tessellating the master cane is the most fun part of the process! For the first design, cut six 1-inch- (2.5cm-) long segments from the master cane. Put 2 triangles together so the sides mirror each other. Repeat, mirroring the same 2 sides, for the other 4 segments. Piece these 3 new segments together so the centers meet and all sides mirror to form a hexagonal cane.
TEMPLATES
1. To make a two-sided twirling bead you need to create a template. Roll out a sheet of scrap polymer to a medium setting. Cut this sheet in half and stack the two halves. Cut the layered sheet into sixteen 1 × 1–inch (2.5 × 2.5cm) square sections. Place each square onto a ceramic tile, and then press until they stick to ensure they remain flat.
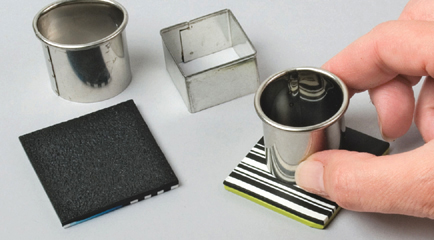
Using various plunger-style cutters, cut differently sized and shaped holes into each of the 16 squares.
TIP: Pull the cutter straight up and leave the cut-out section of polymer in place. The outside edge of the internal shape will remain true and will easily pop out after baking.
Place the tile in the oven and cure according to manufacturer’s instructions; allow the polymer to cool to room temperature, and then remove each piece from the tile. Each template will be slightly indented, so lay a sheet of 220-grit sandpaper on a flat surface and sand flat.
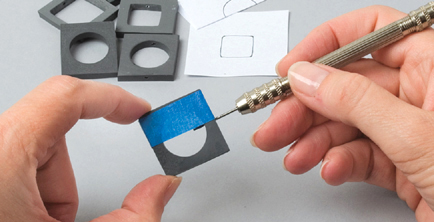
2. Lay each cured template on a small piece of copy paper and trace the perimeter of the cut-out shape. Fold the paper in half and lay it down, matching the drawn line with the cut-out shape in the template. Lay a piece of painter’s tape along the folded edge of the paper and wrap around the edges of the template. This will act as a guide for the drill bit and ensure you drill exactly on center, which is necessary for the spinning effect. Repeat for each template.
Drill a hole into each template using a #70 drill bit fitted to a variable-speed or hand drill, first through the top and then through the bottom.
TIP: Keep the templates once you’re finished with this project, as they can be reused.
TWIRLING BEADS
1. Gather and cut all of your canes into ¼-inch- (6mm-) thick slices. Some of the tessellated canes may need to be rounded and reduced to fit the shape of the cutout in the template. Cut out shapes in the striped and checkerboard canes using the cutters that correspond with the openings you cut out of the templates in step 1 of Tessellated Master Cane Templates.
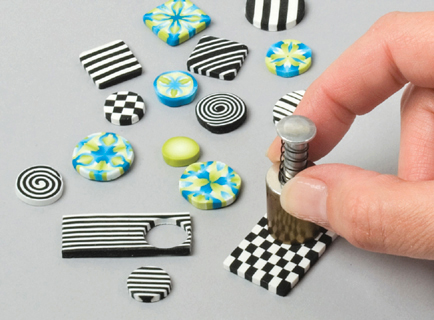
2. Using a paintbrush and a generous amount of repel gel, coat the inside edge of the hole in each template. The repel gel is what allows the center beads to release from the template; otherwise they would bond to the cured template and stay in place permanently. Place a headpin through the drilled holes. Place a slice of black-and-white cane on one side of the opening and a slice of a colored cane on the other, covering the headpin. Press the slices firmly to be sure the cane fully fills the opening. Holding a stiff blade flat against the surface of the template, gently slice off the excess cane on both sides. Repeat for each bead, making sure to create different combinations of black and white and color. With the headpins still intact, place the beads onto a copy paper–covered ceramic tile and cure following the manufacturer’s instructions. Allow the beads to cool, remove the headpins, and pop the center beads out.
TIP: Kato Polyclay can be shiny when cured. You can matte the surface of the polymer by brushing each bead with cornstarch before curing.

3. To add interest and finish the edges of the twirling beads, add a strip of stripes. Cut 4 to 6 slices of a thin-striped black-and-white cane. Lay the slices down onto your work surface so they butt up right next to each other. Using a sheet of uncoated deli paper, press the slices together so they become one sheet. Lift the sheet from the table, and then line it up so the stripes are perpendicular to the rollers on the pasta machine. Roll the sheet through on the thickest setting. Continue to thin the sheet until you reach the next-to-thinnest setting on the pasta machine. Lightly coat the outside edge of each twirling bead with liquid polymer. Cut a thin strip of the striped sheet, just wide enough to cover the edge of the bead. Wrap the strip around the bead and trim the excess. Replace the headpin to repierce the hole. Repeat for each bead and cure again.
FRAMING BEADS
1. Framing beads house the twirling beads, giving them a place to play and spin. Create a 6 × 8–inch (15 × 20.5cm) sheet of black polymer rolled on a medium setting and cut into 2 × 2–inch (5 × 5cm) squares. Cut ¼-inch- (6mm-) thick slices from the gradated canes (described in step 1 of
Technique: Creating Tessellated Canes) and from the black-and-white canes (described in steps 1–4 of
Striped and Checkerboard Canes).
Combine the segments of black clay with various black-and-white cane slices to create 12 sections of polymer that are 2 × 2 inches (5 × 5cm), or larger if the cutters you chose for making the framing beads are larger. Combine slices of the green gradated cane with the remaining black-and-white cane slices and repeat with the slices of the turquoise gradated cane to form an additional 12 sections for the reverse side of the framing bead.
Use uncoated deli paper to adhere the slices together. Apply texture if you’d like; I used Clay Yo Texture Sponges.
2. Lay out the black/black-and-white sections and place a section of color combination alongside each one. Play with the layout of patterns and colors to be sure you like the
order they are placed in on each side. Keep in mind that this necklace can be worn all black and white, a turquoise/green combination—or a bit of both! When you are pleased with your layout, press the two sections together by retexturing each side, creating 12 different two-sided sections. Choose the size and shape of the nesting cutter you plan to use for each of the sections. Vary the sizes and shapes as you decide placement. Remember that smaller beads will be more comfortable at the back of the neck. Using the nesting cutters, press firmly and straight down to cut the outside of the framing bead.
TIP: Most nesting cutters have a seam that creates a bump in the polymer; carefully trim off this bump with a craft knife.
3. Decide which twirling beads you want to place inside each framing bead. Experiment with the patterns, colors, and shapes until you find an arrangement that pleases you. Use the plunger-style cutters that are slightly larger than the twirling bead to cut holes in the framing bead. Place the framing beads onto a paper-covered ceramic tile and cure. If, after these frames are cured and cooled, you find that the holes are not large enough to accommodate the twirling bead, enlarge the hole using sandpaper attached to a craft stick or dowel rod with double-sided tape. Using the same method from step 2 of
Tessellated Master Cane Templates, drill each frame.
NOTE: If you have chosen to use a framing bead for the toggle ring, drill only one hole in that frame.
TWIRLING NECKLACE
1. You may choose to finish your necklace with a purchased clasp, or, as I have done here, use one of the framing beads for a toggle ring. Using wire cutters, cut a suitable length of flexible beading wire. String a crimp bead, the framing bead that serves as the toggle ring, and 1 glass bead. Loop the wire back through the hole in the toggle ring and through the crimp bead, skipping the glass bead, as it acts as a stop for the wire. Using crimping pliers, crimp the crimp bead. For instructions on crimping with crimping pliers, see step 8 in Folded Beads on
this page.
String the rest of the twirling beads and framing beads onto the wire, placing a rubber O-ring (as shown in the finished image on
this page) or other bead of your choice between each framing bead.
2. To create the toggle bar and decorative spacing beads, form a 2-inch- (5cm-) long snake of scrap polymer, and wrap with a slice from a striped cane. Smooth and roll to close the seam.
3. Cut four ⅛-inch (3mm) segments for decorative, striped ball spacing beads. The number of spacing beads needed for your clasp will depend on the size of the framing bead you choose for the toggle. The beads are strung along with the toggle bar on one end of the necklace and help the toggle bar have the slack needed to pass through the toggle ring.
4. Work the stripes to the top and bottom of the slice so that they meet in the middle and form round, striped beads. Smooth the seams, and roll between your palms to ensure the bead is round.
5. Work the stripes to the middle of the ends of the remaining section of wrapped cane, forming nicely rounded ends for the toggle bar. Cure the components following the manufacturer’s instructions. Using a #70 drill bit, drill a hole in the center of the toggle bar and each round bead.
6. To finish the necklace, string as many of the small striped beads as necessary, placing O-rings between them, a crimp bead, the toggle bar, and a small glass bead. Loop back through the hole in the toggle bar, and the crimp bead. Using crimping pliers, crimp the crimp bead. Using wire cutters, trim the excess wire on each end.
Exploring movement in jewelry, Judy created an entire line of kinetic jewelry in vibrant jewel tones that invite the wearer to play. This one is appropriately titled Fidget.
Before meeting in the Outer Banks, their planning for the project was minimal—essentially a string of spirited e-mails—but they did establish that the collaboration would take shape around two goals: The finished piece would be table or wall art rather than jewelry, and it would be infused with a sense of movement and energy. Each artist looked at the challenge more as a diversion rather than an assignment—taking seriously the growth opportunity, yet hoping to impart the joy they felt being given the chance to explore together.
Organizing an Embarrassment of Riches
The different design approaches embraced by each artist were clearly demonstrated by what they arrived with at the beach home: Julie with hastily sketched drawings on an airplane napkin; Wendy with a beautifully embellished sketchbook containing numerous notes and fine drawings; and Judy with numerous unfinished samples, which she hastily unpacked while talking and making gestures with her hands. Some of the ideas were quickly discarded, sometimes sheepishly, in the hopes that no one would be offended by the decision; others were completely embraced with loud whoops of joy. Mixing in various ideas from each of their designs, a picture began to appear.
The fun started when they gathered in Julie’s room and dumped, right in the middle of her bed, all of the items they had collected while scouring the aisles of hardware, antique, thrift, and craft stores. It was an incredible display of ephemera—metal tubing, 16-gauge wire, small hinges, threaded rods, nuts, bolts, washers, cotter pins, ball chain, nails, screws, wing nuts, eye bolts, springs, a pulley, metal flashing, antique metal balls and spokes, and so forth. Wendy was particularly drawn to several brightly colored thin springy bracelets that Judy had brought, already envisioning the playful “dance” they could create.
Ideas flowed freely at this point—perhaps too much so. Julie, Wendy, and Judy were having fun brainstorming, but Julie knew they needed to shift into an edit mode. After admiring the items, they began to place only their favorite components on a tray.
During the initial design phase, Julie, Wendy, and Judy selected their favorite components—the ones that would make the perfect “skeletons,” to be embellished with polymer, that would facilitate movement in the piece.
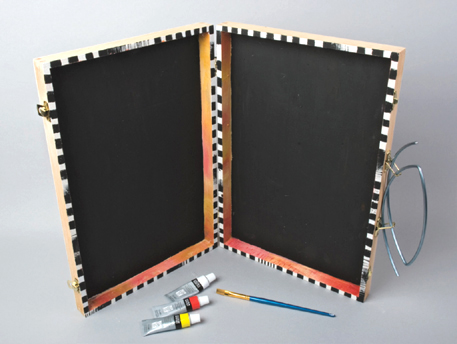
At times the group’s enthusiasm moved the project along more quickly than perhaps it should have. They had arranged to have a discussion with Jeff about their plans, but when they realized that their creation needed some kind of framework, they immediately ran out of the house in search of a suitable structure, leaving Jeff to wonder where the team had gone. This trip to a local store provided the perfect container: an inexpensive paint set. The paints were hastily set aside—the wooden box itself was the prized item. It was just the thing to contain the moving pieces that Julie, Wendy, and Judy planned to make.
The paint originally stored within the box turned out to be useful, though, as Wendy applied her illustration talents and decorated the box. She chose black and white paints—both to visually anchor the various pieces of metal and polymer that would be attached to the box as well as to mimic the checkerboard canework that Judy planned to use for some of her sculptural elements.
Embracing Independence
Julie, Wendy, and Judy settled into their workstations near the front of the house in a lovely bay window overlooking the marshes and Currituck Sound. From the outset, the project was conceived to allow each of the three team members to work somewhat independently. This approach was in part dictated by Judy’s dual role in the retreat—both as author/organizer and as partner for this project. Julie and Wendy good-naturedly embraced Judy’s erratic participation, laughingly referring to her contributions as “drive-by art.”
Julie, Wendy, and Judy started creating an array of little kinetic sculptures. These elements had a harmonious palette—as Judy’s and Wendy’s bright polymer hues were softened a bit by stolen pinches from Julie’s workspace, and vice versa. Literally, “mix it up” became the mantra as the group gathered several times to evaluate the pieces they had made and to determine if their color choices were harmonious. Some strident black-and-white pieces were subdued with dots or edges of more muted colors.
At first, the team thought the structure would sit on a table. But once they realized that hanging it on the wall would provide more opportunities for dangling movement, they created a more interesting hanger so it could mount on the wall.
Wendy put her graphic-design skills to work adding complementary artwork to the box.
The team set to work, figuring out how to create the movement they desired. Their plan was to incorporate the metal components with polymer and then attach them to the box. The question was how? Some of the hardware finds—like the pulley—presented the obvious potential for movement. Other pieces required more thought.
The team soon faced a dilemma—how to marry a nonporous item with polymer. But they saw this obstacle as a wonderful challenge. They kept a colorful ceramic bowl in the center of the table to place pieces that they loved but were struggling with. As the week went on, they conferred with others on how best to resolve the issue and came up with a number of brilliant solutions.
Rather than simply pushing springs into polymer, Judy realized that twisting the coils helped to embed them in the polymer, creating a more solid connection between the two materials. In addition, texturing the back of the polymer before applying two-part epoxy helped create a firm bond between the polymer and the wood.
Wendy, excited to use the thin metal spring bracelets that she coveted, chose them to give her polymer legs real bounce and swing. She embedded the springs in the legs prior to curing and attached them to the box by drilling holes slightly smaller than the springs, adding drops of glue, and twisting the legs into position. This technique facilitated the series of “running” legs that eventually adorned the lower half of the box.
Julie loved that Judy and Wendy were willing to “just let it happen.” For her, arriving at the beach almost completely unprepared with just a vague goal did not feel stressful, but rather incredibly liberating.
Adding a solid polymer base to each coil made it easy to attach it to the wooden box.
“Our cabinet piece entertains and satisfies me on a visual, functional, and visceral level. I now have new, alternative ways to look at metalworking and making connections.”
—Wendy
From the beginning, Julie, Wendy, and Judy had known they wanted a crankshaft—something that could be turned to feature dangling elements that would move up and down. Julie used flat-nose pliers to bend 16-gauge plastic-coated wire into a shape that resembled dentil molding. Wendy discovered that the loops or holes on cotter pins and eyebolts threaded easily onto the crank, so they were distributed to whoever wanted to add an embellishment to the crankshaft. Leslie was inspired and quickly offered her donation—a dancing pig.
Once the sculptures had been assembled, Julie added screw-eye hooks (large enough to accommodate the 16-gauge wire) into the sides of the box. She then positioned the crank in the box, bending one end to be a handle and trimming the other closely to the box edge. Wendy finished the ends with decorated pods that were cured, according to manufacturer’s instructions, drilled using a 3/16-inch (5mm) drill bit, and glued to the wire ends.
“Take two distinctly different artists (Julie and Wendy), catalyze with Judy, and stand back! This dynamic trio set a whirlwind in motion that swept in nearly every other artist. In many ways their piece is the embodiment of the playful collaborations of the week at the beach.”
—Jeff
Jeff offered Wendy a stash of brightly colored nail polish (which he uses to embellish the pins of his own work) to adorn the toenails of the legs, but the group ran out of time to implement this clever idea.
Julie kept the ends of the crankshaft straight until the piece could be mounted to the box. This allowed the wire to be threaded through the eye of the screw and kept the crankshaft level.
Having been officially invited to add their own pieces of “drive-by art,” others decided to join in the fun: Robert added metalwork connections; Sarah added a trio of beads that swirled around a dangle; Dayle added a decorated spinner; and Cynthia added her new beach glass for the bead bar. The project was officially open to all!
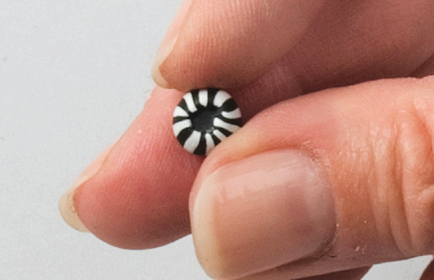
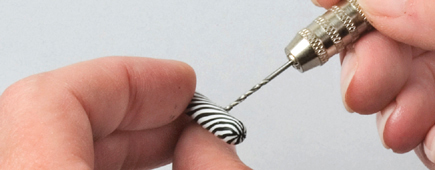
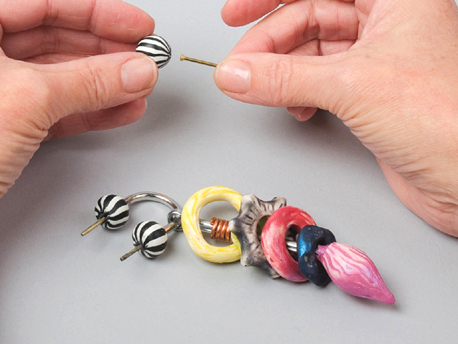
Judy created striped polymer balls with muted embellish-ments to use as finials. Julie cut 16-gauge plastic-coated wire, forming it into a hanger at the top of the box. The balls were cured, drilled, and glued to the ends of the wire.
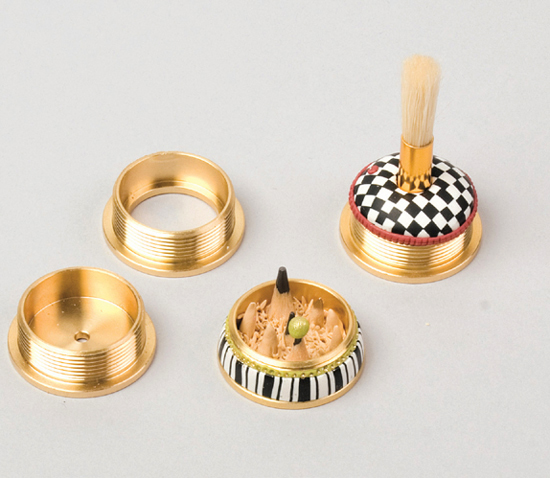
No one on the team was familiar with the threaded brass pieces that Judy had purchased—nor did they even know what they were. Robert solved the mystery with a laugh: They were brass router base inserts. Wendy instantly recognized that they could be repurposed into interesting elements. She filled a bottom piece with a polymer sea scene, and Robert created a lens that he affixed with two-part epoxy into the top piece. (See Technique: Forming a Domed Piece of Plastic to create your own plastic lens.) Wendy used the epoxy to attach the bottom insert to the box; when the top piece was screwed on, the lens magnified the art underneath.
Marrying metal, a nonporous material, with polymer was easy for the handle, as the wire had a plastic coating. Judy used cyanoacrylate, commonly known as Super Glue, as it bonds both types of plastic beautifully.
Julie left a “viewing” hole in the disk, so when it is spun you can read letters that spell out the team’s motto for the week: Running with Scissors!
Wendy was inspired when she realized that brass router base inserts could be screwed together, allowing them to house a small treasure.
Wendy’s delight with the thin metal spring bracelets recurs several times in the cabinet. Here they rise from the metal tube almost like branches swaying in the wind.
Using a jeweler’s saw, Julie cut a piece of decorative metal designed to cover vents into a circle. She then backed the metal piece with polymer and riveted metal and polymer accents in place. (For instructions on riveting see step 7 in Tubular Totems on this page.) Julie crafted a handle from polymer, embedding a bolt head in the bottom before curing the piece. She then threaded several washers onto the bolt; these lifted the disk off the back of the box, allowing it to spin freely.
Wendy used metal tubing to give height to a fun polymer sprig. Using shears, she made two small cuts in the tubing and then bent the clipped section outward, creating a flap. This flap provided a grip for the polymer on the otherwise slick metal surface.
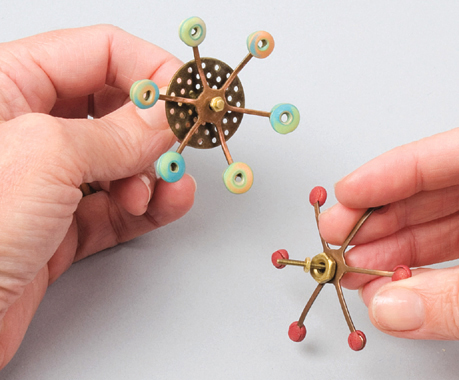
While visually simple, Julie’s spinning spokes were by far the thing that others in the house chose to play with first.
“Making our collaboration was like building a house of cards. A few of the cards fell during the process (amid hoots of laughter and a bad word here or there). We were holding our collective breath as we added the final card; then we exhaled with delight when our house stood on its own.”
—Julie
Thanks to Robert, micro bolts and nuts were aplenty on the team’s table. As with the balls shown on the top of the frame, an entire “contraption” could be held to the side of the box simply by embedding a micro bolt into one end of a polymer ball and adding a U-shaped wire into the other end before curing. Though complex, the entire sculptural piece is deceptively light, as Wendy created the dangling rings and pod using Sculpey UltraLight after being inspired by the shapes and forms that Sarah and Dayle were creating (see this page).
Micro fasteners were used to connect many of the items to the box. The bolts easily embed into raw polymer, becoming secure when the piece was cured.
Wendy continued to use those thin, springy bracelets—this time to add an unusual movement to her subverted sea-like creations.
Julie’s prized items from the tray were vintage brass spokes that she purchased in an antique store. She embellished them with polymer, and stacked them with copper sink screens and nuts. The pieces were threaded onto small thin bolts, and, as with the spinning disk, extra washers were added to create lift and to facilitate movement. She bolted both pieces to the box.
Wendy threaded a chain through a pulley, decorating the ends with pre-cured polymer pieces that resemble the forms she created for her Subverted Bracelet. She fashioned a base from hammered metal, which she then nailed to the box. By the week’s end, everyone in the house delighted in playing with the Cabinet of Curiosities, but which of the women would take home the prize? They agreed it would be treated as a time-share and visit each home over the years to come.
“The way the piece came together strengthened my feeling that allowing others to participate in my work—adding elements of their own, suggesting new and better ways to do things, even gently critiquing my contributions—can make me a better artist. My only regret is that readers can’t reach right into the pages of this book and play with this piece. It is a joy!”
—Judy
Judy embellished several orphan router bases with her signature striped and checkerboard cane slices. She then added the trimmed pencils and paintbrush, symbolizing Wendy’s drawing and painting contributions and providing a great tactile addition.

