2 Creating New Documents and Queries
Create queries graphically with the highly intuitive and enhanced Query Panel in Web Intelligence. Use the Result Objects pane and Query Filters pane to access the data you need from universes, Excel or text files, free-hand SQL, analysis views or web services, and then create and share powerful analysis documents with business users.
This chapter takes you through the first steps of creating a Web Intelligence document from within the BI Launch Pad portal. It describes a simple workflow starting from a relational universe and describes how to create a query from it through the Query Panel, and filter the retrieved dataset with filters and prompts.
All these steps are easily done through Web Intelligence Query Panel which provides business users with an intuitive interface for retrieving and filtering data. Queries are created graphically by selecting objects (database fields) to query or to filter. This collection of objects is translated a generated SQL statement sent to the database.
Specific versions of this Query Panel are also available for other data sources: Excel and text files, Free-Hand SQL, web service and analysis views. Query Panel’s advanced capabilities, like accessing SAP data sources, multi-dimensional universes, query stripping or multi-queries are covered in Chapter 12 to Chapter 14.
Whatever your data source, you can set some useful options to your document.
2.1 Creating a Web Intelligence Document from a Universe
The portal interface in SAP BusinessObjects BI 4.2 provides two ways to launch the Web Intelligence query and analysis tool in the BI Launch Pad. After logging on to the BI Launch Pad and going to the Home tab, you’ll notice a column on the right-hand side of the page with six application shortcuts. These links are beneath the My Applications heading.
Figure 2.1 shows the shortcut icons for these six applications in the BI Launch Pad:
- Module
- Analysis Edition for OLAP
- Information Steward
- Crystal Reports for Enterprise
- BI Workspace
- Web Intelligence
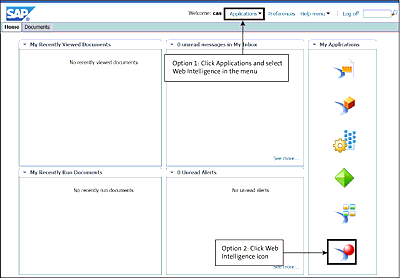
Figure 2.1 Launching Web Intelligence from BI Launch Pad
An alternate method of launching Web Intelligence from within the BI Launch Pad is by clicking on the Applications link located in the top menu of the page. Links to the same six applications as previously described will appear but in a different order.
Figure 2.2 shows the result of clicking on the Applications menu link and selecting Web Intelligence from the list provided.

Figure 2.2 Launching Web Intelligence from the Applications Menu Link
An alternate method of launching Web Intelligence is to click its icon in the bottom of the pane in the right side.
If you have set Web Intelligence Java Applet as your preferred client (see Chapter 1, Section 1.3.2), then it opens after the security warning and the splash screen. Otherwise, if you have selected the Web Intelligence HTML client, then the HTML version opens almost immediately.
In both cases, Web Intelligence displays to a blank screen with all of the shortcut icons disabled except for two choices:
- Create a new document ([Ctrl)+[N))
- Open (retrieve) a document from the server ([Ctrl)+[O))
From the Web Intelligence tab itself, you have additional options to interact with the document by clicking on one of three small icons located beside the document name. This is where you can enlarge the screen by opening the document in a new window or simply close the Web Intelligence application. There are three clickable icon options on the Web Intelligence tab:
- Open in a new window
- Pin (or unpin) this tab
- Close
Figure 2.3 shows the options available after launching the Web Intelligence application and before a document is created or opened.
Click on the Blank Document icon to create a new Web Intelligence document.

Figure 2.3 Options Available before Creating or Opening a Document
As shown in Figure 2.4, the Create a Document dialog box opens and proposes you to create a blank document based on seven possible data sources:
- Universe
- Excel
- BEx
- SAP HANA
- SAP HANA Online
- Analysis View (this data source is not supported in Web Intelligence HTML)
- Free-hand SQL
The No data source option allows you to start creating a document without any data source.
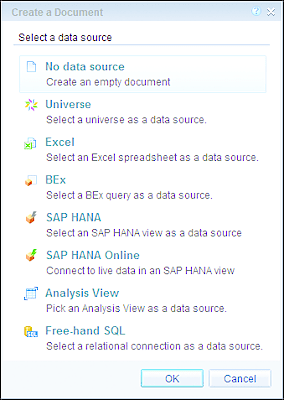
Figure 2.4 Selecting a Data Source for a New Document in Web Intelligence Java
In addition of the data sources supported in HTML and Java Applet, two additional data sources can be used to create Web Intelligence documents while working in the Web Intelligence Rich Client (see Figure 2.5): Text and Web Services.
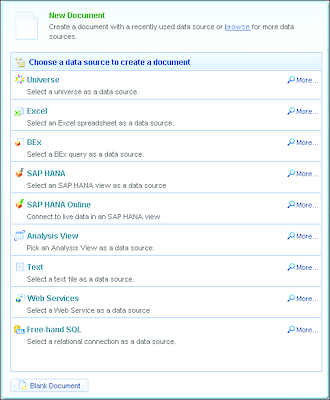
Figure 2.5 Data Source Types Available in Web Intelligence Rich Client
As this is the most common data source, to introduce you the Query Panel, we’ll first describe the workflow to create a new document from a universe; other data sources being presented in Section 2.6.
The patented SAP BusinessObjects semantic layer known as the universe remains the primary method for connecting reporting documents to traditional data warehouses and relational databases. Historically, universes were created in the tool named Designer, renamed into Universe Design Tool in SAP BusinessObjects BI 4.0. SAP BusinessObjects 4.0 also introduced the Information Design Tool, a new universe creation tool that creates a new universe format (UNX). This new universe format can be created from multiple sources and from multidimensional sources.
The objects in your universes should be consistently named with business terms to provide users with the simplest and most intuitive approach to retrieving the data they need.
Additional Reference
For more details on universes, you can refer to Universe Design with SAP BusinessObjects BI: The Comprehensive Guide (SAP PRESS, 2014, www.sap-press.com/3412).
But little has changed from a user’s perspective when it comes to connecting to a universe to query a database. Database fields, known in the universe as objects, are used in the Query Panel to retrieve data and to restrict the results to return only the information needed.
After selecting Universe as the data source for a new document, you’re presented with a list of available universes that you have permission to access. Click on a universe in the list, and click on Select to proceed. Figure 2.6 shows an example list of available universes that can be used as a data source.
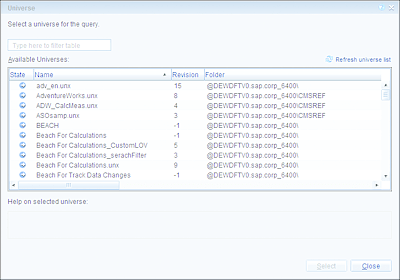
Figure 2.6 Universe Selection
After you make your universe selection, the Web Intelligence tool will be launched and opened to the Query Panel. Before you can begin analyzing information and creating reports, you need to retrieve information from your data source. The Query Panel is your window for accessing that data.