Denali means “the high one” in Athabaskan. Previously called Mount McKinley, the name was officially changed to Denali in 2015. The highest peak in North America, the summit is 20,237 feet (6,168 m) above sea level. The first well-documented ascent was in 1913, but the West Buttress route, which is the most popular one, was first documented in 1951. It can get extremely cold on top, with temperatures as low as -75°F (-59°C). Add windchill and it can get as cold as -118°F (-83°C). Bring good winter gear!
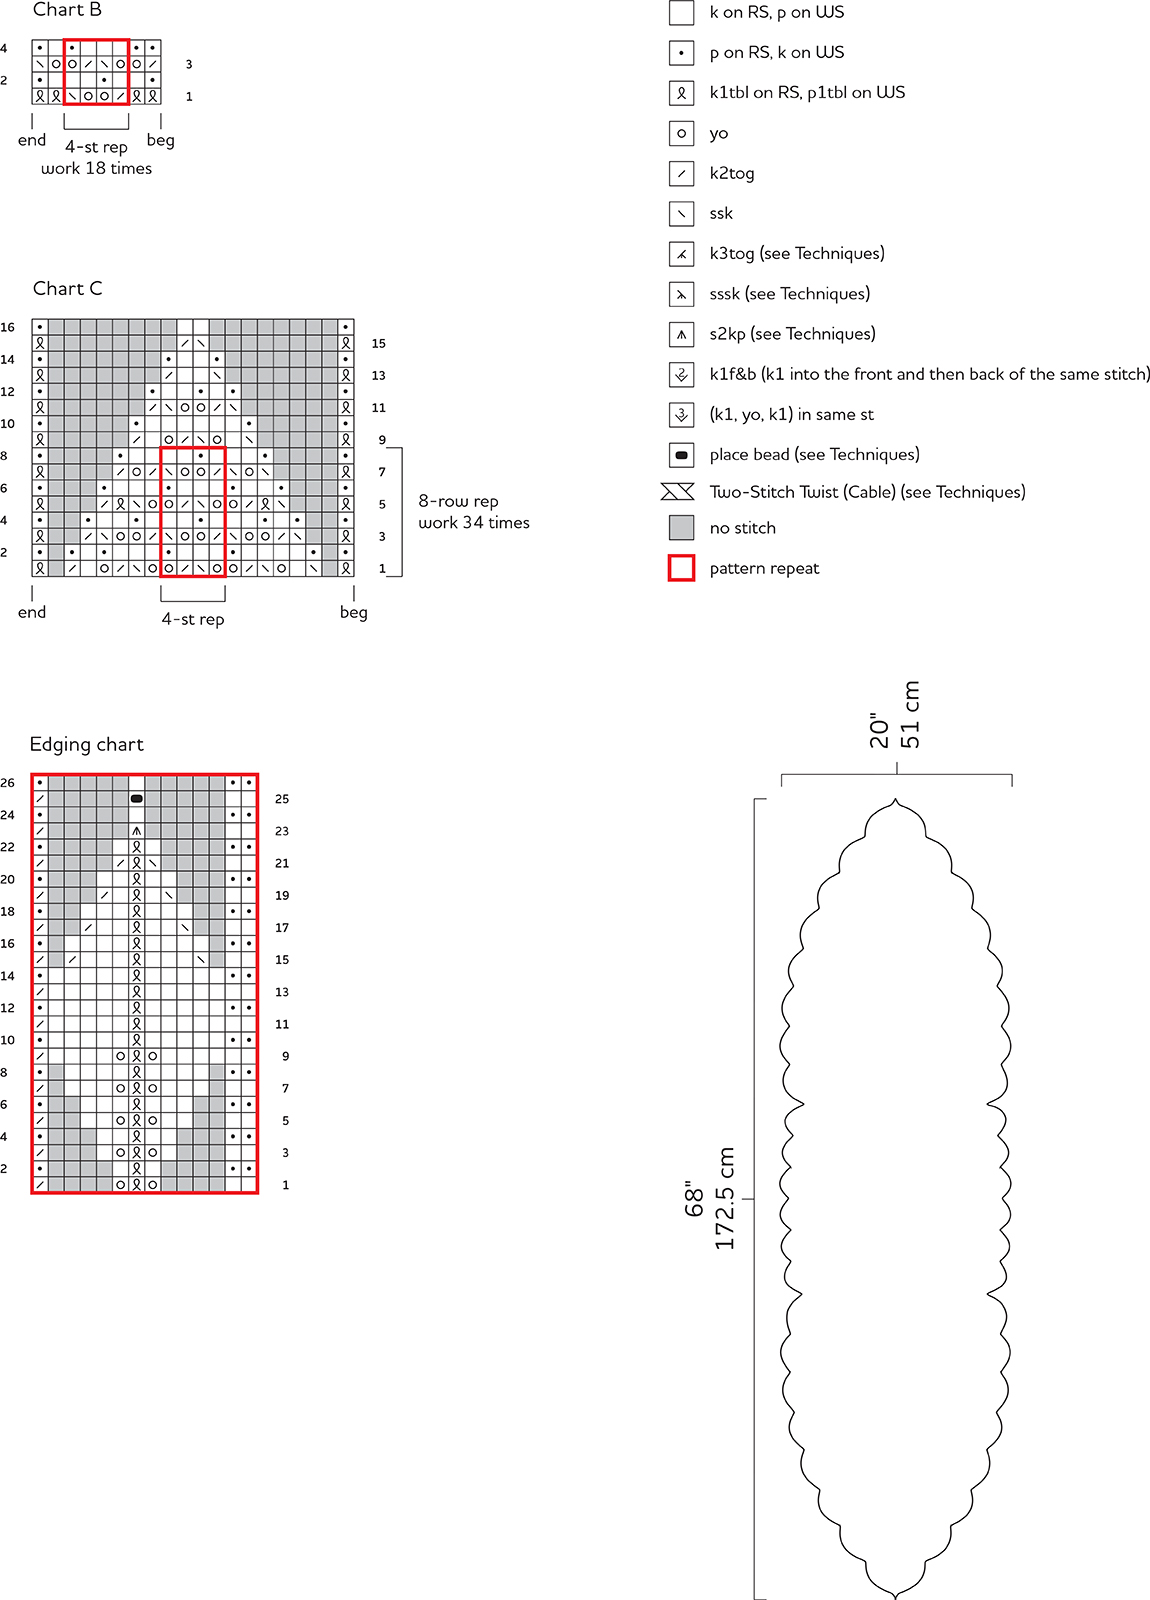
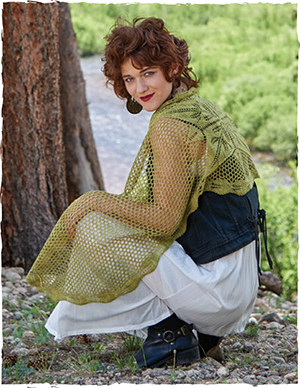
This project starts from the center, with large beaded leaf motifs. The hex-mesh “wings” are then worked out from opposite sides. Finally, a leaf border is worked along each long edge and finished at the points.
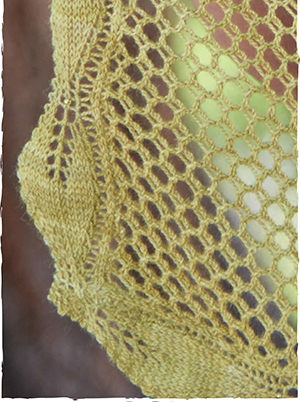
18" (45.5 cm) wide and 66" (167.5 cm) long.
Laceweight (#0 Lace).
Shown here: A Verb for Keeping Warm Reliquary II (80% superfine merino, 20% silk; 875 yd [800 m]/ 100 g): Succulent, 1 skein.
Size U.S. 1.5 (2.5 mm): set of 5 double-pointed (dpn), 16" (40 cm), 24" (60 cm), 32" (80 cm), and 40" (100 cm) circular (cir). Adjust needle size if necessary to obtain the correct gauge.
Smooth waste yarn; 20 g Toho 8/0 Japanese seed beads in olivine/color-lined metallic antique gold #378b; size U.S. 14 (0.6 mm) steel crochet hook, or size to fit beads; marker (m); locking markers (m) (optional); point protectors; cable needle (cn) (optional); small stitch holder; tapestry needle; stainless T-pins; blocking mats; 4 long very flexible blocking wires.
20 sts = 4" (10 cm) over St st, blocked and relaxed.
Beads: See Techniques.
Managing double yarnovers at the start of the round: (on odd-numbered Rounds 3–35, 45–55, 63, 67, and 71). See Techniques.
Dealing with stitch markers when the beginning of the round shifts: I find it easier to use only one marker for the beginning of round. If you want to use a marker between every chart repeat, I have two suggestions. First, use a unique marker for your beginning of round because that one is critical. Second, treat each marker the same way you treat the beginning-of-round marker (see note above). When a double yarnover or a double decrease is worked over the marker, you will have to “borrow” a stitch from the next repeat and therefore will have to move the marker one stitch over and return it to the original spot once you are done.
All pattern rows are charted. Some portions of the shawl are worked in the round and others are worked back and forth. When working in the round, read all chart rows from right to left, and there are no wrong-side rows. When working back and forth, read right-side chart rows from right to left and wrong-side chart rows from left to right.
A word about slipping selvedge stitches. Don’t! This piece was designed to block freely and slipped selvedge stitches will create a less flexible edge.
When you work on the double-pointed needles, use the yarn end from your cast-on to mark the beginning of the round. A locking marker can also be used if desired.
Two-Stitch Twist (Cable): See Techniques
There is a Two-Stitch Twist (Cable) straddling the beginning and end, and between each chart row repeat of Row 60 as follows: Slip marker at beginning of round. Knit 1. *Work to 1 stitch before end of chart row repeat, knit second stitch on left needle tip as shown in Techniques but do not remove from needle, knit first stitch through front loop, then slip both stitches from left needle. Repeat from * twice more. Work to just before last stitch of round. Slip that stitch onto right needle tip, remove marker, return stitch to left needle tip. Work final Two-Stitch Twist. Slip 1 stitch to left needle tip. Replace beginning-of-round marker to right needle tip. Begin Row 61.
With dpn, CO 8 sts using the long-tail method (see Techniques). Distribute sts evenly over 4 dpn, with 2 sts on each needle. Place marker (pm) for beg of rnd and join for working in rnds, being careful not to twist sts.
Next rnd: [K1tbl] around.
Next rnd: Working Row 1 of chart A, [k1tbl, yo, k1tbl] 4 times—4 sts inc’d.
Work Rows 2–72 of chart—304 sts. Change to shortest cir needle when there are too many sts to work comfortably on dpn, then to progressively longer cir needle as the number of sts increases. (See Notes about working double yarnovers at beginning/end of rnd and rep).
Cut yarn leaving a 9" (23 cm) tail. Sl 38 sts to RH needle. Place point protector onto right needle tip.
With RS facing, rejoin yarn to left needle tip.
Next row: (RS) With 24" (60 cm) cir needle, work Row 1 of chart B over next 76 sts. Place second point protector on left needle tip of longer cir needle and leave these rem 228 sts hold.
*Next row: (WS) Work over 76 sts on 24" (60 cm) cir needle only, work Row 2 of chart B as foll: beg at left edge of chart, work 2 sts before rep, work 4-st rep to last 2 sts, work 2 sts at right edge of chart after rep.
Work Rows 3 and 4, then rep Rows 1–4 thirty-three more times.
Next (dec) row: (RS) Work Row 1 of chart C as foll: beg at right edge of chart and work first 7 sts before rep, work 4-st rep to last 8 sts, then work 7 sts at left edge of chart after rep—2 sts dec’d.
Work Rows 2–8, then rep Rows 1–8 seven more times—12 sts rem.
Work Rows 9–16 once—4 sts rem.
Next (dec) row: (RS) Ssk, k2tog—2 sts rem.
Next row: Knit.
Next (dec) row: K2togtbl. Cut yarn leaving a 9" (23 cm) tail, pull tail through rem st.*
With RS facing, sl 76 sts to waste yarn, next 76 sts to 24" (60 cm) cir needle, then rem 76 sts to waste yarn.
Rejoin yarn to beg with a RS row, and work Row 1 over 76 sts. Rep from * to * for second long end.
Note: When picking up stitches along the point edges of the stole, lift the vertical strand of the garter stitch from the edge with the right needle tip. Make sure 212 rows have been worked along each long end, and pick up 1 loop for every 2 rows.
*With 40" (100 cm) cir needle and RS facing, beg at right point and pick up 106 sts by lifting along first long edge to held sts, sl 76 held sts from waste yarn along one side of center square to right needle tip, then pick up 105 sts along second long edge—287 sts.
Turn piece with WS facing. CO 4 sts using provisional method (see Techniques).
Next row: (RS) K3 sts just cast on, k2togtbl (last st cast on and 1 st from shawl), turn.
Next row: (WS) K1, p1, k2, turn.
Next row: Work Row 1 of Edging chart as foll: k2, yo, k1tbl, yo, k2tog (last edging st and next st from shawl), turn.
Next row: Work Row 2 of Edging chart.
Work Rows 3–26, then rep Rows 1–26 twenty-one more times, omitting bead on Row 25 of last rep—4 sts rem.*
Cut yarn leaving 18" (45.5 cm) tail. Place rem 4 sts onto holder.
Rep from * to * along second long edge but do not cut yarn.
With RS facing, remove provisional CO from sts at beg of edging along first side and place 4 sts onto right needle tip—8 sts.
Next (dec) row: (RS) K2, ssk, k2tog, k2—6 sts rem.
Next row: K2, p2, k2.
Next (dec) row: K1, ssk, k2tog, k1—4 sts rem.
Next row: Knit.
Next (dec) row: Ssk, k2tog—2 sts rem.
Next (dec) row: K2tog—1 st rem. Cut yarn leaving 9" (23 cm) tail, pull tail through rem st.*
Return 4 held sts at rem end to dpn, remove provisional CO from beg of edging along second side and place 4 sts onto same dpn.
With RS facing, use long tail and work second tip same as first.
Weave in ends but do not trim. Soak in cool water until fully saturated (about 30 minutes). Press to remove water, roll in a towel, and blot to remove extra water.
Weave 2 blocking wires through garter bars along each long edge of piece. Pin out to schematic measurements, pinning each leaf to form scallops and the point at each end where wires cross. Allow to dry completely. Stole will relax to finished measurements after removing pins. Trim ends.

* See Note on page 102 for beginning round and each repeat with LT.