Chapter 1
Key Principles of Power Yoga
In This Chapter
 Recognizing the difference between Traditional and Power Yoga breathing
Picking up the soft, graceful dance of Power Yoga
Understanding and using energy locks
Maintaining your focus
Setting your internal thermostat
Taking on a pose that lets you practice important Power Yoga principles
As yoga gained popularity in the United States, the different types of yoga began to separate into two major categories — soft and hard. Soft-form yoga practice emphasizes meditation, relaxation, and separate, distinct postures. Hard-form yoga emphasizes attaining physical strength, improving muscle action, and building physical vitality and endurance. Ashtanga Yoga (see Book I, Chapter 1) is a prime example of hard-form yoga, because it involves nonstop, high-energy routines that increase the circulation, raise body heat, and get your heart and lungs working. Power Yoga is a general name for any yoga style that closely follows Ashtanga Yoga.
To really enjoy (and benefit from) your Power Yoga practice, you need to utilize some power tools of your own: your natural powers of breathing, muscle control, movement, focus, and body heat. In this chapter, you discover how to concentrate on each of these tools and develop it into the Power Yoga techniques of connecting poses, focused gazing, muscle locks, and managed body heat. After taking a quick tour through your natural power tools’ “user’s manual” provided in this chapter, you’ll be ready to launch into some basic Power Yoga routines.
Power Yoga Breathing versus Traditional Yoga Breathing
All forms of yoga breathing are similar, but they have subtle differences. If you’re a practitioner of traditional soft-form yoga, you need to note a few critical differences between the Power Yoga breathing techniques covered here and those of your current yoga practice. With traditional yoga breathing, you use the same complete yoga breathing technique explained in Book II, Chapter 1. But in traditional yoga breathing, you expand the lower abdominal muscles on inhalations and contract those muscles on exhalation.
Incorporate proper yoga breathing, called ujjayi, in every Power Yoga pose. You know you have it down when you make a slight purring or hissing sound as you inhale and exhale. Follow these steps to become familiar with proper yoga breathing and refer to Book II, Chapter 1 for more information:
- Sit comfortably.
- Close your eyes and inhale slowly through your nose, fully expanding your lungs.
- Exhale just as slowly through your nose.
- Keep breathing through your nose and tighten your throat muscles a bit as you whisper “haaaaa” through your mouth.
- Continue breathing deeply and slowly, feeling and hearing the air passing through your slightly tightened throat and over the roof of your mouth.
 In Power Yoga breathing, you keep your abdominal muscles firm and slightly contracted. When you inhale, you expand your chest and lift your rib cage. As you exhale, your chest sinks and your lungs contract. Your abdominal muscles remain engaged throughout the breathing cycle. The Power Yoga breathing technique is best for giving you strength and stability as you practice your poses, and this added stability can help you avoid injuries.
Making the Most of Vinyasas: Mastering Movement in Power Yoga
Vinyasas, or connecting movements, link the power of your Power Yoga poses like electrical lines that carry power between generating stations. As you use a vinyasa to move from one pose to the next, you build upon the body heat and life-force energy that your exercises generate, and you maintain the power of your routine’s momentum. The powerful conditioning and aerobic boost of the vinyasa connecting movements are what put the power in Power Yoga.
Moving with your breathing
Your breathing brings strength, vitality, and life to your vinyasa. As you move through your Power Yoga routines, always remember to move with your breathing. You can use your breathing to set the speed at which you move from one pose to the next. Use these guidelines for coordinating your breathing and movement during Power Yoga practice:
- As a general rule, exhale as you move into a yoga posture, and inhale as you move out.
- Inhale when you’re going against gravity, and exhale when you’re going with gravity.
- Expand your chest as you inhale, and contract your chest as you exhale.
- Inhale before you move into a strength vinyasa, and then relax into the movement.
Using connecting links
In Power Yoga, you use connecting poses, or vinyasas, to enter and exit each posture, or asana. These connecting movements help you maintain the energy flow of your routine. For example, if you’re in a seated posture and you need to go into a standing pose, you can scramble to your feet, tug at your workout clothes, and slowly shake yourself into position. The calm, gently flowing movement of a vinyasa, however, can transport you from one posture to the other with no break in energy, keeping the natural rhythm you’ve developed in your routine. Well-formed vinyasas make up the dance of Power Yoga. Do them correctly, and you’re in Swan Lake; ignore them, and your routine is Funky Chicken all the way.
Some vinyasas are very strenuous. Because one function of the vinyasas is to generate body heat, strenuous vinyasas are referred to as hot. Cool vinyasas are less strenuous movements that you use to connect poses in the warm-up and cool-down phases of your Power Yoga routine.
Combining grace with power in your movements
As you move from one pose to the next during your Power Yoga workout, try to enter and exit each posture with grace and elegance. In all forms of yoga, you develop power by developing softness. The smoother, gentler, and more controlled your movements are, the more they strengthen your body. And don’t forget that the way you move has a big impact on your state of mind. When your body’s jumping and jerking, your mind is twitchy and unsettled. But when you move smoothly and softly, your mind is calm, relaxed, and in control.
 If you’re new to yoga, you may be a bit awkward and uncoordinated, moving between poses like a clumsy bull. Many beginners to Power Yoga move into vinyasas in spurts of speed. As you work to refine your technique, think of each posture as a delicate flower and, as you move between the postures, try to float like a butterfly so as not to disturb the calm beauty of the pose after you land. As you gain experience, your Power Yoga practice will improve in many ways; careful, controlled movement is just one of the improvements you’ll notice over time.
Time teaches you to go with the flow of your practice. Your practice becomes smooth and fluid and, ultimately, takes on the quality of a slow, soft dance. As you combine this gentle yet powerful movement with your deep breathing and mental focus, you gain the maximum Power Yoga benefit.
Controlling the Gateways of Internal Power (Energy Locks)
One of the important natural tools your body makes use of during Power Yoga practice is the bandha, or energy lock. You engage an energy lock by contracting certain muscles in your body; these contractions, or locks, direct through your body the flow of energy (the prana) that you create during Power Yoga exercises. Not only do energy locks help direct the flow of energy to high-demand areas during your Power Yoga practice, but they also can give you energy boosts and added stability and tone your stomach and cleanse your internal organs.
Understanding how energy locks work
To better understand the way energy locks work, visualize the workings of your circulatory system for a moment. Your heart pumps blood throughout your body, using your veins and arteries as the delivery system. When you practice Power Yoga, you create an enormous amount of life-force energy. This energy travels throughout your body through unseen channels called nadis. The energy locks act as valves to regulate the flow of life energy through the nadis in your body. In this respect, your bandhas work much like your heart, to control the flow of essential forces through your system.
Using muscle locks for a powerful practice
You should engage your energy locks each time you hold a yoga asana or pose. You should release the bandha as you leave a pose, but often you reengage the energy locks during your vinyasa, or connecting movements.
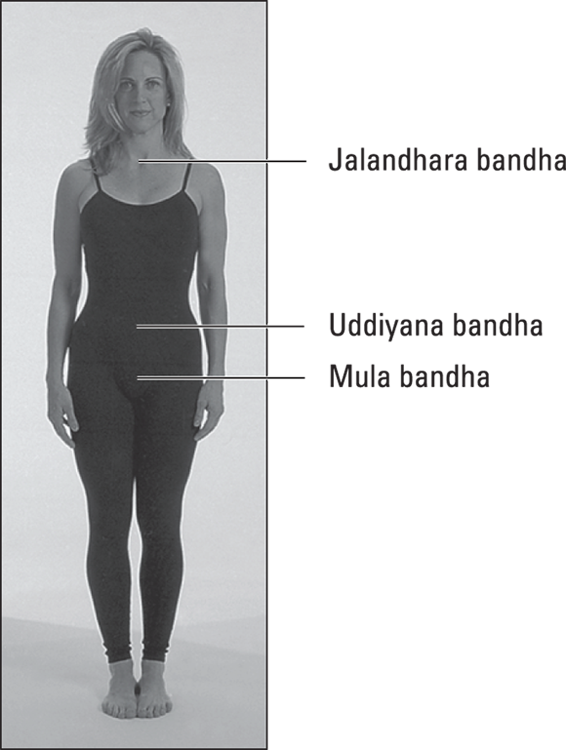
Unlike the nadis (which you can’t see), energy locks are made up of muscle groups in your body. To engage a bandha, you physically contract muscles in one of three areas of your body. Each of these three energy locks has a special name (see Figure 1-1):
- Mula bandha: The Mula bandha is called the root lock, and it’s located in the perineal muscles between your genitals and anus. To identify these muscles, imagine that you need to make an emergency trip to the bathroom and the nearest one is w-a-a-y down the hall. As you take that long walk, you engage your Mula bandha to fend off an unfortunate accident. Isn’t that a great energy lock to have available?
- Uddiyana bandha: The name Uddiyana means “flying up.” This bandha is located about three fingers’ width below your navel. In this bandha, you lift your stomach, drawing up your diaphragm. This bandha helps flatten your stomach. In your Power Yoga practice, however, this bandha firms your abdominal muscles; you use it in conjunction with the Mula bandha.
- Jalandhara bandha: The Jalandhara bandha is called a chin lock. You engage this bandha by stretching the back of the neck as you lower your chin into the notch in your breastbone. You engage this bandha in a few poses and in some yoga breathing exercises, but you don’t use it nearly as often as you use the Mula bandha or the Uddiyana bandha.
Keeping Your Eyes on the Power Yoga Prize: Directing Your Gaze
“Looking good” during Power Yoga isn’t about wearing the right clothes, having the right hairstyle, or sporting the right genetic background. Nope, it refers to the way you direct your gaze as you move into and hold each Power Yoga posture. The way you direct and hold your gaze during Power Yoga practice has an impact on your mental state, your posture, and your ability to remain focused and energized.
In yoga, the gazing point for each posture is called a drishti, which means both “looking out” and “looking in.” The purpose of the drishti isn’t to get your vision fixed on a particular place or part of your body; it’s actually an exercise in turning your gaze inward. When you gaze inward, you can check to make sure that you’re breathing properly, that your posture alignment is accurate, and that your energy lock is engaged. Gazing inward is a form of sense withdrawal, so your gaze is a tool to help you in this important part of Power Yoga practice. When you’re “doing the drishti,” you’re focused.
In most Power Yoga postures, you gaze in the direction of the posture’s stretch. If you want to get technical about it, you can memorize the focus or drishti gazing points listed in the “Finding points of focus (drishti)” sidebar in this chapter.
Benefiting from Body Heat
Power Yoga practice generates body heat. This body heat comes from the inside out, sort of like the heat that forms in a microwave oven. Your body heat is an important natural tool in Power Yoga. Body heat makes your muscles, tendons, and joints more pliable.
 Body heat is a tool that you really need to use correctly, or it can hurt you. Follow these guidelines to get the most benefit from the body heat that you generate during your Power Yoga workouts:
- As you sweat, you lose fluids, so drink lots of water before and after your Power Yoga practice.
- Try to work out in a warm (but not hot) room.
- If possible, have fresh air entering the room, but try to avoid blasts of cold air. Your muscles are most flexible in a warm environment, but quick changes in temperature can be damaging to them (and your entire body, for that matter).
Putting All Your Power Tools to Work
Reading about how to practice yoga breathing, energy locks, and points of gaze is one thing. But the real trick is figuring out how to put them all to use while you’re practicing a Power Yoga pose — especially one that requires lots of balance. But you can do it! To boost your confidence in your ability to perform Power Yoga, try the asana in this section. This asana requires you to pay special attention to balance. The extended foot one leg stand posture (utthita hasta padangusthasana) trains you to incorporate all your natural tools into your Power Yoga practice.
 In Sanskrit, the word utthita means “extended,” hasta means “hand,” and padangustha loosely translates to “big toe.” In this posture, you stand on one leg while extending your other leg forward and grabbing your big toe with your hand.
The extended foot one leg stand posture stretches and strengthens muscles in your legs, expands your chest, and opens those tight hips. In addition, this posture is wonderful for teaching balance and coordination. Follow these steps to perform this posture:
-
Stand with your spine straight and your shoulders back, and extend your arms down the sides of your torso; keep your vision forward.
This is mountain pose. (Refer to Book II, Chapter 3 for more on the mountain pose.)
-
Close your eyes for a few slow, deep yoga breaths while you maintain good posture.
Ground yourself firmly onto the floor, and be conscious and aware of your breathing.
- Open your eyes, and place your left hand on your left hip.
-
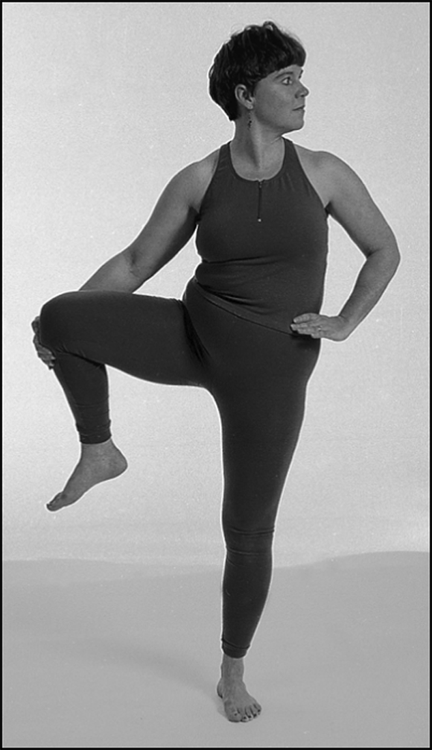
Pick your right foot up off the floor and, balancing on your left foot, bend your right knee and place your right hand around the outside of your right knee.
You should now be balancing on your left foot, holding your right knee with your right hand.
- Pull your right knee 90 degrees toward your right side as you open your hip.
-
Keep your torso and chest facing forward, and pull your right leg to your right side, turning your head to your left side and looking over your left shoulder (see Figure 1-2).
If you have trouble balancing, place your left hand on a wall for support.
- Put your power tools to work:
- Listen to the sound of your slow, deep breaths.
- Engage your Mula bandha by tightening your perineal muscles.
- Engage your Uddiyana bandha by firming and lifting your stomach.
- Direct your gaze (drishti) by looking over your left shoulder, parallel to the floor.
- Hold this positwion for 5 to 10 slow, deep breaths.
- Release your energy locks, turn your head back to the center, and exhale as you bring your right leg back to the center and lower your foot to the floor.
- Repeat these steps, but this time balance on your right leg, lift your left leg off the floor, and direct your drishti to the right.
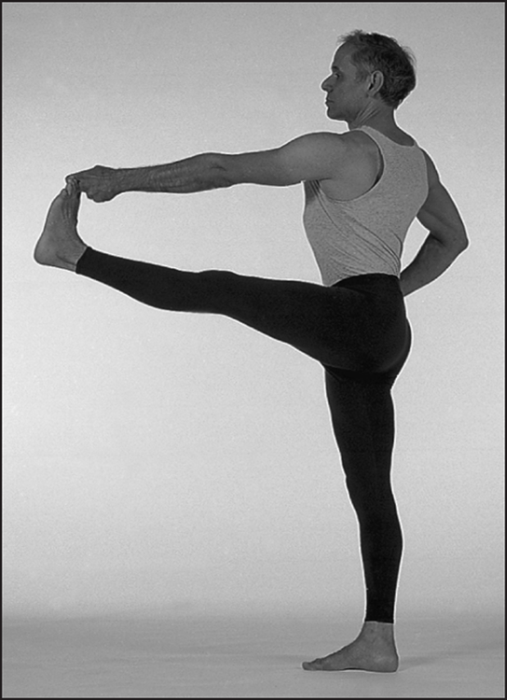
If you’re an advanced student, you can do a full version of this posture. Follow the same series of steps, but instead of holding onto your knee, grab your right big toe with the first two fingers of your right hand and fully extend your leg out to the front and off to the side, as illustrated in Figure 1-3.