Installing an L2L Irrigation System
Installing an L2L system requires very basic plumbing and landscaping skills. You’ll be working with plastic pipe and tubing, which are easy to cut and assemble. In general, the most difficult aspect of the installation is drilling the exit hole for the pipe. If drilling through the wall or floor of your home feels daunting, get help from a knowledgeable friend or hire a handy-person to help you. Most systems take a day or two to install, though with help can go more quickly. Make sure to source the materials for your system a few weeks before you plan to install it. Depending on what your local hardware and irrigation stores stock, you may need to mail-order a few of the parts; see Resources for online retailers. You can also build a PVC-free system using Blu-Lock or Eco-Lock fittings (see Resources).
See Plumbing Basics for Greywater Installation for details on parts and basic techniques.
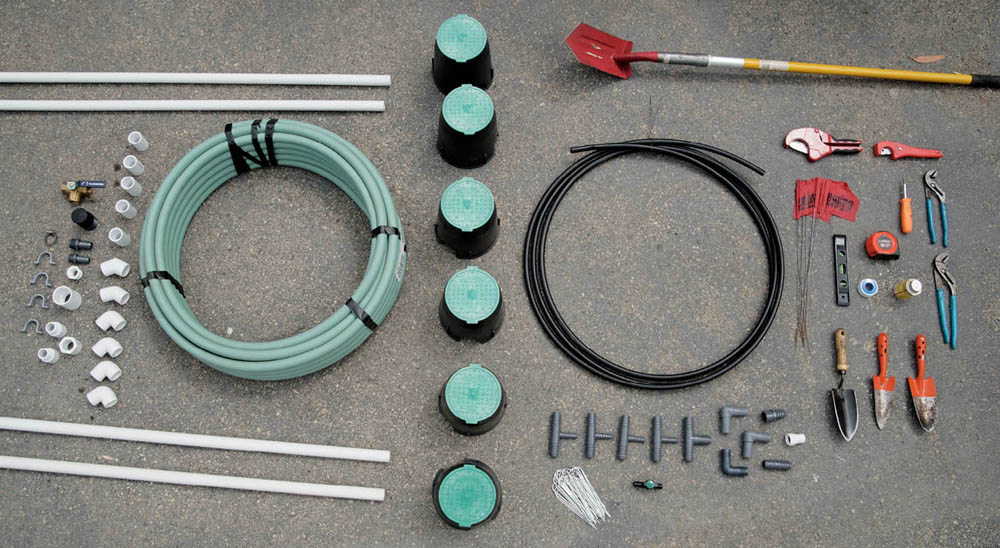
Materials
Interior Plumbing
- Piece of wire
- Pipe thread tape
- Two 1" PVC male adapters (slip x MPT)
- One 1" PVC male × barbed adapter (or 1" male × 3⁄4" barbed adapter if your washer hose is smaller; measure the inner diameter of the end of your washing machine drain hose to determine which size you need. Or use a 3⁄4” barbed adapter screwed into a 1" × 3⁄4” bushing instead)
- One brass threaded 3-way valve (L-type, full-port valve; see step 2)
- One 1" hose clamp
- Two 11⁄4" 2-hole straps with screws
- 1" schedule 40 PVC pipe (as needed)
- 1" PVC 90-degree and 45-degree elbows (as needed)
- One air admittance valve (AAV) or auto-vent
- One 1" × 11⁄2" PVC reducer bushing
- One 11⁄2" PVC female adapter (slip × FPT)
- One 1" PVC tee
- PVC glue (solvent cement; use PVC primer, if recommended)
- 1" PVC couplings (as needed)
- 1" 2-hole strap with screws (as needed)
Landscape Irrigation
- One 1" barbed × slip (or barb × insert) transition coupling
- 1" HDPE tubing (as needed)
- 1⁄2" PE tubing (as needed)
- 1" × 1⁄2" barbed reducing tee (one for each “irrigation point,” or branch from the main line to each mulch basin)
- 1" × 1" × 1" barbed tee (quantity as needed; one for each branch from the main line)
- Large garden staples (for 3⁄4" or 1" tubing; use one every few feet)
- 1⁄2" green- or purple-backed ball valves (full port ball valves; quantity as needed, usually 2 to 4)
- Exterior house paint
- Construction-grade sealant (see step 15)
- Optional, for flushing the system with a garden hose: either one 1⁄2” slip x 3⁄4" female hose thread (this fitting inserts into a 1" barbed × slip fitting); or one 3⁄4" slip × 3⁄4" female hose thread (this fitting inserts into 1" pipe); or one 1" PVC slip union and one brass female hose thread × 3⁄4" male hose thread fitting. (See step 12)
Tools
- Drill and 1⁄4" pilot bit (long enough to go through your wall or floor)
- 11⁄2" hole saw (optional: masonry bits for stucco)
- Flathead screwdriver
- Two tongue-and-groove pliers (or two large wrenches)
- Hex-head (nut) driver
- Permanent marker
- PVC pipe cutter or handsaw
- Level
- Shovel
- Mattock or pickax
- Narrow trenching shovel
- Tubing cutters or large clippers
- Hammer
- Thermos (full of hot water) and a cup
- Painting supplies and caulking gun
Finding Parts to Build an L2L System
Gathering parts for your system will take you to several stores (irrigation, plumbing, and hardware) or online retailers (see Resources).
Tubing. Find 1" tubing, either high-density polyethylene (HDPE) or polyethylene (PE, or “poly”). HDPE is stronger and less likely to kink than PE. Irrigation stores sell several types of HDPE tubing, all suitable for greywater. Don’t use tubing that is visibly kinked or seems easy to kink (try bending it to see). In urban areas the only 1" option typically is Eco-Lock from Home Depot or Blu-Lock; find a distributor on the manufacturer’s website (Hydro-Rain).
3-way valve. Brass 3-way valves (L type), used in hydronic heating, often are hard to find locally. Larger plumbing supply stores carry them, and sometimes general building supply stores or irrigation stores will order them. Get a full port valve, available from brands such as Legend Valve, Webstone, and Red-White. The inside of a full port valve is not reduced in size, whereas regular port valves are a pipe size smaller inside, which creates more friction in the system. Banjo makes a suitable full port 1" plastic valve.

PVC fittings to connect to 3-way valve
Air admittance valve (AAV). Use either an official AAV ($20) or a lower-cost auto-vent or in-line vent ($4). Both are available from plumbing suppliers and hardware stores. Note that the cheaper one isn’t allowed in standard plumbing applications but often is okay to use in an L2L system because it’s connected only to the irrigation system, not the household plumbing.
Mulch. Use chunky wood chips (1 to 11⁄2") from a local tree trimmer. One-half of a cubic yard is usually enough. Or, buy wood chips from a landscaping store (loose or bagged).
1" barbed fittings. Find these at irrigation stores or online (for example, dripworks.com).
PVC-free Parts. Source Eco-Lock or Blu-Lock from a local irrigation store or order from Home Depot. Use a 11⁄2" × 1" poly reducing coupling made by Banjo to connect the AAV.
System using Blu-Lock fittings
Installing the System

Watch out for plumbing and electrical inside the wall when you drill.
1. Make an exit hole for the pipe.
To exit the house you need a 11⁄2" hole, either in the wall or floor. Identify the best location for the hole. Exit through the wall if you don’t have a basement or crawl space, the area you plan to irrigate is adjacent to the wall, or the washing machine is on the second story and there is living space below the floor. Exit through the floor if you have an accessible basement or crawl space and can run the pipe out through a screened vent or other opening (you won’t have to drill a hole in an exterior wall or foundation wall).
Before you drill, look for hidden obstacles in the wall, such as electrical wires, pipes, or studs. Drill a 1⁄4" pilot hole with a long, thin drill bit (called a pilot bit) that can pass through the entire wall or floor. Use a masonry pilot bit for stucco walls. Drill carefully; stop if you hit anything in the wall. If necessary, try different spots until you exit freely. Insert a piece of wire into the hole and wiggle it around to check for nearby pipes. Check the exit hole from the outside to see if it’s a good location, for example, not right next to the window frame. Since the pilot hole represents the center of the 11⁄2" hole, make sure there’s at least 3⁄4" clearance around all sides of the pilot hole.

Step 1. Drilling a hole through the floor with a hole saw
When you’re confident you’re drilling in the proper location, use the pilot hole as a guide and drill the exit hole with a 11⁄2" hole saw. To make a clean-looking hole on both sides of the wall, drill from both the inside and the outside. When drilling through several wall layers, the hole saw will get filled up and you must remove the “cookie” that forms inside the bit (using a screwdriver) before you’re able to drill all the way through. Be sure to drill either straight out, or at a slight downslope, so the pipe will gently slope downwards, directing any rain that lands on the pipe outside away from the building.
If your wall’s exterior siding is wood or vinyl, use a regular hole saw bit for the hole. If the siding is stucco or fiber cement siding, you can use a special masonry hole saw bit, but these are expensive. Alternatively, trace the outside of a scrap piece of 1" PVC pipe on the wall with a marker, then drill around the hole with a smaller masonry bit. Chip out the circle with a hammer and chisel, then snip the lath or wire behind with metal snips (for stucco). After the stucco or fiber cement is removed, drill the rest of the way using a standard hole saw.
Note that some building codes require exit holes to be “fire rated” if they are within a certain distance from another building; for example, 5 feet. If other homes are very close to yours, check with your permitting agency about fire rating requirements.

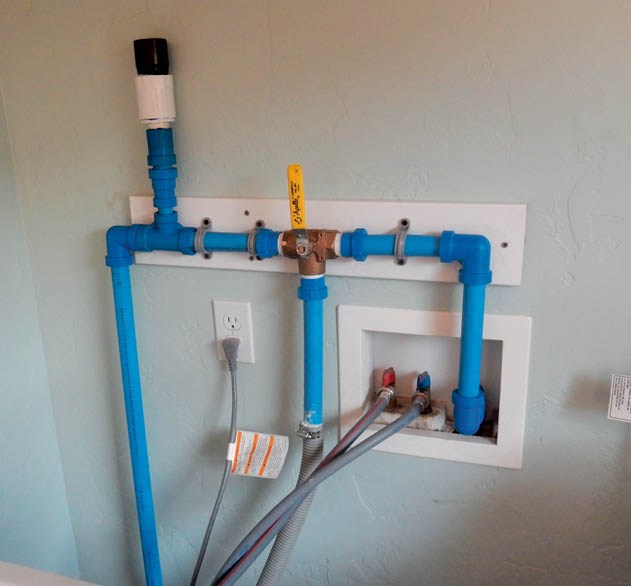
L2L indoor plumbing: Washing machine connected to diverter valve; water flows either to landscape or to sewer/septic.
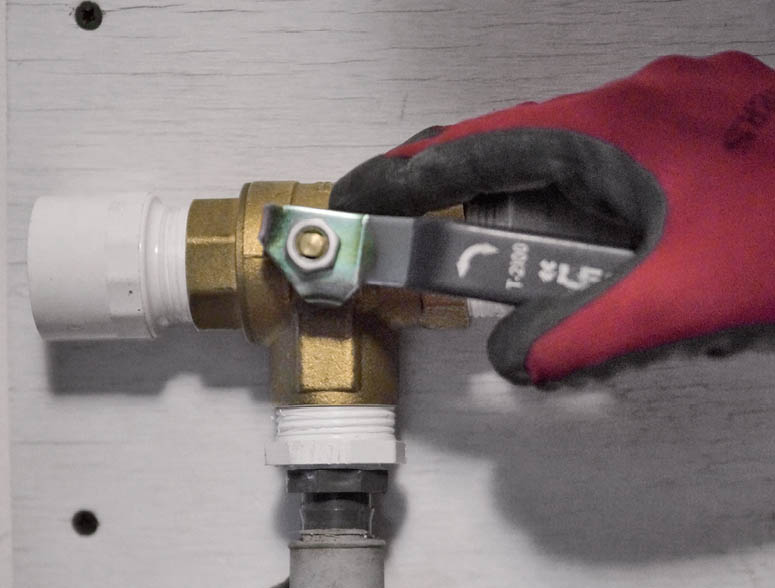
2. Prepare the 3-way valve.
Wrap pipe thread tape clockwise around the threads of the two 1" male (non-barbed) adapters (clockwise as you face the open end of the threaded side), wrapping tightly three times around. Screw the adapters into the right and left sides (opposite ends) of the 3-way valve. Start gently by hand to avoid cross-threading. (If you cross-thread, the metal threads will strip the plastic threads and will leak.) The fitting should turn easily at first, then get harder. Do the same with the 1" male × barbed adapter (or 1" male × 3⁄4” barbed adapter for smaller washer hoses) in the middle outlet of the valve. Tighten the fittings snugly with tongue-and-groove pliers. Don’t overtighten, or the fitting could crack.
Place the hose clamp over the washing machine drain hose. Then push the hose over the barbed fitting on the adapter. Tighten the hose clamp over the hose and barbed fitting, using a flathead screwdriver or hex-head driver.


First screw the threaded fittings into the valve by hand, being careful not to cross-thread. Then tighten them with tongue-and-groove pliers.

Attach the washer hose to the valve with a hose clamp.

Parts to connect 3-way valve to washing machine drain hose
3-way parts together. Pipe thread tape used on threads and PVC glue on pipe joints create a watertight seal.
Note: Some hoses have a hard end portion that can be cut off. Others have a rigid U-shaped piece of plastic attached to the hose that can be removed. If the hose is too short or otherwise unsuitable, replace it (it’s easy to do). If it’s hard to fit the hose over the barb, soften the hose by heating it with a hair dryer or sticking it into a cup of hot water; when hot, the hose should fit on. Check this connection for leaks after you finish the system.
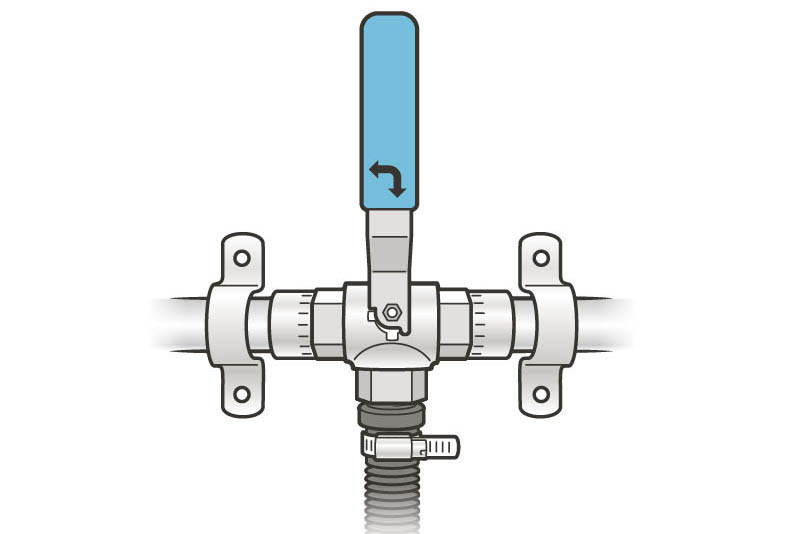
3. Mount the valve.
Decide where to mount the 3-way valve. The valve must be above the flood rim of the washing machine (the highest place water could fill) and have enough clearance so you can easily turn the handle. The valve must be strapped to a stud or other piece of wood mounted behind. (If there is no stud, attach a piece of wood behind the valve location.) Mount the valve with 11⁄4" 2-hole straps (if you strap over the pipe, use 1" straps), using a level to keep valve straight. The valve can be oriented in any direction (such as sideways or upside-down), but the washer hose must still connect to the middle port. Note: If you mount the valve sideways or upside-down, use a 90-degree elbow to run the pipe horizontal before the tee and AAV assembly.
Step 3: Decide where to mount the valve. Attach a piece of wood to fasten the strap to.
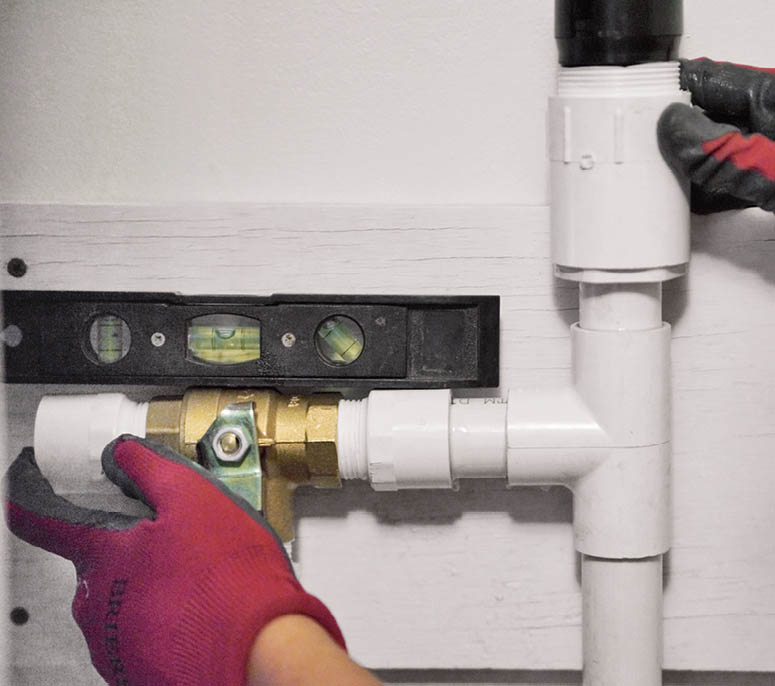
Mount the diverter valve to the wall.
4. Plumb to and from the 3-way valve.
Next, plumb the most direct route from one side of the valve back to the sewer/septic (where the hose previously drained). At this stage, you’re just dry-fitting the parts. If your hose previously drained into a utility sink, direct the PVC pipe into the sink in an out-of-the-way location. If your hose drained into a standpipe, plumb the PVC pipe so it extends a few inches into the standpipe. The standpipe should be larger than the PVC pipe so that there is room around the sides for airflow. If your existing standpipe is undersized, consider upgrading it.

Step 4: Plumb to and from the 3-way valve.
Plumb the other side of the valve to the exit hole to the outdoors. Try to maintain a slight downward slope to avoid having extra water drain back into the machine. Use 1" schedule 40 PVC pipe and either 90- or 45-degree elbow fittings. Measure, cut, and dry-fit (without glue) the PVC together to get an idea where the pipe will go. With glue, the pipe will slide farther into the fitting, up to the lip on the interior; take this into account when measuring so you don’t end up short. Leave several inches of pipe sticking out of the 11⁄2" hole (outside the building or below the floor).
Locate the air admittance valve (AAV), or autovent (see below). This must be at the highest point of the system. Position the AAV at least 6" above the flood rim of the washing machine and in a visible and accessible location.

Optional: Use a second washer hose or a flexible 1" tube to connect from the valve to the standpipe.
If you pipe through the floor or drop down to exit lower than the 3-way valve, locate the vent inside the laundry room. If the pipe travels directly out of the wall, at the height of the 3-way valve, the AAV can be outside. The valve may need protection in freezing climates; confirm that the specific valve you use is rated for outdoor use, or install it inside. In any case, the tee and AAV assembly will be located above the point where you drop the pipe down (either through the floor or, if outside the house, down to the soil).
3 locations for AAV

Note: If the plumbing to the sewer/septic feels tricky (i.e., a lot of tight turns), use a second washer hose or 1" flexible tubing instead of rigid pipe. Attach it to the valve via a second male pipe thread × barbed fitting and slip it into the standpipe instead of plumbing with PVC. You can buy a washer hose at most hardware stores.
Optional: Add a union fitting into the pipe in any location where you may want to easily disconnect it — for example, if you plan to paint the wall behind the valve and want to easily disconnect and reconnect the system, or to send a plumber’s snake down the standpipe to clean out a clog.
5. Assemble the AAV.
Glue the 1" × 11⁄2" reducer bushing into the slip side of the 11⁄2" female adapter. Take care that the glue doesn’t drip onto the threads on the other side of the adapter. Wrap pipe thread tape on the threads of the AAV, screw it into the threaded side of the female adapter, and hand-tighten the valve. Cut a 2" to 3" piece of 1" PVC pipe. Glue one end of the pipe into the 1" side of the bushing and the other end into the top of the tee.
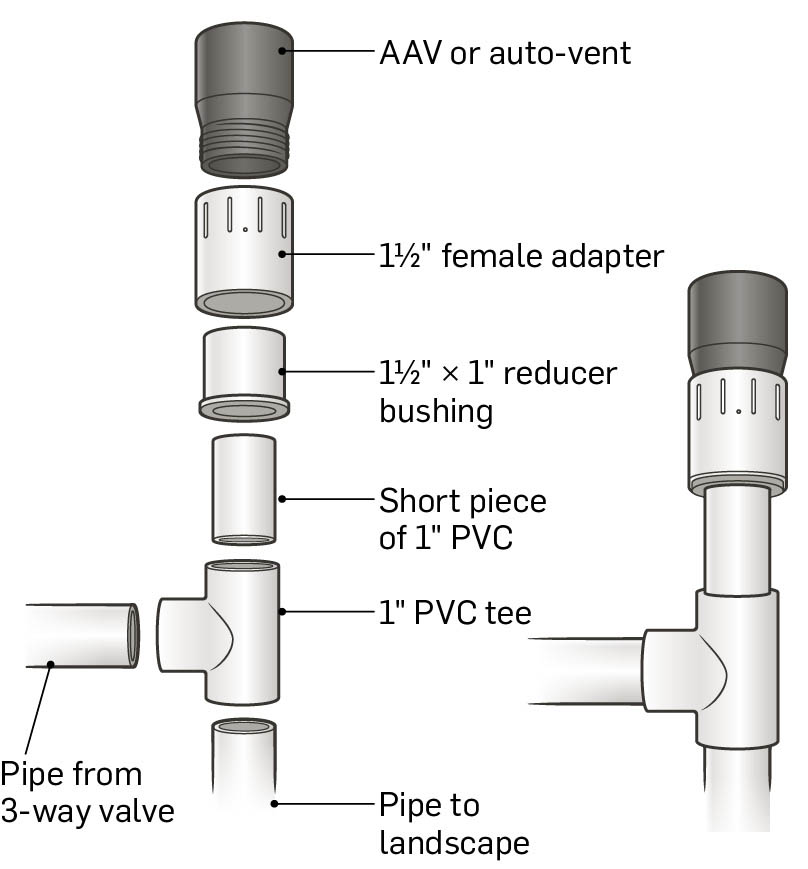
AAV assembly, separated and together
6. Complete the interior pipe runs.
Now you’re ready to glue the interior PVC piping. Before gluing, number and mark the fittings and pipes (with a permanent marker) so you’ll know what goes where after you disassemble the parts to apply the glue. Plan the best order to glue and avoid “gluing yourself into a corner.” Some of the glued joints allow for more flexibility than others; for example, the last two pieces in an assembly need space to be separated and pushed together.
7. Complete the remaining PVC pipe run.
Depending on your site, at this point you may have a short section of PVC remaining to reach the landscape, or you may need to pipe under the house through the crawl space before reaching the landscape. If the AAV is located outside, attach it to the pipe sticking through the house wall, and pipe down to the landscape. If the AAV is inside, connect it to the pipe extending through the floor and continue to the landscape. Try to maintain a downward slope whenever possible, and minimize fittings to reduce friction in the pipe. In the crawl space, strap the pipe to floor joists or available beams every 5 feet or so. Use 1" couplings as needed to connect long runs of pipe, and glue all joints.
Outside the house, use the 1" barbed × slip adapter (or barbed × insert) to transition between PVC and the irrigation tubing. The tubing will slip over the barbed side of the fitting. This often is the most convenient place to disconnect the irrigation portion of the system to flush the line. Either use a union so it’s easy to detach, or simply leave this connection unglued (it usually doesn’t leak, but if a small leak would be problematic don’t use this method).

Step 7: Run the PVC pipe outside.

Transitioning from PVC to HDPE tubing using a barbed x insert adapter (the gray fitting)
8. Prepare the landscape: dig the mulch basins.
To irrigate trees, bushes, shrubs, and larger annuals, dig a mulch basin in the drip line of the plant. See How to Dig a Mulch Basin for details. If you are irrigating vegetables or herbs in a garden bed, see Irrigating Raised Beds for advice on preparing the soil. You’ll either dig very small mulch pits or cover the soil with straw and irrigate onto the straw.

Step 8: Circular mulch basin around fig tree

Trench-shaped mulch basin in front of a row of citrus trees
Level the bottom of the basin.
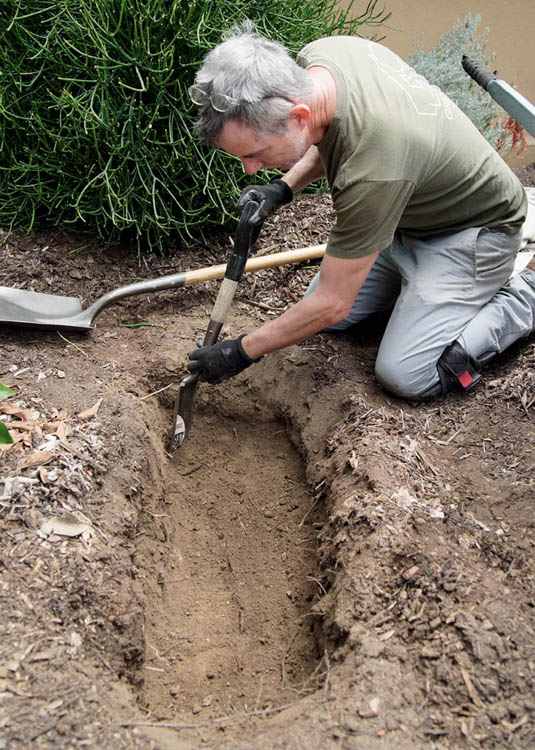
9. Trench to each basin.
In most sites, you’ll dig a trench for the tubing and bury it. Sometimes you can run the tubing on top of the soil in shaded locations; for example, along the edge of a fence, under a deck, or other out-of-the-way locations. Tubing can be in the sun, but it will last longer if it’s not. You may also leave it above ground once it’s inside garden beds.
Plan the run of irrigation tubing from the PVC pipe to all the mulch basins. Take the most direct route you can, with no sharp turns. Never kink or squish the tubing, which restricts the flow of water and could damage the washing machine pump. The tubing should run parallel to the basins but a few inches offset from each basin so when you install the tee the 1⁄2" tube will enter the basin (see Tubing Tips).
If there are any areas where the tubing may become damaged, such as under a swing set, transition back to rigid PVC in those locations.

Step 9: Trench for tubing

Make wide-radius turns with the tubing to prevent kinks.
Note: Avoid using 90-degree elbows for turns. Instead, make a wider-radius turn with the tubing. The tight turn in a barbed 90-degree elbow restricts the flow of water and creates a place for debris to get stuck.
Trenches should be about 4" deep and level or sloping downward. If the tubing runs up and down, it will be harder to distribute water evenly to the plants.
10. Install the main line and greywater outlets.
Roll the 1" HDPE main-line tubing to all the mulch basins (see Tips for Working with Irrigation Tubing). Make sure the main-line tubing isn’t inside of the basin; it should be a few inches offset, on top of solid earth. At each irrigation point cut the tubing and insert a 1" × 1⁄2" barbed reducing tee. Dig a small trench into the basin and attach a short piece of 1⁄2" tubing from each tee and into the center of each mulch basin.
Optional: If your site requires the 1" main-line tubing to reach multiple areas, use 1" × 1" × 1" barbed tees as needed. Run a 1" line anytime you would need more than a few feet of 1⁄2" tubing to reach the plants, unless you have a very water-efficient machine, in which case it will be easier to distribute the flow by minimizing the 1" size tubing and using longer 1⁄2" runs to reach the basins.
You may discover that it’s much more convenient to run tubing inside of a basin; for example, when irrigating along a narrow strip of land that isn’t wide enough for the basin and tubing. In this situation, run tubing inside the outer edge of the basin and securely stake it against the side wall of the basin, as high up as possible, as shown at right. Never run the tubing in the middle of your basin, because it can be damaged or wiggled by people stepping on it.
Stake the tubing down with long garden staples so it doesn’t wiggle out of the trench. You will bury the tubing later, after you’ve tested the system.


Whenever possible keep tubing buried on top of solid ground next to the basin.

If tubing is inside the basin, stake it securely to the upper side of the basin wall.


Run tubing under larger roots.

Cut tubing to insert tees.

Dip tubing into hot water to soften plastic so it slides with ease over barbed tee.
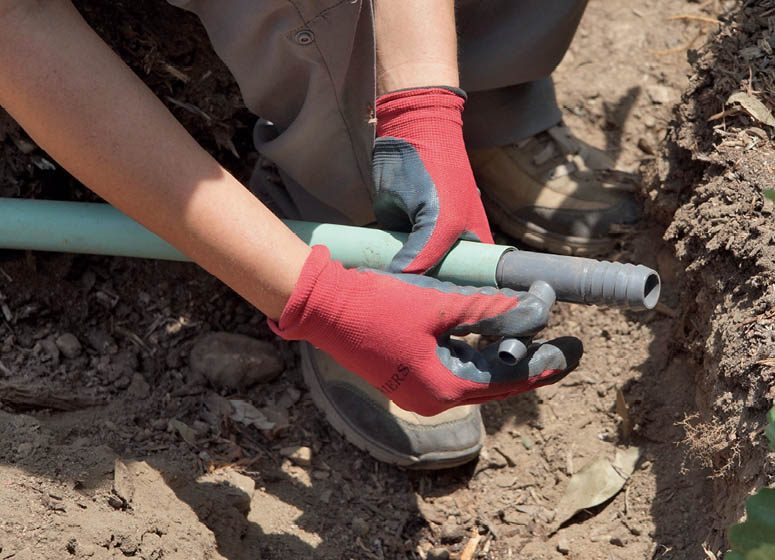
Push barbed tee into tubing.

Attach 1⁄2" tubing to barbed reducing tee and run it into the center of each mulch basin.
11. Prepare the greywater outlets and add mulch.
For surface irrigation: Add mulch to fill the basins. Place a flat stone or brick under the greywater outlet to help locate it in the future and prevent it from being inadvertently covered with mulch. You’ll need to be able to find the outlets easily for annual maintenance.

Greywater flows onto mulch and is quickly absorbed.
For subsurface irrigation: Fill each basin partway with mulch, then add a “mulch shield” to the end of each outlet, including the end of the main line. See How to Make a Mulch Shield. Fill the basin the rest of the way with mulch.
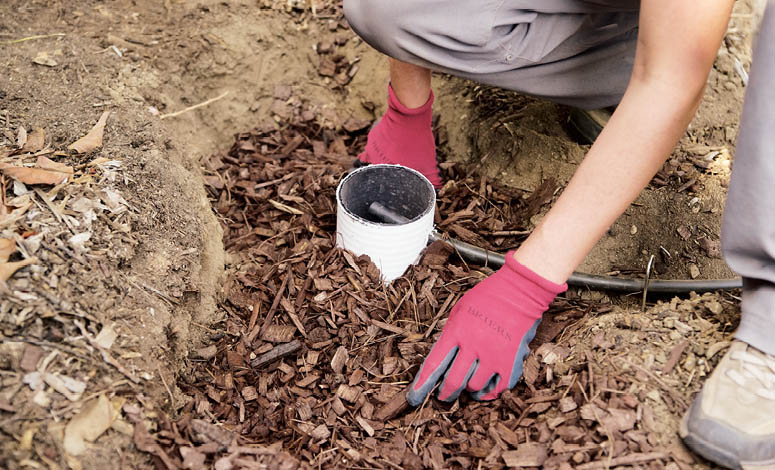
Use a section of 4" drain pipe as a mulch shield.

After basin is filled with mulch, cover finished 4" drain pipe mulch shield with a paver.

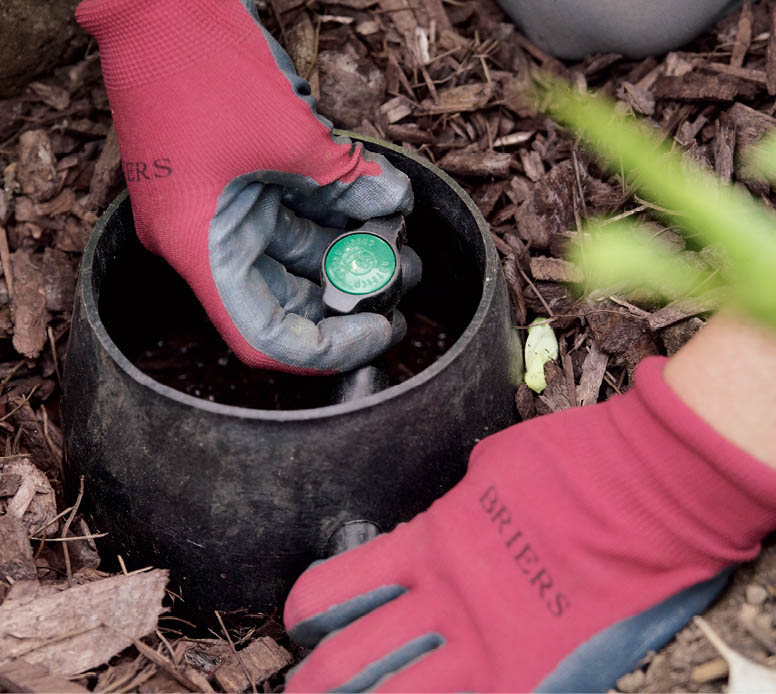
Adapt an irrigation valve box for a strong mulch shield.

Fill basin just below the top of the mulch shield. After tubing is buried, the top of the mulch shield will be the only visible part of the system.
Mark the greywater outlets. This is where you’ll do the annual maintenance to ensure the outlet doesn’t clog and greywater flows freely onto the mulch.

Fill the basins with mulch.

Multiple outlets in a trench-shaped basin
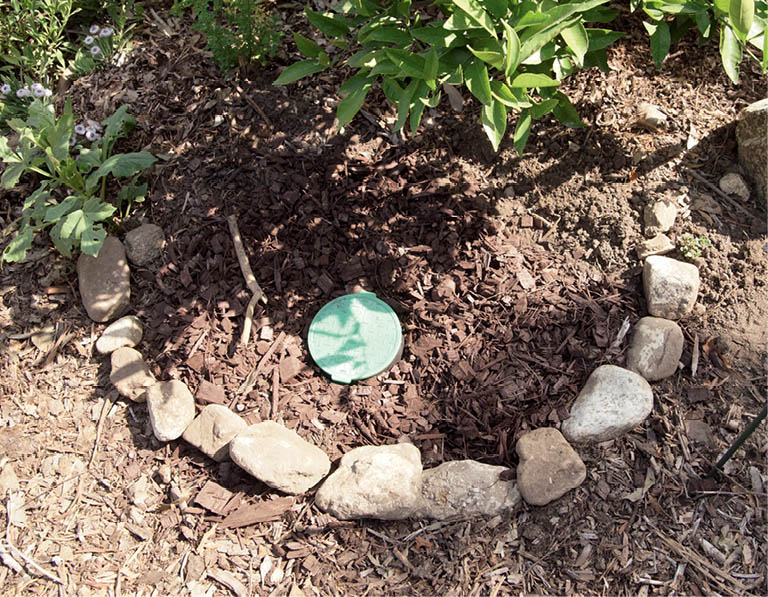
Finished basin with mulch shield
12. Add a connection to flush the system (optional).
You may include a garden-hose connection to test or flush the system. If you do this, make sure that it’s not possible to connect a garden hose without fully disconnecting the greywater pipe coming from the washer. That would be considered a cross-connection and is not allowed. There are two easy ways to temporarily connect a garden hose: 1) pull apart the joint where the tubing connects to the PVC adapter and insert a fitting that connects to a garden hose (see below), or 2) install a union with some adapters to easily disconnect the system. My favorite method is to leave the barbed x insert adapter unglued where it connects to the PVC elbow, pull it out, and insert a 1⁄2” PVC slip × female hose thread fitting, to which you can attach a garden hose. (A 3⁄4” slip × female hose thread also works and will fit into any PVC fitting.)
To use a union, open the union and insert a brass female hose thread × 3⁄4" male hose thread (MHT) fitting into the side going to the garden. Do this by firmly pushing the brass threads into the plastic (see image) and turning— the metal will bite into the plastic enough to hold the fitting in place. Then, connect the hose and flush the line.
Two methods for Connecting a Garden Hose to Flush irrigation tubing


1. Leave connection unglued between PVC elbow and barbed × insert adapter. To flush system, pull fittings apart and temporarily insert a 1⁄2" pipe to a 3⁄4" female hose fitting into the insert side of the adapter. Attach garden hose to other side.

2. Install a union so the system can be easily disconnected. To flush the line, separate the union, use a brass hose fitting and temporarily connect a garden hose to the irrigation tubing (for flushing system).
13. Test and tune the system.
Now you’ll check to see if water comes out evenly from all the outlets. The first step is to get water running through the system, and there are two ways to do this. One is to run a washer cycle (or two or more), which works well with a conventional top-loading machine or in a small system with a water-efficient machine. The other method is to temporarily insert a garden hose (see step 12), and turn on the hose to medium flow. If you use this method, be sure to check the flow again with only the machine running to adjust for differences in pressure and water quantity.

Step 13. Insert a garden hose adapter to send water through system for testing.

Connect a garden hose to the adapter.

Tune the system by adjusting the angle of the tee.
Note: The first few gallons of water will fill the lines and wet the plastic tubing, and water may not come out for a few moments (possibly not until the second cycle of the machine).
If your yard is flat, you’ll probably have more water coming out the first few outlets than the last ones. To tune, or balance, the system, first adjust the angles of the tees. Orient them slightly downward to get more water out of the 1⁄2" branch, or upward to slow the flow. You can also spin the 1⁄2" tubing so that the curve increases or decreases the flow.
If the flow is still uneven, add a 1⁄2" ball valve to the first outlet and close the valve slightly to reduce the flow, allowing more water to continue to other outlets. Be sure to use “green” or “purple back” ball valves. These are full-port valves with no restriction inside the valve; regular ball valves restrict the flow inside and will clog up.
Add valves until water comes out evenly, but only use them as needed. Do not add valves to all the outlets! They are clogging and maintenance points. If you have more than a couple of valves, you probably need to redesign the main line instead of adding more valves. If your system has multiple 1" main lines and you are getting too much water in one line, consider reducing the diameter of the tubing in one of the lines, (for example, to 1⁄2") to reduce the flow.
After you’ve tuned the system, take photographs before burying any tubing. Put them in your O&M manual (see here) so you know where to avoid digging in the future.
Bury the tubing as needed. Double-check each mulch shield (if you have them) to make sure there are several inches of air space between the outlet and the surface of the mulch.
Warning: Always leave an end of the 1" main line open. Never use a valve or plug at the end to stop water flow unless there is an alternate open 1" end (see Overflow Options, below).
If you used a garden hose to test the system, disconnect it and reconnect the irrigation tubing to the PVC pipe. Run a load of laundry and observe how water flows through the system. You may need to make a few more adjustments to get water flowing out all outlets evenly.

Green-back ball valve installed on outlet line to control flow
A 1⁄2" ball valve installed at the end of a 1⁄2" tubing outlet

Photograph system before burying tubing.

Another view of system before burial
Overflow Options
Restricting the main line can back up the washing machine or damage its pump if outlets clog over time. The exception to this rule is when a system has multiple 1" lines. For example, if you used a 1" × 1" × 1" tee and have two different main lines, one can be restricted, as long as the other one stays fully open. You can locate the 1" open end anywhere along the system (use a 1" × 1" × 1" tee), and even elevate it so that water doesn’t flow out of it under typical conditions.
One option for end of main line Open 1" line in a mulch shield.

Second option for open end of 1" line Fail-safe overflow. Extend a 1" line off a 1" barbed tee in a discreet location (looking like a snorkel) to provide a fail-safe exit for the water in case the outlets clog over time. Add a 1" barbed 90° elbow on the top to prevent debris from falling into the line.
Using a fail-safe overflow allows you to cap or restrict the end of the mainline. Locate the overflow against the trunk of a tree, in a corner of a porch, or other out-of-the-way location. Water should not exit the overflow under normal conditions.

Three ways to release greywater into the mulch shield

Barbed reducing tee (top), 1⁄2" tubing (middle), and 1⁄2" full-port ball valve (bottom). All outlets should release greywater a few inches above the mulch layer to prevent roots from growing into the system and clogging it.
14. Check for leaks.
With the water still flowing through the greywater system, check all of your glued joints in the house (on both the greywater and sewer/septic side). Carefully check the connection from the washing machine hose to the 3-way valve. If it leaks, tighten the hose clamp or add a second clamp. If it’s still leaking, disconnect the hose and use a short piece of vinyl tubing to create a bridge. Clamp the tubing to the washing machine drain hose and to the barbed fitting.

Bridge of vinyl tubing between the washer drain hose and 3-way valve to stop a leaky connection.
15. Paint the pipe and label the system.
Paint any exposed exterior PVC pipe with exterior latex house paint to protect it from sunlight, which makes bare pipe brittle over time. Seal any holes in the wall or floor with a construction-grade exterior sealant that is waterproof and adhesive to protect your home from water damage. Sikaflex is a common brand. Regular silicone caulk can peel away over time.
Label the 3-way valve. Even though the valve comes pre-labeled with a small arrow indicating the direction of flow, it’s not always obvious where the water is going. Make a clear label, or take a photo of the valve with the handle in each position and label the photos. Prominently post the label or photos near the valve.

Note: Many codes require aboveground pipes to be labeled with “Caution: Non-potable Water, Do Not Drink” or similar wording placed every 5 feet (see here).
Put your O&M manual in a visible place; for example, inside a plastic sleeve taped to the washing machine.