3.6 Exercise: Configuring the System Landscape Directory
This exercise is meant to serve as an implementation example and provides a practical insight into the SLD and its objects. We begin with a description of the exercise, briefly touch on what the solution would look like, and then provide step-by-step instructions for the solution.
3.6.1 Exercise Description
Imagine that you’re employed by a fictitious company called Reader’s Paradise as an SAP integration expert. Reader’s Paradise is a bookstore that specializes in selling exclusive books. The company uses SAP PO, and you’ve been asked to build an interface enabling Reader’s Paradise to order books from its main supplier, Book Fountain. This means that you need to build an interface that will fetch a purchase order from Reader’s Paradise’s system and send the order to Book Fountain.
This first exercise focuses on creating all necessary SLD objects required to build the interface, as illustrated in Figure 3.25.
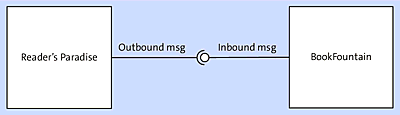
Figure 3.25 Scenario to be Built for Purchase Order Transfer
3.6.2 Exercise Solution Approach
In this first exercise, you’re only required to create the relevant SLD objects. The SLD objects to be created include the following artifacts:
- A product
- Three SCs (given that we want to use the three components model, the SC containing the shared object needs to have a dependency to the other two SCs)
- Two technical systems (for sender and receiver of the third-party type)
- Two business systems (for sender and receiver of the third-party type)
A graphical representation of these artifacts and the relationships among them is depicted in Figure 3.26.

Figure 3.26 The SLD Artifacts and Their Relationships
We provide the step-by-step solution of the exercise in the next section.
3.6.3 Exercise Step-by-Step Solution
The activities and steps to create the objects (as listed in the exercise solution approach) are described in the following subsections.
Log On to the System Landscape Directory
To log on to the SLD, open a browser, go to http://<hostname>:<port>/sld, and log in with your credentials when prompted to do so. In the preceding URL, <hostname> is the hostname of the SAP NetWeaver system, and <port> is the port number of the SAP NetWeaver system.
Create a Product
To create a product that will hold the SCs, follow these steps:
- Click on the Products tab of the System Landscape Directory landing page.
-
Click on the New button to follow the wizard for creating a product (see Figure 3.27).
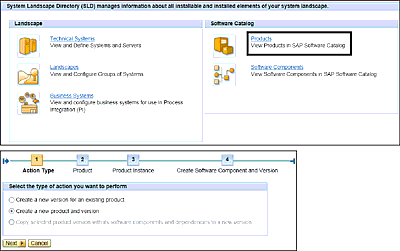
Figure 3.27 First Steps for Creating a Product in the SLD
- Follow the wizard, and enter the name “PR_READERSPARADISE” for your product. Enter “ReadersParadise.com” as the product vendor (see Figure 3.28).
- Click on Next, and you’ll be asked to fill in data to create the SC.
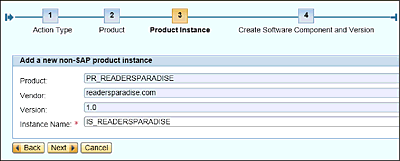
Figure 3.28 Creating a Product in the SLD
Create Three Software Components
Because we’re following the three SC model, we’ll need three separate SCs to hold the sender, receiver, and canonical objects.
To create the SCs that will hold the objects and artifacts during design time and with which the technical and business systems will be associated, follow these steps:
- Click on the Software components tab of the System Landscape Directory landing page.
- Click on the New button to follow the wizard for creating a new SC. Follow the wizard, and name the SC “SWC_READERSPARADISE”. The final results are shown in Figure 3.29.
- Click on Finish.
- Repeat steps 2 and 3 to create two more SCs, with the names “SWC_BOOKFOUNTAIN” and “SWC_MAPPINGS”.
Note
You need to select the product (PR_READERSPARADISE) that was previously created for your SCs.
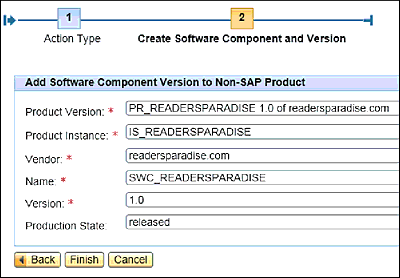
Figure 3.29 Creating a Software Component in the SLD
Given that the SC named SWC_MAPPINGS will contain the mapping and transformation object, it needs to have dependencies to both SWC_READERSPARADISE and SWC_BOOKFOUNTAIN SCs. To create dependencies for the SWC_MAPPINGS, follow these steps:
- From the System Landscape Directory landing page, select Software Components.
- Search or filter for the SC to which the dependencies need to added—in this case, the SC called SWC_MAPPINGS.
- Click on the Dependency tab, and filter for or select the SC SWC_READERSPARADISE.
-
Click on Define as Prerequisite Software Components. The final result should look like Figure 3.30.

Figure 3.30 Creating Software Component Dependency to Other Software Components
- Repeat steps 2, 3, and 4 to define another dependency from SWC_MAPPINGS to SWC_BOOKFOUNTAIN.
The dependencies are defined to ensure that the Enterprise Services Repository (ES Repository) objects (data, messages types, and service interfaces) of SWC_BOOKFOUNTAIN and SWC_READERSPARADISE can be accessed from the SC SWC_MAPPINGS.
Create Technical Systems (Sender and Receiver)
To create a technical system with which the business system will be associated, follow these steps:
- Click on the Technical Systems tab of the System Landscape Directory landing page.
- Click on the New Technical System button to follow the wizard for creating a new technical system.
- Follow the wizard, and specify the type of the technical system as Third Party.
- Click on the Next button to proceed to the next screen.
-
Name the technical system “TS_READERSPARADISE” to represent the sending system (see Figure 3.31).
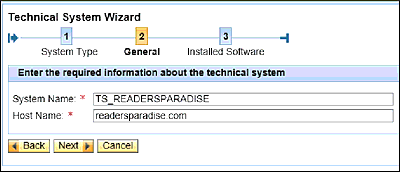
Figure 3.31 Creation of a Technical System
- Select the products and SCs that are installed in this technical system. If you don’t add a SC to a technical system, then it won’t be possible to use its service interfaces in your scenario (see Figure 3.32).
- Repeat steps 2, 3, and 4 to create a new technical system for the receiver system called TS_BOOKFOUNTAIN.
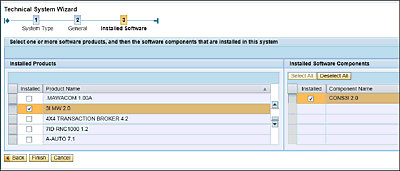
Figure 3.32 Adding Software Components to a Technical System
Create Two Business Systems (Sender and Receiver)
To create a business system that will represent the sender and receiver applications during configuration in the Integration Directory (see Chapter 5), follow these steps:
- Click on the Business Systems tab of the System Landscape Directory landing page.
- Click on the New Business System button to follow the wizard for creating a new business system. Click on Next.
- Follow the wizard, and specify the Type of business system to be Third Party/Other. Click on Next.
- On the next screen, choose the technical system for this business system. Choose TS_READERSPARADISE because you’re required to create a relationship between a business system and its corresponding technical system. Click on Next.
- On the next screen, name the business system “BS_READERSPARADISE” to represent the sending system. Click on Next.
- Because you linked the new business system to an existing technical system, all products and SCs used in that technical system will be automatically loaded. You still have the option to select or deselect products and SCs on this screen.
- In the final step, select the Integration Server (SAP PO system) to be used by this application system. You can select from a dropdown list of all SAP PO/SAP PI systems in your landscape.
- Repeat steps 1 to 7 for a new business system for the receiving system. This last business system needs to be named BS_BOOKFOUNTAIN and will need to be linked to the technical system previously created and named TS_BOOKFOUNTAIN.