10.4 Flow Objects
Chapter 9 touched on flow objects purely from a modeling perspective. This section will dive deeper into each type of flow object from a technical perspective. This section will describe how to configure these objects and will explore the different available configuration options and how they can impact the behavior of these flow objects.
10.4.1 Events
An event indicates that something occurred during the running of the process. Next, we’ll be exploring some specific events. As discussed in Chapter 9, we can distinguish the following main types of events:
- Start event
- End event
- Intermediary event
- Boundary event
The technical aspects and configuration details of each of these event types will be discussed in the next sections.
Start Event
The start event is the first object found in the beginning of the process and has no incoming connections or sequence flows. In the next sections, we’ll describe the start event properties.
Event Trigger
In most cases, a start event is linked to a trigger or signal. After a trigger is received, the SAP BPM engine evaluates whether it matches the process definition. If there’s a match, then a new instance of the process is created, and the process is started. In some scenarios, it’s not required to specify an event to start a process. In an embedded subprocess, for instance, it’s not mandatory to have a start event’s trigger.
To specify whether or not a start event has a trigger, follow these steps:
- Select the start event from your process.
- The Properties view is then displayed in the bottom of the screen.
-
Select the Event Trigger tab, and select the relevant radio button, either Message or None (see Figure 10.30).
Figure 10.30 Default Trigger Configuration of a Process
If the Message radio button is selected, then an appropriate message trigger needs to be specified. By default, the following message triggers are available:
-
DefaultService_Empty
This message trigger is assigned by default to the start process. It’s advised to use this message trigger when you intend to manually start the process via SAP NetWeaver Administrator. As the name suggests, DefaultService_Empty expects an empty message. It’s a synchronous message, so you can expect an empty message back to indicate the process has started. -
DefaultService_EmptyAsync
This message trigger is mostly identical to the previous one, except for the fact that it’s asynchronous; no reply message can be expected.
Alternatively, you can decide to start the process upon receipt of a web service call. In that case, you’ll need to create a new message trigger that points to the message structure of the WSDL of the message in question.
If you created a message trigger, then it becomes possible to select the newly created trigger from the dropdown box. Refer to Section 10.4.1 to learn how to create a trigger.
Output Mapping
Because the start event is the first element of the process, we don’t have an input mapping, only an outbound mapping. The input mapping is indirectly represented by the message trigger. In the outbound mapping, you can transform the initial message that started the process to any of the other data objects.
Start Condition
A start condition provides a mechanism to further specify under which condition the process can be started. Instead of accepting all incoming messages that match the trigger, we also want the incoming message to pass an extra condition. Considering the demonstration scenario about employees, assume that we only want employee data with a start date later than January 1, 2015, to start a process. In such a scenario, we can consider specifying the start condition.
Note that, by default, the start condition is always the Boolean value true, which basically means that there is no correlation and that any message matching the trigger structure can start the process.
End Event
As the name of the event suggests, the end event is the last step in a process flow, and it indicates the end of the process. It contains no outgoing connections or sequence flows.
Event Trigger
The end event can also trigger messages as a response to a previously synchronous instantiated process. In that case, a trigger based on a WSDL will need to be assigned to the end event. In cases in which the process needs to return a response, the same (synchronous) trigger used in the start event can be reused for the end event.
Other supported trigger types for the end event are described in Table 10.7.
| Trigger Type | Description |
|---|---|
| Message | Enables the process to return a message if the trigger used for the start event was synchronous. |
| Error | Facilitates the throwing of an error. |
| Escalation | Used to signal a business error. This type of error generally needs to be handled in your process. |
| None | In some cases, like an embedded subprocess, an end event doesn’t need to have a trigger. |
Table 10.7 Trigger Types for the End Event
In the event trigger, you can maintain the Terminating property. If this checkbox is selected, then the end event will terminate any other running activities in the process—like any parallel flow. By default, this checkbox is unchecked.
Input Mapping
Because we’re dealing with the last object in the process, we only have an input mapping and no output mapping. If the end event is of the type Message and needs to return a message, this mapping can be used to populate the appropriate response message.
Intermediary Event
Intermediary events were introduced in SAP Composite Environment 7.2. An intermediary event puts the process in a wait phase until a specific signal or event has been triggered toward the process. This type of event is generally placed in the middle of the process—between the start and end events. The process goes into an idle or sleep mode until a specific trigger is received.
We can distinguish different types of intermediary events:
- Message
- Timer
- None
We’ll now explore each of these event types.
Message
An intermediate message event signals the process that a particular message is received. This type of event exists as a process step (in the BPMN model of the process) and generally represents the fact that one of the surrounding applications wants to signal an existing instance of a process about some event that occurs. The running process is generally in an idle mode and waiting for such an external trigger to resume running. When a matching intermediate message or trigger is received, the process instance proceeds to the next process step. Figure 10.31 shows what an intermediary message object looks like.
Figure 10.31 Trigger Types of an Intermediary Message Event Step
Scenarios in which the intermediate message event can be used include the following:
- A message collect pattern (collection or aggregation of messages matching a particular message type and correlation).
- Communications or conversations between two running processes.
- Communications or conversations between a running process instance and another application in the environment. This application should also be represented in the BPMN model as one of the pool’s lanes.
The intermediate message event is an asynchronous message and generally involves the use of correlation as a way to match the incoming message with the correct running process instances. If multiple process instances are matched, then this leads to the broadcast. The process of receiving this asynchronous message as an intermediary message happens in two asynchronous and independent transactions that don’t necessarily happen at the same time. The two transactions are as follows:
-
Matching
This is the first step in which the arriving asynchronous message is received by the process server. The process server then compares the arriving message with the correlations of all existing and running process instances. If there is a match with one or multiple processes, then the message is put into a queue for it to be delivered to the matching process instances. This is where the next transaction (delivery) comes into play. If there are no matches found, then the message stays in the queue. -
Delivery
In this transaction, the messages that were previously matched are delivered to the corresponding process instances. The intermediary steps of these process instances are therefore executed.
When a trigger is of type Message, you’re required to set or select the corresponding message trigger. Figure 10.31 depicts an example of an intermediary message event with the message trigger called MsgF2FDELI008AcknowledgeSalesOrderOut.
The message trigger represents the asynchronous service interface or web service to act as the trigger for the intermediate message event. You can read more on message triggers in Section 10.4.1.
In addition to the message trigger, it might be necessary to define the correlation conditions to be used. The correlation needs to evaluate to true or false (as a Boolean) where true represents a match, and false represents a mismatch. By default, the correlation condition is set to true, which means that the correlation will always match; in other words, the correlation is disabled by default.
You can also create a condition that evaluates fields in the incoming message and process context data (e.g., data objects). The expression to be built can be simple or complex.
Table 10.8 contains some examples of correlation conditions and their descriptions.
Table 10.8 Correlation Conditions
Note
The correlation condition is by default set to the Boolean value true. This value means that the correlation is disabled, and any message matching the message trigger will be consumed by the intermediary message event.
Timer
The intermediate timer event provides the mechanism to make a particular running process instance stop and wait until a certain period of time has elapsed or passed. Figure 10.32 shows what an intermediary timer object looks like. In SAP NetWeaver Developer Studio, you can’t configure a trigger while configuring an intermediate timer event step. Instead, a Timer Configuration tab needs to be configured, as shown in Figure 10.32. You can use one of the following options:
-
A time offset
The amount of seconds, minutes, days, months, or years that the process need to wait before it can resume. The time offset starts from the time the intermediate timer event step is reached. -
An expression
By using the expression editor, you can define the trigger time. Here, you want the expression to evaluate to the time that the process needs to resume. Be aware that the expression is evaluated in milliseconds.
Figure 10.32 Example of Timer Configuration Using a Time Offset of Five Minutes
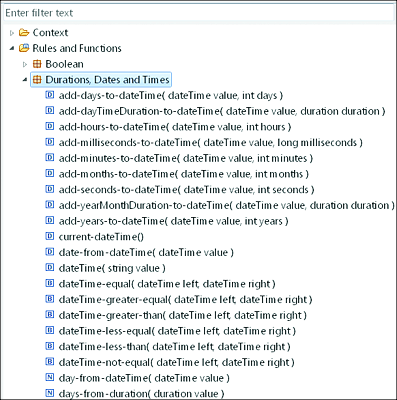
SAP provides a lot of useful functions for configuring an intermediate timer event via an expression. See the rules and functions in the Durations, Dates and Times node, as shown in Figure 10.33.
Figure 10.33 Rules and Functions for Use when Configuring a Timer Event Using an Expression
None
The None intermediary trigger type has no real use in the runtime. It’s mostly used as a temporary step while modeling the process and when the exact details of the trigger to be aren’t yet known. The None intermediary trigger type will need to be changed later to a message or timer.
Boundary Event
A boundary event is a special type of event that throws an exception in a process. This type of event is always attached to another activity. When an exception occurs in an activity (to which the boundary event is attached), the boundary event is triggered, and the exception is caught. In the case of a boundary event attached to an automated activity, the service interface or WSDL used must have a fault message attached to it.
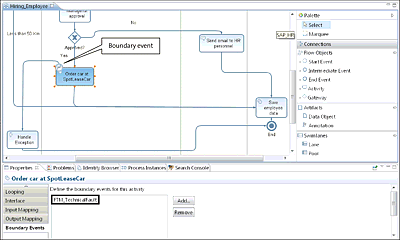
A boundary event redirects control to the steps defined in the outgoing sequence flow from the boundary event (see Figure 10.34).
Figure 10.34 Example Configuration of a Boundary Event Attached to an Automated Activity
In the process depicted in Figure 10.34, when an exception occurs in the automated step, the boundary event catches the exception and transfers the process control to a human activity. In our demonstration scenario, when an error occurs while ordering a car at the lease company, the exception is caught by the boundary event. The exception is then handled by another human task (called Handle Exception).
In addition, note that the activity has a Boundary Events tab, from which you can configure the boundary events. To configure the boundary events, follow these steps:
- Select the activity (here using an automated activity) for which the boundary events need to be configured. In the case of an automated activity, the event trigger must contain fault messages. For every fault type, you can add a boundary event.
- In the Properties view, select the Boundary Events tab, and add the fault messages for which you want to configure the boundary event by clicking on the Add button.
- In the pop-up screen that appears, select the desired fault message. Click on OK. The boundary event will appear on top of the activity, and the outgoing sequence flow can be configured to handle the exception.
Note
You can attach multiple boundary events around an activity—one boundary event per message fault type. Each boundary event has its own outgoing sequence flow, enabling the SAP BPM process to handle multiple exception types. Having multiple boundary events has the advantage of giving you more control for handling different exceptions in different manners.
Message Trigger
A message trigger represents an event of receiving a specific message in the SAP BPM engine. Message triggers are reusable entities, are normally used to start processes, and are referenced by different types of events. To create a new message trigger, you need to have a WSDL (that you imported or created) in your project as a prerequisite. To create a message trigger, follow these steps:
- From your project structure (in the Project Explorer view of SAP NetWeaver Developer Studio), click on the SAP BPM DC node named [LocalDevelopment] pr_hireemployee/pr/pm to expand it. Then, click on Process Modeling to expand it further.
- Click on the Event Triggers node to expand again.
-
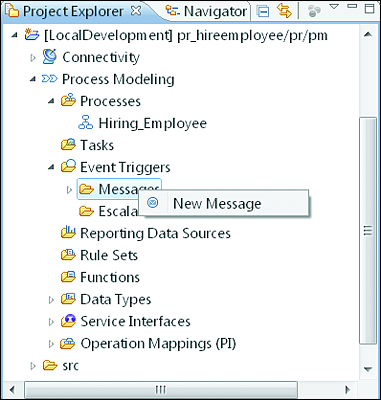
Right-click on the Messages node, and select the New Message menu item (see Figure 10.35).
Figure 10.35 First Steps of Creating a Message Trigger
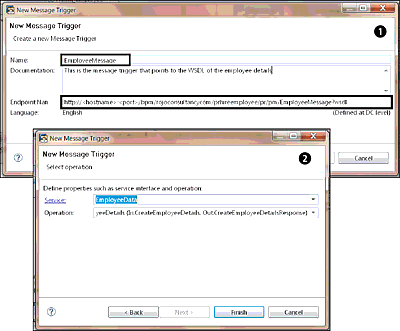
- A wizard starts in which you need to fill in the name and documentation of the message trigger. Note that as you specify the trigger name, the endpoint and link to the WSDL link are modified (see Figure 10.36 1). This is the WSDL, which can be used to externally trigger or call the SAP BPM process. Then, click on Next.
- Select the service interface and operation to be used as a message trigger of the process. In this case, select the EmployeeData WSDL that you created in Section 10.3. Click on Finish 2.
After the message trigger is created, it can be referenced by events such as start events, end events, or intermediary message events.
Figure 10.36 Steps to Create a New Message Trigger
10.4.2 Tasks
A task is an action that needs to be performed by a human. From a technical perspective, a task enables us to point to a particular UI technology to be used for the user to perform the human action represented by the task and the human activity. A task can be used in a human activity object, which will be explored in Section 10.4.3. A task is reusable and can, in principle, be used in multiple human activities.
A task has a number of attributes (or task settings) to be maintained Table 10.9 lists the attributes, specifies their categories, and describes their roles.
Table 10.9 Task Properties’ Options, Categories, and the Roles They Play
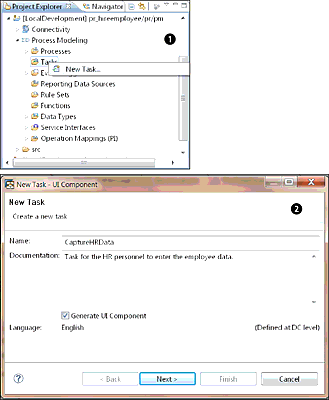
To create a new task, follow these steps:
- From the Project Explorer view in SAP NetWeaver Developer Studio, select your project, and collapse all the nodes until you get to the Tasks node.
- Right-click on the Tasks node, and select New Task (see Figure 10.37 1).
-
You’ll see a pop-up screen, in which you need to specify the name of the new task and its documentation (optional). You can also decide to generate a UI component at this step by selecting the Generate UI component checkbox. If you decide to generate a UI component, then proceed to Step 4; otherwise, click on Next 2.
Figure 10.37 First Steps of Creating a New SAP BPM Task
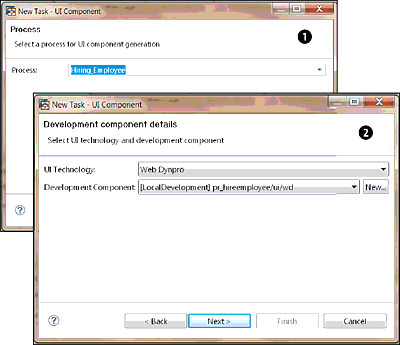
- You’re asked to select the process for which the UI component will be created. This is especially relevant if you have more than one process in your current project (see Figure 10.38 1).
-
On the next screen, select Web Dynpro for the UI technology 2. You can also select other UI technologies from the UI Technology dropdown field.
Figure 10.38 Selecting the Process and UI Technology to be Used for the SAP BPM Task
- Note that SAP NetWeaver Developer Studio automatically selects the Web Dynpro DC that was created as part of the composite application. You also have the choice of creating a brand-new Web Dynpro DC, but in this case, leave the default values (see Figure 10.38 2). Click on Next.
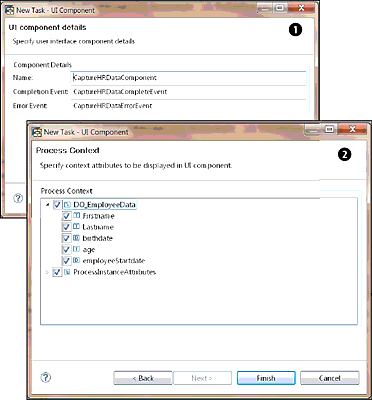
- You’re now provided with some UI component details. The required details will go into the Name, Completion Event, and Error Event fields. These details are prefilled in by default with names constructed based on the task’s name, and you can choose to leave the default values here. Click on Next (see Figure 10.39 1).
-
It’s now time to select process context attributes and data (e.g., data objects) to be used and displayed in the new UI component. You can choose all the attributes that are relevant for you by selecting their checkboxes 2.
Figure 10.39 Details of the New UI Component SAP BPM Task
- After you’re done, click on Finish.
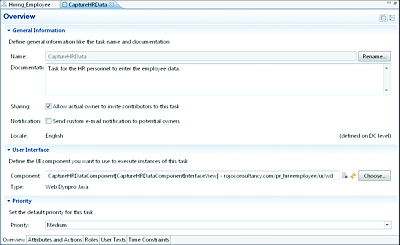
You’re now presented with a task screen showing the name of the UI DCs that you just created. They are populated in the component attributes, as shown in Figure 10.40. In addition, note that you can send the notification by email by selecting the Notification checkbox.
Figure 10.40 Final Look at the Task Object after Linking It to a Web Dynpro Java DC
After successfully creating a task, the only remaining action is to use it in a human activity. More details about the human activities are presented in Section 10.4.3.
When creating a task, you might want to add some business data in the task’s subject or description to give it more context. This is referred to as parameterized text. To create parameterized text, follow these steps:
- Open the task for which you want to create parameterized text.
- Click on the User Texts tab.
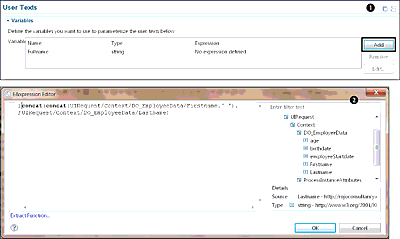
- Click on the Add button to the right of the Variable section, and name the variable. Select string for the Type (see Figure 10.41 1).
-
Select the variable you just created, and click on the Edit button. You’re then presented with an expression editor, in which you can select where the variable should get its value from. In this case, we’ll need to concatenate Firstname and Lastname to Fullname, which is present in the UI component 2. Be aware that you can define as many variables as you need to achieve your goal.
Figure 10.41 Creation of a Variable and Assigning It a Value via Functions and Data Objects
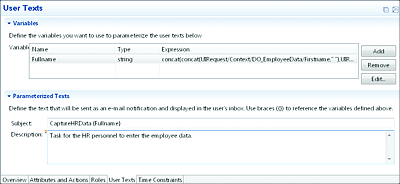
- Now that the variable is ready, it’s time to create the parameterized text for the subject and description. Enter any desired text, and include the desired variable surrounded by brackets { }. The Subject field in Figure 10.42 shows an example of such a dynamic text implementation.
Figure 10.42 Example of a Subject Using a Variable to Make Text Dynamic
10.4.3 Activities
As the name indicates, an activity is an object in your BPMN that represents an activity or action to be performed automatically by the system (system-centric) or by a human (human-centric). In addition to automated or human activities, many more activities are supported within SAP BPM. The following activities are supported:
- Activity
- Human
- Automated
- Mapping
- Embedded subprocess
- Referenced subprocess
- Notification
Next, we’ll explore each of these activities and give more technical details about their roles and how they can be configured.
Activity
This is a placeholder that represents work and actions to be performed. It’s mostly used during modeling and should be later changed to a human, automated, referenced subprocess, or embedded subprocess activity.
Human Activity
A human activity is used in a BPMN to model an action or task to be performed by a human. Other BPM platforms refer to this activity as a user task. In general, a human activity is performed via a UI. A human activity can be claimed and completed by an SAP NetWeaver UME user.
SAP NetWeaver provides a wonderful functionality that allows you to automatically generate a UI based on a diverse range of SAP-supported UI technologies. A human activity has a number of property attributes that will be explored in the next sections.
General
This tab in the property view contains descriptive information, such as name and documentation.
Looping
This section enables the human activity to be repeated multiple times. This is sometimes referred to as the multi-instance loops of activities. It uses the Parallel For Each loop option and creates multiple instances of the human task in parallel.
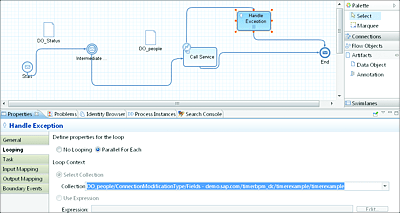
To be able to specify the number of activity instances to be created in parallel, you’ll need to point to a context object (data object) in the process containing a collection. You can alternatively use an expression that produces a list. The number of items contained in the list will determine the number of human activity instances that will be executed in parallel. Figure 10.43 shows an example configuration of the looping using a human activity.
Figure 10.43 Example of a Human Activity Configured with Looping
The looping or Parallel For Each option can be configured for most activities, including human, automated, reporting, mapping, embedded subprocess, and referenced subprocess activities.
Be aware that if you configured looping for an activity, then two new context objects (data objects) are created (see Table 10.10).
Table 10.10 Local Data Objects Used Specifically for Activities Using Looping
These data objects can be found in the input mapping and outbound mapping of the activity in question. See the next section for more details about how to create and deal with a task.
Tip
When using a loop, be aware that in runtime, the process will only proceed to the next steps when all the created parallel instances have been executed or completed (in case of a human activity).
Task
A task enables you to point to a particular UI technology to be used for the user to perform the human action represented by the task and human activity. After creating a human activity, that activity is assigned a default task called DefaultTask. You can assign another task to it as well. The topic of tasks was explored in Section 10.4.2. Assuming that you already created a task, you only need to point the human activity to the task. The task attribute included in a human task can be seen as a pointer that references an existing task.
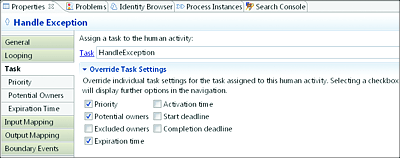
In addition to the task settings already maintained in a task (explained in Section 10.4.2), the human task provides the flexibility to overwrite the attributes already maintained in the task. These setting values can be overwritten by selecting the checkboxes of each relevant task setting. After ticking a checkbox, further options will be displayed in the navigation, as shown in Figure 10.44.
Figure 10.44 Task Properties’ Options
Most of these options were already explained in Section 10.4.2 as part of the attribute options for a task, with the exception of the Potential owners attribute. Potential owners are users who are allowed to process or complete a task. If there is more than one user allowed to execute a particular task, then the actual owner of the task is the user who eventually completes the task. Be aware that both the potential and excluded owners’ concepts don’t only apply to tasks. These concepts are also used for a single human activity and for individual lanes.
Being able to overwrite a task’s attributes from the human task is very handy for SAP BPM developers because it gives the flexibility to reuse the same task in multiple human activities and to have them behave differently. Each one of the task instances will adopt different attributes or settings from their respective human activities. This approach encourages reusability and avoids the creation of a new task for each human activity. A human activity can easily be linked to a task by selecting the appropriate task from the dropdown, as shown in Figure 10.44.
Input Mapping
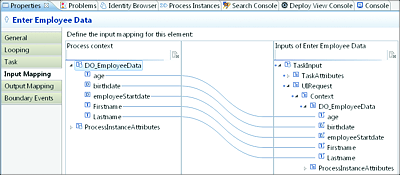
If you consider the process depicted earlier in Figure 10.43, in which a human activity is required to take a human action if the call service task fails, you might need to map some details (e.g., the full name) from the process to the human activity.
The input mapping in a human activity allows you to map values from the process context to the task. By doing so, you’re populating the task with the required inputs. By default, a human activity comes with a local context object named TaskInput, which is made of two main parts:
-
TaskAttributes
This is a mandatory element that is always present in TaskInput that is intended to contain the attributes of a task. -
UIRequest
This element contains the values that will be presented to the user as part of the UI. By populating these attributes, you’re indirectly populating what data the user will see when processing the task.
The topic of mapping will be covered in Section 10.4.3. For now, what is important is the fact that values from the process context are used to populate the TaskAttributes and UIRequest local data objects for tasks (see Figure 10.45).
Figure 10.45 Example of Input Mapping of a Human Activity Used to Populate the Data to be Displayed in a Task
Output Mapping
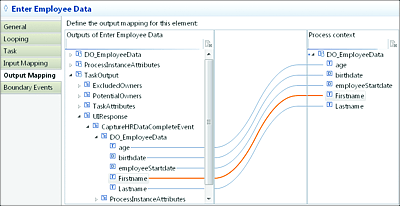
The output mapping of a human task facilitates the mapping or copying of data from the task’s UI to the process context. This mechanism allows you to copy the data that the user entered in the UI back to the process for further processing.
The outbound mapping step is only performed after the task has been completed by the task’s owner and the control has been returned to the process. By default, the element named TaskOutput, which contains all the data entered by the process owner, is provided. The TaskOutput local data object contains more data than the TaskInput, which is used in the input mapping. It contains nearly all of the task’s attributes. All of these task attribute values can now be retrieved because the task has been completed, and details such as who executed the task and which values were filled in by the task owner are now known. Figure 10.46 shows an example of how the process context is populated with data filled in by the user from a Java Web Dynpro UI.
Figure 10.46 Sample Outbound Mapping of a Human Activity to Populate the Process Context with Data Filled by the Process Owner
Boundary Events
We’ve touched on the boundary event from a general perspective. When looking at boundary events from a specific human task context, they represent situations in which the execution of a human task can fail or terminate in error. The exceptions are generally generated as a result of one of the constraints set by the task’s attribute settings (e.g., start deadline, activation time, etc.) not being met.
The exceptional or erroneous situation in a human task can be categorized as follows:
-
Critical exceptions
The task processing is canceled, and the corresponding boundary event should catch and handle the exception. -
Noncritical exceptions
The task processing isn’t canceled and carries on its processing normally from the noncritical boundary event.
The possible exception types and their categories are listed in Table 10.11.
Table 10.11 Possible Human Task Exception Events
To add boundary events from a human activity, follow these steps:
-
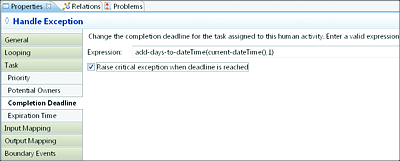
Make sure that the correct task settings were configured. If you’re interested in raising a critical exception, then select the Raise critical exception when deadline is reached checkbox to raise the exception (Figure 10.47).
Figure 10.47 Raising an Exception When a Deadline Occurs
- Select the human activity for which the boundary event needs to be created.
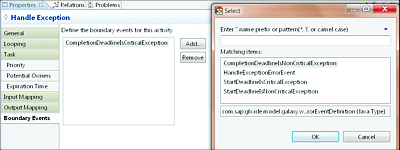
- Navigate to the Properties view, and select the Boundary Events tab.
- Click on the Add button (Figure 10.48).
- You’ll see a pop-up, in which you need to select the desired exception type. Click on OK.
Figure 10.48 Steps Involved in Setting Up Boundary Events in a Human Activity
Automated Activity
Automated activities are steps in an SAP BPM process that need to be performed by a system without human intervention. They are often referred to as system-centric steps. From a technical perspective, an automated activity will invoke a web service or make an RFC. This can be considered the opposite of a human activity.
SAP NetWeaver Developer Studio simplifies the modeling and configuration of an automated activity in your process. You can add it to your process by using one of the following methods:
- Use the speed buttons by mousing over any object or process step in the BPMN model.
- Drag the automated activity object from the palette on the left side of the SAP NetWeaver Developer Studio, and drop it at the appropriate location in your existing SAP BPM process.
- Drag the service interface’s operation element from the WSDL that has been imported in SAP NetWeaver Developer Studio. This is a very handy method because the automated activity is automatically configured to point to the appropriate service interface. However, this method requires the service interface in question from the ES Repository to be present already and imported in the SAP NetWeaver Developer Studio project. Refer to Section 10.3 for an explanation of importing XSD and WSDL.
It’s now time to explore the automated activity’s property attributes and their roles. The first tab, like in other activities, is the General tab. The other tabs and properties are discussed ahead.
Looping
Looping enables the automated activity to be repeated multiple times. It uses the Parallel For Each loop option and creates multiple instances of the automated activity in parallel.
To specify the number of activity instances to be created in parallel, you’ll need to point to a context object (data object) in the process containing a collection. You can alternatively use an expression that produces a list. The number of items contained in the list will determine the number of automated activity instances that will be executed in parallel.
Interface
This tab enables you to choose the service interface that you want to invoke. All the service interfaces that have been imported in the current SAP NetWeaver Developer Studio project will be available for selection in the Service Interface dropdown list. You can further specify the Operation to be used in your service interface.
When importing a service interface into your project, you’re required to assign a service reference to it, as discussed in Section 10.3 in regards to importing XSD and WSDL. Figure 10.49 demonstrates how the Interface tab of an automated activity can be configured.
Figure 10.49 Automated Activity: Configuration of the Interface Tab
It’s important to note that, in addition to web services, you can import remote function modules from an SAP backend system.
Note
When you add a brand-new automated activity to a process, you’re provided with two default service instances: SampleTimer and DefaultService.
The SampleTimer service is selected by default and comes with a predefined service group. However, you can replace it with the created or imported web service.
Input Mapping
The input mapping in an automated activity allows you to map values from the process context to the request structure of the WSDL used in the automated activity. After the web service input has been populated, the web service can be normally called, already containing values in the request message.
Output Mapping
The output mapping of an automated activity facilitates the mapping or copying of data from the service interface response structure (for a synchronous service) back to the process context. The outbound mapping step is only performed after the automated activity step has been executed and the web service call made. The execution control is then returned to the process.
Boundary Events
From the perspective of an automated activity, a boundary event catches the exception or fault thrown by the web service. To configure a boundary event, the service interface or WSDL used needs to contain fault messages.
Configuring an Automated Activity
Now that we’ve explored the different attributes that make up the Properties tab of an automated activity, it’s time to detail the steps required to configure an automated activity:
- Import the WSDL or service interface from the ES Repository, local file, remote location, or Service Registry. Refer to Section 10.3 for a step-by-step walkthrough. Alternatively, you can locally create the WSDL in SAP NetWeaver Developer Studio.
- Add an automated activity to the process.
- Select the automated activity, and navigate to the Properties view and Interface tab. From here, you’ll need to link the automated activity to the service interface, service operation, and service reference, as shown earlier in Figure 10.49.
- Create the required mapping in Input Mapping to populate the request structure of a service interface.
- Create the required mapping in Output Mapping to copy back to the process context the response values returned by the service call, which are mostly only relevant for a synchronous service.
Embedded Subprocess Activity
When modeling large, real-life processes, all steps involved in the process might not necessarily fit on one screen. To improve the reading of the process, the process can be grouped in collapsible subsections. These subsections group steps that logically belong together from a business process perspective. The embedded subprocess activities can be used to make the process more readable by grouping steps. An embedded subprocess activity is a mini process embedded in another process.
Note that a subprocess doesn’t exist as a process in its own right but only exists within the context of its main (parent) process. Because of this dependency to its parent, not all SAP BPM artifacts and events are supported in an embedded subprocess.
From a technical perspective, an embedded subprocess has the following characteristics:
- Can be used as a single combined step
- Can be visually collapsed and expanded
- Has neither lanes nor roles
- Has its own start and end events
- Has its own context objects and data and can access the context objects of its main (parent) process by default
Based on its behaviors and properties, consider using an embedded subprocess in the following circumstances:
- The process to be modeled is too large to be drawn in one sheet.
- The group of steps included in the subprocess isn’t reusable for other main processes.
The attributes of the properties of an embedded subprocess and their roles are described in the next sections.
From the perspective of an embedded subprocess activity, a boundary event catches the exception thrown by the subprocess. If the subprocess throws exceptions, you can add them in the boundary events and specify how to handle them.
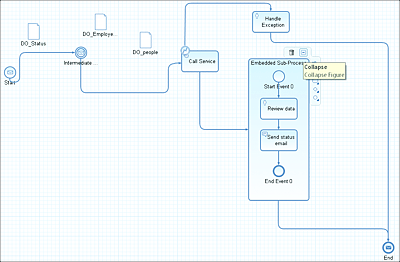
An embedded subprocess can be added to the process from the palette in a drag-and-drop manner; see Figure 10.50 for a sample setup. Note that the embedded subprocess can be collapsed by mousing over it and selecting the Collapse icon in the top-right corner.
Figure 10.50 Sample Embedded Subprocess Activity
Referenced Subprocess Activity
Referenced subprocesses are standalone processes in their own right. Other processes can reference or call them. The following details need to be taken into consideration for a referenced subprocess:
- A referenced subprocess is an independent process that can run on its own. It contains its own context data and objects.
- It can be called and referenced by another process.
- It has a start event and end event and has no restrictions in terms of the type of SAP BPM steps that it can use.
- By default, the subprocess can only be called by other processes that are contained in the same DC. If you need to create a reference from a process in another DC, then you’ll have to create some dependencies between the different DCs and expose public parts.
Based on its behaviors and properties, consider using a referenced subprocess in the following circumstances:
- The process to be modeled is too large to be drawn in one sheet.
- The group of steps included in the subprocess can be reused by other process in the same DC.
- The subprocess can exist on its own as a main process.
The attributes of the properties of a referenced subprocess and their roles are described in the next sections.
Process
This tab allows you to select the subprocess that you need to refer to. You’ll need to select the Browse option from the dropdown and navigate to the desired subprocess. This requires that the subprocess already exists. If the process doesn’t yet exist, you can create it by selecting the New option from the dropdown.
Looping
Looping enables the referenced subprocess activity to be repeated multiple times. It uses the Parallel For Each loop option and creates multiple instances of the subprocess in parallel.
Input Mapping
The input mapping in a referenced subprocess activity facilitates the mapping of values from the main process context to the input structure of the subprocess that you’re referencing.
Output Mapping
The output mapping of a referenced subprocess facilitates the mapping of data from the subprocess structure back to the main process context. The outbound mapping step is performed after the referenced subprocess step has been executed, and the control is returned to the main process.
Boundary Events
Depending on the business scenario that you’re currently modeling, you could face a situation in which the referenced subprocess throws an exception. In such a case, the thrown exception can be caught by the main process. The boundary event enables the catching and handling of an exception in a referenced subprocess.
Mapping Activity
A mapping is an SAP BPM flow object that can be used to transform or copy data from one data object to another. It can also be used to modify the value of an existing data object. Different types of simple or complex data transformations can be created between the data objects. A number of SAP BPM flow objects already include inbound and outbound mapping functionality. These inbound and outbound mappings are specific to the type of flow object being used. The mapping activity fits a more general mapping purpose.
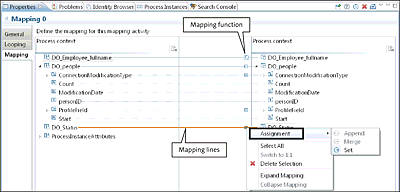
SAP provides a number of predefined rules and functions in SAP NetWeaver Developer Studio, allowing you to easily perform your data transformation. Figure 10.51 shows a sample mapping inside a mapping activity.
In Figure 10.51, the following aspects are highlighted:
-
Mapping lines
These lines indicates that data is copied from the element on the left side to the one on the right side. To create such mappings, simply drag the relevant node from the left side and drop it on the element on the right side. If the data types of the elements mapped don’t match, then you’ll see a red X on the line, indicating that you have an error. You can then mouse over the X to see more details about the error. You can also double-click on the X to be taken to the mapping editor, in which you can fix the problem. -
Mapping function
The round icon showing the “fx” annotation indicates that there is a function applied to the transformation. You can get more details about the full mapping rule by double-clicking on the icon.
The property attributes of a mapping activity and their roles are described in the next section.
Figure 10.51 Sample SAP BPM Mapping Using Predefined Functions
General
This tab in the property view contains descriptive information, such as name and documentation.
Looping
Looping enables a mapping activity to be repeated multiple times. It uses the Parallel For Each loop option and creates multiple instances of the mapping activity in parallel for each collection item.
Mapping
In this tab, you specify the action details of the mapping by linking process context objects on the left to the ones on the right. Figure 10.51 shows a sample mapping activity’s configuration.
Report Activity
As the name indicates, a report activity can be used to create reports based on data present in your process. Because a process captures data about business processes, it could be useful to collect information to present to the business. This report can provide critical real-life insight into the business and therefore allow the business to react in time to adapt to the ever-changing business environment. To collect the required data for the report, you must create a reporting data source object that will gather information on the process context data on which the report should be created. A data source can be manually created or automatically generated.
To use the report activity, follow these steps:
- Create a data object in the process. This data object needs to contain all the fields or structures that you want in your report.
- Add a report activity in your SAP BPM model by dragging it from the palette or using the speed buttons.
-
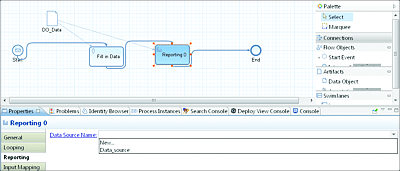
Select the added report activity. From the Properties view, create a data source to be used in your report activity by selecting the New option in the dropdown menu (see Figure 10.52).
Figure 10.52 Configure a Report Activity
- A wizard will start, and you’ll be asked to name the data source. Follow the wizard.
-
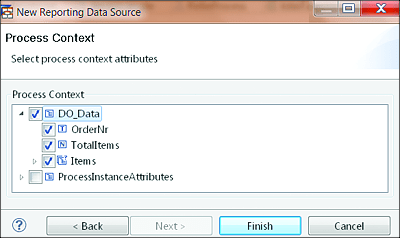
You’ll need to select the data object containing the structure that you want to have in your report (created in the first step; see Figure 10.53). Click on Finish. The report data source is automatically linked to the report activity.
Figure 10.53 Creation of a Reporting Data Source
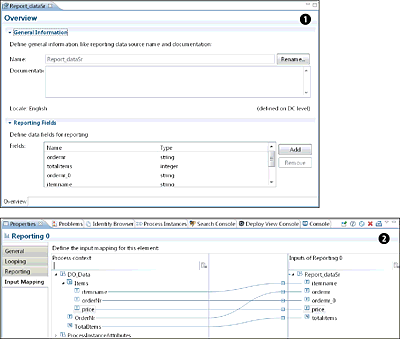
- The fields of the data object have been added to the reporting fields list. You can add more reporting fields if you wish (Figure 10.54 1).
- Go to the input mapping of the report activity, and map the field accordingly 2.
- Optionally, you could build a UI or presentation layer to display the report data (e.g., in Visual Composer).
Figure 10.54 Following Steps to Configure a Report Activity
Be aware that in addition to all the custom reporting fields shown in Figure 10.54 1, there are also some SAP-standard fields that are captured during runtime as listed in Table 10.12.
| Field | Data type | Description |
|---|---|---|
| PROCESS_ID | VARCHAR | The ID of the process instance |
| OCCURRENCE_D | DATE | The date on which this process instance runs |
| OCCURRENCE_T | TIME | The time during which this process instance runs |
| OCCURRENCE | BIGINT | The time during which this process instance runs expressed in milliseconds |
Table 10.12 SAP Standard Fields for a Reporting Data Source
Notification Activity
It’s common to need to keep some people informed about the status or execution of a business process. To facilitate this need, a notification activity can be used to send a notification via email.
The property attributes of a notification activity and their roles are described in the next sections.
General
This tab in the property view contains descriptive information, such as name and documentation.
To
This attribute specifies the person to whom the email notification needs to be sent. You can specify the notification receiver in one of two ways:
-
UME Users are users available in the SAP NetWeaver UME store. You can specify the UME principals by one of the following options:
-
Principal
You can directly select users, roles, and groups from UME. With this option, you’ll need to specify static values. -
Expression
You can use an expression to dynamically evaluate the notification recipients based on process context elements and rules and functions available within the expression editor.
-
Principal
- External users are available in case the intended notification recipients don’t exist in SAP NetWeaver UME. You can add a static value, and you’ll need to click on the Add button and specify the E-Mail ID attribute accordingly. Note that you can add multiple external users.
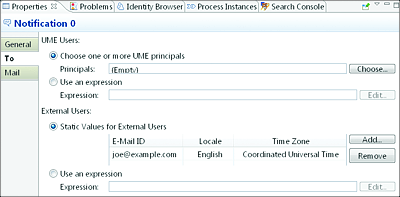
Alternatively, you can make the recipient evaluation dynamic by using an expression. Figure 10.55 shows a sample configuration using an external user.
Figure 10.55 Notification Sample Configuration
This tab specifies the notification content. It includes the subject and text message to be sent to the notification recipients. You can create a static subject and message.
You can also make both the subject and message dynamic (with details from the process data objects) by using variables and parameterized texts as described earlier in Section 10.4.2.
Note
Even though you’ve configured the notification activity to send a message to designated recipients, you need to make sure that the SAP BPM mail server connectivity configuration has been correctly performed in SAP NetWeaver Administrator. Without SAP NetWeaver Administrator being configured properly, email notification will fail.
10.4.4 Gateways
SAP BPM gateways objects are used to control the flow of a process. A gateway has the ability to determine the path of the process flow based on predefined conditions you’ve set and modeled at design time.
The different types of gateways all have specific usages. In the next sections, we’ll explore each of them and specify under which conditions they can be used.
As discussed in Chapter 9, following are the main types of gateways:
- Abstract or undefined gateway
- Exclusive choice
- Event-based choice
- Parallel split
- Uncontrolled merge
- Parallel join
The technical aspects and configuration details of each of these gateway types will be discussed in the next sections.
Abstract or Undefined Gateway
When designing a process and the specifics of the type of gateway aren’t yet known, an abstract gateway can be temporarily used. It can be thought of as a placeholder and will need to be changed to a specific gateway type later on.
Exclusive Choice
The exclusive gateway is a choice between the different outgoing flows (called gates). Only one of the outgoing gates can be selected. The selection of the gate to be taken is facilitated by conditions that need to be supplied for each gate. The conditions are Boolean based and evaluate to true or false.
You also need to define the priority order that will be followed to evaluate the different evaluation conditions. The first gate to evaluate to true will be taken, and the others will be ignored.
You also have the flexibility to specify a default gate, which is taken in case no other gate evaluates to true. Note that the condition of the default gate isn’t evaluated. Having a default gate is a good practice to avoid unnecessary exceptions in case none of the conditions evaluate to true.
The property attributes of an exclusive gateway will be explored next.
General
This tab in the property view contains descriptive information, such as name and documentation.
Condition Evaluation
Figure 10.56 shows an example of evaluation conditions for a three-gate exclusive choice.
Figure 10.56 Exclusive Gateway Sample Configuration with Three Gates
You can change the priority of the condition evaluation of each gate by selecting the condition and using the Up or Down buttons on the right side. You can also edit the condition evaluation of each gate by selecting the condition and using the Edit button on the right side.
Event-Based Choice
The event-based choice is almost the same as the exclusive gateway, but instead of using conditions, it uses events. Depending on the event received, the process will flow toward one of the subsequent gates.
The event-based choice is always followed by intermediate events, which can be message or timer events. When an event-based gateway is used, the process waits until one of the intermediate events is triggered before resuming. The event-based choice doesn’t require any special settings or configuration. The only attributes it contains are descriptive, such as name and documentation.
Parallel Split
As its name suggests, the parallel split enables the parallel execution of multiple gates. It can be considered as a more complex gateway compared to the ones we’ve mentioned so far.
It’s quite common to have processes that require multiple tasks to be executed at the same time. If the parallel gateway didn’t exist, then you would need to execute the steps sequentially. It goes without saying that sequential processing can be slow. When the steps to be performed are independent from each other’s processing, a parallel split is a good option to increase performance and to speed up the completion of a process.
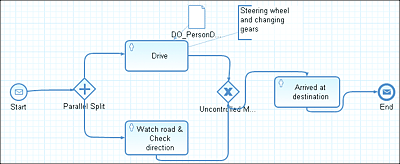
The parallel split also works with the notion of parallel joins, in which all the outgoing flows from the split meet again and merge in a join. Another important aspect about the parallel split is that even though all outgoing gates are executed simultaneously, the processing waits (at the join) for all the gates’ execution to finish before proceeding to the subsequent steps. To better illustrate the use of the parallel split, consider the driving process example depicted via the process shown in Figure 10.57. You always need to physically drive (steer the wheel and change gears) and to watch the road at the same time (in parallel). Both gates need to be completed for you to arrive at your destination.
Figure 10.57 Driving Process Representation with a Parallel Split and Parallel Join
The parallel split doesn’t require any special settings or configuration. The only attributes that it contains are descriptive, such as name and documentation.
Note
You don’t have to use a parallel split for modeling a parallel flow, but it’s preferable because it makes the process flow more readable and less complex.
Uncontrolled Merge
The uncontrolled merge is derived from the exclusive gateway and is used as a merge for alternative sequence flows. The uncontrolled merge doesn’t require any special settings or configuration. The only attributes it contains are descriptive, such as name and documentation.
Parallel Join
The parallel join is used together with a parallel split. It joins all the outgoing gates from a parallel split. We’ve already explored its functionality when exploring the parallel split (refer to Figure 10.57 for an example process that uses a parallel join).
A parallel join doesn’t require any special settings or configuration. The only attributes that it contains are descriptive, such as name and documentation.
10.4.5 Artifacts
An artifact is used in an SAP BPM process to store process-related data and to display extra information for the process. We can distinguish two artifacts in SAP BPM: data objects and annotation. Both artifacts will be explored in the next sections.
Data Objects
The context data of a process can be stored in data objects. As the different steps of a process are performed, the data of the process can be modified and can change along the way. Data structures based on XSDs are used to represent the nature of the data to be stored in the process. These XSD structures are then assigned to data objects. In addition to the custom data types, SAP has preloaded SAP NetWeaver Developer Studio with a large number of data types (primitive, simple, and complex) to choose from. You can therefore assign any of these data types to your data object. The values stored in a data object are used to map to and from the different flow objects of a process.
To add a data object to your process, follow these steps:
- If the data object needs to be assigned to a custom structure, then make sure that the related XSDs are imported or created in your project. Importing an XSD was described in Section 10.3.
- Drag and drop the data object artifact from the palette or by using the speed buttons from your process.
- Select the data object from the process, and navigate to the Properties view.
- In the Properties view, you can change the name of the data object (from the General tab) to something meaningful.
- In the Data Type tab, select the data type that represents the relevant data object structure.
If you can’t see the desired data type from the dropdown menu, then follow these steps:
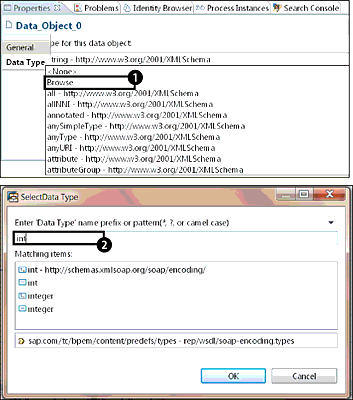
- Select Browse from the dropdown menu (Figure 10.58 1).
- A new screen will appear. Here, you can type the name of the data type to select it 2.
Figure 10.58 Configuring the Data Type for a Data Object
Note
To store data of a particular structure in the process, you need to first import or create all required XSDs in the SAP BPM process.
Not all data types are supported by data objects. Refer to SAP Note 1266539 for the limitations that apply.
Note that the SAP BPM context data can also be stored in SAP CAF or an EJB, but data objects are preferable because they are visible and simplify the readability of a process.
Annotation
An annotation artifact makes it possible to add descriptive notes to the different flow objects of the process, but they don’t change the behavior of your process. The notes can be very useful for documentation purposes and make it easier to read and understand a process model. Figure 10.59 depicts a process that contains an annotation to explain what the Drive activity entails.
Figure 10.59 A Process Using an Annotation to Give More Information about a Flow Object


