Appendix E
Lauter Tun Design for Draining
On any given day, there is at least one person standing in front of the brass fittings at the hardware store, trying to figure out what he needs to build his mash tun. Building a mash tun from a cooler is inexpensive and the easiest way to start all-grain brewing. You can use either a rectangular chest cooler or a cylindrical beverage cooler (fig. E.1).
As was discussed earlier in Chapter 19, “Clearing the Wort Out (Lautering),” there are two types of lautering, draining and rinsing. Draining lautering methods simply drain the existing wort and don’t require any uniformity of flow through the grainbed. On the other hand, rinsing the grainbed via the continuous sparging method requires uniform flow to insure that all the grist is equally well-rinsed of wort (see appendix F). This appendix will discuss how to build a mash-lauter tun for the draining lautering methods (i.e., the batch sparging and no-sparge techniques). The BIAB method does not require a lauter tun and this appendix doesn’t apply to it.
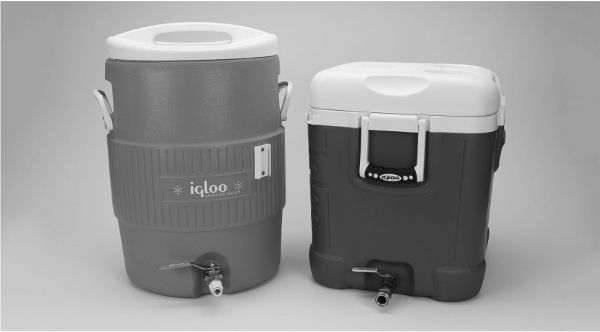
Figure E.1. Examples of both cylindrical (round or circular) and rectangular coolers or ice chests. Choose a cooler that provides for a good grain bed depth of between 4–12 inches (10–30 cm).
Choosing a Cooler
The original home lautering system was probably the bucket-in-a-bucket false bottom championed by Charlie Papazian in the first edition (1984) of The Complete Joy of Homebrewing. This setup is effective and very cheap to assemble. Using two food-grade 5 gal. buckets, the inner bucket is drilled with lots of small holes to form a false bottom that holds the grain and allows the liquid to run off; the sweet wort passes into the outer bucket and is drawn off through a hole in the side.
Picnic coolers (also called cool boxes, or “eskies” after the Esky® brand) offer a few advantages over buckets, adding both simplicity and efficiency. A cooler’s built-in insulation provides better mash temperature stability than a bucket can provide. Their size also allows mashing and lautering in the same vessel. Thus, all-grain brewing is as simple as pouring the grain into the cooler, adding hot water, waiting an hour, and then draining the sweet wort.
The shape of the cooler determines your grain bed depth. In general, deeper is better. If the grain bed is wide and shallow (<4 in. [<10 cm]), it won’t filter efficiently and your wort will be cloudy with debris. However, if the grain bed is too deep it is more likely to compact from lautering too fast and stop flowing. My advice is to pick your cooler based on your average batch size. Don’t pick one larger than you really need and think that a larger one will give you more flexibility for future batches. If you pick one that is too large for the majority of your batches, the grain bed depth for your usual batch size will be too shallow and it won’t hold the heat as well. The minimum grain bed depth should be about 4 in. (10 cm). The maximum should be about 16 in. (40 cm), although deeper will work if you are careful.
A 10 gal. (38 L) cylindrical beverage cooler with either a false bottom or manifold works well for both 5 and 10 gallon (19 and 38 liter) batches. The rectangular ice chest coolers also work well, and are commonly sized at 20, 24, 34, and 48 quarts (roughly equivalent in liters), which offers a good choice for any batch size. Many coolers have drain spigots that can be removed to make it easy to drain the wort via a bulkhead fitting. If you are using a cooler that does not have a drainage opening or spigot, lautering works just as well if you come over the side with a vinyl hose and siphon the wort out (fig. E.3). You should use a stopcock or clamp to regulate the flow, and as long as you keep air bubbles out of the line, it will work great.
Everything you need to build a mash-lauter tun is readily available at a hardware store. In the US, you should find that the total investment for the cooler and all the parts to convert it into a mash-lauter tun is usually less than $50.
Rinsing versus Draining—a Recap
Traditionally, commercial brewers have sparged their mashes using water sprinklers, or rotating sparge arms, and grain rakes to rinse the mash uniformly for the best extraction. They use large lauter tuns, anywhere from 10–20 ft. (3–6 m) in diameter, because they are lautering tons of grain. The only way to add water uniformly is to use large sprinkler devices to distribute over the whole tun. It’s different on the homebrewing scale. Our mash and lauter tuns are barely 2 ft. (60 cm) wide; it is quite easy to simply drop in a hose and have the water uniformly spread out across the grain bed. A sparge arm or diffuser plate can help, but it is not strictly needed.
To get the most uniform flow through all parts of the grain bed, the mash must be kept fully hydrated with free water above the grist to help prevent settling and compaction. Lautering was typically an hour-long process of monitoring the flow rates and the run-off gravity to assure good extraction. I spent a year conducting fluid flow experiments with ground-up corncobs and food coloring, and enlisted the aid of two hydrologists and an astrophysicist, in order to gain a thorough understanding of how to optimize extraction of wort via continuous sparging. That work is collected in the appendix F.
Meanwhile, other homebrewers, whom were not so concerned with optimizing efficiency, simply drained their mashes using a slotted pipe manifold or stainless steel screen, dumped in another batch of water, drained again, and got on with their day. Frankly, I was disturbed by this flagrant disregard for technology; sure, it was easy, and took less time, but where was the fun in that? Eventually, I realized that there was room for intellectual discussion and elegance of design in batch sparging, and I joined the bandwagon.
Draining the wort, rather than rinsing the grain bed, changes the design requirements. In the steady state flow conditions of continuous sparging, you want the flow rate to be the same at every point in the grain bed, and a false bottom is the best solution for realizing this goal. The problem with this solution is that a uniformly high outflow rate can compact the grain bed uniformly into an impenetrable layer that results in a stuck sparge. High performance comes with a high-risk price tag. If you are simply draining the wort, you don’t care whether it is drained from over here or over there, as long as it drains. Extraction uniformity is achieved with stirring in the next batch of sparge water. The drainage points could be entirely along one side of the tun—it doesn’t matter so long as you can drain it.
In batch sparging, if the grain bed is drained from a single point with a high flow rate, the grain will quickly compact around that point and flow will cease. The more you distribute that collection point, the lower the effective flow rate will be at any of those distributed points. This is the benefit of a slotted pipe or long screen—any decrease in flow at one point can be alleviated by an increase in flow at another point. Actually, false bottoms operate the same way, but the difference is that they are more uniform and symmetrical so that a high flow rate at one point is a high flow rate everywhere. Slotted pipes are not efficient enough to have that problem. Thus, slotted pipes and screens work better for draining the wort than false bottoms at high flow rates. Nevertheless, fluid dynamics states that the initial wort flow be slow, to avoid compacting the bed and causing a stuck sparge. Start slow and gradually increase the rate.
Batch sparging also works fine with false bottoms, you just need to be aware that it if you throw the valve wide open, you run a high risk of compacting the bed. Start draining slowly and you won’t have any problems.
Siphon or Bulkhead Fitting?
You have two options for actually getting the wort out of the tun: you can use a bulkhead fitting, or you can siphon the wort out. Many coolers have drain spigots that can be removed to make it easy to drain the wort via a bulkhead fitting. If your cooler does not have a drainage opening or spigot, you can buy a hole saw for your drill that will easily cut a nice hole in the cooler. Bulkhead fittings are available from several suppliers, or you can make your own. A bulkhead fitting is a short section of fully threaded pipe with two flat washers, two rubber washers, and two nuts for sealing around the hole that the pipe passes through. A hose barb and vinyl tubing can be used to connect to the lautering device on the inside, and a ball valve or a hose barb is connected to the outside. Another suggested design using off-the-shelf fittings is detailed in figure E.2.
With the siphon method, vinyl tubing connects directly to the lautering device and just comes out over the side of the cooler. During the mash, the tubing can be coiled inside the tun with the lid on to help retain the heat. Both methods work well, though the bulkhead fitting looks spiffier, and it is hard to siphon all the wort out. Whichever method you choose, you will also need a proper valve to regulate the flow rate. Ball valves are readily available in brass, chrome-plated brass, or stainless steel. Plastic stopcocks are an inexpensive option and work nicely in-line with the siphoning method (see fig. E.3).

Figure E.2. Suggested design for brass bulkhead fitting.
1: ½" nylon barb to ¾" M hose fitting
2: ¾" F hose to ½" MIP adapter (brass)
3: Rubber O-ring (No. 15, ⅛" thick)
4: Washer/spacer, trimmed to fit
5: ½" FIP to ⅜" FIP Reducer
6: ⅜" MIP nipple (1.5")
7: ⅜" ball valve (brass)
8: ⅜" MIP to ⅜" barb
To assemble:
- 1. Slip the O-ring over the male threads on #2, so it rests against the flange.
- 2. Apply some Teflon tape to the male threads of #2, and insert it through the spigot hole from the inside of the cooler.
- 3. Slip the spacer over the threads and hand tighten #5 to make a good seal.
- 4. Assemble the rest of the parts in the sequence shown.

Figure E.3. This cooler doesn’t have a drainage port and therefore is using a siphon hose connected to the manifold to siphon the wort out.
False Bottom, Pipe Manifold, or Screen?
There are several options for lautering devices available. Here is a list of pros and cons for each.
False Bottoms
Pros:
- • Pre-fabricated false bottoms for cylindrical beverage coolers are readily available from several suppliers and are easy to assemble.
- • False bottoms are always more uniform than manifolds when continuous sparging—near 100%.
Cons:
- • False bottoms are tedious to fabricate yourself and difficult to fit to rectangular coolers. They should fit closely around the edges of the tun to prevent gaps that can allow sparge water to bypass the grain bed and reduce the yield.
- • False bottoms are more prone to stuck sparges when the lauter flow is too fast, because they will compact the grain bed uniformly.

Figure E.4. This is a picture of a perforated false bottom designed for cylindrical beverage coolers. A drainage hose would connect to the hose barb in the center.
Manifolds
Pros:
- • Copper pipe manifolds are easy to build and fit to any size cooler.
- • Stuck sparges are rare with manifolds, because the grain bed will not compact uniformly.
- • Highly efficient configurations are easily built.
Cons:
- • The efficiency of manifolds depends on the pipe spacing and grain bed depth.
- • The grain bed is not lautered below the manifold, so the pipe slots should face down and be as close to the bottom of the tun as possible.
- • Many slots to cut.
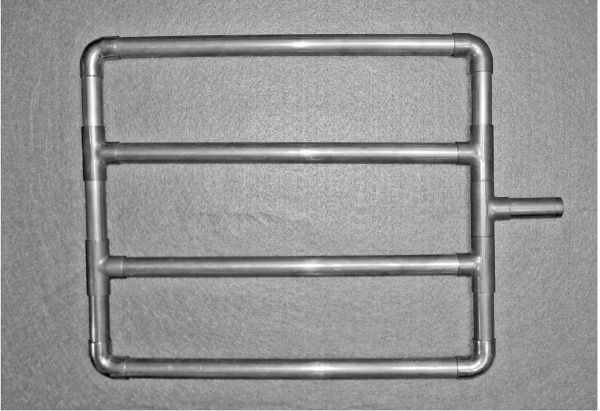
Figure E.5. A manifold is a distributed drainage device that can easily be made with copper or CPVC water pipe. Regular rigid PVC pipe should not be used because it will contribute plastic and solvent flavors and aromas to the beer.
Stainless Steel Screens and Braids
Pros:
- • No slots to cut.
- • Screens clear very quickly during the lautering recirculation step.
- • Stuck sparges are rare with screens and braids, because the grain bed will not compact uniformly.
- • Pre-fabricated screens and braid assemblies are available from several suppliers.
Cons:
- • Cutting the braid free from a rubber hose is a bit of work.
- • Half-inch diameter, light gauge steel braids can collapse from the weight of the mash and make lautering difficult. One-inch hose braids won’t collapse.
- • Not well-suited for continuous sparging.

Figure E.6. Stainless steel mesh screens or braids can be purchased or made yourself from off-the-shelf materials.
Building a Copper Pipe Manifold
A manifold can be made of either soft or rigid copper tubing. Choose a form to suit your cooler and design. In a round cooler, the best shape is a circle divided into quadrants, although an inscribed square works nearly as well. In a rectangular cooler, the best shape is rectangular with several legs to adequately cover the floor area.
Copper sweat fittings can be used to join the legs together. The fittings don’t need to be soldered, simply crimping the ends slightly with a pair of pliers will provide the friction to hold the assembly together. When you cut the ½" copper water pipe lengths to fit the cooler, don’t forget to take the assembled elbow and T fitting lengths into account.
Use a standard hacksaw blade to cut the slots into the ½" copper water pipe—they don’t need to be any narrower. The slots in the pipes should only be cut halfway through and don’t need to be closer than a quarter-inch apart. Even a half-inch apart is fine. The slots should face down—wort that is physically below the slots will not defy gravity and flow upward.
A wide variety of off-the-shelf brass fittings, such as hose barbs and compression fittings, can be used to connect the manifold to a siphon or bulkhead.
Building a Stainless Steel Braided Ring
The stainless steel braid from hot water hoses makes good lautering screens. They are a bit of work to cut and disassemble, however, so here is one suggestion for making one.
Parts List:
- • 24" × 1" diameter water heater connecter
- • 5/8" compression Tee brass fitting (with included ferrules)
- • Two 1" lengths of ½" diameter copper tubing

Figure E.7. Manifolds should be shaped to uniformly fit the cooler and distribute the drainage points. The pipes should be spaced at half the inter-pipe distance to the wall, to ensure uniform flow throughout the grain bed to the manifold.
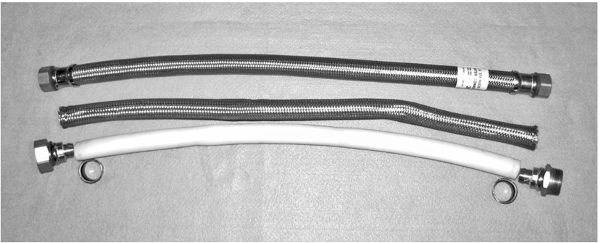
Figure E.8. This picture shows a common hot water heater hose before (top) and after the stainless steel outer braid has been removed.
Procedure:
- 1. Clamp one of the end fittings in a shop vise.
- 2. Cut all the way through the metal sleeve that binds the hose braid to the end fittings with a hacksaw. This way the ends are evenly trimmed and won’t fray.
- 3. Pull the hose off the fitting in the vise.
- 4. Clamp the other end and repeat.
- 5. Now axially compress the braid to work it loose and slide it off the hose (see fig. E.8).
- 6. Pull or compress the ends of the braid to make it narrow and slide one of the copper tubing pieces onto each end of the braid. Let the end of the braid extend about ⅛" beyond the tubing.
- 7. Slide a compression Tee nut over each end of the braid onto the copper pipe.
- 8. Insert a ferrule into each end of the braid (see fig. E.9).
- 9. Slide the assembly snugly into the Tee and tighten the nut so that it crimps down on the copper pipe.
- 10. Repeat step 9 for the other side of the Tee, and now you have a braided ring manifold that won’t come apart in the mash. This ring can now be connected to a bulkhead or siphon like the other systems (see fig. E.10)
A ring that divides the area equally in half (half area is inside/outside ring) is nearly as effective as a false bottom is for uniformity of sparge flow during continuous sparging. Flow uniformity doesn’t really matter for batch sparging, but it’s nice to have. See appendix F for more information on uniform fluid flow during lautering.
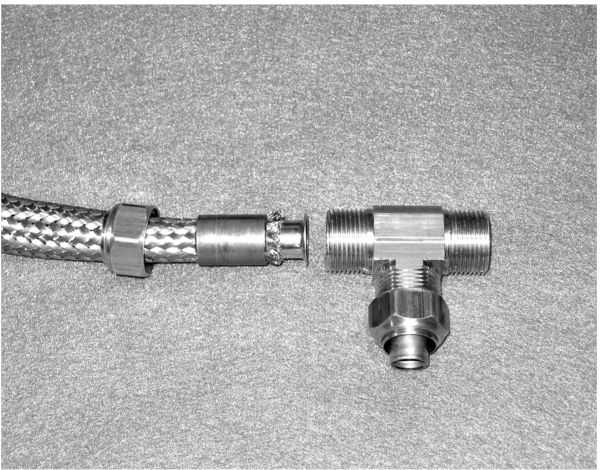
Figure E.9. Assemble the copper tube, compression nut and brass ferrule onto the steel braid as shown. When assembled and tightened, the nut will be attached to the tube, and the braid will be securely attached to the T fitting but can be easily disassembled for cleaning.
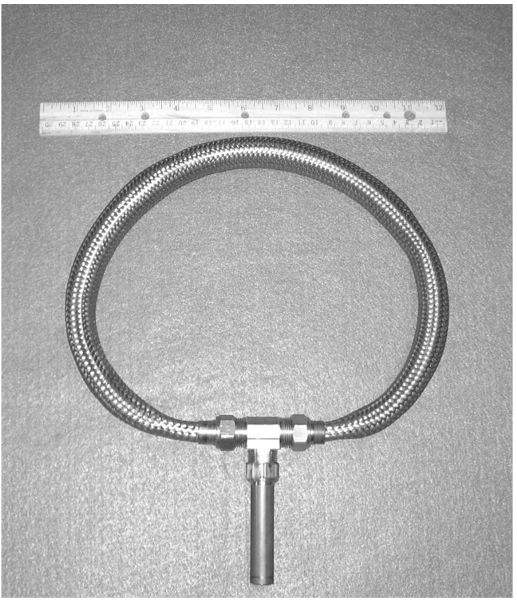
Figure E.10. The braid diameter can be sized to fit any round cooler. For uniformity, the diameter of the ring should be 0.707 times the diameter of the tun.
Design Examples
Design Option 1—Cylindrical Cooler with False Bottom
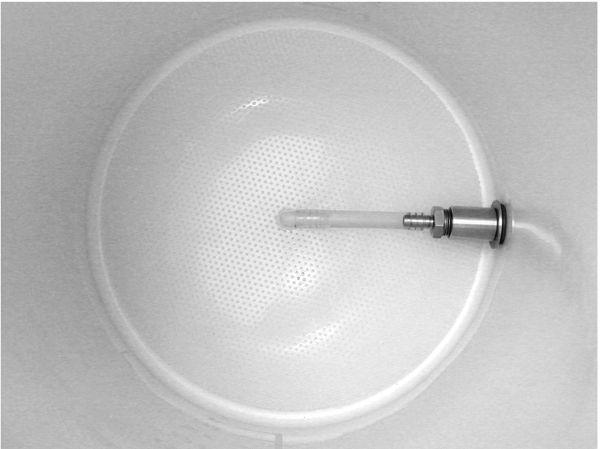
Figure E.11. A cylindrical beverage cooler with a false bottom.
- Works for: Continuous sparging, batch sparging, no-sparge
- Degree of difficulty: Easy
A cylindrical cooler with false bottom system is probably the easiest to assemble, because it is readily available off the shelf. This system can lauter any beer by any method—the only caveat is that you need to watch your initial flow rate so that you don’t compact the grain bed and get a stuck sparge.
Design Option 2—Cylindrical Cooler with Manifold
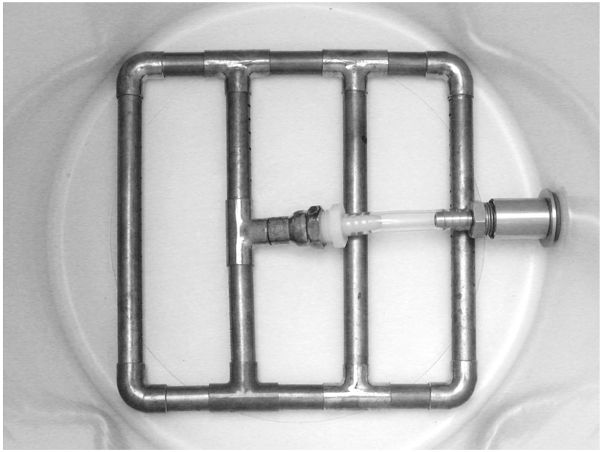
Figure E.12. A cylindrical beverage cooler fitted with a square manifold.
- Works for: Continuous sparging, batch sparging, no-sparge
- Degree of difficulty: Strenuous
The cylindrical cooler with manifold design can be optimized for distribution and uniformity, allowing flexibility for any sparging method. Soft copper tubing and compression fittings can be used to make a ring. The advantage of the manifold over the false bottom in this case is the reduced risk of a stuck sparge caused by uniform compaction.
Design Option 3—Rectangular Cooler with Manifold
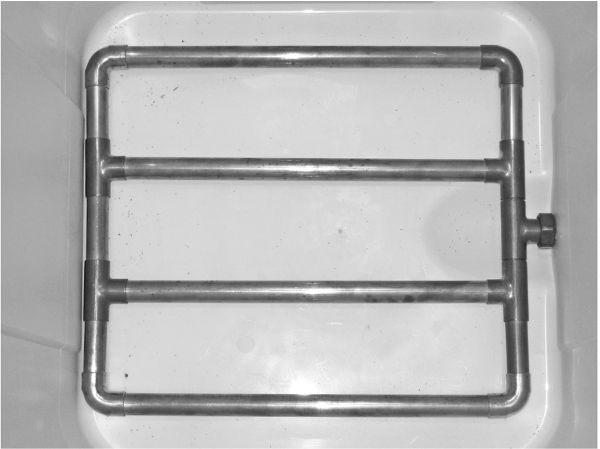
Figure E.13. A rectangular cooler fitted with a rectangular manifold.
- Works for: Continuous sparging, batch sparging, no-sparge
- Degree of difficulty: Moderate
The rectangular cooler with manifold design can be optimized for distribution and uniformity, allowing flexibility for any sparging method. The slotted pipes require some time to make, but the resulting manifold is very durable. Many brewers prefer the larger, wider rectangular coolers for ease of stirring and water additions.
Design Option 4—Cylindrical Cooler with Braided Ring
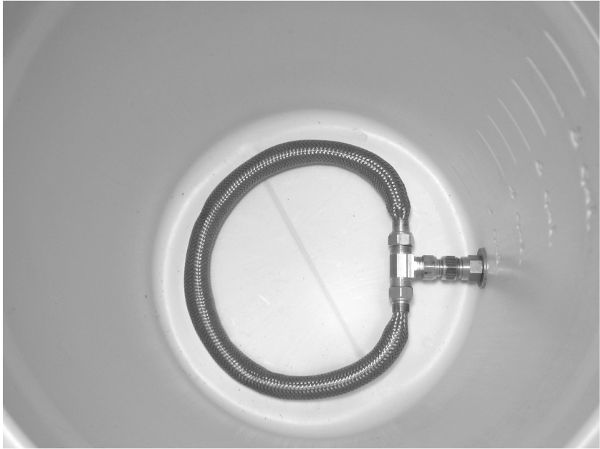
Figure E.14. A cylindrical beverage cooler fitted with a stainless steel braid ring.
- Works for: Batch sparging, no-sparge, continuous sparging
- Degree of difficulty: Moderate
A circular braided ring in a cylindrical cooler that divides the area evenly inside and outside the ring is actually more uniform than a false bottom of the same size. The other advantage of a ring over the false bottom here is the reduced risk of a stuck sparge from uniform compaction.
Design Option 5—Rectangular Cooler with Single Braid Tube
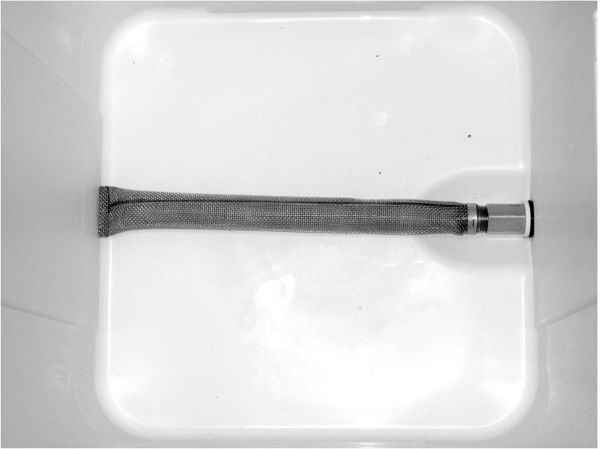
Figure E.15. A rectangular cooler with a single straight stainless steel braid drain tube.
- Works for: Batch sparging, no-sparge
- Degree of difficulty: Easy
A single screen or manifold pipe a rectangular cooler configuration doesn’t adequately cover the floor area to work well for continuous sparging, but will still work fine for the draining methods. Stainless steel braids clear quickly during the recirculation step. Many homebrewers prefer the larger, wider rectangular coolers for ease of stirring and water additions. The only problem is that the braid tends to crush flat and it is hard to hold down on the bottom. Stainless steel springs are often placed inside the braid to help it hold its shape and maintain good flow.
Design Option 6—Cylindrical Cooler with a T-Screen

Figure E.16. A cylindrical cooler with a T-screen.
- Works for: Batch sparging, no-sparge
- Degree of difficulty: Easy
Cylindrical and rectangular coolers with a T-screen or manifold work fine for batch sparging and no-sparge brewing. They tend to be rigid and movement is not a problem. These sorts of drains do not work for continuous sparging because the collection area is not uniform. Uniformity is discussed in more detail in appendix F.