Chapter 1
Choosing and Set ting Up Your Chromebook
IN THIS CHAPTER
 Understanding what makes a Chromebook tick
Selecting your very own Chromebook
Using your Chromebook for the first time
Transitioning to Chromebook from Windows or Mac
With the world entrenched in Windows and Mac laptops, it was gutsy of Google to introduce a brand new concept in laptops — the Chromebook. In 2014, Google captured 1 percent of the laptop market in the U.S., which equates to roughly 5.3 million units sold, a number expected to grow. In 2016, Chromebooks captured 3.6 percent of the overall U.S. laptop market. And in late 2017, nearly 60 percent of all computers sold into K–12 education in the U.S. were Chromebooks. This growth means that a lot more people will be using Chromebooks in the future.
In this chapter, I discuss what makes the Chromebook unique when compared to other personal computers on the market. I also take an in-depth look at how to set up your Chromebook and prepare you to transition to Chromebook from Windows or Mac.
But I can tell you right up front: A Chromebook is very easy to use and learn. Easier, I’d say, than a Windows computer or even a Mac. In fact, a Chromebook is about as easy to use as an iPhone or an iPad. I’ve used Windows and Macs professionally and personally for more than 25 years, so believe me when I tell you this.
Checking Under the Hood of the Chromebook
But what is a Chromebook? In short, a Chromebook is a laptop computer running Google’s proprietary operating system, Chrome OS.
 The operating system (OS) is the software that manages and schedules the basic tasks and functions of your computer. You might have a little experience with other popular operating systems like Microsoft Windows, Linux, or Apple’s Mac OS. Smartphones and tablets have operating systems, too; Apple’s iphone OS is called iOS, iPadOS runs on Apple iPads, and the OS that runs on Android tablets and phones is called, um, Android.
Chrome OS is an operating system developed by Google to work primarily with web-based software on laptop computers. Your experience using your Chromebook will be very similar to previous experiences you might have had surfing the web with the Chrome web browser (or any browser). The Chrome web browser shares many similarities with other web browsers on the market like Firefox, Internet Explorer, and Safari. (See Figure 1-1.)
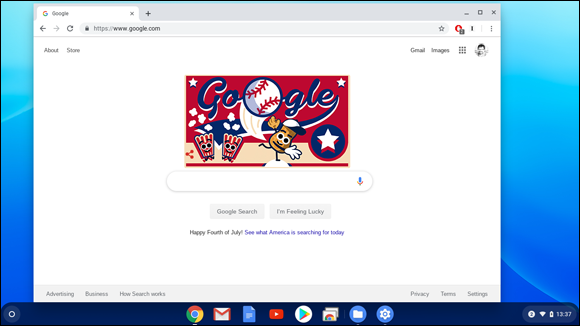
FIGURE 1-1: The Google Chrome web browser.
Except for the Chromebook Pixel, Google isn’t manufacturing Chromebooks directly. Instead, Google has licensed several major laptop manufacturers to create them. Manufacturers such as Acer, ASUS, HP, Lenovo, Dell, Toshiba, and Samsung are all making their own Chromebooks with their own technical specifications.
The software
Much of what you will do on your Chromebook happens in the Chrome web browser. This is because many of the applications you will use on your Chromebook actually reside on the Internet. This is one of the things that sets Chromebook apart from other computers: You don’t install applications on a Chromebook; instead, you access them from the Internet. You find applications through the Chrome Web Store (dubbed CWS) and add them to your Launcher, which, in many cases, means nothing more than creating a bookmark for quick access through your Chrome web browser. This approach can be limiting in some cases, but these cases are rare. Thanks to the vast nature of Google’s global computing ecosystem, thousands of great applications are at your fingertips.
 Although some Chromebook applications offer offline features and functionality, you will need an Internet connection to initially set up your Chromebook and be able to take advantage of everything your Chromebook has to offer. You could say that Chromebooks are designed for an “always online” lifestyle, but you can definitely do things with your Chromebook while offline as well.
The hardware
Unlike all other computers on the market that run Mac OS or Windows, not much software is installed on your Chromebook, which means that your Chromebook doesn’t need to have vast amounts of hard drive space, memory, or processing power. Most Chromebooks have 2–4 gigabytes (GB) of memory, less than 64GB of hard drive space, and a low-power processor.
The reduced technical features mean that Chromebooks use less power, which means longer battery life. It also means that Chromebooks come with a drastically lower price tag compared to other computers available today. This explains why Google is gaining such a large share of the laptop market. For the things that most people do, a Chromebook is more than adequate.
If you prefer a desktop computer running Chrome OS, plenty are available. These computers are called Chromeboxes. If you own or are thinking about getting a Chromebox instead of a Chromebook, 99 percent of everything you will read in this book will still apply to you, because most of what’s in this book is about Chrome OS— the same OS that runs on Chromebooks and Chromeboxes.
Choosing a Chromebook
Given the nature of Chrome OS, Chromebooks do not require extremely high-powered hardware to provide an excellent user experience. Even so, the great variety of manufacturers and hardware specifications available can make choosing a Chromebook somewhat tricky.
If you are not yet familiar with computer things like hard drives, RAM, SD card slots, or HDMI ports, you don’t really need to understand any of these things to buy a Chromebook that will work for you. If you are shopping for your first Chromebook (even if it’s the first computer you have ever purchased), go to a store with a good selection (three or more models) of Chromebooks and knowledgeable salespeople. If you buy the least expensive model with a screen size you can live with, you probably won’t be disappointed. If this is you, you can read about RAM, hard drives, HDMI, and other things later — or never! If you do want to understand the inner details of Chromebooks and make your purchase decision based on RAM, hard drive size, and ports, flip over to Chapter 21 for all those details.
 Another useful way to decide which Chromebook to purchase is to research them online. Amazon.com has a good article from Consumer Reports on Chromebooks (just search for Chromebooks). PC Magazine and other well-known publications also have good reviews on Chromebook models.
Setting Up Your Chromebook
You really should have a wireless Internet service available when you first set up your Chromebook. (If you don’t know about the Internet service, it’s time to bring in the person who does.) If you’re using a stationary (home or public) wireless Internet network or a portable device with an Internet hotspot, you probably need to know
- The network name (like Smith Family Wi-Fi or ATT034)
- The network password (usually a bunch of random letters and numbers)
If you don’t already have a Google Account, you’ll also need a phone handy to verify your new account while you set up your Chromebook.
Turning on your device
Regardless of the brand you choose, the Chromebook is built for speed — and you’ll notice this speed the first time you turn on your device! To turn on your device, you may simply need to plug in the power cord and open the laptop. If your Chromebook doesn’t turn on automatically, locate the Power button, which may be found on the top-right corner of the keyboard itself, or on the side or back of the Chromebook. Look for the familiar “0-1” logo. Figure 1-2 shows the Power button on the Lenovo C330 and on the Samsung 303C. The Power button on your Chromebook is probably similar to one of these.
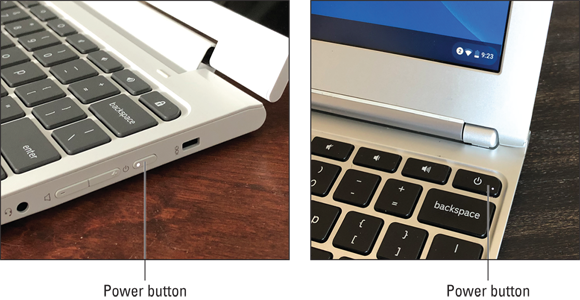
FIGURE 1-2: The Power button on two different Chromebook models.
When you turn on the device for the first time, a Chrome logo pops up on the screen, and within seconds, the computer powers on and displays the Welcome window. Click Let’s Go to begin setup.
Selecting a language
When the Welcome window appears, it will most likely say Welcome in your language. If it’s not in your language, click Country Language at the lower-left corner of the Welcome window and then find and select your language. (I wish it had an option for Pirate English. “Select your languaaaarge, matey!”)
If you needed to change your language, you might also need to select the keyboard layout. If you’re living in the United States, you likely want to select the defaults here, which are English (United States) and US Keyboard.
Most people will not need to change the language, country, or keyboard options.
Connecting to the Internet
Next, you need to select a network to connect to the Internet. If no network is available, I suggest holding off on attempting to set up your Chromebook until you can connect to an Internet source.
If you’re using a mobile device that can provide an Internet hotspot, it’s time to turn on the hotspot and find the network name and password, which you use in the following steps to connect your Chromebook to the Internet for the first time:
Click the Open the Network drop-down list and select your network name.
Your Chromebook may detect and display several other nearby home or business networks. You can ignore them.If your Chromebook requests it, enter your network password.
After you select the network and enter a password, if applicable, the Wi-Fi bars onscreen fluctuate as your computer tries to connect. (Figure 1-3 shows the Wi-Fi signal icon.) After the connection is successfully established, the Continue button at the bottom of the dialog window becomes active.
If your Chromebook does not successfully connect to the Wi-Fi network, you’ll see the error message
bad passwordand you can try entering the password again. You can also select a different Wi-Fi network if you wish. You can view the Wi-Fi password you are typing by clicking the little eye symbol to the right of where you are typing in your password.- Click the Continue button.

FIGURE 1-3: The Wi-Fi signal icon.
Agreeing to the Terms of Service
You might see a message that says Your Connection is Not Private. This issue is not something to worry about at this point.
If you’ve installed software or activated a device within the last 10 years, you’ve likely seen a terms-of-service agreement. You can accept it by following these steps:
- Review the Terms of Service.
(Optional) When you’re satisfied that you understand and agree to the terms, select or deselect the check box that sends usage stats back to Google.
I recommend that you leave this box selected. The data is useful for identifying and fixing bugs, creating new features, and otherwise making the Chromebook better for everyone! (Google and the NSA have all our information anyway, so why not?)- Click Accept and Continue to move to the next step.
Logging In for the First Time
To unlock all the features that your Chromebook has to offer, you must first log in with a Google username and password. You can use your existing Google Account or create a new account at this time.
Logging in using an existing Google Account
You can log in by using your Google Account username and password:
- Enter your Google Account username into the Username field.
- Enter your Google Account password into the Password field.
Click Login.
The option to select a profile picture appears.
Select your profile picture.
Pick one of the default pictures, use your existing Google profile picture, or take a new picture.
Click OK.
This completes the initial login process.
If your Google account uses Google Authenticator or Google Advanced Protection for logging in to Google, you need to log in to your Chromebook using those services for the first time. If this is your situation, your first login to your new Chromebook will be like logins you’ve done in the past on other computers.
Creating a new Google Account
You can create a Google Account by following these steps:
On the login screen, click the Create a Google Account Now option.
The Chrome web browser launches and takes you to a page where you can create your account.
Complete the form and click Next.
On this screen, Google wants to verify that you are a real human being. I assume that you are!
Enter your phone number and whether you’d rather be called or texted, and click Next.
Google will contact you in the manner you selected to provide you with a verification code.
- Enter the verification code and click Continue.
- Close the browser by clicking the X in the upper-right corner of the browser window.
On the bottom-right of the screen, click the word Guest.
A pop-up menu appears with several options.
Select Exit Guest from the list.
This step takes you back to the login screen.
- Log in to your Chromebook with your new Google Account.
Using Chromebook as a guest
Logging in to your Google Account allows you to use all of Chromebook’s functionality, but you can still access many of these functions without logging in. Chromebook allows you to use the device as a guest by selecting the Browse as Guest option.
Letting a friend or family member use your Chromebook for a while is a great use of Chromebook’s Guest feature.
If you browse the Chromebook as a guest and then later decide to register or log in as a user, you first need to exit Guest mode. You can log out by clicking the status area (on the bottom-right of your screen, where you see the time, battery, and Wi-Fi status) and then selecting Exit Guest from the top of the list. (See Figure 1-4.) Exit Guest takes you back to the login screen.
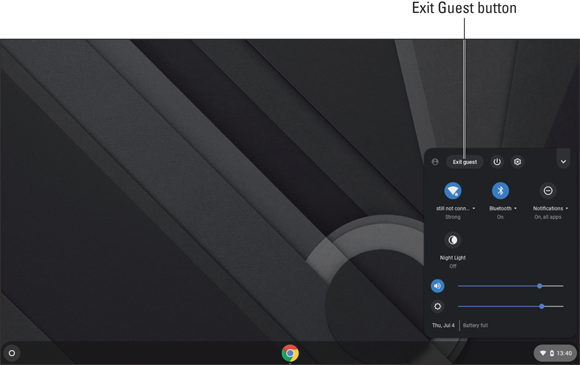
FIGURE 1-4: The Exit Guest button.
Transitioning to a Chromebook from Mac, Linux, or Windows
Transitioning from a Mac, Linux, or Windows computer requires a few easy steps outlined in the following list. All these items are covered later in this book:
- Get a Google Account. The section “Creating a new Google Account,” earlier in this chapter, shows you how to get a Google Account. Your Google Account is the key to nearly everything you do on your Chromebook moving forward.
- Move your files. In Chapter 6, you can find out how to access your Chromebook hard drive, external storage, and Google Drive (which is where the bulk of your files will reside after you make the leap to Chromebook).
- Get your Chrome bookmarks. If you’ve signed in while using the Chrome web browser on other devices, your bookmarks, apps, and extensions will come with you to your new Chromebook! I cover bookmarks in Chapter 3.
- Find new apps. Your Chromebook comes with several applications in your Launcher by default. You can, however, add new apps by navigating to the Chrome Web Store and adding them to your menu. In Chapter 5, you can look at some of the existing apps on your Chromebook, as well as discover ways to locate and add new apps that are useful to you.
Where to Go Next
Now that you’ve completed the basics of setting up your Chromebook and logging in, what would you like to do next? Here are a few ideas:
- Learn more about using your Chromebook. Go to Chapter 2.
- Learn more about the Chrome browser. Go to Chapter 3.
- Download and use other Chromebook apps. Go to Chapter 5.
- Use office tools to create documents and worksheets. Go to Part 2 (Chapters 7–11).
- Start working with photos, videos, and ebooks. Go to Part 3 (Chapters 12–16).
- Explore advanced features (are you ready?). Go to Part 4 (Chapters 17–20).
A last word: If you’re finding your initial Chromebook experience to be difficult or frustrating, don’t give up! You’ll soon develop “muscle memory” for common functions and before long, you’ll love the sheer simplicity and ease of use of your Chromebook.