One of the most powerful adjuncts to any treatment for relieving pain is, without a doubt, regular exercise. The weakness that often accompanies musculoskeletal pain can, in part, be altered by exercise.
Exercise has many benefits, not only for maintaining a healthy body, but also for helping the body cope with pain. Exercise can help to heal back ailments and prevent their occurrence and can significantly reduce stress.
Increases the level of endorphins, the body’s own morphine-like pain relievers, the action of which is not unlike that of acupuncture and electrical nerve stimulation, or TENS.
Increases the production of synovial fluid in joints (such as the facet joints), which helps to reduce wear and tear.
Increases the tensile strength of tendons and ligaments, making them better able to resist strain and tissue damage.
Strengthens joints and muscles, rendering them less vulnerable to injury.
Decreases the risk of osteoporosis, which makes bones more susceptible to fracture.
Improves coordination and balance, which help to protect against falls and consequent injury.
Is one of the best tools for coping with stress.
Before you attempt to do the exercises in this book, or to embark on any exercise programme, please first check with your doctor or other professional health-care provider. This precaution is especially important if you are recovering from an injury or from surgery, if you have osteoporosis or other health disorder, if you are pregnant, or if you have not engaged in regular exercise for some time.
For best results, try to do some exercise every day. There are many simple stretches you can integrate into everyday activities no matter how busy you are (see opposite). If this is not possible, try to do some exercise at least every other day – practising regularly is important for maintaining the good results gained from the previous session.
Try not to exercise too close to meal times as it may interfere with digestion.
Make sure that your exercise area is free of obstruction and practise whenever possible on a non-skid surface.
Remove any personal items that can cause injury.
Wear clothing that allows you to move and breathe easily. If you wear shoes, they should provide good traction.
Practise slowly and attentively, in synchronisation with regular breathing.
At the first hint of pain while exercising, stop. You may be performing the movement incorrectly, or the exercise may not be appropriate for you at this time.
If you have osteoporosis, some forward-bending exercises are best avoided because of possible compression fracture of spinal bones. Check with your doctor.
Pregnant women with a history of miscarriage should avoid the exercises in this book during the first trimester (three months). Check with your doctor. During pregnancy, omit exercises done in the prone position (lying on the abdomen). After the first trimester, avoid exercises requiring you to lie flat on your back: this position can restrict the delivery of blood and oxygen to mother and foetus by placing pressure on the mother’s vena cava (principal vein) draining the lower body.
Chief among the benefits to be derived from daily stretching are injury prevention and faster recovery from exercise. A regular programme of stretching exercises will increase the range of motion of your spinal and other joints. It will also facilitate the delivery of nutrients to and removal of wastes from the body’s tissues and promote healing.
Try to do some stretches every day and repeat each about three times.
Make sure your stretches are slow and smooth and synchronised with regular breathing.
Hold (maintain) each stretch for 5 to 20 seconds, but no longer than 90 seconds.
Regardless of how short your exercise programme is, a brief warm up period is imperative. Warm ups slightly increase body temperature, reduce stiffness and improve circulation. They help to prevent muscular pulls and strains when you do the main exercises or engage in sports or other strenuous activities.
Spend at least five minutes warming up; longer for more vigorous endeavours.
Do your warm ups slowly and attentively, maintain good posture and breathe regularly.
Some of the warm ups in this chapter can be integrated into daily activities to prevent or reduce tension build-up. You can, for example, do Shoulder Rolls (below) or Neck Stretches during short breaks from prolonged sitting at a desk or computer.
Whenever the word ‘mat’ is used in the instructions, it refers to the surface on which you are doing the exercise.
The word ‘hold’ means ‘maintain’ a stretch or completed exercise. The length of time for holding the position will vary with your level of functioning. The number of times to repeat an exercise will also depend on your general condition. Keep these to a minimum if you have not exercised for some time or if you are recovering from an illness or from surgery. Check with your doctor or physiotherapist.
Enhance the effects of the Neck Stretches
Condition the muscles of the upper back
Keep the shoulder joints freely moving
Prevent tension build-up in the upper back
1 Sit or stand tall. Relax your hands. Relax your jaw and breathe regularly.
2 Slowly and smoothly rotate your shoulders in a backward to forwards motion three or more times.
3 Repeat the Shoulder Rolls three or more times in the opposite direction. Rest.
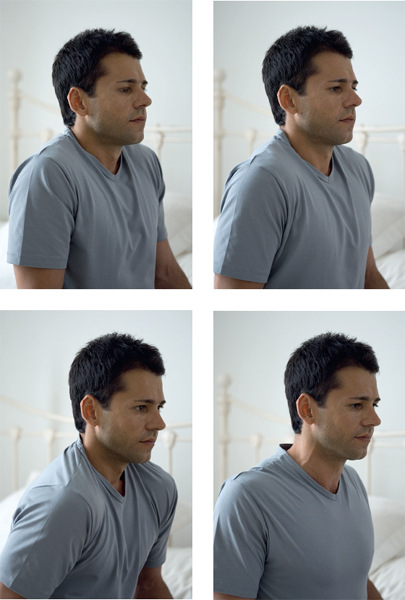
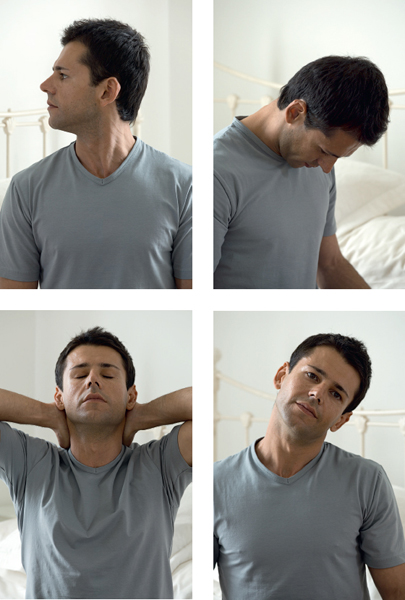
Keep the cervical (neck) part of the spine flexible and counteract stiffness
Contribute to a healthy spinal circulation
Prevent tension build-up in the neck
Strengthen neck muscles
1 Sit or stand tall. Relax your shoulders and hands. Relax your jaw and breathe regularly.
2 Slowly and smoothly turn your head as far to the left as you comfortably can. Hold the neck stretch for five or more seconds.
3 Turn your head slowly and smoothly to the right as far as you comfortably can. Hold the neck stretch for five or more seconds.
4 Repeat these two moves (steps 2 and 3) two or more times.
5 Gently supporting the back of your neck with your hands, slowly and carefully tilt your head backwards. Hold the neck stretch for five or more seconds.
6 Relax your hands and slowly and carefully tilt your chin towards your chest. Hold the neck stretch for five or more seconds.
7 Repeat these two moves (steps 5 and 6) two or more times before returning to your starting position.
8 Slowly and smoothly tilt your left ear towards your left shoulder to stretch the right side of your neck. Hold the stretch for five or more seconds.
9 Repeat the sideways neck stretch (step 8) on the other side.
10 Repeat these two neck stretches (steps 8 and 9) two or more times before resuming your starting position, with head upright and facing forwards. Rest.
The next set of warm ups are for the lumbar part of the spine, at the small of the back.
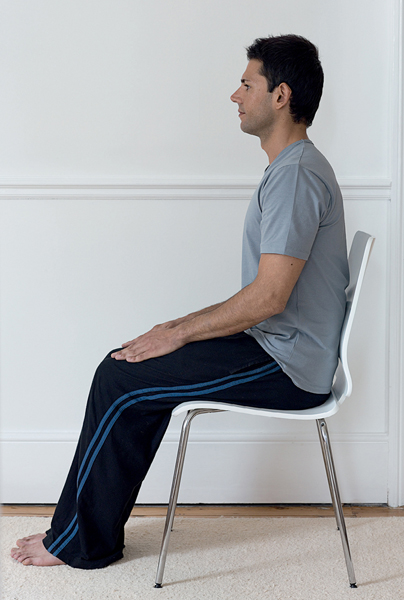
Strengthens the lower back
Strengthens the abdominal muscles
Keeps the spine flexible
Relieves spinal stiffness and minor backaches
1 Sit on a chair or stand with your back to a wall or other prop. Maintain good posture, relax your jaw and breathe regularly.
2 On an exhalation, press the back of your waist towards or against the back of the chair or other prop. Hold the pressure as long as your exhalation lasts. This will gently tilt your pelvis.
3 Inhale and relax, then repeat the exercise (steps 2 and 3) two or more times. Rest.
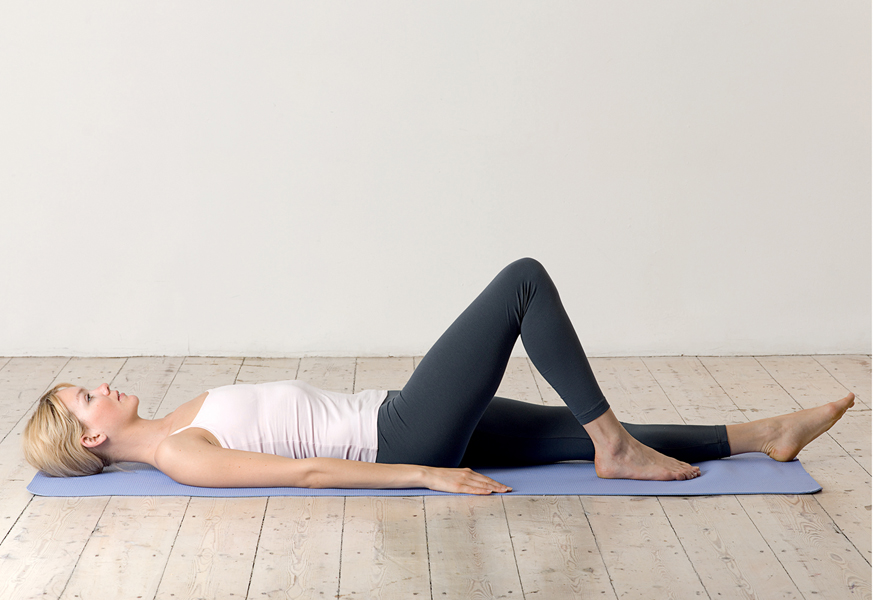
Strengthens the lower back
Strengthens the abdominal muscles
Keeps the spine flexible
Relieves spinal stiffness and minor backaches
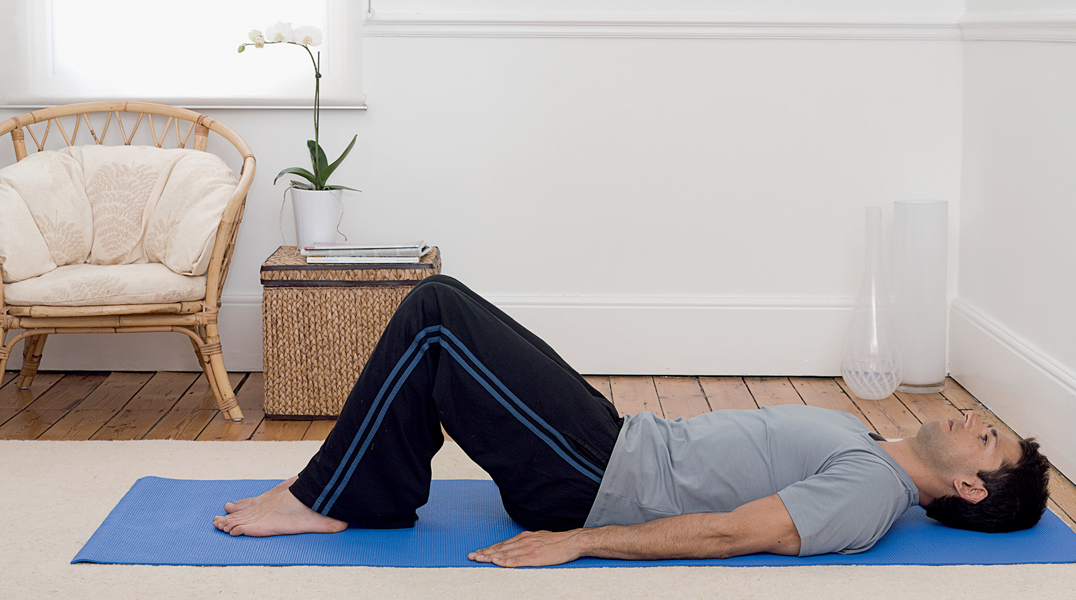
1 Lie on your back, bend your knees and rest your feet flat on the mat. Relax your arms at your sides.
2 On an exhalation, press the small of your back towards or against the mat. Hold the downward pressure as long as your exhalation lasts.
3 Inhale and relax your back, then repeat the exercise (steps 2 and 3) two or more times. Rest.
Helps to keep the lower spine flexible
Conditions the lower back muscles
Firms and strengthens the oblique and transverse abdominal muscles
1 Sit on your mat. Bend your knees and rest the soles of your feet on the mat. Lean backwards and prop yourself up on your elbows. Relax your jaw and breathe regularly.
2 Bring your knees towards your body. Alternately tilt your knees, as a unit, to left and right in synchronisation with regular breathing.
3 Repeat these movements (step 2) five or more times on each side before resuming your starting position. Rest.
CAUTION
Pregnant women and individuals with osteoporosis should omit this exercise.
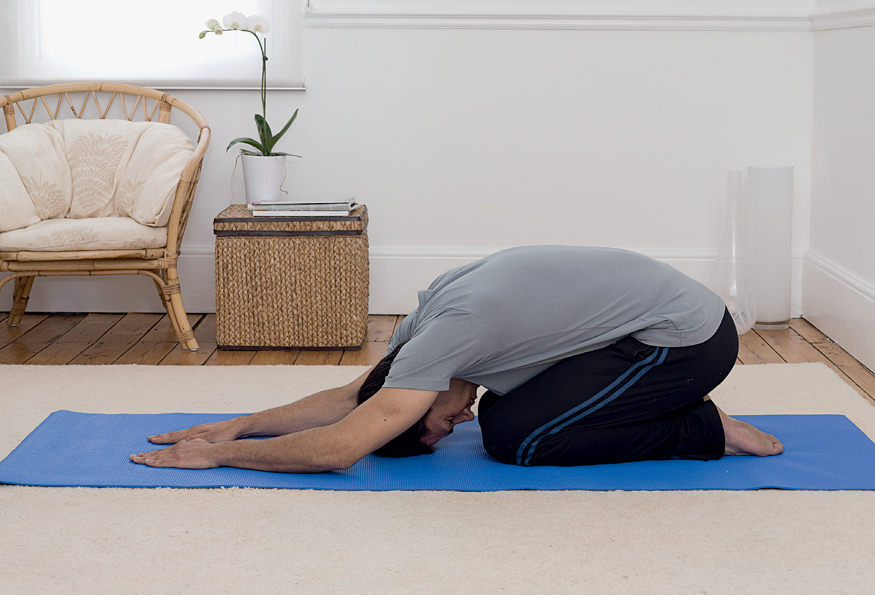
Gives a gentle therapeutic massage to the back
Helps to keep the spine flexible
Conditions back and abdominal muscles
Loosens tight hamstrings: when these muscles shorten, they affect the angle of pelvic tilt and so influence posture
1 Sit on your mat. Bend your knees and bring them close to your body by passing your arms under them. Tuck in your chin. Relax your jaw and breathe regularly.
2 Roll backwards and forwards on your rounded back. Avoid landing heavily on your feet so as not to jar your spine.
3 Repeat the exercise four or more times. Rest.
CAUTION
Pregnant women and individuals with osteoporosis should omit this exercise. Instead, do the alternative below.
This is, in effect, a Pelvic Tilt on all fours.
1 On hands and knees, tuck your bottom downwards and lower your head on an exhalation.
2 Hold the arched-back posture as long as your exhalation lasts.
3 Inhale and relax your back.
4 Repeat the exercise two or more times. Rest.
Here is a sequence of exercises that is manageable for most people. It is designed to make the transition from one exercise to the other smooth and logical. As described, it takes about ten minutes to do altogether, including the warm ups, depending on the number of repetitions and on how long you hold each finished position or final stretch. Try to do the exercises in the order given. If this is not quite right for you, modify the sequence for maximum comfort. You can also practise any of the exercises individually whenever it suits you. Do each one slowly, smoothly and attentively, and synchronise your movements with regular breathing, with jaw relaxed.
When doing these exercises, and indeed at any other time, to avoid injuring your back, never get up from a supine (lying on the back) position by bolting straight forwards. Instead, follow these simple steps:
Check that you are breathing regularly. Synchronise your breathing with every move you make.
Roll onto your side, bend your knees and bring them closer to your torso.
Use your hands to help push you onto your hip.
Carefully manoeuvre yourself until you are sitting evenly on your bottom.
Sit quietly for a few seconds before standing up or assuming another position.
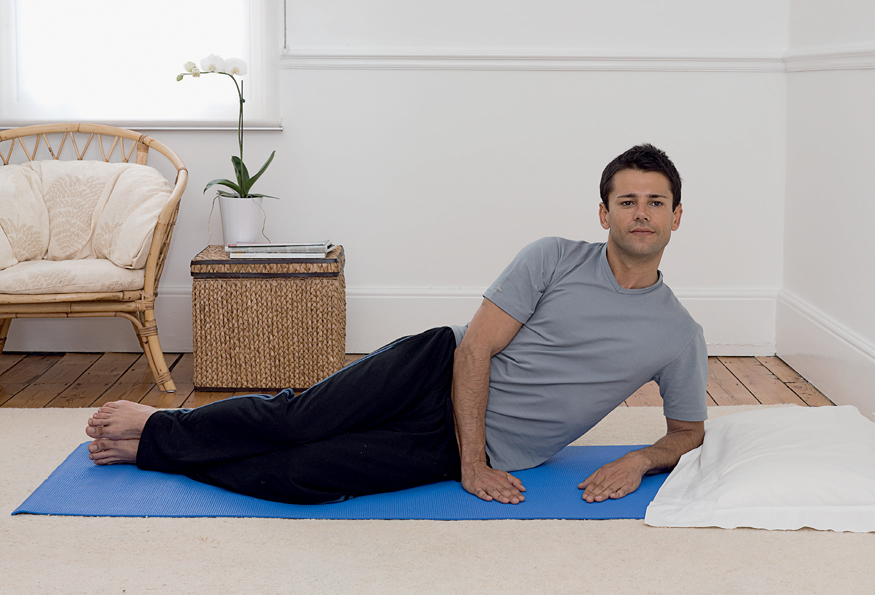
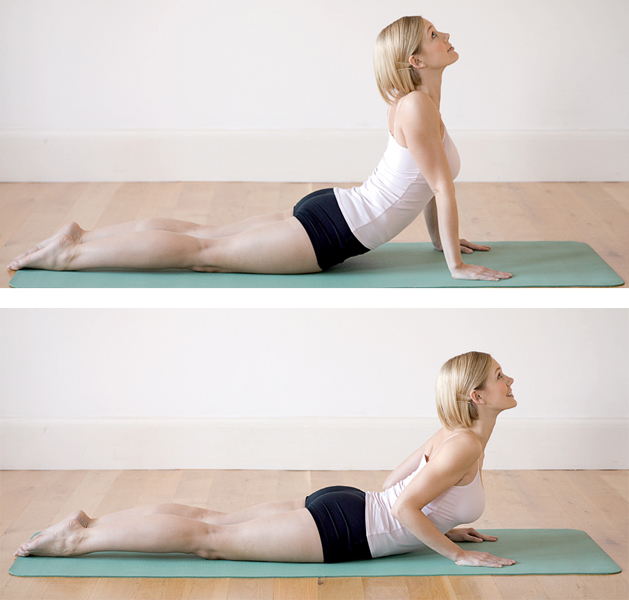
Tones the muscles at the front and back of the body
Helps to keep the spine flexible
1 Lie on your back on a mat. Bend your knees and rest your feet flat and comfortably close to your body. Breathe regularly. Relax your arms at your sides.
2 On an inhalation slowly raise your torso, from hips to upper back.
3 When you have reached your comfortable limit, hold the posture for five or more seconds while breathing regularly.
4 To return to your starting position, slowly and smoothly lower your torso from top to bottom. Stretch out your legs and rest.
5 You may repeat the exercise once or twice.
Strengthens the back muscles
Strengthens the abdominal muscles
Gently stretches the hamstring muscles, which are secondary back supports
1 Lie on your back on a mat, with legs stretched out in front. Relax your arms at your sides. Breathe regularly.
2 Bend one leg and rest the sole of the foot on the mat.
3 Raise the other leg slowly and with control, a few inches/centimetres from the mat. You may flex your ankle to point your toes upwards.
4 Hold the raised-leg posture for five or more seconds while breathing regularly.
5 Lower and relax the leg.
6 Repeat steps 3 to 5 two or more times.
7 Repeat the exercise (steps 3 to 5) three or more times with the other leg. Rest.
Tones the back and abdominal muscles
Relaxes the back and relieves minor backaches
Helps to keep the spine flexible
1 Lie on your back on a mat, with your legs stretched out in front. Breathe regularly.
2 Bend one leg and bring the knee towards you. Hold it in place with your hands for five or more seconds while breathing regularly.
3 Relax your hands and stretch out your leg.
4 Repeat steps 2 and 3 two or more times.
5 Repeat the exercise (steps 2 and 3) three or more times with the other leg. Rest.

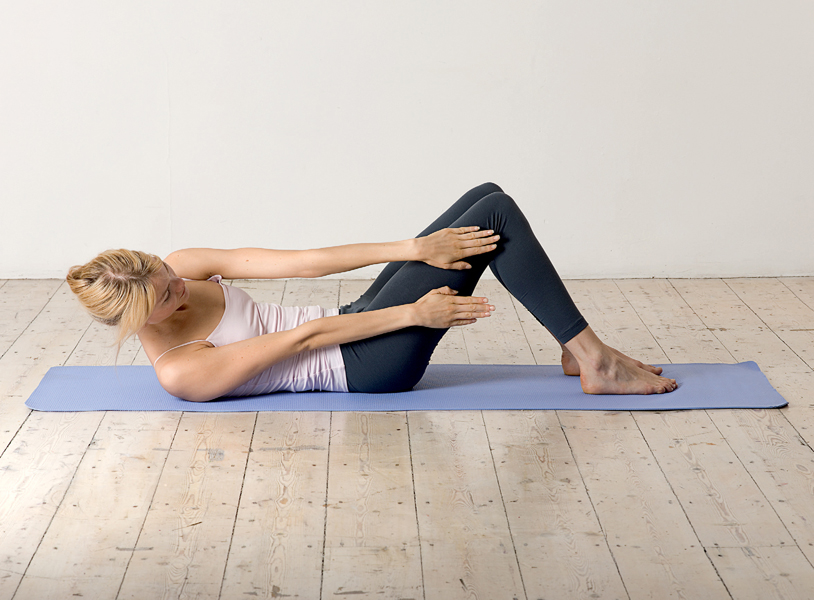
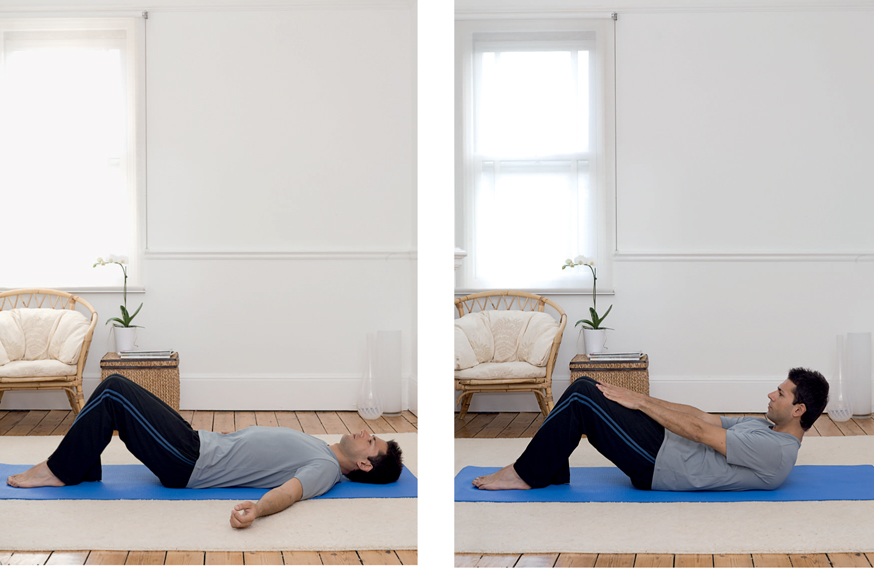
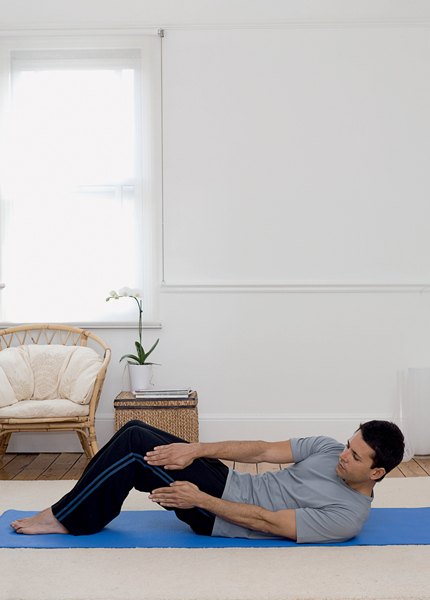
Tones and strengthens abdominal muscles and so indirectly gives support to back muscles
Helps to keep the spine flexible
A safer alternative to some conventional sit-ups
1 Lie on your back on a mat, with your legs stretched out in front. Breathe regularly.
2 Bend your knees until you can rest the soles of your feet flat on the mat.
3 Rest your palms on your thighs.
4 Carefully lift up your head and as much of your upper back as you comfortably can. As you do so, your hands will slide towards your knees. Keep your gaze on your hands.
5 Hold the curl-up for five seconds or more while breathing regularly.
6 Curl back onto the mat and stretch out your legs to resume your starting position. Relax your arms at your sides. Rest.
7 You may repeat the exercise (steps 2 to 6) once or twice.
Complements the Curl Up (opposite)
Tones and strengthens abdominal muscles and so reinforces back muscles
Helps to keep the spine flexible
1 Lie on your back on a mat, with your legs stretched out in front. Breathe regularly.
2 Bend your knees until you can rest the soles of your feet flat on the mat.
3 Carefully lift up your head to begin a curl-up but, instead of continuing forwards, reach with both arms to the outside of your bent legs to execute a diagonal curl-up.
4 Hold the posture for five seconds or more while breathing regularly. Curl back onto the mat and stretch out your legs to resume your starting position. Relax your arms at your sides. Rest.
5 Repeat the exercise on the opposite side (steps 2 to 5). Rest.
6 You may repeat the entire sequence (steps 2 to 6) once or twice.
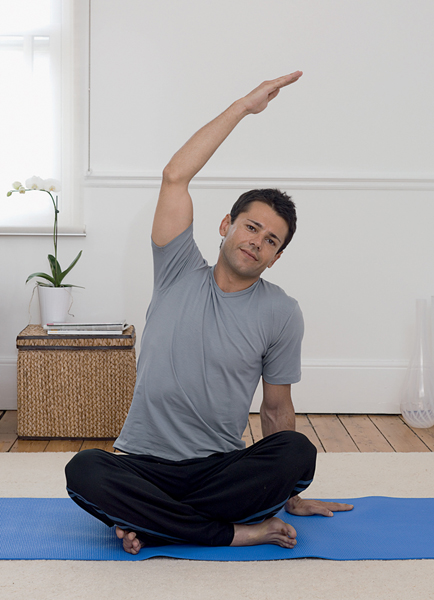
Tones back and abdominal muscles
Complements the Curl-Up exercises
Complements the Spinal Twist
Facilitates free movement of the ribcage for more efficient breathing (see ankylosing spondylitis)
1 Sit tall and fold your legs inwards. Breathe regularly.
2 Rest the palm of your right hand on the mat beside your hip.
3 Stretch your left arm straight upwards.
4 Keeping your lower body still, bend and stretch your upper torso towards the right as far as you comfortably can while exhaling.
5 Hold the stretch for five or more seconds while breathing regularly.
6 Inhale and return to your starting position. Rest briefly
7 Repeat the exercise (steps 2 to 6) on the other side (substitute the word ‘left’ for ‘right’ and vice versa).
8 Repeat the entire exercise (steps 2 to 7) two or more times. Rest.
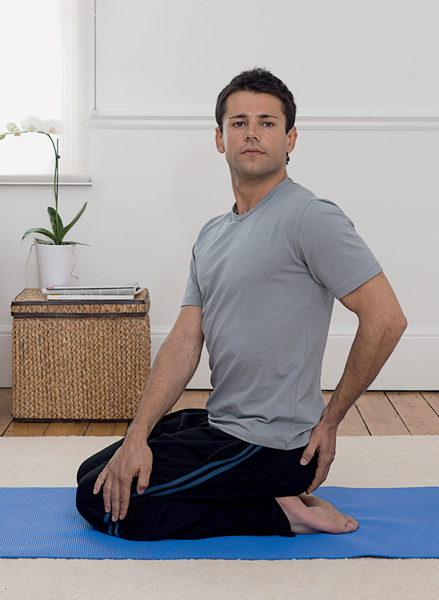
Allows maximum torsion (twisting) of the spine to both sides and so provides a gentle, therapeutic massage to nerves branching from the spinal column
Helps to keep the spine flexible
Tones the lower back muscles
Tones the transverse and oblique abdominal muscles
Enhances spinal circulation
1 Sit tall on your heels, Japanese style. Breathe regularly.
2 Slowly rotate your upper body to the right as you exhale.
3 Hold on to the outside of your right thigh with your left hand. Rest your right hand on your lower back. Look over your right shoulder.
4 Hold the posture for five or more seconds while breathing regularly.
5 Slowly resume your starting position. Rest briefly.
6 Repeat the exercise (steps 2 to 5) on the other side (substitute the word ‘left’ for ‘right’ and vice versa).
7 Repeat the entire exercise (steps 2 to 6) once or twice. Rest.
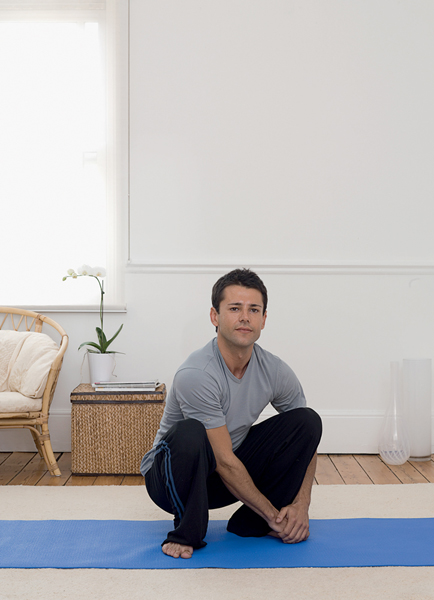
Eases pressure on spinal discs through gentle traction
Improves spinal flexibility
Tones back and abdominal muscles
1 From a standing position, lower your body as if to sit on your heels. Try to keep your feet flat on the mat. Breathe regularly.
2 Hold the posture for five seconds or more.
3 Stand up again.
4 Repeat the exercise (steps 2 and 3) two or more times. Rest.
NOTE
Incorporate squatting into daily activities.
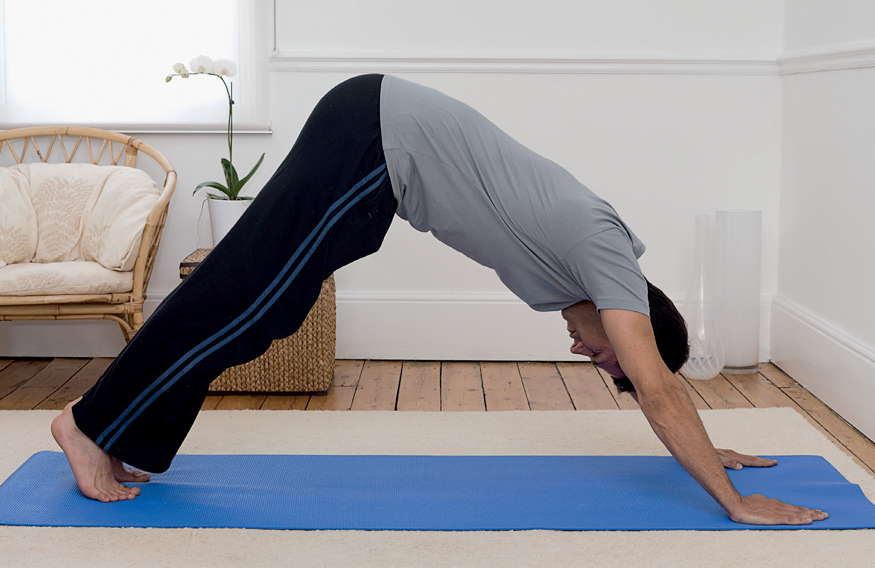
Gives a therapeutic stretch to the back and the legs, which are secondary back supports
Relieves fatigue in the back and legs
Helps to maintain the elasticity of the hamstrings: when these muscles shorten, they affect the angle of pelvic tilt and so influence posture
1 Start in an all-fours position, on hands and knees, with arms sloping slightly forwards. Breathe regularly.
2 Rock forwards somewhat, raise your knees and straighten your legs. Aim your heels towards the mat but do not strain. Straighten your arms and keep your head down.
3 Hold the posture for five or more seconds while breathing regularly.
4 Rock forwards gently and ease into your starting position.
5 Sit on your heels and rest.
6 You may repeat the exercise (steps 1 to 5) once or twice.
CAUTION
Do not practise this posture if you have high blood pressure, or a heart condition or other disorder that produces feelings of lightheadedness or dizziness when you hang your head down. Instead, try the alternative exercise that follows.
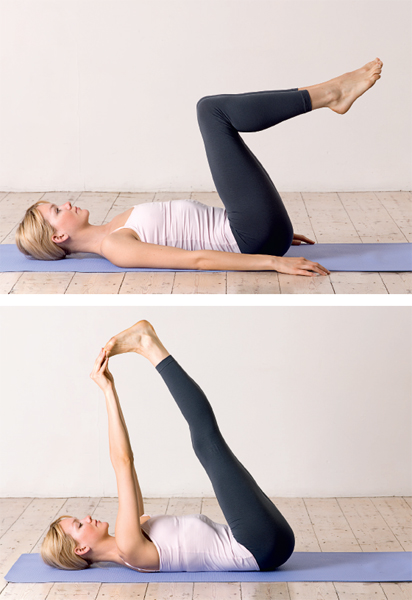
Stretches and strengthens the back muscles
Helps to ease tension in the back
Tones the abdominal muscles, which give support to the back
Stretches and strengthens the leg muscles, which are secondary back supports
1 Lie on your back with your legs stretched out in front. Relax your arms at your sides. Breathe regularly.
2 Bend your right knee and bring it towards your chest. Tuck the fingers of your right hand under the toes. Do the same with the left knee and fingers.
3 Holding the toes securely, carefully raise and straighten your legs as much as you can with absolute comfort. Be careful not to strain.
4 Hold the posture for five or more seconds while breathing regularly.
5 Release your hold on the toes and carefully lower one leg at a time to resume your starting position. Rest briefly.
6 You may repeat the exercise (steps 2 to 5) once or twice.
7 Stretch out your legs and rest.
1 Vary the basic exercise above by carefully spreading your legs apart to their comfortable limit.
2 Hold the spread-legs posture for five or more seconds.
3 Carefully resume your starting position. Rest briefly.
4 You may repeat the exercise once or twice.
5 Stretch out your legs and rest.
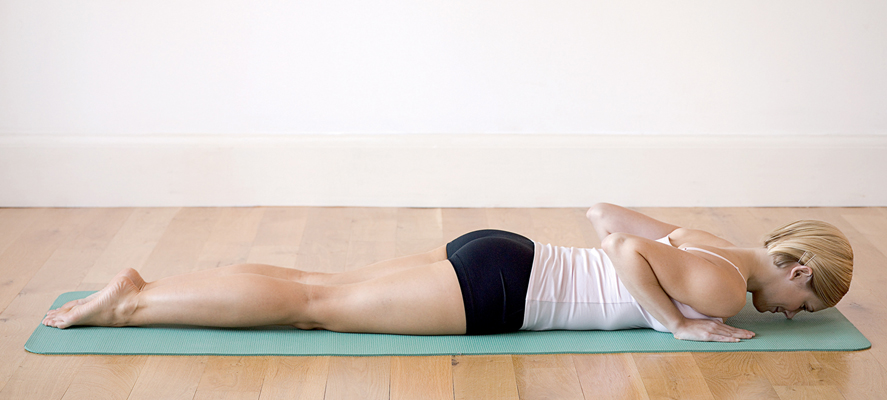
Gives a beneficial stretch to the back muscles
Wonderfully relaxing for the back
Helps to relieve pressure on spinal discs by widening the spaces between the vertebrae, where the discs are located
Eases pressure on nerves branching from the spine and so helps to relieve pain
Helps to keep the spine flexible
1 Sit on your heels on a mat, Japanese style. Breathe regularly.
2 Slowly bend forwards and rest your head on the mat. Relax your arms at your sides.
3 Stay in this posture for five to twenty seconds or longer.
4 Slowly resume your starting position.
NOTES
In step 2 above, you may rest your head on a small pillow or cushion. You may also try doing this exercise with a bolster between your knees, and your arms resting at the sides of it.

This sequence is probably a little more challenging than the first one and offers some variety. Start with the warm ups. Then follow with the exercises below.
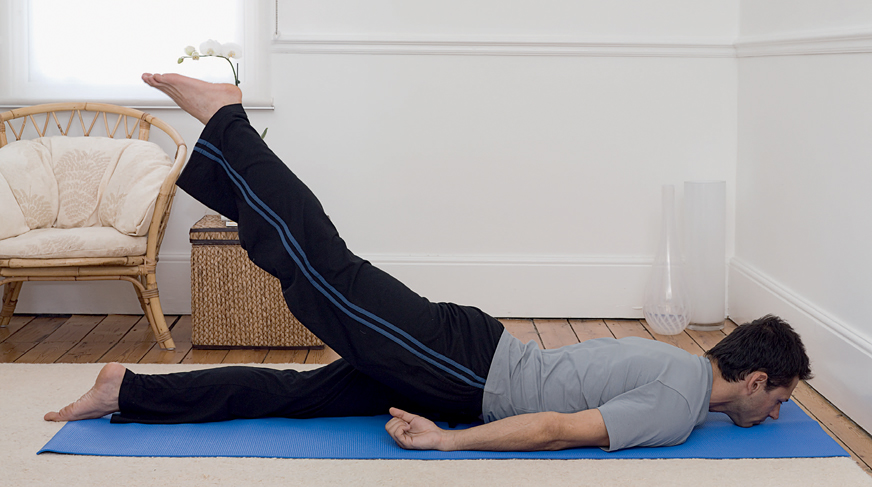
Strengthens the back muscles
Stretches and strengthens the abdominal muscles, which give support to the back muscles
Strengthens the leg muscles, which are secondary back supports
1 Lie on your abdomen. Rest your chin on the mat. Keep your legs close together and your arms on the mat, straight and close to your sides. Breathe regularly.
2 On an exhalation, slowly raise one straight leg as high as you comfortably can. Hold the raised-leg posture for five or more seconds while breathing regularly.
3 Carefully lower your leg and rest briefly.
4 Repeat the exercise (steps 2 to 4) with the other leg. Rest.
5 You may repeat the sequence (steps 2 to 4) once or twice.
CAUTION
Omit this exercise if you are pregnant, or if you have a hernia or a heart disorder.
Helps to keep the spine flexible
Strengthens neck and back muscles
Enhances spinal circulation
1 Lie on your abdomen. Rest your forehead on the mat. Rest your palms under your shoulders. Breathe regularly.
2 Inhale and slowly and carefully begin to arch your spine backwards, from neck to chest. Keep your hips on the mat.
3 Hold the posture for five or more seconds while breathing regularly.
4 Very slowly and carefully, return to your starting position in reverse order. Rest briefly, with your head turned to the side and arms relaxed beside you.
5 You may repeat the exercise (steps 1 to 4) once or twice.
CAUTION
Omit this exercise if you are pregnant, or if you have a hernia or neck pain.
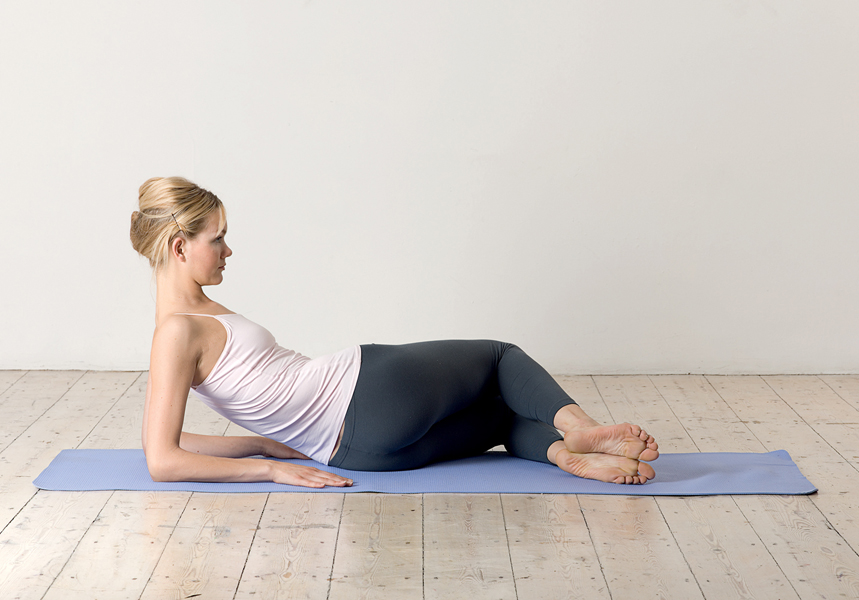
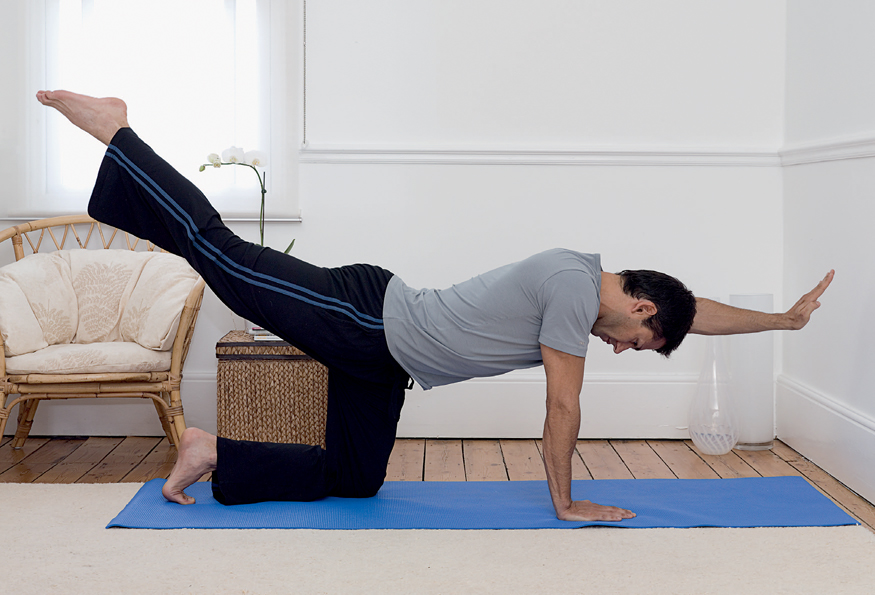
Strengthens the back muscles
Stretches and strengthens the leg muscles, which are secondary back supports
Stretches and strengthens the abdominal muscles, which give reinforcement to the back
1 Start in an all-fours position, on your hands and knees. Breathe regularly.
2 Inhale and lift your left arm and right leg and fully stretch them.
3 Hold the raised-limbs posture for five or more seconds while breathing regularly.
4 Resume your starting position.
5 Repeat the exercise (steps 2 to 4) with your right arm and left leg. Rest briefly.
6 Repeat the entire sequence (steps 2 to 5) once or twice. Rest.
Gives a beneficial stretch to the back muscles
Wonderfully relaxing for the back
Helps to relieve pressure on spinal discs by widening the spaces between the vertebrae, where the discs are located
Eases pressure on nerves branching from the spine and so helps to relieve pain
Helps to keep the spine flexible
1 Sit on your heels on a mat, Japanese style. Breathe regularly.
2 Slowly bend forwards and rest your head on the mat. Relax your arms at your sides.
3 Stay in this posture for five to twenty seconds or longer.
4 Slowly resume your starting position.
NOTES
In step 2 above, you may rest your head on a small pillow or cushion. You may also try doing this exercise with a bolster between your knees, and your arms resting at the sides of it.
VARIATION
Instead of resting your arms at your sides, as in step 2 above, stretch them ahead of you and rest them on the mat.
Allows maximum torsion (twisting) of the spine to both sides and so provides a gentle, therapeutic massage to nerves branching from the spinal column
Helps to keep the spine flexible
Tones the lower back muscles
Tones the transverse and oblique abdominal muscles
Enhances spinal circulation
1 Sit tall with your legs stretched out in front. Breathe regularly.
2 Bend your right leg and rest the foot on the mat outside the left knee.
3 Exhale and smoothly swivel your upper body to the right, as far as you comfortably can.
4 Look over your right shoulder. Rest one or both hands on the mat on your right.
5 Hold the twist for five or more seconds while breathing regularly.
6 Inhale and slowly resume your starting position. Rest briefly.
7 Repeat the exercise (steps 2 to 5) on the other side (substitute the word ‘left’ for ‘right’ and vice versa).
8 Repeat the entire exercise (steps 2 to 6) once or twice. Rest.

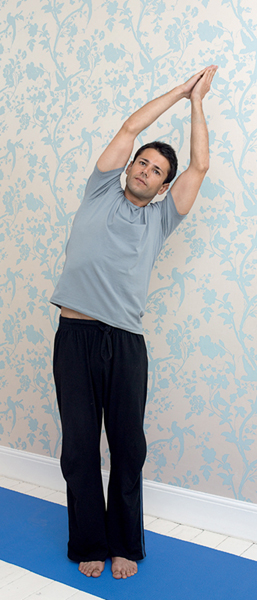
Strengthens the back muscles
Helps to keep the spine flexible
Conditions abdominal muscles, which are often under-exercised, to provide reinforcement for back muscles
Facilitates efficient breathing, which can be restricted in some spinal disorders (see ankylosing spondylitis)
1 Stand tall with your feet close together and arms at your sides. Breathe regularly.
2 Inhale and stretch your arms overhead. Keep them close to your ears and bring the palms together if you can.
3 Exhale and smoothly bend your upper torso to one side, as far as you comfortably can.
4 Hold this sideways arch for five or more seconds while breathing regularly.
5 Inhale and resume your starting position. Rest briefly.
6 Repeat the exercise (steps 2 to 5) on the other side.
7 Repeat the entire exercise (steps 2 to 6) once or twice. Rest.
The Swiss ball (which is known by various other names, including exercise, fitness and stability ball) has long been used by physiotherapists for rehabilitation and other therapeutic purposes. Its effectiveness lies, surprisingly, in its instability: your muscles have to work to keep both the ball and your body stable.
Exercises ordinarily under-utilised muscles to make them more efficient.
Improves posture.
Strengthens postural muscles (those of the back, abdomen and legs).
Lessens fatigue.
Improves concentration and so reduces the risk of inadvertent injury.
Gives support to body parts during rehabilitation exercise, after injury or illness and decreases pain.
Before attempting to do the main Swiss Ball exercises, it’s important to spend at least five minutes warming up to reduce stiffness, slightly increase body temperature, enhance circulation and prevent pulls and strains.
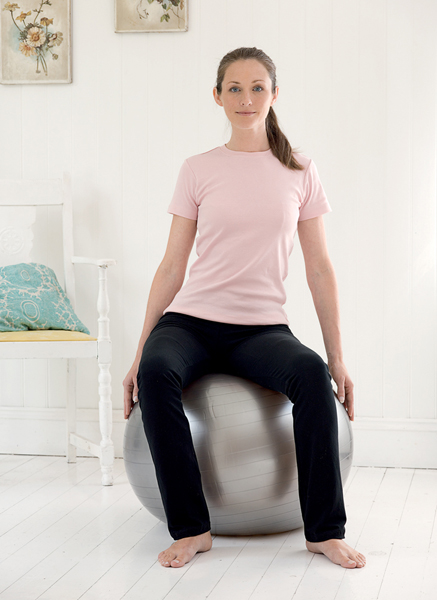
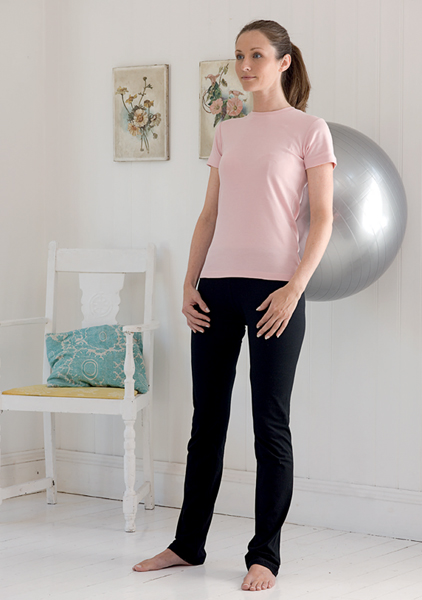
Successful ball work partly depends on choosing a ball that’s right for you. A simple guide is that when you sit on the ball, with your feet flat on the floor, your thighs should be parallel to the floor and your hip and knee joints should each form a 90-degree angle. Personnel at the store where you purchase your ball can be helpful, and the manufacturers’ guidelines are generally easy to follow.
Sit tall on the centre of the ball.
Rest your feet flat on the floor, shoulders’ width apart.
Rest your hands on your thighs or on the sides of the ball.
Secure in this position, proceed to do the Neck Stretches and Shoulder Rolls. Follow these with Hip Circles.
Keep the joints of the lower spine freely moving
Contribute to flexibility of the lower spine
Tone the lower back and abdominal muscles
1 Sit on the ball and rotate your hips as if drawing smooth imaginary circles: shift your weight to one ‘sitting bone’ (under the buttock), then tilt your pelvis backwards. Shift your weight to the other sitting bone and complete the circle by tilting the pelvis forwards to complete one rotation.
2 Repeat the exercise twice in the same direction.
3 Repeat the exercise twice in the opposite direction.
NOTE
Keep your upper body as still as you can and breathe regularly while doing the Hip Circles.

The following exercises have been specially chosen for their excellent ability, with regular practice, to help keep the spine flexible, to tone and strengthen the postural muscles (those of the neck, back, abdomen and legs), and to facilitate breathing, through which all tissues receive oxygen.
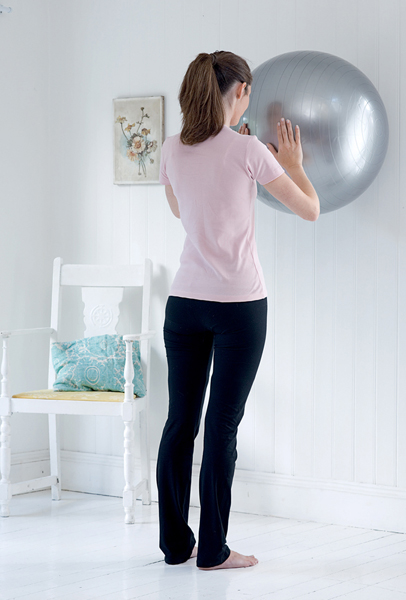
Tones and strengthens muscles of the upper back and chest
Promotes efficient breathing, for better delivery of oxygen to the body’s tissues
Useful in conditions such as ankylosing spondylitis where ribcage expansion and unrestricted breathing may be compromised
1 Stand facing a wall. Place a ball between your upper body and the wall.
2 Rest a hand securely on each side of the ball, as if preparing to push it upwards. Breathe regularly.
3 Use both hands for the initial upward roll of the ball, then use alternate hands to continue, until your arms are fully but comfortably stretched.
4 Hold the stretch for five or more seconds while breathing regularly.
5 Roll the ball downwards to the starting position.
6 Repeat the exercise twice. Remove the ball. Rest.

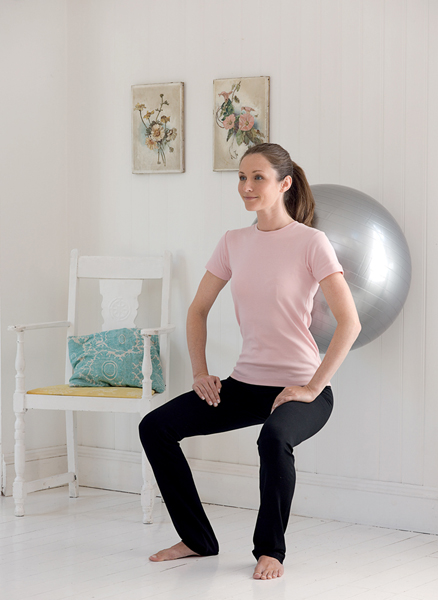
Tones and strengthens back and abdominal muscles
Tones and strengthens leg muscles, which are secondary back supports
See also Squatting Posture
1 Stand tall with a ball placed securely between your back and wall. Breathe regularly.
2 Slowly bend your knees as if preparing to sit down, until your thighs are roughly parallel to the floor, if you can.
3 Hold the posture for five seconds or more while breathing regularly.
4 Slowly return to a standing position.
5 Repeat the exercise (steps 2 to 4) twice. Rest.
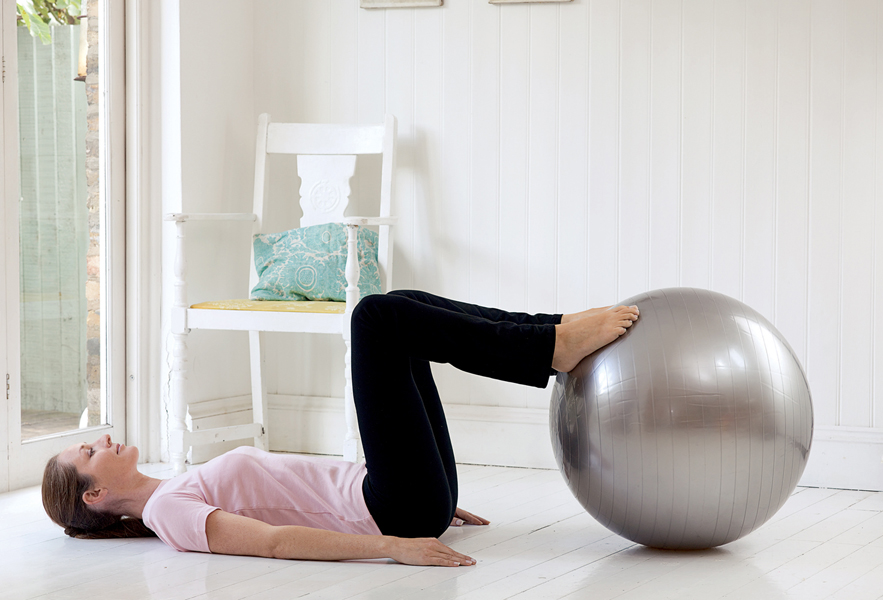
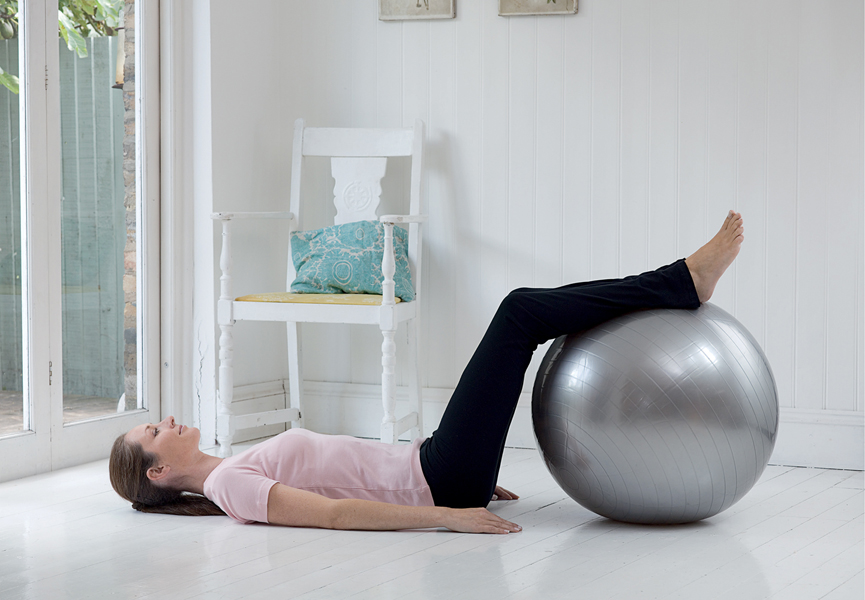
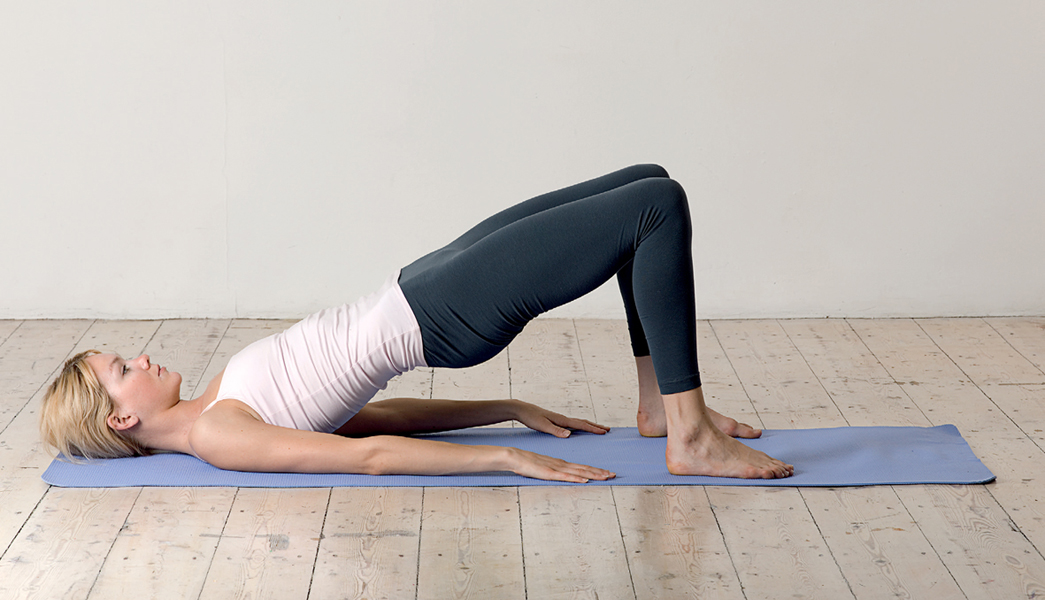
Tones the muscles of the back
Helps to keep the spine flexible
Tones abdominal muscles, which provide reinforcement for the back
Strengthens and tones the leg muscles, which are secondary back supports
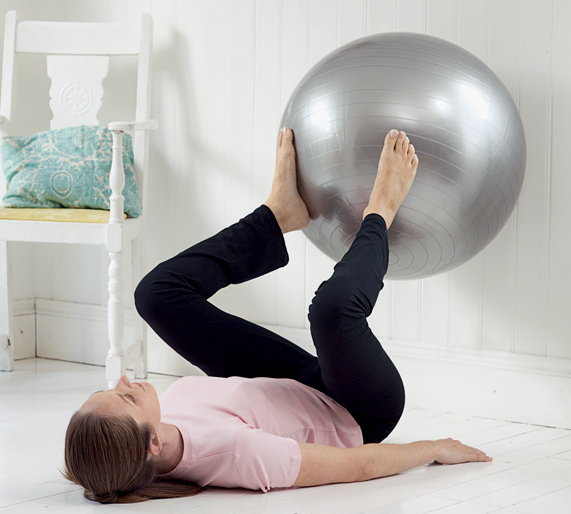
1 Lie on your back, with your knees bent and feet resting on a ball. Breathe regularly.
2 On an inhalation, slowly, carefully and with control, raise your torso from hips to upper back. Stay fully focused in order to keep the ball stable.
3 When you have reached your comfortable limit, hold the posture for five or more seconds while breathing regularly.
4 To return to your starting position, slowly and with control lower your torso from top to bottom. Put your feet on the mat and stretch out your legs and rest.
5 You may repeat the exercise (steps 2 to 4) once or twice.
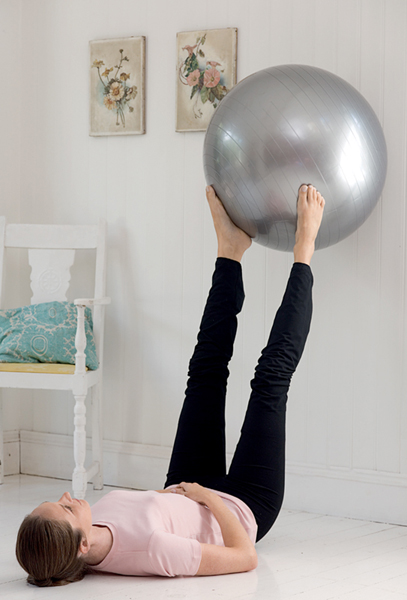
Strengthens the muscles of the back
Strengthens the abdominal muscles, which give reinforcement to the back
Helps to maintain the elasticity of the hamstrings: when these muscles shorten, they affect the angle of pelvic tilt and so influence posture
1 Lie on your back facing a wall, with your bottom close to it and your feet resting against it. Relax your arms at your sides and breathe regularly.
2 Bend your knees and place a ball securely between your feet and the wall.
3 Slowly and attentively straighten your legs to their comfortable limit. As you do so, the ball will roll up the wall.
4 Hold the leg stretch for five or more seconds while breathing regularly.
5 Bend your legs to resume your starting position (step 2). As you do so, the ball will roll down the wall.
6 You may repeat the exercise (steps 2 to 5) once or twice.
7 Put the ball aside and turn on your side to get up safely. Rest.
At a desk, a computer or other keyboard or while watching television, for short periods. This trains you in ‘active sitting’ and subtly exercises postural muscles and improves balance.
Sit on a chair or couch and elevate your legs by resting your feet on a ball. This relaxes back muscles and lessens fatigue.
Lie on a carpeted floor and rest your feet on a ball, instead of a padded chair seat.
Cooling down after exercise allows your cardiovascular (heart and blood vessel) system to return to natural functioning in a gradual way. This prevents dizziness and lightheadedness, which can signal a sudden drop in blood pressure. Cooling down exercises also provide a chance for static muscle stretching.
The following exercises, are suitable for cool-downs. Do them very slowly and attentively, and in synchronisation with regular breathing. To avoid back strain, maintain good posture.
• Neck Stretches
• Shoulder Rolls
• Pelvic Tilt
• Reclining Twist
• The alternative to the Spinal Roll (Pelvic Tilt on all fours)
You may, in addition, add the All-Body Stretch opposite.
Relaxes tense abdominal muscles
Allows for maximum stretching of the body
Helps to counteract faulty postures
1 Lie on your back with legs straight in front and arms at your sides. Breathe regularly.
2 Inhale and stretch your arms straight overhead. Simultaneously stretch your legs, bring your toes towards you and push your heels away.
3 Hold the all-body stretch for five or more seconds while breathing regularly.
4 Exhale, release the stretch and resume your starting position. Rest briefly and breathe regularly.
5 Repeat the exercise (steps 2 to 4) once or twice. Rest.
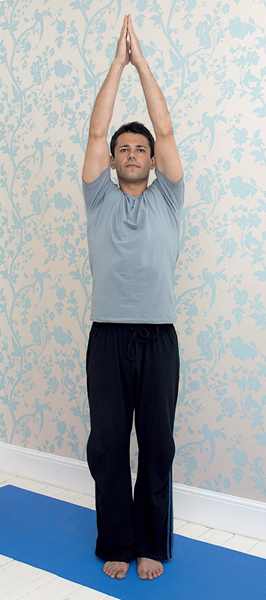
1 Stand tall with your weight equally distributed between your feet and your arms relaxed at your sides. Breathe regularly.
2 Inhale and fully stretch your arms overhead. Bring your palms together if you can. Hold the stretch for five or more seconds while breathing regularly.
3 Exhale and lower your arms.
4 You may repeat the exercise (steps 2 and 3) once or twice. Rest.