WHEN WE’RE STANDING IN LINE at the grocery store and we see a lovely someone in front of us stocking up on soymilk, Tofutti cream cheese, coconut milk ice cream, and nondairy cheese, first we think, “Hey, vegan!” and then we think, “Can we help you with that?”
Not the vegan part (we’re pretty thrilled about that), but the weight of the whole prepackaged pile we’d like to take off their shoulders. We get busy, too, and we agree that it’s amazing that you can now find soy milk at grocery stores around the world, but every package costs money for water, plastic, and shipping. We’d like to save said dollars for something more exciting, like shipping ourselves somewhere tropical!
So, in this chapter, you’ll find all the solutions you need to lighten the heft of your grocery haul by whipping up everything from oat milk to cheddar cheese to frozen yogurt at home. We’ve got secrets for making your own fortified milk and coconut whipped cream, and creating concoctions like cookie crumbs from your magical milk leftovers. With these tricks and techniques, no matter where you live in the world, you’ll have access to all the best dairy alternatives available (right in your own kitchen).
MAKES 3 TO 4 CUPS
Soak, blend, strain! Thankfully, making your own plant-based milk is as easy as 1-2-3 and doesn’t require a guy in overalls hooking up a cow to a machine. The only difficult part is remembering to soak your nuts or seeds to give them time to soften and improve digestibility (if that’s too much to ask, try the Easy Almond Milk here). Costly equipment isn’t even required, as your old blender will do a proper job. To strain the pulp from the fresh milk, a fine-mesh sieve or cheesecloth will do the trick, but we love our reusable mesh nut milk bags, which are available for less than ten dollars at health food stores or online. They’re easy to clean and less wasteful than cheesecloth. Plus, they do double duty for culturing cheese (see here).
You can start with a batch of almond milk to get comfortable and then play around with different combinations of nuts and seeds to find your favorite flavor—we love combining almonds, Brazil nuts, and hemp seeds, for example. You can also add flavorings like vanilla, cocoa powder, or fresh fruit (hint: strawberry-flavored milk is incredible), or spices like cinnamon or nutmeg to keep things interesting.
INGREDIENTS
1 cup raw nuts and/or seeds, soaked in water for 8 hours (note: hemp seeds don’t need to be soaked)
Optional add-ins: 2 pitted Medjool dates or other sweetener to taste, ½ to 1 teaspoon pure vanilla extract to taste, pinch of ground cinnamon or nutmeg
INSTRUCTIONS
TIP: Don’t dispose of the precious pulp! Leftover pulp can be stored in a sealed container or bag in the freezer and used to make Almond Pulp Cookie Crumbs (here).
MAKES ABOUT 2 CUPS
Need milk in an instant? Follow this simple recipe and you’ll be enjoying a perfect, sweet beverage before you know it. Using roasted almond butter results in a more flavorful and almondy milk. If you prefer something milder, try cashew butter instead.
Commercial nondairy milk brands often boast that they are fortified, which means they are enriched with extra vitamins and minerals, but just take a quick look at the ingredients list, and you’ll also notice they also contain unnecessary additives, preservatives, stabilizers, and sweeteners. With homemade milk, you can control what goes in. We often add vitamin B12 (and D during dark Canadian winters) for an extra boost. After you have strained the milk, return it to the blender and drop in one or two vitamin tablets. Blend briefly until the tablets are dissolved, and then serve!
INGREDIENTS
2 tablespoons almond or cashew butter
Optional add-ins: 1 to 2 teaspoons maple syrup or other liquid sweetener, ¼ teaspoon pure vanilla extract, pinch of ground cinnamon or freshly grated nutmeg
INSTRUCTIONS
In a blender, combine 2 cups water, the almond butter, and any optional add-ins and blend on high speed until smooth. Enjoy immediately or store in a mason jar in the fridge for up to 5 days. The milk may separate while sitting, so be sure to give the jar a shake before using.
Oat, Quinoa, or Rice Milk
MAKES ABOUT 1¼ CUPS
Sick of soy? Over almonds? Mix up your milk routine with something new.
INGREDIENTS
⅓ cup uncooked rolled oats, cooked quinoa, or cooked short-grain brown rice, cooled
1 Medjool date, pitted
Pinch of sea salt
½ teaspoon pure vanilla extract
INSTRUCTIONS
TRY THIS: If you’re looking for a more savory milk, replace the vanilla extract with the same amount of lemon juice.
MAKES ABOUT 1 CUP
Here you have it—a vegan version of sweetened condensed milk. To create it, homemade cashew milk is heated to produce a slightly thicker, creamier version of itself, perfect for adding to coffee, tea, milkshakes, and desserts.
INGREDIENTS
½ cup raw cashews, soaked in water for 6 hours
3 Medjool dates, pitted
2 teaspoons cane sugar
¼ teaspoon pure vanilla extract
INSTRUCTIONS
MAKES 2 CUPS
Things have been oh-so-creamy in our world ever since the discovery of full-fat coconut milk and its glorious attributes and uses, and so it made the perfect base for this heavenly whipped cream. To obtain the thick, stable quality of traditional varieties, we use a plant-based gelatin substitute called agar (see here). This whipped cream needs some time in the fridge after being blended into a “whip,” so be sure to make this ahead—ideally, a day before you need it.
INGREDIENTS
1 (13.5-ounce) can full-fat coconut milk
2 tablespoons agar flakes, or 1¼ teaspoons agar powder
2 tablespoons pure maple syrup
¼ cup raw cashews, soaked in water for 6 hours
1 teaspoon pure vanilla extract
INSTRUCTIONS
TIP: It’s important to use full-fat coconut milk (not “lite”) for this recipe. A good-quality brand, like Thai Kitchen, is recommended for best consistency and flavor.
MAKES ABOUT 1¼ CUPS
Before dairy-free milks were conveniently found at every café counter, I took my coffee black. I didn’t mind the bitter note and enjoyed how my order seemed to give me a higher status—with nods of acceptance from the barista. I felt kind of tough. And then I tried the first sweet vegan coffee creamers to hit the shelves. There was no going back to black. It seems many people, much smarter than me, already knew the transformative power of a few tablespoons of cream. Coffee became something to be enjoyed, not endured. And now you have my answer to special Saturday morning moments: cashew creamer, made at home, in your pajamas. —L. P.
INGREDIENTS
⅓ cup raw cashews, soaked in water for 6 hours
2 teaspoons soy lecithin granules or liquid sunflower lecithin
1½ tablespoons pure maple syrup
½ teaspoon pure vanilla extract
INSTRUCTIONS
TIP: If you’re using lecithin granules and find the creamer just doesn’t want to blend smooth, pulse the granules first in a spice grinder.
TRY THIS: Turn this into a specialty creamer by adding ¼ teaspoon hazelnut extract.
MAKES ABOUT 2 CUPS
Do you keep scrolling past recipes for buttermilk pancakes and biscuits because they seem impossible to veganize? Well, now you have the secret to fluffy, light pancakes and classic, flaky, pull-apart biscuits (psst … it’s vinegar).
INGREDIENTS
¼ cup raw cashews, soaked in water for 6 hours
2 cups unsweetened nondairy milk
2 tablespoons apple cider vinegar
INSTRUCTIONS
MAKES 1¾ CUPS
This cream is a great substitute whenever you need sour cream. It’s subtly sour, but you can always add more lemon juice or vinegar, if desired, or jazz it up by using the garlic variation at the bottom of the recipe. Like most creams in this book, this gets better after chilling.
INGREDIENTS
1½ cups raw cashews, soaked in water for 6 hours
2 tablespoons fresh lemon juice
2 teaspoons apple cider vinegar
½ teaspoon sea salt
INSTRUCTIONS
TRY THIS: We sometimes add 1 small garlic clove and ½ teaspoon Dijon mustard to the blender to give this simple sour cream a little more oomph. This version makes a flavorful topping for tacos, burritos, or baked potatoes.
MAKES ABOUT 1¼ CUPS
I had been experimenting (aka struggling) with almond and cashew versions of this recipe for a few days when my friend Gena (of ChoosingRaw.com) posted a coconut milk yogurt recipe on her blog. It was so simple and had the smooth texture I had been chasing. I toasted her genius from my kitchen and went about creating a fermented version that would be perfectly thick and blissfully creamy. Ta-da! This coconut concoction is just as versatile as a traditional yogurt. It works beautifully in a bowl, topped with granola and fresh berries, and adds the ideal texture to a tzatziki sauce when blended with salt, garlic, and cucumber. —L. P.
Fermented foods contain Lactobacillus acidophilus, which is essential for gut health. Lactobacillus acidophilus has been shown to aid in digestion, and reduce gas and stomach upset, as well as improve the function of your immune system. Many cultures have been consuming fermented foods for centuries. Common fermented foods include yogurt, kefir, kombucha, kimchi, miso, pickles, and sauerkraut.
INGREDIENTS
1 (13.5-ounce) can full-fat coconut milk, chilled in the fridge for at least 8 hours
½ teaspoon probiotic powder
2 teaspoons agave nectar or pure maple syrup
2 teaspoons fresh lemon juice
Pinch of sea salt
INSTRUCTIONS
TRY THIS: This yogurt has a thick, almost Greek yogurt–like texture. If you’d like a thinner yogurt, add up to ½ cup of the liquid from the coconut milk can prior to the fermentation process. The yogurt will thicken as it ferments and again when it chills. You can play with this ratio to get the perfect consistency for parfaits, frozen yogurt (see here), and dips.
MAKES ¾ CUP
Butter is something we can live without, but we can’t deny others’ love for it. What makes this butter better is that it contains plant-based fats and acts just like dairy-based butter: it’s hard when it’s cold, it’s soft at room temperature, and it melts when spread on toast. The use of refined coconut oil gives it a mild flavor perfect for baking or cooking. Try replacing the conventional butter in your next batch of cookies, and you may never go back.
INGREDIENTS
½ cup melted refined coconut oil
¼ cup unsweetened nondairy milk
2 tablespoons olive oil
1 teaspoon sunflower lecithin liquid, or 2 teaspoons soy lecithin granules
1 teaspoon maca powder
¼ teaspoon fresh lemon juice
¼ teaspoon xanthan gum
Pinch of turmeric
Pinch of sea salt
INSTRUCTIONS
MAKES 1½ CUPS
Love a crisp, toasted bagel smothered in cream cheese? Let me introduce you to this incredible, dairy-free alternative to my favorite cheese spread. It’s tangy, creamy, and a whole lotta dreamy. Add flair by mixing in your favorite fresh herbs like minced chives and parsley. —N. A.
INGREDIENTS
1½ cups raw cashews, soaked in water for 6 hours
½ teaspoon probiotic powder
2 tablespoons melted coconut oil
1 teaspoon fresh lemon juice
½ teaspoon cane sugar (optional)
½ teaspoon sea salt
INSTRUCTIONS
MAKES ONE 8 X 12-INCH CHEESE LOG
If you’ve never cultured your own nut cheese, this is a great recipe to start with. You will be surprised that, by following a few simple steps, you’ll soon be creating creamy, spreadable cheese at home. You’ll see that this recipe, like those for most of our cheeses, calls for probiotic powder. There are quite a few vegan probiotic brands on the market. We like both Trophic and NuChapter, but you’ll surely find your own favorite at your local health food store. You can buy probiotic capsules or just the powder; if you pick up capsules, just make sure they are gelatin-free (usually it says “vegan” right on the label). Now, find some counter space and soak those cashews.
INGREDIENTS
2 cups raw cashews, soaked in water for 6 hours
1 teaspoon probiotic powder
2 teaspoons nutritional yeast flakes
½ teaspoon sea salt
Finely chopped fresh herbs or spices of your choice, for rolling
INSTRUCTIONS
TRY THIS: This recipe makes a smooth, spreadable cheese. To make a firmer version, see the air-drying technique in the Date and Fig Cashew Cheese recipe here.
Easy Cheese
MAKES ABOUT 1¼ CUPS
Although our first bite of fermented vegan cheese completely revolutionized our culinary repertories, we live in the real world, with full-time jobs, to-do lists that seem to grow every day, and families who refuse to wait a week for a cheesy dinner. So, when we have time to prep ahead, we make the fancy fermented version, and when we don’t, we make this one. Just soak those cashews when you get up, and you’ll be serving an amazing entrée covered in slices of creamy, garlicky, cheesy goodness by six P.M.
INGREDIENTS
1 cup raw cashews, soaked in water for 6 hours
3 tablespoons fresh lemon juice
1 tablespoon nutritional yeast flakes
½ teaspoon sea salt
¼ teaspoon garlic powder
¼ teaspoon white miso
INSTRUCTIONS
TIP: Slice the cheese over salads, spread on bread for sandwiches, or stir in chopped basil or thyme and pipe into shells to serve smothered in tomato sauce (see here).
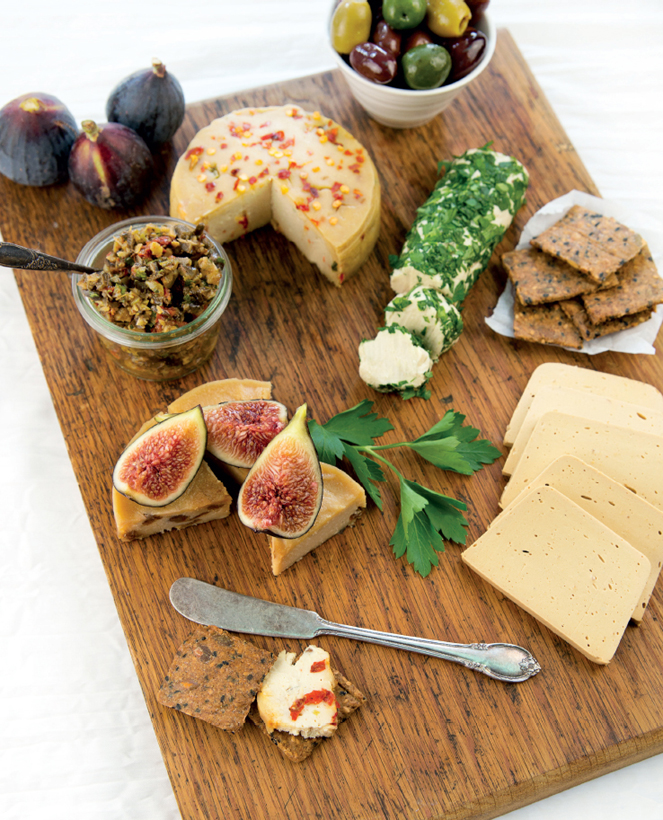
Clockwise from bottom left: Date and Fig Cashew Cheese (here), Spicy Jalapeño Cheese (here), Cultured Nut Cheese (here), and Cheddar Cheese (here)
MAKES ONE 6 X 3-INCH BLOCK
Cheese is usually the last thing to keep vegetarians from making the final switch to veganism. Cheddar, specifically, is the go-to for quesadillas, nachos, and grilled cheese sandwiches, and we’d be willing to bet there’s a block in most people’s refrigerators. Who can blame them? It’s salty and tangy and full of fat, all things our bodies crave. This made-from-scratch cheddar has all the qualities of the dairy-based stuff but is made with plants and doesn’t cause harm to animals or our bodies in the process. And it’s a simple process at that—you’ll be slicing, dicing, and grating before you know it.
INGREDIENTS
1 cup raw cashews, soaked in water for 6 hours
½ teaspoon probiotic powder
¼ cup agar flakes, or 2½ teaspoons agar powder
½ cup nutritional yeast flakes
1½ tablespoons mellow brown rice miso
½ teaspoon sea salt
¼ teaspoon xanthan gum
1 tablespoon coconut oil
Canola oil or other neutral oil, for the pan
INSTRUCTIONS
MAKES 4 BALLS, ABOUT ⅓ CUP EACH
Missing that summer salad staple, composed of stacks of sliced tomato, creamy mozzarella, and bright, bold basil leaves? The wait is over—vegan mozzarella is here. This recipe makes what seemed impossible undeniably easy. Sure, it takes some time to prepare, but think of it as a B plot: a few minutes of effort here and there in between your life’s A-plot adventures (work, sleep, play). When it’s time for the exciting culmination, your mozzarella will be ready to star in a Caprese salad, amid roasted vegetables or thinly sliced atop a classic Neapolitan pizza.
INGREDIENTS
1 cup raw cashews, soaked in water for 6 hours
½ teaspoon probiotic powder
2 teaspoons nutritional yeast flakes
1 teaspoon xanthan gum
½ teaspoon sea salt
¼ cup agar flakes, or 2¼ teaspoons agar powder
INSTRUCTIONS
TIP: We suggest using a serrated knife to slice the mozzarella; it makes lovely thin slices without mashing the beautiful ball of mozzarella.
MAKES ONE 4-INCH WHEEL
Add a little heat to your next nondairy cheese plate with this spicy and tangy wheel. Much like other cheeses in this book, this one requires a little extra time since it needs to be air-dried for about a week (but the actual hands-on time is minimal). You’ll be awarded with a sliceable, aged cheese that pairs so well with crackers and wine that you’ll want to have parties every week just for an excuse to make it again.
INGREDIENTS
1½ cups raw cashews, soaked in water for 6 hours
½ teaspoon probiotic powder
1½ tablespoons nutritional yeast flakes
2 teaspoons mellow white miso
2 teaspoons seeded and minced jalapeño
½ teaspoon red pepper flakes
½ teaspoon sea salt, plus more for coating
INSTRUCTIONS
MAKES ONE 4-INCH WHEEL
Round out your cheese plate with this sweet addition, a smattering of Pecan and Raisin Rice Crackers (here), and, of course, juicy red grapes. The caramel-like flavor of the dates along with the figs’ wine undertones beautifully balance the tanginess of this air-aged artisan cheese. On the sweeter side, it is ideal as an appetizer or a dessert course.
INGREDIENTS
1 cup raw cashews, soaked in water for 6 hours
½ teaspoon probiotic powder
1 Medjool date, pitted and finely chopped
1 dried fig, finely chopped
1 tablespoon nutritional yeast flakes
1 teaspoon fresh lemon juice
½ teaspoon white miso
¼ teaspoon sea salt, plus more for coating
INSTRUCTIONS
TIP: Fermenting and air-aging impact the sourness of your cheese. Once you’re comfortable with the technique, adjust the time period for your preferred level of tang. The air-aging technique also works with the basic fermented cashew cheese recipe to make it firm and sliceable. Give it a try here.
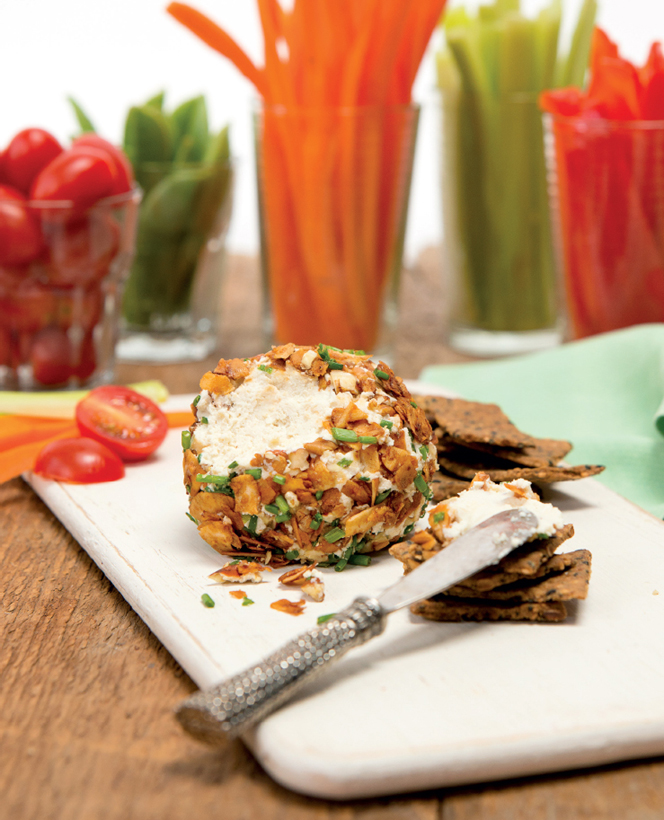
MAKES ONE ½-CUP BALL
If you’re ready to take your cheese-making mastery to the masses, here is an impressive cheese ball centerpiece you can present at your next party. The cheese ball can be made well in advance, but it will soften at room temperature, so keep it in the freezer until a little before the party starts, then roll it in all the goodies and set it in the center of your table with some beautiful seedy crackers (see here) to impress your guests. This was a favorite among our testers, who tried to convince us it made only a single serving.
INGREDIENTS
½ cup Cultured Nut Cheese (here)
1 clove garlic, grated
1 teaspoon apple cider vinegar
1 tablespoon finely sliced scallion (green and white parts) or chives
2 tablespoons Coconut Bacon Bits (here), crumbled
1 tablespoon finely chopped pecans
Crackers, raw vegetables, and bread, for serving
INSTRUCTIONS
TIP: Crumbling and finely chopping the garnishes into small pieces makes it easier for them to adhere to the cheese ball and distributes the flavors evenly in each bite when you spread the cheese over a cracker.
SERVES 2
We believe we’ve told everyone we know about the great banana transformation. But just in case you’ve been out of earshot, trust us, you must make this. And you must be patient and believe. When you put those bananas in your food processor and they jump around and become chunky, you will doubt. We all doubted. But scrape down the sides and keep believing, and you will be rewarded with the most incredible, fruit-based soft serve you could ever imagine. Even though we’ve made it at least a thousand times, we are still impressed. It is the perfect summer treat, the best breakfast going, and a super-satisfying post-workout, potassium-packed snack.
INGREDIENTS
2 ripe bananas, peeled, cut into quarters, and frozen
1 cup chopped fruit (mango, raspberry, strawberry, blueberry, peach, etc.; optional)
INSTRUCTIONS
TRY THIS: You can also jazz this up by pulsing in a tablespoon or two of chocolate chips, nut butter, or coconut butter at the end. To serve this treat, we like to set up a soft-serve bar with lots of fun toppings (chopped nuts, dried fruit, coconut, granola, etc.) as an awesome brunch for a family with lots of little ones. They love the idea of having ice cream for breakfast and don’t care at all that it is completely made of fruit.
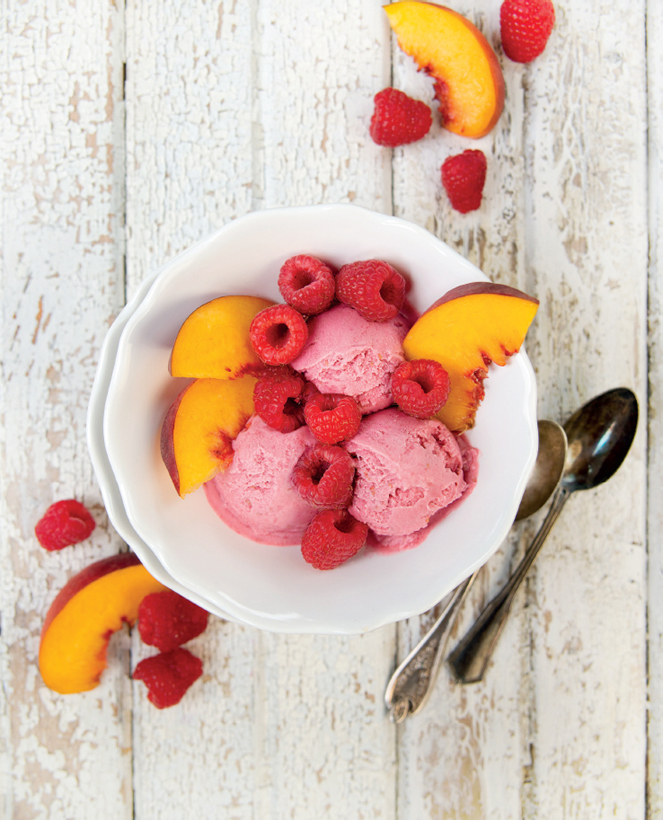
MAKES ABOUT 4 CUPS
I remember my grandparents always had vanilla ice cream on hand, and my sister and I would follow their lead and load it up with chocolate fudge, caramel sauce, peanuts, and fruit. It was the perfect end to every meal we shared with them. This particular recipe is delicious on its own, but I’ve included a few fun flavor variations, too, because, well, I’d like to think I learned from the best ice cream eaters in town. You can also use it to make Ice Cream Cone Confections (here) or Ice Cream Sandwiches (here). —N. A.
INGREDIENTS
1 (13.5-ounce) can full-fat coconut milk
1 cup unsweetened nondairy milk
½ cup pure maple syrup
¼ cup cane sugar
3 tablespoons melted coconut oil
½ teaspoon vanilla bean powder, or 2 vanilla beans, halved lengthwise and seeds scraped
½ teaspoon xanthan gum
INSTRUCTIONS
TRY THESE FLAVOR VARIATIONS: Chocolate Swirl: Once the ice cream has been churned, scoop one-third of the ice cream into a container. Drizzle Simple Chocolate Syrup (here) on top. Cover with another third of the ice cream and add another drizzle of syrup. Repeat until all the ice cream has been used, then top with one last drizzle of syrup.
Cookie Dough: Add chunks of unbaked Cookie Dough (here) at the end of the churning process.
Strawberry Cheesecake: Once the ice cream has been churned, scoop one-third of the ice cream into a container. Scatter teaspoons of Strawberry Chia Jam (here) and crushed Cinnamon Graham Crackers (here) on top. Cover with another third of the ice cream, then another layer of jam and graham crackers. Top with the remaining ice cream.
MAKES ABOUT 4 CUPS
This creamy, intensely chocolate ice cream will remind you of your favorite double scoop. Serve it as is or jazz it up with a drizzle of Quick Caramel Sauce (here) or Simple Chocolate Syrup (here) and a handful of berries or toasted nuts.
INGREDIENTS
1 (13.5-ounce) can full-fat coconut milk
1 cup unsweetened nondairy milk
⅔ cup cocoa powder
½ cup pure maple syrup
¼ cup coconut sugar
¼ cup strong coffee, chilled
1 teaspoon pure vanilla extract
Pinch of sea salt
½ teaspoon xanthan gum
INSTRUCTIONS
MAKES ABOUT 3¼ CUPS
Do you remember those little frozen yogurt carts with the blocks of plain frozen yogurt wrapped in paper, and the containers of frozen raspberries, strawberries, peaches, and mango? You’d watch the alchemy as a white block of yogurt went into the chute, followed by a cup of frozen fruit, then with one little pull of that metal slot-machine handle, you’d have a pink, purple, or peach spiral sitting atop your cone. It was magnificent. Now you can create the same magic in your own home. You won’t even need a wand to replace the excitement of the slot-machine payout moment—one bite of a strawberry coconut cone, and you’ll believe you’ve hit the jackpot.
INGREDIENTS
2 (13.5-ounce) cans full-fat coconut milk, chilled in the fridge for at least 8 hours
1 teaspoon probiotic powder
⅓ cup plus 2 teaspoons agave nectar or pure maple syrup
1 tablespoon plus 2 teaspoons fresh lemon juice
½ teaspoon pure vanilla extract
Generous pinch of sea salt
INSTRUCTIONS
TRY THIS: Add your favorite fruit at the blending stage of the recipe to make a wonderful frozen concoction. Strawberries, raspberries, and blueberries are personal favorites, but try cherries, blackberries, peaches, or mango if you’re feeling adventurous. We like to add 2 cups chopped fruit to the frozen yogurt recipe.