WE ALWAYS SAY THAT COOKING done with care is an act of love. Putting in a little effort to make something sweet to share feeds our souls and nurtures our relationships. The good news is that making many standard desserts truly homemade is easier than ever, and more satisfying than thawing a frozen, beige pound cake on your kitchen counter.
In this chapter, you’ll find tips and techniques for making fresh flour from whole grains; piping perfect white chocolate chips; preparing premade pie crusts; and creating all your own make-ahead favorites like frozen cookie dough and ice cream sandwiches. We’re offering a colossal cornucopia of confections you’d be proud to share at every one of life’s celebrations. These recipes are as simple as they are useful—plus, with gluten-free alternatives for each treat, we’ve got you all covered. It’s pie o’clock—let’s bake.
YIELD VARIES
Making our own fresh flours was truly the first step in our DIY journey. We were moving away from more processed ingredients and were looking for nutrient-dense alternatives. The terms nut flour and nut meal are used interchangeably, but in practice, nut flours, particularly those made with almonds, are often made from blanched (skins-removed) nuts to produce a lighter texture, and nut meal is made from whole, raw nuts (with the skin intact). We prefer the latter, but for most recipes you can use flour or meal and get good results either way.
Some of our favorite flours to use in baking, cereals, and raw desserts include almond, oat, cashew, hazelnut, coconut, buckwheat, and millet. These pantry staples are superstars, incredibly versatile and incredibly delicious. Take almonds as an example—you can use them to make a creamy milk, grind into thick, spreadable butter, blend into flour for pancakes, or save the pulp for Almond Pulp Cookie Crumbs (here). Amazing! No need to buy each of those products (milk, butter, flour) separately when you can just invest in a great big bag of almonds and make what you need, when you need it. Many of the recipes in this book call for fresh flours to provide a healthful base for baked goods that is also gluten- and grain-free.
Flours made in a blender are slightly finer than those made in a food processor, but not to worry, both will work well in most recipes (including all the ones in this book).
INGREDIENTS
At least ⅓ cup nuts (almonds, cashews, hazelnuts, etc.), shredded coconut, rolled oats, raw buckwheat groats, or uncooked millet grains
INSTRUCTIONS
In a blender or food processor, pulse the base (nuts, coconut, oats, groats, or grains), scraping down the sides as needed, until a fine flour forms. Fresh flours are best used within a couple of days. During that time, they will keep well in the fridge. To extend their freshness to weeks or months, store them in the freezer in an airtight container or sandwich bag.
TIPS: In a blender: As a blender has a powerful motor, we recommend starting a nut flour at low speed for a couple of seconds before turning it up to high to turn the nuts into a fine meal. Scrape down the sides and pulse rather than letting the blender run. This will keep the blender from heating up and causing the nuts to turn into a paste. It should only take 30 to 45 seconds to turn almonds or cashews into a flour. With dry grains or coconut, you can simply turn the blender to a high speed, stopping to scrape down the sides every few seconds, and blend until it becomes a fine meal.
In a food processor: A food processor is a great alternative to a blender when you’re making a big batch of flour. If you’re only making a little, sometimes it is hard for the food processor blades to catch all of the little bits of the grains (so just make a little more and save it for later). As with the blender, we suggest using the pulse button and stopping to scrape down the sides when making a flour out of nuts to avoid making a paste or nut butter instead. It should take less than a minute to create a flour from nuts. Grains become a flour much faster, and because of their lower fat content, you can leave the food processor running for the 20 to 30 seconds it will take to create a fine flour.
MAKES 1 CUP
Vanilla is intoxicating and exotic. But the world’s love for this unbelievable bean has made it so ubiquitous in recipes that the word vanilla has been redefined as boring or plain. Well, we believe using fresh vanilla beans, powders, and extracts make your results anything but. Since a teaspoon of vanilla extract can elevate an entire dish, we like to make sure we always have a supply (those extract bottles are just so tiny), so we make our own—in big batches. Homemade vanilla extract makes a wonderful gift for your fellow baking fiends. We suggest using the best vodka and the freshest vanilla beans you can find. Using the best ingredients to create your extract will infuse all your future treats with extra deliciousness.
Unlike most recipes in this book, this one takes some forward thinking—five months, in fact—but since it only takes a couple of minutes to prep, this could become a monthly routine that pays off in huge, delicious dividends. Don’t forget to label your jars with a date so you know when your extract is ready to use.
INGREDIENTS
1 cup vodka
3 plump, soft vanilla beans
INSTRUCTIONS
TIP: If you have a dishwasher, you can sanitize your jar by running a rinse wash at a high temperature setting. If you don’t have a dishwasher, wash the jar, then pour in some boiling water and let stand for a couple of seconds before pouring it out and adding the vodka.
TRY THIS: Vanilla extract can also be made with bourbon rather than vodka.
MAKES ¼ CUP
This is an amazing addition to lemonade, Popsicles, ice creams, jams, and cookies. If you don’t like pieces of lavender in the finished product, just strain it out once the flavor is infused.
INGREDIENTS
¼ cup cane sugar
1 tablespoon dried culinary lavender
INSTRUCTIONS
In a spice grinder, combine the sugar and lavender and pulse to blend. Store in an airtight container at room temperature for up to 6 months.
Vanilla Sugar
MAKES ½ CUP
This incredible infused sugar is fantastic to add to your favorite baked goods, stir into coffee, or sprinkle on cookies.
INGREDIENTS
¼ cup coarsely chopped vanilla bean pods, hard ends removed before chopping
¼ cup cane sugar
INSTRUCTIONS
In a spice grinder, combine the vanilla bean pods and sugar and grind until well combined. Store in an airtight container at room temperature for up to 6 months.
MAKES 1 CUP
Intimidated by the thought of making your own caramel? Don’t be. It can all happen right on your stovetop without sugar or butter or cooking thermometers. The process is simple, and within just a few minutes, you’ll have an incredible sweet sauce that can be drizzled over ice cream sundaes or cake slices, or used as a dip for pretzels or chocolate. Seriously, it’s all you could ever want from a caramel sauce!
INGREDIENTS
½ cup brown rice syrup
¼ cup pure maple syrup
2 tablespoons macadamia or cashew butter, or a combination (here)
¼ teaspoon sea salt
2 tablespoons nondairy milk or water
1 teaspoon pure vanilla extract
INSTRUCTIONS
MAKES ¾ CUP
This homemade syrup is a super-simple way to get your chocolate fix. Our tester Cintia quickly became addicted as she drizzled it over bowls of fruit and banana soft serve each night until it was all gone. We also use it to make delicious chocolate milk with Basic Nut/Seed Milk (here) or chocolate swirl ice cream using the Vanilla Bean Ice Cream here. The options are endless.
INGREDIENTS
⅓ cup pure maple syrup
¼ cup cocoa powder
1 tablespoon coconut oil
Pinch of sea salt
½ teaspoon pure vanilla extract
INSTRUCTIONS
Date Paste
MAKES 1½ CUPS
Date paste is a fairly standard ingredient in raw dessert recipes and is one of our preferred ways to sweeten raw desserts. It involves an extra step beyond using agave or maple syrup, but it is well worth it. Date paste can be made ahead and stored in the refrigerator for a couple of weeks. Even if you’re keeping things simple, date paste is a great addition to smoothies, a nut butter sandwich, or just a sliced apple.
INGREDIENTS
1½ cups Medjool dates, pitted and soaked in water until soft (about 30 minutes)
INSTRUCTIONS
MAKES 2 CUPS
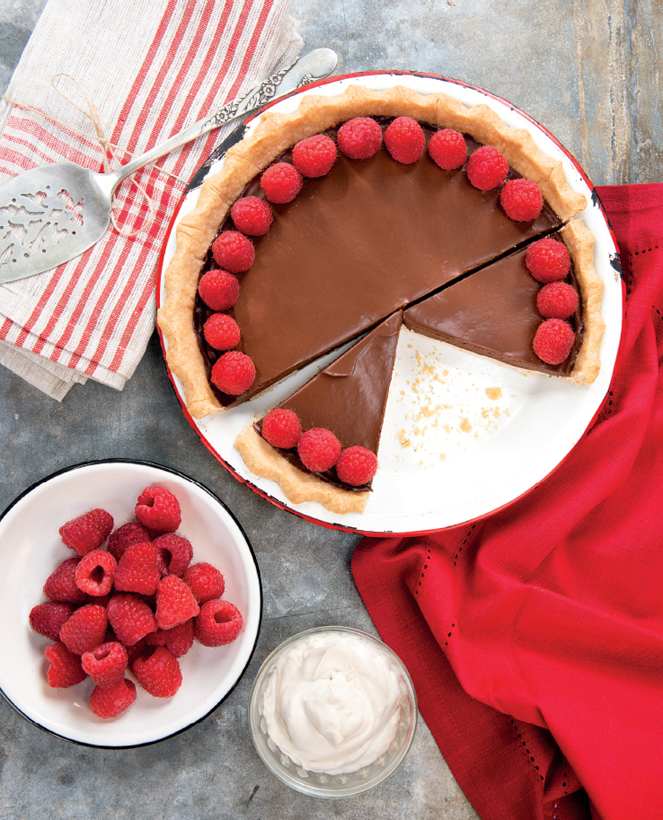
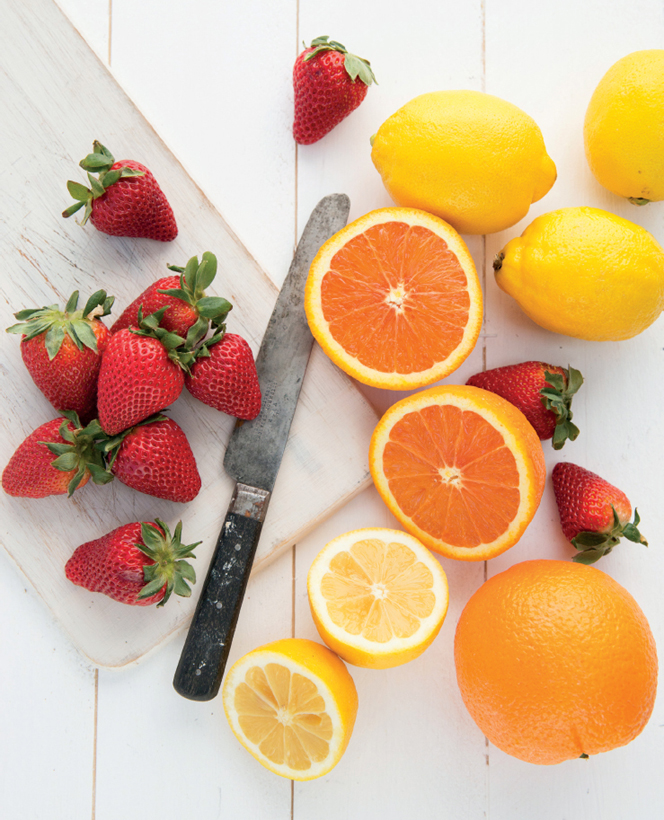
This light and refreshing lemon curd is reminiscent of the incredible lemon meringue pie my grandma Martin used to make during my childhood—for family dinners, bake sales, or just about anytime someone requested it. This vegan spin on my grandma’s classic might be better than the old favorite. It’s a pie filling, spread, and dessert topping all in one, and oh so good. Share this lemony pleasure at your next party and your guests will be begging for more. —N. A.
HOW TO MAKE A LUSCIOUS LEMON PIE
To use this lemon curd as a filling for a tart or pie, prepare through step 4, then pour the curd directly into a premade tart or pie crust (use the Almond Press-In Pie Crust here or the fully baked Premade Pie Crust here). Let cool to room temperature, then refrigerate until firm, about 2 hours, before slicing and serving.
INGREDIENTS
1¾ cups unsweetened almond milk
½ cup pure maple syrup
3 tablespoons agar flakes, or 2 teaspoons agar powder
1 tablespoon fresh lemon zest
¾ cup fresh lemon juice (from about 3 lemons)
2 tablespoons tapioca flour
⅛ teaspoon turmeric powder
Pinch of sea salt
1 teaspoon pure vanilla extract
INSTRUCTIONS
MAKES 3 CUPS
This is vegan decadence at its best. If you’re a sucker for anything luxurious and vanilla flavored, this stuff is a must. Once it’s blended, it can be poured over just about anything, but if you want a thicker, scoopable cream, allow it to sit in the fridge overnight. Use it to layer in granola or fruit parfaits, or serve with French toast or special occasion desserts.
INGREDIENTS
1 cup raw cashews, soaked in water for 6 hours
1 (13.5-ounce) can full-fat coconut milk
¼ cup pure maple syrup
1 teaspoon fresh lemon juice
¼ teaspoon vanilla powder, or 1 vanilla bean, halved lengthwise and seeds scraped
Pinch of sea salt
INSTRUCTIONS
TIP: Soak the cashews ahead of time and store in the fridge for up to 2 days.
SERVES 3 TO 4
We don’t know anyone who would turn away an offer of chocolate pudding. This perfectly rich, easy-to-make treat far surpasses those handy lunch box pudding cups and is just as convenient. Throw a few ingredients into a blender and then divide the pudding among mini mason jars for a ridiculously charming little treat that will make you feel like a kid again.
INGREDIENTS
1 (13.5-ounce) can full-fat coconut milk
⅓ cup pure maple syrup
¼ cup cocoa powder
2 tablespoons chia seeds
1 teaspoon pure vanilla extract
¼ teaspoon sea salt
1½ ounces dairy-free chocolate, chopped, or ¼ cup chocolate chips
INSTRUCTIONS
Almond Press-In Pie Crust (no-bake option)
MAKES 1 SINGLE PIE OR TART CRUST
Once you’ve whipped up this simple raw crust, you can make anything from a large pie or mini tarts to a decadent raw cheesecake. Pair it with the Classic Vanilla Cheesecake filling here, the Chocolate Fudge Filling here, or even the Lemon Curd here.
INGREDIENTS
1½ cups raw almonds
½ cup unsweetened shredded coconut
¾ cup pitted Medjool dates (see tip)
1½ tablespoons melted coconut oil
½ teaspoon pure vanilla extract
Pinch of sea salt
INSTRUCTIONS
TIP: It’s best to use soft dates, as they help the ingredients hold together. If yours have hardened somewhat, just soak them in a bowl of warm water for 10 minutes and drain well before using.
MAKES ONE 10-INCH CHEESECAKE
Raw vegan desserts have been all the rage in recent days. Some of them are decadent confections that highlight the undeniable richness of ingredients like cashews and coconut—a richness that many believed was impossible to achieve without dairy. It seems like some kind of alchemy that such a heavenly dessert can be created with plants. One bite of this pie and you’ll start to believe in magic.
This classic raw cheesecake is easy to pull together and doesn’t require the water bath or oven time that a more traditional pie would. However, it is a bit temperamental in warm temperatures, so keep it cool and firm in the freezer until you’re ready to serve.
Have you ever admired those beautifully swirled cheesecakes at your local café? It is far easier than you’d imagine to pull off. You just need a bit of confidence, as being too timid with your pour can make the accent flavor pool on top of your cheesecake rather than getting mixed into dramatic swirls. Simply reserve a cup of the filling mixture and blend with the flavor addition of your choice (berry, chocolate, caramel, lavender). Transfer to a spouted measuring cup. Here’s the tough part: slowly but consistently pour the mixture in a number of spots around the top of your cheesecake (forceful pours of about 1 tablespoon or so spread out across the cheesecake); you want to actually break the surface of the cheesecake with each pour. Then take a knife and swirl out from each of the spots where you added the accent flavor, in a circular motion. Do a little and take stock. You don’t want the swirls to overtake the cake; you’d like it to look like a wonderful added bonus.
INGREDIENTS
1 cup raw cashews, soaked in water for 6 hours
1¼ cups unsweetened almond milk
1 cup pure maple syrup
¼ cup fresh lemon juice
2 vanilla bean pods, halved lengthwise and seeds scraped
½ teaspoon sea salt
½ cup coconut oil, melted
¼ cup cacao butter, melted
1 recipe Almond Press-In Pie Crust (here)
INSTRUCTIONS
TRY THIS: This is a great basic cheesecake filling that can easily be transformed into a myriad of variations with a few simple additions. You can top it with the Oh My Cherry Pie Filling (here) for a classic New York cheesecake slice, or try adding raspberries, strawberries, blueberries, lavender, chocolate sauce, or caramel sauce when blending to create something fun and flavorful to impress your guests.
MAKES 1 SINGLE CRUST
This flaky, buttery, all-purpose pie crust is easy as can be using your food processor. No need to freeze all your bowls, spoons, and ingredients beforehand—the only secret (that isn’t really a secret) is to freeze the whole pan before baking to prevent shrinkage and the need for pie weights. While you’re at it, make another that you can have on hand for all your pie crust needs. This crust suits just about any pie filling but is especially good paired with Pumpkin Pie filling (here), the Oh My Cherry Pie Filling (here), or the Lemon Curd (here).
INGREDIENTS
1 cup whole wheat pastry flour
¾ cup unbleached all-purpose flour
1 tablespoon coconut sugar or cane sugar
¼ teaspoon sea salt
½ cup plus 1 tablespoon solid coconut oil (see tip, here)
1 teaspoon pure vanilla extract
½ tablespoon apple cider vinegar
INSTRUCTIONS
MAKE IT GLUTEN-FREE: Replace the whole wheat pastry flour and unbleached all-purpose flour with 1¾ cups Gluten-Free Flour Mix (here).
Premade Pie Crust (opposite), Chocolate Fudge Frosting or Filling (here)
MAKES ABOUT 2 CUPS
You may have seen that red, glossy, gloppy canned cherry pie filling spread on top of cakes and tarts. Well, as ardent cherry lovers, we just had to create a version that truly let the cherries and not the sweet goop be the star. Although called a pie filling, this recipe also offers a solution for all of your decadent garnishing dilemmas (you have those, right?). You can make a show-stopping treat by topping the Classic Vanilla Cheesecake (here) and topping it with a generous layer of cherry pie filling. Just allow the cheesecake filling to firm up completely before topping with the cherries—garnish with a few curls of chocolate and you’ll get a gold star for sure. Or bake a cake using the Chocolate Cake Mix (here); once cooled, cut the cake in half horizontally, spread the bottom layer with about half the cherry pie filling, then carefully place the top layer on top. Coat the whole big beautiful cake with frosting and serve with some Vanilla Bean Ice Cream (here). Or, of course, you could make a pie (recipe follows).
INGREDIENTS
2 tablespoons pure maple syrup
1 tablespoon fresh lemon juice
2½ teaspoons arrowroot powder
Pinch of sea salt
2 cups sweet cherries, pitted (thawed, if frozen)
½ teaspoon pure vanilla extract
INSTRUCTIONS
MAKES 1 PIE
INGREDIENTS
2 Premade Pie Crusts (here), unbaked
3 Oh My Cherry Pie Fillings (here), cooled 30 minutes or made up to 1 week in advance.
INSTRUCTIONS
MAKES ONE 9-INCH PIE
This fall-themed pie filling favorite is creamy, spicy, and not too sweet. Paired with the Premade Pie Crust, it makes a perfect vegan pumpkin pie. See below if you’ve got time for freshly roasted fall pumpkin; otherwise, canned pumpkin puree will do just fine.
PUMPKIN PUREE—CANNED VS. HOMEMADE
We tend to agree that fresh is always best, but there are a few reasons why canned pumpkin puree is so popular: it is convenient, relatively inexpensive, and it means pumpkin pie all year round. Most important, though, it is consistent. Canned pumpkin puree does not vary much in thickness, texture, or flavor.
Homemade pumpkin puree can be just as good as canned, but it takes some prep work. If you are using fresh pumpkin, do not use the jack-o’-lantern type; the flesh of these large pumpkins is too watery and stringy. Instead, look for small pumpkins, often called sugar pie pumpkins. To bake, cut 2 pie pumpkins in half and remove the seeds and stringy bits. Set the pumpkin halves, cut side down, in a baking pan. Bake at 400°F for 30 to 40 minutes, until soft. Let cool, then scoop out the cooked flesh and puree in a food processor.
INGREDIENTS
FILLING
2 cups pumpkin puree (see above)
1 cup full-fat coconut milk
¼ cup pure maple syrup
¼ cup coconut sugar
¼ cup oat flour
1 tablespoon Pumpkin Pie Spice (here)
¼ teaspoon sea salt
1 teaspoon pure vanilla extract
CRUST
1 recipe Premade Pie Crust (here), unbaked
INSTRUCTIONS
Chocolate Fudge Frosting or Filling
MAKES 2 CUPS
An ongoing project in our kitchens is creating a luscious chocolate frosting that can rival the traditional margarine-shortening-sugar concoction. We tried a number of alternatives, but this version won us over as soon as the first spoonful touched our lips. Good quality dark chocolate combined with a little coconut milk and avocado give this frosting a smooth, rich texture that makes it irresistible. It’s great for piping into swirly mountains on cupcakes, spreading into a thick layer atop a cake, or even poured directly into a pie shell for an elegant yet easy dinner party dessert.
HOW TO MAKE A SIMPLE CHOCOLATE TART
Want an easy, chocolaty, showstopping dessert? Because this filling is more rich than over-the-top sweet, it also makes an incredible filling for a pie or tart (use the Premade Pie Crust here or the Almond Press-In Pie Crust here). After step 2, simply pour the mixture into the premade crust and freeze until firm, about 1 hour. Serve with Whipped Cream (here) and fresh berries.
INGREDIENTS
7 ounces 70% cocoa dairy-free dark chocolate, finely chopped
½ cup full-fat coconut milk
2 tablespoons coconut oil
½ cup pureed avocado (see tip)
¼ cup pure maple syrup
2 teaspoons pure vanilla extract
Pinch of sea salt
Nondairy milk (if needed)
INSTRUCTIONS
TIP: To puree avocado, simply peel and pit a just-ripe avocado and then process briefly in your food processor before measuring.
MAKES 3½ CUPS
If the world were ending, I might just whip up a batch of this frosting and eat it with a spoon. A thick and delicious peanut buttery frosting without the need for shortening and sugar? I’ll take it. This recipe makes enough to pipe generous hills of frosting on a batch of cupcakes or to spread on a two-layer cake. Either way, it is divine. —N. A.
INGREDIENTS
1 (13.5-ounce) can full-fat coconut milk
1 cup pitted Medjool dates (see tip, here)
1 cup natural smooth peanut butter
1 teaspoon pure vanilla extract
½ teaspoon blackstrap molasses
⅛ teaspoon sea salt
2 tablespoons melted coconut oil
INSTRUCTIONS
MAKES 50 STICKS
These little sweets are not only a dream after-dinner treat but a truly spectacular garnish—slip a few sticks into an ice cream sundae, on top of a cheesecake, or into a minty milkshake. The flavor resembles everyone’s favorite Girl Scout cookie, hence the name.
INGREDIENTS
½ cup raw cashews, soaked in water for 6 hours
1 cup coconut oil
¼ cup pure maple syrup
2 tablespoons unsweetened vanilla almond milk
1 tablespoon pure peppermint extract
7 ounces dairy-free dark chocolate, finely chopped
3 tablespoons coconut butter
INSTRUCTIONS
TRY THIS: The peppermint makes these a perfect after-dinner treat, but if you’re into the chocolate-orange combo, you can swap out the peppermint for orange extract and enjoy a more tropical dessert.
MAKES 14 PEANUT BUTTER CUPS
For those of you who miss Reese’s peanut butter cups, here is a veganized version of everyone’s favorite corner store treat. We pushed the filling to maximum peanut capacity and added dates and salt for an extra element of sweet and salty. We prefer using 70% cocoa dark chocolate for the coating but you can also use semisweet, if that’s what you’ve got.
INGREDIENTS
½ cup dry-roasted unseasoned peanuts (here)
¼ cup pitted Medjool dates
¼ teaspoon sea salt
½ teaspoon pure vanilla extract
7 ounces dairy-free dark chocolate, finely chopped
3 tablespoons coconut butter, homemade (here) or store-bought
INSTRUCTIONS
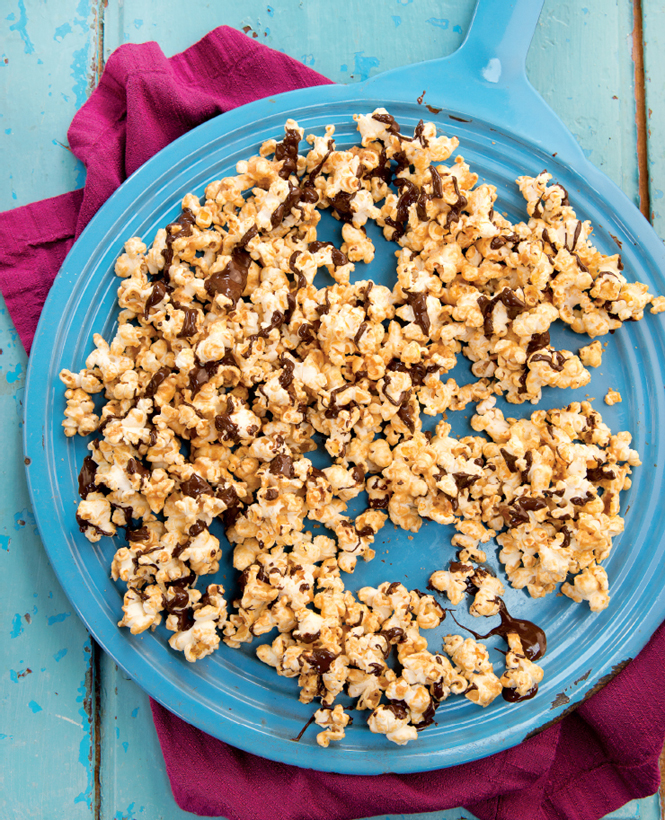
MAKES 8 CUPS
Since when do they sell big tubs of popcorn in bookstores? Turns out that was not the real question I needed to answer. Instead, it was how I could create a decadent vegan version of the peanut butter cup popcorn I had spotted among the stacks. That label had me dreaming about fluffy popcorn, in a sweet peanut butter coating, drizzled with a ribbon of dark chocolate. And now I’ve made those dreams come true. —L. P.
INGREDIENTS
2 teaspoons plus 2 tablespoons coconut oil
½ cup popcorn kernels
¼ cup smooth natural peanut butter
2 tablespoons pure maple syrup
½ teaspoon sea salt
1 teaspoon pure vanilla extract
4 ounces dairy-free chocolate, or ½ cup chocolate chips
INSTRUCTIONS
The luscious combination of cashews and cacao butter make these chips rich and dreamy; however, that creamy texture means high heat is a nightmare. Instead of baking them into your cookies and muffins, save these chips for garnishing your cookies post-oven, or add them to raw desserts, sprinkle them atop frosted cakes, or slip some into your Mountain Climber’s Mix (here).
INGREDIENTS
½ cup raw cashews, soaked in water for 6 hours
½ cup cacao butter, melted
¼ cup vanilla sugar (here), or ¼ cup cane sugar, pulsed fine in a blender plus 1 teaspoon pure vanilla extract
INSTRUCTIONS
1. Drain and rinse the soaked cashews.
2. In a food processor, grind the cashews until the nuts are broken down and just starting to form a paste.
3. In a blender, combine the ground cashews with the cacao butter and vanilla sugar and blend until completely smooth.
PIPING INSTRUCTIONS FOR PATIENT PEOPLE:
4. Transfer the mixture to a zip-top bag or a piping bag fitted with a small tip (e.g., #27) and refrigerate for 8 minutes to firm up. Depending on the temperature of your fridge, it might take a little longer to the get the chocolate firm enough to pipe. After 8 minutes, check it every 2 to 3 minutes until it is firm enough that you can pipe a perfect chip.
5. Warm up the piping bag for a few seconds by massaging it with your hands, until it feels pipable. If using a zip-top bag, cut off a small tip from one of the bottom corners, and twist the bag into the shape of a cone (like a piping bag).
6. Pipe small chocolate chips onto a piece of parchment paper (if you do this on top of a small cutting board, it is easier to move in and out of the freezer).
7. Once finished piping, transfer to the freezer for about 1 hour, until the chocolate chips easily release from the parchment paper and hold their form. Store in an airtight container in the fridge or freezer for up to 6 months.
CHOPPING INSTRUCTIONS FOR IMPATIENT PEOPLE:
8. Line an 8 x 8-inch pan with parchment paper. Pour the blended mixture to fill the pan evenly. Refrigerate until firm, about 1 hour.
9. Remove the firm white chocolate from the pan by pulling up on the parchment paper (releasing any sticking spots with a sharp knife). Place the chocolate on a large cutting board and chop into tiny squares (equivalent in size to chocolate chips). Separate the chips using your hands. Store in an airtight container in the fridge or freezer for up to 6 months.
MAKES 8 CUPS
One night in Portland, Oregon, at the good-bye gala for a big vegan conference, Nicole and I tasted a chai caramel corn that made both of us stop in our tracks. There, under the twinkling lights, surrounded by dancing and celebrating vegans, it was like our world had been paused as we savored every spicy bite. The next day, we tracked down more bags and squeezed as many as we could into our carry-ons. Back in Toronto, there was no way to avoid our mission: we needed to figure out how to replicate that special treat we had discovered so many miles away. Lucky for you, the tests are complete. We’d like to present this mind-blowing, sophisticated, spiced-up twist on the classic caramel corn. —L. P.
INGREDIENTS
2 teaspoons plus ⅓ cup coconut oil
½ cup popcorn kernels
1 cup coconut sugar
½ cup pure maple syrup
1 teaspoon ground cinnamon
½ teaspoon ground ginger
½ teaspoon freshly ground black pepper
½ teaspoon sea salt
¼ teaspoon ground cloves
Pinch of ground cardamon
2 teaspoons pure vanilla extract
INSTRUCTIONS
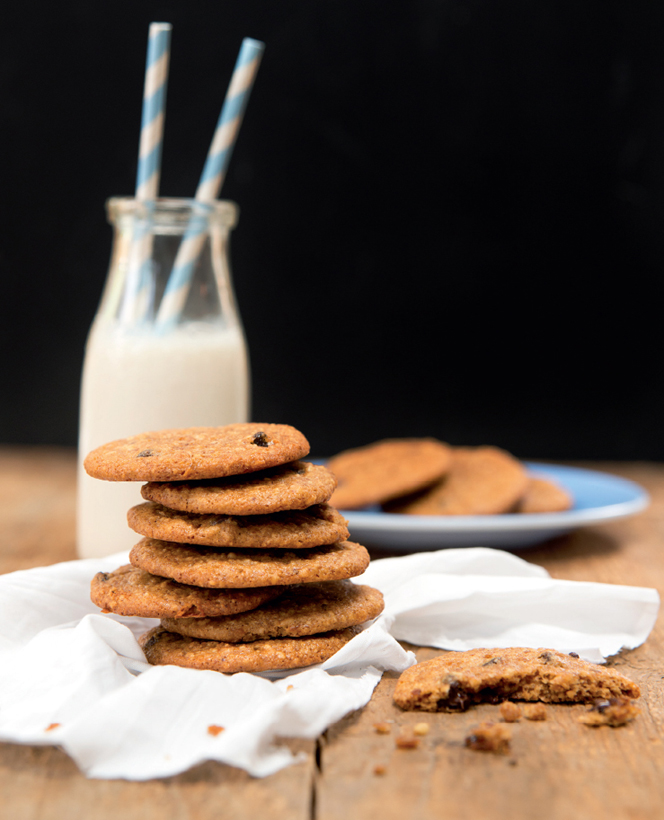
Cookie Dough (for baking or eating)
MAKES 30 COOKIES
There is no question: cookie dough is awesome. Although for decades, vegans have been licking the spoon coated in uncooked cookie dough without fear, just recently we’ve seen prepared vegan versions popping up in grocery store coolers. So this make-at-home version was specially designed to delight you by the spoonful or to satisfy with a toothsome texture when baked up fresh. Even though they’re oil-free, you won’t miss it. As our testers claimed, these just might the best cookies you’ve ever eaten.
INGREDIENTS
¾ cup smooth natural peanut or almond butter
2 tablespoons pear sauce or applesauce
1 teaspoon pure vanilla extract
½ cup rolled oats, pulsed into a flour using a food processor or blender
½ cup raw almonds, pulsed into a meal using a food processor or a blender
½ cup maple sugar
¼ cup coconut sugar
1 teaspoon baking powder
½ teaspoon sea salt
⅓ cup dairy-free chocolate chips
INSTRUCTIONS
TIP: These are small cookies that freeze beautifully. Make a big batch and always have cookies handy to garnish desserts, slip into a sundae, or snack on with a glass of warm almond milk. For ready-to-bake cookies any time, portion out tablespoon-size scoops onto a baking sheet and freeze. Once firm, the cookies can be stored in an airtight container in the freezer and baked a few at time whenever you’re in the mood.
TRY THIS: All out of almonds? This recipe can also be made with 1 cup whole wheat pastry flour in place of the ½ cup almonds and ½ cup oats.
MAKES 1 CUP
A fantastic way to use up all that leftover almond pulp, these sweet, cinnamony, all-purpose cookie crumbs can be used in place of store-bought cookie crumbs for ice cream cakes, pie crusts, or as a topping for parfaits or fruit crisp. Feel free to double the recipe if you have enough pulp!
INGREDIENTS
¾ cup almond pulp, left over from making Basic Nut/Seed Milk (here)
¼ cup finely shredded coconut
1 teaspoon ground cinnamon
¼ teaspoon sea salt
3 tablespoons pure maple syrup
2 tablespoons melted coconut oil
½ teaspoon pure vanilla extract
INSTRUCTIONS
MAKES ABOUT 30 CRACKERS
I first learned the stunningly simple technique of toasting flour to bring out its flavor from Fran Costigan, vegan pastry chef extraordinaire and instructor at the Natural Gourmet Institute in NYC, where I studied. This technique is key to the flavor of these crackers and is our preference to using graham flour, the ingredient that is traditionally used but not easy to find. Packed with whole grains and a good dose of cinnamon, these crackers bake up crisp so they hold up to all sorts of decadent desserts, like the Lemon-Blueberry Icebox Cake here. They’re also great on their own, and are especially good paired with tea. —N. A.
INGREDIENTS
2 cups whole wheat pastry flour
⅓ cup coconut sugar
1 teaspoon ground cinnamon
½ teaspoon sea salt
¼ teaspoon baking soda
¼ cup melted coconut oil
¼ cup pure maple syrup
2 teaspoons pure vanilla extract
1 teaspoon blackstrap molasses
INSTRUCTIONS
MAKE IT GLUTEN-FREE: Replace the whole wheat pastry flour with 1½ cups gluten-free oat flour and ½ cup tapioca flour (toast only the oat flour in step 2). The dough will be much thinner, so refrigerate for about 30 minutes to firm it up before rolling out.
MAKES ONE 8 X 8-INCH CAKE
At the tail-end of a historically frigid winter, we created this recipe to transport us to a big, beautiful porch at sunset on a sweltering summer night, where we would serve this by the spoonful to all of our favorite people and top each bowl with berries as the sunset painted the sky pink. Since you don’t need to turn on your oven to make this cake, it seems ideal for those nights when all you want to eat is something cool, covered in berries. And because no matter how hard you try, you can’t make this look like a perfectly composed confection, you can just relax, spoon out a big luscious lump, and invite over all your friends to share.
And if you live somewhere where winter lasts so long that you can no longer believe summer exists, make a batch, put on a sweater, and escape.
INGREDIENTS
1 recipe Cinnamon Graham Crackers (here)
1 recipe Lemon Curd (here)
1 cup blueberries (frozen work best—defrost in a strainer to remove any excess liquid before using)
1 recipe Whipped Cream (here)
Fresh blueberries, for garnish
INSTRUCTIONS
MAKES 6 SANDWICHES
The best ice cream sandwiches use cookies that stay soft and chewy even when frozen. In this case, we took that basic requirement and ramped things up a couple of notches by creating a vegan, gluten-free cookie that tastes like a decadent brownie and sandwiching two around a creamy, coconutty, vanilla ice cream. You’re welcome.
INGREDIENTS
½ cup almonds, ground into a meal using a food processor or blender
½ cup rolled oats, ground into a flour using a food processor or blender
½ cup cocoa powder
½ cup maple sugar or cane sugar
¼ cup coconut sugar
1 teaspoon baking powder
½ teaspoon sea salt
¾ cup coconut butter, homemade (here) or store-bought, softened
2 tablespoons unsweetened applesauce
1 recipe Vanilla Bean Ice Cream (here), softened for 30 minutes at room temperature.
INSTRUCTIONS
TRY THIS: Prefer a triple chocolate explosion dessert experience? Swap out the Vanilla Bean Ice Cream for Chocolate (here), and before firming, press the sides of the ice cream sandwiches into a tray of chocolate chips. Happy times are here again.
TIP: If you have a pizza cutter, it does an amazing job slicing through the warm cookies. If not, you can use a sharp knife or have fun with different cookie cutters.
MAKES 6 CONES
There was a time when you could get a vegan treat just like this at your health food store. But for some reason, its availability was so fleeting that we never even got to try a bite. So, we’ve given up on waiting on the whims of others—we’ve put our DIY spirit to good use and created a recipe you can count on. Vegan cones for everyone!
INGREDIENTS
1 cup dairy-free chocolate chips
2 tablespoons coconut oil
6 sugar cones (read the ingredients to be sure they are vegan)
1 recipe Vanilla Bean Ice Cream (here), softened at room temperature for 30 minutes
¼ cup toasted pecans, hazelnuts, or salted peanuts, finely chopped
INSTRUCTIONS
Ice Cream Cone Confections (here)