Although the actual military organisations of the combatant nations differed in detail, officers, support weapons, radio operators, forward observers, and medical staff generally formed part of a platoon, company, or in some cases battalion, headquarters (HQ). These HQ units would often be scattered amongst the fighting units where they could be most effective. In Konflikt ‘47 we allow these units to be incorporated as part of a force without worrying unduly about exactly how they fit into the army’s structure. Once deployed for battle such units all form part of the same overall command.
HQ units are infantry units comprising one or more models. Regardless of its size, each HQ unit adds an order die to your force just like any other unit.
The most common and possibly the most useful type of HQ units are officers. Officer units consist of an officer model together with a number of other men. Officers are vital when it comes to getting troops moving under fire. To represent this an officer model adds a morale bonus to all friendly units within 6”, including to the officer unit itself. The morale bonus conferred by an officer depends upon his rank – the more senior the officer the higher his bonus. Of course, we accept that linking effectiveness to rank is merely a convenience for purposes of our game. In reality there were many junior officers who were excellent and inspiring leaders and any number of senior officers who were anything but! We have listed the ranks according to British/US usage, and obviously the same bonuses apply to their equivalents in other armies.
| OFFICER’S MORALE BONUS | |
| Second Lieutenant | +1 |
| First Lieutenant | +2 |
| Captain | +3 |
| Major | +4 |
The greatest bonus we need take account of is +4. Therefore the highest rank we have made use of is major, but models of higher-ranking officers can certainly be fielded as part of an army with the same bonus as a major, should players wish. Bear in mind that the highest morale value is always 10, regardless of any bonuses that apply. A force can include multiple officers of the same or different ranks, but a unit can only benefit from the morale bonus of one officer at a time. This will always be the highest value available.
A medic team consists of a field medic and can include assistants such as orderlies and stretcher-bearers. The field medic is trained to deal rapidly and efficiently with battlefield injuries. These invaluable men can save lives and even put a man straight back into action if his injuries are slight. If an infantry or artillery unit, including the medic team itself, has a medic model within 6” roll a die every time the unit suffers a casualty from small-arms fire. On a 6, that casualty is ignored. Note that a medic cannot be used in cases of exceptional damage, against casualties inflicted by heavy weapons, or against damage suffered in close quarter combat.
An artillery observer unit consists of an artillery officer model and can include a second model as assistant radio operator. Artillery officers were often attached as liaison at company level to coordinate the fire of artillery batteries behind the frontline. This was done in various ways, ranging from the use of radio or field telephones to runners.
Once per game, when the forward artillery observer unit receives a Fire order, the observer can contact his battery, calling in either an artillery barrage or a smoke barrage. To represent this you will need a token of some kind – a coloured chit, for example. Place the token anywhere within sight of the artillery observer. This token represents the aiming point for the artillery battery he has contacted.
Once the token has been placed on the battlefield, at the start of each following turn, before drawing any order dice, roll a D6 and consult the appropriate chart, either the Artillery Barrage or the Smoke Barrage chart:
German Heavy Infantry
| SMOKE BARRAGE CHART | |
| Die Roll | Result |
| 1 | Miscalculation Either the observer or the artillery battery has made a terrible mistake in the heat of battle. The enemy can move the token up to 24” in any direction and then immediately resolve a smoke barrage as described in result 4−6 below. |
| 2 or 3 | Delay The battery is probably busy with another fire mission in another part of the battle. Nothing happens – leave the token in place. The player making the barrage can move the token up to 12”. Roll again at the beginning of the next turn. |
| 4, 5 or 6 | Smoke screen deployed The area around the aiming point is filled with smoke shells, creating a fluttering smoke screen that billows in the wind and hides the movement of troops. To represent the smoke some cotton wool, kapok or similar material is required. Make a circle of smoke 6”in radius centred upon the aiming point. Visibility through a smoke screen is reduced to a maximum of 2”. If a shooter’s line of fire to a target passes through more than 2” of smoke then the shot is blocked and the target is considered impossible to see. If a shooter’s line of fire passes through less than 2” of smoke then it can see the target, but suffers a –1 penalty to hit for shooting at a target in ‘soft’ cover. |
Whenever there is smoke on the table, roll a die at the start of each turn. On the roll of a 1 all the smoke is dispersed by the wind and is removed. On the roll of a 2 all the smoke on the table drifts D6” in the same randomly determined direction. On a roll of a 3 or more the smoke stays where it is.
An air observer unit consists of an air force liaison officer and can include a second model as assistant radio operator. These air force officers are attached to ground forces so that air strikes can be effectively coordinated against enemy-held positions. In the game they function in a similar way to artillery observers, but instead of calling down an artillery barrage they can summon an air strike.
Once per game, when the forward air observer unit receives a Fire order, the observer can call in aircraft to attack the enemy. Nominate an enemy unit anywhere within sight of the observer as the target for the air strike. Once a target has been chosen an aircraft can potentially appear at the beginning of any following turn. At the start of the next turn, before drawing any order dice, roll a D6 and consult the chart opposite.
The target unit and every unit (from either side) within 12” of the target unit is potentially pinned simply because the aircraft has been spotted. Roll D3–1 for each unit and add the indicated number of pin markers. Once any pinning has been worked out, place a suitable token 18” away from the intended target to represent the point where the aircraft opens fire or deploys its payload. Whilst any suitable coloured chit will suffice to mark the spot, many players will doubtless wish to employ a model aircraft in this role. This certainly looks more threatening!
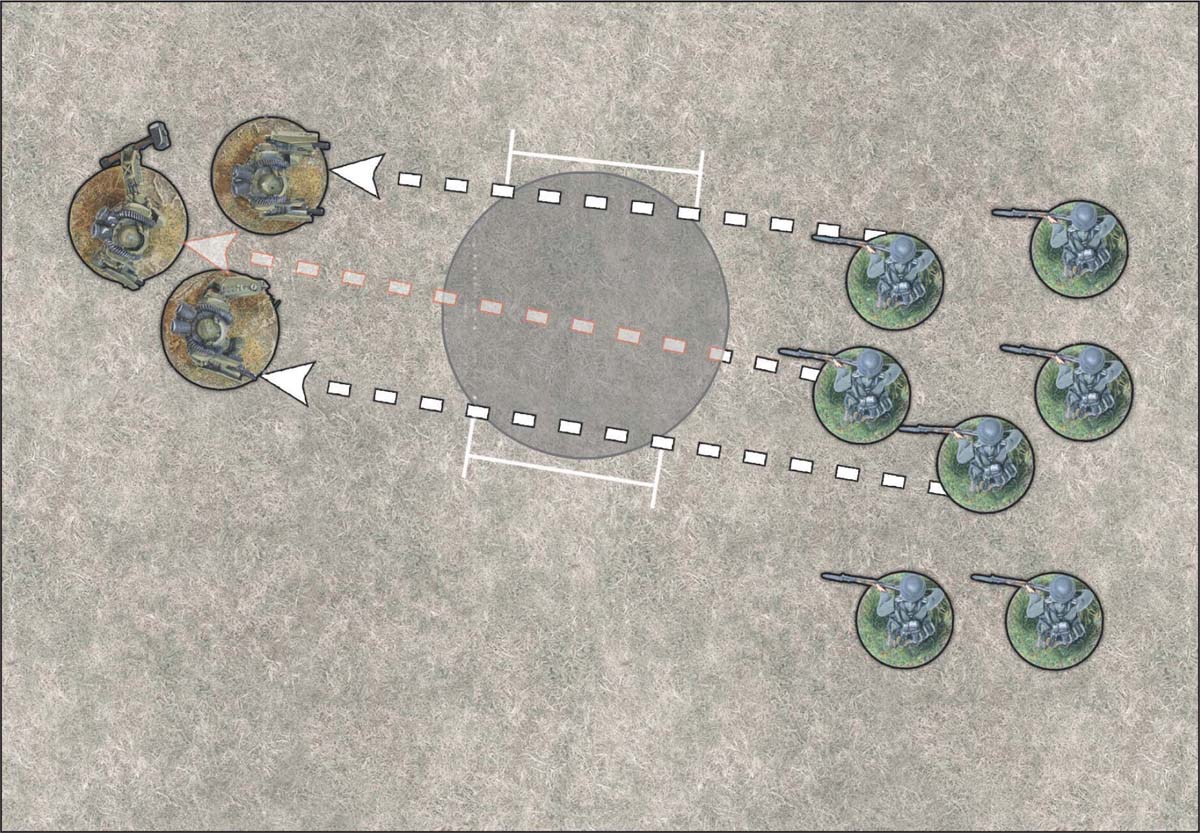
German soldiers A and B draw line of sight through more than 2” of smoke, so they cannot see to shoot their targets. The other models in the shooting squad draw line of sight through less than 2” of smoke, so they can shoot but their target is counted as being in soft cover.
Once the aircraft model or token has been positioned resolve shooting from flak units, if either side has any. Work out if the aircraft has taken damage during its attack run as described below. Note that it is possible for flak units from either side to inflict damage on attacking aircraft – as troops would often mistake friendly aircraft for enemy.
Once damage from flak has been worked out, and assuming the plane has not been shot down or forced to abort its mission, roll a D6 to determine the type of attack against the target unit.
| AIR STRIKE CHART | |
| Die Roll | Result |
| 1 | Rookie pilot This inexperienced airman must have trouble with target recognition. The opposing player can choose one of your units as the new target for the air strike. He places the aircraft marker as described for a Here it comes! result and resolves the attack against your unit. |
| 2 or 3 | The skies are empty Possibly because of interdiction by enemy fighters, or simply for lack of availability, no plane is sighted. Nothing happens. If he wishes the player can change the nominated target to any other enemy unit within sight of the Air Observer. Roll again at the beginning of the next turn. |
| 4, 5 or 6 | Here it comes! With a roar, the aircraft begins its attack run. Follow the sequence overleaf to resolve the air strike. |
All enemies with the flak special rule that are not currently Down automatically fire at the attacking aircraft if the token or model lies within their firing arc and range. Flak units fire regardless of whether they have already taken an action or not that turn. Flak fire does not require an action and takes place outside of the normal turn sequence. The usual line of sight rules are ignored when firing at aircraft because the target is plainly visible in the sky. Measure the range between the shooter and target ignoring everything in between. Rolls to hit aircraft are always at a –2 penalty because they are fast moving targets and inherently difficult to hit.
Friendly flak units that are not currently Down must test to hold their fire against attacking aircraft if they are in arc and range of the marked position. Roll a D6 for each flak unit. To successfully hold their fire inexperienced units must roll a 5 or 6, regular units a 4, 5, or 6, and veteran units a 3, 4, 5, or 6. Units that do not manage to hold their fire will shoot at the incoming aircraft as if it were an enemy.
Any flak units that are in Ambush lose their ambush status if they shoot at aircraft, in which case their order die is flipped to Down. Any units that are hidden as described in the scenarios section lose their hidden status if they shoot at aircraft (see here)
Do not roll to damage the aircraft if it is hit; instead tally up the number of hits scored in total. Once all flak units have fired, if the plane has suffered 6 or more hits in total it has been shot down or damaged and forced to abort the attack. The aircraft marker or model is removed. Otherwise proceed with the ground attack, with the number of hits suffered from flak affecting the result of the attack as already noted.
| AIR STRIKE RESOLUTION | |
| Die Roll | Result |
| 1 Strafing fighter |
The target takes one additional pin marker and 3D6 hits with a +1 penetration value. Reduce the number of hits by 1 for every hit the plane has suffered from flak. Armoured targets are hit on their top armour. Infantry and artillery can go Down, to halve the hits taken in the same way as from HE shells (see here). |
| 2 or 3 Fighter-bomber |
The target takes two additional pin markers and 2D6 hits with a +2 penetration value. Reduce the number of hits by 1 for every hit the plane has taken from flak. Armoured targets are hit on their top armour. Infantry and artillery can go Down, to halve the hits taken in the same way as from HE shells (see here). |
| 4, 5 or 6 Ground-attack aircraft |
This is either a dive-bomber or a fighter-bomber equipped with rockets or heavy automatic cannons to attack armoured targets. The target takes three additional pin markers and 3D6 hits with a +4 penetration value. Reduce the number of hits by 1 for every hit the plane has taken from flak. Armoured targets are hit on their top armour. |
The easiest way to establish a random direction is to use a Warlord order die. Each face of the die has an arrow symbol clearly marked – roll the dice and the arrow will indicate a random direction. Any kind of die that has numbers rather than ‘pips’ can be used in a similar fashion to give a random direction by drawing a line through the top of the number rolled. Some players use a D10 in a similar way, as its sides are ‘arrow shaped’ and will therefore always point in a direction when rolled. Another method is to use a D12 (a die with 12 sides) and to nominate a direction as 12 o’clock – this will give you a random direction according to a clock face: 1 o’clock, 2 o’clock, and so on.
