
Both a healthy body and a healthy mind are required to sustain the increased levels of energy needed for Yoga Meditation. It is therefore important that any impurities – whether physical (known as malas) or mental (known as vikshepas), such as doubt, inattention, laziness and pleasure-seeking – are removed before meditation.
When the purification practices in this chapter – Nadi Shodhana (Alternate Nostril Breathing), Agnisara Kriya (Activating the Digestive Fire), Kapalabhati (Skull-shining Breath) and Ashvini Mudra (Horse Gesture) – are regularly performed, preferably daily, they will purify the body’s energy channels, strengthen the digestion, burn up toxins, massage the internal organs, awaken the life energies of the body, and cleanse and calm the mind in preparation for meditation.
Aim to do the four purifications as part of your regular yoga practice (preferably in the morning) – after your yoga postures and before your pranayama and meditation. Doing this regularly for at least three to six months will allow you to experience the optimum benefits of increased energy and clarity of mind.
This important exercise – also commonly known as Anuloma Viloma – purifies all the energy channels of both the physical and astral bodies so that prana can flow smoothly; nadi is Sanskrit for “flow”, and shodhana for “purification”. The exercise also balances breathing between the left and right nostrils and activity between the left and right brain hemispheres, which has a calming effect on the nervous system. When the flow of air becomes equal in the nostrils, the flow of energy in the ida and pingala nadis is also equalized, which allows prana to flow in the central sushumna nadi, centring the mind for the purpose of meditation.
Regular practice will increase your capacity for focused concentration and meditation. It is best to start using a ratio of 4:8:8 – inhaling for a count of four, holding the breath for eight, exhaling for eight.

Vishnu Mudra
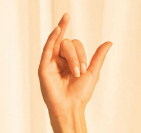
This mudra, which involves folding your middle and index fingers into your palm and keeping your thumb and ring and little fingers extended, is used in Nadi Shodhana to help to contain prana within the body. The right hand is usually used to perform this mudra.
Practising Nadi Shodhana

1 Sit in a comfortable meditation pose (see pages 52–7), close your eyes and relax your whole body.
2 Relax your left hand on your left knee, palm upward.
3 Raise your right hand and position it in Vishnu Mudra (see below left).
4 Exhale and close your right nostril with your thumb.
5 Inhale slowly and smoothly through the left nostril for a count of four.
6 Gently close your left nostril with your ring and little fingers so that both nostrils are now closed, and hold your breath for a count of eight.
7 Release your thumb and exhale slowly through your right nostril for a count of eight.
8 Remain with the left nostril closed and inhale through your right nostril to a count of four.
9 Close both nostrils and hold your breath to a count of eight.
10 Release your left nostril and exhale through it for a count of eight. This completes one full round; repeat from Step 5 to start the next round. Practise five to ten rounds in total daily. Over a period of time, gradually aim to increase to 25 rounds. Once you’ve progressed to 25 rounds at this 4:8:8 ratio, revert to five to ten rounds, but this time trying a 5:10:10 ratio.

Agni is Sanskrit for “fire”, sara means “essence” and kriya means “action”. This purification practice is therefore a means of stimulating the “essence of fire”, which is thought to be at the navel in yogic terms; this creates internal heat to rekindle the digestive fire. It is also an effective exercise for toning the abdominal muscles. Spiritually, it activates manipura chakra at the navel, which frees us from negative energies and imbues us with vitality.
Only ever do the exercises on pages 89–90 on an empty stomach, and after evacuation of the bowels. If you are new to the practice, it is best to do just Stage 1 first, then gradually progress to the more advanced Stages 2 and 3 as your abdominal muscles become stronger. Stages 2 and 3 are, however, best learned under the guidance of an experienced yoga teacher.

1 Stand with your feet slightly wider than hip-width apart. Bend your knees and lean forward, pressing your hands on your thighs just above your knees, and keeping your arms straight.
2 Inhale deeply. Then relax your abdomen, and as you exhale deeply, firmly contract your abdominal muscles, pressing the navel toward the spine. Comfortably hold the abdominal contraction with your breath held out for a few seconds. As you inhale, relax and allow the abdomen to return to its normal position. Repeat five to ten times.
1 Remain leaning forward, with your hands pressed on your thighs just above your knees, arms straight.
2 Inhale deeply, then, exhaling deeply and slowly, contract the lower abdominal muscles just above your pubic bone, pulling them firmly inward and upward. This also creates a strong upward pressure in the perineum area between the genitals and anus. Continue exhaling, while contracting the abdominal wall up toward the ribcage. As you complete the exhalation, inhale and, without pause, in a wave-like motion, slowly release the contraction from the upper to the lower abdomen.
3 On your next exhalation, once again contract first your lower, then your upper abdominal muscles. Then, holding your breath for as long as you comfortably can without strain, pump your abdominal muscles in and out in quick succession. At first, aim to do about 20 “pumps”. Then inhale, relax and stand upright again. As you become more experienced, you can gradually increase to doing ten rounds of 20 pumps, taking a short break between each round.
1 Bend your knees again and lean forward, pressing your hands on your thighs just above your knees, and keeping your arms straight.
2 Exhale deeply, and firmly contract your abdominal muscles, bringing the navel toward the spine. This is Uddiyana Bandha (see page 61).
3 Maintaining this lock, press your hands into your legs and give a forward and slightly downward thrust to the abdominal portion between the navel and the pubic bone. This helps to contract the rectus abdominus muscles – the two long vertical rows of muscle running down the centre of the abdomen – keeping the other muscles of the abdomen in a relaxed condition. Equal hand pressure on your legs further helps you to achieve the isolation of the rectus abdominus muscles.
4 Once you can achieve this initial isolation of these muscles, try to isolate just the right rectus muscle (Dakshina Nauli) by leaning your body forward, tilting your torso slightly to the right and putting extra pressure on the right hand.
5 Then try to isolate the left rectus muscle (Vama Nauli) by leaning slightly to the left while increasing pressure on the left hand.
6 Finally, start trying to move each one from side to side so they move or “roll” in a wave-like movement in quick succession. Begin by doing five rolls to the right and five to the left.
CAUTION: Do not practise any of these exercises during menstruation (Agnisara Kriya stimulates the upward flow of pranic energy, which is counter to the natural downward cleansing flow), while pregnant or after an abdominal operation, or if you have a stomach disease, cardiovascular disease or high blood pressure.
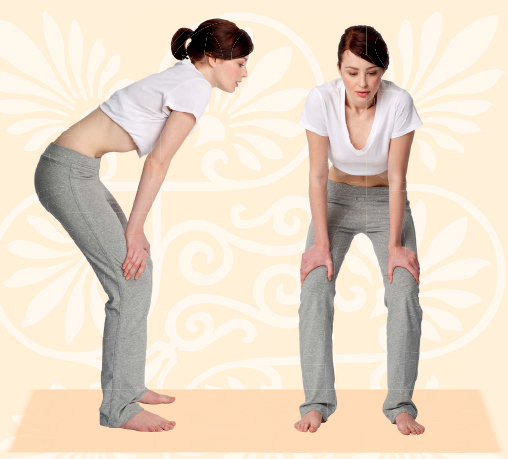
This shows Stage 2 of Agnisara Kriya practice –Abdominal Pumping – in action.
The art of Abdominal Rolling

It will take time and perseverance to master Abdominal Rolling as it is an advanced exercise that requires voluntary control of the central abdominal muscles. You will need to learn how to isolate, contract and rotate the rectus muscles in a churning motion while maintaining a static posture. This practice is therefore best learned under the expertise of an adept yoga teacher. However, it is included here because, once learned, it is a valuable practice that contributes toward the awakening of dormant kundalini, helping it to ascend through the sushumna to the crown chakra.
Kapala is Sanskrit for “skull” and bhati means “shine”. The practice of Kapalabhati, which involves a series of rapid, active exhalations and passive, effortless inhalations, therefore literally “shines” or purifies the cavities within the skull, invigorating the brain with a massaging effect, rejuvenating the nervous system, and awakening dormant centres responsible for subtle perception. It expels more carbon dioxide and other waste gases from the cells and lungs than normal breathing. If you feel dizzy at any point while doing it, simply stop, sit quietly and breathe normally. When you feel ready to begin again, breathe with awareness and less forcibly.
1 Sit in a comfortable meditation pose (see pages 52–7), palms on your knees, close your eyes, relax your whole body and breathe deeply, in and out through your nose.
2 Begin actively emphasizing your exhalation by contracting your abdomen, so that you feel your diaphragm lift, pushing the air out of your lungs forcefully through both nostrils. This will create a vacuum so that the passive inhalation happens naturally. This is one respiration.
3 Continue by rapidly exhaling and inhaling through both nostrils without pausing, making each exhalation short, strong and powerful and each inhalation light, relaxed and effortless. Aim to keep the muscles of your face relaxed.
4 Start with three rounds of ten to 20 rapid respirations. Aim to add ten respirations per “round” each week until you reach 120 respirations per round.
CAUTION: Those suffering from heart problems, high blood pressure, epilepsy, nausea or fainting should not practise Kapalabhati.
The traditional practice of Ashvini Mudra, meaning “horse gesture”, is named after a subtle internal dilation and contraction of the anal sphincter muscles that a horse is known to make several times once it has evacuated its bowels. Repeatedly contracting the anal sphincter muscles in this way acts as a perineal seal, conserving prana and redirecting it to the higher chakras, preparing the mind for meditation. The exercise also promotes overall strength and vigour and is a good preparatory practice for Mula Bandha, the root or anal lock (see page 60). It also has physical benefits of strengthening the anal muscles and helps in counteracting disorders such as constipation, piles and prolapsed uterus or rectum.
1 Kneel in Thunderbolt Pose (see page 54) with your head, neck and spine upright and aligned. Rest your palms on your thighs.
2 Inhale deeply, hold your breath and contract your gluteal muscles, pelvic diaphragm and anal sphincter for a few seconds, then release. The feeling is like the squeezing of your back passage to stop yourself going to the loo. Repeat the contraction and release rapidly as many times as you can hold your breath comfortably without strain.
3 Repeat Step 2 twice more so that you do three rounds of contractions in total. Aim to slowly and gradually work your way up to being able to do 30 contractions in one go, then 60, being careful not to strain in any way.
NOTE: To make it easier to get the feeling when you first do it, you might want to try it lying down on your back with your legs and feet together. Any posture that pulls the hips together will make it easier.