cups of yogurt cheese.
Frequently Asked Yogurt Questions
Beet and Turnip Salad with Yogurt and Herbs
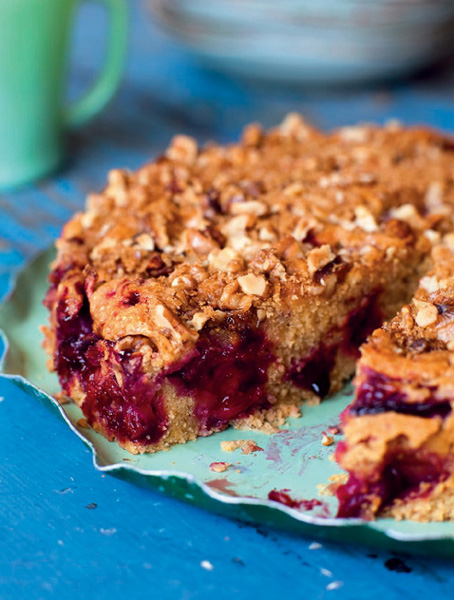
Stone Fruit–Yogurt Cake with Cornmeal and Walnut Streusel
Savory Spinach-Cheese Pie with Olive Oil Crust
Fresh Pasta with Asparagus, Homemade Cheese, and Lemon
Artichoke Soup with Crème Fraîche
Pain Perdu with Maple-Cinnamon Mascarpone
THE DAIRY PRODUCTS YOU WILL FIND in this chapter start simply—with milk or cream and some sort of culturing or curdling agent. It’s my intention to provide a useful repertoire of dairy products boiled down to a few simple formulas and techniques. If you are interested in learning more about making your own dairy products or getting into more complicated cheeses, there are resources in the back of this book to help you.
There is nothing more satisfying than watching your own fresh cheese form curds or tasting your own homemade tangy yogurt or creamy cultured butter for the first time. Many commercial dairy products are full of artificial flavors, stabilizers, and colors. Not so with homemade. And it’s a simple process that anyone can master. All you need is good milk or cream and a few simple tools. The dairy products in this chapter can be made by anyone, in any home kitchen. The methods are simple and streamlined and avoid the use of special equipment whenever possible. You’ll find four fresh and delicious homemade dairy products and a variety of special recipes that utilize them—everything from pasta to crêpes to a cake.
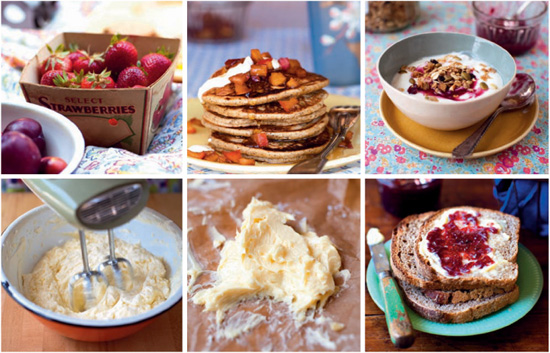
Plain, full-fat yogurt is a staple in my house. I eat it for breakfast with honey, fresh fruit, and Granola Your Way. It’s also great with maple syrup or jam stirred in. Sometimes I drizzle it into whole-grain porridge; drain it to transform it into thick, creamy dressings and dips; dollop it on Simple Dal or spicy grilled chicken; blend it with fresh summer fruit into smoothies; or add it to baked goods for a luscious tang. It’s very easy to make yogurt without a yogurt maker, but you will need a method for keeping your yogurt warm while it cultures. Read the FAQs before getting started.
TIME REQUIRED: 20 minutes active; 20 minutes passive, but watchful; 8 to 10 hours passive
YIELD: 1 quart
1 quart of the best milk available (I use non-homogenized, full-fat organic cow’s milk from a local dairy, but you can use low-fat milk if you prefer)
2 tablespoons plain yogurt with active cultures, or 1 teaspoon powdered yogurt starter
EQUIPMENT NEEDED
A candy or dairy thermometer (optional but helpful)
A one-quart mason jar
A whisk that will fit into the mason jar
Pour the milk into a large saucepan and turn the heat to medium-low. Heat it slowly, stirring occasionally, until it is just below the boiling point, about 20 minutes. Watch carefully and do not allow it to boil. If you have a thermometer, the milk should be about 185 degrees F. There are some visual and olfactory cues to look for if you don’t have a thermometer. Tiny bubbles will form just under the skin that covers the surface of the milk. The surface will undulate slightly, but the bubbles shouldn’t break the surface. The milk will have a cheesy, scalded aroma. Once the milk reaches this state, hold it there for 5 minutes.
While you wait for the milk to come up to temperature, sterilize a 1-quart mason jar and its lid with boiling water. Let them air-dry. Warm a large pot of water for a water bath, if using.
Once the milk has remained at 185 degrees F for 5 minutes, remove it from the heat and let it cool down to 115 degrees F, stirring occasionally. This will take 20 to 30 minutes.
Put the yogurt or starter in the bottom of the sterilized mason jar and add about ½ cup of the cooled milk. Whisk to blend well. Add the remaining cooled milk, stirring well to distribute the cultures throughout. Fasten the lid and place the jar in your incubator of choice for 8 to 10 hours.
Remove the jar from the incubator and refrigerate it until cool before eating. If your yogurt is a little lumpy, simply whisk it smooth before eating. If you would like thicker yogurt, strain it to the desired thickness in a coffee filter set in a strainer over a bowl. The whey that drains off can be used to soak grains, cook beans, or ferment beets.
Drain 1 quart of yogurt in the refrigerator in a coffee filter set over a strainer for 12 hours and you have yogurt cheese. It’s sublime with fresh, sweet strawberries and makes an impressive appetizer with olive oil and the Middle Eastern spice za’atar. Serve it with Ajvar, assorted pickles, and Whole-Wheat Sesame Crackers. One quart of yogurt yields about 1 cups of yogurt cheese.
WHY MAKE YOGURT?
1. If you find yourself drowning in plastic yogurt containers, making your own yogurt will solve that problem.
2. It may be difficult for you to find good-quality, plain yogurt without additives, gums, or thickeners.
3. Sometimes supermarket yogurt is super-heated, which kills some of the beneficial live cultures.
4. You’ll save money because fresh, organic milk is less expensive than organic yogurt.
CAN I USE A YOGURT MAKER?
You can buy a yogurt maker if you want to be completely foolproof, but all you really need is yogurt starter, a thermometer, and a method for keeping your yogurt at a steady 90 to 100 degrees F for 8 to 10 hours.
WHAT KIND OF STARTER SHOULD I USE?
You can use plain store-bought active yogurt, and your own homemade yogurt after that, or powdered yogurt culture bought in a grocery or natural foods store. Powdered culture will give you more consistent results and is necessary if you forget to hold back some yogurt for the next batch.
Powdered starter is available in small jars in the refrigerated section where dietary supplements are sold. The directions on the jar will tell you how much to use. You can also purchase yogurt starter from a cheese supply house.
WHAT’S THE BEST WAY TO INCUBATE YOGURT?
You may have to experiment a couple of times until you find the method that works best for you, but below are a few ideas.
1. Put a quart jar of ripening yogurt in a large pot of water heated to 90 to 100 degrees F and keep the whole thing in the oven overnight with the light on, or in a gas oven with the pilot light on.
2. Wrap the jar in a black plastic garbage bag and leave it in the sun on an 80- to 85-degree-F day for about 8 hours.
3. Put the yogurt in a warm water bath and set the whole thing in an insulated cooler with towels wrapped around it for 8 to 10 hours.
4. Wrap a heating pad set on low around a jar of ripening yogurt for 8 to 10 hours.
5. Make the yogurt directly in a pre-warmed insulated thermos and keep it in a warm place while it cultures.
This salad is the essence of uncomplicated deliciousness. All you do is steam the vegetables, whisk herbs into the Yogurt, and toss it together. Because the turnips will cook faster than the beets, steam the vegetables separately or use a two-level steamer that allows you to cook both at once, separately. Vary the herbs according to your taste and what’s in your garden.
TIME REQUIRED: 10 minutes active; 25 minutes passive (excluding yogurt preparation)
YIELD: 4 servings
1 pound Tokyo (small white) or golden turnips, trimmed, or regular turnips, quartered
1 pound medium beets, trimmed
 cup Yogurt
1 tablespoon snipped fresh chives
1 tablespoon chopped fresh parsley
2 teaspoons chopped fresh dill Pinch of fresh thyme
Salt
Freshly ground black pepper
Place the turnips and beets on separate levels of a two-level steamer. If you only have one level, start the beets first as they will take 5 to 10 minutes longer. Turn the heat to medium, bring to a boil, and steam until the vegetables are tender, checking the water level occasionally, and adding more if necessary. The turnips will take about 15 minutes and the beets about 25 minutes.
In a small bowl, whisk together the yogurt, chives, parsley, dill, and thyme (or whatever herbs you are using). Season with salt and pepper. Set aside.
Remove the vegetables from the heat, let cool, and peel the beets. Cut the beets and turnips into bite-sized wedges and transfer them to a medium bowl. Pour the herbed yogurt over, toss to coat, and season with salt and pepper. Serve immediately.
TIP: The yogurt can be mixed with the herbs a couple of hours ahead of time, and the vegetables can be steamed and refrigerated up to 2 days ahead. It’s best not to mix the vegetables and yogurt until you are ready to serve, as the beets stain the salad and the yogurt becomes watery. If you’ve cooked the vegetables ahead and refrigerated them, bring them to room temperature before tossing with the yogurt and serving.
This cake is perfect for nonbakers because it’s easy and foolproof. Inspired by a bumper crop of plums from a relative’s tree and my own homemade yogurt, I created this one summer day. The streusel was my friend Haven Bourque’s suggestion. This has become my signature cake and may become yours as well. It’s a great way to use frozen, sliced stone fruit of any sort, any time of year. Apples or pears, sautéed until soft before folding into the cake, are also a great idea.
TIME REQUIRED: about 30 minutes active; 45 minutes passive (excluding butter and yogurt preparation)
YIELD: 8 to 10 servings
1½ cups unbleached all-purpose flour
½ cup yellow cornmeal
1½ teaspoons baking powder
½ teaspoon kosher salt
½ teaspoon baking soda
8 tablespoons Cultured Butter or store-bought butter, softened
½ cup granulated sugar
½ cup lightly packed brown sugar
2 large eggs
1 teaspoon vanilla extract
cup plain whole-milk Yogurt
3 cups sliced fresh or thawed frozen plums or other fruit
1 cup (about 4 ounces) pecan or walnut halves, lightly toasted and roughly chopped
Preheat the oven to 350 degrees F.
Lightly butter and flour a 10-inch round cake pan. You can use a springform pan if you want to unmold it and serve it on a platter.
In a small bowl, sift together the flour, cornmeal, baking powder, salt, and baking soda.
In a large bowl, using a handheld mixer, beat together the butter, granulated sugar, and ¼ cup of the brown sugar until creamy. Add the eggs and vanilla and mix to combine.
Add the dry ingredients and the yogurt to the sugar mixture in two additions, starting with the dry ingredients and ending with the yogurt. Fold in the fruit.
Pour the batter into the prepared pan. Mix together the nuts and the remaining brown sugar and sprinkle over the top of the cake.
Bake on the middle shelf of the oven, until the cake rises in the center and browns, and a toothpick inserted into the cake comes out clean, about 45 minutes. Set the cake on a cooling rack and let it cool completely before cutting and serving, or removing from the pan. Wrap any leftovers well and store at room temperature for up to 2 days. The cake will keep, refrigerated, for 1 week, or may be frozen for 1 month, if wrapped well, whole or in pieces.
There is a whole class of cheese made using this method. Ricotta is one, though it was traditionally made from the whey left over from making hard cheeses. This recipe makes a cheese similar to whole-milk ricotta. The same process is used to make queso blanco and panir, but that soft Indian cheese is lightly pressed. Whatever you call this fresh cheese, it’s versatile; is easy for anyone to make; and tastes clean, sweet, and milky. You can create your own particular style of fresh cheese by adjusting the time you drain the cheese and the thickness of your cheesecloth. You can even try cutting holes in a plastic or metal container to make a cheese mold and then fashioning a press to make a pressed cheese. When moist, this cheese is good for spreading and using as a dessert filling. Drain it longer, and it’s perfect for pizza and pasta.
TIME REQUIRED: 10 minutes active; 1 hour mostly passive, yet watchful
YIELD: about 1¼ pounds, depending on how much whey you drain out
1 gallon whole milk (not ultra-pasteurized as you may have trouble curdling it)
cup white or apple cider vinegar, or ½ cup freshly squeezed lemon juice
Non-iodized salt, such as kosher or cheese salt (optional; see Sources)
Pour the milk into a large nonreactive pot (stainless steel, ceramic, or enameled). Over medium-low heat, slowly bring up the milk temperature to 185 degrees F, stirring occasionally. Take your time, so you don’t scorch the milk. Stir occasionally and watch closely. This can take 45 minutes or longer.
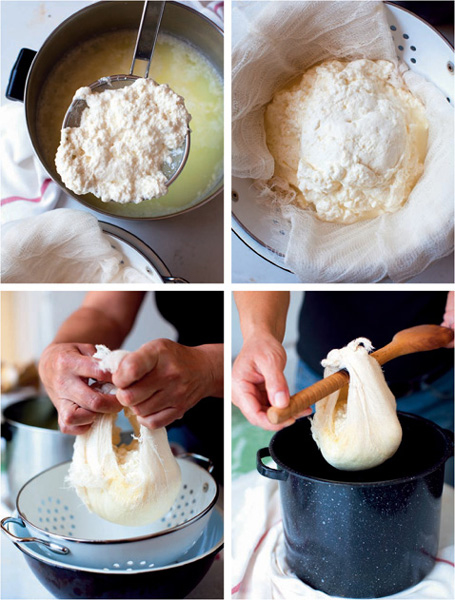
While you wait, ready two, four, or six layers of cheesecloth (the number of layers depends on how dry you want your cheese), folded into a square of about 18 inches on each side. Place the cheesecloth in a strainer. Fewer layers will make the cheese drain more quickly and yield a drier, crumblier cheese.
If you don’t have an accurate thermometer, you can still make ricotta. The milk should be just short of boiling. Signs that the milk is almost ready include tiny bubbles on the sides of the pan and a shimmering, vibrating surface not yet broken by bubbles.
When the milk reaches the proper temperature, turn off the heat, pour in the vinegar and stir to distribute. Stop stirring and let the milk sit undisturbed for 5 to 8 minutes. You will see curds begin to form and separate from the whey. Using a slotted spoon or small, handheld strainer, spoon the curds out into the cheesecloth-lined strainer. It will look a little like wet biscuit dough. Work the cheese a little with a spoon to release some of the liquid. Tie the ends of the cheesecloth together so you have a bundle of cheese and hang it from a wooden spoon set across a big pot until it reaches the desired consistency (5 to 10 minutes). Reserve the whey for another use, transfer the cheese to a medium bowl, and season with salt, if desired. If using for desserts, you’ll want to add little or no salt. Mold the cheese or put it in a container and cover. The cheese will keep, refrigerated, for 4 to 5 days.
Don’t dump it down the drain! It provides nourishment for indoor and outdoor plants, and has many culinary uses besides. It can be used to cook porridges or grains for salads, or to serve as a broth for soup or beans. You can also add it to smoothies or simply drink it over ice.
Here’s another easy dish that illustrates how tasty foods from a D.I.Y. kitchen can be. A few fresh herbs, finely chopped shallots, and some great olive oil can transform your homemade fresh cheese into an impressive appetizer. You could do the exact same thing with store-bought cheese and it would taste good; but with your own cheese, it’s great. Just serve it in a small bowl with a spoon, accompanied by fresh bread, olives, and pickles; and it will disappear fast. You can also use the marinated cheese in pasta or on pizza.
TIME REQUIRED: 5 minutes active (excluding cheese preparation)
YIELD: ½ pound; 4 to 6 servings as an appetizer
½ pound Fresh Whole-Milk Soft Cheese
¼ cup extra-virgin olive oil
2 teaspoons chopped fresh parsley
2 teaspoons chopped fresh mint
2 teaspoons finely chopped shallot
1 teaspoon snipped fresh chives
½ teaspoon chopped fresh thyme Pinch of red pepper flakes
Salt
Freshly ground black pepper
Put the cheese in a small bowl and add the oil, parsley, mint, shallot, chives, thyme, and red pepper flakes. Season with salt and pepper. Stir with a fork to crumble the cheese and distribute all the flavors. Serve immediately or cover and refrigerate for 1 or 2 days.
A luxurious filling of spinach and sweet, milky Fresh Whole-Milk Soft Cheese encased in a crisp-tender olive oil crust makes for a special dish that will work as a light supper, a side dish, or a picnic item. For those who are intimidated by pastry crust or pie dough, this dough is easy to mix and roll out, bakes up beautifully, and won’t give you any trouble at all. You can substitute chard or kale for the spinach if you like.
TIME REQUIRED: about 45 minutes active; 1 hour passive (excluding cheese preparation)
YIELD: 4 servings as a meal; 6 as a side dish
OLIVE OIL CRUST
2 cups unbleached all-purpose flour
1 teaspoon kosher salt
cup extra-virgin olive oil, plus more for brushing filling
FILLING
¼ cup extra-virgin olive oil
1 medium yellow onion, diced
2 garlic cloves, finely chopped
3 bunches spinach (about 1 pound), washed
Salt
¼ cup chopped fresh dill
½ pound Fresh Whole-Milk Soft Cheese
Freshly ground black pepper
Preheat the oven to 400 degrees F.
To make the crust: In a medium bowl, mix together the flour and salt. Pour in the cup olive oil and mix with a wooden spoon until the flour is moistened. Add cup warm water and continue to stir. With your hands, knead the dough in the bowl for a few minutes until it comes together. The dough will be soft and elastic, but not sticky. Divide it into two equal portions, one slightly larger than the other, and set both aside while you prepare the filling.
To make the filling: In a large, heavy skillet or wok over medium heat, warm the olive oil. Add the onion and cook, stirring until soft and fragrant, about 10 minutes. Add the garlic and cook for 1 to 2 minutes, until fragrant. Add the spinach and a few pinches of salt and stir until it is wilted and cooked down (you may need to add the greens gradually and let them cook down before adding more). Add the dill, stir, and continue to cook for 1 to 2 minutes, until fragrant. Transfer the spinach mixture to a colander set in the sink and drain for a few minutes, pushing down on it with the back of a wooden spoon to release excess moisture. Transfer the spinach mixture to a cutting board and chop coarsely. Transfer it to a bowl, add the cheese, and mix together until well blended, seasoning with salt and pepper.
Select a 2-quart, 2-inch-deep baking dish of any shape. On a lightly floured surface, roll out one portion of dough in the shape of the baking dish, but slightly larger. Lay it carefully in the dish, stretching and shaping it with your hands if needed, so it comes up and over the sides of the dish. Transfer the spinach-ricotta mixture to the dish, distributing it evenly over the dough. Roll out the other piece of dough in the size and shape of the dish and place it carefully over the filling so it meets the edge of the dish, stretching and shaping if needed, and trimming if it’s too large. Pinch the edges to the edge of the dish to seal. Puncture the top of the crust with the tines of a fork in several places.
Transfer the pie to the oven and bake until it is brown and crisp all over, 50 minutes to 1 hour. Brush the top of the pie with oil about 15 minutes before the end of the cooking time. Cut and serve immediately or at room temperature. Cover any leftovers and refrigerate for up to 4 days, reheating in a low (250-degree-F) oven until hot.
The batter for these easy crêpes is enriched with the sweet, buttery homemade Fresh Whole-Milk Soft Cheese. They’re great for desserts and savory preparations. For dessert, fill them with Plum-Verbena Jam, fresh fruit, Mascarpone Cheese, or caramelized apples, or simply drizzle with honey or maple syrup and Crème Fraîche. For filling savory crêpes, try cured or smoked meats and fish or roasted or grilled seasonal vegetables. If making a savory crêpe, skip the sugar. You’ll need waxed paper or oiled parchment to separate the finished crêpes as you cook them.
TIME REQUIRED: about 30 minutes active; 20 minutes passive (excluding cheese and butter preparation)
YIELD: 8 or 9 crêpes
1 cup whole milk
cup unbleached all-purpose flour
½ cup Fresh Whole-Milk Soft Cheese
3 large eggs
3 tablespoons Cultured Butter or store-bought butter, melted, plus more for cooking
1 tablespoon sugar (omit for savory crêpes)
½ teaspoon vanilla extract
Pinch of salt
Put all of the ingredients in a blender and blend until well combined, about 2 minutes. Set aside for 20 minutes to allow the flour to absorb the liquid thoroughly.
Heat a crêpe pan or an 8-inch nonstick pan with low, sloped sides over medium-high heat. Add about ½ teaspoon butter. When the butter melts, use a spatula to distribute it evenly. Pour cup batter into the pan and swirl quickly with a few flicks of the wrist before the batter fully sets, so that the batter covers the bottom of the pan entirely. Return to the heat and cook until the edges become brown and lacy, about 2 minutes. Flip, using a small spatula and your fingers, very carefully to avoid tearing, and cook until set on the second side, 15 to 20 seconds more. Stack the crêpes between sheets of waxed paper while you finish cooking the remainder of the batter. Fill as desired and serve immediately. You can reheat them in a 250-degree-F oven wrapped in foil. Or wrap them well and store for 3 days in the refrigerator or up to 2 months in the freezer.
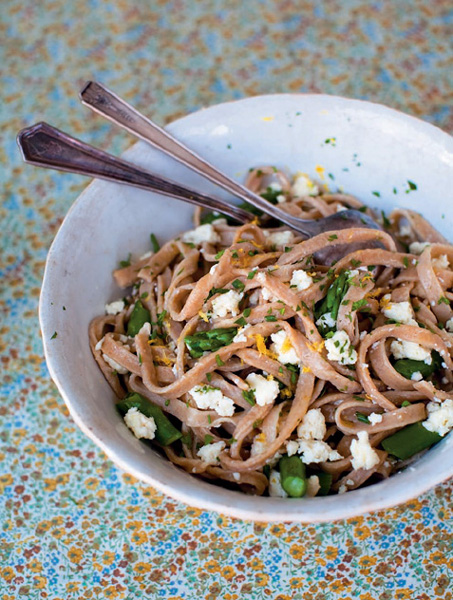
This is such a wonderful way to enjoy spring asparagus and homemade cheese! The flavors and textures combine so well, you won’t believe how simple it is to make. This recipe is one that represents the principles of the D.I.Y. kitchen perfectly. Store-bought pasta and store-bought ricotta would make a fine dish, but not transformative, as this is.
TIME REQUIRED: 15 minutes active (excluding butter, cheese, and pasta preparation)
YIELD: 4 to 5 servings
1 bunch (about ¾ pound) fresh, in-season medium asparagus
2 tablespoons Cultured Butter or store-bought butter, softened
½ pound Fresh Whole-Milk Soft Cheese, drained to a moist, slightly crumbly texture
3 tablespoons chopped mixed fresh herbs (parsley, mint, chervil, savory, marjoram—anything you like)
1 lemon for zesting
1 pound Fresh Pasta or store-bought whole-wheat fettuccini
Salt
Freshly ground black pepper
Grasp one end of each asparagus spear in each hand and bend until it snaps at its natural breaking point. Discard (or compost) the lower fibrous ends. Cut the remaining parts of the spears into bite-sized pieces. In a vegetable steamer, steam the asparagus until tender but still vibrant green, 2 to 3 minutes. Submerge it in ice water to stop the cooking, drain, and pat dry. Set aside.
Meanwhile, bring a large pot of salted water to a boil, put the softened butter in a bowl large enough to hold all the ingredients, and have the cheese, chopped herbs, and lemon ready, as this dish comes together quickly.
Add the fresh pasta to the boiling water and cook until it is tender but still chewy, 2 to 3 minutes (if using store-bought pasta, follow package instructions). Drain immediately, do not rinse, and add the pasta to the bowl with the butter. Toss to coat the pasta, and then add the cooked asparagus, cheese, and herbs to the hot pasta. Toss and season with salt and pepper. Transfer the pasta to plates. Using a Microplane, or the small holes of a cheese grater, grate lemon zest over each serving and top with a few grindings of fresh pepper. Serve immediately.
Crème Fraîche is a wonderfully easy dairy product to make yourself. It’s perfect for beginners because success is virtually guaranteed. Making your own will save you a lot of money because store-bought crème fraîche is fantastically expensive. The basic technique is simple. Just warm up a little cream, culture it, and let it sit out at room temperature until thick. Crème fraîche is one of the more versatile items in the dairy world. Spoon a little over a creamy pureed vegetable soup like Artichoke Soup, drizzle it over Sourdough Buckwheat Pancakes with Caramelized Apples, use it to top a fresh fruit cobbler, or simply dip fresh strawberries into it. Crème fraîche’s other nifty trick is that it can be cooked without curdling. I like to use yogurt as the culturing agent because I generally have it around, but you could also use sour cream or buttermilk. Ultra-pasteurized cream doesn’t culture properly because in pursuit of increased shelf life, it is superheated, which kills all desirable microorganisms.
TIME REQUIRED: 10 minutes active; 12 to 24 hours passive
YIELD: as desired
Fresh heavy cream (not ultra-pasteurized)
1 tablespoon yogurt, buttermilk, or sour cream per cup of cream
Pour the cream into a saucepan and turn the heat to low. Heat until slightly warmer than lukewarm (95 to 100 degrees F). Stir in the culturing agent and pour the mixture into a glass jar, such as a 1-quart mason jar. Fasten the lid and shake to blend. Leave it out in a warm area of your kitchen, such as near a pilot light or on top of the stove, for 12 to 24 hours. Check every 4 hours after the initial 8 hours to see if it has thickened. Remember that it will become even thicker after refrigeration. Taste it. It should taste tangy but not sour and it should smell clean, not funky. Once it is about the thickness of pancake batter, refrigerate it and use within 5 to 7 days.
Yogurt can be the mother culture for all the cultured dairy products in this book. If you use yogurt to make your Crème Fraîche, you can use that Crème Fraîche to create two other dairy products in this book. Whip it to make Cultured Butter or drain it to make a tangy-style Mascarpone Cheese.
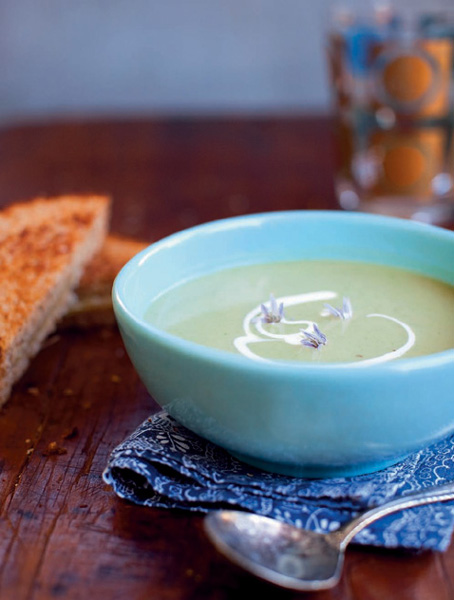
Once the artichokes are prepped, this creamy soup is easy and quick to make. A dollop of crème fraîche and a sprinkling of dill nicely balance the soup’s richness. You can use yogurt if you don’t have crème fraîche. I choose small (not baby) or medium artichokes for this. They’re easier to prepare before they’ve had a chance to develop much of a choke or pokey thorns. Use a serrated knife to cut the tops off the artichokes. It’s much safer than a chef’s knife because it won’t become dull and slip.
TIME REQUIRED: about 1 hour active; 30 minutes passive (excluding crème fraîche preparation)
YIELD: 4 servings
1 lemon
2½ pounds artichokes (about 6 medium)
1 quart vegetable or chicken broth, or whey from drained cheese
1 tablespoon olive oil
1 large leek, sliced and rinsed well
2 celery ribs, diced
4 to 5 garlic cloves, finely chopped
2 tablespoons unbleached all-purpose flour
Salt
Freshly ground black pepper
Crème Fraîche for garnish
Chopped fresh chive or chive flowers for garnish
Ready a large bowl of water and squeeze half of the lemon into it. Keep the other lemon half handy. Using a serrated knife, cut off the top 1 inch of the artichokes (work on one artichoke at a time, rubbing the cut edges with lemon as you go to prevent browning). Cut off the bottom ½ inch of the stems. Starting at the bottom of each choke, peel back each leaf and snap it off wherever it gives. Continue working your way up to the top of each artichoke, until the remaining leaves are pale green and yellow, with no dark green tips. Using a paring knife, whittle away the dark green parts of the stem, working your way up and trimming the dark green bottom of each artichoke, continuing to rub with lemon as you work. Cut each artichoke into quarters and scrape out the furry chokes with a stainless-steel spoon. Slice each quarter into ¼-inch-thick slices and drop them into the lemon water.
In a medium saucepan over medium heat, warm the broth to a simmer.
In a large soup pot over medium heat, warm the oil. Add the leek, celery, and garlic and cook gently until soft and fragrant, about 10 minutes. Don’t let the vegetables brown. Add the flour and stir for 2 minutes, without letting it brown. Slowly whisk in the warm broth and bring to a simmer. Drain the artichokes well and add them to the pot along with a little salt and pepper. Return to a simmer, lower the heat, and cover partially. Let the soup cook until the artichokes are tender, about 30 minutes.
Let the soup cool slightly and then transfer it to a blender or food processor to puree. Process in batches to avoid splattering. Return the pureed soup to the pot, warm it up, and taste for salt and pepper. Serve in warmed bowls garnished with crème fraîche and chopped chive or chive flowers. The soup can be made 2 to 3 days ahead and stored, covered, in the refrigerator.
√ TIP: You can use this exact method and similar proportions to make any kind of pureed vegetable soup. Simply substitute the artichokes with potatoes, asparagus, sweet potatoes, broccoli, carrots, turnips, or cauliflower. You may need to adjust the amount of liquid slightly and change up the herbs and garnishes to your taste.
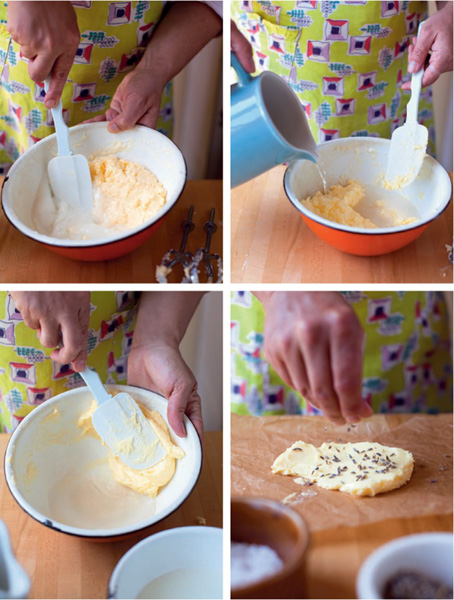
Homemade cultured butter is a revelation. If you’ve ever had butter in France that knocked your socks off, it was probably cultured. Culturing (simply a slight souring) gives the butter a rich, cheesy-in-a-good-way taste that is tangy and complex with layers of flavor. And it’s so easy to make. Culturing butter uses the same technique as crème fraîche, and then you simply chill and whip your crème fraîche. For very little effort, you’ll be rewarded with a superior product, for much less money than you’d spend at a specialty store. It’s also great fun to make flavored butters out of your own cultured butter. Add flaky sea salt and enjoy with bread and radishes; or add chopped anchovies and garlic to flavor grilled fish, roasted vegetables, or beans. Stirring in dried lavender makes a wonderful butter for biscuits and muffins. While the butter is still soft, simply work the flavorings in to your taste. Making small batches of butter is best because homemade butter doesn’t keep as long as store-bought, though it does freeze well. This recipe can be scaled up, but a larger batch will take longer to whip.
TIME REQUIRED: 20 to 25minutes active (excluding crème fraîche preparation)
YIELD: about 4 ounces
3 cups chilled Crème Fraîche
Salt and flavorings (optional; see headnote)
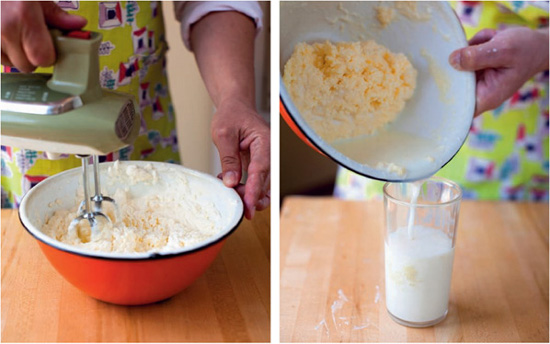
Pour the crème fraîche into a medium bowl and, using a handheld mixer on medium-low speed, begin whipping the crème fraîche as if you were making whipped cream. Stop every now and then to scrape down the sides of the bowl with a spatula. As the crème fraîche thickens, increase the speed to medium-high. When it’s just past the stage of a stiff whipped cream, the crème fraîche will become yellow and separate into clumps. At this point, decrease the speed to medium-low or you run the risk of spraying buttermilk all over. After this point, the butter will quickly solidify and separate fully from the buttermilk. The whole process takes 8 to 10 minutes. When the butter seems to have given off all the buttermilk it is going to, pour off the buttermilk and save it. (It’s truly delicious, and it’s also great to use for biscuits or Aunt Mil’s Jam-Filled Sugar Cookies.) Push the butter against the sides of the bowl with a flexible spatula to squeeze out as much of the buttermilk as possible.
Pour clean, cool water into the bowl and work it around and into the butter with a spatula. Pour off the water. Wash the butter two or three times until the water runs clear. This step is a must, as unwashed butter will spoil quickly.
Transfer the washed butter to a sheet of parchment and work it for a minute or so with the spatula to press out any additional water. Pat dry and then use the spatula to work in any salt and flavorings. Transfer to a clean dish, cover, and refrigerate for up to 5 days. You must keep your homemade butter refrigerated or frozen, as it is more perishable than store-bought.
Mascarpone is a sweet, luscious dairy product that I fondly think of as a cross between whipped cream and butter. It’s the traditional creamy ingredient in tiramisu. You can create easy desserts with nothing but mascarpone and seasonal fresh fruit. One of my favorite combinations is mascarpone and dates drizzled with honey. You can blend mascarpone with maple syrup and cinnamon and serve over Pain Perdu for breakfast or dessert. It’s simple to make using one of two methods: Follow the recipe below using cream of tartar, or simply drain your own Crème Fraîche for a tangier version. Truthfully, I like the sweeter version a little better, but I love the idea of repurposing crème fraîche. You need about two days advance planning for the draining and setting-up process.
TIME REQUIRED: 15 minutes active; 32 to 36 hours passive
YIELD: about 2½ cups or about 1¼ pounds
3 cups heavy cream (not ultra-pasteurized; see Crème Fraîche)
1 cup half-and-half
¼ teaspoon cream of tartar
Pour the heavy cream and half-and-half into the top half of a double boiler. Over medium-low heat, slowly warm the mixture to 185 degrees F, stirring occasionally. When the mixture comes to temperature, sprinkle the cream of tartar over the surface and stir it in. The mixture should thicken immediately, but it won’t form large, visible curds. Maintain the temperature for 5 minutes, without stirring or allowing it to boil. Let cool slightly, transfer the mixture to a nonreactive glass or ceramic bowl, and cover. Refrigerate for 8 to 12 hours, or overnight.
Line a strainer with a coffee filter or clean towel and place it over a bowl. Transfer the mascarpone to the strainer; it should be rather thick, but pourable. Cover the bowl and set in the refrigerator to drain for 24 hours. The mascarpone is now ready to use and should be enjoyed within 5 to 7 days. Transfer it to a container, cover, and refrigerate.
French pain perdu is translated literally to “lost bread,” which is so much more romantic than American “French toast.” Such a sexy term befits this extremely decadent way to use leftover bread. Serving it with homemade Mascarpone Cheese decked out with maple syrup and cinnamon elevates it to the category of special treat. Add a little fresh fruit if you like. It’s great for breakfast (especially if you plan on going back to bed!) and dessert, too.
TIME REQUIRED: 30 minutes active; 1 hour passive (excluding bread, butter, and mascarpone preparation)
YIELD: 2 breakfast servings; 4 dessert servings
½ cup whole milk
¼ cup heavy cream
¼ cup sugar
1 large egg, beaten
½ teaspoon vanilla extract
4 thick slices day-old Half-Wheat Sourdough Bread or Sourdough Cornmeal-Pumpkin Seed Bread or purchased bread
2 tablespoons Cultured Butter or store-bought butter
½ cup Mascarpone Cheese
2 teaspoons maple syrup
½ teaspoon ground cinnamon
Fresh fruit (optional)
In a shallow casserole, whisk together the milk, cream, sugar, egg, and vanilla until the sugar is dissolved. Add the bread, arranging it in a single layer. Let the bread sit, turning occasionally, until it absorbs as much of the custard as it will hold, about 1 hour.
In a large, cast-iron skillet over medium heat, melt the butter. When the pan is hot and sizzling, but not smoking, add the custard-soaked bread slices. Cook on each side until dark brown on the outside and custardy but set on the inside, about 5 minutes per side. Remove from the pan and blot on paper towels.
Whisk together the mascarpone, maple syrup, and cinnamon and serve on top of the warm pain perdu, with fresh fruit, if desired.