Sarma: Serbian Stuffed Cabbage Rolls with Sauerkraut
Spicy Soft Tofu Soup with Kimchi
Pickled Kohlrabi and Turnips with Cardamom
Potato Salad with Pickled Green Beans and Hard-Cooked Eggs
Garlicky Cucumber Pickle Relish
Black-Eyed Peas with Stewed Okra and Tomatoes with Garlicky Cucumber Pickle Relish
ALMOST EVERY HUMAN CULTURE incorporates a variety of pickled or fermented vegetables into meals. Traditionally used as a way to preserve foods, extend shelf life, and add flavor, pickled and live-culture foods can add interest, texture, and excitement to the simplest meals. Examples of common fermented foods include cheese, kimchi, salami, sourdough bread, and wine. Wild fermented foods are made by adding salt to vegetables to inhibit spoilage while the vegetables are left out at room temperature to allow the wild yeasts and bacteria in the environment to colonize the food. These wild organisms multiply rapidly as they work to preserve the foods. They also contain beneficial organisms that are thought to improve digestion and general well-being, and they taste great. Pickles are preserved through the use of vinegar and salt and can be made with a wide variety of vegetables. Different kinds of pickles abound throughout the world, including common pickled cucumbers, Japanese pickled radish, and Indian mango pickle.
This chapter includes a variety of pickles and wild fermented vegetables along with suggestions for using them in or alongside other recipes in the chapter. Small-batch pickling and fermenting is the focus, but readers who wish to preserve larger quantities for shelf-stable storage can adapt the recipes by using the processing chart in any good canning book (see Sources).
Sauerkraut is often thought of as a German dish, but the first sauerkraut was probably created in China. Before refrigeration, it was a great way to preserve fresh vegetables for traveling workers and armies. The technique is easy and lends itself to a variety of different vegetables. Once you’ve made this a few times, you’ll want to experiment with different vegetables and embellishments. On the ’kraut continuum, on one end, there’s just cabbage and salt. On the other end, you’ll see many other types of vegetables (and sometimes fruits), including whole cabbages, turnips, or beets (I’ve even seen people ferment mashed potatoes). In the middle, you have something like this: mostly cabbage, a few different vegetables to add interest, and some whole spices or aromatics. I like to play with garlic, ginger, or other types of whole spices. In the winter, when the kale and daikon radish are at their best, I will add them instead of carrots and turnips. Think of this as a nice basic ’kraut to help you build skills and confidence.
TIME REQUIRED: 15 minutes active; 5 to 10 days passive
YIELD: 1 quart
1 medium head green cabbage (about 1½ pounds), quartered, cored, and sliced as thinly as possible
2 to 3 carrots, grated on the large holes of a box grater
3 to 4 red turnips, grated on the large holes of a box grater
1 tablespoon plus 1 teaspoon kosher salt
¼ teaspoon mustard seeds or fennel seeds, lightly crushed
Put all the vegetables in a large bowl along with the salt and mustard seeds. With clean hands, toss and squeeze the vegetables until they start to soften and release their liquid (about 5 minutes). Pack them tightly into a 1-quart, wide-mouthed, glass mason jar, pushing down on them with a wooden spoon or your fingertips with as much force as you can until the level of liquid rises above the vegetables. Put a smaller jar inside the glass jar and push down on it to keep the vegetables submerged. Cover with a clean towel and secure with a rubber band. This is to allow the ’kraut to breathe while keeping bugs out.
Leave out at room temperature for about 5 days. Check once daily to be sure the vegetables stay submerged, pushing down on them if needed. If you see a foamy scum, simply skim it off. Taste daily, starting on the third day. The sauerkraut is ready when it tastes good to you. This could be anywhere from 3 to 10 days. When it’s to your liking, fasten the lid and transfer it to the refrigerator. Sauerkraut will last for months in the refrigerator. It doesn’t really go bad, but older ’kraut can become unpalatably soft, almost mushy. Some people like to cook it when it gets to that point—in a bean soup or with sausages and potatoes.
This is pretty much the version my mother made when I was growing up, but there was no recipe, so my sister and I re-created this one from our flavor memories. Even though my mother didn’t, I’ve added Simple Wild Sauerkraut because I happen to love it, and I know many people bake their stuffed cabbage with sauerkraut. For a real Balkan bacchanal, kick off dinner with an appetizer of Ajvar and Easy Yogurt Cheese served with Whole-Wheat Sesame Crackers or crostini. This recipe nicely illustrates how, with very little money, you can feed a lot of people gorgeous, filling, nutritious food.
TIME REQUIRED: 45 minutes active; about 2 hours passive (excluding sauerkraut and ketchup preparation)
YIELD: 6 to 8 servings
CABBAGE ROLLS
1 large head green cabbage (2 to 2½ pounds)
1½ pounds ground beef (local pasture-raised if possible)
½ cup uncooked, long-grain white rice
½ small yellow onion, very finely chopped
1 large egg, beaten
1¼ teaspoons salt
¼ teaspoon freshly ground black pepper
SAUCE
2 tablespoons olive oil
½ small yellow onion, diced (about ½ cup)
One 28-ounce can crushed tomatoes
Salt
3 to 6 tablespoons Real Ketchup or store-bought ketchup
3 cups Simple Wild Sauerkraut
To make the rolls: Bring about 3 inches of salted water to a boil in a large pot. Core the cabbage, leaving it whole, and put it in the pot, covered. Cook until the leaves are pliable, but still retain their structure, about 12 minutes, turning once. Remove and drain until cool enough to handle. Reserve the cabbage water.
In a large bowl, mix together the beef, rice, onion, egg, salt, and pepper just until blended.
To make the sauce: In a medium saucepan, warm the oil. Add the onion and sauté until soft. Add the tomatoes and a pinch of salt, stir, and bring to a simmer. Simmer while you stuff the rolls, until the sauce thickens and the flavors are blended, about 15 minutes. Add the ketchup, gradually, to taste.
Stuff the rolls. Carefully peel the large leaves from the poached cabbage. Using a sharp paring knife, gently trim some of the thick vein from the back of the larger leaves. This will make them easier to roll. Lay the leaves out on a flat surface. Spoon about 3 tablespoons of the beef mixture into each leaf, depending on the size of the cabbage leaves. Roll up each leaf lengthwise and tuck the ends in with your fingers to make little packets. If the leaves won’t hold together, use a toothpick to secure them at the seam. You should have about 15 rolls.
Select a Dutch oven large enough to contain all the rolls and the sauerkraut. Spread the sauerkraut out on the bottom of the Dutch oven, covering it. Lay the rolls on top of the sauerkraut. You can make multiple layers.
Pour about 2 cups of the cabbage water into the tomato sauce and stir. If you don’t have enough cabbage water, make up the difference with tap water. Pour the sauce over the rolls and bring the whole pot to a simmer over medium-high heat.
Preheat the oven to 350 degrees F.
Lower the heat under the Dutch oven to medium-low and simmer, partially covered, until the sauce begins to cling to the cabbage leaves, about 20 minutes. Cover completely, transfer the pot to the oven, and cook until the sauce thickens, the cabbage is soft, and the rolls are very hot inside, 1½ hours. Serve hot with sauce spooned over. This one-dish meal has all the components you need, but you may want to serve it with a salad or a cooked vegetable and bread to scoop up the sauce.
NOTE: Some traditional cabbage-roll recipes used cabbage leaves from whole heads of cabbage fermented in giant crocks and kept through the winter. I’m sure the step of boiling the cabbage was developed as a short-cut method of softening the leaves, as if they’d been fermented. But there is no substitute for the taste. If I ever get one of those big fermenting crocks, I plan to try it sometime.
√ TIP: If using store-bought ketchup, be careful not to add too much as it’s sweeter than Real Ketchup.
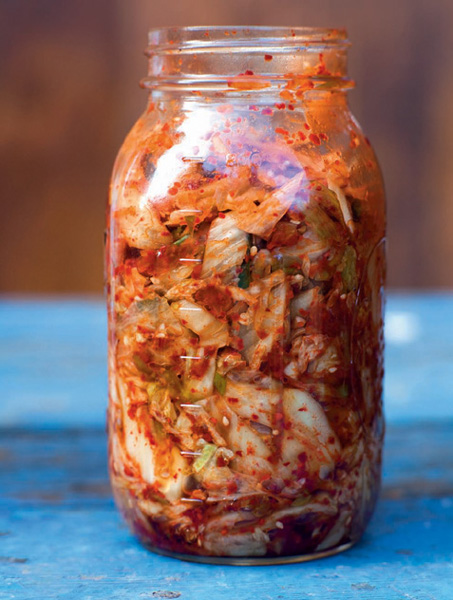
I adapted this recipe from one I learned in a workshop at the Asian Culinary Forum in San Francisco with Huynjoo Albrecht, of CookingKorean.com. If you’ve only had commercial kimchi, which is sometimes overly salty and very spicy while lacking dimension, you’ll be surprised at the complexity of this version. Lightly fermented and spicy, to be sure, the nuances of the individual components come through in layers. If you’re worried about making it too spicy, start with less red pepper the first time you make it and see how you like it. It’s wonderful with Spicy Soft Tofu Soup, served alongside brown rice and fish, or tossed into a seasonal grain salad.
If you have access to a Korean market, buy the medium ground Korean red pepper powder for kimchi, which usually comes in a one-pound plastic bag. Make sure that it doesn’t have salt or other additives. Or see Sources. You can also experiment with a milder cayenne pepper; a mild ground red chile, such as New Mexico; or Aleppo pepper, a mild red pepper used in Middle Eastern cooking that has a nice fruity flavor and a similar heat level to Korean pepper. This recipe is written for kosher salt. If you’re using a finer-grained sea salt, you will need to use about 25 percent less.
TIME REQUIRED: 45 minutes active; 9 hours plus 3 days passive
YIELD: 1 quart
2½ cups plus 1 tablespoon kosher salt
1 head Napa cabbage, untrimmed (about 2½ pounds)
½ pound daikon radish, peeled and grated on the large holes of a box grater
2 green onions, finely chopped (white and green parts)
¼ cup mild ground Korean red pepper powder (see head note)
2 garlic cloves, finely chopped
One 1-inch piece fresh ginger, peeled and finely chopped
1 tablespoon soy sauce
1 tablespoon sugar
1½ teaspoons sesame oil
1 teaspoon toasted white sesame seeds
Dissolve 1¼ cups of the salt in 2 quarts of water. Test the proper amount of salt by gently placing an egg in the water. If it floats, the salt solution is perfect. If it sinks, add a little more salt.
Peel just the outer leaves from the cabbage and discard or compost them. Then, leaving it untrimmed, quarter it lengthwise through the root end, so the root holds each quarter together. Sprinkle 1¼ cups more salt between the cabbage leaves. Starting from the outer layer, lift each leaf and sprinkle salt on it, dividing the salt evenly, so that each layer of cabbage is salted. Put the cabbage in the salted water and place a weighted plate on top to keep it fully submerged.
Toss the grated radish in the remaining 1 tablespoon salt and let it drain in a colander while the cabbage soaks in its water bath.
The cabbage should soak until the heavy white parts of the cabbage closest to the root end are pliable but not mushy. Try bending one or two leaves. If they break, the cabbage hasn’t soaked long enough. It should take 3 or 4 hours, depending on the room’s temperature. In the end, the cabbage should offer a little resistance but not break.
Remove the cabbage from the salted water and rinse it thoroughly under running water several times (this is important or your kimchi will be too salty). Squeeze lightly and place the cabbage quarters, root-side up, in a colander to drain. Drain for 1 hour. Rinse the radish, squeeze out the excess moisture, and continue to drain it.
Meanwhile, in a large bowl, combine the onions, red pepper powder, garlic, ginger, soy sauce, sugar, sesame oil, and sesame seeds.
Squeeze the drained cabbage to remove as much water as possible. Slice the cabbage crosswise into pieces 1 to 1½ inches wide. Add them to the bowl with the seasonings. Add the drained daikon and toss to coat thoroughly.
Transfer the kimchi and its juices to a 1-quart, wide-mouth mason jar and push it down with a wooden spoon. Fasten the lid and let it sit undisturbed at room temperature for 4 to 5 hours, depending on the warmth of the room. Refrigerate for 2 to 3 days to let the flavors develop before eating. It should taste balanced, but spicy and lightly fermented. It keeps, refrigerated, for several months.
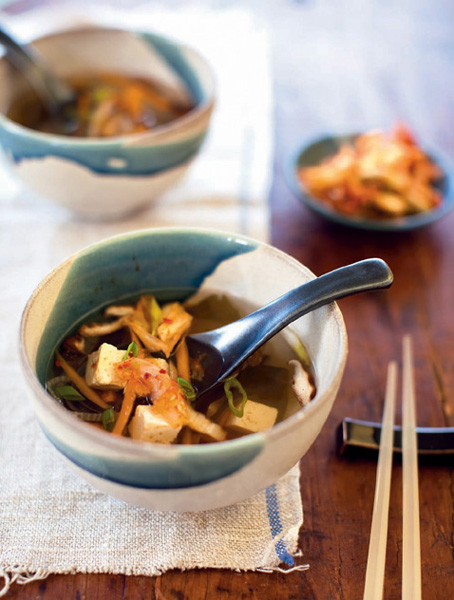
Inspired by the soft tofu soups served in Korean restaurants, but using a quick and flavorful Japanese broth, this soup is an easy way to incorporate your homemade Spicy Kimchi into a meal. This dish is healthful, light, and low in calories. It’s perfect for those feeling a little under the weather or simply trying to eat lightly. The dashi broth that you’ll make in this recipe is the mother broth of Japanese cooking and has multiple uses in a resourceful kitchen. Use it to simmer vegetables or seafood for a light dinner; add miso, tofu, and green onions to make miso soup; or simmer noodles and fish together with greens for a quick dinner. See Sources for information on locating any hard-to-find ingredients.
TIME REQUIRED: 15 minutes active; 25 minutes passive (excluding kimchi preparation)
YIELD: 4 servings
Two 5-by-3-inch pieces kombu
1 cup bonito flakes
1 large shallot, thinly sliced
2 garlic cloves, finely chopped
1 tablespoon Korean red pepper powder or about ½ teaspoon cayenne pepper (depending on its heat level and your taste)
Salt
1 turnip, peeled, sliced, and julienned
1 carrot, peeled, sliced, and julienned
2 ounces fresh mushrooms, such as shiitake or cremini, sliced
½ ounce dried mushrooms, such as shiitake or wood ear, rehydrated and sliced thinly
¼ ounce wakame seaweed
One 14-ounce package organic soft tofu, cut into 1-inch pieces
Thinly sliced green onions (green and white parts) for garnish
Toasted sesame oil for drizzling
Spicy Kimchi for garnish
In a large saucepan over medium heat, bring 2 quarts of water and the kombu to a boil. Turn off the heat and add the bonito flakes. Don’t stir. Let the broth sit, undisturbed, until the bonito flakes sink to the bottom, about 5 minutes. Strain the broth into a bowl through a very fine strainer, or through a regular strainer lined with a coffee filter.
Rinse the saucepan and return the broth to it. Bring the broth to a boil and add the shallot, garlic, red pepper powder, and a little salt and simmer for 10 minutes. Taste and correct the salt. Add the turnip, carrot, mushrooms, and seaweed and simmer until the vegetables are crisp-tender, about 10 minutes. Add the tofu and simmer for another few minutes, to warm it through.
Ladle the soup into deep bowls and garnish each serving with green onions, a drizzle of sesame oil, and kimchi.
The process used here is similar to the one used for Simple Wild Sauerkraut, Wild Salvadoran Curtido, and Spicy Kimchi. Rather than vinegar, all of these vegetables are preserved with the help of salt, while the lactic acid bacteria that are naturally present starts the work of fermenting the vegetables. In the case of these beets, I’ve used whey obtained from draining yogurt to introduce the lactic acid directly. Many people use this method in place of brining with salt, but I like salt, so I use both. The lactic acid feeds on the sugar in the beets, introducing a gentle sourness. These beets will remain quite crisp after fermentation. Don’t discard the brine after finishing your beets. It’s a wonderful tonic drink that some people swear by as a liver cleanser. It’s very similar to beet kvass, which is made from fermented beets. You can also use it to make vinaigrette.
TIME REQUIRED: 10 to 15 minutes active; 8 to 10 days passive
YIELD: 1 quart
1½ pounds baby beets (about 25 to 30)
 teaspoon mustard seeds
2 cups non-chlorinated water (see Note)
¼ cup whey from drained chese
1 tablespoon kosher salt
Scrub the beets and peel them if you wish (sometimes I just cut off the rough parts with a paring knife). Put them in a clean, 1-quart mason jar with the mustard seeds. Combine the water and whey in a small bowl. Add the salt and stir to dissolve.
Pour the water and whey over the beets to submerge. Cover the jar with a tea towel and fasten with a rubber band. Leave it out at room temperature for about 10 days, depending on the warmth of the weather. Start testing after 6 days by tasting a slice of one of the beets. When they are done, they will remain crisp all the way through but a slight sourness will overtake the beet’s natural earthiness and they will no longer taste raw. Seal the jar and refrigerate them in their brine at this point. They will last for several months.
NOTE: Some municipalities chlorinate the water. If this is true of your area, use bottled water, as chlorine can inhibit the fermentation process.
If you’ve ever eaten a pupusa in a Salvadoran restaurant, you’ve probably had the tangy cabbage salad called curtido that is usually served alongside them. Inhabiting the same culinary niche as Spicy Kimchi or Simple Wild Sauerkraut, curtido is the perfect companion to any rich, heavy, or meaty dish. In addition to pupusas, I’ve enjoyed it on both fish and meat tacos, with quesadillas, on top of simply cooked beans with tortillas, or stirred into a bean soup, posole, or other Latin American–inspired soup. Using the same technique as Simple Wild Sauerkraut and with a very different flavor profile, curtido is so simple to make and so versatile, you might find it becoming a staple in your kitchen. For my taste, I like a lighter ferment than for sauerkraut so I tend to only let my curtido ferment for three to five days. You’ll want to taste it every day starting on day two and decide how you like it.
TIME REQUIRED: 15 minutes active; 3 to 5 days passive
YIELD: 1 quart
1 medium head green cabbage (about 1½ pounds), quartered, cored, and sliced as thinly as possible
½ small onion, sliced thinly
2 to 3 carrots, peeled and grated on the large holes of a box grater
1 tablespoon plus 1 teaspoon kosher salt
2 jalapeños, cut in quarters lengthwise, seeded and sliced thinly
½ teaspoon dried Mexican oregano, crushed
Put the cabbage, onion, and carrots in a large bowl. Add the salt and, with clean hands, toss and squeeze the vegetables until they start to soften and release their liquid (about 5 minutes). Add the jalapeños and oregano and toss to distribute. Pack the mixture tightly into a 1-quart, wide-mouthed, glass Mason jar, pushing down on the vegetables with a wooden spoon or your fingertips with as much force as you can until the level of liquid rises above the vegetables. Put a smaller jar inside the glass jar to keep the vegetables submerged. Cover with a clean tea towel and secure with a rubber band. The curtido needs to breathe.
Leave out at room temperature for about 3 to 5 days. Check once daily to be sure the vegetables stay submerged, pushing down on them if needed. If you see a frothy residue on the surface, simply skim it off. Taste daily starting on the second day. The curtido is ready when it tastes good to you. When it’s to your liking, fasten the lid and transfer it to the refrigerator. It will last for months in the refrigerator. It doesn’t really go bad but will soften over time.
Sweet and a little spicy, these classics are great on sandwiches and paired with creamy cheeses. I think they go surprisingly well with Southeast Asian–inspired dishes like grilled chicken with Spicy Southeast Asian Peanut Sauce, and they’re perfect chopped up in egg, potato, or chicken salad.
TIME REQUIRED: 15 minutes active; 3 days passive
YIELD: 1 pint
About ¾ pound medium pickling or Persian cucumbers (4 to 5), peeled and sliced into ¼-inch slices
¾ cup distilled white vinegar
½ cup sugar
½ teaspoon kosher salt
½ teaspoon mustard seeds
¼ teaspoon ground turmeric
Pinch of celery seeds
Pinch of red pepper flakes
Sterilize a 1-pint mason jar and lid with boiling water. Drain them and air-dry. Pack the cucumber slices into the jar as tightly as they will go.
In a small saucepan over medium heat, bring ¼ cup water, the vinegar, sugar, salt, mustard seeds, turmeric, celery seeds, and red pepper flakes to a boil. Stir to dissolve the sugar. Lower the heat and let them simmer for 5 minutes. Pour the hot liquid over the cucumbers, fasten the lid, and refrigerate.
Let them sit for 3 days to allow the flavors to develop. They should taste crisp and sweetly sour. They will keep, refrigerated, for several weeks.
Also called giardiniera, these are the pickled vegetables found in many an Italian antipasti. They’re great for your Thanksgiving relish, with sandwiches, or alongside any rich, heavy, or meaty meal. You can use a variety of vegetables, depending on the season: bell peppers, broccoli, cauliflower, onion, carrot, green beans, radishes, fennel—whatever strikes your fancy and is in season. You can make them spicier by adding more red pepper. Whichever vegetables you use, a good rule of thumb is to allow approximately one pound of cut-up vegetables per quart jar. The rough quantities given below add up to about one pound.
TIME REQUIRED: 15 minutes active; 3 days passive
YIELD: 1 quart
About ¼ head broccoli, cut into florets
About ¼ head cauliflower, cut into florets
About ¼ red onion, sliced into ½-inch pieces
1 large carrot, cut into bite-sized chunks
3 garlic cloves, sliced
3 sprigs fresh dill
1 cup distilled white vinegar
1 teaspoon sugar
1 teaspoon kosher salt
¼ teaspoon red pepper flakes
¼ teaspoon fennel seeds
¼ teaspoon peppercorns
teaspoon yellow mustard seeds Pinch of celery seeds
2 dried bay leaves
Sterilize a 1-quart mason jar and lid with boiling water. Drain them and air-dry. Pack the broccoli, cauliflower, onion, carrot, garlic, and dill into the jar. Use a chopstick to distribute the dill and garlic evenly.
In a small saucepan, bring 1 cup water, the vinegar, sugar, salt, and spices to a boil. Stir to dissolve the sugar and salt. Pour the hot brine over the vegetables, fasten the lid, and refrigerate. Let it sit for 3 days or so to let the flavors blend. The pickles will taste crisp and vinegary with a nice balance of salt. They will keep, refrigerated, for several weeks.
These easy refrigerator pickles are wonderfully versatile. Enjoy them as a snack or on sandwiches or serve them with Simple Dal drizzled with homemade Yogurt. Kohlrabi is a crisp, slightly sweet and spicy brassica vegetable that I believe is underutilized and underappreciated in American kitchens. Like turnips, it can be cooked, but I enjoy it raw or pickled best.
TIME REQUIRED: 30 minutes active; 3 days passive
YIELD: 1 quart
About ¾ pound turnips
About ¾ pound kohlrabi
1 cups distilled white vinegar
2 garlic cloves, peeled and left whole
2 teaspoons sugar
2 teaspoons kosher salt
4 green cardamom pods, lightly crushed
6 whole peppercorns
½ teaspoon mustard seeds, lightly crushed
½ teaspoon ground turmeric
Peel the turnips and kohlrabi and cut them into quarters. Cut the quarters into ¼-inch wedges (after trimming, the yield is about 1 pound total).
Sterilize a 1-quart, wide-mouth mason jar and lid with boiling water. Drain them and air-dry.
In a nonreactive, heavy, medium saucepan, combine  cup water, the vinegar, garlic, sugar, salt, cardamom, peppercorns, mustard seeds, and turmeric. Bring to a boil, lower the heat to a simmer, and cook for 10 to 15 minutes.
Pack the cut vegetables into the mason jar and pour the hot vinegar and spice mixture over them. Fasten the lid and refrigerate immediately. Refrigerate the pickles for 3 days before enjoying to allow the flavors to blend. The pickles will be crisp and infused with spices. They will keep, refrigerated, for several weeks.
This dish perfectly illustrates how to eat simply, cheaply, and healthfully by using the building blocks in this book to make a complete meal. Cook some brown rice and make this dish in thirty minutes or so with nothing more than red lentils and a few simple spices. Accompany it with a side of sautéed greens, Pickled Kohlrabi and Turnips with Cardamom, homemade Yogurt or Easy Yogurt Cheese, Ajvar, and homemade bread or even Flour Tortillas, and you have a very nice meal that doesn’t pretend to be authentic to any one culture but whose flavors and textures go together beautifully. I encourage you to mix and match this book’s building blocks in whatever ways interest you. Of course you’ve invested time up front on some of the accompaniments, but it’s like time in the bank later.
TIME REQUIRED: about 30 minutes (excluding accompaniment preparation)
YIELD: 4 servings
1 cup split red lentils
½ teaspoon ground turmeric
Salt
2 tablespoons vegetable oil
½ yellow or red onion, thinly sliced
2 small, dried red chiles
½ teaspoon cumin seeds
¼ teaspoon mustard seeds
2 garlic cloves, finely chopped
Freshly ground black pepper
Rinse the lentils and put them in a medium saucepan with 4 cups water, the turmeric, and a few pinches of salt. Bring to a boil, lower the heat to a bare simmer, and cover partially. Cook until the lentils are soft and resemble a thick, textured porridge, stirring occasionally and watching so it doesn’t boil over or scorch, 15 to 20 minutes.
In a heavy, medium skillet over medium-high heat, warm the oil. Add the onion and cook, stirring, until it begins to brown, about 5 minutes. Add the chiles, cumin, and mustard seeds and cook, stirring, for about 1 minute, until the seeds start to pop. Add the garlic and cook, stirring, for 30 seconds. Stir this mixture into the lentils and cover. Let them sit for 5 minutes or so to blend the flavors. Season with salt and pepper. Serve with the accompaniments suggested in the head note.
These spicy, garden-fresh beans are wonderful as part of a relish tray, served alongside sandwiches, tucked into a Bloody Mary, or tossed into Potato Salad with Spicy Pickled Green Beans and Hard-Cooked Eggs.
TIME REQUIRED: 15 minutes active; 3 days passive
YIELD: 1 quart
1 pound green beans, stems snapped off and left whole
2 fresh mild red chiles (such as Fresno), quartered lengthwise and seeded
2 garlic cloves, thinly sliced
3 or 4 sprigs fresh dill
1 cups distilled white vinegar
1 tablespoon sugar
2 teaspoons kosher salt
1 teaspoon yellow mustard seeds
Sterilize a 1-quart mason jar and its lid with boiling water. Drain them and air-dry.
Pack the green beans, chiles, garlic, and dill into the jar in alternating layers, distributing them evenly.
In a small saucepan over medium heat, bring cup water, the vinegar, sugar, salt, and mustard seeds to a boil. Stir to dissolve the sugar and let the mixture boil for 5 minutes. Pour the hot liquid over the green beans, fasten the lid, and refrigerate. Let it sit for 3 days to blend the flavors. The beans will remain crisp, with the flavors of the spices evident. The pickled green beans will keep, refrigerated, for several weeks.
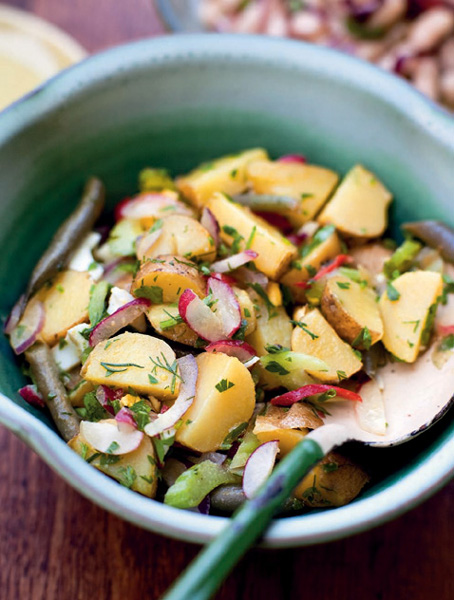
This salad has a down-home uncomplicated taste, like a mid-day Sunday farmhouse supper—roasted chicken, biscuits, potato salad, and iced tea, all laid out on a checkered tablecloth. I really like the combination of tart, spicy green beans; creamy potatoes; and hard-cooked eggs. You don’t even have to make a dressing. Just toss with olive oil and pickle juice from the Spicy Pickled Green Beans. If you want to make this salad but don’t have any pickles on hand, replace the pickled green beans with fresh steamed green beans and make Basic Best-Ever Vinaigrette to dress the salad.
TIME REQUIRED: 20 minutes active; 20 minutes passive (excluding pickle preparation)
YIELD: 6 to 8 servings
4 large eggs
1½ pounds young fingerling or Yukon gold potatoes
1 small red onion, thinly sliced
1 bunch radishes (about 6), halved and thinly sliced
1 celery rib, cut in half lengthwise and thinly sliced on the diagonal
1½ cups Spicy Pickled Green Beans, cut into 1-inch lengths, juices reserved
¼ cup chopped fresh flat-leaf parsley
1 tablespoon snipped fresh chives
1 tablespoon chopped fresh dill
¼ cup olive oil
Salt
Freshly ground black pepper
Put the eggs in a small saucepan and cover with cold water. Bring to a boil over medium-high heat. Turn off the heat, cover, and leave the eggs undisturbed for 12 minutes (15 minutes if the eggs are very large). Drain the eggs and run cold water over them. Let them sit in the cold water until you are ready to peel them.
Meanwhile, wash the potatoes, leaving them unpeeled. In a vegetable steamer over medium-high heat, steam them until tender, about 15 minutes. Remove them from the steamer and let cool slightly.
Cut the potatoes into bite-sized pieces and put them in a large salad bowl. Add the onion, radishes, celery, green beans, and herbs. Peel the eggs and cut them into ½-inch pieces. Add them to the bowl. Toss and add the oil, season with salt and pepper, and add pickle juice to taste. Serve immediately, or within 2 hours at room temperature. This salad tastes best if it’s consumed the day it is made and never refrigerated. If you must make it ahead, it will keep, refrigerated, for up to 5 days. Remove from the refrigerator 30 minutes before serving and taste and adjust the salt and pepper.
Pounding the garlic helps to distribute its flavor fully throughout this relish. I like a chunky relish like this to spoon over beans or Black-Eyed Peas with Stewed Okra and Tomatoes. It also works as a fresh salsa on grilled chicken or fish. If you like a finer-textured relish, you can grate the cucumbers instead of dicing them, but you’ll need to use a few more to fill your pint.
TIME REQUIRED: 15 minutes active; 20 minutes plus 3 days passive
YIELD: 1 pint
1 pound pickling or Persian cucumbers (about 6), peeled
1 teaspoon kosher salt
¾ cup distilled white vinegar
1 teaspoon sugar
1 garlic clove, peeled and left whole
1 small, fresh mild red chile (such as a Fresno), seeded and quartered, then sliced thinly
1 teaspoon chopped fresh dill
Sterilize a 1-pint mason jar and its lid with boiling water. Drain them and air-dry.
Cut the cucumbers into quarters lengthwise and scrape out the seeds. Cut each quarter lengthwise in half and then dice it into ¼-inch pieces. If using plump pickling cucumbers, you will need to cut them one more time lengthwise to get a ¼-inch dice. Put the cucumbers in a strainer and sprinkle ½ teaspoon of the salt over them. Toss with your hands to distribute, and let the cucumbers drain for about 30 minutes. Squeeze and massage the cucumbers with your hands once or twice during this time to help them release their liquid.
In a small saucepan over medium heat, bring ¼ cup water, the vinegar, sugar, and remaining ½ teaspoon salt to a boil. Boil for 5 minutes.
Pound the garlic to a paste with a pinch of salt in a mortar and pestle.
Remove the vinegar mixture from the heat and stir in the garlic.
Pack the drained cucumbers, the chile, and dill into the mason jar. Pour the hot vinegar mixture over them and fasten the lid. Refrigerate for 3 days to blend the flavors. The relish will remain crisp with the flavor of garlic and spices permeating the cucumbers. It will keep, refrigerated, for up to 2 weeks.
Black-eyed peas are so rich, it’s nice to have a little something vinegary and spicy alongside them. For this reason, I always serve this dish with a spoonful of Garlicky Cucumber Pickle Relish. If you’ve spent much time dining in the South, you will be reminded of the bottles of chile-infused vinegar that are often available for diners to shake over rich, pork-infused greens or red beans and rice. This dish is great on its own, but it becomes a balanced meal when served over rice.
TIME REQUIRED: 30 minutes active; about 1 hour passive (excluding relish preparation)
YIELD: 6 to 8 servings
6 tablespoons vegetable oil for high-heat cooking
1 yellow onion, diced
1 celery rib, diced
2 garlic cloves, finely chopped
1 pound dried black-eyed peas, rinsed and drained
Salt
1 pound fresh okra (choose small pods if available), left whole
Freshly ground black pepper
1 pound fresh Roma tomatoes, cut into ½-inch dice
½ teaspoon smoked paprika
Garlicky Cucumber Pickle Relish for serving
In a large soup pot over medium heat, warm 3 tablespoons of the oil. Add half of the diced onion, the celery, and the garlic. Cook, stirring occasionally, until soft and fragrant, about 10 minutes. Add the peas and water to cover by 1 inch. Turn up the heat and bring to a boil. Reduce the heat to medium-low, cover partially, and simmer until the peas are almost tender, about 30 minutes. Stir occasionally to prevent sticking and add a little water, as needed, but don’t add too much as this should not be an overly soupy dish. Season with salt. Continue cooking, covered, over low heat until the peas are tender and most of the broth is absorbed, another 15 minutes.
In a large skillet spacious enough to hold all the okra, heat the remaining 3 tablespoons oil over medium-high heat. (I sometimes use a wok because it’s large enough to contain all the okra, making it easy to toss.) Add the okra and a little salt and pepper and cook, stirring often, until the okra begins to soften and brown, 8 to 10 minutes. Remove the okra pods from the skillet to a bowl or plate and lower the heat to medium-low. If the okra pods are large (more than 1½ inches long), cut them crosswise on the diagonal into two or three pieces. Add the remaining diced onion, and cook until the onion is fragrant, 7 or 8 minutes. Add the tomatoes and paprika and return the okra to the pan. Cover partially and simmer, stirring occasionally, until the okra is soft and the tomatoes have cooked down, about 10 minutes. Taste and correct the seasoning with salt and pepper.
Serve the stewed okra and tomatoes over the black-eyed peas with the Garlicky Cucumber Pickle Relish on the side.
NOTE: If you dislike the viscosity of okra, be aware that this characteristic is enhanced by cutting and exposing it to moisture. There are two methods for reducing slime. Buy small okra and cook it whole, never cutting it. Or, if only larger pods are available, cook them over high heat for 10 minutes before cutting and adding them back to the pan with the tomatoes to finish cooking. The initial high heat works to cauterize the okra, preventing excessive slime.
√ TIP: You can cook the peas 1 to 3 days ahead and keep them refrigerated until you are ready to cook the okra and tomatoes. The whole dish makes fantastic leftovers.