Two-Minute Drill
4.02 Access Control Lists and More
4.04 Securing SSH with Key-Based Authentication
4.05 A Security-Enhanced Linux Primer
Linux security starts with a concept known as discretionary access control (DAC). This includes the permissions and ownership associated with files and directories. With specialized bits, including access control lists (ACLs), permissions can be more granular than the simple user/group/other categories. These ACLs support permissions given to specific users or groups, overriding standard permissions and allowing more fine-grained access rules for a given file or directory.
Also in the realm of security is the firewall. In this chapter, you’ll examine both the iptables service (which was the default firewall in RHEL 6) and the new firewalld daemon, which provides support for different trust zones. You will learn how to allow or block services through firewalld using the firewall-config graphical utility and the firewall-cmd command tool.
A service that is installed on most Linux systems is SSH. As it is a very common service for logging in to a machine, “black hat” hackers everywhere want to find a weakness in SSH. So this chapter also describes how you can improve security by using key-based authentication for SSH.
Further protection can be provided by a different kind of security known as mandatory access control (MAC). The RHEL 7 MAC implementation is known as Security-Enhanced Linux (SELinux). Red Hat expects you to work with SELinux enabled during exams. In this chapter, you will examine how to set enforcing modes, change file contexts, use boolean settings, and diagnose SELinux policy violations.
If you’re starting with the default installation created during the installation process, you may need to install additional packages during this chapter. If a remote repository is available, take the name of the package and apply the yum install command to it. For example, to review the GUI-based firewall configuration tool, you’ll need to install it with the following command:

For more information on the package install process, see Chapter 7.
Basic File Permissions
Security in Linux starts with the permissions given to files. As everything in Linux can be defined as a file, it’s an excellent start. In any case, the related objectives, once understood, are fairly straightforward:
 List, set, and change standard ugo/rwx permissions
Diagnose and correct file permissions problems
Standard permissions for Linux files are defined for users, groups, and others, which leads to the ugo. Those permissions are read, write, and execute, which define the rwx. Such permissions are defined as discretionary access control, to contrast with the mandatory access control system known as SELinux, also discussed in this chapter.
Access Control Lists
ACLs can be configured to override and extend basic file permissions. For example, with ACLs, you can set up a file in your home directory that can be read by a limited number of other users and groups. The related RHCSA objective is
Create and manage access control lists (ACLs)
Firewall Control
As configured in Linux, a firewall can block traffic on all but a few network ports. It also can be used to regulate traffic in a number of other ways, but that is the province of the RHCE exam. The related RHCSA objective is
Configure firewall settings using firewall-config, firewall-cmd, or iptables
The Secure Shell Server
As suggested in the introduction, there’s a special focus on the SSH service. The related RHCSA objective is
Configure key-based authentication for SSH
With key-based authentication, you’ll be able to log in to remote systems by using private/public key pairs. Password transmission over the network would no longer be required. The 1024 or more bits associated with such authentication are a lot harder to crack than a password transmitted over a network.
Security-Enhanced Linux
There’s no way around it. On the Red Hat exams, you’re expected to work with SELinux. It’s not clear whether you can even pass the Red Hat exams unless at least some services are configured with SELinux in mind. To help exam candidates understand what’s needed, Red Hat has broken down SELinux-related objectives. The first objective is fundamental to SELinux, as it relates to the three modes available for SELinux on a system (enforcing/permissive/disabled):
Set enforcing and permissive modes for SELinux
The next objective requires that you understand the SELinux contexts defined for different files and processes. Although the associated commands are straightforward, the available contexts are as broad as the number of services available on Linux:
List and identify SELinux file and process contexts
As you experiment with different SELinux contexts, mistakes happen. You may not remember the default contexts associated with important directories. But with the right commands, you don’t have to remember everything; as suggested by the following objective, it’s relatively easy to restore the default:
Restore default file contexts
The next objective may seem complex. But the boolean settings associated with SELinux have descriptive names. Excellent tools are available to further clarify the boolean contexts that are available. In essence, this means that to run a certain service under SELinux, all you need to do is turn on one or more boolean settings (rather than having to modify the SELinux policy rules directly):
Use boolean settings to modify system SELinux settings
Once SELinux is operational, you should monitor the system for policy violations. A violation may be the result of a misconfiguration or an unauthorized intrusion attempt. Hence, to get the most out of SELinux, you should know how to audit for policy violations and be able to address common problems. The related RHCSA objective is
Diagnose and address routine SELinux policy violations
CERTIFICATION OBJECTIVE 4.01
The basic security of a Linux computer is based on file permissions. Default file permissions are set through the umask command. Special permissions can be configured to give all users and/or groups additional privileges. These are known as the super user ID (SUID), super group ID (SGID), and sticky permission bits. Ownership is based on the default user and group IDs of the person who created a file. The management of permissions and ownership involves commands such as chmod, chown, and chgrp. Before exploring these commands, it’s important to understand the permissions and ownership associated with a file.
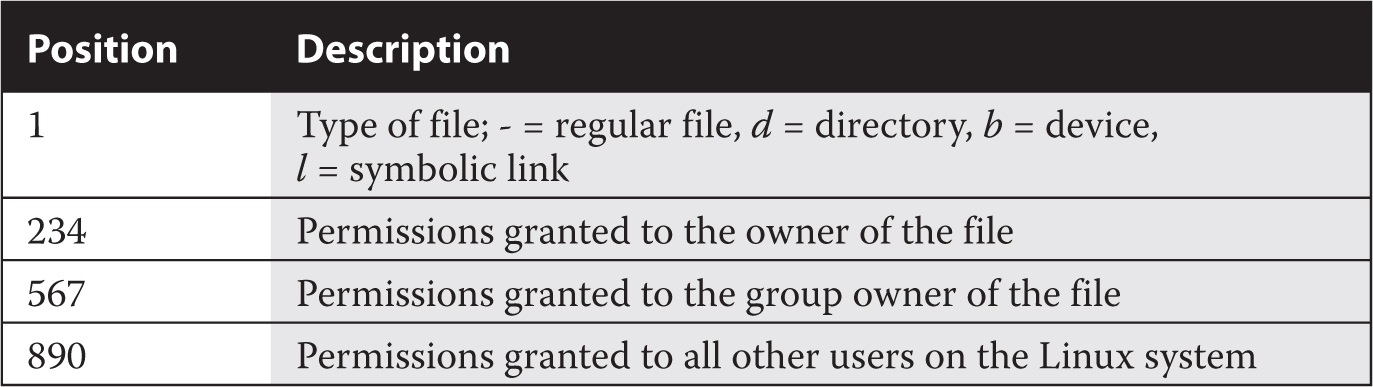
Linux file permissions and ownership are straightforward. As suggested by the related RHCSA objective, they’re read, write, and execute, classified by the user, the group, and all other users. However, the effect of permissions on directories is more subtle. Table 4-1 shows the exact meaning of each permission bit.
TABLE 4-1 Permissions on Files and Directories

TABLE 4-2 Description of File Permissions
Consider the following output from ls -l /sbin/fdisk:

The permissions are shown on the left side of the listing. Ten characters are shown. The first character determines whether it’s a regular or a special file. The remaining nine characters are grouped in threes, applicable to the file owner (user), the group owner, and everyone else on that Linux system. The letters are straightforward: r = read, w = write, x = execute. These permissions are described in Table 4-2.
It’s common for the user and group owners of a file to have the same name. In this case, the root user is a member of the root group. But they don’t have to have the same name. For example, directories designed for collaboration between users may be owned by a special group. As discussed in Chapter 8, that involves groups with several regular users as members.
Keep in mind that permissions granted to the group take precedence over permissions granted to all other users. Similarly, permissions granted to the owner take precedence over all other permissions categories. Thus, in the following example, although everyone else has full permissions to the file, the members of the group “mike” have not been granted any permissions, and as such they won’t be able to read, modify, or execute the file:

There’s a relatively new element with permissions—and it’s subtle. Notice the dot after the last x in the output to the ls -l setup.sh command? It specifies that the file has a SELinux security context. If you’ve configured ACL permissions on a file, that dot is replaced by a plus sign (+). But that symbol doesn’t override SELinux control.
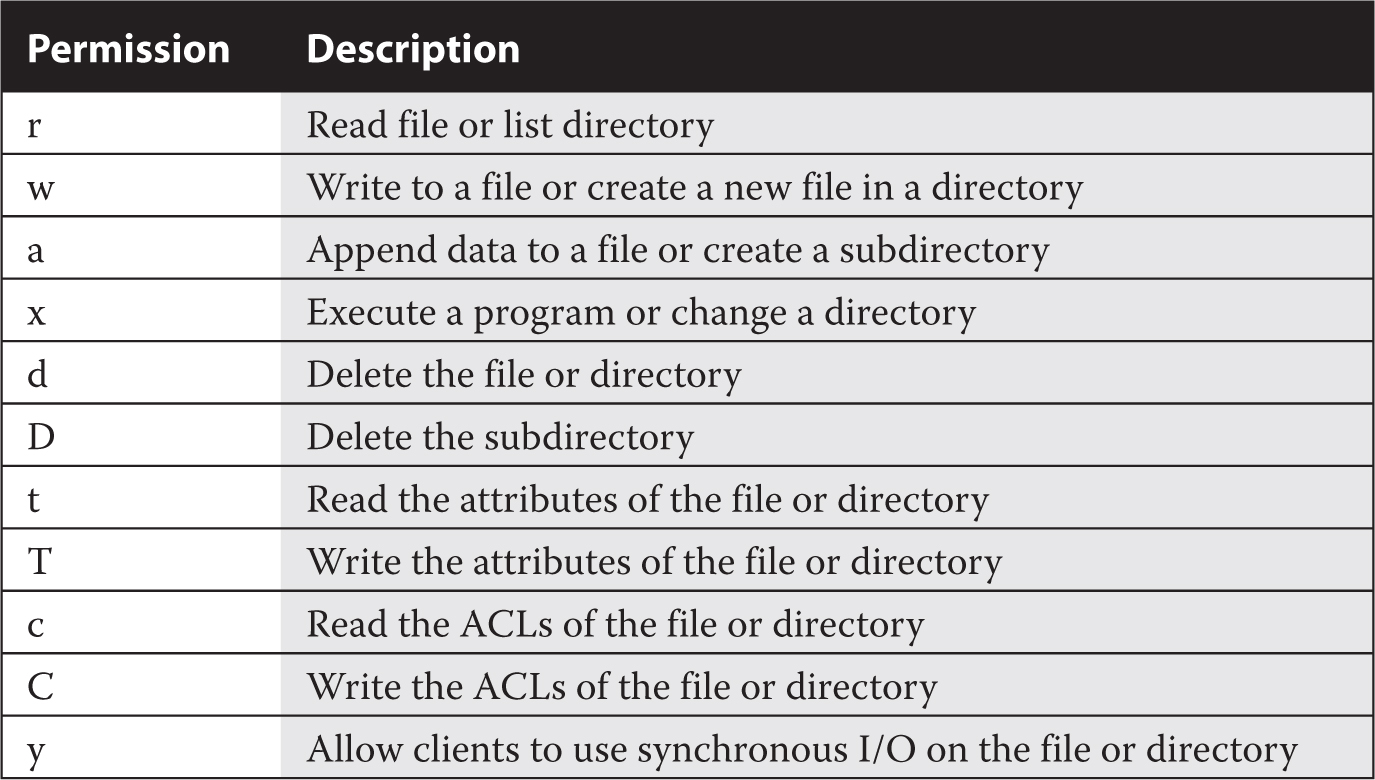
You need to consider another type of permission: the special permission bits. Not only are these the SUID and SGID bits, but also another special permission known as the sticky bit. The effects of the special permission bits on files and directories are shown in Table 4-3.
An example of the SUID bit is associated with the passwd command in the /usr/bin directory. The ls -l command on that file leads to the following output:

TABLE 4-3 Special Permission Bits

The s in the execute bit for the user owner of the file is the SUID bit. It means the file can be executed by other users with the authority of the file owner, the root administrative user. But that doesn’t mean that any user can change other user’s passwords. Access to the passwd command is further regulated by Pluggable Authentication Modules (PAM), as described in Chapter 10. This is an RHCE skill. An example of the SGID bit can be found with the ssh-agent command, also in the /usr/bin directory. It has the SGID bit to properly store passphrases. The ls -l command on that file displays the following output:

The s in the execute bit for the group owner of the file (group nobody) is the SGID bit.
Finally, an example of the sticky bit can be found in the permissions of the /tmp directory. It means that users can copy their files to that directory, but no one else can remove those files, apart from their respective owners (which is the “sticky”). The ls -ld command on that directory shows the following output:

The t in the execute bit for other users is the sticky bit. Note that without the sticky bit, everyone will be able to remove everyone else’s files in /tmp because write permissions have been granted to all users on that directory.
It’s easy to remove write permissions from a file. For example, if you wanted to make the license.txt file “read-only,” the following command removes write permissions from that file:

The user who owns the file can still make changes, however. It won’t work in GUI text editors such as gedit. It won’t even work in the nano text editor. But if a change is made in the vi text editor, the user who owns that file can override a lack of write permissions with the bang character, which looks like an exclamation point (!). In other words, while in the vi editor, the user who owns the file can run the following command to override the lack of write permissions:

Although this may seem surprising, in practice the w! command of the vi editor is not bypassing the Linux file permission system. The w! command overwrites a file—that is, it deletes the existing file and creates a new one with the same name. As you can see from Table 4-1, the permission bit that grants the privilege to create and delete files is the write permission on the parent directory, not the write permission on the file itself. Hence, if a user has write permission on a directory, she can overwrite the files in it, regardless of the write permission bits set on files.
Key commands that can help you manage the permissions and ownership of a file are chmod, chown, and chgrp. In the following subsections, you’ll examine how to use those commands to change permissions along with the user and group that owns a specific file, or even a series of files.
One tip that can help you change the permissions on a series of files is to use the -R switch. It is the recursive switch for all three of these commands. In other words, if you specify the -R switch with any of the noted commands on a directory, it applies the changes recursively. The changes are applied to all files in that directory, including all subdirectories. Recursion means that the changes are also applied to files in each subdirectory, and so on.
The chmod command uses the numeric value of permissions associated with the owner, group, and others. In Linux, permissions are assigned the following numeric values: r = 4, w = 2, and x = 1. In numerical format, permissions are represented by an octal number, where each digit is associated with a different group of permissions. For example, the permission number 640 means that the owner is assigned permission 6 (read and write), whereas the group has permission 4 (read), and everyone else has no permissions. The chown and chgrp commands adjust the user and group owners associated with the cited file.
The chmod command is flexible. You don’t always have to use numbers. For example, the following command sets execute permissions for the user owner of the Ch3Lab1 file:

Note how the u and the x follow the ugo/rwx format specified in the associated RHCSA objective. To interpret, this command adds (with the plus sign) for the user owner of the file (with the u) execute permissions (with the x).
These symbols can be combined. For example, the following command disables (with the minus sign) write permissions (with the w) for the group owner (with the g) and all other users (with the o) on the local file named special:

Rather than adding or removing permissions with the + and − operators, you can set the exact mode of a permission group using the equal operator (=). As an example, the following command changes the group permissions of the file named special to read and write, and clears the execute permission if it was set:

While you can use all three group permission types in the chmod command, it’s not necessary. As described in the labs in Chapter 3, the following command makes the noted file executable by all users:

For the SUID, SGID, and sticky bits, some special options are available. If you choose to use numeric bits, those special bits are assigned numeric values as well, where SUID = 4, SGID = 2, and sticky bit = 1. For example, the following command configures the SUID bit (with the first “4” digit in permission mode). It includes rwx permissions for the user owner (with the “7”), rw permissions for the group owner (with the “6”), and r permission for other users (with the last “4”) on the file named testfile:

If you’d rather use the ugo/rwx format, the following command activates the SGID bit for the local testscript file:

And the following command turns on the sticky bit for the /test directory:

For the chmod command, changes don’t have to be made by the root administrative user. The user owner of a file is allowed to change the permissions associated with her files.
The chown command can be used to modify the user who owns a file. For example, take a look at the ownership for the first figure that we created for this chapter, based on the ls -l command:

The user owner of this file is michael; the group owner of this file is examprep. The following chown command changes the user owner to user elizabeth:

You can do more with chown; for example, the following command changes both the user and group owner of the noted file to user donna and group supervisors, assuming that user and group already exists:

Only the root administrative user can change the user owner of a file, whereas group ownership can be modified by root and also by the user who owns the file.
You can change the group owner of a file with the chgrp command. For example, the following command changes the group owner of the noted F04-01.tif file to the group named project (assuming it exists):

Just beyond regular rwx/ugo permissions are file attributes. Such attributes can help you control what anyone can do with different files. Whereas the lsattr command lists current file attributes, the chattr command can help you change those attributes. For example, the following command protects /etc/fstab from accidental deletion, even by the root administrative user:

With that attribute, if you try to delete the file as the root administrative user, you’ll get the following response:

The lsattr command shows an active immutable attribute on /etc/fstab:

Of course, the root administrative user can unset that attribute with the following command. Nevertheless, the initial refusal to delete the file should at least give pause to that administrator before changes are made:

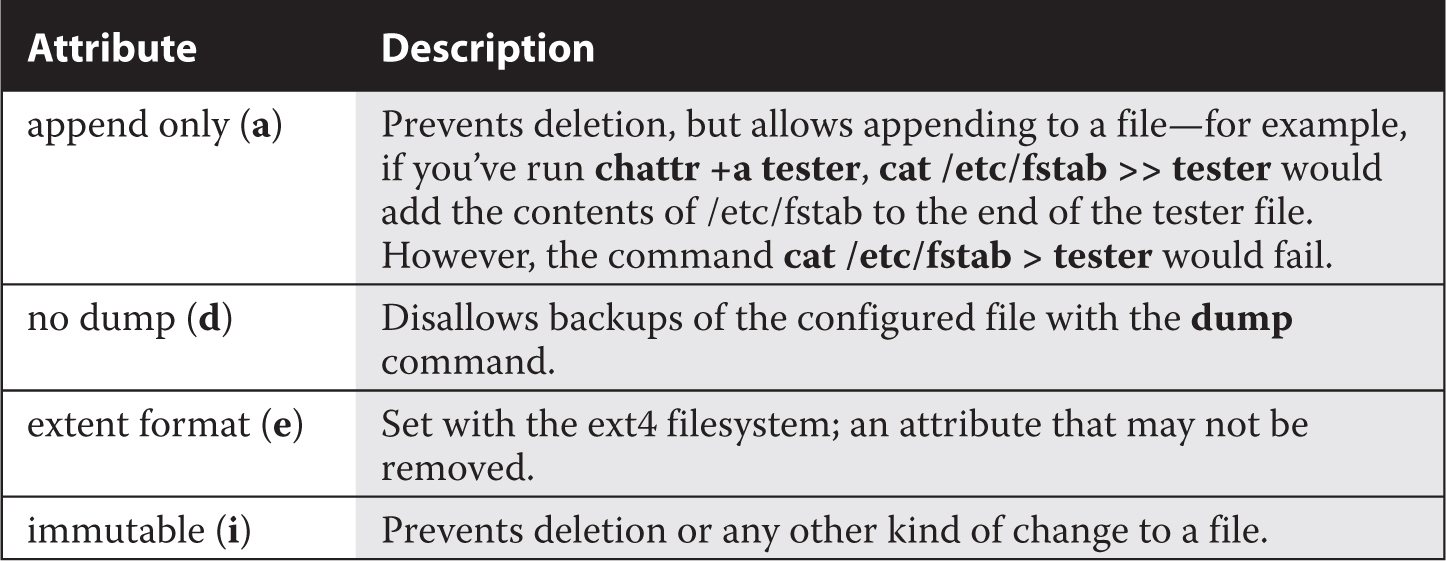
Several key attributes are described in Table 4-4. Other attributes, such as c (compressed), s (secure deletion), and u (undeletable), don’t work for files stored in the ext4 and XFS filesystems. The extent format attribute is associated with ext4 systems.
Linux, like Unix, is configured with users and groups. Everyone who uses Linux is set up with a username, even if it’s just “guest.” There’s even a standard user named “nobody.” Take a look at /etc/passwd. One version of this file is shown in Figure 4-1.
As shown, all kinds of usernames are listed in the /etc/passwd file. Even a number of Linux services such as mail, news, ftp, and apache have their own usernames. In any case, the /etc/passwd file follows a specific format, described in more detail in Chapter 8. For now, note that the only regular users shown in this file are alex and michael; their user IDs (UID) and group IDs (GID) are, respectively, 1000 and 1001; and their home directories match their usernames. The next user gets UID and GID 1002, and so on.
FIGURE 4-1 The /etc/passwd file

This matching of UIDs and GIDs is based on the Red Hat user private group scheme. Now run the ls -l /home command. The output should be similar to the following:

Pay attention to the permissions. Based on the rwx/ugo concepts described earlier in this chapter, only the named user owner has access to the files in his or her home directory.
The way umask works in Red Hat Enterprise Linux may be surprising, especially if you’re coming from a different Unix-style environment. You cannot configure umask to allow the automatic creation of new files with executable permissions. This promotes security: if fewer files have executable permissions, fewer files are available for a “black hat” hacker to use to run programs to break through your system.
Every time you create a new file, the default permissions are based on the value of umask. When you type the umask command, the command returns a four-digit octal number such as 0002. If a bit of the umask is set, then the corresponding permission is disabled in newly created files and directories. As an example, a umask of 0245 would cause newly created directories to have 0532 octal permissions, which is equivalent to the following permission string

In the past, the value of umask affected the value of all permissions on a file. For example, if the value of umask was 000, the default permissions for any file created by that user were once 777 – 000 = 777, which corresponds to read, write, and execute permissions for all users. They’re now 666, since regular new files can no longer get executable permissions. Directories, on the other hand, require executable permissions so that any file contained therein can be accessed.
With that in mind, the default umask is driven by the /etc/profile and /etc/bashrc files, specifically the following stanza, which drives a value for umask depending on the value of the UID:

In other words, the umask for user accounts with UIDs of 200 and above is 002. In contrast, the umask for UIDs below 200 is 022. In RHEL 7, service users such as adm, postfix, and apache have lower UIDs; this affects primarily the permissions of the log files created for such services. Of course, the root administrative user has the lowest UID of 0. By default, files created for such users have 644 permissions; directories created for such users have 755 permissions.
In contrast, regular users have a UID of 1000 and above. Files created by such users normally have 664 permissions. Directories created by such users normally have 775 permissions. Users can override the default settings by appending an umask command in their ~/.bashrc or ~/.bash_profile.
CERTIFICATION OBJECTIVE 4.02
There was a time when users had read access to the files of all other users. By default, however, users have permissions only in their own directories. With ACLs, you can give selected users read, write, and execute permissions to selected files in your home directory. This provides a second level of discretionary access control, a method that supports overriding of standard ugo/rwx permissions.
Strictly speaking, regular ugo/rwx permissions are the first level of discretionary access control. In other words, ACLs start with the ownership and permissions described earlier in this chapter. You’ll see how that’s displayed with ACL commands shortly.
To configure ACLs, you’ll need to mount the appropriate filesystem with the acl option. Next, you’ll need to set up execute permissions on the associated directories. Only then can you configure ACLs with desired permissions for appropriate users.
ACLs are supported on ext4 and XFS filesystems, as well as on the Network File System (NFS) version 4.
Assuming the acl package is installed, you should have access to the getfacl command, which displays the current ACLs of a file. For example, the following command displays the current permissions and ACLs for the anaconda-ks.cfg file in the /root directory:

Run the ls -l /root/anaconda-ks.cfg command. You should recognize every element of the output shown here: as no ACLs are set in the anaconda-ks.cfg file, the getfacl command displays only standard permissions and ownership. The ACLs that you’ll add shortly are over and above the permissions shown here. But first, you may need to make a filesystem friendly to that second level of ACLs.
RHEL 7 uses the XFS filesystem. When you create an XFS or an ext2/ext3/ext4 filesystem on RHEL 7, ACLs are enabled by default. On the other hand, ext2, ext3, and ext4 filesystems created on older versions of Red Hat may not automatically have ACL support enabled.

To verify whether an ext2/ext3/ext4 filesystem has the acl mount option enabled by default on a partition device such as /dev/sda1, run the command tune2fs -l/dev/sda1. Remember, XFS filesystems and all ext filesystems created on RHEL 7 have ACL support enabled by default. Hence, mounting a filesystem with the acl option would be required only on ext filesystems created on older versions of Red Hat Enterprise Linux or on ext2/ext3/ext4 filesystems where the acl option has been explicitly removed.
If you want to enable ACL support on a filesystem that does not have the acl mount option configured, you can remount the existing partition appropriately. For example, we can remount the /home partition with ACL using the following command:

To make sure this is the way /home is mounted on the next reboot, edit /etc/fstab. Based on the previous command, the associated line might read as follows if /home is formatted with ext4:

Once the change is made to /etc/fstab, you can activate it with the following command:

To confirm that the /home directory is mounted with the acl option, run the mount command alone, without switches or options. You should see acl in the output, similar to what’s shown here:

Now you can start working with ACL commands to set access control lists on desired files and directories.
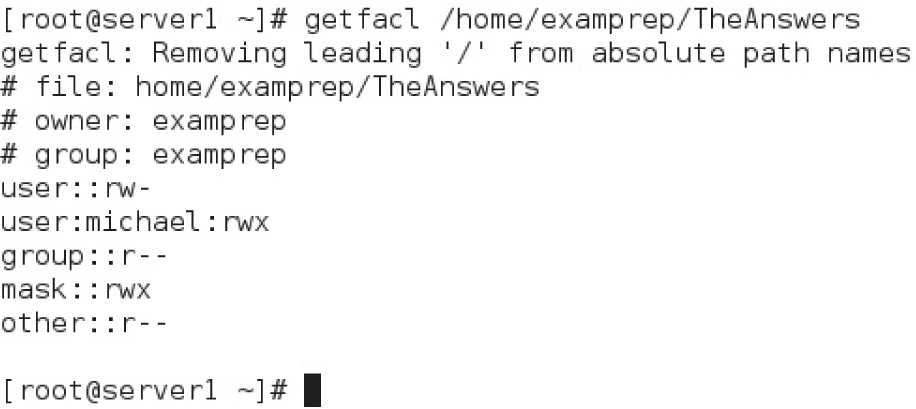
Now with a properly mounted filesystem and appropriate permissions, you can manage ACLs on a system. To review the current ACLs, run the getfacl filename command. For this example, we’ve created a text file named TheAnswers in the /home/examprep directory. The following is the output from the getfacl /home/examprep/TheAnswers command:
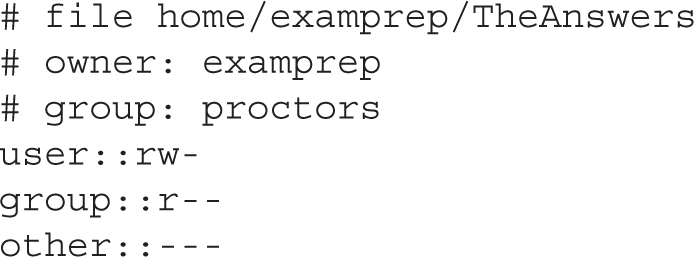
Note that the file TheAnswers is owned by user examprep and group proctors. That user owner has read and write permissions; that group owner has read permissions to that file. In other words, whereas the examprep user can read and change this file, user members of the proctors group can read it.
Now if you were the examprep user or the root user on this system, you could assign ACLs for the file named TheAnswers for me (user michael) with the setfacl command. For example, the following command gives michael read, write, and execute permissions to that file:

This command modifies the ACLs for the noted file, modifying (-m) the ACLs for user michael, giving that user read, write, and execute permissions to that file. To confirm, run the getfacl command on that file, as shown in Figure 4-2.
FIGURE 4-2 The ACLs of a file
But when we tried to access that file from michael's user account, it didn't work. Actually, if we try to access the file with the vi text editor, it suggests that /home/examprep/TheAnswers is a new file. Then it refuses to save any changes we might make to that file.
Before files from the /home/examprep directory are accessible, the administrative user will need to either change the permissions or the ACL settings associated with that directory. Before we get to modifying discretionary access controls on a directory, let’s explore some different setfacl command options.
Despite the name, the setfacl command can be used to remove such ACL privileges with the -x switch. For example, the following command deletes the previously configured rwx permissions for user michael:

In addition, the setfacl command can be used with groups; for example, if the teachers group exists, the following command would give read privileges to users who are members of that group:

You can also use the setfacl command to remove all permissions from a named user. For example, the following command denies access to the /home/examprep directory for the user michael:

If you want to see how ACLs work, don’t remove the ACL privileges on the TheAnswers file, at least not yet. Alternatively, if you want to start over, the following command, with the -b switch, removes all ACL entries on the noted file:

Some of the switches available for the setfacl command are shown in Table 4-5.
TABLE 4-5 Description of File Permissions

One slightly dangerous option relates to other users. For example, the command

allows other users read, write, and execute permissions for the TheAnswers file. It does so by changing the primary permissions for the file, as shown in the output to the ls -l/home/examprep/TheAnswers command. The -b and the -x switches don’t remove such changes; you’d have to use the following command:

There are several ways to set up a directory for file sharing with ACLs. First, you could set the regular execute bit for all other users. One way to do so on the noted directory is with the following command:

It is a minimal way to provide access to files in a directory. Users other than examprep and root can’t list the files in that directory. They have to know that the file TheAnswers actually exists to access that file.
However, with the execute bit set for other users, any user can access files in the /home/examprep directory for which she has permission. That should raise a security flag. Any user? Even though the file is hidden, do you ever want to give real privileges to anything to all users? Sure, ACLs have been set for only the TheAnswers file in that /home/examprep directory, but that’s one layer of security that you’ve taken down voluntarily.
The right approach is to apply the setfacl command to the /home/examprep directory. The safest way to set up sharing is to set ACL execute permissions just for the user michael account on the noted directory, with the following command:

As the examprep user is the owner of the /home/examprep directory, that user can also run the noted setfacl command.
Sometimes, you may want to apply such ACLs to all files in a directory. In that case, the -R switch can be used to apply changes recursively; for example, the following command allows user michael to have read and execute permissions on all files in the /home/examprep directory as well as any subdirectories that may exist:

There are two methods available to unset these options. First, you could apply the -x switch to the previous command, omitting the permission settings:

Alternatively, you could use the -b switch; however, that would erase the ACLs configured for all users on the noted directory (and with the -R switch, applicable subdirectories):

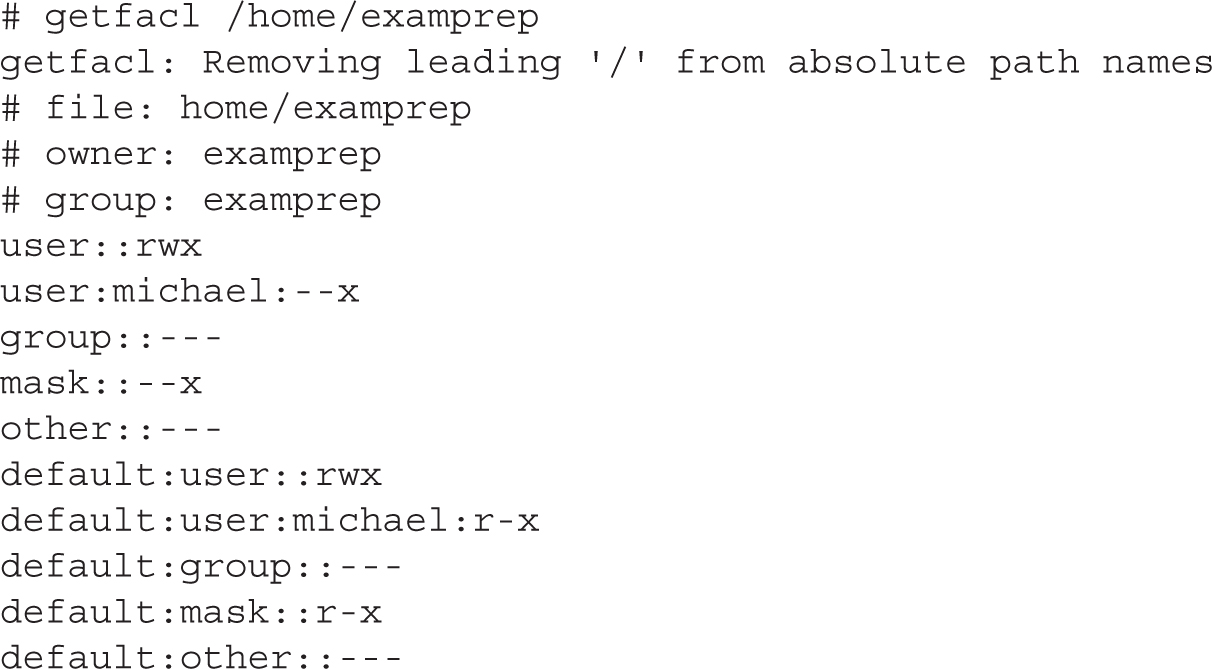
Directories can also contain one or more default ACLs. The concept of a default ACL is similar to a regular ACL entry, with the difference that a default ACL does not have any effect on the current directory permissions, but it is inherited by the files created within the directory.
As an example, if you want all new files and directories in /home/examprep to inherit an ACL that grants read and execute permissions to the user michael, you can run the following command:

The -d option in the preceding command specifies that the current operation applies to a default ACL. The getfacl command can display standard and default ACLs on the noted directory:
The mask associated with an ACL limits the permissions available on a file for named users and groups, and for the group owner. The mask shown in Figure 4-2 is rwx, which means there are no limits. If it were set to r, then the only permissions that could be granted with a command such as setfacl is read. To change the mask on the TheAnswers file to read-only, run the following command:

Now review the result with the getfacl /home/examprep/TheAnswers command. Pay attention to the entry for a specific user. Based on the ACL privileges given to user michael earlier, you’ll see a difference with Figure 4-2:

In other words, with a mask of r--, you can try to provide other users with all the privileges in the world. But all that can be set with that mask is read privileges.
The mask has an effect only on the group owner and on named users and groups. It does not have any effect on the user owner of the file and on the “other” permission group.
EXERCISE 4-1
In this exercise, you’ll set up ACLs to deny access to the loopback configuration file to a regular user. That is the ifcfg-lo file in the /etc/sysconfig/network-scripts directory. This exercise assumes that you’ve configured a regular user. Because we’ve configured user michael on our systems, that is the regular user listed in this exercise. Substitute accordingly. To deny such access, take the following steps:
1. Back up a copy of the current configuration file for the loopback device. It’s the ifcfg-lo file in the /etc/sysconfig/network-scripts directory. (Hint: use the cp and not the mv command.)
2. Execute the setfacl -m u:michael:- /etc/sysconfig/network-scripts/ifcfg-lo command.
3. Review the results. Run the getfacl command on both copies of the file, in the /etc/sysconfig/network-scripts and backup directories. What are the differences?
4. Log in as the target user. From the root administrative account, one method to do so is with the su - michael command.
5. Try to read the /etc/sysconfig/network-scripts/ifcfg-lo file in the vi text editor or even with the cat command. What happens?
6. Repeat the preceding step with the file in the backup directory. What happens?
7. Now run the cp command from the backup of the ifcfg-lo file, and overwrite the current version in the /etc/sysconfig/network-scripts file. (Don’t use the mv command for this purpose.) You would need to return as the root user to do so.
8. Try the getfacl /etc/sysconfig/network-scripts/ifcfg-lo command again. Are you surprised at the result?
9. There are two ways to restore the original ACL configuration for the ifcfg-lo file. First, apply the setfacl -b command on the file. Did that work? Confirm with the getfacl command. If any other related commands have been applied, it may or may not have worked.
10. Another way to restore the original ACL of a file is to restore the backup by first deleting the changed file in the /etc/sysconfig/network-scripts directory and then by copying the file from the backup directory.
11. However, if you run Step 10, you may also need to restore the SELinux contexts of the file with the following command:

More information on the restorecon command is available later in this chapter.
Although there’s no evidence that the Red Hat exams cover NFS-based ACLs, it is a feature that Linux administrators should know. As such, the description in this section just provides examples and is far from complete. For more information, refer to the nfs4_acl man page, which is installed by the nfs4-acl-tools RPM package.
Frequently, the /home directory is taken from a shared NFS volume. In fact, NFS-based ACLs are more fine-grained than standard ACLs. This feature was introduced with NFS version 4, the standard for RHEL 7. To that end, the nfs4_getfacl command can display the ACLs associated with files on a shared directory. Based on the ACLs previously given, Figure 4-3 shows the output to the nfs4_getfacl command.
The output is in the format


where the settings are delineated by the colon. Briefly, the two types shown either allow (A) or deny (D) the noted principal (a user or group) the specified permissions. No flags are shown in Figure 4-3, which can provide relatively fine-grained control. The principal may be a regular user or group, in lowercase. It may also be a generic user such as the file OWNER, the GROUP that owns the file, or other users, as specified by EVERYONE. The permissions, as shown in Table 4-6, allow very fine-grained control. The effect varies depending on whether the object is a file or a directory.
The configuration of NFS as a client is covered in Chapter 6, with other local and network filesystems. The configuration of an NFS server is an RHCE objective covered in Chapter 16.
TABLE 4-6 Descriptions of NFSv4 ACL Permissions
Traditionally, firewalls were configured only between LANs and outside networks such as the Internet. But as security threats increase, there’s an increasing need for firewalls on every system. RHEL 7 includes firewalls in every default configuration.
The Linux kernel comes with a powerful framework, the Netfilter system, which enables other kernel modules to offer functionalities such as packet filtering, network address translation (NAT), and load balancing. The iptables command is the main tool that interacts with the Netfilter system to provide packet filtering and NAT.
Before you send a message over an IP network, the message is broken down into smaller units called packets. Administrative information, including the type of data, the source address, and destination address, is added to each packet. The packets are reassembled when they reach the destination computer. An iptables rule examines these administrative fields in each packet to determine whether to allow the packet to pass.


RHEL 7 also includes a firewall command for IPv6 networks, ip6tables. The associated commands are almost identical. Unlike iptables, the ip6tables command is not listed in the Red Hat objectives.
The iptables tool is the basic foundation that is used by other services to manage system firewall rules. RHEL 7 comes with two such services: the new firewalld daemon and the iptables service, which was included with the previous releases of Red Hat Enterprise Linux. You can interact with firewalld using the graphical utility firewall-config or the command-line client firewall-cmd.
The iptables and firewalld services both rely on the Netfilter system within the Linux kernel to filter packets. However, whereas iptables is based on the concept of “chain of filter rules” to block or forward traffic, firewalld is “zone-based,” as you will see in the next sections.
There are RHCSA and RHCE requirements related to firewall configuration and management. For the RHCSA, you need to understand how to configure a firewall to either block or allow network communication through one or more ports using iptables, firewall-config, or firewall-cmd. For the RHCE, you need a more in-depth knowledge of firewalld and its features, such as “rich rules, zones and custom rules, to implement packet filtering and configure network address translation (NAT).”

Linux communicates over a network, primarily using the TCP/IP protocol suite. Different services use certain ports and protocols by default, as defined in the /etc/services file. It may be useful to know some of these ports by heart, such as those described in Table 4-7. Be aware, some of these ports may communicate using the Transmission Control Protocol (TCP), the User Datagram Protocol (UDP), or even the Stream Control Transmission Protocol (SCTP). For example, as noted in the following excerpts from the /etc/services file, the FTP service has been assigned the TCP and UDP ports listed here:

However, you’ll see shortly that the Red Hat firewall configuration tools open only TCP communications for FTP services, and the default vsFTP server configured in Chapter 1 works fine under such circumstances. This is because the default policy of the Internet Assigned Number Authority (IANA) is to register port numbers for both TCP and UDP, even if a service only supports the TCP protocol.
The philosophy behind iptables is based on “chains.” These are sets of rules applied to each network packet, chained together. Each rule does two things: it specifies the conditions a packet must meet to match the rule, and it specifies the action if the packet matches.
The iptables command uses the following basic format:

Now let’s analyze this command, step by step. First is the -t tabletype switch. There are two basic tabletype options for iptables:
filter Sets a rule for filtering packets.
nat Configures network address translation, also known as masquerading, which is discussed later in Chapter 10.
The default is filter; if you don’t specify a -t tabletype, the iptables command assumes that the command is applied as a packet filter rule.
Next is the <action_direction>. Four basic actions are associated with iptables rules:
-A (--append) Appends a rule to the end of a chain.
-D (--delete) Deletes a rule from a chain. Specify the rule by the number or the packet pattern.
-L (--list) Lists the currently configured rules in the chain.
-F (--flush) Flushes all the rules in the current iptables chain.
If you’re appending to (-A) or deleting from (-D) a chain, you’ll want to apply it to network data traveling in one of three directions:
INPUT All incoming packets are checked against the rules in this chain.
OUTPUT All outgoing packets are checked against the rules in this chain.
FORWARD All packets received from a computer and being sent to another computer are checked against the rules in this chain. In other words, these are packets that are routed through the local server.
Typically, each of these directions is the name of a chain.
Next, you need to configure a <packet_pattern>. All iptables firewalls check every packet against this pattern. The simplest pattern is by IP address:
-s ip_address All packets are checked for a specific source IP address.
-d ip_address All packets are checked for a specific destination IP address.
Packet patterns can be more complex. In TCP/IP, packets are transported using the TCP, UDP, or ICMP protocol. You can specify the protocol with the -p switch, followed by the destination port (--dport). For example, the -p tcp --dport 80 extension affects users outside your network who are trying to make an HTTP connection.
Once the iptables command finds a packet pattern match, it needs to know what to do with that packet, which leads to the last part of the command, -j <what_to_do>. There are three basic options:
DROP The packet is dropped. No message is sent to the requesting computer.
REJECT The packet is dropped. An error message is sent to the requesting computer.
ACCEPT The packet is allowed to proceed as specified with the -A action: INPUT, OUTPUT, or FORWARD.
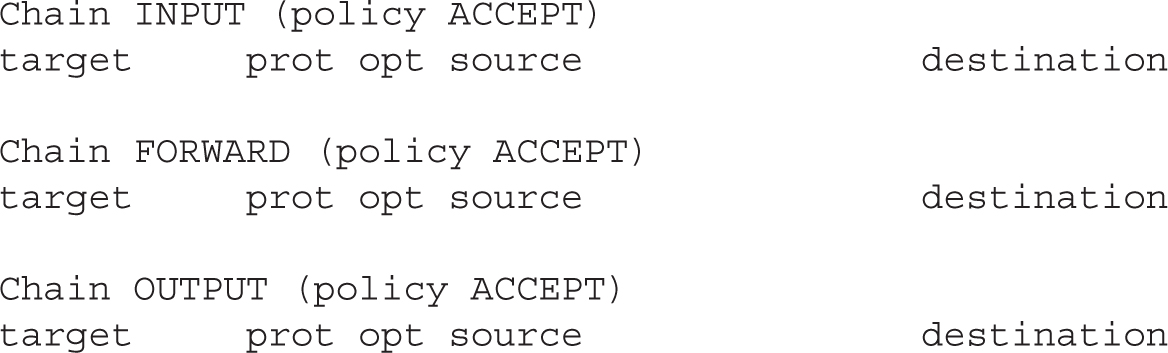
Take a look at some examples of how you can use iptables commands to configure a firewall. The first step is always to see what is currently configured, with the following command:

If an iptables firewall is configured, it should return chain rules in at least three different categories: INPUT, FORWARD, and OUTPUT.
Linux firewalls such as firewalld and the iptables service are based on the iptables command. To review current rules, run the iptables -L command. Suppose all you see is the following blank list of rules:
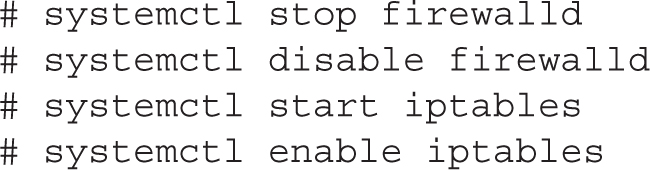
This output means that the firewalld service may not be enabled. In RHEL 7, firewalld is the default firewall service. Make sure that it is running:

If the service is not active, check that the iptables service is disabled, then start firewalld and ensure that it is enabled at boot:

Before moving to the configuration of firewalld, we will briefly review the iptables service. Besides being a requirement for the RHCSA exam, a basic knowledge of the iptables service will provide a better understanding of the more advanced functionalities that come with firewalld.
Whereas the iptables service was the default firewall running in RHEL 6, firewalld is the default in RHEL 7. If you wish, you can disable firewalld in RHEL 7, and switch to the old iptables service. To do so, run the following commands:
Likewise, to switch back to firewalld, run the commands listed in the previous section. After starting the iptables service, list the existing firewall rules with iptables -L. The output on the default server1.example.com system is shown in Figure 4-4.
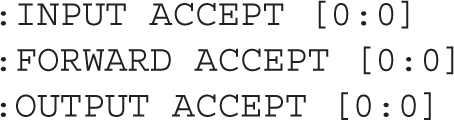
Six columns of information are shown in Figure 4-4, which correspond to various iptables command options. The firewall shown is based on the following rules listed in the /etc/sysconfig/iptables file. The first line in the file specifies that the rules to follow are filtering rules. Alternative rules support network address translation (NAT) or mangling.

FIGURE 4-4 Firewall rules for the iptables service

Next, network traffic that is directed to the local system, intended to be forwarded and sent out, is normally accepted by default with the ACCEPT option. The [0:0] part shows the byte and packet counts.
The lines that follow are all applied to the iptables command. Every switch and option listed in this file should be available on the associated man page.
The next line keeps current network communications going. The ESTABLISHED option continues to accept incoming packets related to inbound network connections. The RELATED option accepts packets for follow-on network connections, such as for FTP data transfers.

The next line accepts packets associated with ICMP, most commonly related with the ping command. When a packet is rejected, the associated message also uses the ICMP protocol.

The following line adds (-A) a rule to an INPUT chain, associated with the network interface (-i) known as the loopback adapter (lo). Any data processed through that device jumps (-j) to acceptance.

The next line is the only one that directly accepts new regular network data, using the TCP protocol, over all interfaces. It looks for a match (-m) for a NEW connection state (--state NEW), for matching TCP packets, using the TCP protocol (-p tcp), sent to a destination port (--dport) of 22, which corresponds to the SSH service. Network packets that meet all of these criteria are accepted (-j ACCEPT). Once the connection is established, the first regular rule described in this chapter continues to accept packets on that established connection.

The last two rules reject all other packets, with an icmp-host-prohibited message sent to the originating system:

The COMMIT ends the list of rules:

As this section is associated with the RHCSA exam, a more detailed discussion can be found in Chapter 10. At this level, you need to know how to manage these firewalls with the standard configuration tools provided.
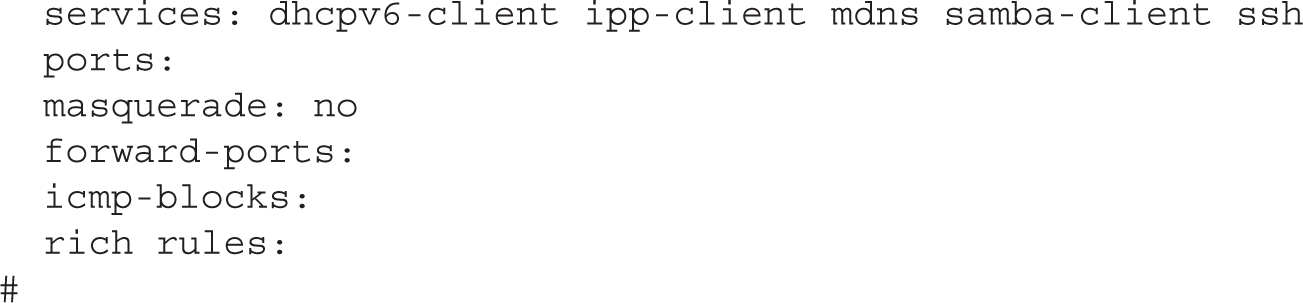
You can automate the process of configuring a firewall. For that purpose, in RHEL 7 firewalld comes with both a console and a GUI configuration tool. Although the look and feel of the two applications are different, you can use both tools to configure access to trusted services. Before starting the firewalld configuration tool, review the steps in the earlier section “Keep That Firewall in Operation” to ensure that firewalld is running and automatically starts during the boot process.
The firewalld service offers the same functionalities of the iptables tool and more. One of the new features of firewalld is zone-based firewalling. In a zone-based firewall, networks and interfaces are grouped into zones, with each zone configured with a different level of trust. The zones defined in firewalld are listed in Table 4-8, along with their default behavior for outgoing and incoming connections.
A zone is made up of a group of source network addresses and interfaces, plus the rules to process the packets that match those source addresses and network interfaces.
TABLE 4-8 Zones in firewalld

FIGURE 4-5 The graphical firewall-config tool

You can start the graphical firewalld configuration tool from a GUI-based command line with the firewall-config command. Alternatively, in the GNOME Desktop Environment, click Applications | Sundry | Firewall. The result is shown in Figure 4-5.
As shown in the figure, the main window includes different menus and tabs. In the top-left area, there is a drop-down Configuration menu, where you can set the firewall to Runtime or Permanent mode. If it’s set to Runtime, the changes applied by firewall-config take effect immediately, but will not survive a server reboot. Alternatively, select Permanent mode to make your changes survive a server reboot. At any time, you can click Options | Reload Firewalld to make a new firewall configuration immediately effective.
You can only modify definitions of zones and services in Permanent mode.
The Zone tab includes all the zones previously listed in Table 4-8. When an incoming packet hits the firewall, its source address is checked for a match with the network addresses that belong to the existing zones. If no match is found, the incoming interface of the packet is checked to verify whether it belongs to a zone. Once a correspondence is found, the packet is processed according to the rules of the zone it has been matched to.
In the main firewall-config window, the public zone is displayed in a bold font to indicate that this zone is the default zone. The default zone has a special meaning: any new network interface added to the system is automatically assigned to the default zone. In addition, the rules of the default zone are processed for all incoming packets that do not match any of the other zones. You can set a different zone to be the default by clicking Options | Change Default Zone.
To allow or deny incoming traffic through the firewall, select a zone and add or remove a checkmark in the zone’s Services tab for the service you want to grant or block. As an alternative, you can also specify a protocol and port from the Ports tab.
In firewalld, a service is defined as a group of one of more protocols and ports. A service can also include a Netfilter helper module to support filtering for those applications that dynamically open multiple connections.
A variety of network services are already defined in the Services window. The most common are described in Table 4-9.
TABLE 4-9 Common TCP/IP Ports

If you switch the firewall-config tool into Permanent mode, you can add new services or edit existing ones. To accomplish this task, scroll to the bottom of the Services window and click the corresponding icon to remove, add, or edit a service. If desired, you can also configure custom ports for an existing service by clicking the Add or Edit icon, as shown in Figure 4-6.
The firewall-cmd configuration tool has the same features and services as the corresponding GUI tool. In fact, both the graphical firewall-config tool and the command interface firewall-cmd are just client front ends that communicate to the underlying firewalld daemon.
FIGURE 4-6 Adding custom ports to a service in the firewall-config tool

As with the GUI tool, firewall-cmd can display all the available zones and switch to a different default zone. In the following example, the default zone is changed from the public to the internal zone:

The option --list-all is particularly useful. It lists all the configured interfaces and services allowed through a zone, as illustrated next:

You want firewall changes that survive after a reboot. To do so with the firewall-cmd command, use the --permanent switch.
As with many of the firewall-cmd command options, the default zone is assumed if no zone is specified with the --zone command switch. You can add and remove ports and services from a zone with the --add-port, --add-service, --remove-port, and --remove-service switches, respectively. The next example enables the http service for traffic hitting the dmz zone:

By default, all configuration changes made by firewall-cmd do not survive a server reboot. To make a change that survives a reboot, add the --permanent switch to firewall-cmd. Then, run firewall-cmd --reload to implement the change immediately.
EXERCISE 4-2
In this exercise, you’ll adjust firewalls from the command-line interface and review the results with the nmap and telnet commands. Although it does not matter how you address a problem on a Red Hat exam, in this exercise you’ll see what happens when adding a new service via the firewall-cmd tool. Of course, it’s possible to use the graphical firewall-config tool to perform the same tasks. This assumes a system with the default firewalld configuration described in this chapter.
1. Review current active services on the local system with the nmap localhost command. Note the IP address of the local system with the ip addr command. If the local system is server1.example.com, that IP address should be 192.168.122.50.
2. Make sure firewalld is currently operational with the systemctl status firewalld command.
3. Go to a different system. You can do so from a different virtual machine, or you can access it remotely with the ssh command. If the tester1.example.com system is running, you can log in to that system with the ssh 192.168.122.150 command.
4. Use the nmap command to review what is seen through the firewall; for the noted server1.example.com system, the right command would be nmap 192.168.122.50. If the IP address found from Step 1 is different, substitute accordingly.
5. Return to the original system. Run the following commands to install and start the telnet service:

6. Run the following command to show the current settings for the default zone:

7. Allow telnet traffic through the default zone. Don’t forget the --permanent switch to make the change persistent:

8. Apply the previous change to the run-time configuration of the firewall:

9. Navigate back to the tester1.example.com system as was done in Step 3.
10. Repeat Step 4. What do you see?
CERTIFICATION OBJECTIVE 4.04
Chapter 2 addressed SSH client programs, including ssh, scp, and sftp. The focus of this section is on securing SSH access with key-based authentication.
As SSH is an important tool for administering systems remotely, it’s important to understand the basics of how it encrypts communication between a client and the SSH server. Then you’ll see how to create a public/private key pair so connections won’t even put user passwords at risk. But first, it may be helpful to review some basic information about SSH configuration commands and files.
There are a few SSH-oriented utilities you need to know about:
sshd The daemon service; this must be running to receive inbound Secure Shell client requests.
ssh-agent A program to hold private keys used for Digital Signature Algorithm (DSA), Elliptic Curve DSA (ECDSA), and Rivest, Shamir, Adleman (RSA) authentication. The idea is that the ssh-agent command is started in the beginning of an X session or a login session, and other programs are started as clients to the ssh-agent program.
ssh-add Adds private key identities to the authentication agent, ssh-agent.
ssh The Secure Shell command, ssh, is a secure way to log in to a remote machine, similar to Telnet or rlogin. The basic use of this command was discussed in Chapter 2. To make this work with key-based authentication, you need a private key on the client and a public key on the server. Take the public key file, such as id_rsa.pub, created later in this section. Copy it to the server. Place it in the home directory of an authorized user in the ~/.ssh/authorized_keys file.
ssh-keygen A utility that creates private/public key pairs for SSH authentication. The ssh-keygen -t keytype command will create a key pair based on the DSA, ECDSA, or RSA protocol.
ssh-copy-id A script that copies a public key to a target remote system.
Systems configured with SSH include configuration files in two different directories. For the local system, basic SSH configuration files are stored in the /etc/ssh directory. But just as important are the configuration files in each user’s home directory in the ~/.ssh/ subdirectory.
Those files configure how the given user is allowed to connect to remote systems. When DSA, ECDSA, and RSA keys are included, the user ~/.ssh/ subdirectory includes the following files:
authorized_keys Includes a list of public keys from remote users. Users with public encryption keys in this file can connect to remote systems. The system users and names are listed at the end of each public key copied to this file.
id_dsa Includes the local private key based on the DSA algorithm.
id_dsa.pub Includes the local public key for the user based on the DSA algorithm.
id_ecdsa Includes the local private key based on the ECDSA algorithm.
id_ecdsa.pub Includes the local public key for the user based on the ECDSA algorithm.
id_rsa Includes the local private key based on the RSA algorithm.
id_rsa.pub Includes the local public key for the user based on the RSA algorithm.
known_hosts Contains the public host keys from remote systems. The first time a user logs in to a system, she’s prompted to accept the public key of the remote server. On RHEL 7, the ECDSA protocol is used by default to encrypt traffic. The corresponding public key on the remote server is stored on the /etc/ssh/ssh_host_ecdsa_key.pub file and is added by the client to its local ~/.ssh/known_hosts file.
Basic encryption in computer networking normally requires a private key and a public key. The principle is the same as GPG communications discussed in Chapter 10. A private key is stored by the owner, and a public key is sent to a third party. When the key pair is properly configured, a user can encrypt a message using her private key, while a third party can decrypt a message with the corresponding public key. This also works in reverse: a third party can encrypt a message using the public key of the receiver, while the receiver can decrypt the message with her private key. The SSH protocol works in a similar way: the server sends a copy of his public key to the client, and this key is used by the client to decrypt the traffic and set up a secure communication channel.
Encryption keys are based on random numbers. The numbers are so large (typically 2048 bits for RSA keys or more) that the chance someone will break into the server system, at least with a PC, is practically impossible. Private and public encryption keys are based on a matched set of these random numbers.
The private key must be secure. Key-based authentication relies on a private key that is accessible only to the user owner of that key in the ~/.ssh subdirectory of that user’s home directory. To authenticate a user, the server sends to the client a “challenge,” which is a request to perform an encryption operation that requires the knowledge of the private key. Once the server receives a response to its challenge from the client, it will be able to decrypt the message and prove that the user’s identity is genuine.
The public key is just that, publicly available. Public keys are designed to be copied to appropriate users’ ~/.ssh/ subdirectories in a file named authorized_keys.
The example shown in Figure 4-7 lists the directories and files associated with SSH usage.
FIGURE 4-7 Keys in a user’s.ssh/ subdirectory

Most of the common issues with SSH key-based authentication are related to file permissions. As shown in Figure 4-7, the permissions for private keys are set to 600 and for public keys are set to 644. In addition, the permissions of the ~/.ssh directory should be 700.
A key is like a password used to encrypt communications data. But it’s not a standard password by any means. Imagine trying to remember the 1024-bit number expressed in hexadecimal format shown here:

The private key is similar, but you must keep it private, or this whole system fails. Keeping it private means no one should have access to the server systems. If your PC is public, secure your private key with a passphrase (password). The procedure to set up a passphrase is described next. Don’t forget the passphrase, or you’ll have to create a new key pair and again copy your public key to all the target systems.
The ssh-keygen command is used to set up a public/private key pair. Although it creates an RSA key by default, it also can be used to create a DSA or ECDSA key. For example, some users may need DSA keys to comply with certain U.S. government standards. An example of the command sequence is shown in Figure 4-8.
FIGURE 4-8 Command to generate an SSH key pair

As shown in the figure, the command prompts for an optional passphrase to protect the private key. When the identical passphrase is confirmed, the private key is saved in the id_rsa file, and the corresponding public key is stored in the id_rsa.pub file. Both files for user michael are stored in the /home/michael/.ssh directory.
If desired, you can set up RSA keys with a larger number of bits. In our testing, we were able to set up key pairs with up to 8192 bits fairly quickly, even on a virtual machine system with just one virtual CPU.
The command that starts the process is

Alternatively, if a DSA key is needed, the following command can help. Only 1024-bit DSA keys are allowed. The process after this command is the same as shown in Figure 4-8.

The next step is to transmit the public key to a remote system. It might be one of the servers you administer. If you’re willing to transmit that public key over the network (once per connection), the following command can work:

Strictly speaking, the ssh-copy-id command without the -i option defaults to transmitting the most recently created public key. The preceding command automatically appends the noted local RSA key to the end of the remote ~/.ssh/authorized_keys file. In this case, that file can be found in the /home/michael directory. Of course, you may choose to substitute the IP address for the hostname.
Sometimes, after copying a key pair to a remote system, you may get an “agent admitted failure to sign using the key” error followed by a password prompt when you try to log in. To fix this problem, log out of the console or the GUI and log back in. In most cases, the ssh command will prompt for the passphrase.
You should then be able to immediately connect to that remote system. In the preceding case, the appropriate command is either one of the following:

When run on a console, the ssh command uses the following prompt for the passphrase:

When run in a GUI-based command line, it prompts with a window similar to that shown in Figure 4-9.
FIGURE 4-9 Prompt for a passphrase

Security-Enhanced Linux (SELinux) was developed by the U.S. National Security Agency to provide a level of mandatory access control for Linux. It goes beyond the discretionary access control associated with file permissions and ACLs. In essence, SELinux enforces security rules within the kernel of the operating system. It limits the damage if there is a security breach. For example, if the system account associated with an FTP service is compromised, SELinux makes it more difficult to use that account to compromise other services.
The SELinux security model is based on subjects, objects, and actions. A subject is a process, such as a running command or an application such as the Apache web server in operation. An object is a file, a device, a socket, or in general any resource that can be accessed by a subject. An action is what may be done by the subject to the object.
SELinux assigns different contexts to objects. A context is just a label, which is used by the SELinux security policy to determine whether a subject’s action on an object is allowed or not.
For example, the Apache web server process can take objects such as web page files and display them for the clients of the world to see. That action is normally allowed in the RHEL 7 implementation of SELinux, as long as the object files have appropriate SELinux contexts.
The contexts associated with SELinux are fine-grained. In other words, if a “black hat” hacker breaks in and takes over your web server, SELinux contexts prevent that cracker from using that breach to break into other services.
To see the context of a particular file, run the ls -Z command. As an example, review what this command does in Figure 4-10, as it displays security contexts in one of this book author’s /root directory.
As noted at the beginning of this chapter, five objectives relate to SELinux on the RHCSA exam. You’ll explore how to meet these objectives in the following sections.
As suggested in the RHCSA objectives, you need to know how to “set enforcing and permissive modes for SELinux.” There are three available modes for SELinux: enforcing, permissive, and disabled. The enforcing and disabled modes are self-explanatory. SELinux in permissive mode means that any SELinux rules that are violated are logged, but the violation does not stop any action.
FIGURE 4-10 SELinux security contexts of different files

If you want to change the default SELinux mode, change the SELINUX directive in the /etc/selinux/config file, as illustrated in Table 4-10. The next time you reboot, the changes are applied to the system.
In RHEL 6, the SELINUX configuration variable was defined in the /etc/sysconfig/selinux file. In RHEL 7, /etc/sysconfig/selinux is a symbolic link that points to /etc/selinux/config.
If SELinux is configured in enforcing mode, it protects systems in one of two ways: in targeted mode or in mls mode. The default is the targeted policy, which allows you to customize what is protected by SELinux in a fine-grained manner. In contrast, MLS goes a step further, using the Bell-La Padula model developed for the US Department of Defense. That model, as suggested in the /etc/selinux/targeted/setrans.conf file, supports layers of security between levels c0 and c3. Although the c3 level is listed as “Top Secret,” the range of available levels goes all the way up to c1023. Such fine-grained levels of secrecy have yet to be fully developed. If you want to explore MLS, install the selinux-policy-mls RPM.
TABLE 4-10 Standard Directives in /etc/selinux/config

If you just want to experiment with SELinux, configure it in permissive mode. It’ll log any violations without stopping anything. It’s easy to set up with the SELinux Administration tool, or you can set SELINUX=permissive in /etc/selinux/config. If the auditd service is running, violations are logged in the audit.log file in the /var/log/audit directory. Just remember, it’s likely that Red Hat wants candidates to configure SELinux in enforcing mode during the exams.
While SELinux is still under active development, it has become much more useful with the releases of RHEL 6 and RHEL 7. Nevertheless, given the complexity associated with SELinux, it may be more efficient for system engineers who are not very familiar with it to use the SELinux Administration tool to configure SELinux settings.
The following sections show how you can configure and manage SELinux from the command-line interface. However, because it’s easier to demonstrate the full capabilities of SELinux using GUI tools, a detailed discussion of such capabilities will follow later in this chapter.
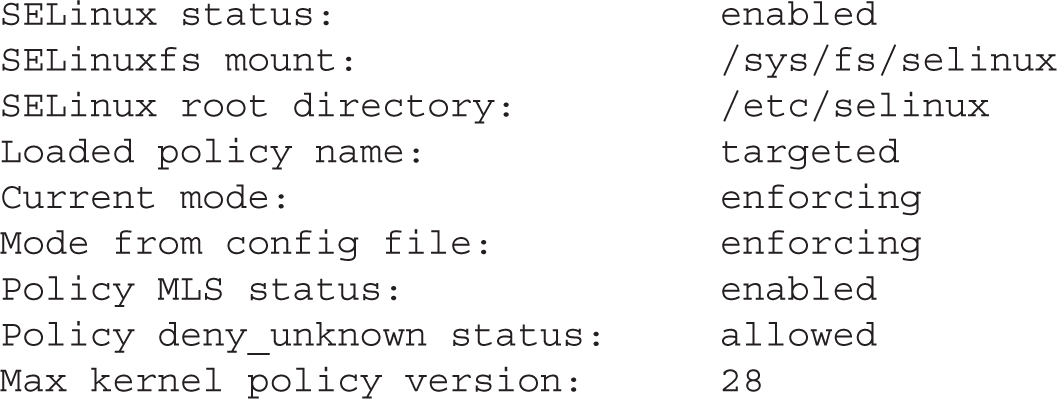
There are some essential commands that can be used to review and configure basic SELinux settings. To see the current status of SELinux, run the getenforce command; it returns one of three self-explanatory options: enforcing, permissive, or disabled. The sestatus command provides more information, with output similar to the following.
You can change the current SELinux status with the setenforce command; the options are straightforward:

This changes the /sys/fs/selinux/enforce boolean. For booleans, you could substitute 1 and 0, respectively, for enforcing and permissive. To make this change permanent, you’ll have to modify the SELINUX variable in the /etc/selinux/config file. However, changes to detailed SELinux booleans require different commands.
Alternatively, if SELinux is disabled for some reason, the output would be

If SELinux is disabled, it may take a few minutes to reboot a system after setting SELinux in enforcing mode. However, the process is less time-consuming than it was for the previous RHEL releases.
In that case, the setenforce command will not work. Instead, you’ll have to set SELINUX=enforcing in the /etc/selinux/config file. And that requires a system reboot to "relabel" all files, where SELinux labels are applied to each file on the local system.
To review the status of current SELinux users, run the semanage login -l command. Based on the default installation of RHEL 7, it leads to the following output:

In other words, regular “default” users have the same SELinux user context of the root administrative user. To confirm, run the id -Z command as a regular user. Without changes, it leads to the following output, which suggests that the user is not confined by any SELinux settings:

The preceding string defines what is called a label in SELinux jargon. A label is made up of several context strings, separated by a column: a user context (which ends with a _u), a role context (which ends with _r), a type context (which ends with _t), a sensitivity context, and a category set. The rules of the targeted policy, which is the default SELinux policy in RHEL 7, are mostly associated with the type (_t) context.
Although it may not be an exam requirement, regular users should be confined by SELinux. When user accounts are compromised, and they will be compromised, you want any damage that might be caused limited by SELinux rules. The following example specifies a confinement rule that adds (-a) regular user michael, specifying (-s) the user_u context for confinement:

The user_u role should not have the ability to run the su and sudo commands described in Chapter 8. If desired, you can reverse the process with the semanage -d michael command. Since user roles are still a work in progress, you should focus on the available user contexts listed in the latest Red Hat documentation, as shown in Table 4-11.
One other commonly seen “user” context is system_u, which typically does not apply to regular users. It is a common user seen in the output to the ls -Z command for system and configuration files.
When a user role is changed, it doesn’t take effect until the next login. For example, if we were to change the role for user michael to user_u in a GUI-based command line, the change would not take effect until we logged out and logged back in to the GUI. If you were to try this on your system, you would no longer be able to start any administrative configuration tools, and you would not have access to the sudo and su commands.
On some networks, you may want to change the role of future users to user_u. If you don’t want regular users tinkering with administrative tools, you could make that change for future default users with the following command:

TABLE 4-11 Options for SELinux User Roles

This command modifies (-m) the targeted policy store (-S), with SELinux user (-s) user_u, with the MLS s0 range (-r) for the default user. Here, “__default__” includes two underscore characters on each side of the word. As long as user_u is in effect for the default SELinux user, regular users won’t have access to use administrative tools or commands such as su and sudo. The following command reverses the process:

The MLS policy adds complexity to SELinux. The targeted default policy with appropriate booleans and file contexts normally provides more than adequate security.
The full MLS range is required (s0-s0:c0.c1023) because the unconfined_u user is not normally limited by MLS restrictions.
Most SELinux settings are boolean—in other words, they’re activated and deactivated by setting them to 1 or 0, respectively. Once set, the booleans can be retrieved from the /sys/fs/selinux/booleans directory. One simple example is selinuxuser_ping, which is normally set to 1, which allows users to run the ping and traceroute commands. Many of these SELinux settings are associated with specific RHCE services and will be covered in the second half of this book.
These settings can be read with the getsebool and modified with the setsebool commands. For example, the following output from the getsebool user_exec_content command confirms that SELinux allows users to execute scripts either in their home directories or from the /tmp directory:

This default applies to SELinux user_u users. In other words, with this boolean, such users can create and execute scripts in the noted directories. That boolean can be disabled either temporarily or in a way that survives a reboot. One method for doing so is with the setsebool command. For example, the following command disables the noted boolean until the system is rebooted:

You can choose to substitute =0 for off in the command. As this is a boolean setting, the effect is the same: the flag is switched off. However, the -P switch is required to make the change to the boolean setting survive a system reboot. Be aware, the changes don’t take effect until the next time the affected user actually logs in to the associated system.
A full list of available booleans is available in the output to the getsebool -a command.
For more information on each boolean, run the semanage boolean -l command. Although the output includes descriptions of all available booleans, it is a database that can be searched with the help of the grep command.
If you’ve enabled SELinux, the ls -Z command lists current SELinux file contexts, as shown earlier in Figure 4-10. As an example, take the relevant output for the anaconda-ks.cfg file from the /root directory:

The output includes the regular ugo/rwx ownership and permission data. It also specifies four elements of SELinux security: the user, role, type, and MLS level for the noted file. Generally, the SELinux user associated with a file is system_u or unconfined_u, and this generally does not affect access. In most cases, files are associated with an object_r, an object role for the file. It’s certainly possible that future versions of the SELinux targeted policy will include more fine-grained options for the user and role.
The key file context is the type, in this case, admin_home_t. When you configured FTP and HTTP servers in Chapter 1, you changed the type of the configured directory and the files therein to match the default type of shared files from those services with the chcon command.
For example, to configure a nonstandard directory for an FTP server, make sure the context matches the default FTP directory. Consider the following command:

The contexts are the system user (system_u) and system objects (object_r) for type sharing with the public (public_content_t). If you create another directory for FTP service, you’ll need to assign the same security contexts to that directory. For example, if you create an /ftp directory as the root user and run the ls -Zd /ftp command, you’ll see the contexts associated with the /ftp directory as shown:

To change the context, use the chcon command. If there are subdirectories, you’ll want to make sure changes are made recursively with the -R switch. In this case, to change the user and type contexts to match /var/ftp, run the following command:

If you want to support uploads to your FTP server, you’ll have to assign a different type context, specifically public_content_rw_t. That corresponds to the following command:

In Chapter 1, you used a different variation on the chcon command. To use that lesson, the following command uses user, role, and context from the /var/ftp directory and applies the changes recursively:

But wait, what happens if a filesystem gets relabeled? The changes made with chcon won’t survive a filesystem relabeling because all file contexts will be reset to the default values defined in the SELinux policy. Hence, we need a way to modify the rules that define the default file context for each file. This subject will be covered in the next section.
Using restorecon is the preferred way to change file contexts because it sets the contexts to the values configured in the SELinux policy. The chcon command can modify file contexts to any value passed as an argument, but the change may not survive a filesystem relabeling if a context differs from the default value defined in the SELinux policy. Hence, to avoid mistakes, you should modify contexts in the SELinux policy with semanage fcontext and use restorecon to change file contexts.
Default contexts are configured in /etc/selinux/targeted/contexts/files/file_contexts. If you make a mistake and want to restore the original SELinux settings for a file, the restorecon command restores those settings based on the file_contexts configuration file. However, the defaults in a directory may vary. For example, the following command (with the -F switch forcing a change to all contexts rather than just the type context) leads to a different set of contexts for the /ftp directory:

FIGURE 4-11 SELinux context definitions

You may notice that the user context is different from when the /ftp directory was created. That’s due to the first line in the aforementioned file_contexts file, which applies the noted contexts:

You may also list all default file contexts rules in file_contexts with the semanage fcontext -l command. See Figure 4-11 for an excerpt of the output.
As you can see, SELinux context definitions use regular expressions, such as the following:

The preceding regular expression matches the / character, followed by an arbitrary number of characters (the .*). The ? character means that the entire regular expression within parentheses can be matched zero or one time. Hence, the overall result is to match a / followed by an arbitrary amount of characters, or nothing. This regular expression is widely used to match a directory and all the files in it.
As an example, a regular expression that matches the /ftp directory and all files in it is given by the following:

Using this regular expression, we can define a SELinux policy rule that assigns to the /ftp directory and all files in it a default type context. This can be done with the semanage fcontext -a command. For example, the following command assigns a default type context of public_content_t to the /ftp directory and all the files in it:

Once you have defined a new default policy context for a filesystem path, you can run the restorecon command to set the contexts to the corresponding default policy values. The following command restores the context recursively (-R) to the public_content_t value defined previously:

As discussed in Chapter 9, the ps command lists currently running processes. In a SELinux system, there are contexts for each running process. To see those contexts for all processes currently in operation, run the ps -eZ command, which lists every (-e) process SELinux context (-Z). Figure 4-12 includes a varied excerpt from the output of that command on our system.
Although the user and role don’t change often, the process type varies widely, frequently matching the purpose of the running process. For example, from the bottom of the figure, you can see how the Avahi daemon (avahi-daemon) is matched by the avahi_t SELinux type. You should be able to identify how at least some of the other SELinux types match the associated service.
In other words, although there is a large variety of SELinux types, they’re consistent with the running process.
FIGURE 4-12 SELinux security contexts of different processes

If there’s a problem, SELinux is running in enforcing mode, and you’re sure there are no problems with the target service or application, don’t disable SELinux! Red Hat has made it easier to manage and troubleshoot. According to Red Hat, the top two causes of SELinux-related problems are contexts and boolean settings.
Problems with SELinux should be documented in the associated log file, audit.log, in the /var/log/audit directory. The file may be confusing, especially the first time you read it. A number of tools are available to help decipher this log.
First, the audit search (ausearch) command can help filter for specific types of problems. For example, the following command lists all SELinux events associated with the use of the sudo command:

Such events are known as Access Vector Cache (-m avc) messages; the -c allows you to specify the name commonly used in the log, such as httpd or su. If you’ve experimented with the user_u SELinux user described earlier in this chapter, there should be several related messages available from the audit.log file.
Even for most administrators, the output is still a lot of gobbledygook. However, it should include identifying information such as the audited user ID (shown as auid), which can help you identify the offending user. Perhaps the user needs such access, or perhaps that user’s account has been compromised. In any case, the alert may cause you to pay more attention to that account.
In contrast, the sealert -a /var/log/audit/audit.log command may provide more clarity. An excerpt is shown in Figure 4-13.
Considering Figure 4-13 and the SELinux concepts described so far, you might wonder if the user in question is allowed to run the su command. If the problem were in the /etc/sudoers file covered in Chapter 8, the SELinux alert message might not even appear. So you should pay attention to the source and target contexts. As they match, the file context is not the issue.
By process of elimination, that points to the user context described earlier as the problem. The UID of the user in question should be listed later in the file, under “Raw Audit Messages.” If the user in question requires access to the su and sudo commands, you should change the role of that user with the semanage login command described earlier. Otherwise, the user might just be experimenting with Linux. Any access to the sudo command will be documented in the /var/log/secure log file.

After deactivating the user_exec_content boolean described earlier, we created a simple script named script1 for a user governed by the user_u label. After making that script executable, we tried running it with the /home/examprep/script1 command. Even though that user had ownership of the file, with executable permissions set, that attempt led to the following message:

That led to the log excerpt shown in Figure 4-14. Note the section on the top; it explicitly cites the command required to address the problem. As an administrator, you need to decide whether such users should be given the ability to execute their own scripts. If so, then the noted command would address the problem.
FIGURE 4-14 A SELinux alert and a solution

If you’ve taken the time to learn SELinux from the command line, this section should be just a review. For many users, the easiest way to change SELinux settings is with the SELinux Administration tool, which you can start with the system-config-selinux command. As shown in Figure 4-15, it starts with a basic view of the status of SELinux on the local system, reflecting some of the information shown in the output to the sestatus command.
As you can see, there are options labeled Default Enforcing Mode and Current Enforcing Mode, which you can set to Enforcing, Permissive, or Disabled. Although the focus of SELinux is on a Targeted policy, MLS is also available if you install the selinux-policy-mls package. Generally, you don’t need to activate the Relabel On Next Reboot option unless you’ve changed the default policy type.
There are a number of categories shown in the left pane of the SELinux Management Tool window described in the following sections. In the RHCE half of this book, you’ll revisit this tool with more of a focus on boolean settings.
In the SELinux Administration tool, click Boolean in the left panel. Scroll through available modules. As you can see, a SELinux policy can be modified in a number of different categories, some related to administrative functions, others to specific services. A select number of these options are shown in Figure 4-16. Any changes you make are reflected in boolean variables in the /sys/fs/selinux/booleans directory. Module categories of interest for the RHCSA exam include cron, mount, virt, and that catch-all category: unknown. A list of selected booleans is included in Table 4-12. The booleans appear in the order shown in the SELinux Management tool.
FIGURE 4-15 SELinux status in the Administration tool

You can change the default labels associated with files, some of which are described earlier in this chapter (and in other chapters discussing SELinux contexts). Some of the options are shown in Figure 4-17. Any changes to this screen are written to the file_contexts.local file in the /etc/selinux/targeted/contexts/files directory.
The User Mapping section allows you to go beyond the defaults for regular and administrative users. The display here illustrates the current output to the semanage login -l command. If you don’t remember the intricacies of the semanage command, it may be easier to use this screen to map existing users to different contexts. Click Add to open the Add User Mapping window shown in Figure 4-18. This figure also illustrates how you might reclassify a user named michael as a SELinux user_u user type.
FIGURE 4-16 Booleans in the SELinux Administration tool
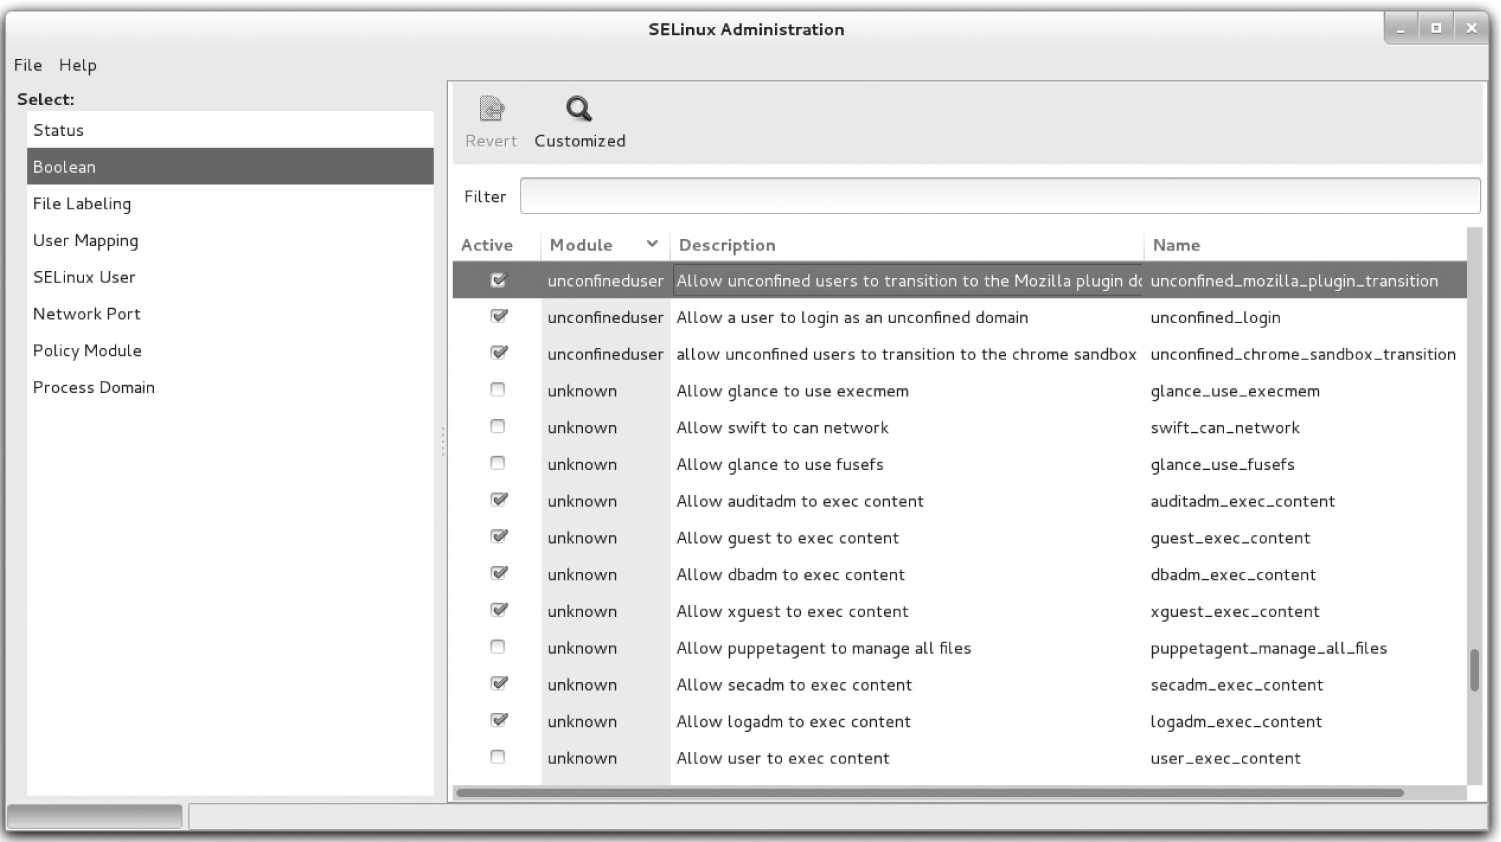
TABLE 4-12 Selected SELinux Boolean Options

FIGURE 4-17 File types in the SELinux Administration tool

The SELinux User section allows you to specify and modify default roles for standard users, such as regular users (user_u), system users (system_u), and unconfined users (unconfined_u).
The Network Port section associates standard ports with services.
The Policy Module section specifies the SELinux policy version number applied to each module.
FIGURE 4-18 Map a user in the SELinux Management tool.

The Process Domain allows you to change the status of SELinux to Permissive or Enforcing mode for a single process domain, rather than for the whole system.
RHEL 7 includes the SELinux Troubleshoot Browser shown in Figure 4-19. It provides tips and advice on any problems you may encounter in a language that Linux administrators can understand, often including commands that you can run and that will address the subject problem.
To start the browser from the GNOME desktop, click Applications | Sundry | SELinux Troubleshooter or run sealert -b from a GUI-based command line. The command is available from the setroubleshoot-server package.
FIGURE 4-19 Security alerts with the SELinux Troubleshoot Browser

EXERCISE 4-3
In this exercise, you’ll configure a user with the staff_u SELinux user type and test the results. You’ll need a GUI and at least one regular user other than the root administrative user.
1. If necessary, create a regular user. Even if you already have a regular user, a second regular user for the purpose of this exercise may reduce risks. Users can always be deleted, as discussed in Chapter 8. To that end, the useradd user1 and passwd user1 commands create a user named user1 with a password.
2. Review the SELinux types of current users with the semanage login -l command.
3. Configure the desired user as a staff_u user with the semanage login -a -s staff_u user1 command. Substitute as desired for user1.
4. If you’re completely logged in to the GUI, log out. Click System | Log Out, and click Log Out in the window that appears.
5. Log in to the GUI with the newly revised staff_u account, user1 (or whatever else you may have configured in Step 3). If you don’t already see a GUI login screen, press ALT-F1 or ALT-F7.
6. Try various administrative commands. Do you have access to the su command? What of sudo? You may want to review this exercise after reading Chapter 8 if you don’t know how to use sudo. What administrative tools discussed so far in this book are accessible? Is there a difference whether that tool is started from the GUI command line or from the GUI menu?
7. Log out of the new user1 account, and log back in to the regular account.
8. Delete the new user from the staff_u list; if that’s user1, you can do so with the semanage login -d user1 command.
9. Confirm the restored configuration with the semanage login -l command.
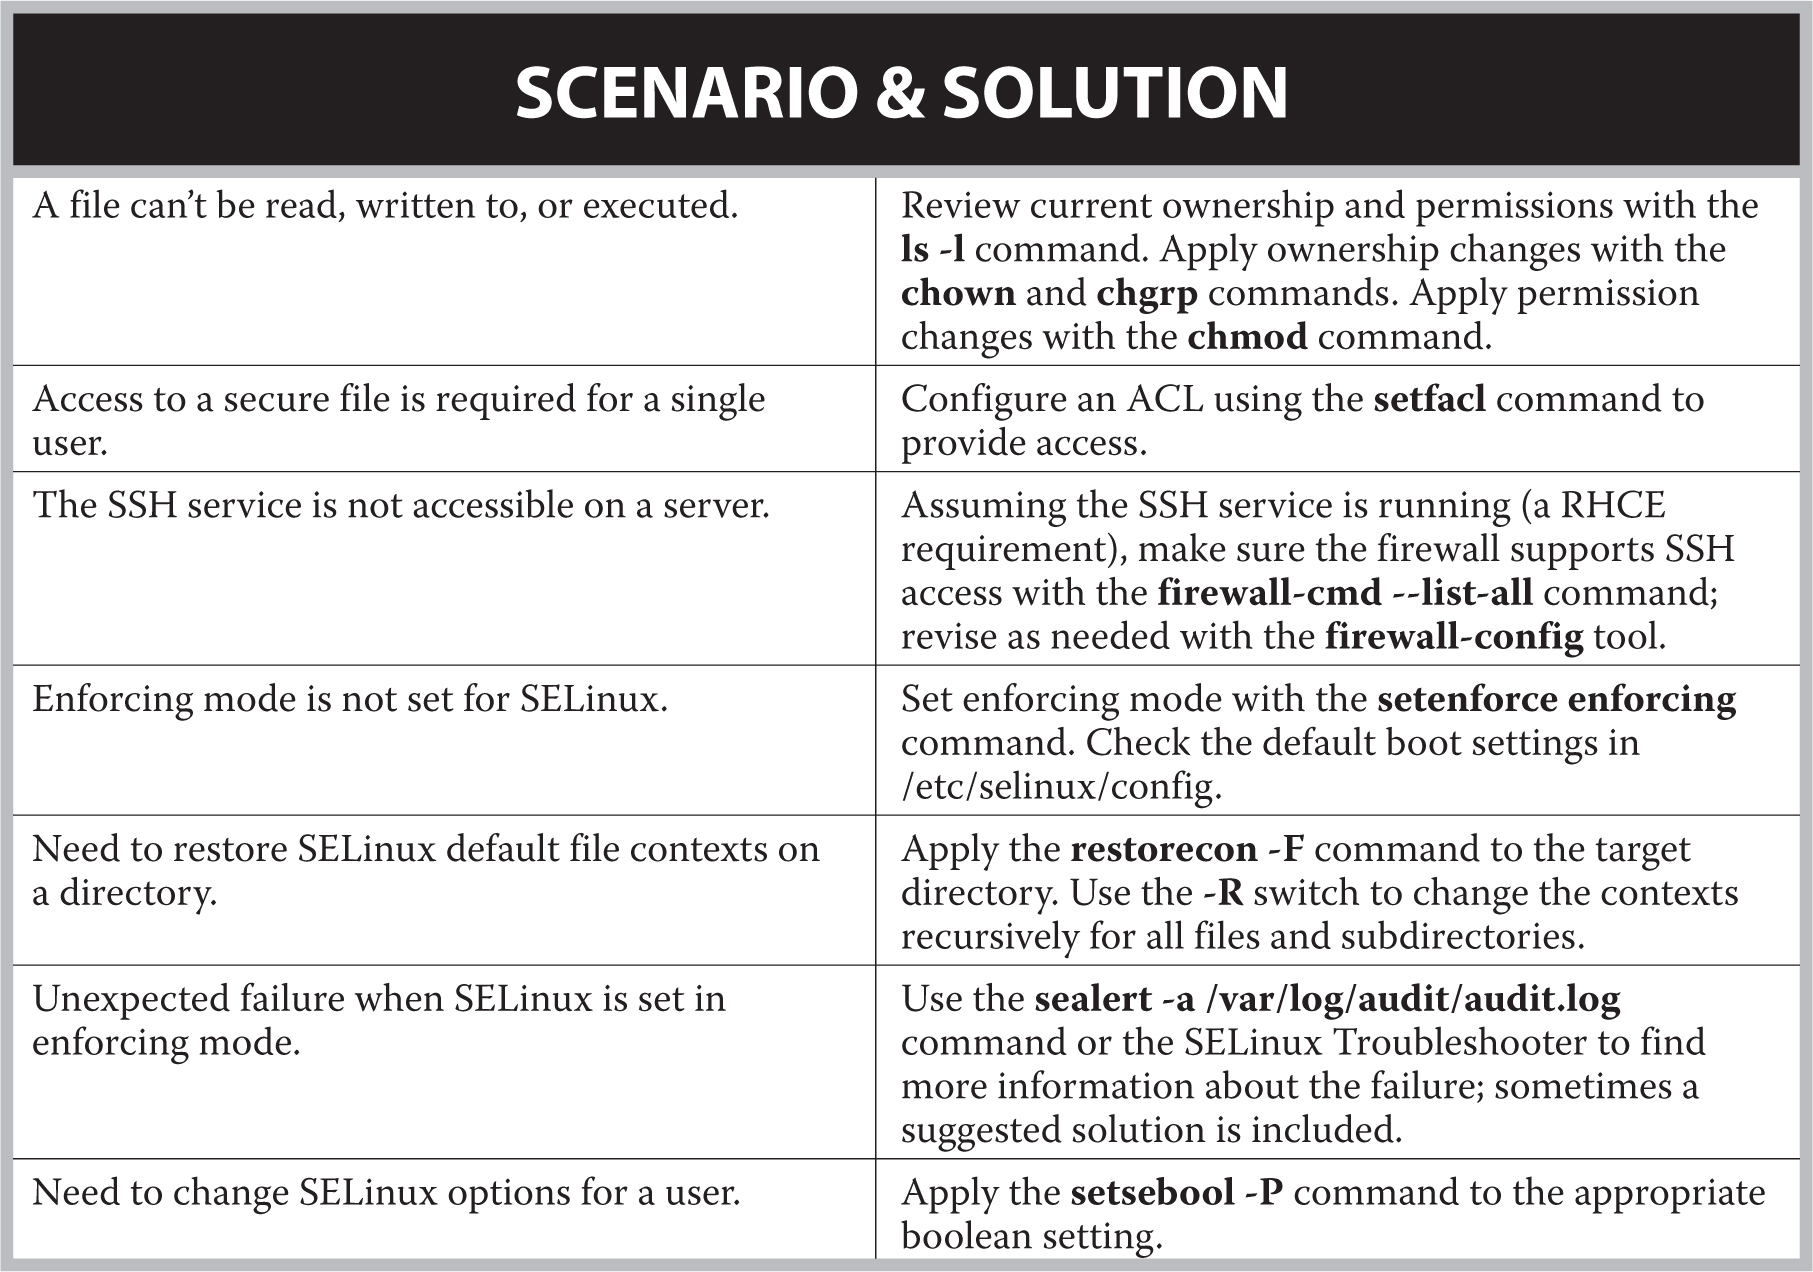
This chapter focused on the basics of RHCSA-level security. On any Linux system, security starts with the ownership and permissions associated with a file. Ownership may be divided into users, groups, and others. Permissions may be divided into read, write, and execute in a scheme known as discretionary access controls. Default file permissions are based on the value of umask for a user. Permissions may be extended with the SUID, SGID, and sticky bits.
ACLs can add another dimension to discretionary access controls. When configured on a mounted volume, ACLs can be configured to supersede basic ugo/rwx permissions. ACLs can be included in NFSv4 shared directories.
Firewalls can prevent communication on all but the desired ports. Standard ports for most services are defined in the /etc/services file. However, some services may not use all of the protocols defined in that file. The default RHEL 7 firewall supports access only to a local SSH server.
The ssh-keygen command creates passphrase-protected key pairs, which can be used to authenticate to an SSH server without transmitting a user’s password over the network.
SELinux provides another layer of protection using mandatory access control. With a variety of available SELinux users, objects, file types, and MLS ranges, SELinux controls can help ensure that a breach in one service doesn’t lead to trouble with other services.
 TWO-MINUTE DRILL
Here are some of the key points from the certification objectives in Chapter 4.
 Standard Linux file permissions are read, write, and execute, which may vary for the user owner, the group owner, and other users.
Special permissions include the SUID, SGID, and sticky bits.
Default user permissions are based on the value of the umask.
Ownership and permissions can be changed with the chown, chgrp, and chmod commands.
Special file attributes can be listed with the lsattr command and modified by the chattr command.
ACLs can be listed and modified on filesystems mounted with the acl option. The XFS and ext4 filesystems created on RHEL 7 have such an option enabled by default.
Every file already has ACLs based on standard ownership and permissions.
You can configure ACLs on a file to supersede standard ownership and permissions for specified users and groups on selected files. Actual ACLs may depend on the mask.
Custom ACLs on a file are not enough; selected users and groups also need access to the directories that contain such files.
Just as custom ACLs can support special access for selected users, they can also deny access to other selected users.
ACLs can be configured on shared NFS directories.
Standard Linux firewalls are based on the Netfilter kernel system and on the iptables tool.
Standard Linux firewalls assume the use of some of the ports and protocols listed in /etc/services.
The default RHEL 7 firewall supports remote access to the local SSH server.
The RHEL 7 firewall can be configured with the GUI firewall-config tool or the console-based tool firewall-cmd command.
SSH configuration commands include ssh-keygen and ssh-copy-id.
User home directories include their own .ssh subdirectory of configuration files, with private and public SSH keys, suitable for passphrases.
Private/public key pairs can be configured with passphrases using the ssh-keygen command.
Public keys can be transmitted to users’ home directories on remote systems with the ssh-copy-id command.
SELinux may be configured in enforcing, permissive, or disabled mode, with targeted or MLS policies, with the help of the setenforce command. Default boot settings are stored in the /etc/selinux/config file.
User options for SELinux can be set with the semanage login command.
SELinux labels contain different contexts, such as user, roles, types, and MLS levels.
SELinux booleans can be managed with the setsebool command; permanent changes require the -P switch.
SELinux contexts can be changed with the chcon command and restored to defaults with the restorecon command.
The sealert command and the SELinux Troubleshoot Browser can be used to interpret problems documented in the audit.log file in the /var/log/audit directory.

The following questions will help you measure your understanding of the material presented in this chapter. As no multiple choice questions appear on the Red Hat exams, no multiple choice questions appear in this book. These questions exclusively test your understanding of the chapter. Getting results, not memorizing trivia, is what counts on the Red Hat exams. There may be more than one right answer to many of these questions.
1. What command configures read and write permissions on the file named question1 in the local directory, for the file owner, with no permissions for any other user?

2. What single command changes the user owner to professor and group owner to assistants for the local file named question2?
3. What command would change the attributes of a file named question3 to allow you to only append to that file?
4. What command reads current ACLs for the local file named question4? Assume that file is on a filesystem with ACL support enabled.
5. What single command gives members of the group named managers read access to the project5 file in the /home/project directory? Assume the managers group already has read and execute access to the directory.
6. What command prevents members of the group named temps from having any access to the secret6 file in the /home/project directory?
7. What TCP/IP port number is associated with the HTTP service?
8. List the full firewall-cmd command to permanently allow incoming HTTP traffic for the default firewalld zone.
9. What command configures a private/public key pair using DSA?
10. What subdirectory of a user home directory contains the authorized_keys file?
11. What command configures SELinux in enforcing mode?
12. What command lists the SELinux status of current users?
13. What command lists all boolean settings for SELinux?
Several of these labs involve configuration exercises. You should do these exercises on test machines only. It’s assumed that you’re running these exercises on virtual machines such as KVM and they’re not used for production.
Red Hat presents its exams electronically. For that reason, most of the labs in this and future chapters are available from the media that accompanies the book. For this chapter’s lab, look in the Chapter4/ subdirectory. In case you haven’t yet set up RHEL 7 on a system, refer to Chapter 1 for installation instructions.
The answers for each lab follow the Self Test answers for the fill-in-the-blank questions.

1. The command that configures read and write permissions on the file named question1 in the local directory, with no permissions for any other user, is

2. The single command that changes the user owner to professor and group owner to assistants for the noted file is

It’s acceptable to substitute a colon (:) for the dot (.).
3. The command that changes the attributes of a file named question3 to allow you to only append to that file is

4. The command that reads current ACLs for the local file named question4 is

5. The single command that gives members of the group named managers read access to the project5 file in the /home/project directory is

6. The command that prevents members of the group named temps from having any access to the secret6 file in the /home/project directory is

7. The TCP/IP port number associated with the HTTP service is 80.
8. The firewall-cmd command that permanently allows incoming HTTP traffic for the default firewalld zone is

9. The command is ssh-keygen -t dsa.
10. Every user with public keys stored in the authorized_keys file can find that file in the .ssh/ subdirectory of her home directory.
11. The command that configures SELinux in enforcing mode is

12. The command that lists the SELinux status of current users is

13. The command that lists all boolean settings for SELinux is

Lab 1 is designed to let you practice configuring permissions associated with the SUID bit of /usr/bin/passwd.
Lab 2 shows an approach to making a script owned by a user executable by another user. If the script is properly executed by the ACL-configured regular user, you’ll find a file named filelist in the local directory.
The configuration of ACLs on the /root administrative directory is a bad security practice. However, it is an excellent way to illustrate the capabilities of ACLs on a system and how it can allow access by selected regular users to the inner sanctums of the root administrative account. Because of the risks, disable the ACLs when the lab is complete. If the selected user is michael, one method is with the following command:

This lab is designed to raise awareness of the time and effort required to disable and re-enable SELinux in enforcing mode. If you switch between disabled and permissive mode, the time and effort required should be about the same. If you have to reconfigure SELinux in enforcing mode, you may lose precious time during a Red Hat exam because nothing else can be done while the system is being rebooted and relabeled.
Standard users in RHEL 7 run as unconfined_u SELinux user types. As such, there are few limits on their user accounts. If instructions on an exam or from a corporate policy require certain limits on regular users, you may want to set up the __default__ user with the SELinux user_u user type. Alternatively, if you’re told to set up specific users to a limited type, such as xguest_u or staff_u, multiple semanage login commands may be appropriate. If you need to review the syntax of the semanage login command, run man semanage-login.
After testing a user as a guest_u user, most administrators will want regular users to have more privileges. However, the guest_u user is suitable for systems such as an edge server, where you want user accounts to be locked down.
Users configured with the guest_u SELinux user type are normally allowed to execute scripts even in their own home directories. That can change with the guest_exec_content boolean described in the lab. Success in this lab is based on a simple comparison: whether a binary can be executed with and without the active boolean.
Although the easiest way to restore the original configuration is with the GUI SELinux management tool, you should also know how to use commands such as the following, which disables a custom SELinux user type for user michael:

Success in this lab can be measured first with the ls -Zd command. When applied to both the /ftp and the /var/ftp/pub directories, it should lead to the same list of SELinux roles, objects, types, and MLS options for each directory.
Then, run the restorecon -R /ftp command and check again the SELinux type of the /ftp directory. If it has changed, it means you have missed the semanage fcontext command to modify the default file contexts described in the chapter.
Everyone will experiment with SELinux in different ways. So the results of this lab are up to you. The objective is to analyze a current relevant log file and process it at the command line. Try to identify the problems associated with each alert. Although you may not be able to address many SELinux issues, at least until the second half of this book, you should be able to identify the problems or at least the users and/or commands associated with each alert.