Two-Minute Drill
12.01 Automate System Maintenance
12.02 Set Up System Utilization Reports
12.03 Kernel Run-time Parameters
12.06 Network Interface Bonding and Teaming
12.07 Authentication with Kerberos
The automation of system maintenance is an objective for both the RHCSA and RHCE exams. For the RHCE, you need to know how to create a shell script. You’ll study some sample scripts used on RHEL 7 to automate system maintenance. You can automate those scripts on a schedule: hourly, daily, or even weekly.
Linux system utilization reports are associated with the sar command, which is configured as a cron job. Once you have identified the most utilized system resources, you can tune a system. This process starts from the Linux kernel, which is highly customizable. With different run-time parameters configured in the /proc/sys directory, kernels can be tuned to meet the needs of your applications.
The RHCE objectives also include a number of additional network requirements. You need to know how to set up static routes and configure IPv6. You will also learn how to configure network teaming and to provide bandwidth aggregation and link redundancy from multiple network interfaces. Finally, you should know how to set up a system as a Kerberos client.
This chapter directly addresses seven RHCE objectives. The first is an essential skill for systems administration; specifically, to
 Use shell scripting to automate system maintenance tasks
Shell scripts combine a series of commands in a single executable file. Automated scripts are normally run on a regular schedule, which the cron daemon is perfectly designed to handle.
System utilization reporting is an important skill for all computer professionals. RHEL 7 includes the sysstat package for such reports. The related objective is
Produce and deliver reports on system utilization (processor, memory, disk, and network)
As this is not a traditional network service, there is no need to configure a firewall. There are no current SELinux-related booleans.
Some Linux tuning tasks can be met through kernel run-time parameters. That’s made possible by the virtual files in the /proc/sys directory and by the sysctl command. The corresponding objective is
Use /proc/sys and sysctl to modify and set kernel run-time parameters
This chapter also addresses several network tasks from the RHCE objectives. The configuration of static routes, as described in the following objective, is an essential task in enterprise networking:
Route IP traffic and create static routes
Now that we are running out of IPv4 addresses, the RHCE for RHEL 7 includes a related objective:
Configure IPv6 addresses and perform basic IPv6 troubleshooting
In an enterprise network, it is common to aggregate multiple network interfaces for increased resiliency or higher throughput. In RHEL 7, you can aggregate multiple network interfaces either through interface bonding or network teaming, as addressed by the following objective:
Use network teaming or bonding to configure aggregated network links between two Red Hat Enterprise Linux systems
For the final objective in this chapter, you will learn to configure a RHEL 7 system as a Kerberos client. Kerberos provides secure authentication services on insecure networks. For the RHCE exam you must be able to
Configure a system to authenticate using Kerberos
To prepare for these requirements, you will learn to configure a Kerberos Key Distribution Center (KDC). For a more detailed background about Kerberos, refer to the Red Hat System-Level Authentication Guide, available at https://access.redhat.com/Documentation/en-US/Red_Hat_Enterprise_Linux/7.
CERTIFICATION OBJECTIVE 12.01
As discussed in Chapter 9, RHEL 7 includes standard system maintenance scripts, scheduled by the /etc/crontab and the /etc/anacrontab configuration files, as well as various files in the /etc/cron.* directories. In this chapter, you’ll analyze some scripts and some related bash internal commands. You’ll then have the skills you need to create basic administrative scripts.
Review the scripts in the /etc/cron.daily directory, starting with rhsmd, part of Red Hat Subscription Manager. It logs information about the current entitlement status of the system. That script has two lines. Normally, lines that start with the hash symbol (#) are comments. The first line starts with a “shebang” (#!), followed by /bin/sh, which is a standard first line for bash scripts. On RHEL 7, since /bin/sh is symbolically linked to /bin/bash, it tells RHEL 7 to interpret the commands that follow with the bash shell:

FIGURE 12-1 The logrotate script


Some Linux distributions (not Red Hat) link the /bin/sh command to a shell other than bash. Unless #!/bin/bash is specified in the script, it may not be transferable to other distributions.
The second line runs the rhsmd command, logging all results (-s) to syslog:

Next, examine the contents of the /etc/cron.daily directory. A slightly more complex script is logrotate. A copy of the script is shown in Figure 12-1.
The script starts with a shebang and the path of the program interpreter that will parse the rest of the script:

The next line in the file is executed automatically. The logrotate command rotates logs as defined in the /etc/logrotate.conf file, described in Chapter 9:

The following line assigns the exit value returned by the last command to a variable named EXITVALUE:

If the logrotate command is successful, EXITVALUE is set to 0.
The next if command starts a conditional statement. The != character sequence means “not equal.” Therefore, the following if conditional is true when the value of EXITVALUE is something other than 0:

If EXITVALUE is not 0, bash executes the commands inside the if conditional, which tells the administrator that there is a problem with the logrotate script or related log files.

The fi command that follows ends the conditional statement. The last directive returns 0, an indication of success:

With this introduction to scripts, you are ready to examine some bash variables and commands.
You can use variables in bash to store data. Although it’s common to write variable names in uppercase letters, you cannot start a variable name with a number.
The following example illustrates how you can assign a variable from the command line:

Take care when assigning a variable to not add spaces around the equal (=) character. To display the value of a variable, use the echo command and add a dollar sign in front of the variable:

You can also add braces around the variable name to avoid ambiguous expressions. For example, without braces, the following command would retrieve the value of the variable $todayth, rather than $today:

You can use variables as part of arithmetic expressions. In bash, arithmetic expressions are enclosed in the $((expression)) syntax. Here’s an example:

But there’s more. Variables can also store the output of a command. There are two ways to do so: using the $(command) syntax and with backticks `command`. Here’s an example of each:

Scripts are filled with various command constructs. Some groups of commands are executed only if a condition is met. Others are organized in a loop, which continues to run as long as a condition is satisfied. These command constructs are also known as conditional and control structures. Common commands include for, if, and test. The end of a loop may be labeled with a keyword such as done or fi. Some commands only exist in the context of others, which will be described in the subsections that follow.
The if operator is primarily used to check if a condition is met, such as if a file exists. For example, the following command checks if the /etc/sysconfig/network file exists and is a regular file:

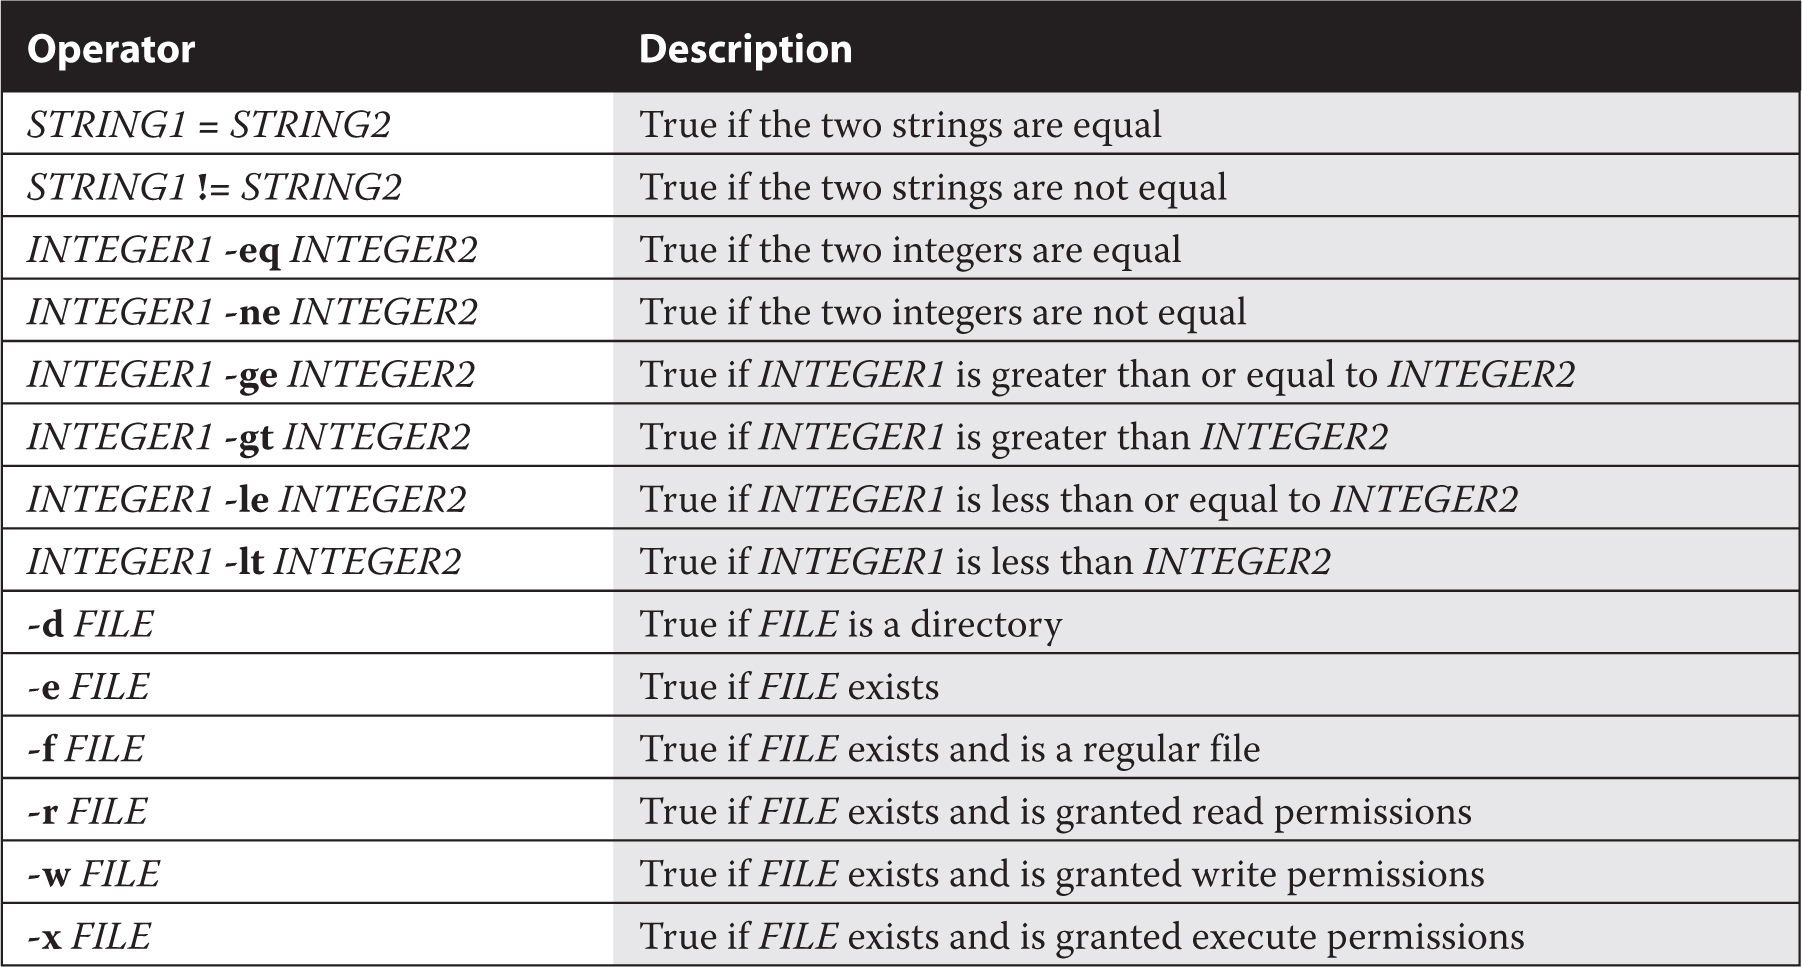
The exclamation mark (!) is the “not” operator and negates the result of the test. The -f checks to see if the filename that follows is a currently existing regular file. Test operators are very common in bash shell scripts. Some of these operators are listed in Table 12-1.
TABLE 12-1 Test Operators for bash Scripts
The if operator normally is associated with a then, and possibly an else operator. For example, take the following hypothetical block:

In this code, if the /etc/fstab file exists (courtesy of the -e), the command associated with the then operator is run. If that file is missing, the noted message is displayed.
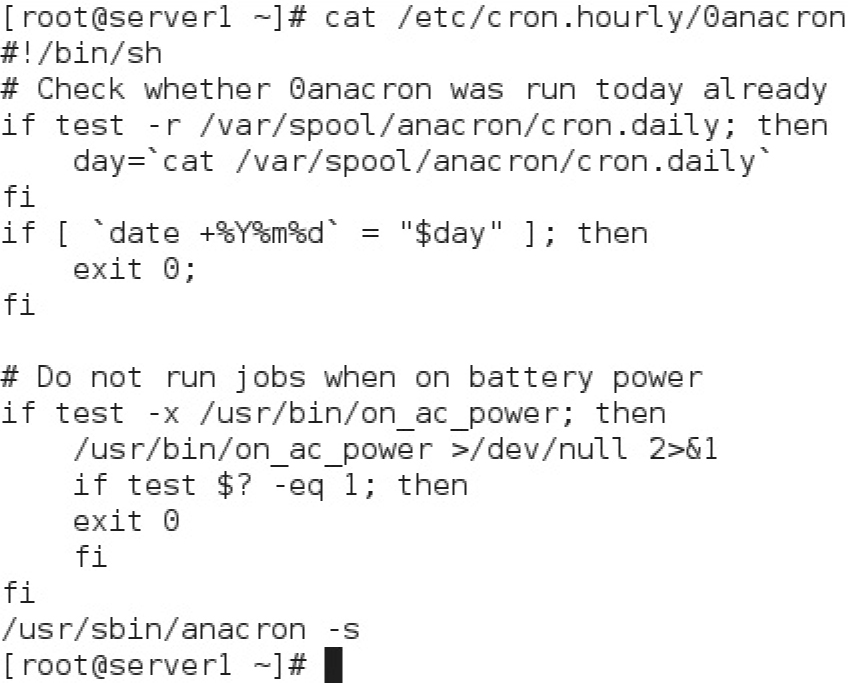
We summarized the intent of the 0anacron script in Chapter 9, but you’ll analyze it in detail here. You can find the script in the /etc/cron.hourly directory. A copy of the script is shown in Figure 12-2.
The script starts with a shebang line, which tells Linux that this is a bash script. Then, there is the following if block:

The test operator is sometimes used as a conditional within the if. For example, the line

FIGURE 12-2 The 0anacron script

This if block verifies whether the file /var/spool/anacron/cron.daily exists and is readable. If the test is successful, the content of the cron.daily file is saved into the day variable. In fact, the cron.daily file contains the last date (in YYYYMMDD format) that anacron was run.
The next lines contain another if block:

This code compares two strings: the current date, as returned by the date command in YYYYMMDD format (note the backticks, to substitute the output of the date command as the first operand in the test comparison), and the content of the day variable. As a good practice, the name of the day variable is enclosed in double quotes to prevent any special characters within the quoted string, apart from the dollar sign, to be interpreted by bash.
If the two dates are equal, the script exits immediately with a value of 0, indicating no errors. In other words, if anacron was already run today, the content of the /var/spool/anacron/cron.daily file would include today’s date. In this case, the script won’t run a second time and will exit with a value of 0.
The next section of code contains two nested if blocks:
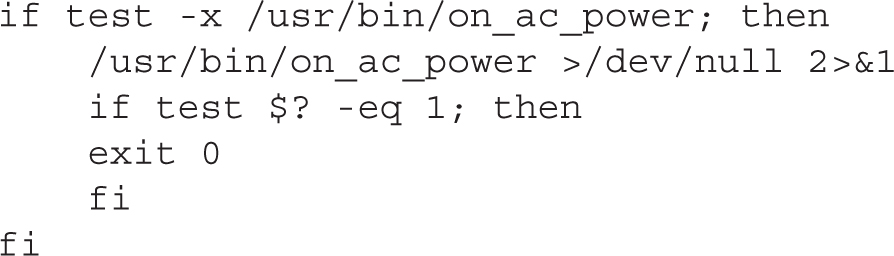
The first if instruction checks if the /usr/bin/on_ac_power file exists and is executable. If so, it runs the program and suppresses all its output by redirecting the standard output and standard error to /dev/null. As indicated in the man page of on_ac_power, this command returns an exit code of 0 if the system is on line power, and 1 otherwise.
Next, the script checks the exit code ($?) of the last command. If this is 1 (that is, if the system is not on AC power), the scripts exits with a value of 0.
Finally, if all the previous tests are passed, the script runs the anacron command:

In turn, anacron will read a list of jobs from /etc/anacrontab and execute them in sequential (-s) order.
The for loop executes a list of commands for all the items specified in a list. It’s fairly simple and has different forms. In the following example, the command in the for loop is executed three times, for each value of the variable n in the list 1, 2, 3:

The output of the previous snippet of code is

A different example exists within the certwatch script in the /etc/cron.daily directory. If you don’t see it on your system, install the crypto-utils package.
Here, the list in the for loop is replaced by the value of a variable:

The $certs variable contains a list of all the certificate files used by the Apache web server. The for goes through each certificate and checks whether it is about to expire. If so, it sends an alert.
Note the && operator between the two certwatch commands. It tells bash to execute the second command only if the first is successful (that is, if it returns a state of 0).
A more complex example is shown next. The for loop is executed for all the users in the system, as returned by the getent passwd command:

In the first line, the getent passwd command returns all the users in the system. This may include users defined locally in /etc/passwd, as well as users defined in a central directory service such as LDAP. The output of the command is truncated to the first column (-f 1), defined by a separator character (-d ":"). This gives a list of usernames that the for loop can cycle through and assign to the username variable at each iteration.
Then, the previous code snippet executes the groups command, with each username as an argument. This command returns the groups that a user is part of, in the following format:

The cut -f 1 -d ":" command extracts all the output after the column separator, and the result is saved in the usergroups variable. Finally, the result is displayed by the echo command.
You can use arguments to pass information to a script, in the same fashion that you would do with normal commands. In a bash script, the first command argument is saved in the special variable $1, the second in $2, and so forth. The total number of arguments is saved in the $# special variable. As an example, consider the following script:

Save the code in a file named args.sh and make it executable with the chmod +x args.sh command. Then, run the program as shown:

You should see the following output:

In Exercise 12-1, you will have a chance to put these lessons into practice.
EXERCISE 12-1
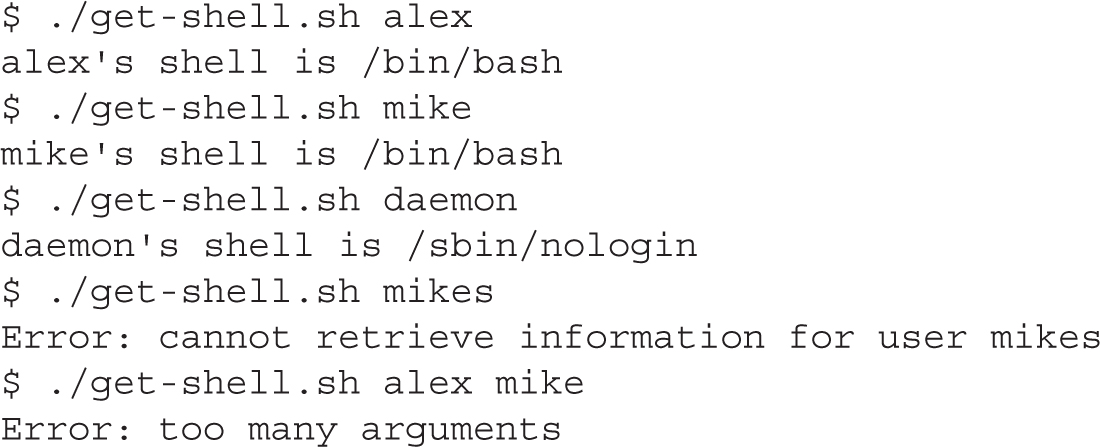
In this lab, you’ll create a script named get-shell.sh. The script takes a username as the first argument and displays the default shell of the indicated user, using the following format:

If no argument is provided, the script must display the default shell of the current user. If more than one argument is given, the script must print the following error message and exit with a value of 1:

If the user given as an argument does not exist, the script must display the following error message and exit with a value of 2:

1. Create a file named get-shell.sh and assign execute permissions
to that file:

2. Open the file with your favorite editor. Start the script with the following line:

3. Add the following lines that check if the number of arguments ($#) is greater than one. If so, print an error message and exit with a value of 1:

4. Add the lines that follow. If no arguments have been passed, the script saves the name of the current user ($USER) in the username variable. Otherwise, the username variable takes the value of the first argument ($1). To express this logic, we use the if-then-else construct:

5. Retrieve the user’s information. You can query the user database with the getent passwd command. This command returns user information from the local /etc/passwd file and from any configured directory systems:

6. Check the exit value of the previous command. Any nonzero exit value means that an error has occurred. If so, exit the program immediately with an exit status of 2:

7. Extract the user’s shell from the userinfo variable. This is the seventh field (-f 7) of /etc/passwd, where each field is separated by a column character (-d ":"):

8. Print the result. As a good practice, exit with a value of 0 to indicate that no errors have occurred:

9. Save your changes. Execute the script with different arguments to test every possible condition:
CERTIFICATION OBJECTIVE 12.02
As an administrator, it’s helpful to know when a system is overloaded. To help you, RHEL 7 includes the sysstat package. In addition, there are other commands related to measuring system utilization—specifically top. Of course, you can identify current disk usage with commands such as df and fdisk. Once system utilization reports are collected, you can review the results to help identify times when a system is in heavier use.
To paraphrase the relevant RHCE objective, there are other important commands that can help you “produce and deliver reports” on the load on the CPU, RAM, hard drives, and the network. While they collect data similar to commands such as top, df, and fdisk, the commands associated with the sysstat package collect such data on each of the noted components. Performance data is collected in log files. Then, the sadf command is designed to actually use that log data to prepare a report. When written to an appropriate text or database file, such reports can then be delivered for evaluation and processing.
FIGURE 12-3 The top command displays system utilization.

Basic system utilization commands are already available for Linux. For example, the top command provides a current view of three important items: CPU, RAM, and processes. Examine the output of the top command, shown in Figure 12-3. Current CPU, RAM, and swap space use is shown atop the display; currently running processes are shown below the bar. Processes that take a lot of CPU and RAM are shown first. By default, the view is refreshed every three seconds.
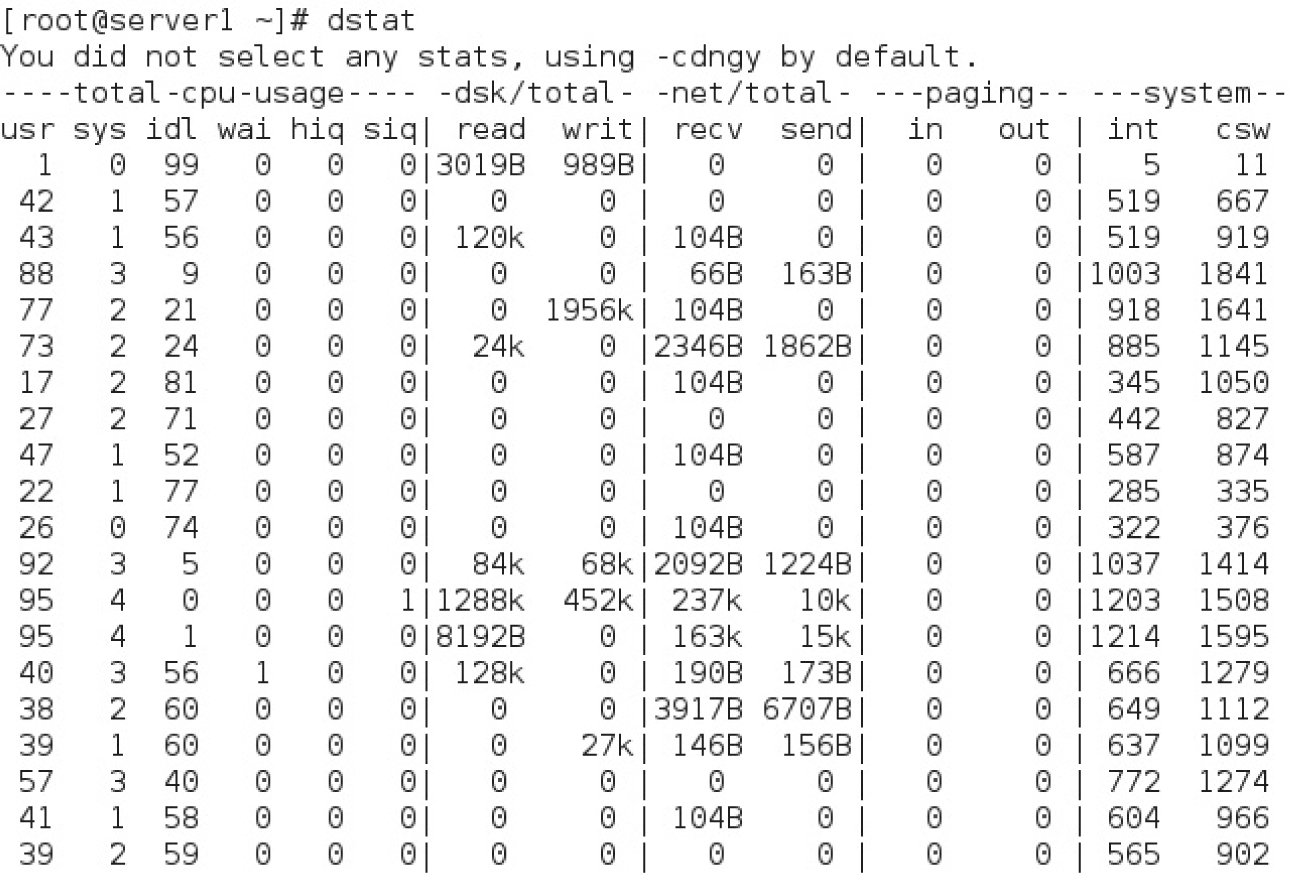
Alternatively, there’s the dstat command, part of the dstat package. As shown in Figure 12-4, it lists a variety of statistics, refreshed every second. The one item added here relative to the top command is network traffic, which can help you view current network usage.
Of course, these are real-time statistics and something that you can’t stare at all the time. That’s the reason behind the System Activity Report tool, or sar.
To set up the System Activity Report tool, install the sysstat package. The package includes a systemd service, as well as a cron job that runs on a regular basis, as defined in the /etc/cron.d/sysstat file. The package also contains a series of related commands, which are covered here.
FIGURE 12-4 The dstat command displays system utilization.
The commands that are part of sysstat use the parameters shown in the sysstat and sysstat.ioconf files, in the /etc/sysconfig directory. The sysstat file is relatively simple; the following directive specifies that log files should be kept for 28 days:

And this directive specifies that log files that are more than 31 days old should be compressed:

Of course, that means that log files are erased before they can be compressed. Naturally, you can change either variable as needed. The meaty /etc/sysconfig file is sysstat.ioconf because it helps collect activity data from a variety of storage devices. It helps some of the commands of the sysstat package collect data from disk devices. While the sysstat.ioconf file is large, changes should not be required to that file unless there’s new disk storage hardware—and the Red Hat exams are not hardware exams.
The sysstat package includes a regular cron job. Available in the /etc/cron.d directory, that job collects information on system utilization and sends it to log files in the /var/log/sa directory. Examine the sysstat file in the /etc/cron.d directory. The first line defines a job that’s run every 10 minutes by the root administrative user:

The sa1 command, with the 1 and 1 at the end, specifies that the command should run once, one second after the job is started. Information from this command is collected in the file named sadd in the /var/log/sa directory, where dd represents the day of the month.
The next line is more powerful than it looks. On a daily basis, at seven minutes before midnight, with the privileges of the root administrative user, the sa2 command writes a daily report on most system activity.

The -A switch is associated with the sar command. As suggested by the following excerpt from the sar man page, it essentially collects every reasonable bit on system utilization:

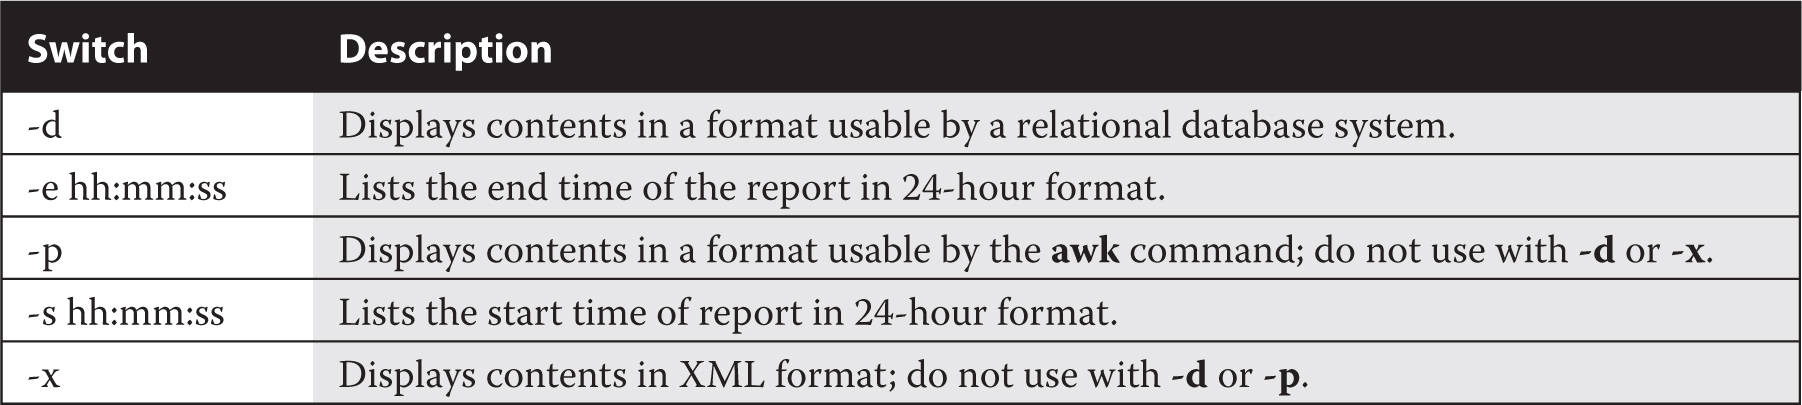
This section will not prepare a report for a presentation. It’s simply an analysis of the sadf command and how it can be used to specify information to filter from the log files in the /var/log/sa directory. The binary log files with names such as sa10 (for the 10th day of the month) can be processed in a number of ways by the sadf command. Some of the more important sadf switches are listed in Table 12-2.
For example, the following command sets up a report with data between the start and end of the 10th of the month:

The data is redirected to the activity10 file for later processing. But the power of the sysstat package comes from the way it interacts with the sar command. However, only some of the options of the sar command work with sadf. As suggested in the sadf man page, the following command prepares a report based on “memory, swap space, and network statistics” from the /var/log/sa/sa21 file in a format that can be processed by a database:

TABLE 12-2 Options for the sadf Command
While the -d switch is associated with the sadf command, the double-dash (--) points to options associated with the sar command. So the -r switch reports memory usage, and -n DEV reports statistics from network devices.
The sadf man page is an excellent reference for the command options required to create a report while on the job, or even during a Red Hat exam. As with many other commands, you can find examples in the EXAMPLES section of the man page.
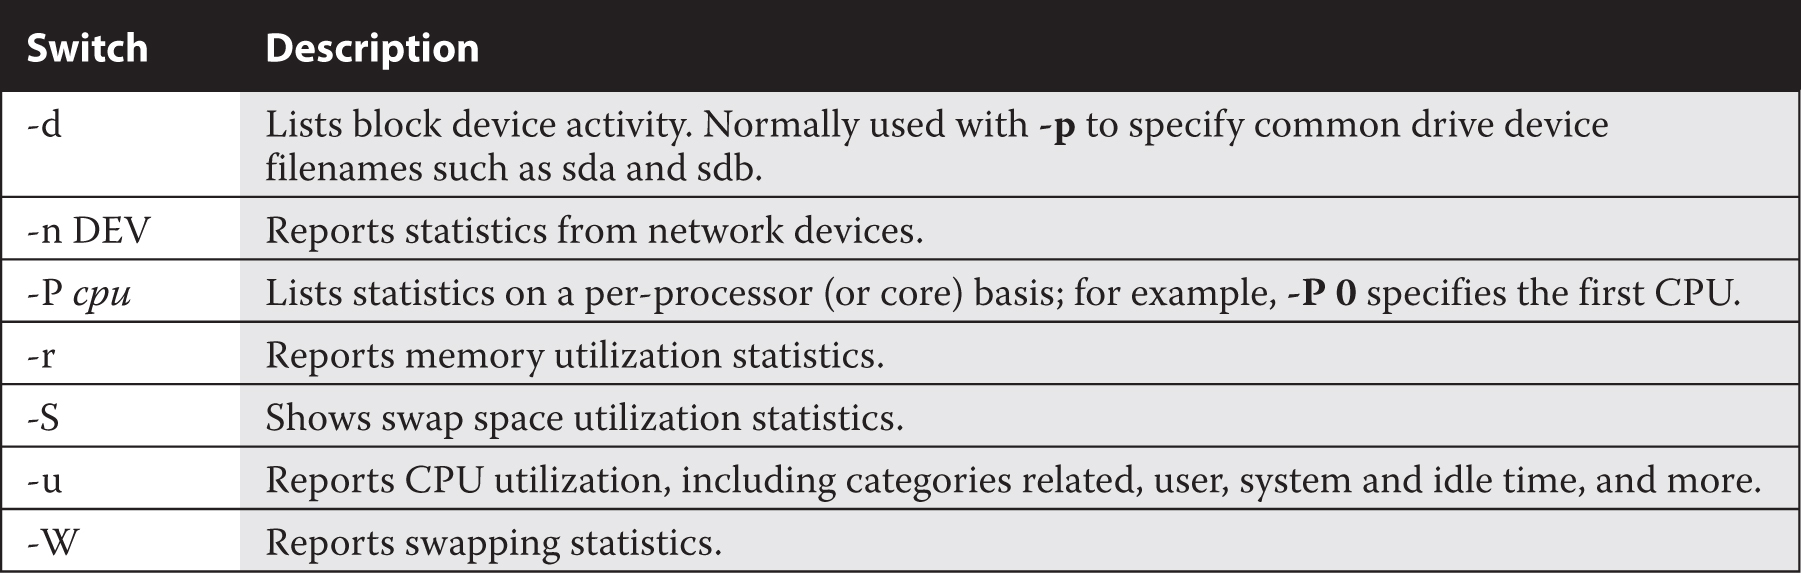
Of course, there are other important sar command switches. Those that may be relevant when you prepare a report on “processor, memory, disk, and network” utilization are described in Table 12-3.
With the switches listed in Table 12-3, you might modify the previous sadf command to meet all four items listed in the related RHCE objective:

TABLE 12-3 System Utilization Options for the sar Command
In other words, the sadf command specifies output usable by a database (-d) from the database file in the /var/log/sa directory associated with the 21st of the month. The double dash (--) points to sar command switches, with CPU utilization (-u), RAM utilization (-r), and activity by block device (-d) presented in more familiar block device names such as sda (-p), and with statistics from network devices (-n DEV).
CERTIFICATION OBJECTIVE 12.03
Kernel run-time parameters, as defined in the RHCE objectives, relate to files in the /proc/sys directory and the sysctl command. Closely related is the /etc/sysctl.conf configuration file, which is used by the sysctl command during the boot process to tune parameters to various files in the /proc/sys directory. Therefore, it’s appropriate to start this section with a look at that sysctl.conf file.
You can enable IPv4 forwarding in two steps. First, add the following boolean directive to activate IPv4 forwarding in the configuration:

Then make the system re-read the configuration file with the following command:

Let’s examine this process in a bit more detail. First, kernel run-time parameters are documented in various files in the /proc/sys directory. The content of the net.ipv4.ip_forward variable is stored in the ip_forward file, in the net/ipv4/ subdirectory. In other words, IPv4 forwarding is documented in the ip_forward file, in the /proc/sys/net/ipv4 directory.
As that file contains either a 0 or a 1, it is a boolean variable. So the value 1 for the net.ipv4.ip_forward variable activates IPv4 forwarding.
What if you want to add IPv6 forwarding? While that’s not configured in the /etc/sysctl.conf file, it’s a feature that you can add. IPv6 forwarding can be set in a file named forwarding, in the /proc/sys/net/ipv6/conf/all directory. In other words, to set IPv6 forwarding on reboot, you’d include the following directive in /etc/sysctl.conf:

Similar directives would work for other settings associated with files in the /proc/sys directory. Look at the icmp_* directives in the /proc/sys/net/ipv4 directory. You might recognize that the Internet Control Message Protocol (ICMP) is sometimes associated with the ping command. In fact, a ping command is a request for an echo. Thus, icmp_echo_ignore_all and icmp_echo_ignore_broadcasts relate to a direct ping command, as well as a ping command associated with the broadcast address.
In other words, if you add the directives

to the /etc/sysctl.conf file, the local system won’t respond to a direct ping command, nor will it respond to a request made by a ping to the broadcast address for the network.
The settings in the /etc/sysctl.conf file are a small fraction of what can be configured. In RHEL 7, /etc/sysctl.conf contains only comments, while the default configuration has been moved to files within the /usr/lib/sysctl.d directory. Have a look at those files. It’s fair to assume that RHEL 7 includes the options in those files for a reason, and those settings are most likely to be addressed in a RHCE exam. You’ve already examined the first directive for IPv4 forwarding. The next directive is included in the 50-default.conf file in the /usr/lib/sysctl.d directory. If active, it makes sure that packets that come in from an external network are in fact external by doing a reverse path forwarding check:

The following directive is normally disabled as a security measure to avoid a potential attack using source routing:

Also known as the kernel magic sysrq key, developers may change the value of this directive for development purposes. Generally, you should retain the default setting:

If there’s a crash of the Linux kernel, this option includes the PID number with the kernel core dump file to help identify the culprit:

Another standard method used by white-hat hackers to overload a system is a flood of SYN packets. It’s similar to the so-called “ping of death.” The following setting avoids the overload:

A bridge is an older term for a switch that can forward traffic between different network segments. The following directives, included in the 00-system.conf file in the /usr/lib/sysctl.d directory, disable the use of the noted iptables, ip6tables, and arptables filters on such bridges:

Such bridges are usually related to virtual networks on a KVM host.
EXERCISE 12-2
In this exercise, you’ll use kernel parameters to disable responses to the ping command. While this exercise can be run on any two connected systems, it assumes that you’ll be configuring the server1.example.com system and testing the result from the tester1.example.com system.
1. On the server1.example.com system, review the current setting related to responses to ping messages with the following command:

2. Assuming the output is a 0, try the ping localhost command. What happens? Don’t forget to press CTRL-C to exit from the output stream. If the output is 1, skip to Step 5.
3. Confirm the result from a remote system such as tester1.example.com. In some situations, you may not have physical access to that system, so connect with the appropriate ssh command. From the remote system, try the ping server1.example.com or ping 192.168.122.50 command.
4. Return to the server1.example.com system. Change the kernel setting described in Step 1 with the following command:

Confirm by repeating the command from Step 1. Try the ping localhost command again. What happens?
5. Restore the original 0 setting to the icmp_echo_ignore_all option.
As described in the RHCE objectives, you need to know how to “route IP traffic and create static routes.” That’s really two tasks. First, it’s a standard part of network configuration to set up a default route to an outside network. But there’s also the related task, when a system has two or more network devices, of setting up a static route to a specific network.
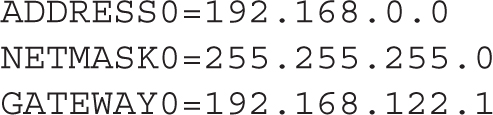
The default route is the path taken by a network packet when there aren’t any other more specific routes for that destination address. When a Dynamic Host Configuration Protocol (DHCP) server is working and is configured to provide a default gateway with IP addresses, a default route is assigned with the IP address received by the DHCP server. That’s normally evident in the output to the ip route command discussed in Chapter 3. One sample of such output for a system that uses a DHCP server is shown here:

To review, the default route goes through the gateway address of 192.168.122.1. In a similar fashion, the default route for a statically configured network system is configured with the GATEWAY directive in its configuration file. Such configuration files are stored in the /etc/sysconfig/network-scripts directory, with names such as ifcfg-eth0.
But there are situations, such as a temporary network issue, where the default route is not given by a DHCP server. Perhaps the DHCP server has to be replaced and you’ll have to set up static IP address information. In such cases, a default route can be added temporarily with the ip route command. For example, the following command would restore the default route shown earlier:

To make sure that default route survives a reboot, you’ll need to ensure either the system configures that default gateway IP address as part of a static network configuration, or the DHCP server used for the network can assign that gateway IP address. To review, Figure 12-5 reflects the way the default gateway IPv4 address is configured with the Network Manager tool. Alternatively, you can make sure the added default route survives a reboot by a direct change to the ifcfg-ethx configuration file.
Some systems may have multiple network devices. In that case, you may need to configure a static route.
FIGURE 12-5 A static network configuration with a default gateway

One way to configure a special route is with the Network Manager Connection Editor tool. As discussed in Chapter 3, you can start it from a GUI console with the nm-connection-editor command. Select an existing wired or wireless network device and then click Edit. Under either the IPv4 or IPv6 tab, there’s a Routes button to add static routes. Click it to see the window shown in Figure 12-6.
When you save the configuration, Network Manager creates a route-eth0 file in the /etc/sysconfig/network-scripts directory. The following is the complete contents of that file:
When the NetworkManager service is restarted, the new route is added to the routing table. Based on the previously configured routing table, the following is the output of the ip route command:

FIGURE 12-6 A static route for a specific network destination


A dummy interface is a special type of virtual interface that is not associated with any network adapters on the system. You can use a dummy interface to practice with certain network scenarios when you don’t have access to a physical network or your system is offline.
EXERCISE 12-3
In this exercise, you’ll create a dummy interface to practice the configuration of static routes. A dummy interface is a virtual interface that is not associated with any adapter on the host. This exercise assumes you’ll be configuring the dummy interface on the server1.example.com system, while the static route will be added to the physical host system.
1. On server1.example.com, run the following commands to add a dummy interface. Check that the IP range 192.168.123.0/24 is not already in use in your network. If so, choose a different network range:

2. Run the ping 192.168.123.123 command on server1.example.com. If you have correctly set up the dummy interface, you should get a reply to your ping requests. Don’t forget to press CTRL-C to exit from the output stream.
3. Run the ip route command on server1.example.com. You will see a valid route to 192.168.123.0/24 because this network segment is directly connected to the dummy interface eth2:

4. Rerun the ping 192.168.123.123 command from the physical host. As your physical host probably doesn’t have a route to 192.168.123.0/24 via server1, your ping command won’t receive a response.
5. Add a static route to 192.168.123.0/24 on your physical host. To do so, open the Network Manager Connection Editor tool. Select the virbr0 bridge device and then click Edit. Under the IPv4 Settings tab, click the Routes button to add a static route. Set 192.168.123.0 as the network address, 24 as the netmask, and 192.168.122.50 (the IP address of server1) as the gateway.
6. Restart Network Manager, like so:

7. Confirm that the route to 192.168.123.0/24 is installed in the routing table by running the ip route command.
8. Try the ping 192.168.123.123 command again from your physical host. What happens?
9. Remove the static route on the physical host.
10. Delete the dummy interface on server1:

One of the special challenges of the RHCE exam is IPv6 networking. While most current networks are configured with IPv4 addresses, several regions have run out of public IPv4 addresses.
Internet Protocol Version 6 (IPv6) was introduced in the late 1990s as a replacement for IPv4. It turns out that the 4 billion (232) IPv4 addresses are not enough. IPv6 supports many more addresses, potentially up to 2128, or 3.4×1038 (340 undecillion) addresses.
In Chapter 3, we introduced the “dot-decimal” notation for IPv4 addresses, where each decimal octet represents 8 bits of the 32-bit address (for example, 192.168.122.50). IPv6 addresses are made of 128 bits and are set up in hexadecimal notation, also known as base 16. In other words, an IPv6 address may include the following “digits”:

An IPv6 address is normally organized in eight groups of four hexadecimal numbers each, called “nibbles,” in the following format:

You can simplify IPv6 addressing further:
Remove any leading zeros in a nibble. For example, you can write 0db8 as db8, 0072 as 72, 0000 as 0, and so on.
Replace any sequence of 0000 nibbles with a pair of colons (::). As an example, you can abbreviate 0000:0000:0000 with a pair of colons. However, to avoid ambiguity, you can apply this rule only once in an IPv6 address.
Hence, we can rewrite the previous address in a much more compact form:

Similarly to IPv4, IPv6 addresses are made of two parts: a host and a network address. The host portion of an IPv6 address is known as the “interface identifier.” In IPv6, subnet masks are typically specified in prefix notation (such as /48).
As an example, assume that the IPv6 address 2001:db8:3dab:1::72 has a network prefix of /64. In other words, the network part of that IPv6 address includes the first 64 bits of that address. In this case, that network prefix is 2001:db8:3dab:1. The interface identifier includes the last 64 bits, shown as the hexadecimal number 72.
IPv6 addresses are classified in several categories. First, there are three address formats:
Unicast A unicast address is associated with a single network adapter.
Anycast An anycast address can be assigned to multiple hosts simultaneously. It can be used for load balancing and redundancy. Anycast addresses are organized in the same way as unicast addresses.
Multicast A multicast address is used to send a message to multiple destinations simultaneously.
With that diversity of address formats, IPv4-style broadcast addresses aren’t needed. If you want to send a message to multiple systems, use IPv6 multicast addresses.
IPv6 addresses are also organized in several different ranges, as described in Table 12-4. The default route in IPv4 (0.0.0.0/0) is shown as ::/0 in IPv6.
The link-local address range requires explanation. Every interface in an IPv6 network is automatically configured with a link-local address. These addresses are not routable; as such communication is limited to the local network segment. Link-local addresses are needed for various IPv6 operations.
Even if you haven’t configured IPv6 in your RHEL 7 servers, each network interface is automatically assigned a link-local address, as shown in the following output:
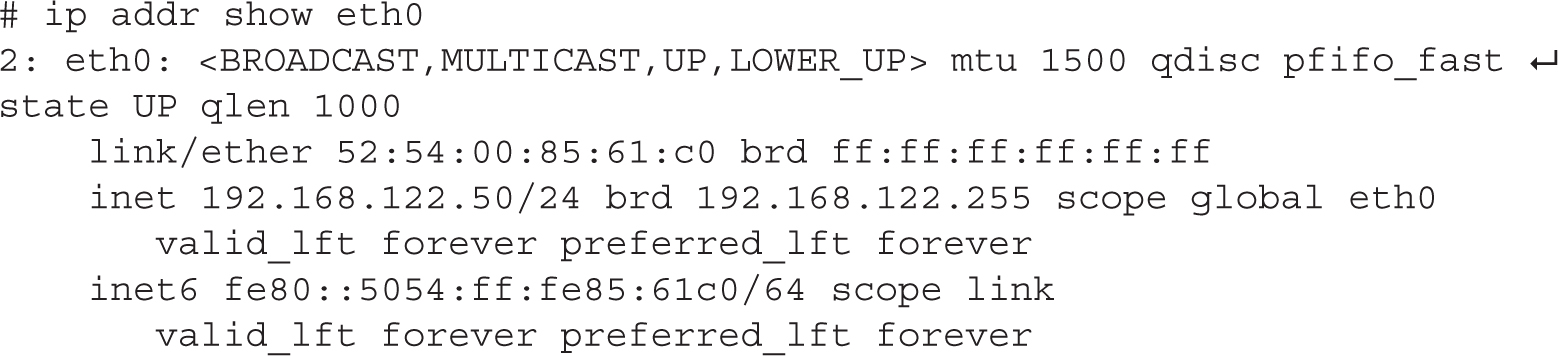
TABLE 12-4 IPv6 Address Types

To identify a link-local address, look for an address that starts with fe80. Note the “scope link” entry. As you can see, interface eth0 has the following IPv6 link-local address: fe80::5054:ff:fe85:61c0/64.
Most of the network tools that we introduced in Chapter 3 work seamlessly with both IPv4 and IPv6 addresses. There are two notable exceptions: the ping and traceroute commands. For IPv6 networking, you would use the ping6 and traceroute6 commands.
The ping6 command works in a similar way to ping. Even before you configure an IPv6 address, you can run the ping6 command on the link-local address of the server1.example.com system:

Since link-local addresses are not routable, you must specify the outbound interface (-I) in the ping6 command when you ping a remote link-local address.
As with IPv4 networking, you can configure an IPv6 address with the Network Manager command-line tool nmcli, the text-based graphical tool nmtui, or the Network Manager Connections Editor.
Start the Network Manager Connections Editor from the GUI with the nm-connection-editor command.
Highlight the connection profile of the first Ethernet device (eth0 in our system) and click Edit; then click the IPv6 Settings tab. It’ll open the window shown in Figure 12-7.
Click the Method drop-down text box and select Manual. You can now add IP address information for the system. For example, on server1.example.com we added the following settings:
IP Address 2001:db8:3dab:2
Prefix 64
Gateway Address 2001:db8:3dab:1
Similarly, we have associated the IPv6 address 2001:db8:3dab:1 with the virbr0 interface on our physical system. You can verify the configuration with the following command:

FIGURE 12-7 Editing an IPv6 address in the Network Manager Connections Editor


The configuration is saved in the ifcfg-eth0 file in the /etc/sysconfig/network-scripts directory. Open that file. You will notice that the Network Manager Connections Editor added the following configuration lines:
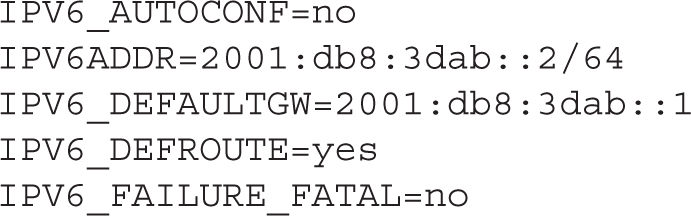
The IPV6_AUTOCONF directive disables auto-configured IPv6 addresses. The next variables, IPV6ADDR and IPV6_DEFAULTGW, set the IP addresses of the interface and the default gateway, respectively, whereas IPV6_DEFROUTE installs a default route in the routing table. Finally, if the IPV6_FAILURE_FATAL directive is enabled, then a failure with the IPv6 configuration would result in the interface being down, even if the IPv4 configuration succeeded.
In mission-critical data centers, you would typically connect a Linux server to the network by patching two of its Ethernet interfaces into different access switches. You would also normally aggregate the two physical ports into a “logical” network interface (the “bond” or “team” interface). This configuration provides full redundancy because a single failure won’t affect the ability of the server to communicate with the rest of the network. In addition, in some configurations the server can actively send and receive packets through both network interfaces, doubling the network bandwidth available.
RHEL 7 offers two ways to set up such configurations:
Interface bonding The standard teaming method in RHEL 6 and still available on RHEL 7
Network teaming Introduced in RHEL 7
At the time of writing, the two methods offer similar features, but network teaming implements a more modular and extensible design than the traditional bond driver. For the RHCE exam (and for your day-to-day job duties), you should be familiar with both configuration methods.
To practice with interface bonding and teaming, start with two Ethernet interfaces. For this purpose, power off the server1.example.com virtual machine and add a second Ethernet adapter. To do so, start the Virtual Machine Manager, open the virtual machine console and details window, and click the virtual hardware details button. Click Add Hardware and select a network device, as shown in Figure 12-8. Set “virtio” as the device model and then click Finish. Power on the virtual machine and run the ip link show command to confirm that the new virtual adapter is recognized by the system. You should see one loopback and two Ethernet adapters installed on your system, as shown in the next output:
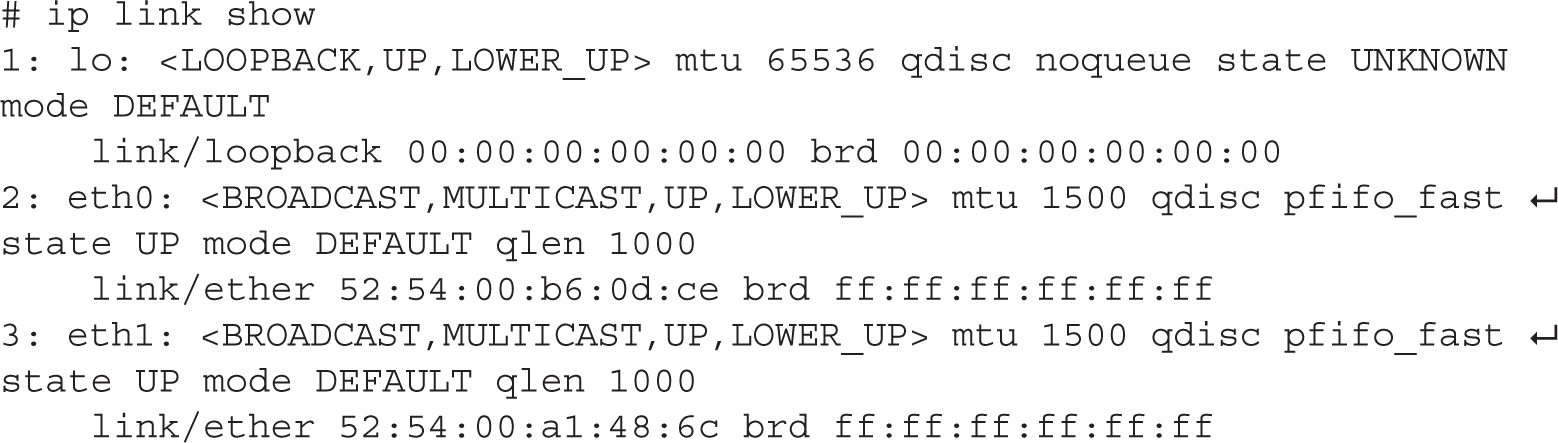
FIGURE 12-8 Add a new network device to a virtual machine.

As noted in Chapter 3, RHEL 7 tries to name network interfaces based on their physical location (for example, “enoX” or “emX” for the onboard network interfaces). If you have configured the virtual adapters on a systems using the “virtio” type, as discussed in this chapter, RHEL 7 should fail back to the traditional interface enumeration method of eth0, eth1.... If you want to force your system to use the traditional ethX naming style, you can apply the procedure described in KB article 283233 at https://access.redhat.com/solutions/283233.
You have several methods to configure interface bonding: the command-line nmcli program, the text-based nmtui tool, and the graphical Network Manager Connections editor. In addition, if you know the syntax of the network configuration files in /etc/sysconfig/network-scripts/, you can also create a new configuration by directly editing a few files.
In this section, we show how to configure a bond interface on server1.example.com using the Network Manager Connections Editor. The objective is to aggregate the two eth0 and eth1 interfaces (the “slave” interfaces) into a single, logical interface named “bond0” (the “master” interface).
1. Start the application Network Manager Connection Editor from the GUI with the nm-connection-editor command.
2. Delete any existing configuration from the eth0 interface. Select the interface in the Network Manager Connection Editor and then click Delete.
3. Click the Add button, select Bond as a connection type, and confirm by clicking the Create button. This opens a new window, as shown here:

4. This next step consists of adding the “slave” interface eth0 to the bond configuration. Click the Add button, select Ethernet as a connection type, and click Create.
5. The Editing bond0 slave 1 window will appear. Set the Connection name to eth0 and set the Device MAC address to the address of the eth0 interface from the drop-down menu, as shown here. Click Save.
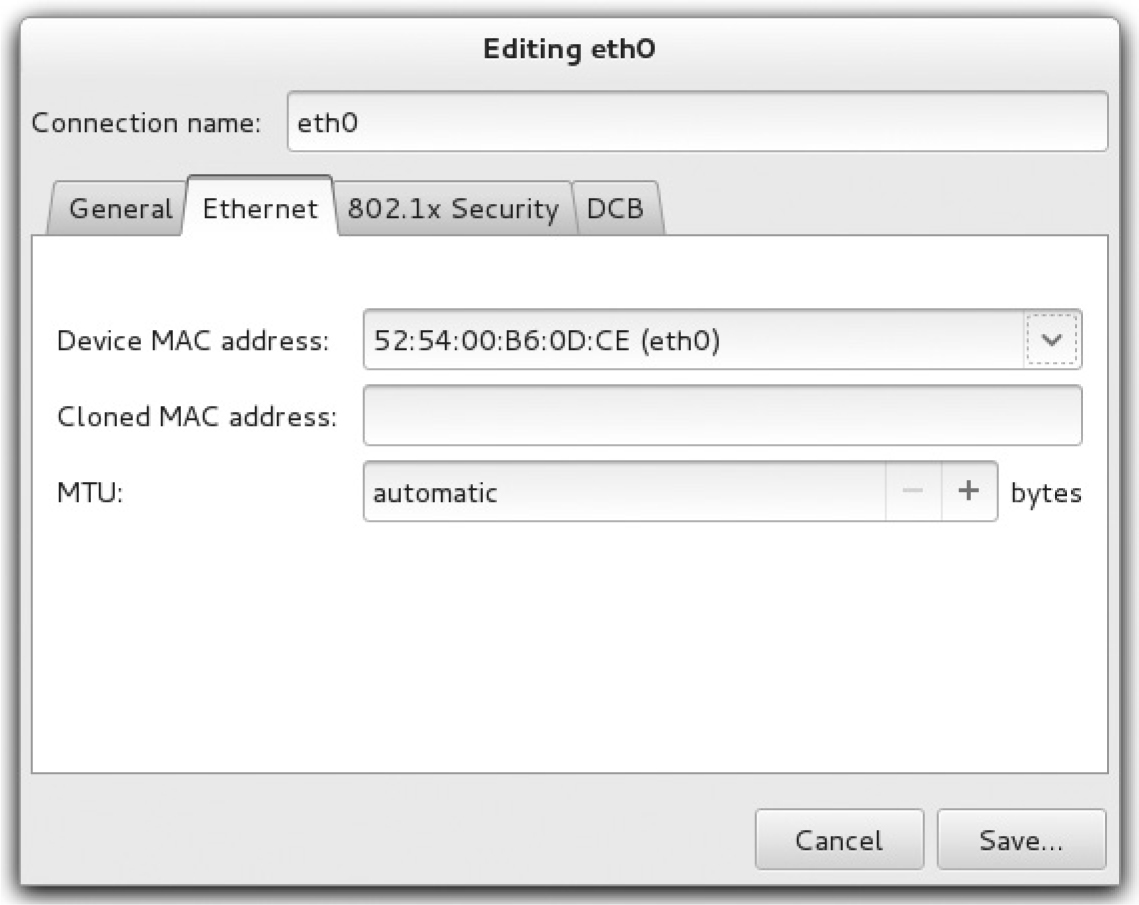
6. Move to the General tab and select the option “Automatically connect to this network when it is available.” Click Save. This will ensure that the device is activated at boot.
7. Repeat Steps 4, 5, and 6 for the other slave interface eth1.
8. Back to the main window in the first illustration, select Active-backup as the failover mode. The available modes for the bonding driver are discussed in Table 12-5.
9. Optionally, you can set the name of the primary interface in the Primary field.
10. Leave the other settings in this window at their default value.
11. Move to the IPv4 Settings tab. Configure the IP address, netmask, and gateway for the system with the settings from Table 1-2 in Chapter 1 .
12. Click Save.

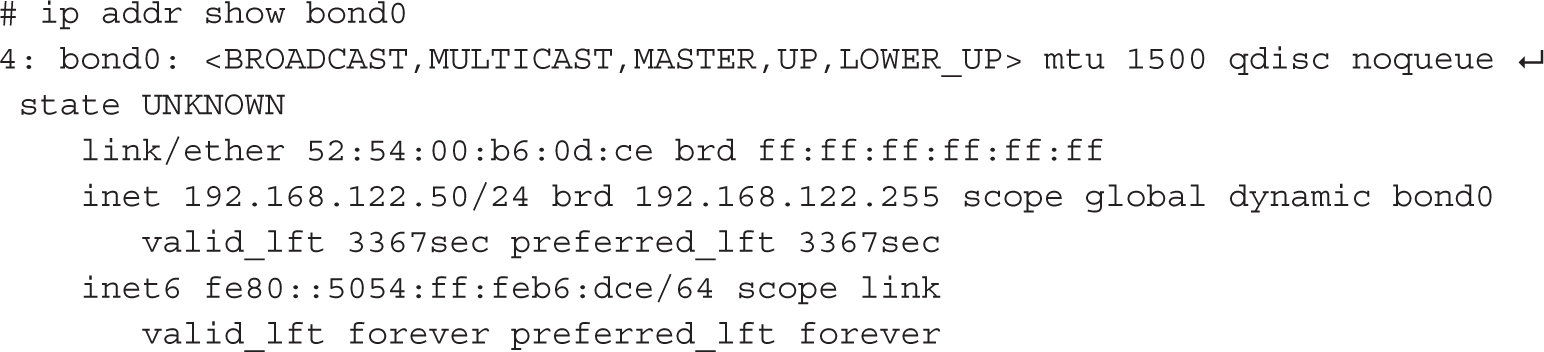
When configuration is complete, you should have a bond0 interface configured in active-backup mode, with two slave interfaces: eth0 and eth1. The following command confirms the current IP configuration settings:
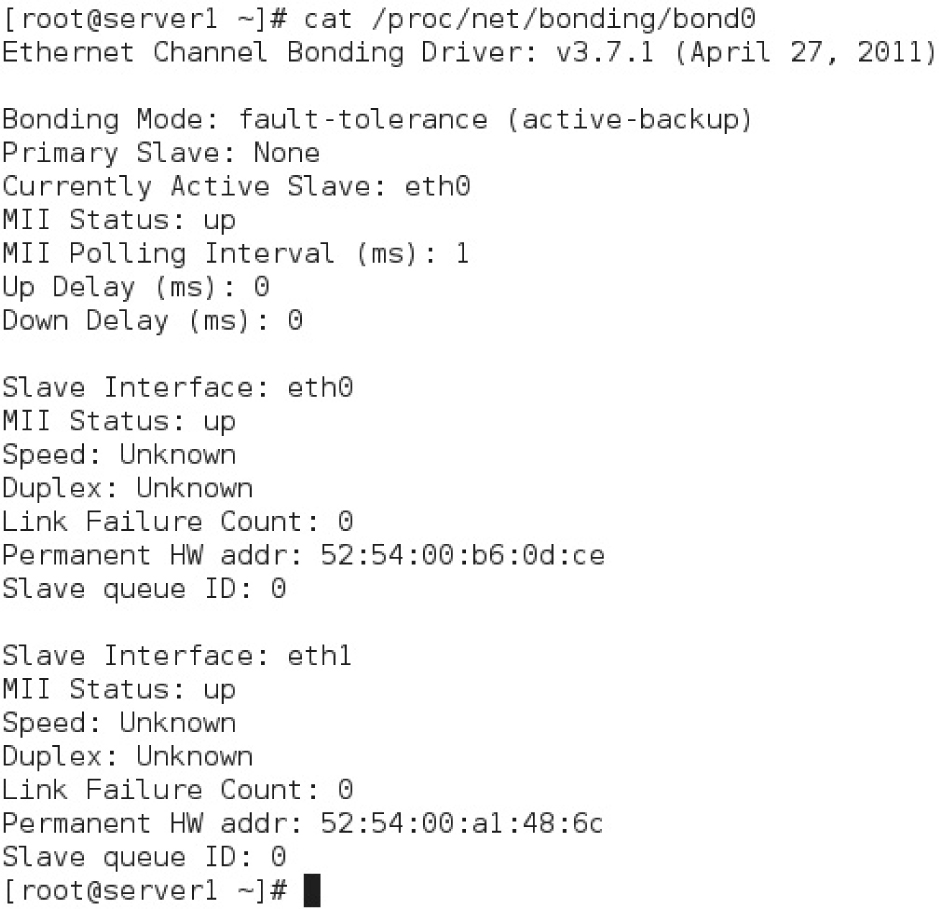
To show the status of the bond0 interface and its slaves from the link-layer perspective, run the cat /proc/net/bonding/bond0 command. The output is shown in Figure 12-9 and indicates that both slave interfaces are up, with the eth0 interface being the active slave.
FIGURE 12-9 Showing the status of the bond0 interface
EXERCISE 12-4
In this exercise, you will test bonding failover. We assume that you have configured an active-backup bonding interface with two slaves, as explained in the previous section.
1. Run a continuous ping command from your physical host to server1.example.com to confirm that IP connectivity is operational:

2. Shut down the active interface on server1 with the ifdown eth0 command. Is server1 still replying to ping requests?
3. Confirm the status of the active slave interface with the following command:

4. Bring back the eth0 interface with the ifup eth0 command. Is server1 still replying to ping requests? Which is the active interface of the bond master interface?
5. Repeat Steps 2–4 for the eth1 interface. As long as you have one slave interface active, IP connectivity should always be operational.
6. Bring down both eth0 and eth1 interfaces. What happens?
Network teaming is a new method of link aggregation available in RHEL 7. Functionally, it is similar to interface bonding. However, its architecture differs significantly. Whereas bonding is implemented in the Linux kernel, interface teaming relies on a very small kernel driver. All the rest of the code runs in user space as part of a user service daemon (teamd). This approach guarantees a more modular and extensible design that facilitates the introduction of new features.
To create a new team interface, start the Network Manager Connection Editor, click the Add button, and select Team as a connection type. Once you click the Create button, a window similar to the one shown next will be displayed.
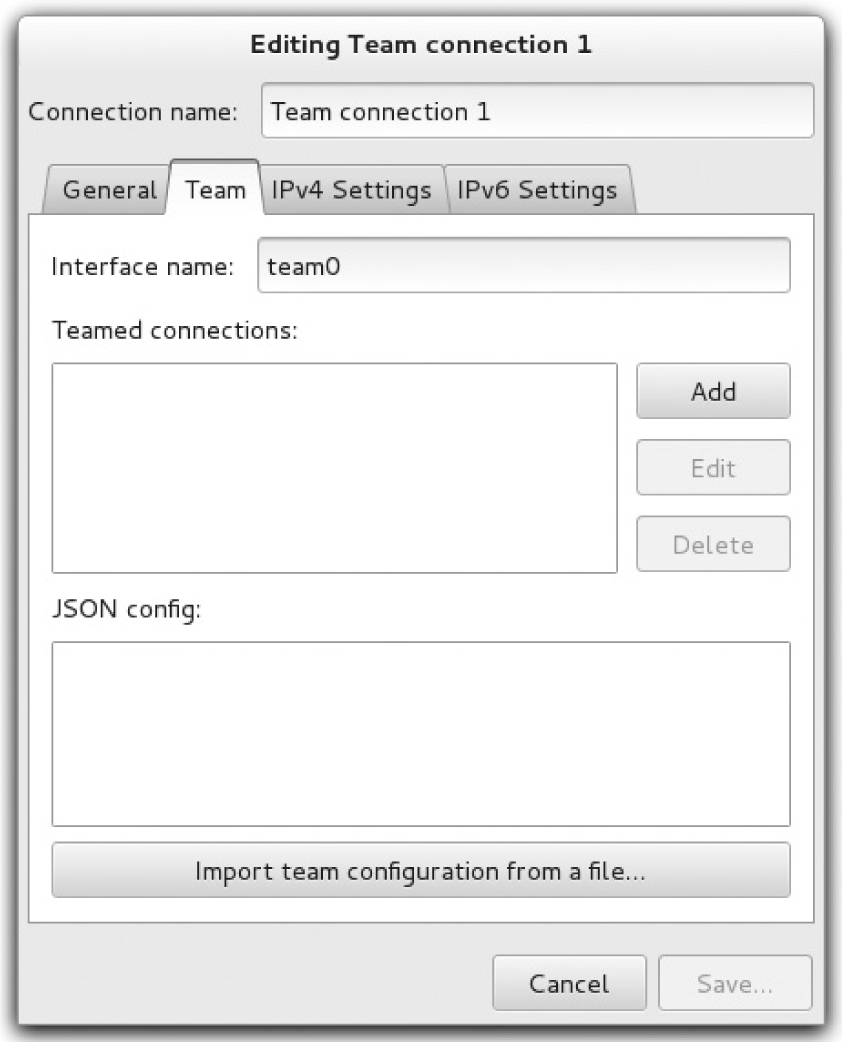
From this point, the configuration for the basic aspects is similar to that of a bonding interface. As such, you can refer to the previous section for details.
Once a new team interface is set up, you can confirm its status with the following command:
CERTIFICATION OBJECTIVE 12.07
Two systems configured with and authenticated by Kerberos can communicate in encrypted format with a symmetric key. That key is granted by a Key Distribution Center (KDC). Although there is no RHCE objective related to the configuration of a Kerberos KDC, you need a KDC to practice with the configurations covered in this section and in Chapter 1 6. In the following sections, we start with the basics of Kerberos and then practice with the configuration of a KDC and a simple client.
Kerberos is a network authentication protocol, originally developed at the Massachusetts Institute of Technology (MIT), that supports secure identification of networked systems. RHEL 7 includes the Kerberos 5 client and software packages developed by MIT.
Kerberos is not a directory service like LDAP. In other words, for a valid client to authenticate to a Kerberos server, it’ll also need a connection to a network authentication database such as LDAP, NIS, or the user database in the /etc/passwd file. Directory services contain the user and group identifiers, users’ home directories, and default shell information. Kerberos was not designed to store this information, but to provide authentication services.
Every participant in a Kerberos network (also known as realm) is identified by a principal. A principal for a user has the form username/instance@REALM. The instance part is optional and normally qualifies the type of user. The realm indicates the scope of the Kerberos domain and is normally indicated by a capitalized version of the DNS domain name. For example, the Kerberos realm for the DNS domain example.com is normally EXAMPLE.COM.
According to these rules, the Kerberos principals for the users mike, alex, and root (with an admin instance) are as follows:

Kerberos principals are not limited to users. You can create principals to identify a computer host or a service. For example, you can represent a host principal in the following format: host/hostname@REALM. As an example, the host principal for server1.example.com would be represented by the following string:

In a similar fashion, you can set up a Kerberos service principal in the following format: service/hostname@REALM. For example, you can set up the following principals for the NFS and FTP services on the host server1.example.com:

In a Kerberos-based network, after a user has typed her username and password, the login program converts the username into a Kerberos principal and sends this information to the KDC, which consists of an authentication server (AS) and a ticket-granting server (TGS). Then, the KDC verifies the user’s access rights and sends back to the client a special message known as a ticket-granting ticket (TGT), encrypted using the password that belongs to the user’s principal. If the user has supplied the correct password to the login program, the client will be able to decrypt the TGT message and authenticate successfully.
When authentication is confirmed, the Kerberos client gets a ticket good for a limited time, typically 24 hours. Besides the maximum ticket lifetime, a TGT also contains the principal name, a session key to encrypt communications, and a timestamp.
Once an account has a valid TGT, that account can authenticate to other network services by providing the same TGT, which takes the place of re-entering authentication credentials for the life of the TGT. This feature is known as single sign-on (SSO).
Kerberos relies on accurate timestamps. If the time on the servers and clients is more than five minutes apart, this will result in authentication failures. To avoid this problem, in a production network usually all the hosts keep their time in sync via NTP (Network Time Protocol).
Kerberos also relies on a name resolution service. You can make it work with either a local DNS server or a complete /etc/hosts file on each host of your network.
For this book, we’ve set up a physical workstation named maui.example.com. This host runs the virtual machines server1.example.com, tester1.example.com, and outsider1.example.com. The /etc/hosts file for this lab environment is shown in Figure 12-10.
FIGURE 12-10 The contents of the file /etc/hosts

EXERCISE 12-5
In this guided exercise, we’ll show how to set up a Key Distribution Center. Although this is not an RHCE requirement, you need a KDC to practice with Exercise 12-6 and the labs at the end of the chapter. You can install a KDC either on the workstation that runs the virtual machines that you deployed in Chapter 1 or on a dedicated virtual machine.
1. Install the krb5-server and krb5-workstation RPM packages:

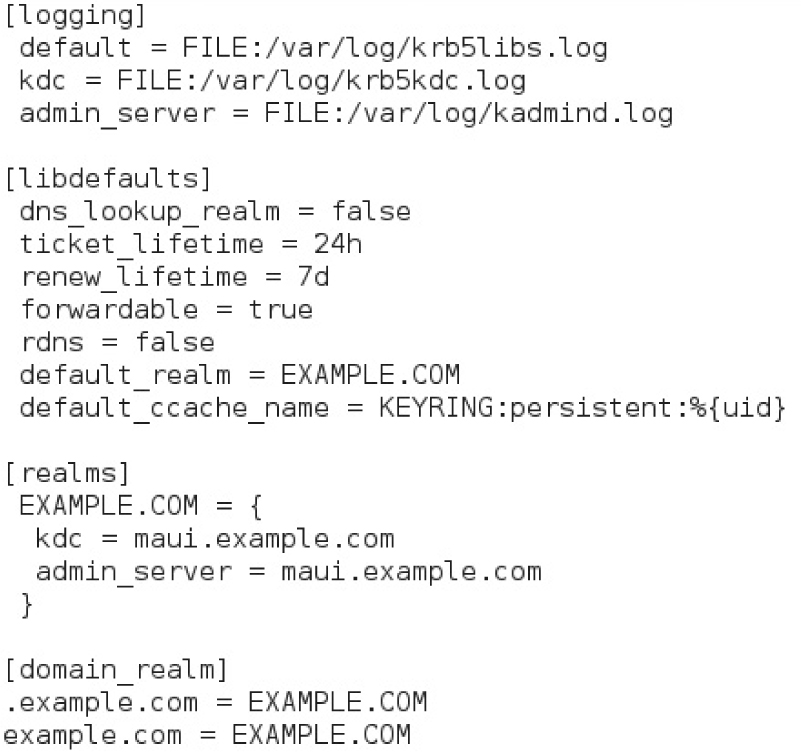
2. Edit the /etc/krb5.conf file. Uncomment the default_realm = EXAMPLE.COM line and the four lines in the [realms] stanza. Replace the kdc and admin_server defaults with the fully qualified domain name of your server (maui.example.com, in our case). The result is shown here.
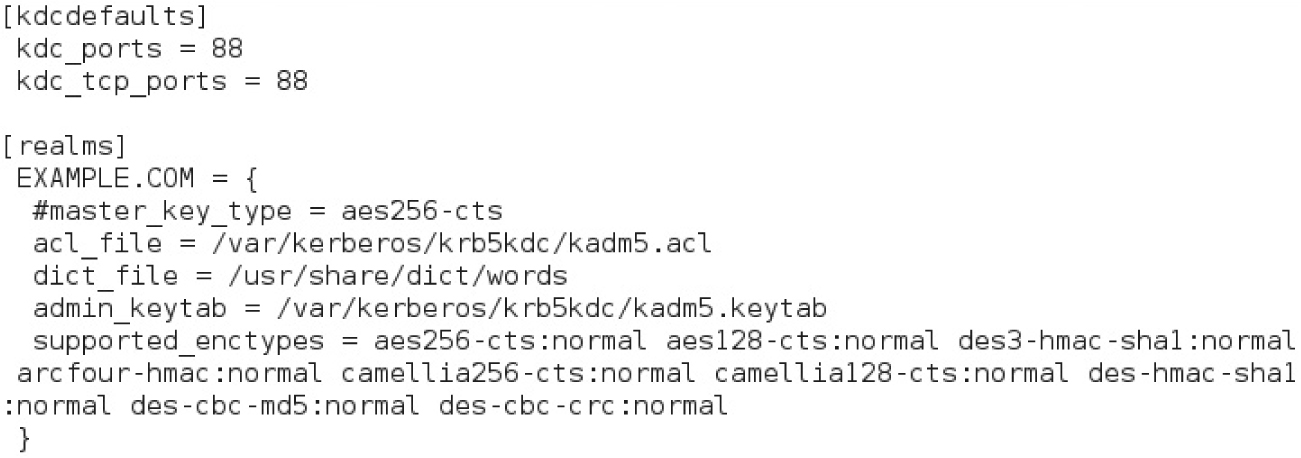
3. Review the contents of the file /var/kerberos/krb5kdc/kdc.conf. By default, this file is configured for the Kerberos realm EXAMPLE.COM, as illustrated next. You don’t have to modify this file, unless you want to configure a different Kerberos realm name than the default.
4. Create a new Kerberos database by running the following command. You will be prompted for a master key (password), which the KDC uses to encrypt the database:
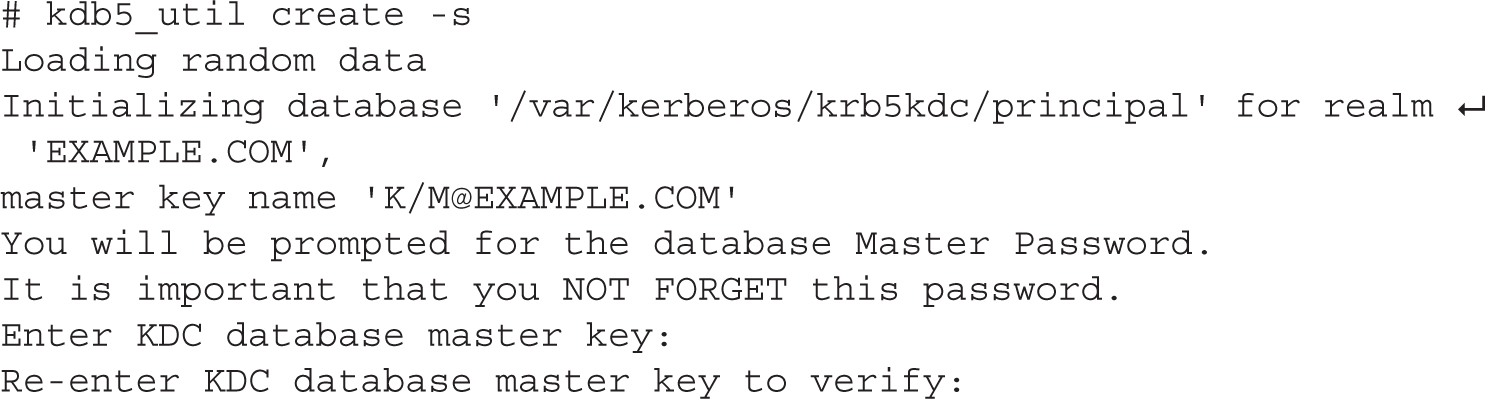
The -s option saves the master key in a stash file so that you don’t have to manually enter the master key every time the Kerberos service is started.
5. Start and enable the Kerberos services to start at boot:

6. Allow connections to the Kerberos server through the default zone on the firewall:

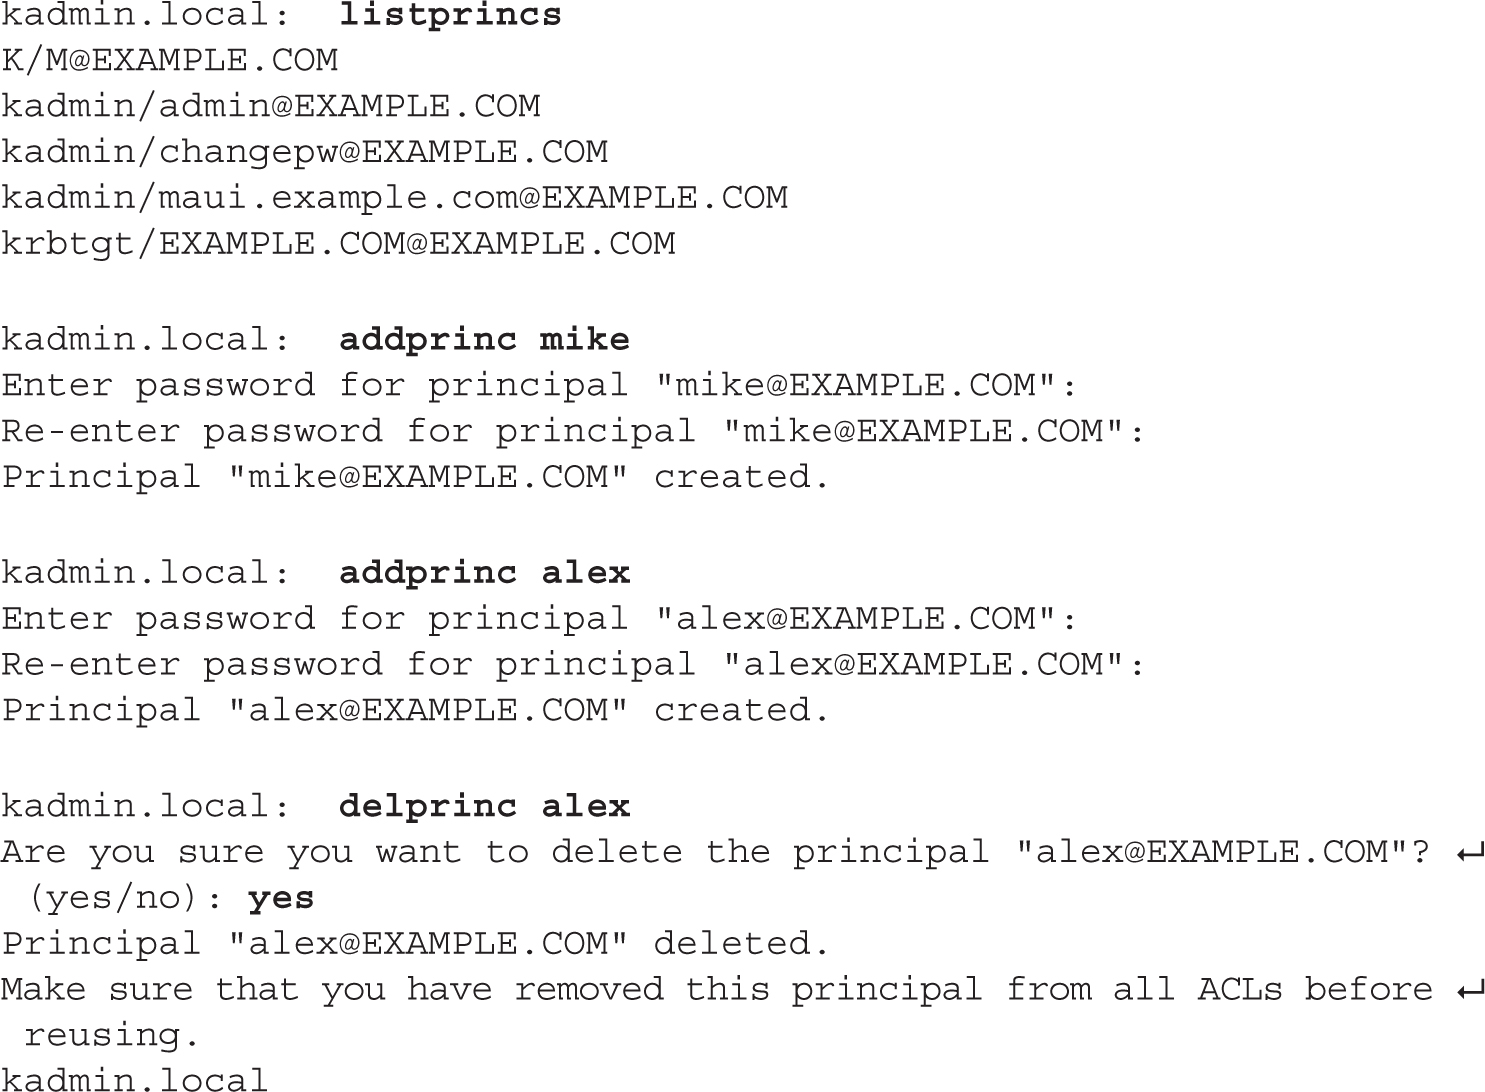
7. Run the kadmin.local command to administer the KDC and create, list, or delete principals, as shown in the following example:

For the purpose of an exam, as well as on the job, it’s almost always best to keep the solutions as simple as possible. That’s where the Authentication Configuration tool can help. To see what this tool does to help configure a Kerberos client, you could back up the files in the /etc/sssd directory, along with the /etc/nsswitch.conf configuration file. This file is related to the System Security Services Daemon.
One way to open the GUI version of the Authentication Configuration tool is with the authconfig-gtk command. That should open the Authentication Configuration tool with the two tabs shown in Figure 12-11. Although other authentication databases are supported, the focus is on LDAP. The options in the LDAP section of the Identity & Authentication tab were discussed in Chapter 8.
FIGURE 12-11 Configure a Kerberos-based client with the graphical Authentication Configuration tool.
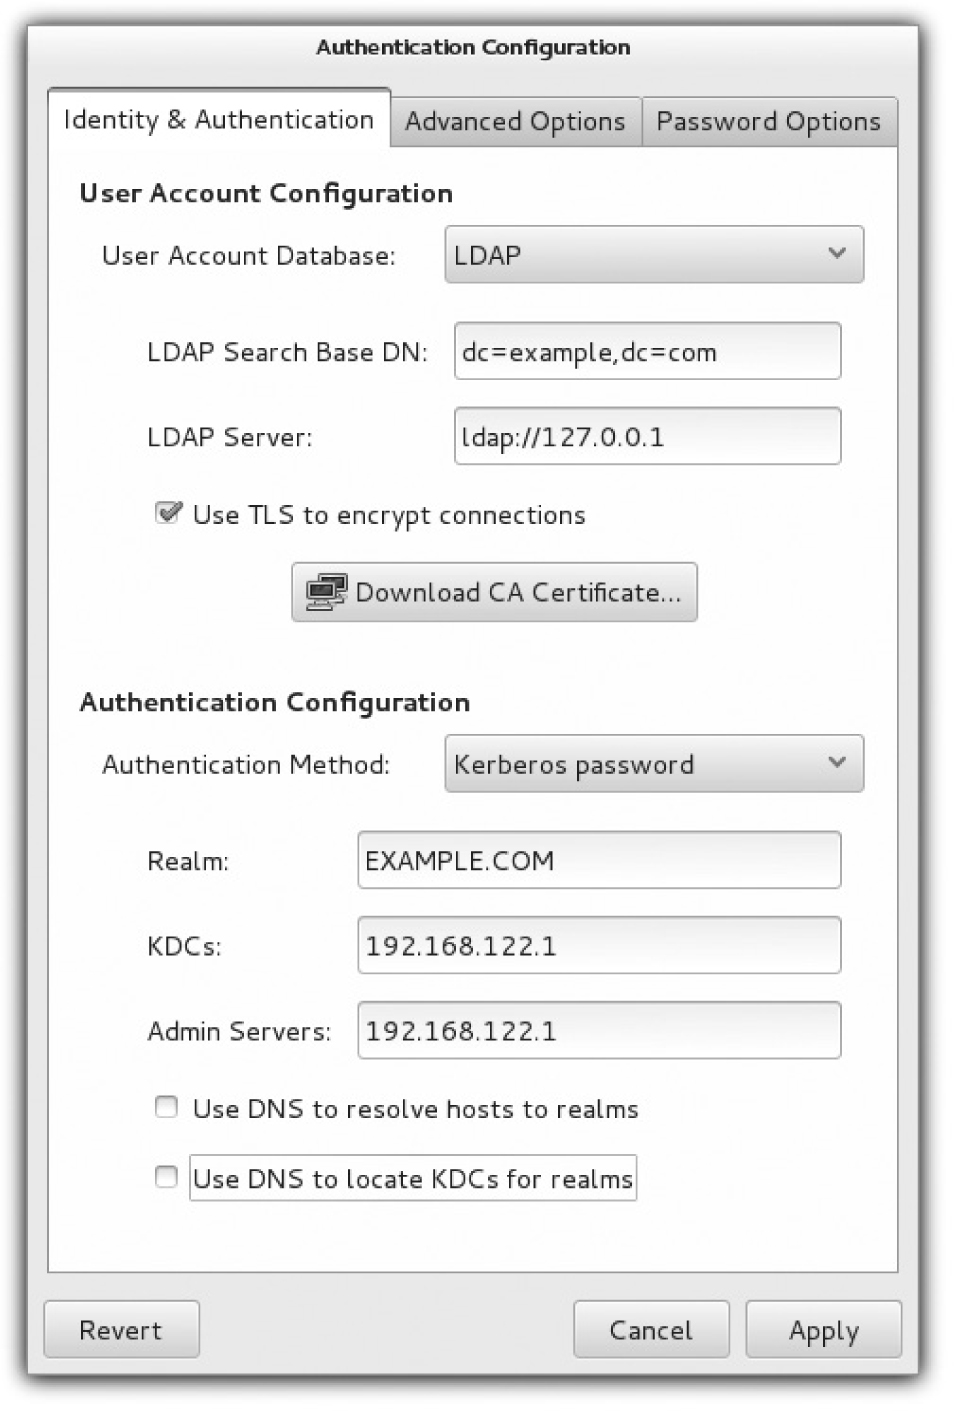
The focus of this section is on the second half of the tab. For a Kerberos-based client, you’d retain Kerberos Password as the Authentication Method setting. Here are the other options:
Realm By convention, the Kerberos realm is the same as the domain name for the network, in uppercase letters.
KDCs The KDC is the Kerberos Key Distribution Center. The entry here should correspond either to the fully qualified domain name (FQDN) or the IP address of the actual Kerberos server.
Admin Servers The administrative server associated with the KDC is frequently located on the same system. On the Kerberos administrative server, the kadmind daemon is running.
Use DNS to Resolve Hosts to Realms Where a trusted DNS server exists for the local network, you can allow the local system to use a DNS server to find the realm. If this option is activated, the Realm text box will be blanked out.
Use DNS to Locate KDCs for Realms Where a trusted DNS server exists for the local network, you can allow the local system to use a DNS server to find the KDC and administrative server. If this option is activated, the KDCs and Admin Servers text boxes will be blanked out.
For the purpose of this section, accept the default options, as shown in Figure 12-11. Click Apply. After a few moments, the Authentication Configuration window will close and changes will be made to the configuration files.
To start the text-mode version of the Authentication Configuration tool, run the authconfig-tui command. As shown in Figure 12-12, you don’t need to activate LDAP, at least for authentication.
After you select Next, the tool prompts for the Kerberos Settings screen shown in Figure 12-13. The default options shown here are the same as those shown in the graphical version of the tool from Figure 12-11.
You may also need to set up changes to configuration files, as described next.
FIGURE 12-12 Configure a Kerberos-based client with the console Authentication Configuration tool.
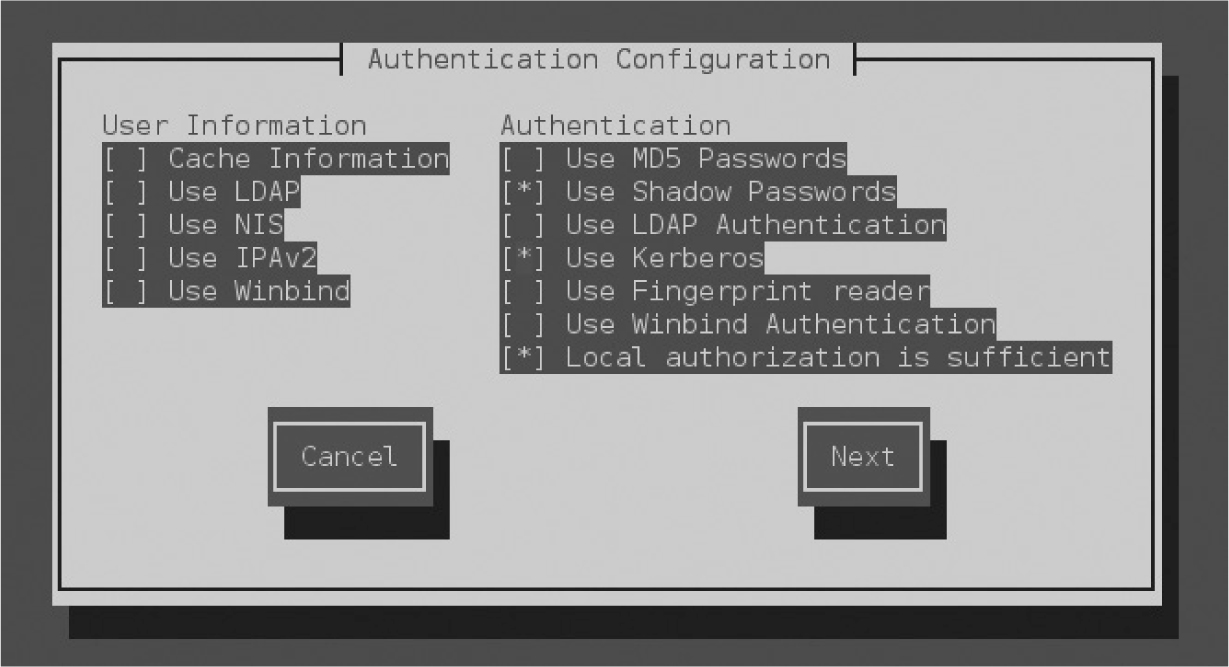
FIGURE 12-13 Specify Kerberos client settings.

EXERCISE 12-6
In this exercise you will set up a user with an associated Kerberos principal for authentication. We assume that you have a KDC installed on your physical system listening to the IP address 192.168.122.1, and that you want to set up a user on the virtual machine server1.example.com to authenticate against the KDC. Follow these steps:
1. Install the RPM packages krb5-workstation and pam_krb5 on the Kerberos client server1.example.com:

2. Add a new user on server1.example.com to test Kerberos authentication. For example:

3. From a GNOME terminal, run the command authconfig-tui and set up server1.example.com to use Kerberos for authentication, as illustrated previously in Figures 12-11 and 12-12. Alternatively, you could run the following command:

4. On the KDC, run kadmin.local and add a principal for the user mike:

5. Test authentication by logging into server1 as mike via SSH.
6. If successful, the klist command will show the TGT for the user mike:

Linux administrators need to configure scripts on a regular basis. Sample scripts are already available in different /etc/cron.* directories. Normally, bash scripts start with the #!/bin/sh line, which sets up the interpreter. Administrative scripts can use Linux commands, along with internal bash commands such as for, if, do, and test.
As an RHCE, you need to be able to monitor the performance of administered systems. That’s the province of the sysstat service. While commands such as df, top, and dstat can display CPU, RAM, disk, and network utilization data, actual reports can be prepared with the help of the sadf command. An example of how this collects RAM and network data is available in the sadf man page; you can then add CPU and disk use data from related sar command switches.
Kernel run-time parameters can be found in the /proc/sys directory, but changes to such files are temporary. For more permanent changes, you’d set up options in the /etc/sysctl.conf file. Changes to that file can be implemented with the sysctl -p command. Many standard kernel options relate to networking.
The RHCE objectives include requirements for several special network configurations. With the help of the Network Connections Editor tool, static IP routes can be configured in a file in the /etc/sysconfig/network-scripts directory. Using the same tool, you can also configure IPv6 addresses, as well as bonding and team interfaces.
Kerberos clients can be configured with the authconfig-gtk command. To practice with Kerberos, you need to configure a Key Distribution Center (KDC), as explained in this chapter.
 TWO-MINUTE DRILL
Here are some of the key points from the certification objectives in Chapter 12.
 Standard administrative scripts can provide a model for custom scripts to automate system maintenance tasks.
Various commands within scripts include do, for, if, and test.
Bash scripts start with the #!/bin/sh or #!/bin/bash shebang line.
Several system utilization commands are available in RHEL 7 with the help of the sysstat package.
The sa1 command regularly collects data in the /var/log/sa directory.
System status reports can be created with the sadf command, with an assist from sar command switches.
One example of a system status report command is shown in the sadf man page.
Kernel run-time parameters are located in the /proc/sys directory.
Many kernel run-time parameters relate to network options such as IP forwarding and security.
Kernel run-time parameters can be configured on a permanent basis with the help of the /etc/sysctl.conf file.
The configuration of a default route requires a gateway IP address.
Static routes to different networks can be configured with the help of the Network Connections Editor tool and its text-based counterpart nmtui.
IPv6 addresses have 128 bits organized in nibbles of 16 bits.
The three different types of IPv6 addresses are unicast, anycast, and multicast.
IPv6 addresses can be limited to local network segments (link-local) or routable.
Network bonding and teaming provide link redundancy and optionally higher network throughput through various configuration modes, such as round-robin and active-backup.
To authenticate with Kerberos, you need a Key Distribution Center (KDC).
To configure a Kerberos client, you can use the authconfig-gtk command.

The following questions will help measure your understanding of the material presented in this chapter. As no multiple choice questions appear on the Red Hat exams, no multiple choice questions appear in this book. These questions exclusively test your understanding of the chapter. It is okay if you have another way of performing a task. Getting results, not memorizing trivia, is what counts on the Red Hat exams.
1. What exit code is associated with success in a script?

2. Write a bash test command to check if a file exists and is executable.
3. Write a bash for statement to cycle through all the users in a system.
4. What directory includes a cron job that logs system activity? Assume the appropriate package is installed.
5. On a RHEL 7 system, where can you find a sample command to create a system utilization report? Where can you find additional switches for that report?
6. What’s the full path to the /proc file associated with the net.ipv4.ip_forward parameter?
7. What are the configuration parameters associated with a static route?
8. What is the shortest representation of the 2001:0db8:00aa:0000:04ba:0000:0000:00cd IPv6 address?
9. What command can you use to ping an IPv6 address?
10. What command can you run to check the status of a bond0 interface and of its slave interfaces?
11. What is the standard Kerberos realm for the server1.example.com system?
12. Which command do you run to list the Kerberos tickets for the current user?
Several of these labs involve configuration exercises. You should do these exercises on test machines only. It’s assumed that you’re running these exercises on virtual machines such as KVM.
Red Hat presents its exams electronically. For that reason, the labs for this chapter are available from the media that accompanies the book in the Chapter12/ subdirectory. In case you haven’t yet set up RHEL 7 on a system, refer to Chapter 1 for installation instructions.
The answers for the labs follow the Self Test answers for the fill-in-the-blank questions.

1. The exit code associated with success in a script is 0.
2. A bash test command to check if a file exists and is executable can be written as follows:

3. A for statement to cycle through all the usernames in a system can be written as follows:

4. The directory with the standard sysstat job is /etc/cron.d.
5. On a RHEL 7 system, one place where you can find a command example of a system utilization report is the sadf man page. Additional switches can be found in the sar man page.
6. The full path to the file associated with the net.ipv4.ip_forward parameter is /proc/sys/net/ipv4/ip_forward.
7. The configuration parameters associated with a static route are the network address, the subnet mask, and the gateway address.
8. The shortest representation of the 2001:0db8:00aa:0000:04ba:0000:0000:00cd IPv6 address is 2001:db8:aa:0:4ba::cd.
9. You can use the ping6 command to ping an IPv6 address. If this is a link-local address, you need to specify the outbound interface with the -I switch.
10. To check the status of the bond0 interface and its slave interfaces, run the following command:

11. The standard Kerberos realm for the server1.example.com system is EXAMPLE.COM.
12. The command that lists the Kerberos tickets for the current user is klist.
Success in this lab should be straightforward. The simplest way to set up the script is to start with the fundamental requirements and then add the other functionalities. For example, the following script saves the current date in MMDDHHSS format in the $TODAY variable. Then, it runs the tar command to back up the directory passed as the first argument into the backup-MMDDHHSS.tar file within the directory given as the second argument:

The next step is to add the other non-core functionalities. You will need a test to check whether the number of arguments is not equal to two:

You will also need to add another test to confirm that the arguments passed to the script are regular directories:

In addition, another test is required to check if the second argument is a directory. If the test fails, the script must create the directory:

Note that if the second argument is a file but not a directory, the script will return an error. However, this is not an error condition that the exercise asks you to take into consideration.
If you put together all the blocks of code, you will have a working script. Test the script with different arguments to verify that all the exception conditions are recognized and successfully processed.
If you understood the requirements of this lab, the answer should be easy. While there are other methods, one appropriate command that meets the given requirements is available on the man page for the sadf command:

Of course, to get that information into the noted file, the output must be redirected:

This lab builds upon what you did in Lab 2. If you haven’t memorized the additional command options that specify information on CPU and disk usage, you can find those options in the man page for the sar command. As suggested in the man page, the -u switch can be used to report CPU usage, whereas the -d switch reports activity by block device. It can help users read the output if the -p switch is combined with -d.
But there’s one more requirement: the -p switch next to the sadf command leads to output in a format usable by the awk command utility. The following is one method to meet the requirements of the lab:

If you’ve successfully completed this lab, the /etc/sysctl.conf file (or a file in the /etc/sysctl.d directory) should now have the following entry:

That just makes sure the new setting survives a reboot. You may have also set the associated file, /proc/sys/net/ipv4/icmp_echo_ignore_all, to 1, or run the sysctl -p command to implement the change before the system is rebooted.
Of course, success can be confirmed with a ping command, both from local and remote systems. If you want to restore the original configuration, return to the server1.example.com system and then remove the net.ipv4.icmp_echo_ignore_all option from the /etc/sysctl.conf file.
If you used the Network Connections tool to set up a special route, it should set up a new file in the /etc/sysconfig/network-scripts directory. If the specified network adapter is eth0, that special file would be route-eth0. Given the parameters used for the outsider1.example.org network, as discussed in Chapter 1, that file would contain the following three lines:

Of course, if the outsider1.example.org system is on a different network, the contents of the route-eth0 file would change accordingly.
To complete this lab, use the Network Manager Connection Editor and add the IPv6 addresses indicated to the interfaces. The network prefix is /64. You don’t need to set an IPv6 default gateway because all the IPv6 addresses indicated are on the same subnet.
Then, test connectivity between the hosts with the ping6 command. For example, run the following command from server1 and tester1 to ping the physical host:

Start this lab by shutting down tester1. Add a new network adapter using the virtio device model and then power on the machine. You can confirm that the new adapter is available on the system with the ip link show command.
Use the Network Manager Connection Editor tool to create the team0 adapter. Before creating the new interface, ensure that the existing configuration on eth0 is removed.
Success in this lab means the following:
You have full network connectivity, as demonstrated by running the ping command to verify that other hosts are reachable.
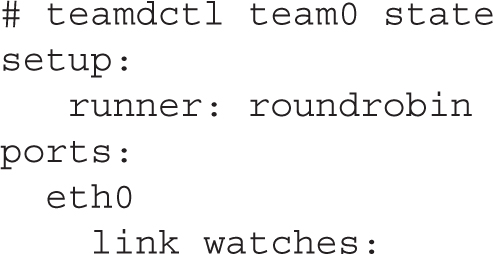
The team0 interface is up and aggregates together eth0 and eth1. You can verify this by running the teamdctl team0 state command.
If you disable the eth0 or eth1 interface with the ifdown command, the system still has network connectivity.