 Two-Minute Drill
17.05 Database Backup and Recovery
Relational databases, commonly referred to as relational database management systems (RDBMSs), provide a standardized method to organize persistent data in a structured way. They use tables to store data, rules to ensure uniqueness and consistency between tables, and indexes to support rapid access. In addition, most relational database systems support the Structured Query Language (SQL), a standard tool to retrieve data and perform many other tasks.
MySQL is the most popular open-source RDBMS, and it’s a key part of the “LAMP” stack (Linux, Apache, MySQL, and Perl/Python/PHP) commonly used to support web applications. It is also extremely easy to install, configure, and use.
Before RHEL 7, MySQL was the default RDBMS in Red Hat Enterprise Linux. After MySQL was acquired by Oracle, Red Hat moved to MariaDB, a community-developed fork of MySQL, licensed under the GPL. MariaDB contains additional community-developed features and optimizations. It is not the only database that comes with RHEL. Others (most obviously including PostgreSQL) are also available but not covered by the RHCE exam.
The ability to install and configure MariaDB (and its equivalent MySQL) is a common requirement for system administrators, although it is new to the RHCE exam in RHEL7. This chapter directly addresses the exam objectives related to MariaDB:
 Install and configure MariaDB
Back up and restore a database
Create a simple database schema
Perform simple SQL queries against a database
In addition, this chapter covers the common network service requirements discussed in Chapter 11.
CERTIFICATION OBJECTIVE 17.01
MySQL AB, a Swedish company, first released MySQL in 1995 as a free implementation of an earlier database known as mSQL. The first releases were based on the existing ISAM indexing method from IBM, which eventually turned into DB2. MySQL was included by Red Hat in its first RHEL release and rapidly acquired popularity. RHEL 6 included MySQL version 5.1.
In 2008 MySQL was purchased by Sun Microsystems, and in 2009 Oracle acquired Sun Microsystems. As Oracle sells an alternative RDBMS to MySQL, this acquisition triggered a substantial backlash both by regulatory authorities and the open-source community. Eventually, the European Union allowed Oracle to acquire Sun in 2010. To satisfy governmental regulatory concerns, Oracle committed to continue to develop MySQL under the existing “dual-source” license model.
One of the original founders of MySQL, Michael “Monty” Widenius, chose to fork MySQL in 2009. He called it MariaDB, after his youngest daughter, Maria. Previously, he had named MySQL after his eldest daughter. MariaDB obtained funding, and a substantial number of developers started moving their work from MySQL to the new MariaDB project.
MariaDB was initially released with the same version numbers as MySQL to suggest complete compatibility. After MariaDB 5.5 was released, developers changed the version number to 10, in part to move away from full compatibility with MySQL. For our purposes, MariaDB 5.5 is fully compatible with MySQL 5.5. In other words, clients and libraries compiled against MySQL 5.5 will just work on a MariaDB 5.5 server.
The RPM package mariadb-server installs mariadb-libs and mariadb as dependencies. These packages include all files that you need to get a working MariaDB installation, such as the server itself (mysqld), the MariaDB client (mysql), and all the Perl libraries required for associated helper scripts.
If you want to develop applications that use MariaDB, you may need the mariadb-devel and MySQL-python packages. However, these are beyond the scope of the RHCE exam.
For the purpose of this chapter, install the MariaDB server with the following command:

This command installs the MariaDB server, the client, and over 30 Perl modules. On client machines, you can install the MariaDB client with the mariadb RPM package.
No configuration is required for basic operation. You can start and ensure that the service survives a reboot with the following commands:

The first time MariaDB starts, it writes some standard tables to the internal “mysql” database by calling the mysql_install_db script. Any problems with this process should appear in the file mariadb.log, located in the /var/log/mariadb directory.

The MariaDB systemd unit in /lib/systemd/system/mariadb.service includes the directive TimeoutSec=300, which limits the amount of time for the server to start up to 300 seconds. While sufficient for a small test database, such a small value for TimeoutSec would lead to problems for a large, real-world database server. Without sufficient time, a transaction recovery may result in an endless cycle of failed starts. Fortunately, this is not an exam concern.
FIGURE 17-1 MariaDB listens to TCP port 3306.

As MariaDB is a “fork” of MySQL, it retains many filenames and commands associated with MySQL. For example, the MariaDB client command is mysql and the server daemon is mysqld. Among others, the Python module is MySQLdb and it works with both MySQL and MariaDB servers.
Now that the service is running, verify that it is listening on the default TCP port 3306 with the ss command. The result is shown in Figure 17-1. Note from the output of the command that by default MariaDB listens on all interfaces available on the server.
To confirm that MariaDB is operational, connect with the mysql client. The result is illustrated in Figure 17-2. Type quit or exit to close the session.
The mysql command has various command options, which will be explained in detail in the following sections. The most common ones are described in Table 17-1.
FIGURE 17-2 The mysql client
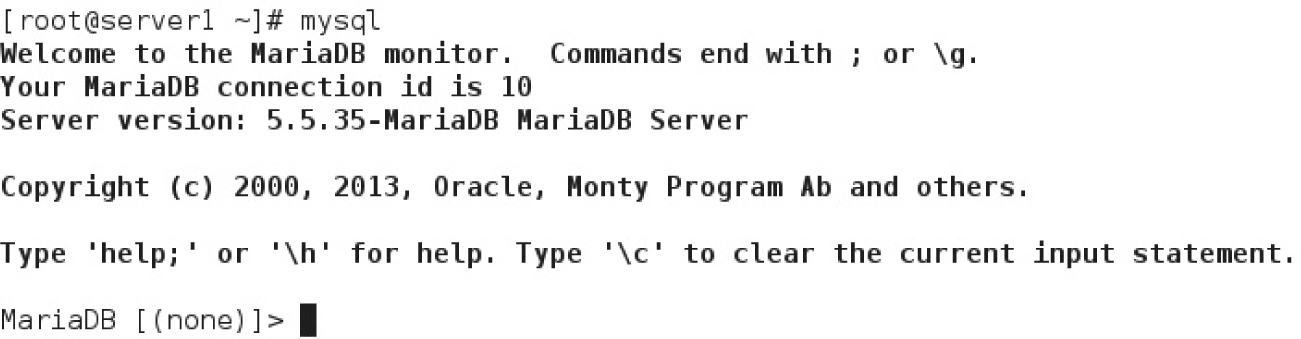
TABLE 17-1 mysql Command Options

FIGURE 17-3 The /etc/my.cnf configuration file

Although you can do more, RHEL 7 includes a working configuration of MariaDB “out of the box.” On the job, the additional changes you make to the MariaDB configuration relate to performance tuning.
Examine the MariaDB configuration file /etc/my.cnf shown in Figure 17-3. By default, it contains two sections: [mysqld] and [mysqld_safe]. The [mysqld_safe] section defines the locations of the log and process identifier (PID) files for mysqld_safe, a wrapper script that monitors the health of the mysqld process and restarts it in the event of a hard crash.
The [mysqld] section begins with the datadir directive, which specifies the location of the data. Next, the socket directive points to the location of the socket file. In a typical installation, you don’t have to change these settings. The last setting in this section is the symbolic-links directive, which prevents MariaDB from following symbolic links for security reasons.
Note the includedir directive at the end of the my.cnf file. It loads the content of a few other configuration files from the /etc/my.cnf.d directory.
The includedir directive in the default my.cnf file includes the contents of every file in the /etc/my.cnf.d directory. By default, the files in this location only affect MariaDB clients, but it is worth ensuring that no other packages have put a file down in here when you are troubleshooting.
MariaDB ships with a script, mysql_secure_installation, to improve the security of the default configuration. After you start the MariaDB service for the first time, run this script as the Linux root user. It will ask a series of security-related questions interactively.
Exercise 17-1 guides you through the installation of MariaDB and the execution of the mysql_secure_installation script.
In this exercise you will install MariaDB and run the mysql_secure_installation script to secure the installation. The script prompts you with a series of interactive questions to set a password for the root user (different from the Linux root superuser!), disable remote logins, remove anonymous users, and delete the default test database.
1. Install MariaDB:

2. Start the service and ensure that it is enabled at the next system boot:

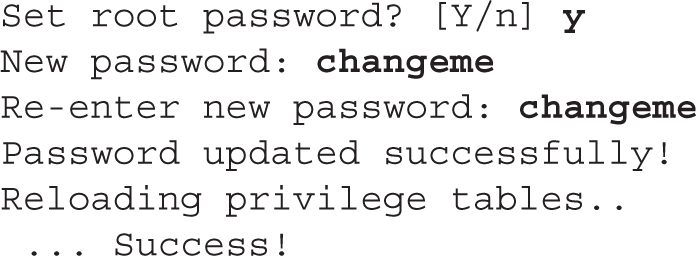
3. Run the mysql_secure_installation script. When you see the following prompt, simply press ENTER, as there is no password for the MariaDB root user:

4. Set a new MariaDB root password. As you can see here, we have set ours to “changeme” but you should select a real password in a production server:
5. By default, MySQL supports connections from anonymous users. This should be disabled, as shown here:

6. To further discourage black hat hackers, you should disable remote root access to MariaDB:

7. The MariaDB installation includes a default database named test. While the mysql_secure_installation script recommends deleting it, you can keep it for testing purposes:

8. Finally, when you flush the privilege tables, MariaDB implements your changes:

By default, MariaDB listens to TCP port 3306. If you want to change the default port, you need to complete the following steps:
1. Open the my.cnf configuration file and add a port=num directive.
2. Open the noted port in your firewall.
3. Modify the default MariaDB port defined in the SELinux policy.
This process is relatively simple and is illustrated in Exercise 17-2.
EXERCISE 17-2
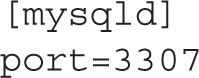
There are three parts to this exercise: editing the MariaDB configuration file, modifying the firewall, and changing SELinux port labeling. We assume that you want to run MariaDB on TCP port 3307, rather than on the default 3306.
1. Add a port=3307 line to the [mysqld] section in /etc/my.cnf:
2. Allow connections to the new port in the firewall configuration of the default zone:

3. Add the new port to the list of permitted ports for MySQL in the SELinux policy:

4. You can now show the ports that SELinux allows MySQL and MariaDB to use. From the following command, verify that it includes your new port:

5. Restart MariaDB:

6. Connect to the server on the new port:

The previous command connects to the MariaDB server running on the specified IP address (-h) and port (-P), as user root (-u), identified by a password (-p). Note that if you specify the host to connect to as “localhost,” the MariaDB client communicates to the local server via Unix sockets rather than on a TCP connection.
7. Close the session by typing quit or exit.
8. Remove the line that you added to /etc/my.cnf and restart MariaDB to run the service on its default port.
If you don’t modify the SELinux policy to account for the custom port, you would see the following error when you try to start MariaDB:

You should also see this corresponding error in the /var/log/mariadb/mariadb.log file:

Relational database management systems such as MariaDB store information in a very structured way. At the highest level, there are databases, which serve as containers for related data. Within databases, data is stored in tables, with each column representing an attribute of the data, and each row representing a record.
If you have never used a RDBMS before but have worked with spreadsheet software such as LibreOffice Calc or Microsoft Excel, you may notice similarities with the concepts of worksheets, columns, and rows. In fact, tables in a database can, in some ways, be considered a giant spreadsheet, with rows and columns containing data. The structure and organization of a database into different tables and columns is referred to as the schema.
Columns can handle various different types of data, and this is defined for each column when it is created. For example, a column may be able to store numbers up to a certain size or up to a certain amount of text characters. Columns can be mandatory or not, and some have a default value. When defining the schema, you can also express constraints. For example, you can specify that a row in one table must have a unique identifier, or “link,” to a record in another table. These rules are enforced when users attempt to insert or change any data in the database.
Users interact with the database by means of SQL commands: some of those commands create databases, create tables, and adjust the schema of tables; others insert data into those tables, and still others obtain data from the database. We cover the basic operation of many of these queries in this chapter. Table 17-2 summarizes the most important concepts of an RDBMS.
TABLE 17-2 Database Terminology
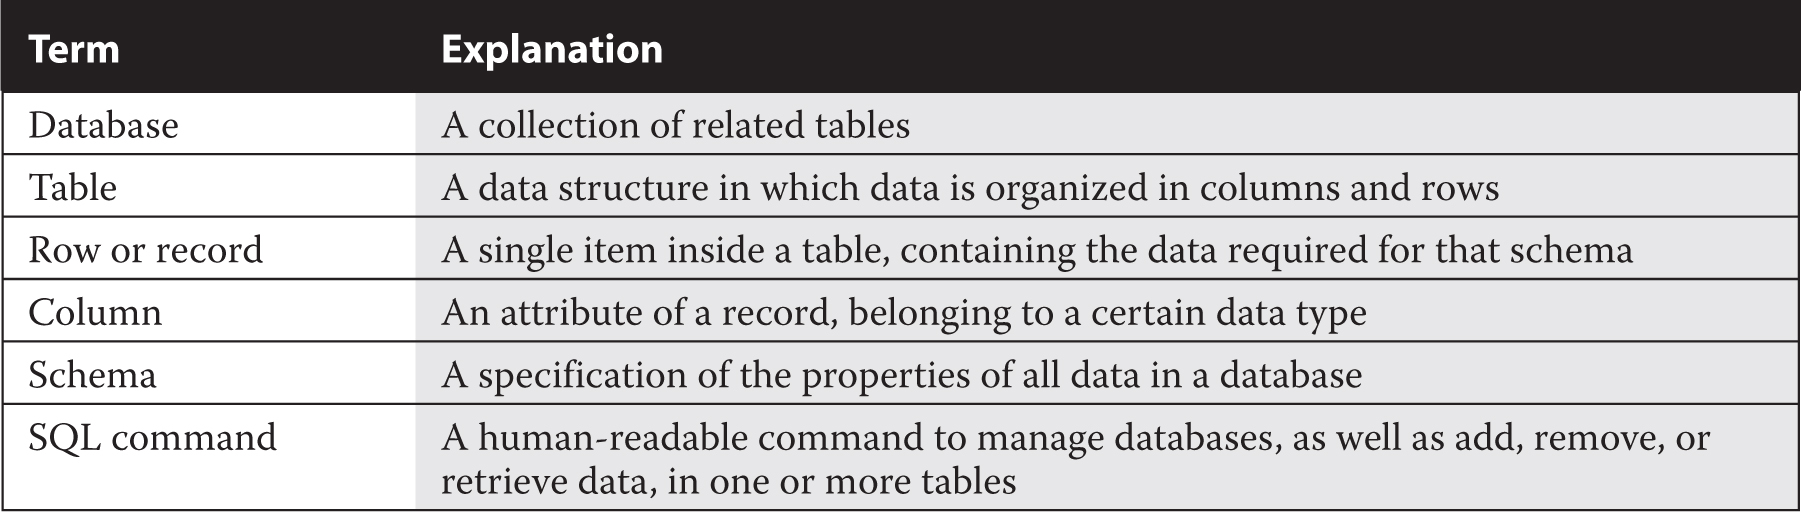
FIGURE 17-4 Listing all the databases
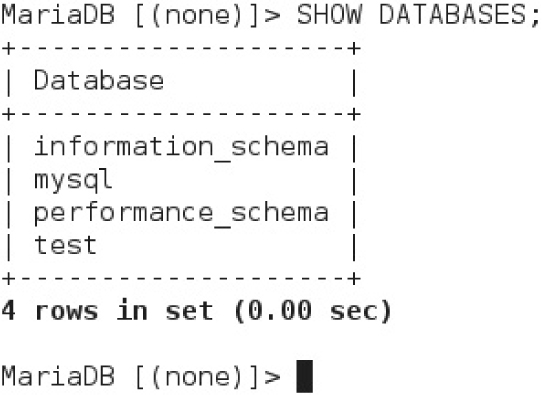
The default MariaDB installation includes a few databases. To list the currently installed databases, connect to MariaDB using the mysql client:

Then run the SHOW DATABASES SQL command:

The output is shown in Figure 17-4. Note that four databases are available (three if you deleted the test database in Exercise 17-1):
mysql An internal database for MariaDB to manage users and permissions
information _schema and performance_schema Specialized databases used by MariaDB to inspect metadata and query execution at run time
test A test database
You can write SQL commands such as SHOW DATABASES in uppercase or lowercase characters. By convention, documentation specifies SQL keywords in uppercase.
You can create a new database from the mysql client with the CREATE DATABASE db_name command, as shown next. The new database contains no data until you create a table and add some data to it:

For pretty much every command in the MariaDB shell other than the ones for creating users and databases, you should first tell the MariaDB client that you are working in a given database with the USE command. In MariaDB, by default, the shell prompt tells you what database you are in (none and mysql in the following examples):

Similarly, a database can be removed with the DROP DATABASE db_name command:

A database is not much of a utility without one or more tables. For the RHCE exam, you are required to “create a simple database schema.” If you want to know more about this topic, refer to the MariaDB website (https://mariadb.com/kb/en/mariadb/create-table).
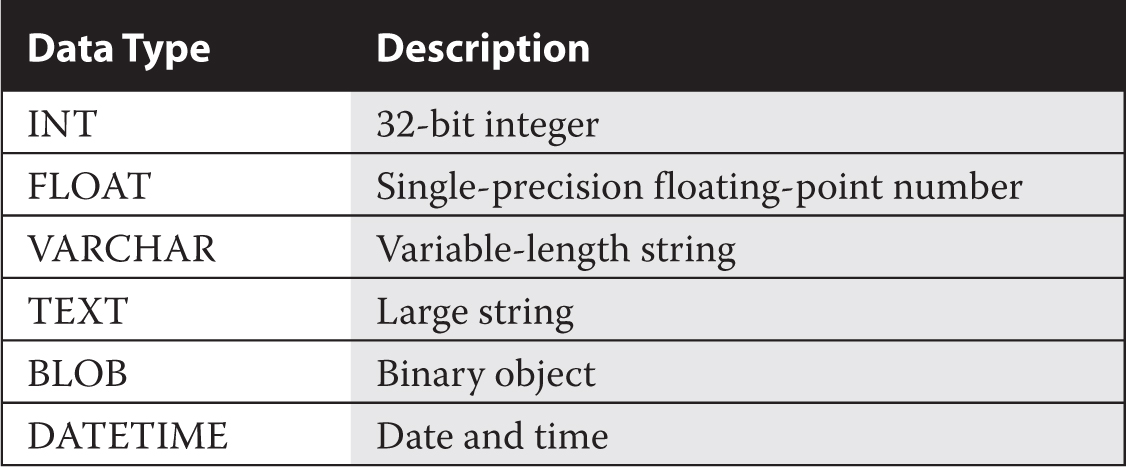
MariaDB tables consist of columns that you can configure as different data types. These data types determine what data can be stored inside a column. You can represent most of the different data formats with the data types listed in Table 17-3.
You should also add indexes to a table to retrieve data without having to read every row (called a “table scan”). This is critical for performance for larger tables. Generally, these involve two types of indexes: unique indexes and secondary indexes.
A unique index should specify something unique about a row, such as an ID number. A special type of unique index is one created with the PRIMARY KEY keyword, which is used internally by MariaDB to identify a given row. If you don’t specify a primary key, the default storage engine in MariaDB will automatically create a primary key on a commonly used column.
Conversely, secondary indexes don’t specify a unique element in a row and are used to speed up queries that rely on a key other than the primary key and avoid table scans.
To create a new table, use the CREATE TABLE command. Here is the syntax of this command in its simplest form:

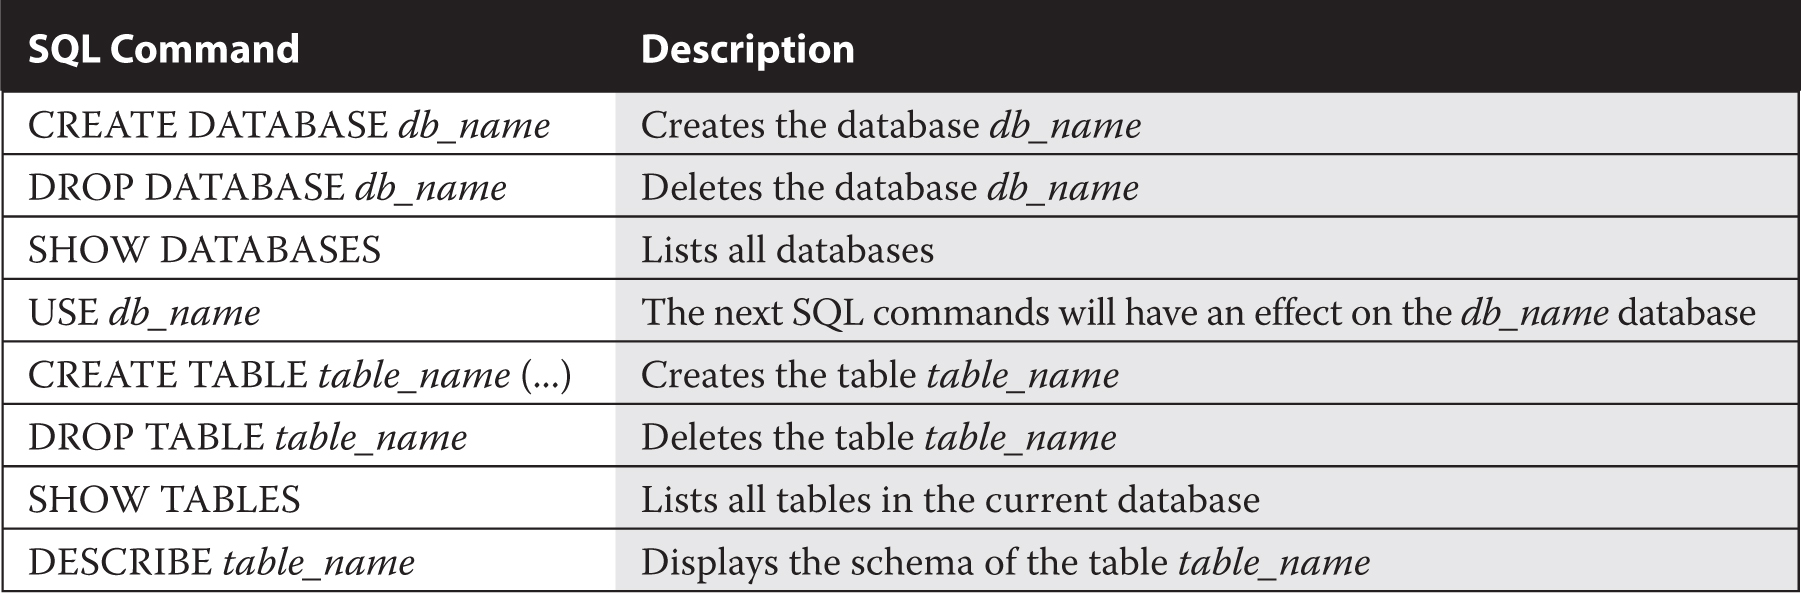
TABLE 17-4 SQL Database and Table Commands
The command defines each column in the table, identified by a name and a type, and an optional constraint such as NOT NULL, which prevents entries in the column from taking an undefined value, or AUTO_INCREMENT, which automatically inserts a new unique number when a new record is added to the table.
The PRIMARY KEY constraint tells MariaDB that the specified column is a primary key. In other words, the given column must contain only unique non-null values.
Table 17-4 summarizes the commands related to database and table management. Each command must be terminated by a semicolon character. Some of these commands will be explored in Exercise 17-3.
EXERCISE 17-3
In this exercise you will create a simple table. Start by connecting to MariaDB with the mysql client.
1. Create a database named “myapp”:

2. Tell MariaDB that the next commands will affect the myapp database:

FIGURE 17-5 Display the schema of an existing table.

3. Create a simple table: a list of widgets, each with an automatically generated ID. To do so, use a CREATE TABLE statement:
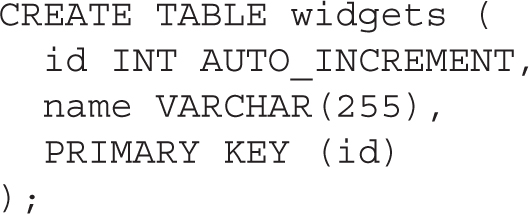
Note that the “id” column is marked as a primary key. There is also a second column (“name”) that can contain a string of variable length, up to 255 characters.
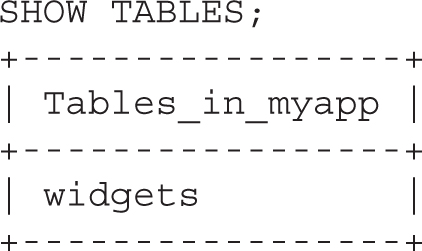
4. Display the newly created table with SHOW TABLES:
5. You can show the full schema of the table with the DESCRIBE tablename command. It will print out the schema you entered earlier. The output is shown in Figure 17-5.
CERTIFICATION OBJECTIVE 17.03
SQL is a special-purpose programming language that operates both as a data manipulation language, to modify data or the schema in a database, and as a query language, to retrieve data from a database.
In the previous section, we have shown how you can use SQL commands to manage databases and tables. In this section, we provide a brief introduction to several SQL commands to retrieve and insert data.
After creating a database and a table, you can make changes to the data with the SQL statements INSERT, SELECT, UPDATE, and DELETE. These are the basic SQL commands required by the RHCE exam.
In computer programming, the SQL INSERT, SELECT, UPDATE, and DELETE statements are also referred as "CRUD" operations, where the letters of the acronym stand for "Create, Read, Update, and Delete."
The INSERT statement adds a record into a table. The syntax of the command is as follows:

For example, you can insert a new record into the widgets table with the following command:

This command adds a new record to the table widgets with the integer value “1” in the id column and the string “widget A” in the name column.
Since we defined the id column as AUTO_INCREMENT in Exercise 17-3, MariaDB automatically gives a unique and incrementing ID to the next row you insert. Hence, you don’t even need to specify the id field when you add a row:

This SQL statement adds a new record to the table widgets with the string “widget B” in the name column. MariaDB will automatically assign the value “2” to the id field.
As we defined the id column to be a PRIMARY KEY, this means that each value in the column must be unique. If you create a new row with the same ID as the previous one, MariaDB will return an error:

As you have some records stored in the widget table, you can now use the SELECT statement to retrieve the data from the table. In its simplest form, the command syntax is as follows:

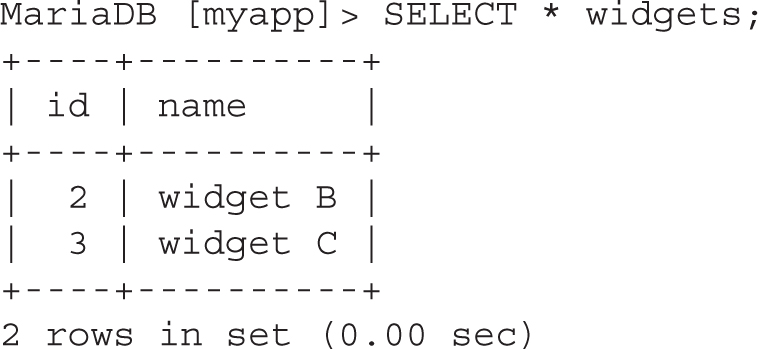
For example, the next command lists all rows in the table named widgets:
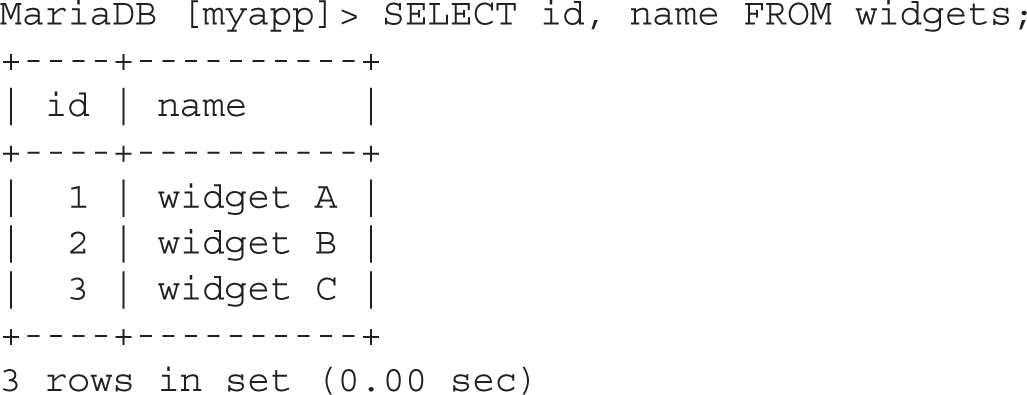
You can also use the star wildcard to specify all the columns in a table. The following SQL statement is equivalent to the last command:

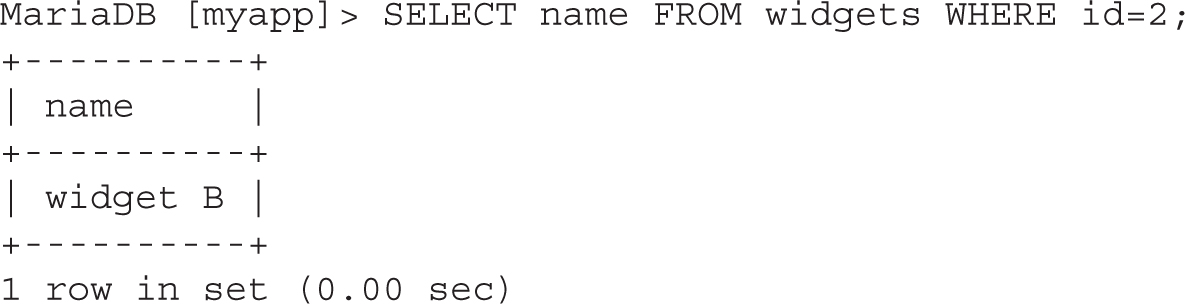
To filter results, pass the WHERE clause to the command. The next example shows how to retrieve a column from a row with a specific ID:
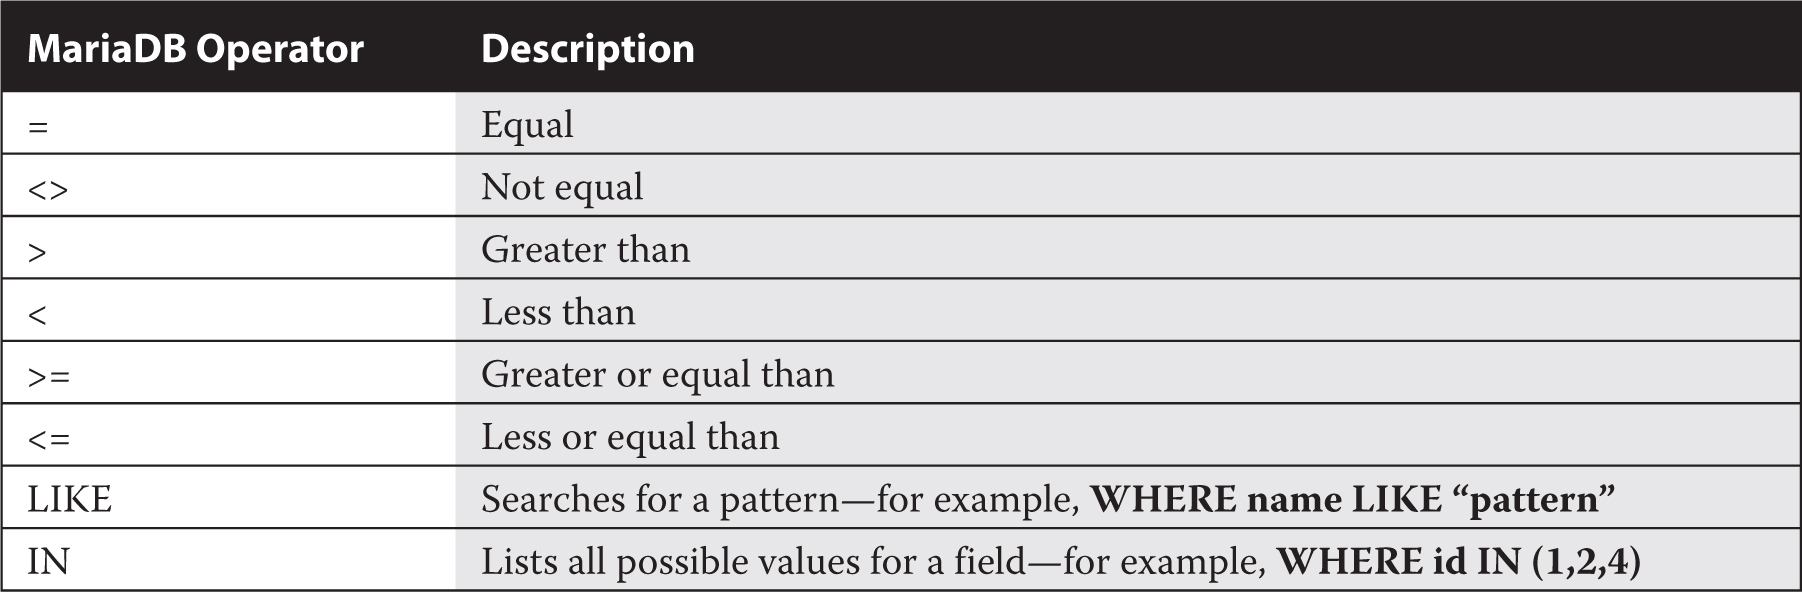
MariaDB supports numerous operators you can include in a WHERE clause. For example, the <> operator matches all the entries that are not equal to a given value.
As an example, the following statement returns all records from the widgets table, whose ID is not equal to the value “2”:

Table 17-5 lists the most commonly used operators.
The DELETE statement works in a similar fashion to SELECT, except it deletes the records matched. The syntax is illustrated in the next line:

For example, if you want to remove the row from the widgets table that has a value of “1” in the id column, run the following:

The following SELECT query confirms that the corresponding row has been removed from the table:
Finally, the UPDATE SQL statement allows you to update one or more rows. This command is slightly more complicated—you have to include the table you are modifying, the change you want to make, and the affected rows:

TABLE 17-6 Summary of Common SQL Queries

For example, the next command sets the value in the name column to a new value, for the record whose ID is equal to “2”:

The following SELECT statement confirms that the change has been applied:
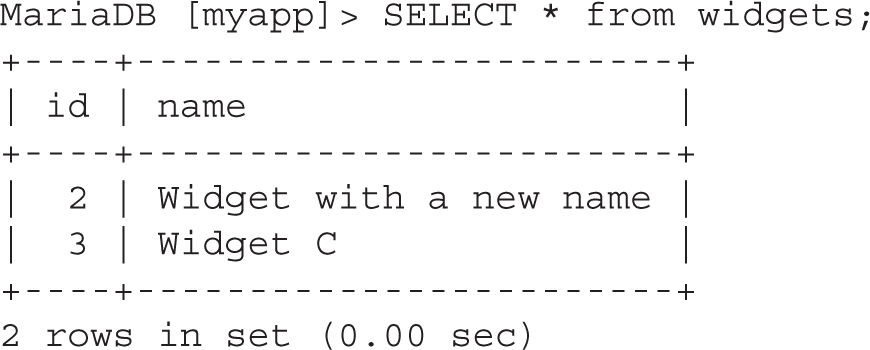
Table 17-6 summarizes the SQL queries we have described so far.
EXERCISE 17-4
In this exercise, you will import a freely available test database to provide sufficient data to be able to explore some slightly more challenging SQL queries.
1. Connect to the MySQL client as root:

2. Create a new database named “employees”:

3. Return to the shell (with the quit command). We will use a standard test database that is available from the media that accompanies this book. Insert the media, navigate to the Chapter17/ subdirectory, and copy the employees_db-full-1.0.6.tar.bz2 file to the local drive.
4. Extract and import the database using the following commands:

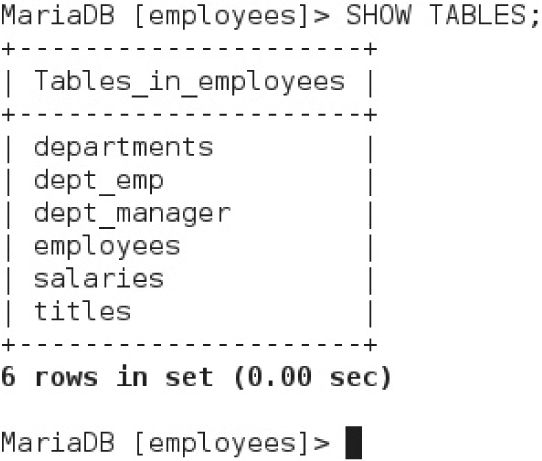
5. Wait for the files to load and verify that the new tables exists, as shown next:

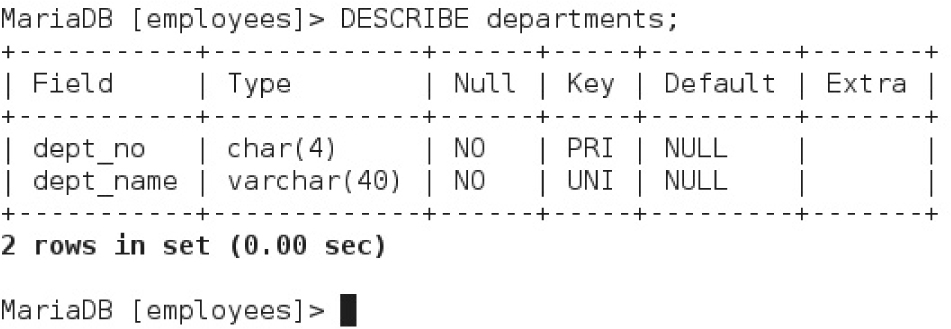
6. Find the schema of the departments table:
7. Display all the content of the departments table:
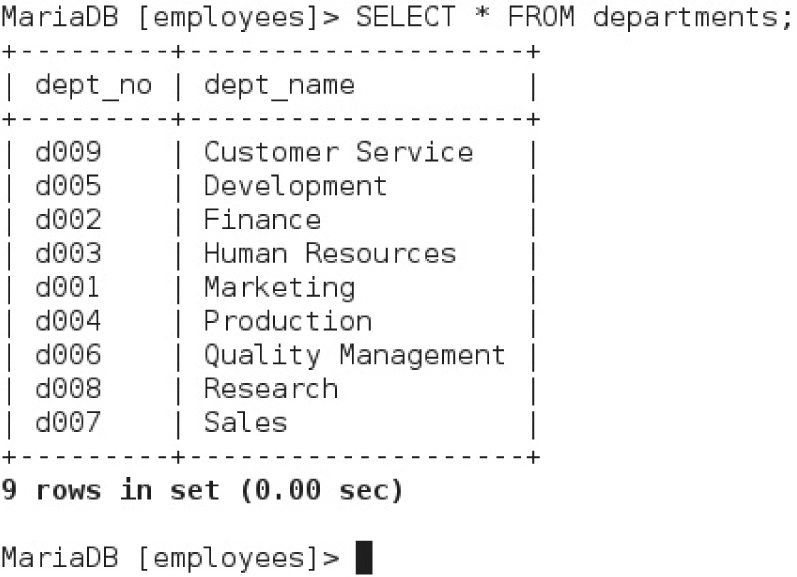
Now, try a slightly more difficult example. You will search for the employee with the highest salary. First, display the schema of the “salaries” table:

8. Identify the employee with the highest salary. To do so, we introduce a new clause, ORDER BY field, which orders the results of a SELECT query based on the values of a specified column. The optional DESC keyword sorts the results in descendent order. In addition, the number of records returned by the query can be limited to a maximum amount with the LIMIT num clause.
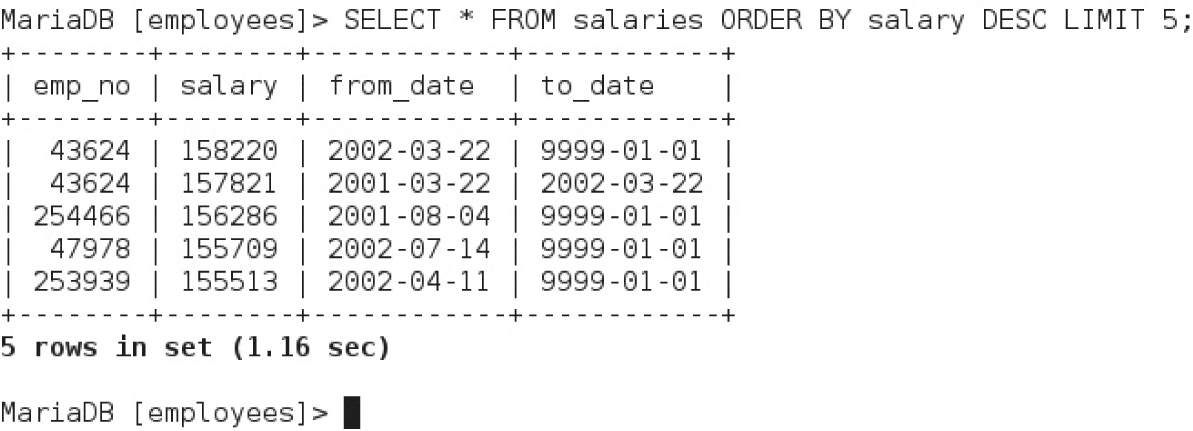
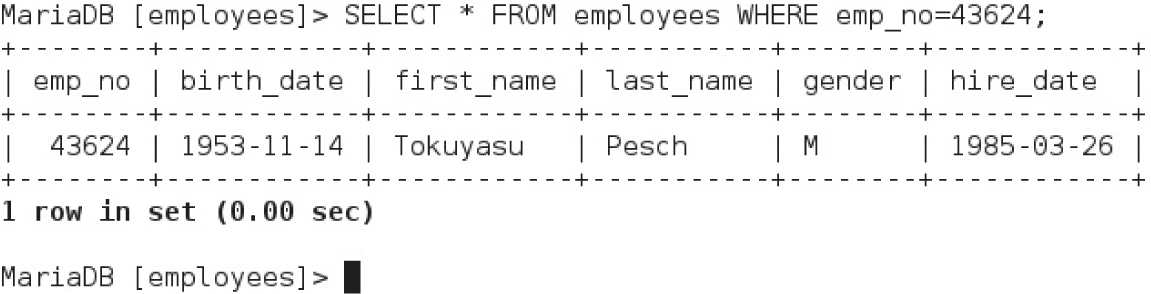
10. From the output of the last query, you can see that the employee with ID 43624 has a salary of $158,220.
11. The next step is to find the details of such employee in the corresponding “employee” table. To do so, run a SELECT query with a WHERE clause to display the record for the employee with ID 43624:
To combine data from multiple tables, you can use a SQL join clause, rather than the step-by-step procedure illustrated in Exercise 17-4. As an example, the final result in Exercise 17-4 can be retrieved with a single query:
SELECT * FROM employees NATURAL JOIN salaries ORDER BY salary DESC LIMIT 1;
However, this is beyond the scope of the RHCE exam.
CERTIFICATION OBJECTIVE 17.04
In a default installation, MariaDB accepts connections from any system on the network. Access is granted to the root user without a password.
Clearly, this is not a secure configuration. In a previous section, we explained how to secure a MariaDB installation with the mysql_secure_installation script. However, there’s more to do to set up a secure installation.
You may have applications that need to connect to MariaDB. For example, a web service may need access. While you can support remote access by some systems, you should ensure that access is prohibited to all other hosts. MariaDB provides a flexible permission scheme that allows you to specify all the types of commands a user can run on the system.
You should start by prohibiting remote access to MariaDB, if possible. Alternatively, you can limit access only to the systems that should be entitled to connect to it. There are two key directives available to this regard in /etc/my.cnf:
skip-networking Prevents MariaDB from listening on any TCP connection. This does not limit access from the local system via Unix sockets.
bind-address Allows MariaDB to listen to a specific IP address. If you set this directive to 0.0.0.0, MariaDB listens for connections on all local IPv4 addresses. This is the default setting. If you set it to ::, MariaDB listens for traffic on all IPv4 and IPv6 addresses. On systems with multiple interfaces and IP addresses, you may want MariaDB to listen on one specific IP address only.
Of course, you can also use firewall-cmd to restrict access to MariaDB. The following example sets a firewall rich rule that allows connections only from the host with IP address 192.168.122.1:

If you need to enable remote access to MariaDB for all hosts, run the following:

Access to MariaDB is maintained via an internal user database and privileges known as “grants.”
From the MariaDB mysql client, the default username is the username you are logged on with. So, if you are logged on the server as root, this is the default username. You can connect as a specific user with the -u command switch. You can pass -p to ask the MariaDB client to prompt you for a password, and -P to pass a custom TCP port. The last argument, which is optional, specifies a database name to connect to.
For example, to connect to the myapp database on server 192.168.122.1 on port 3307 with username myuser and password changeme, run this command:

Note that there must be no space between the -p switch and the password.
MariaDB uses the internal mysql database to manage users and permissions. To list the current users, run these SQL statements:

You can create a new user with the CREATE USER command. The syntax is illustrated in the following example:

This SQL command creates a user named “appuser” that can connect only from the host with IP address 192.168.122.1, with the password “changeme.” New users are not assigned any privileges, so you must specifically assign the permissions that a user should be entitled to.
Each user can be assigned a list of permissions (“grants”) that you can display with the SQL command SHOW GRANTS [FOR username]. A sample output is shown in Figure 17-6.
Focus on the first line of the output. This tells us that the root user connecting from the localhost is granted ALL PRIVILEGES, on all databases and all tables (*.*), with an additional permission known as GRANT OPTION that allows that user to create new users and assign them grant privileges.
FIGURE 17-6 Default grants for the MariaDB root user


If you need more information about the syntax of a GRANT statement, run SHOW GRANTS. It displays the grants of the currently connected user, which you can use as a template to modify the grants of other user accounts.
A list of the most common privileges is shown in Table 17-7.
Each GRANT statement is applied either globally (*.*), to a given database (db_name.*), or to a given table (db_name.table_name). GRANT statements add more privileges; to revoke a privilege, use the REVOKE command.
To put this into practice, we will create a user named “appowner” that can log in to MariaDB from any host ('%'), with full privileges on the myapp database and “password123” as a password:

The previous commands can be merged into a single GRANT command. In other words, the next statement has the same effect as the previous ones:

TABLE 17-7 Grant Privileges

If you want a user to be able to log in to MariaDB from the localhost via both TCP and Unix socket connections, you should run the GRANT command twice and specify the host as 127.0.0.1 and localhost. An example of this syntax is provided in Exercise 17-5.
MariaDB stores privileges internally in a database called “mysql.” When you make changes to user permissions, these are reflected in a database table. However, MariaDB does not implement these changes until you “flush” these privileges (or restart the service). At the MariaDB prompt, the required command is FLUSH PRIVILEGES:

Next, you can verify that the new user account works by connecting to the mysql client and listing the current user’s grants.

Don’t forget to run FLUSH PRIVILEGES after modifying a user’s grants.
To delete a MariaDB user, run the DROP USER statement. An example is shown here:

This command has an immediate effect and does not require you to flush the user’s privileges.
EXERCISE 17-5
In this exercise, we assume that you have completed Exercise 17-3 and created a “myapp” database. You will create two MariaDB users:
apprw This user is identified by the password “pass123” and has read, write, update, and delete permissions to all the tables in the myapp database. The user can log in from any host.
appro This user is identified by the password “pass456” and has read permissions to all the tables of the myapp database. The user can log in only from the localhost.
1. Connect to the MySQL client as root:

2. Create the apprw user with the following command:


4. Apply the new privileges:

5. Open a new terminal window and check that the new users can connect to MariaDB using the mysql client. For example, to connect as the appro user, run the following:

6. Run a simple SELECT query, such as the following:

Does this command work for the appro and apprw users?
7. Run an INSERT query:

Does this command work for the appro and apprw users?
8. Exit the mysql client with the quit command.
CERTIFICATION OBJECTIVE 17.05
MariaDB ships with the mysqldump backup program, which converts the entire contents of one or more tables or databases into SQL statements that would be required to re-create them.
Data can also be exported by redirecting the result of a SELECT query into a file. This can be done through the SELECT INTO OUTFILE statement, or by executing a query from the mysql command and redirecting the output to a file.
The mysqldump command outputs SQL statements to the standard output. To make that output useful, you can redirect the output to a .sql file, or capture any errors that are sent to stderr. For example, you can save the content of the widgets table created earlier with the following command:

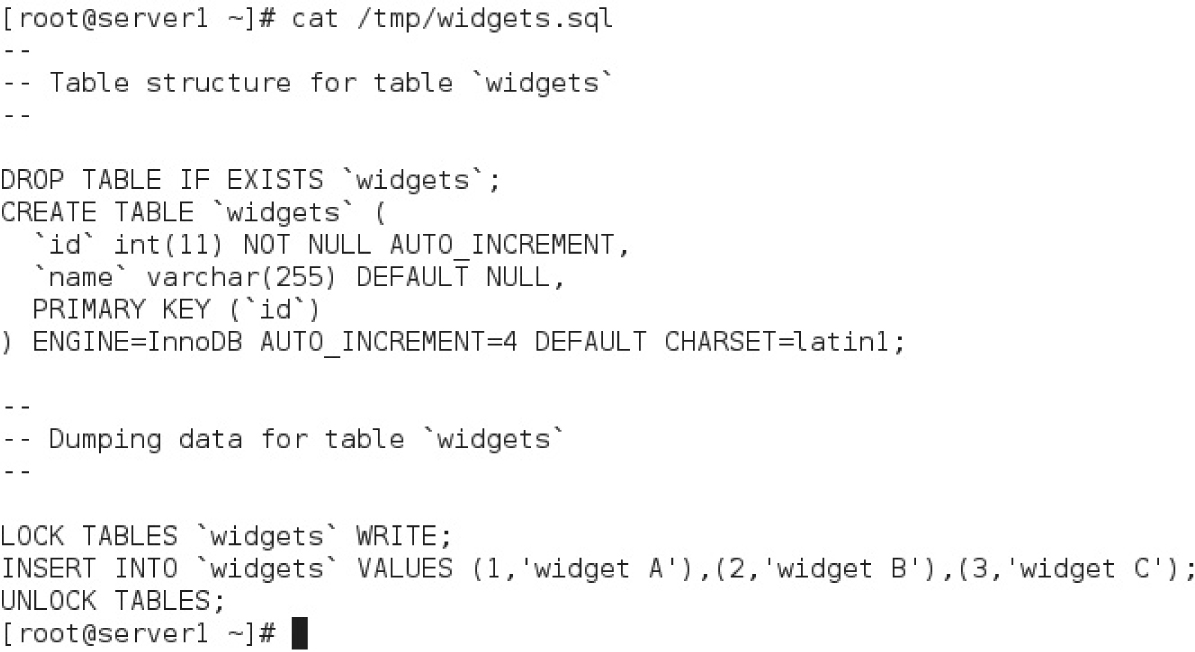
FIGURE 17-7 A backup generated by mysqldump
If mysqldump returns any errors, make sure that the database and table exist, and that the user has permissions to access the database and retrieve its contents.
Figure 17-7 shows the contents of the file generated by the previous command after some of the comment lines have been removed.
The first command is a DROP TABLE IF EXISTS statement. This line removes the widgets table only if it already exists to avoid any error messages if the table is not present.
Next, you will see a CREATE TABLE command, which should resemble the one from Exercise 17-3.
The LOCK and UNLOCK statements that follow prevent other commands from modifying the contents of the table while its contents are restored with the INSERT command.
With a backup file generated by mysqldump, you can re-create every entry in your database from this file. For example, if you want to import this backup into a database called myapp_restored, take the following three steps:
1. Create a new database:

2. Add a grant for the owner account:

3. Execute the contents of the dump file from the mysql client:

As an alternative, the last step can be executed from a Bash shell with the following command:

So far, we have backed up and restored a single table. However, mysqldump can also back up an entire database. For example, the following command creates a full backup of the employee database:

If you want to back up all databases in your MariaDB system, substitute the --all-databases flag for the database name:

If you have a large amount of data, you can create a dump of the data in a text file (for example, to be imported by another application). There are two ways to create a file with specific rows in it: using the SELECT INTO OUTFILE statement and the -e flag to the mysql command.
SELECT INTO OUTFILE creates a file on the server that contains the requested table rows. For example, the following command selects all the employee IDs and names and saves the result in the /tmp/employees.data file:

As another option, you can use standard output redirection and the -e flag to the mysql command:

You should be aware that while the mysqldump command can back up and restore the data and schema of a database, the commands illustrated in this section cannot back up the schema. In addition, there isn’t a standard and easy procedure for restoring the data generated by a SELECT INTO OUTFILE statement into a database or table.
MariaDB is a very popular relational database management system, derived from and fully compatible with MySQL. The mariadb-server RPM package installs the server components, whereas the client and libraries are included with the mariadb and mariadb-libs packages.
The default configuration in RHEL 7 works “out of the box,” and no changes are required to the /etc/my.cnf configuration file. However, at a minimum you should secure the installation by running the mysql_secure_installation script.
Like in many other relational database management systems, a MariaDB database is organized into different tables. Each table consists of columns of various data types and rows (or records). The specification of the properties of all data in a database is known as the schema. Databases and tables can be created with the CREATE DATABASE and CREATE TABLE statements. Other SQL statements perform the most common “CRUD” (create, read, update, delete) operations. These are INSERT, SELECT, DELETE, and UPDATE.
MariaDB supports some host-based security directives in the /etc/my.cnf configuration file, such as skip-networking to disable TCP connectivity, and bind-address, to listen for connections on a specific IP address. Access to the server can also be restricted on the local zone-based firewall.
User access is managed with the GRANT statement. This command can assign a specific set of permissions to each user, either on a per-database or per-table basis. After modifying user permissions, you must apply the changes with the FLUSH PRIVILEGES command.
The mysqldump command can perform a full backup of the contents and schema of a single table, a database, or all the databases on a system. The backup can be saved into a file, which can be passed to the mysql client as a script to restore the backup into MariaDB.
 TWO-MINUTE DRILL
Here are some of the key points from the certification objectives in Chapter 17.
 MariaDB is an RDBMS included in the base RHEL7 repositories. It is a community-developed fork of MySQL released under the GPL license.
The server package is provided by the mariadb-server RPM, whereas the client is in the mariadb RPM.
The main MariaDB configuration file is /etc/my.cnf.
The port=num directive in /etc/my.cnf can be used to run the service on a different port.
The mysql_secure_installation script can be used to secure a MariaDB server installation by assigning a password to the MariaDB root user, disabling remote logins, removing anonymous users, and deleting the default test database.
Databases store data in tables.
Tables are a sort of giant spreadsheet, with rows and columns containing data.
The schema defines how data is organized and structured into a database.
The CREATE DATABASE and CREATE TABLE SQL commands create a new database and table, respectively.
Data can be retrieved, inserted, edited, and modified with the SQL SELECT, INSERT, UPDATE, and DELETE statements.
The WHERE clause filters the results or applies a condition to a SQL statement.
The ORDER BY clause sorts the records of a query in ascending or descending (with the DESC keyword) order.
The LIMIT clause restricts the amount of records returned by a query.
The skip-networking directive in /etc/my.cnf disables TCP connections to the database and allows access only via Unix sockets.
The bind-address directive specifies the IP address that MariaDB should listen to for connections.
MariaDB users can be assigned a list of permissions (“grants”) with the GRANT command.
Permissions must be applied with the FLUSH PRIVILEGES command.
Backups of an entire database or specific tables can be taken with the mysqldump command.
Databases can be restored from a SQL file (such as one created by mysqldump) by redirecting its contents to the mysql command.
Data can be saved into a file with the SELECT INTO OUTFILE statement.

The following questions will help measure your understanding of the material presented in this chapter. As no multiple choice questions appear on the Red Hat exams, no multiple choice questions appear in this book. These questions exclusively test your understanding of the chapter. It is okay if you have another way of performing a task. Getting results, not memorizing trivia, is what counts on the Red Hat exams. There may be more than one answer to many of these questions.
1. Which RPM package provides the MariaDB server?

2. Which four actions are performed by the mysql_secure_installation script?
3. Which configuration directive runs MariaDB on TCP port 33066?
4. What SQL command would you use to create a database named foo?
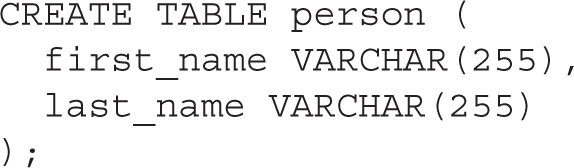
5. What SQL command would you use to create a table named person, containing two columns to store the first and last name?
6. What SQL command would you run to print all the records in the table salaries, where the value in the column salary is greater than or equal to 10,000?
7. What SQL command would you run to insert the values 7 and “finance” in the column id and department of the departments table?
8. What SQL command would you run to delete all the records in the employees table where the last_name column is equal to “Smith”?
9. What SQL command would you run to change the value of the first_name column to “Adam” in the employees table where the id column is equal to 5?
10. To disable all TCP connections, what directive would you include in /etc/my.cnf?
11. What command would you use to set up a user named “redhat” with password “redhat”? Also, give that user read-only access to a table named bar on the database foo, and grant access only from the IP address 192.168.1.1.
12. How do you display what privileges you have as a user logged in to a MariaDB client?
13. What is the command to back up the entire database foo to a text file /tmp/foo.sql?
Several of these labs involve configuration exercises. You should do these exercises on test machines only. It’s assumed that you’re running these exercises on virtual machines such as KVM. For this chapter, it’s also assumed that you may be changing the configuration of a physical host system for such virtual machines.
Red Hat presents its exams electronically. For that reason, the labs in this chapter are available in the Chapter17/ subdirectory from the media that accompanies the book. In case you haven’t yet set up RHEL 7 on a system, refer to Chapter 1 for installation instructions.
The answers for each lab follow the Self Test answers for the fill-in-the-blank questions.

1. The mariadb-server RPM package installs the MariaDB server.
2. The mysql_secure_installation script sets a password for the MariaDB root user, disables remote logins, removes anonymous users, and deletes the default test database.
3. The directive port=33066 in /etc/my.cnf runs MariaDB on TCP port 33066. You would also need to configure the local firewall and customize the default SELinux policy to allow MariaDB to accept connections on that port.
4. The following SQL command creates a database named foo:

5. The following command creates a table named person, with two columns to store the first and last name:
6. The following SQL statement prints all the records in the table salaries, where the value in the column salary is greater than or equal to 10,000:

7. The following SQL statement adds a record with the values 7 and “finance” in the columns id and department of the departments table:

8. The following SQL statement deletes all the records in the employees table where the last_name column is equal to “Smith”:

9. The following SQL statement modifies the value of the first_name column to “Adam” in the employees table where the id column is equal to 5:

10. To disable all remote TCP connections, add the skip-networking directive in the [mysqld] section of /etc/my.cnf.
11. The following command sets up a user named “redhat” with password “redhat” and read-only access to a table named bar on the database foo from the IP address 192.168.1.1:

Don’t forget to run FLUSH PRIVILEGES to make the change effective.
12. To list the privileges of the current user, run the SHOW GRANTS command.
13. The following command backs up the entire database foo to a text file /tmp/foo.sql:

This lab is a skill drill—practice it until you can do it without thinking. Install the mariadb-server package, start and enable the MariaDB service, run mysql_secure_installation, and ensure that the local firewall allows MySQL connections.
Then, connect as the MariaDB root user with the mysql client from the localhost, and run the following commands:

To test, connect to the database server from a remote host:

The first part of this lab was covered in Exercise 17-4.
To create the new user and assign the required permissions, execute the following SQL commands:

The queries in question 4 of this lab can be solved using a single SQL join query. However, SQL join clauses are beyond the scope of the Red Hat exam. Hence, we have provided the answers using simple SELECT statements.
To explore the structure of the employees database, use the SHOW TABLES and DESCRIBE table_name commands.
1. Execute the following query to retrieve all employees born on the 31st of October 1963:

This query should return 61 records.
2. The second question is similar to the previous, but requires a second condition in the WHERE clause:

The query should return 25 records.
3. To find the youngest employee, retrieve all the first few records from the employee table, sorted by birth data in descending order:

The youngest employees were born on the 1st of February 1965.
4. This question requires multiple queries to be answered. First, find the relevant record for Eran Fiebach in the employee table:

This query should return the employee number of 50714 for Eran Fiebach. Next, retrieve the job title using this information:

The job title returned by the query is Technique Leader. The last step is to find the salary information for this employee number:

This query should return 14 salaries for Eran Fiebach. You should find that her starting salary was $40,000, while the current salary is $57,744.
As discussed in the answers to Lab 3, you may need to study the structure of the database using the SHOW TABLES and DESCRIBE table_name commands.
Then, add a record for the new employee in the employees table:

Then, add the job title:

Note the special date 9999-01-01 to indicate that this is a current entry for the employee.
To assign the new employee to the Development department, we need the department code. The following query tells us that this is d005:

With this information, we assign the employee to the Development department:

The last step consists of adding the salary information:

Create the backup with the following command:

It is also perfectly acceptable to save the raw SQL file and then run gzip to compress the file. To verify that the backup is valid, explore the contents of the file:

Ensure that you have backed up only the contents of the employees table from the employees database.
To restore the backup, first create the new database:

Then import the contents of the backup:

As a final check, verify that the data looks the same by running the SQL query that you used to answer part 1 of Lab 3.