Two-Minute Drill
11.01 Red Hat System Configuration
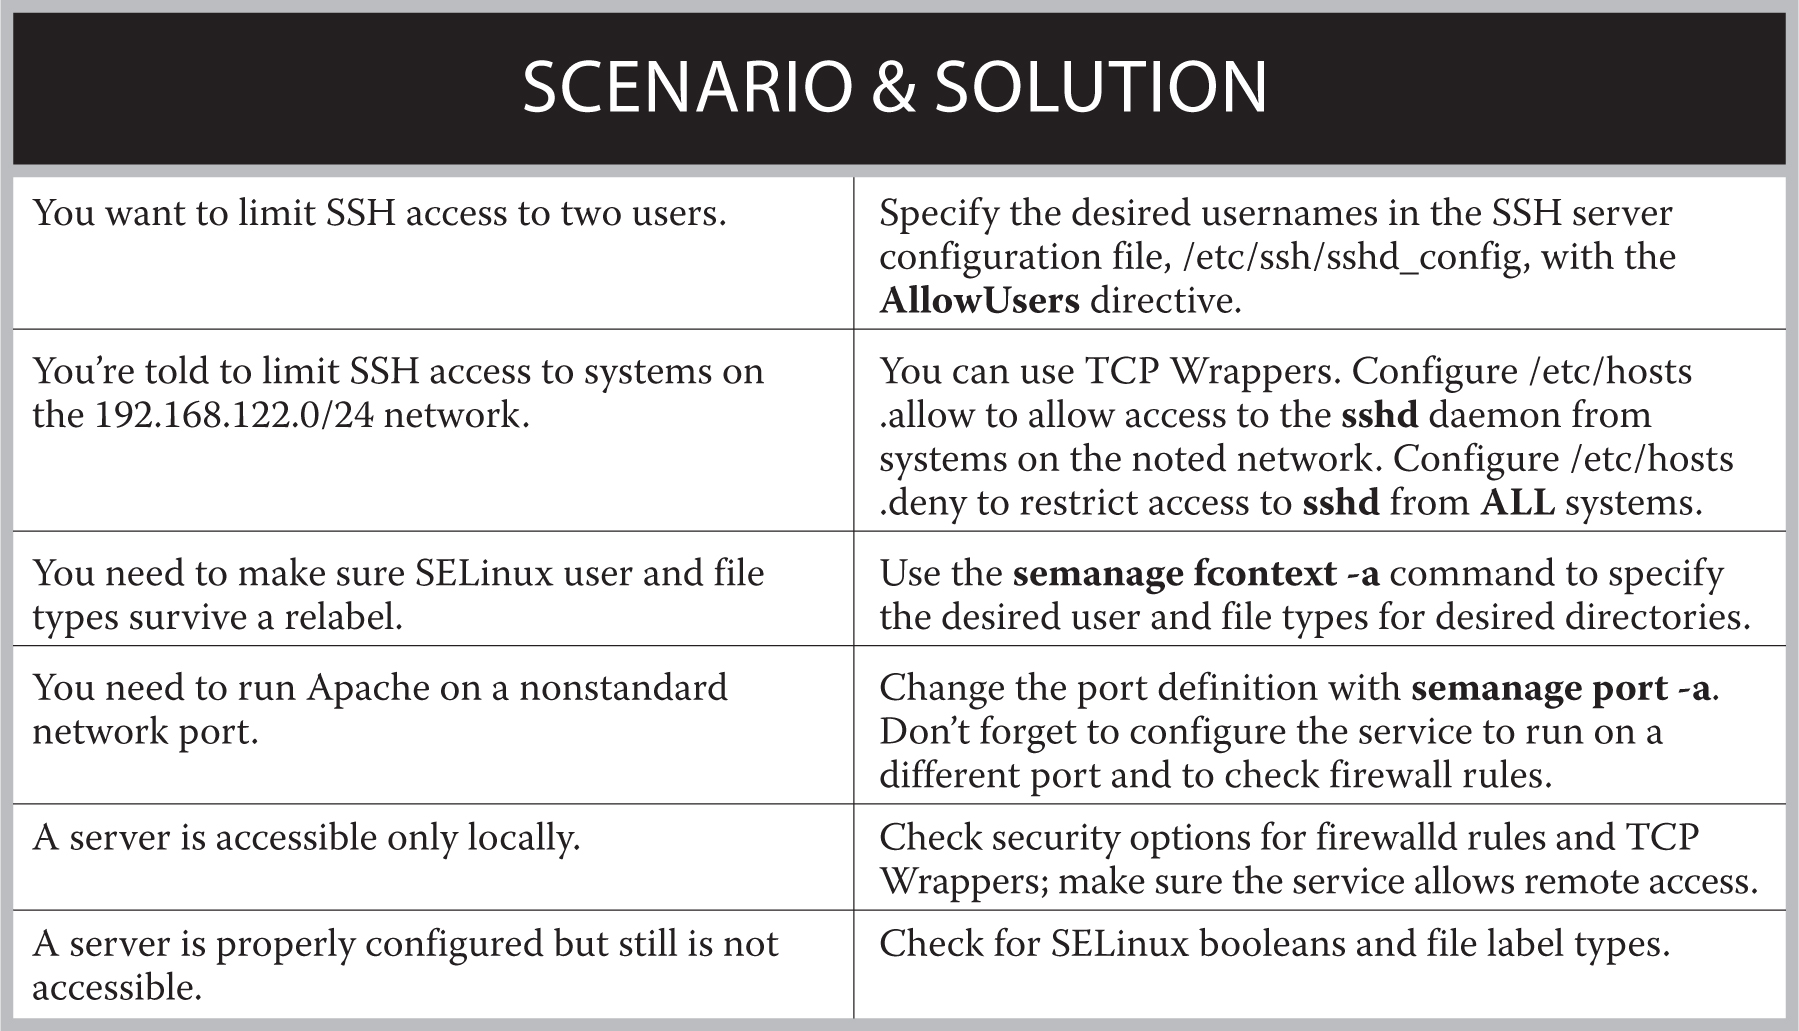
11.04 A Security and Configuration Checklist
This is a “big picture” chapter, focused on common tasks you’ll perform on the job. These tasks relate to the detailed configuration of RHCE-level services.
RHEL 7 incorporates basic system configuration files in the /etc/sysconfig directory, called by various services and cron jobs. Integral to this approach is the configuration of SELinux, as it includes a substantial number of custom options for various services.
You will test these tools on the one service that you might install on all bastion systems: SSH. As it is the common service for all such systems, “black hat” hackers want to find a weakness in SSH. Therefore, this chapter describes how you can make SSH services more secure. This is the first chapter where you will use the three virtual machines created in Chapters 1 and 2.
In this chapter, you’ll also configure the boolean options used by SELinux to secure various services. While SELinux is a common source of frustration, it is easier to handle when you know the options that support the desired features.
In addition, this chapter covers the basic procedure to make sure various services are operational, accessible from remote systems, and started the next time the system is rebooted.
Inside the Exam
This section includes tasks that will be repeated in the remainder of the book:
 Install the packages needed to provide the service
Whether you’re installing the Samba file server or a DNS caching-only name server, you will use the same tools. Yes, these are the same rpm and yum commands, along with the Package Management tools described in Chapter 7. To save time, you might use these commands to install the services described in Chapters 12 through 17.
Configure the service to start when the system is booted
Configure SELinux to support the service
Configure SELinux port-labeling to allow services to use nonstandard ports
While the detailed configuration of individual services is the province of each chapter, the steps required to configure a service to start during the boot process are based on common commands such as systemctl. In addition, the configuration of SELinux to support a service requires access to and the configuration of similar options.
As suggested in the introduction, there’s a special focus on the SSH service.
Configure key-based authentication
Key-based authentication is a requirement for both the RHCSA and RHCE exams, covered in Chapter 4. You may want to review that chapter’s section titled “Securing SSH with Key-Based Authentication.” Given the importance of SSH security, in this chapter we also cover the following task:
Configure additional options described in documentation
In this section, you’ll review basic information on how services are configured on Red Hat systems. The actual process associated with a service is a daemon. Such daemons are executable files, normally stored in the /usr/sbin directory. Red Hat configures custom parameters and more in the /etc/sysconfig directory. These files are referenced by cron jobs or systemd units.
As discussed throughout the book, services are controlled by systemd service unit configuration files. As described in Chapter 4, you can use systemctl to start, stop, or restart a service. In many cases, you can use systemctl to reload a service with modified configuration files, without kicking off currently connected users.
Although the real daemons are in the /usr/sbin directories, the systemd unit files do more. They call the daemons with parameters configured in their unit files in the /lib/systemd/system directory. The unit files then reference service-specific configuration files.
RHEL 7 maintains compatibility with the traditional init-script system that was found in earlier versions of Red Hat Enterprise Linux. Old-style init scripts are still located in the /etc/rc.d/init.d directory and referenced by symbolic links in the /etc/rc.d/rcX.d subdirectories. And the old service command in the /usr/sbin directory is a wrapper to the systemctl command. In other words, the following commands are functionally identical:

The files in the /etc/sysconfig directory are normally used with cron jobs and systemd units. They’re as varied as the unit configuration files included in the /lib/systemd/system directory. As they include basic configuration options for each daemon, they drive the basic operation of each service.
In most cases, each of these files supports the use of switches as described in the associated man pages. For example, the /etc/sysconfig/httpd file can be used to set up custom options for starting the Apache web server. In that file, the OPTIONS directive would pass switches to the /usr/sbin/httpd daemon, as defined in the httpd man page.
In general, when you configure a network service on Linux, run the general steps described in this section. The actual steps you take may vary; for example, you may sometimes modify SELinux options first. Sometimes, you’ll want to test a service locally and remotely before making sure the service starts automatically upon the next reboot.
1. Install the service with a command such as rpm or yum. In some cases, you may need to install additional packages.
2. Edit appropriate service configuration files. Usually, you have to modify and customize several configuration files, such as for the Postfix e-mail server in the /etc/postfix directory.
3. Modify SELinux booleans. As discussed later in this chapter, most services have more than one SELinux boolean. For example, you may modify different SELinux booleans to allow the Samba file server to share files in read/write or read-only mode.
4. Start the service. You’ll also need to make sure the service starts the next time the system is booted, as discussed later in this chapter.
5. Test the service locally. Make sure it works from the appropriate client(s) and on the local system.
6. Set appropriate firewall policies, based on firewalld, TCP Wrappers, and service-specific configuration files. Configure access to desired users and systems.
7. Test the service remotely. If the right ports are open, the service should work as well as when you connect locally. With the right limits, the service should not be accessible to undesired users or systems.
In general, it’s most efficient to configure various services from the command line. An administrator who knows a service can set up basic operation in just a few minutes. However, most administrators can’t specialize in everything. To that end, Red Hat has developed a number of configuration tools. When used properly, these tools will modify the right configuration files. Some are installed with each service; others have to be installed separately. Most of these tools are accessible from a GUI command-line interface with a system-config-* command.
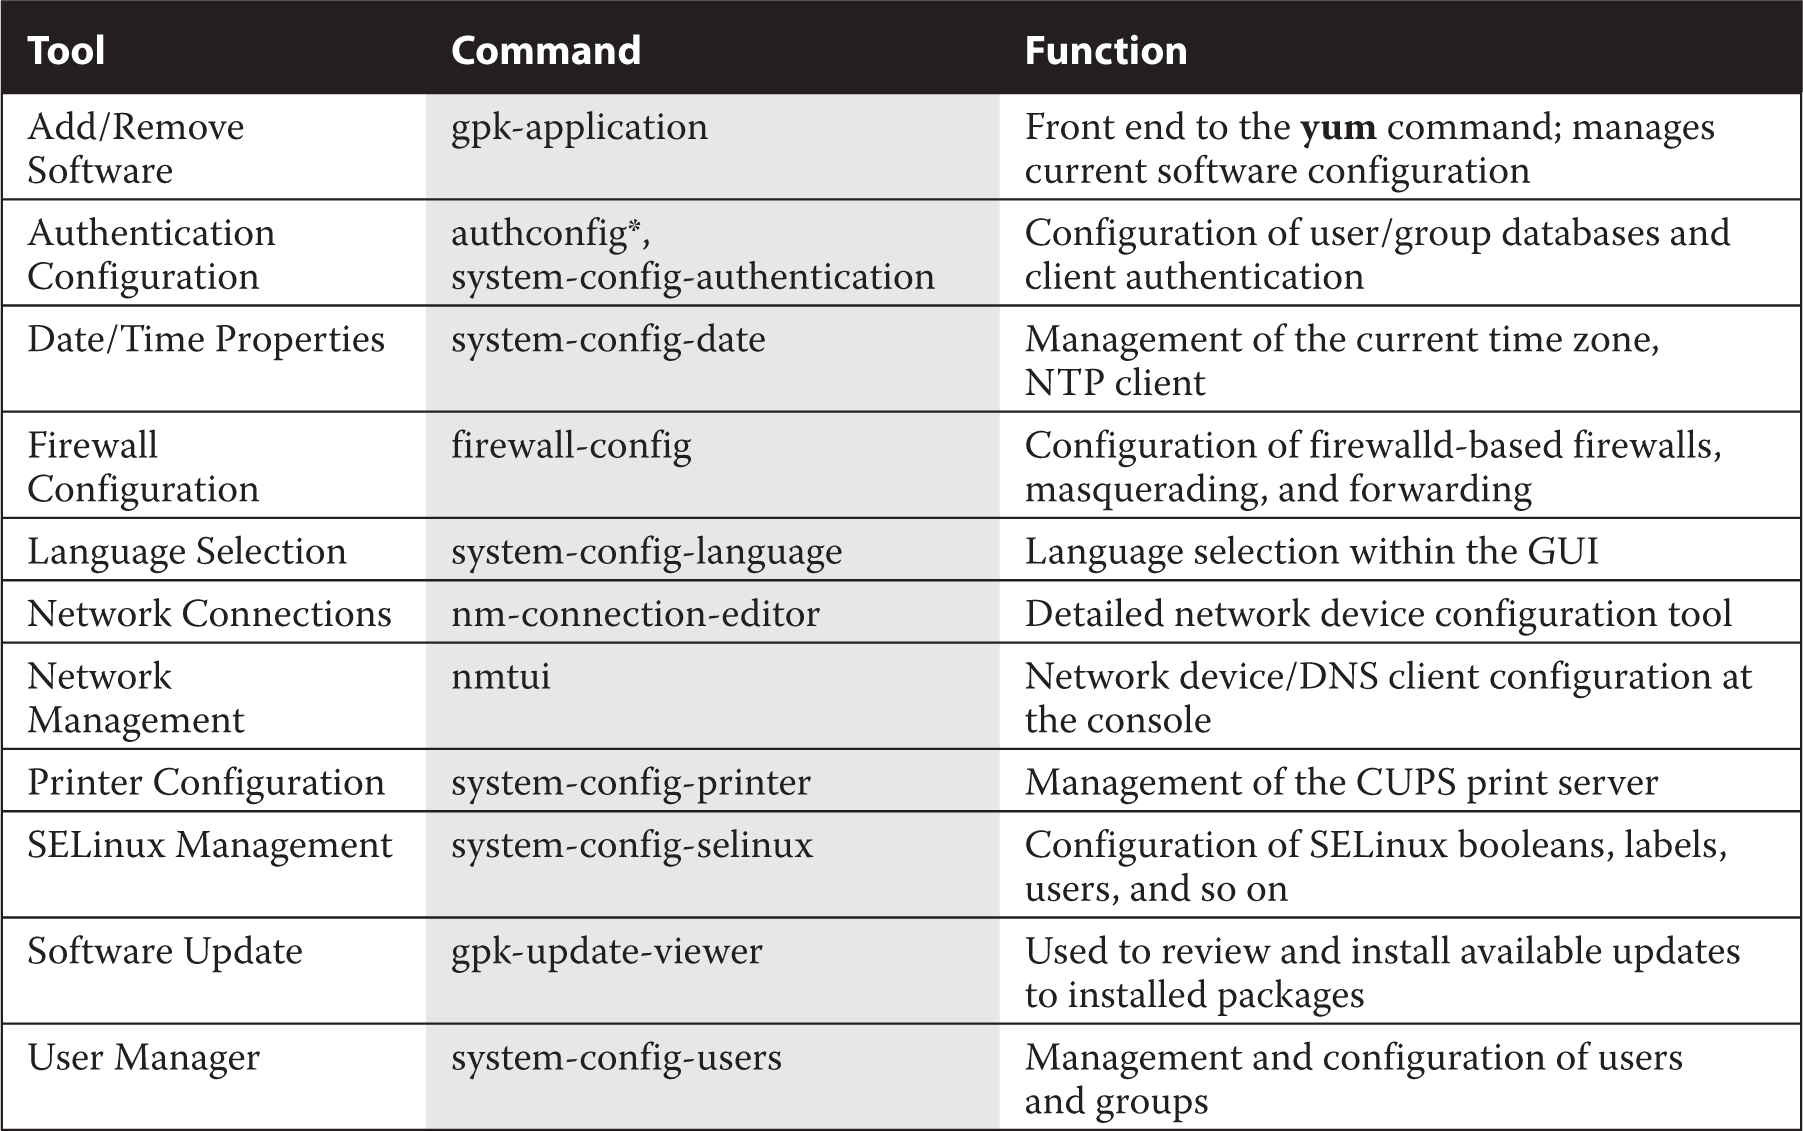
The tools used in this book (and a couple more) are summarized in Table 11-1.
TABLE 11-1 Red Hat Configuration Tools
CERTIFICATION OBJECTIVE 11.02
Security-Enhanced Linux (SELinux) provides one more layer of security. Developed by the U.S. National Security Agency, SELinux makes it more difficult for “black hat” hackers to use or access files or services, even on compromised systems. SELinux assigns a context to each object, such as a file, a device, or a network socket. The context of the object tells which actions a process (or subject, in SELinux jargon) can perform.
Basic SELinux options were covered in Chapter 4, as this is also a requirement for the RHCSA certification. For the RHCE, the focus of SELinux relates to various services. Specifically, you need to know how to configure SELinux to support the Apache web server, the Domain Name System (DNS) service, the MariaDB database management system, the Samba file server, the Simple Mail Transport Protocol (SMTP) service, the Secure Shell (SSH) daemon, and the Network Time Protocol (NTP) service.
The requirements for each of these services are covered in this and later chapters of this book. As the SELinux configuration for each service requires the use of the same commands and tools, they’re covered here.
The key commands and tools discussed in this section are getsebool, setsebool, chcon, restorecon, ls -Z, and the SELinux Management Tool. While these are the same tools used in Chapter 4, the focus is different. To review, the getsebool and setsebool commands set boolean options in the files of the /sys/fs/selinux/booleans directory. A boolean is a binary option, 1 or 0, which corresponds to yes or no.
When configuring SELinux for a service, you’ll generally make changes to boolean settings in the /sys virtual filesystem. Take a look at the files in the /sys/fs/selinux/booleans directory. The filenames are somewhat descriptive.
For example, the http_enable_homedirs boolean either allows or denies access to user home directories via an Apache server. It is disabled by default. In other words, if you configured the Apache server in Chapter 14 to serve files from user home directories without changes to SELinux, the web server wouldn’t be able to access the files.
Problems like this are a common source of frustration for administrators of RHEL systems. They do all the work to configure a service, they test out the configuration, they check their documentation, they think they’ve done everything right, and yet the service doesn’t work as they want. The solution is to make SELinux a part of what you do to configure a service.
As an example, run the following command:

By default, the output should be

That’s two zeros. Supposedly one boolean is for the current setting, and the other is for the permanent setting. In practice, the numbers don’t reflect the differences, at least for RHEL 7, but the differences are still there. Because of this issue, the best way to see the current state of a boolean is the getsebool command. For example, the command

leads to the following output:

Bottom line, if the current setting is 0, the following command would activate httpd_enable_homedirs only until the system is rebooted:

To repeat from Chapter 4, the way to make the change permanent from the command line is with the setsebool -P command, which in this case is


Many service-related SELinux booleans are described in local documentation; for a list of associated man pages, run the man -k selinux command.
There are nearly 300 pseudo-files in the /sys/fs/selinux/booleans directory. As the filenames in this directory are descriptive, you can use database filter commands such as grep to help classify those booleans. Based on some of the services discussed in this book, the following would be some appropriate filtering commands:

You’ll explore each of these categories of booleans in more detail shortly. For a brief description of available booleans with their current status, run the semanage boolean -l command. The semanage command is part of the policycoreutils-python package.
One of the benefits of GUI tools is a view of the “big picture.” With the SELinux Management tool, you can review the active booleans and quickly get a sense of whether SELinux is set to allow few or many options associated with a service. As discussed in Chapter 4, you can start the SELinux Management tool in a GUI desktop environment with the system-config-selinux command. In the left pane, click Boolean. This opens access to a group of booleans in the right side of the window. Note the http filter added in Figure 11-1. It filters the system for all booleans related to the Apache web server.
FIGURE 11-1 Filter booleans with the SELinux Management tool.

Compare the list to the output of the ls /sys/fs/selinux/booleans | grep http command described earlier. Note the differences. You’ll actually see more Apache-related booleans in the GUI tool because the filter in the SELinux Management tool filters by SELinux boolean names and descriptions.
A number of categories are shown in the left pane of the SELinux Management Tool window; they are described in the following sections. Most of the focus here will be on the boolean category, where most of the SELinux policies are customized.
In some cases, a boolean is associated with a requirement for a SELinux file context. For example, the httpd_anon_write boolean works only if associated files and directories are labeled with the public_content_rw_t type. To set that type on, say, the /var/www/html/files directory (and subdirectories), you would run the following command:

The boolean settings discussed in the following sections fall into several categories. They’re based on the services defined in the RHCE objectives. The SELinux settings do not stand alone. For example, if you enable the httpd_enable_homedirs boolean, you’ll still have to configure the /etc/httpd/conf.d/userdir.conf file to support access to user home directories. Only after both SELinux and Apache are configured with such support can users connect to their home directories through that Apache server.
As there are no current SELinux booleans related to the Network Time Protocol (NTP) service, there is no separate section for NTP booleans in this discussion.
A number of SELinux directives are available to help secure the Apache web server, as summarized in the following list. Most are straightforward and self-explanatory. They are ordered by the filename of the boolean, as shown in the /sys/fs/selinux/booleans directory. While these booleans can apply to other web servers, Red Hat assumes the use of the Apache web server. The descriptions specify the configuration if the boolean is active.
httpd_anon_write Allows the web service to write to files labeled with the public_content_rw_t type.
httpd_builtin_scripting Permits access to scripts, normally associated with PHP. Enabled by default.
httpd_can_check_spam Supports the use of SpamAssassin for web-based e-mail applications.
httpd_can_network_connect Allows Apache scripts and modules access to external systems over the network; normally disabled to minimize risks to other systems.
httpd_can_network_connect_cobbler Allows Apache scripts and modules to access an external Cobbler installation server. If you don’t need to connect to any services other than Cobbler, you should disable the httpd_can_network_connect boolean.
httpd_can_network_connect_db Allows connections to database server ports; more specific than httpd_can_network_connect.
httpd_can_network_memcache Enables access to a memcache server over the network.
httpd_can_network_relay Supports the use of the HTTP service as a forward or reverse proxy.
httpd_can_sendmail Allows Apache to send e-mails.
httpd_dbus_avahi Supports access to the avahi service via the D-bus message system. Disabled by default.
httpd_enable_cgi Allows the running of Common Gateway Interface (CGI) scripts. Enabled by default; requires scripts to be labeled with the httpd_sys_script_exec_t file type.
httpd_enable_ftp_server Allows Apache to listen on the FTP port (normally 21) and work as an FTP server.
httpd_enable_homedirs Allows Apache to serve content from user home directories via the UserDir directive.
httpd_execmem Supports programs such as those written in Java or Mono that require memory addresses that are executable and writable.
httpd_mod_auth_ntlm_winbind Permits access to the Microsoft NT LAN Manager (NTLM) and Winbind authentication databases; requires an installed and active mod_auth_ntlm_winbind module for Apache.
httpd_mod_auth_pam Supports PAM access for user authentication; requires an installed and active mod_auth_pam module for Apache.
httpd_read_user_content Allows the Apache web server to read all files in user home directories.
httpd_setrlimit Allows changes to Apache file descriptor limits.
httpd_ssi_exec Supports executable Server Side Includes (SSIs).
httpd_sys_script_anon_write Allows HTTP scripts to write to files labeled with the public_content_rw_t type.
httpd_tmp_exec Lets Apache run executable files from the /tmp directory.
httpd_tty_comm Supports access to a terminal; needed by Apache to prompt for a password if the private key of a TLS certificate is password-protected.
httpd_unified Enables access to all httpd_*_t labeled files, whether they are read-only, writable, or executable. Disabled by default.
httpd_use_cifs Supports access from Apache to shared Samba files and directories labeled with the cifs_t file type.
httpd_use_fuse Supports access from Apache to FUSE filesystems, such as GlusterFS volumes.
httpd_use_gpg Allows Apache to use GPG for encryption.
httpd_use_nfs Supports access from Apache to shared NFS files and directories labeled with the nfs_t file type.
httpd_use_openstack Allows Apache to access OpenStack ports.
The name service daemon (named) is based on the Berkeley Internet Name Domain (BIND) software, which is the default RHEL 7 DNS service. If you maintain an authoritative DNS zone, activate the named_write_master_zones boolean. Then local DNS software can overwrite master zone files.
In general, this section does not apply to the RHCE because the objectives state that all you need to do with DNS is to configure a caching-only name server. Such servers are not authoritative for a specific domain. Therefore, the noted DNS boolean does not apply because such DNS servers do not have master zone files.
RHEL includes the Unbound DNS resolver, a small service that you can install in place of BIND to provide a caching name server.
Two SELinux booleans are solely related to the MariaDB database service. Typically, you don’t need to change their default values.
mysql_connect_any Allows MariaDB/MySQL to connect to all ports. Disabled by default.
selinuxuser_mysql_connect_enabled Allows SELinux users to connect to a local MariaDB/MySQL server using a Unix domain socket. Disabled by default.
Some of the basic SELinux booleans associated with the Network File System (NFS) servers are enabled by default, which allows you to share directories with the NFS server.
nfs_export_all_ro Allows shared NFS directories to be exported with read-only permissions. Enabled by default.
nfs_export_all_rw Allows shared NFS directories to be exported with read/write permissions. Enabled by default.
use_nfs_home_dirs Supports access of home directories from remote NFS systems. Disabled by default.
virt_use_nfs Enables access from virtual guests to NFS mounted filesystems.
Samba booleans are generally not enabled by default. So in most configurations, you’ll need to activate one or more SELinux booleans to match changes to the Samba configuration files. These booleans include the following:
samba_create_home_dirs Allows Samba to create new home directories, such as for users who connect from other systems, normally via the pam_mkhomedir.so PAM module.
samba_domain_controller Enables the configuration of the local Samba server as a local domain controller on a Microsoft Windows–style network.
samba_enable_home_dirs Supports the sharing of user home directories.
samba_export_all_ro Allows files and directories to be shared in read-only mode.
samba_export_all_rw Allows files and directories to be shared in read/write mode.
samba_run_unconfined Allows Samba to run unconfined scripts stored in the /var/lib/samba/scripts directory.
samba_share_fusefs Supports sharing of filesystems mounted under FUSE filesystems (fusefs).
samba_share_nfs Supports sharing of filesystems mounted under NFS.
smbd_anon_write Allows Samba to modify files on public directories configured with the public_content_rw_t and public_content_r_t SELinux contexts.
use_samba_home_dirs Supports the use of a remote Samba server for local home directories.
virt_use_samba Allows virtual machines to use files shared from Samba.
The two SELinux booleans associated with SMTP services both work with the default Postfix server. The httpd_can_sendmail boolean was previously described. The other Postfix boolean is enabled by default:
postfix_local_write_mail_spool Allows Postfix to write to the local mail spool directories
The SELinux booleans associated with SSH connections are listed next. All are disabled by default:
ssh_chroot_rw_homedirs Allows a chroot-enabled SSH service to read and write files from user home directories.
allow_ssh_keysign Allows host-based authentication; would not require usernames or public/private passphrase-based authentication.
ssh_sysadm_login Supports access by users configured with the sysadm_r role. This does not include the root administrative user; in general, it’s more secure to log in as a regular user, connecting with passphrases, before authenticating with administrative privileges.
Changes made with the chcon command are not permanent. While they do survive a reboot, they do not survive a relabel. SELinux relabels of a system can happen when SELinux is disabled and then re-enabled. The restorecon command relabels a target directory. The configured SELinux contexts are stored in the /etc/selinux/targeted/contexts/files directory.
The default version of this directory includes, among the others, three important files:
file_contexts Baseline file contexts for the entire system
file_contexts.homedirs File contexts for the /home directory and all subdirectories
media File contexts for removable devices that may be mounted after installation
If you need a change to file system contexts to survive a relabel, the semanage command can help. For example, if you need to set up the /www directory for virtual websites, the following command makes sure the file contexts are appropriate for that directory (and subdirectories) even after a relabel:

The noted command adds a file context rule to the file_contexts.local file in the /etc/selinux/targeted/contexts/files directory. For a discussion of the meaning of the (/.*)? regular expression, refer to Chapter 4.
While the semanage command manages a variety of SELinux policies, the focus here is on file contexts, as represented by the fcontext option. The command switches available are described in Table 11-2.
TABLE 11-2 Command Switches for semanage fcontext

The SELinux policy controls every action that a process can execute on a certain object, such as a file, a device, or a network socket. Opening a TCP socket and listening to a network port is one of those actions you can control and restrict via the SELinux policy.
If one of the services covered in the previous section is configured to listen to a nonstandard port, by default the SELinux targeted policy will deny this action. In fact, SELinux uses labels to control not only access to files or devices, but also to network ports.
You can list all SELinux port labels by running the semanage command:

Filtering for a certain string can help in identifying which ports a service is allowed to listen to. As shown in the following example, the SSH service is restricted to listening to port 22:

Similarly, the http_port_t label regulates the ports that Apache can listen to, whereas http_cache_port_t identifies the ports allowed by web proxies:

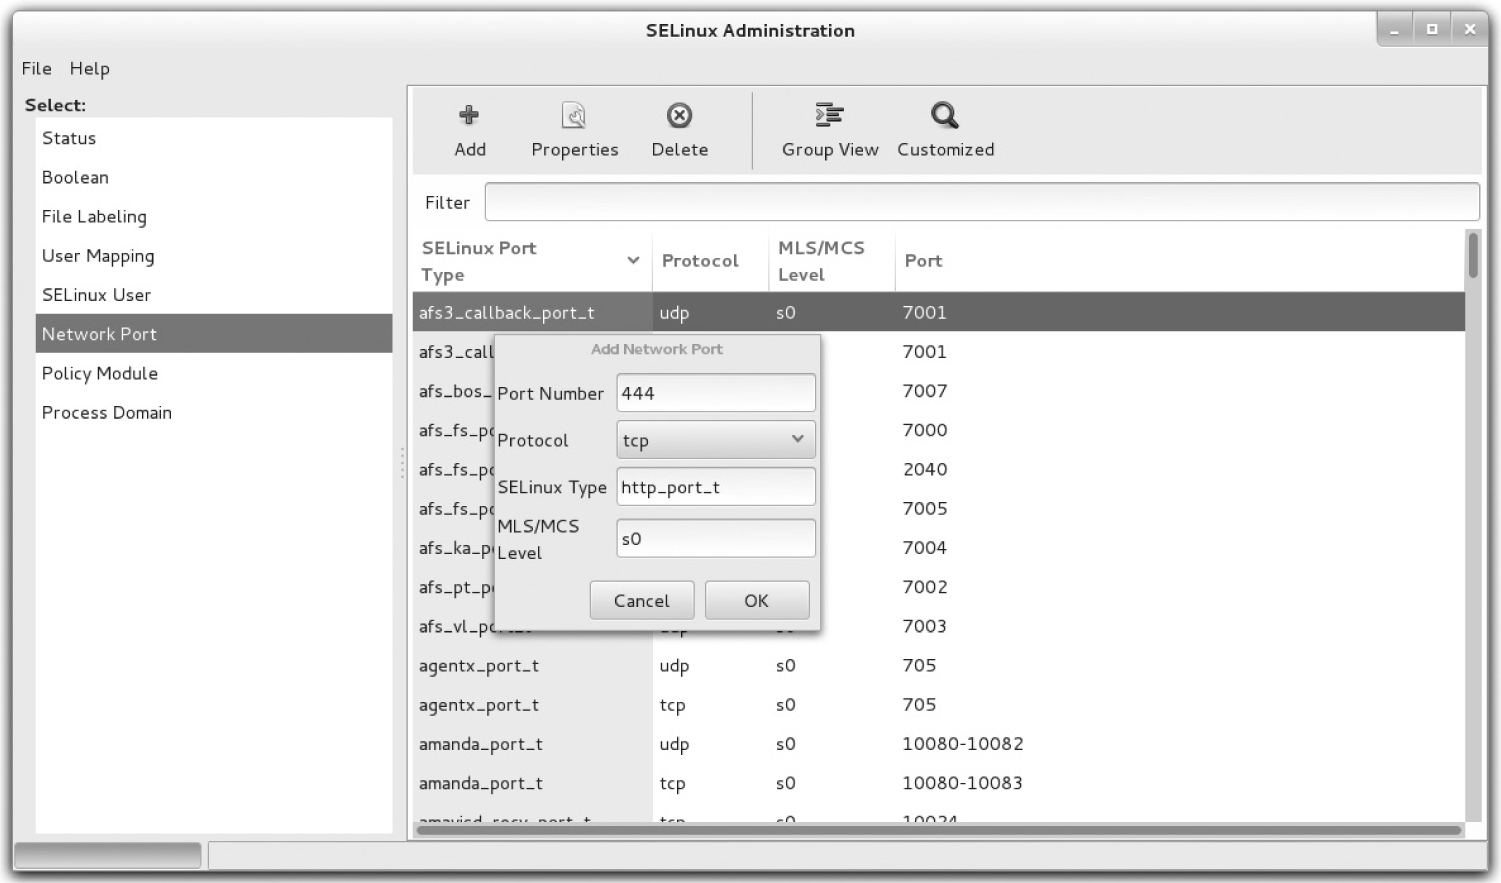
If you need to change a label to allow a service to listen to a nonstandard port, use the semanage command. In the following example, the SELinux policy is modified to allow Apache to listen to port 444:

Needless to say, you can achieve the same result from the SELinux Management tool, as shown in Figure 11-2.
EXERCISE 11-1
In this exercise, you’ll set up a new directory, /ftp, with SELinux contexts that match the standard directory for FTP servers. This exercise demonstrates how this is done with the chcon command, along with the effect of the restorecon and semanage commands.
1. Create the /ftp directory. Use the ls -Zd /ftp command to identify the SELinux contexts on that directory. Contrast that with the contexts on the /var/ftp directory.
FIGURE 11-2 Adding a network port with the SELinux Management Tool
2. Change the contexts on the /ftp directory to match those on the /var/ftp directory. The most efficient method is with the following command:

While the -R switch is not required, we include it to help you get used to the idea of changing contexts recursively.
3. Run the ls -Zd /ftp command to review the changed contexts on that directory. It should now match the contexts on the /var/ftp directory.
4. Run the following command to see what happens when SELinux is relabeled:

What did this command do to the contexts of the /ftp directory?
5. To make changes to the /ftp directory permanent, you need help from the semanage command, with the fcontext option. As there is no analog to the chcon --reference command switch, the following command specifies the user role and file type, based on the default settings for the /var/ftp directory:

6. Review the results. First, the semanage command does not change the current SELinux contexts of the /ftp directory. Next, review the contents of file_contexts.local in the /etc/selinux/targeted/contexts/files directory. It should reflect the semanage command just executed.
7. Re-run the restorecon command from Step 4. Does it change the SELinux contexts of the /ftp directory now?
CERTIFICATION OBJECTIVE 11.03
Red Hat Enterprise Linux installs the Secure Shell (SSH) server packages by default, using the openssh-server, openssh-clients, and openssh RPMs. Chapter 2 addressed SSH client programs, including ssh, scp, and sftp, whereas in Chapter 4 we discussed how to secure SSH access with key-based authentication. The focus of this section is on the SSH server. The secure daemon, sshd, listens for all inbound traffic on TCP port 22. The SSH server configuration files are located in the /etc/ssh directory.
The configuration files of the SSH server are stored in the /etc/ssh directory. The functionality of these files is summarized here:
moduli Supports the Diffie-Hellman Group Exchange key method with prime numbers and random key generators
ssh_config Includes the configuration for the local SSH client, discussed in Chapter 2
sshd_config Specifies the configuration of the SSH server, which is discussed in detail later in this chapter
ssh_host_ecdsa_key Includes the host private key for the local system, based on the ECDSA algorithm
ssh_host_ecdsa_key.pub Includes the host public key for the local system, based on the ECDSA algorithm
ssh_host_rsa_key Includes the host private key for the local system, based on the RSA algorithm
ssh_host_rsa_key.pub Includes the host public key for the local system, based on the RSA algorithm
You don’t have to do much to configure an SSH server for basic operation. Install the packages described earlier, activate the service, and make sure it’s active the next time the system is rebooted. As discussed in Chapter 1, the standard SSH port (TCP 22) is open in the default RHEL 7 firewall.
However, the RHCE objectives specify that you should be prepared to “configure additional options described in the documentation.” Because of the general nature of that objective, this section will address every active and commented option in the default version of the SSH server configuration file.
The SSH server configuration file is /etc/ssh/sshd_config. The commands in comments are generally defaults. So if you want to set a nonstandard port for the SSH service, you could change the commented directive

to something like this:

Assuming the firewall and SELinux allow access through this port, you’d then be able to connect from a remote system with the ssh -p 2222 server1.example.com command. If the SSH server is different, substitute for server1.example.com.
While the next commented line (#AddressFamily any) implies that the SSH server uses both IPv4 and IPv6 addresses, it’s possible to limit access to one of these types of addresses with the inet and inet6 keywords, which correspond to IPv4 and IPv6, respectively:

The default shown with the following ListenAddress directives is to listen for SSH communications on all local IPv4 and IPv6 addresses:

You can limit SSH to listening on the IPv4 or IPv6 addresses of certain network cards. That can help limit access to the SSH server to certain networks.
The next commented directive configures the SSH version. As noted earlier, SSH version 1 is considered insecure. Version 2 is used by default:

Since SSH version 1 is disabled, you should not have to activate the following directive, which sets the host key for version 1:

The standard RSA and ECDSA keys are documented in the next lines. ECDSA (Elliptic Curve DSA) is considered more secure than the standard DSA protocol. Generally, there’s no reason to change the locations of the keys:

The commented directives that follow relate to an SSH version 1 ephemeral key. Such a server key would be regenerated every hour, with 1024 bits, but that would still be insecure.

The next line specifies how often a session key is renegotiated. The default is to renegotiate after the cipher’s default amount of data has been transmitted (“default”), with no time-based limits (“none”).

In the following lines, the first uncommented directive sends all log messages to the appropriate log facility. Based on the configuration of the /etc/rsyslog.conf file, all messages associated with the AUTHPRIV facility are logged to the /var/log/secure file. The level of information is INFO and above.

To limit denial-of-service (DOS) attacks, the default LoginGraceTime shown here is two minutes. In other words, if a login process has not been completed in that time, the SSH server automatically disconnects from the remote client.

The directive that follows documents that the root administrative user can log in using SSH:

Direct root logins over SSH can be inherently insecure. If you’ve set up private/public key–based passphrase authentication from an administrative account on a laptop system, that’s a risk. A “black hat” hacker who gets a hold of that laptop system might then be able to connect to the remote server with administrative privileges. For that reason, it’s usually recommended to change that directive to the following:

Administrators who log in as regular users can use the su or sudo command as appropriate to take administrative privileges with fewer risks. But if that’s not a requirement when you take the RHCE exam, don’t make that change. In fact, it could be counted as an error on the exam.
Next, it’s more secure to retain the following directive, especially with respect to private and public keys:

This directive checks that appropriate permissions are set on the user’s home directory and SSH keys, before authorizing a login.
As noted with the following directive, the default number of authentication attempts per connection is six. You could reduce that number for additional security, but the downside is that you may get more false positives in the logs related to legitimate users who have mistyped their password:

The following directive suggests that you could open up to 10 SSH sessions on a connection:

The following directive is used only with SSH version 1. Hopefully, you didn’t activate that version of SSH.

On the other hand, the following directive is critical if you want to set up private/public key–based authentication on the standard SSH protocol version 2:

The following directive confirms the use of the authorized_keys file on the system to specify the public keys that can be used for authentication:

The next directive applies only when a Certification Authority is used in the authentication process:

The two directives that follow are typically ignored:

The following Rhosts directive is generally not used because it applies to SSH version 1 and the less secure Remote Shell (RSH):

While the following directive could support the use of the /etc/hosts.equiv file to limit hosts that connect, that’s not normally encouraged. Nevertheless, it is one method for SSH host-based security beyond what’s possible with an alternative such as TCP Wrappers, as discussed in Chapter 10.

As described in Chapter 4, the .ssh/known_hosts file stores public keys from remote systems, and is read because of the following default:

The following directive may help administrators who are converting from RSH to SSH, as they use .rhosts and .shosts files. However, because it’s not used by default, the following option is sensible:

For systems and users where private/public passphrases aren’t used, password-based authentication is needed, as enabled by this default:

In general, you should never permit empty passwords due to security risks:

Challenge-response authentication is normally associated with one-time passwords common with remote terminals. While it can also work with PAM, it is normally disabled on SSH:

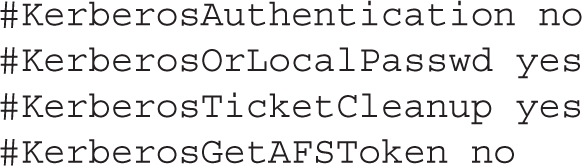
If you did set up a Kerberos system for the local network using SSH version 1, you would have used some of the following options. The first two are almost self-explanatory, as they can enable Kerberos verification of a user and set up alternative Kerberos or local password authentication.
With SSH version 2, the Generic Security Services Application Programming Interface (GSSAPI) library is used for Kerberos authentication:

The following directive destroys GSSAPI credentials upon logout:

Normally, hostname checks are strict:

Also, GSSAPI key exchange is allowed:

Authentication via PAM modules is supported:

With the following setting, the ssh-agent command can be used to forward private keys to other remote systems:

With the next configuration line, TCP communications can be forwarded over an SSH connection:

The GatewayPorts directive is normally disabled to keep remote hosts from connecting to forwarded ports:

The following directive is important for anyone who needs remote access to a GUI tool via X forwarding:

For example, when you are working from a remote location, you can connect to and open GUI tools from your Red Hat system at home or in our office via SSH, using a command similar to the following:

The next directive helps avoid conflicts between local and remote GUI displays. The default should be adequate, unless there are more than 10 X11 displays in use.

Normally, no changes are required to the following default, related to how the GUI display is bound on the SSH server:

When SSH users log in remotely, the following setting means they see the contents of the /etc/motd file. Different messages are possible, based on the cron script configured in Chapter 9.

This is one useful setting for administrators because it documents the date and time of the last login to the noted system:

The TCPKeepAlive directive enables TCP keepalive messages, to avoid a session hanging forever if a network connection, the SSH server, or any connected SSH client goes down:

Generally, you should not enable this option because it is incompatible with X11Forwarding:

The privilege separation associated with the following directive sets up a separate process after successful authentication, with the privileges of the authenticated user:

The following directive does not supersede the default AuthorizedKeysFile setting earlier in the file:

Compression often helps speed communications over an SSH connection. The default is to delay compression until the password is accepted or the private/public key pair is matched to authenticate the user:

Sometimes, it’s important to have the SSH server make sure the user still wants to transmit data. It’s how clients are disconnected from sensitive systems such as bank accounts. But for an administrative connection, the following option disables such checks:

If the ClientAliveInterval is set to some number, the following directive specifies the number of messages that may be sent before that client is automatically disconnected:

The following option for a patch level applies only to SSH version 1:

To minimize the risks of spoofing, the following directive checks remote hostnames against a DNS server or an /etc/hosts file:

The PID file listed here contains the process ID number of the running SSH server process:

When a “black hat” hacker tries to break into an SSH server, he may try to set up a bunch of connections, all attempting to log in simultaneously. The following directive limits the number of unauthenticated connections that the SSH server will work with. For an SSH server on an administrative system, it’s something that you might consider reducing.

The following directive, if activated, would support device forwarding:

The following directive may seem like a good idea, but could be difficult to put into practice. Any directory specified should contain all of the commands and configuration files within that directory tree because the SSH session will be chroot’ed to the noted directory:

The next directives can be used to specify additional text to append to the SSH protocol banner and to set a default banner:

The following directives allow the client to set several environmental variables. The details are normally trivial between two Red Hat Enterprise Linux systems:

The final directive supports the use of SSH encryption for SFTP file transfers:

In this exercise, you’ll configure the OpenSSH server to listen to TCP port 2222. To complete this objective, you’ll have to modify not just the SELinux policy, but also the SSH service and the firewall configuration.
1. Show which ports the SSH service is allowed to listen to, based on the current SELinux policy:

2. Run the following command to allow OpenSSH to listen to TCP port 2222:

3. Open the /etc/ssh/sshd_config file and change the line

to

4. Don’t forget to allow TCP port 2222 through the default zone of the firewall, as shown here:

5. Reload the SSH service to apply the change:

6. If you have successfully completed the previous steps, you should be able to log in from a remote system by running a command similar to the following:

7. Finally, restore the SSH configuration to its original settings.
User-based security can be configured in the /etc/ssh/sshd_config file. To that end, we like to add directives that limit the users allowed to access a system via SSH. The key is the AllowUsers directive. You can limit by user with a directive such as

Alternatively, you can limit access by each user from certain hosts with a directive such as the following, which combines aspects of both user- and host-based security:

Be aware, if an access request is coming from a remote network, a masquerading firewall may assign the IP address of the router to the remote system. In that case, you won’t be able to block a single system on a remote network.
You can include several related directives in the /etc/ssh/sshd_config file: AllowGroups, DenyUsers, and DenyGroups.
If you want to limit access to SSH to a very few users, the AllowUsers directive is the simplest solution. For the first AllowUsers directive just shown, only users michael and donna can connect to this SSH server. A corresponding DenyUsers or DenyGroups directive is not required. Even the root user can’t connect via SSH under those circumstances.
Although the SSH server would prompt other users for a password, access is denied even when the remote user enters the correct password. The /var/log/secure log file would reflect that with a message similar to the following:

Although there are methods for configuring host-based security through the SSH configuration files, the process is complex. It requires changes to both servers and clients, and involves risks that we believe are not necessary. It’s also possible to set up host-based security through the local firewalld zone-based firewall.
The simplest method for host-based SSH security is based on TCP Wrappers, as discussed in Chapter 10. For the purpose of this chapter, we’ve included the following directive in /etc/hosts.allow, which accepts SSH connections from the noted network addresses:

To make sure access is limited to systems on the noted networks, you would also include the following line in /etc/hosts.deny:

Of course, it would be more secure to include ALL : ALL in /etc/hosts.deny, but that may block communications to legitimate services that you’ve configured. In addition, other ports should already be protected by an appropriate firewall rule. So it may be an option to avoid during a Red Hat exam.
A number of steps required to install, configure, and secure a service are repetitive. We therefore summarize them in this section. If desired, you can use this section to help prepare for Chapters 12 through 17. It will help you install required services, as well as make sure those services are active and accessible through a firewall configured with the appropriate open ports.
The RHCE objectives directly address eight different services. This section addresses some of the different ways you can install these services. If you’ve read Chapter 7 , this should be mostly review, but it will also give you an opportunity to prepare a system such as the server1.example.com virtual machine for testing in Chapters 12 through 17.
In this section, you’ll review commands such as rpm and yum in the context of the server services needed for upcoming chapters. If you prefer to use the GNOME Software tool, refer to Chapter 7 . Generally, you can use any of these options to install desired services.
In general, the installation of a service requires more than one RPM package. One exception is the RPM package associated with the vsFTP server. To that end, if you’ve mounted the RHEL 7 DVD on the /media directory, you can install the vsFTP server with the following command (the version number may vary):

As discussed in Chapter 7 , the yum command can be used to install packages with dependencies. Sometimes, dependencies are simple. For example, for the DNS services configured in Chapter 13, you may be more familiar with BIND, as opposed to the Unbound DNS service.
One way to install the bind package with dependencies is with the following command:

As needed, you can use the yum install command to install a package in a way that automatically identifies and installs all dependent packages.
TABLE 11-3 RHCE-Related Server Package Groups
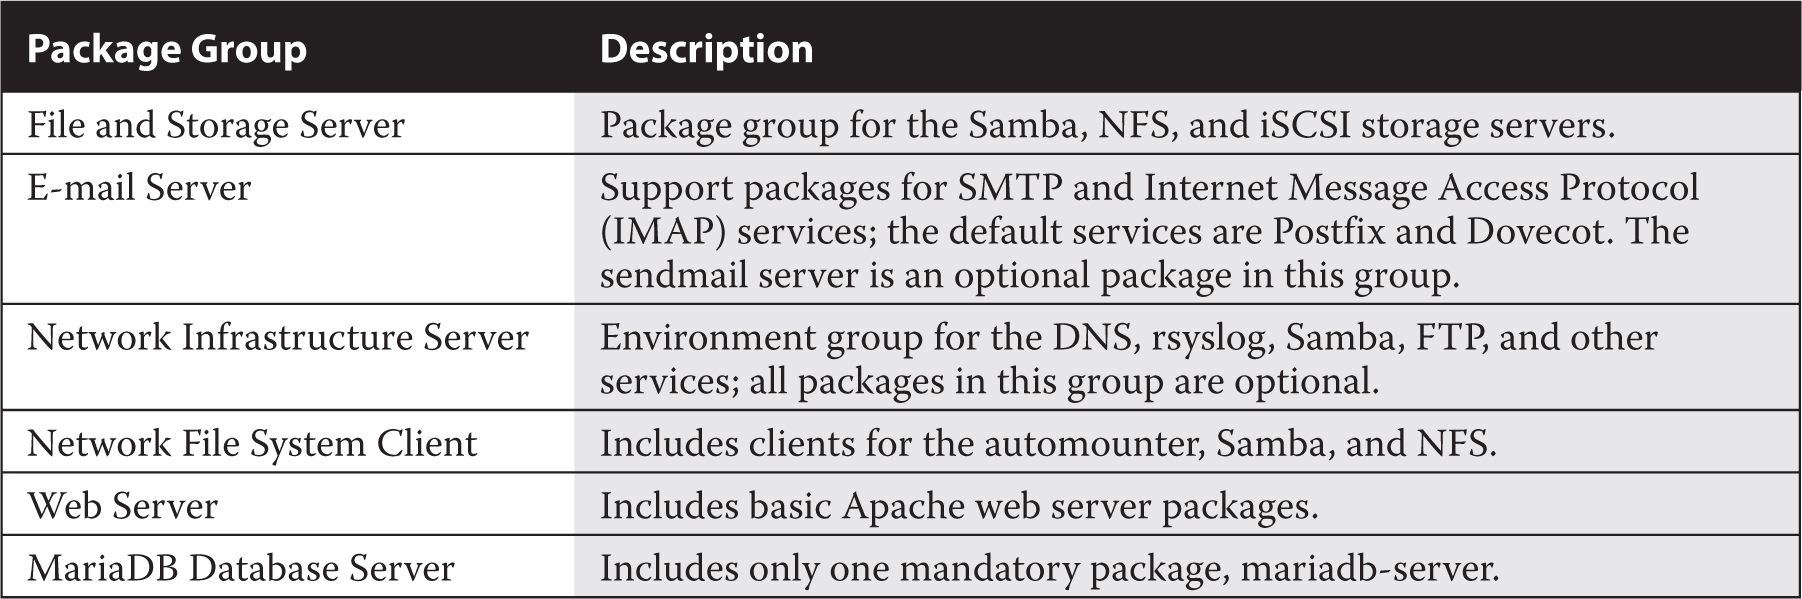
Chapter 7 also describes how RHEL 7 packages are organized in groups. Each of those groups have names, which can be identified with the yum group list command. The relevant groups for the RHCE exam are listed in Table 11-3.
You can identify different packages and subgroups in each group with the group list switch; for example, the following command lists the subgroups that are part of the Basic Web Server environment group:

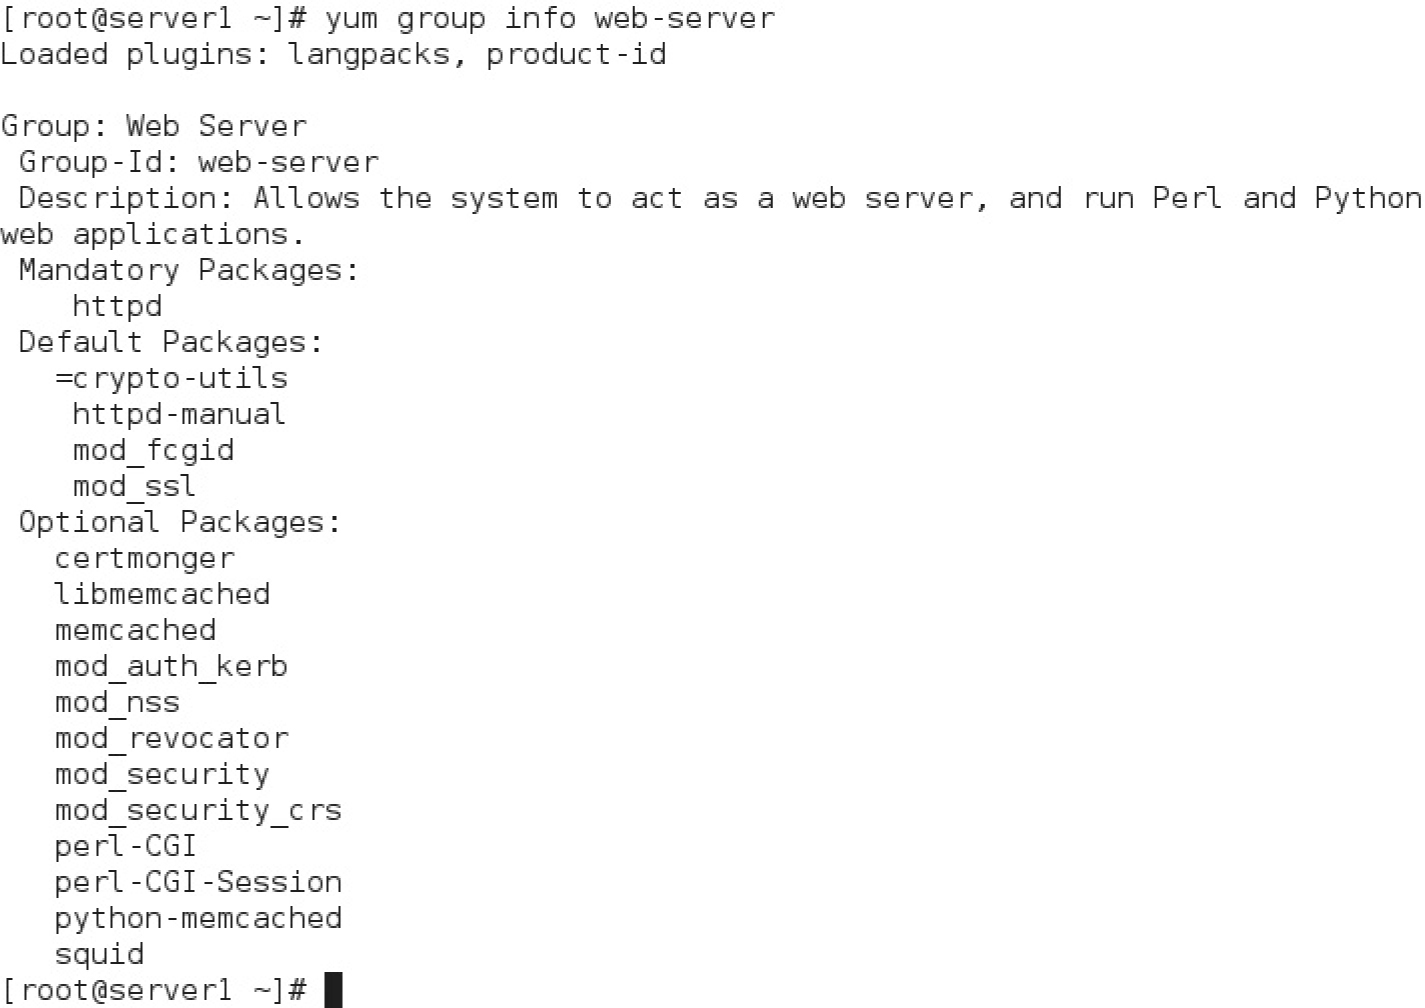
The output for RHEL 7 is shown in Figure 11-3. From there, you can identify the packages included in each subgroup. For example, the following command lists the packages in the web-server group:

The output is shown in Figure 11-4. Note that packages are classified in three categories: mandatory, default, and optional. If you run the following command, only packages and groups in the mandatory and default categories are installed:

In most cases, that’s not a problem. However, sometimes you may need to install packages that are listed as optional. Although there are ways to set up the installation of optional packages with the group install switch, it’s easier for our purposes to just install the needed packages separately by name.
FIGURE 11-3 Packages in the Basic Web Server environment group

In a similar fashion, you can install the Samba File Server (covered in Chapter 15) and NFS (covered in Chapter 16) with the following command:

For Chapter 13, the Network Infrastructure Server package group includes packages associated with logging and DNS. However, as all packages in this group are optional, the yum group install command would not install any packages from that group. Fortunately, the rsyslog package is already installed by default, even in a minimal RHEL 7 installation, but you will want to install DNS to address one of the RHCE objectives. One way to set up a DNS caching service for Chapter 13 is to install the Unbound DNS resolver with the following command:

FIGURE 11-4 Packages in the Web Server package group
For a number of server services, you should make sure that appropriate client packages are installed. The Network File System client package group can help in that respect; the following command would install clients for the automounter, Samba, and NFS:

A different kind of network server relates to iSCSI storage. There are two package groups of interest: the File and Storage Server already mentioned earlier, and the iSCSI Storage Client.
Finally, a couple of packages of interest are not included in standard package groups. They set up the NTP server and authentication to remote user directories. If they’re not already installed, you’ll need to install them. One method is with the following command:

We focus on command-line installation methods because they are generally fastest. Of course, you could install packages with the GUI Add/Remove Software tool discussed in Chapter 7 .
While the current RHCE objectives are more specific than ever, it’s best to keep what you change as simple as possible. As noted in the objectives, you’ll be asked to “configure the service for basic operation.” Basic operation is easier to set up. It is frequently more secure. If you do less to configure a service, it takes less time. You’ll have a better chance to finish the exam. You’ll be able to do more on the job.
The details associated with basic configuration are covered in upcoming chapters.
In Chapter 5, you looked at when a service starts or does not start during the boot process. The simplest method is associated with the systemctl command. To review, the systemctl list-unit-files --type=service command lists all service units and whether they are activated at boot. For the services discussed in the following chapters, once the appropriate packages have been installed, you’ll want to make sure they start during the boot process with the following commands:
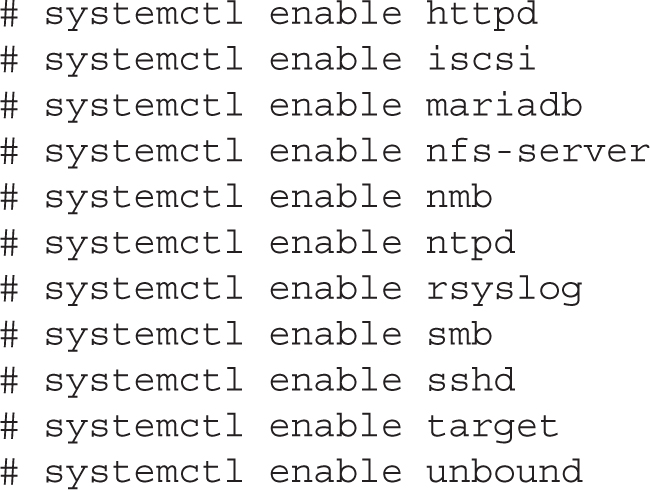
This is just a list. On an actual exam, install just the services you’re asked to install.
Of course, during an exam, you might be told to make sure a service does not start during the boot process. Also, keep in mind that in a production environment the installation of so many services on a single system is rare because of the security risks.
The first place to check a service is from the local system. For example, if you can connect to an Apache server from that system, you’ve set up basic configuration of Apache.
If you have problems connecting locally or remotely, you may have issues related to SELinux or various user- and host-based firewalls. For issues beyond SELinux, refer to the network command tools installed in Chapter 2: telnet, elinks, and nmap.
If the configuration is good but still does not work, that suggests a SELinux issue, typically in one of the two following areas:
Boolean settings For example, to enable Apache server access to user home directories, enable the SELinux boolean httpd_enable_homedirs.
SELinux file contexts Make sure the contexts of files and directories match those of default directories. Assume you’ve set up a virtual web host on the /virtual/host directory. Run the ls -Z /virtual/host command. The file contexts you see in that output should match what you see from the ls -Z /var/www/html command.
Next, test the connection from a remote system:
If a system allows access for server communications to the default zone, you’ll see it in the output to the firewall-cmd --list-all command. To review the configuration for all zones, run firewall-cmd --list-all-zones.
While you can use the Firewall Configuration tool described in Chapters 4 and 10, you need to know how to configure firewalls from the command line.
If a port or server is not open in the firewall, an attempt to connect to a service is rejected. For example, for the SSH server you may get a message like the following:

To verify whether connectivity to a remote service is operational, you can use the telnet or nmap command. For example, run the following command to verify connectivity to the HTTP port on the server 192.168.122.50:

If you can successfully connect to the server, you will see the following reply:

Similarly, you can use nmap, as shown next, to verify connectivity to the HTTP service on TCP port 80:

If you can successfully connect to the service, you will see the following output:

In this exercise we explore the effects of different network and firewalld misconfigurations on a running service. We assume that you have a working SSH service running on server1.example.com.
1. From another host, run the ping 192.168.122.50 command to test the connection to the server.
2. Now run the following command on server1:

Run the ping command again. What is the output?
3. Restore network connectivity with systemctl start network.
4. From the client, use the telnet or nmap command to check the connection on the SSH server port:

If successful, you’ll see the following output:

Type in the quit command. You should see an error message from the OpenSSH server, followed by this message:

Block connectivity to the SSH service on server1 with the following command:

5. Try the ping and telnet commands again. What output do you see?
6. Restore connectivity on the firewall by running firewall-cmd --reload.
7. Block the IP address of the client (assuming it is 192.168.122.1), as shown here:

8. Try the ping and telnet commands again. What output do you see?
In general, if the telnet or nmap command does not connect to the specified port, you may have one of the following firewall issues:
The firewalld zone-based firewall may be blocking the desired port.
The firewalld zone-based firewall may be limiting access to the client.
The TCP Wrappers system discussed in this chapter may also be limiting access to specific clients and users, by service.
Some servers include configuration files that also limit access based on users, IP addresses, and hostnames.
In contrast, if the service is protected by TCP Wrappers, the error message behavior is different. For this section, we configured the /etc/hosts.allow and /etc/hosts.deny files on the server1.example.com system to allow access only from .example.com systems on the 192.168.122.0/24 network. That means access is not allowed from systems such as outsider1.example.org on IP address 192.168.100.100.
In that case, when we tried accessing the server1.example.com system with the ssh command, we received the following error message:

In contrast, the telnet server1.example.com 22 command from the same system returns the following messages, which stops for a moment:

For a few moments, it appears the system is about to connect, but then the block from TCP Wrappers results in the following message:

EXERCISE 11-4
This exercise assumes an operational vsFTP server, similar to the one configured in Chapter 1 for installations. Configure that vsFTP server on the server1.example.com system. Make sure the firewall blocks traffic on the standard FTP port, TCP 21, and then check the connection from a blocked system, outsider1.example.org. To review, these systems as configured in Chapters 1 and 2 are on IP addresses 192.168.122.50 and 192.168.100.100, respectively.
Next, open TCP port 21 on the firewall. In addition, limit access using TCP Wrappers.
This exercise is complex; each numbered step requires several commands or actions. In some cases, the required command is implied.
1. If it is not already installed, install the vsFTP server, as discussed in the chapter. Make sure that server is active with the systemctl start vsftpd command.
2. Start the Firewall Configuration tool with the firewall-config command. Make sure FTP is not activated in the list of services in the default zone. Make sure the changes are applied and then exit from the Firewall Configuration tool.
3. Try connecting to the vsFTP server from the local system with a command such as lftp localhost. It should work, which you can confirm from the lftp localhost:/> prompt with the ls command. Exit from the vsFTP server with the quit command.
4. Move to the outsider1.example.org system. It’s acceptable to connect to it via SSH; in fact, that may be the only method available to connect to that system on the exam (and in real life).
5. Try pinging the system running the vsFTP server with the ping 192.168.122.50 command. Remember to press CTRL-C to stop the process. Try connecting to the vsFTP server with the lftp 192.168.122.50 command. What happens? Try to connect to the system with the telnet 192.168.122.50 21 command. What happens?
6. Return to the server1.example.com system. Open the Firewall Configuration tool again, and this time make FTP a trusted service. Don’t forget to apply the change before exiting from the Firewall Configuration tool.
7. Open the /etc/hosts.allow file and include the following entry:

8. Open the /etc/hosts.deny file and include the following entry:

9. Return to the outsider1.example.com system as discussed in Step 4. Repeat Step 5. What happens after each attempt to connect?
10. Go back to the server1.example.com system. Open the /etc/hosts.allow and /etc/hosts.deny files and delete the lines created in Steps 7 and 8.
11. Once again, move to the outsider1.example.org system. Repeat Step 5. Both commands should result in a successful connection. The quit command should exit in both cases.
12. BONUS: Review connections via the contents of the /var/log/secure file. Review the originating IP addresses in that file. Use that information to configure firewalld to deny access to all but one IP address.
This chapter focused on the general steps required to configure, secure, and access various services. Daemons are controlled by unit files in the /lib/systemd/system directory, and by configuration files in /etc/sysconfig. Access to various aspects of server services may be controlled by different SELinux booleans.
The SSH server configuration files are located in the /etc/ssh directory. The sshd_config configuration file includes a substantial number of options for configuring that service.
To configure a service, you’ll need to install the right packages and make sure the service is active after the next reboot. You’ll also need to navigate through a variety of available security options, including SELinux, zone-based firewalls, and TCP Wrappers–based security in the /etc/hosts.allow and /etc/hosts.deny files.
 TWO-MINUTE DRILL
The following are some of the key points from the certification objectives in Chapter 11.
 System services can be started by systemctl, based on unit configuration files in the /lib/systemd/system and /etc/systemd/system directories.
System services use basic configuration files in the /etc/sysconfig directory. Such files often include basic parameters for service daemons.
When configuring a network server, you’ll need to be concerned about SELinux booleans, zone-based firewalls, TCP Wrappers, and more.
Services should be tested locally and remotely.
Individual services are frequently protected by multiple SELinux booleans.
SELinux booleans are stored in the /sys/fs/selinux/booleans directory, with descriptive filenames.
SELinux booleans can be changed with the setsebool -P command or the SELinux Management tool. From the command line, make sure to use the -P switch; otherwise, the change won’t survive a reboot.
SELinux file contexts can be changed with the chcon command. However, the change does not survive a relabel unless the new context rule is made persistent with the semanage fcontext -a command. Changes are documented in the file_contexts.local file, in the /etc/selinux/targeted/contexts/files directory.
SELinux port labels can be modified with the semanage port -a command to allow services to listen to nonstandard network ports.
SSH server configuration files in the /etc/ssh directory include client and server files, along with public and private RSA and ECDSA host key pairs.
The SSH server configuration file, sshd_config, can be set up with user-based security.
The AllowUsers directive in sshd_config specifies which users are allowed to log in via SSH.
The easiest way to set up host-based SSH security is through TCP Wrappers.
You’ll need to install a number of services to prepare for the RHCE exam with commands such as rpm and yum.
One way to make sure services survive a reboot is with the systemctl command; a full list of such commands related to RHCE services is provided in the chapter.
You’ll need to configure access to a service through layers of security, including SELinux, zone-based firewalls, and TCP Wrappers.

The following questions will help measure your understanding of the material presented in this chapter. As no multiple choice questions appear on the Red Hat exams, no multiple choice questions appear in this book. These questions exclusively test your understanding of the chapter. It is okay if you have another way of performing a task. Getting results, not memorizing trivia, is what counts on the Red Hat exams. There may be more than one answer to many of these questions.
1. Which directory includes configuration files that specify startup options for various service daemons?

2. What command reloads the configuration of the SSH server without stopping the service?
3. What directory contains boolean options associated with SELinux? Specify the full path.
4. What man page contains SELinux options associated with NFS daemons?
5. What command restores the default SELinux file context on a given directory?
6. What file is modified when you run the semanage fcontext -a command? Hint: it’s in the /etc/selinux/targeted/contexts/files directory.
7. Which command lists the current SELinux port label configuration for the MariaDB (MySQL) service?
8. What directory contains the OpenSSH server configuration file and host keys?
9. What directive specifies the port number of the local SSH server in the associated configuration file?
10. What directive specifies a list of allowed users in the SSH server configuration file?
11. What command displays a list of available environment groups?
12. What command can help the abcd service survive a reboot?
Several of these labs involve configuration exercises. You should do these exercises on test machines only. It’s assumed that you’re running these exercises on KVM-based virtual machines.
Red Hat presents its exams electronically. For that reason, the labs in this and future chapters are available from the media that accompanies the book, in the Chapter11/ subdirectory. In case you haven’t yet set up RHEL 7 on a system, refer to Chapter 1 for installation instructions.
The answers for the labs follow the Self Test answers for the fill-in-the-blank questions.

1. Slight trick question: the file in the /etc/sysconfig directory, as well as unit files in /lib/systemd/system and /etc/systemd/system, can specify options for various service daemons at startup.
2. The command to reload the configuration of the SSH service is

3. The directory with SELinux booleans is /sys/fs/selinux/booleans.
4. The nfsd_selinux man page contains some SELinux booleans for that service.
5. The command that restores the default file context on a given directory is restorecon.
6. The name of the file that is modified by the noted command is file_contexts.local.
7. One acceptable answer is

8. The OpenSSH server configuration file and host keys are included in the /etc/ssh directory.
9. The directive is Port.
10. The directive is AllowUsers.
11. The command that lists all available environment groups is yum group list.
12. Assuming the abcd service is also associated with a service unit in the /lib/systemd/system directory, the command that would help it survive a reboot is systemctl enable abcd.
This lab should give you an idea of what can be done with /etc/sysconfig files and how those files change the way a daemon is started. This lab should also demonstrate the risks; the wrong change, such as that shown in the lab, means that the service won’t work.
Although SSH key-based authentication was covered in the first part of this book, it is also a requirement for the RHCE exam. If you don’t remember how to configure key-based authentication, review Chapter 4. There are three measures of success in this lab:
There will be an id_rsa file and an id_rsa.pub file in the client /home/hawaii/.ssh directory.
You’ll be able to connect to the remote system without a password. Just enter the “I love Linux!” passphrase (without quotes) when prompted.
You’ll find the contents of the user’s id_rsa.pub file in the remote authorized_keys file in the /home/hawaii/.ssh directory.
Unsecure permissions are one of the most common reasons of failure for SSH key-based authentication. Your ~/.ssh directory should have octal permissions 0700, whereas the private key and the authorized_keys files should have the permissions bits set to 0600.
Much as in Lab 2, there are three measures of success in this lab:
There will be an id_ecdsa and an id_ecdsa.pub file in the client /home/tonga/.ssh directory.
You’ll be able to connect to the remote system without a password. Just enter the “I love Linux!” passphrase when prompted.
You’ll find the contents of the client’s id_ecdsa.pub file in the remote authorized_keys file in the /home/hawaii/.ssh directory.
The simplest way to implement this lab is to add the following directive to the /etc/ssh/sshd_config file:

Just don’t forget to reload or restart the SSH service after making the change; otherwise, other users will still have access.
In case you’re curious, user tonga on the client is still able to access the hawaii account on the SSH server with the passphrase because connections to the user hawaii account are being allowed. The identity of the remote account does not matter to the AllowUsers directive.
If you’ve made too many changes to the /etc/ssh/sshd_config file and want to start fresh, move that file and run the yum reinstall openssh-server command. It’ll set up a fresh copy of that configuration file. If you want to connect from other accounts in the future, make sure the AllowUsers hawaii directive is disabled.
Oh yes, did you need to activate the PermitRootLogin no directive to prevent SSH logins to the root account?
Success in this lab is confirmed by a good SSH connection from client to server. If you just want to make sure, use the ssh -p 8122 command from the client. If you haven’t disabled the AllowUsers directive on the server, that connection would have to be to the hawaii account.
In addition, this lab should give you a sense of the effort required to set up obscure ports. However, although the nmap command would detect a listening application on port 8122, it would be obscure; the relevant output would be

Go to the client system and try connecting to the SSH server. Remember, you’ll also need to open port 8122 in the firewall of the SSH server.
Although repeating this lab with port 8022 may look similar to using port 8122, there is a little problem when you try to add port 8022 to the ssh_port_t label:

This error occurs because port 8022 is already in use by another service:

There is not an easy way to add port 8022 to the ssh_port_t type without recompiling the policy. When this lab is complete, restore the original port numbers on the SSH client and server.
Confirmation of success in this lab is straightforward. Run the ls -Zd commands on the noted directories. The SELinux contexts for the /virtual/web and /var/www directories should match with the following contexts:

The contexts for the /virtual/web/cgi-bin and /var/www/cgi-bin directories should also match:

It should go without saying that any changes you make should survive a SELinux relabel. Otherwise, how do you expect to get credit for your work? If you’ve run the semanage fcontext -a command on the correct directories, you’ll see these contexts listed in the file_contexts.local file, in the /etc/selinux/targeted/contexts/files directory: